

PDF Download - Glidewell Dental Labs
PDF Download - Glidewell Dental Labs
PDF Download - Glidewell Dental Labs

Create successful ePaper yourself
Turn your PDF publications into a flip-book with our unique Google optimized e-Paper software.
used before the patient even presents for the surgery. As is<br />
often the case, however, many surgical decisions are made<br />
intraoperatively. In essence, sometimes even the best-laid<br />
plans need modification.<br />
A good rule of thumb in osteotomy preparation is to start<br />
small and advance as needed. In other words, drill to the<br />
manufacturer’s recommendations for your specific implant<br />
system for soft bone. Once you have done so, if you feel<br />
that the bone was particularly difficult to penetrate with the<br />
drills, or, when you attempt to place the implant, it does not<br />
easily advance to full depth, then it is typically advisable<br />
to enlarge the osteotomy diameter with the dense bone<br />
drill. The potential dangers in not having an adequately<br />
sized osteotomy include: damaging the implant connection<br />
during placement, not fully seating and properly positioning<br />
the implant in the bone, and creating excess pressure on the<br />
surrounding bone. All of these are detrimental to the longterm<br />
success of the implant and restoration. Some surgeons<br />
advocate drilling to the dense bone diameter in all cases.<br />
This is certainly an option, but the risk is that you could<br />
compromise the amount of initial stability that you achieve<br />
and that the drill or the implant could be displaced into an<br />
unfavorable location due to loss of resistance and torque.<br />
So, again, it is at the discretion of the surgeon.<br />
Screw taps are used in cases of extremely dense bone,<br />
Type I and perhaps Type II. Essentially, the screw taps<br />
precisely mimic the thread patterns of the proposed implant.<br />
Therefore, by tapping the bone with these specialized drills,<br />
the internal configuration of the osteotomy is identical to<br />
that of the threads of the planned implant. This allows for<br />
a more passive, complete placement of the implant with<br />
less insertional torque, and is therefore gentler to the<br />
surrounding bone. Many implants today purport to be<br />
self-threading or tapping, often eliminating the need for<br />
the screw tap. But in those instances where the bone is<br />
particularly dense, screw taps are useful. The screw tap<br />
may be used as an alternative to, or in conjunction with, the<br />
dense bone drill.<br />
There is a great deal of latitude in the choice of whether to<br />
utilize the soft or dense bone protocol, as well as whether<br />
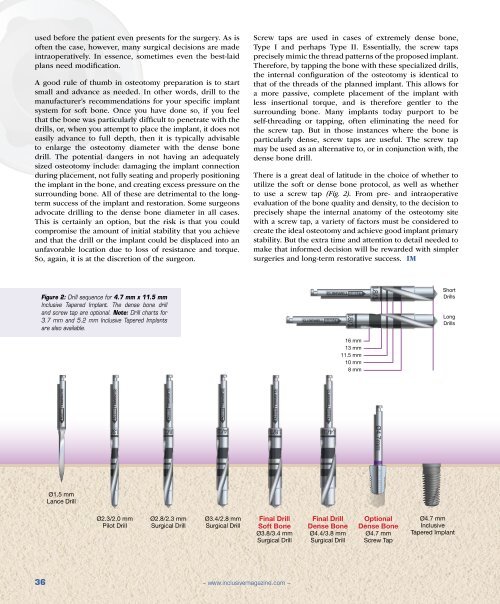
to use a screw tap (Fig. 2). From pre- and intraoperative<br />
evaluation of the bone quality and density, to the decision to<br />
precisely shape the internal anatomy of the osteotomy site<br />
with a screw tap, a variety of factors must be considered to<br />
create the ideal osteotomy and achieve good implant primary<br />
stability. But the extra time and attention to detail needed to<br />
make that informed decision will be rewarded with simpler<br />
surgeries and long-term restorative success. IM<br />
Figure 2: Drill sequence for 4.7 mm x 11.5 mm<br />
Inclusive Tapered Implant. The dense bone drill<br />
and screw tap are optional. Note: Drill charts for<br />
3.7 mm and 5.2 mm Inclusive Tapered Implants<br />
are also available.<br />
Short<br />
Drills<br />
Long<br />
Drills<br />
16 mm<br />
13 mm<br />
11.5 mm<br />
10 mm<br />
8 mm<br />
Ø1.5 mm<br />
Lance Drill<br />
Ø2.3/2.0 mm<br />
Pilot Drill<br />
Ø2.8/2.3 mm<br />
Surgical Drill<br />
Ø3.4/2.8 mm<br />
Surgical Drill<br />
Final Drill<br />
Soft Bone<br />
Ø3.8/3.4 mm<br />
Surgical Drill<br />
Final Drill<br />
Dense Bone<br />
Ø4.4/3.8 mm<br />
Surgical Drill<br />
Optional<br />
Dense Bone<br />
Ø4.7 mm<br />
Screw Tap<br />
Ø4.7 mm<br />
Inclusive<br />
Tapered Implant<br />
36<br />
– www.inclusivemagazine.com –


