

PDF Download - Glidewell Dental Labs
PDF Download - Glidewell Dental Labs
PDF Download - Glidewell Dental Labs

Create successful ePaper yourself
Turn your PDF publications into a flip-book with our unique Google optimized e-Paper software.
Creating Surgical Guides Using CBCT and Intraoral Scanning<br />
“missing” teeth, and had also lost a number of teeth after<br />
failed endodontic procedures. The patient was first seen<br />
by the Department of Oral and Maxillofacial Surgery of<br />
Virginia Commonwealth University’s School of Dentistry,<br />
with a stated desire for using dental implants to restore<br />
the missing teeth. The patient was referred to my private<br />
practice for an evaluation of his restorative needs.<br />
Treatment Plan<br />
After a discussion of the alternatives, benefits, and complications<br />
of treatment options, the patient stated that<br />
he wished to receive implant restorations. Following a<br />
discussion of financial considerations, it was agreed that<br />
the treatment plan would be divided into several phases.<br />
Phase one would be to place two implant fixtures in the<br />
area of tooth #29 and tooth #30. It was agreed that a custom<br />
surgical guide would be created using CBCT and digital<br />
scanning technology, for the ultimate purpose of facilitating<br />
guided placement of the dental implants.<br />
Scan Procedure<br />
A full-arch optical scan of both maxillary and mandibular<br />
arches with a centric record of the teeth in maximum<br />
intercuspation was taken using the iTero intraoral scanning<br />
unit. The resultant generic STL data files, the standard<br />
CAD/CAM file format, were exported directly from this<br />
user’s “MyAligntech” account. A CBCT scan was taken with<br />
a NewTom CBCT scanner (ImageWorks; Elmsford, N.Y.) and<br />
the resultant DICOM data files exported to the In2Guide <br />
(Cybermed; Irvine, Calif.) software. The DICOM and STL<br />
files types were then merged via the In2Guide software to<br />
produce a 3-D rendering.<br />
Virtual Planning<br />
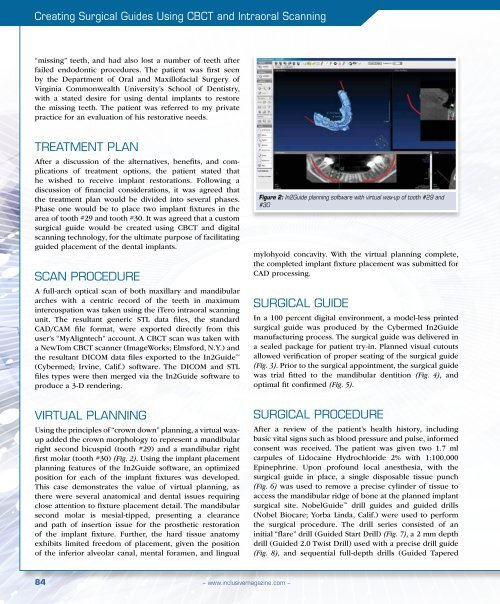
Using the principles of “crown down” planning, a virtual waxup<br />
added the crown morphology to represent a mandibular<br />
right second bicuspid (tooth #29) and a mandibular right<br />
first molar (tooth #30) (Fig. 2). Using the implant placement<br />
planning features of the In2Guide software, an optimized<br />
position for each of the implant fixtures was developed.<br />
This case demonstrates the value of virtual planning, as<br />
there were several anatomical and dental issues requiring<br />
close attention to fixture placement detail. The mandibular<br />
second molar is mesial-tipped, presenting a clearance<br />
and path of insertion issue for the prosthetic restoration<br />
of the implant fixture. Further, the hard tissue anatomy<br />
exhibits limited freedom of placement, given the position<br />
of the inferior alveolar canal, mental foramen, and lingual<br />
Figure 2: In2Guide planning software with virtual wax-up of tooth #29 and<br />
#30<br />
mylohyoid concavity. With the virtual planning complete,<br />
the completed implant fixture placement was submitted for<br />
CAD processing.<br />
Surgical guide<br />
In a 100 percent digital environment, a model-less printed<br />
surgical guide was produced by the Cybermed In2Guide<br />
manufacturing process. The surgical guide was delivered in<br />
a sealed package for patient try-in. Planned visual cutouts<br />
allowed verification of proper seating of the surgical guide<br />
(Fig. 3). Prior to the surgical appointment, the surgical guide<br />
was trial fitted to the mandibular dentition (Fig. 4), and<br />
optimal fit confirmed (Fig. 5).<br />
Surgical Procedure<br />
After a review of the patient’s health history, including<br />
basic vital signs such as blood pressure and pulse, informed<br />
consent was received. The patient was given two 1.7 ml<br />
carpules of Lidocaine Hydrochloride 2% with 1:100,000<br />
Epinephrine. Upon profound local anesthesia, with the<br />
surgical guide in place, a single disposable tissue punch<br />
(Fig. 6) was used to remove a precise cylinder of tissue to<br />
access the mandibular ridge of bone at the planned implant<br />
surgical site. NobelGuide drill guides and guided drills<br />
(Nobel Biocare; Yorba Linda, Calif.) were used to perform<br />
the surgical procedure. The drill series consisted of an<br />
initial “flare” drill (Guided Start Drill) (Fig. 7), a 2 mm depth<br />
drill (Guided 2.0 Twist Drill) used with a precise drill guide<br />
(Fig. 8), and sequential full-depth drills (Guided Tapered<br />
84<br />
– www.inclusivemagazine.com –


