
Create successful ePaper yourself
Turn your PDF publications into a flip-book with our unique Google optimized e-Paper software.
English<br />
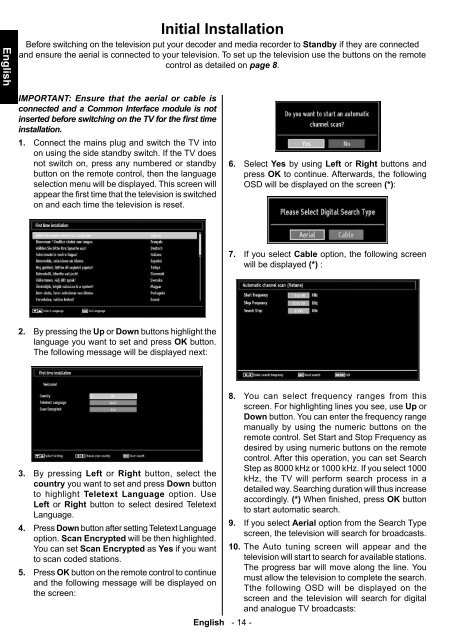
Initial Installation<br />
Before switching on the television put your decoder and media recorder to Standby if they are connected<br />
and ensure the aerial is connected to your television. To set up the television use the buttons on the remote<br />
control as detailed on page 8.<br />
IMPORTANT: Ensure that the aerial or cable is<br />
connected and a Common Interface module is not<br />
inserted before switching on the TV for the first time<br />
installation.<br />
1. Connect the mains plug and switch the TV into<br />
on using the side standby switch. If the TV does<br />
not switch on, press any numbered or standby<br />
button on the remote control, then the language<br />
selection menu will be displayed. This screen will<br />
appear the first time that the television is switched<br />
on and each time the television is reset.<br />
6. Select Yes by using Left or Right buttons and<br />
press OK to continue. Afterwards, the following<br />
OSD will be displayed on the screen (*):<br />
7. If you select Cable option, the following screen<br />
will be displayed (*) :<br />
2. By pressing the Up or Down buttons highlight the<br />
language you want to set and press OK button.<br />
The following message will be displayed next:<br />
3. By pressing Left or Right button, select the<br />
country you want to set and press Down button<br />
to highlight Teletext Language option. Use<br />
Left or Right button to select desired Teletext<br />
Language.<br />
4. Press Down button after setting Teletext Language<br />
option. Scan Encrypted will be then highlighted.<br />
You can set Scan Encrypted as Yes if you want<br />
to scan coded stations.<br />
5. Press OK button on the remote control to continue<br />
and the following message will be displayed on<br />
the screen:<br />
English - 14 -<br />
8. You can select frequency ranges from this<br />
screen. For highlighting lines you see, use Up or<br />
Down button. You can enter the frequency range<br />
manually by using the numeric buttons on the<br />
remote control. Set Start and Stop Frequency as<br />
desired by using numeric buttons on the remote<br />
control. After this operation, you can set Search<br />
Step as 8000 kHz or 1000 kHz. If you select 1000<br />
kHz, the TV will perform search process in a<br />
detailed way. Searching duration will thus increase<br />
accordingly. (*) When fi nished, press OK button<br />
to start automatic search.<br />
9. If you select Aerial option from the Search Type<br />
screen, the television will search for broadcasts.<br />
10. The Auto tuning screen will appear and the<br />
television will start to search for available stations.<br />
The progress bar will move along the line. You<br />
must allow the television to complete the search.<br />
Tthe following OSD will be displayed on the<br />
screen and the television will search for digital<br />
and analogue TV broadcasts:<br />
A01_MB60_[GB]_(IB_INTERNET)_DVB-TC_(CT90326)_1007xxxx_5018xxxx_v4.indd 14 30.03.2011 11:41:49