Create successful ePaper yourself
Turn your PDF publications into a flip-book with our unique Google optimized e-Paper software.
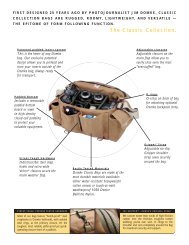
Identify the following parts:<br />
Getting Started<br />
Gimbal. We identified the Gimbal in Section 1, but<br />
now examine its range of motion. The Gimbal contains<br />
delicate bearings and must not be forced beyond its<br />
natural range of movement.<br />
Grip. The Grip supports and positions the <strong>Merlin</strong> 2.<br />
The Grip should always be held with the rubber grip<br />
side facing forward in contact with your fingers. If<br />
it’s held backward, movement of the Gimbal will be<br />
impeded and under some circumstances the Gimbal<br />
could be damaged. Try gently moving the Grip and<br />
Gimbal around to compare its range of motion in the<br />
correct vs. incorrect positions.<br />
Guide. This is the black ring above the Gimbal. The<br />
Guide provides a minimal surface so the thumb and<br />
one or two fingers can aim the camera. The “Tongue”<br />
at the front of the Guide provides extra surface area to<br />
assist in tilting the camera. Do not rotate or adjust the<br />
Guide yet.<br />
Fore-and-Aft Trim Roller, along the side of the<br />
Stage.<br />
Side-to-side Trim Roller, under the Stage at the<br />
back of the Gimbal mount.<br />
Now you are ready to begin balancing the unit for your camera.<br />
Watch Section 4 of the DVD, Presetting Balance.<br />
Then continue with the <strong>Manual</strong>.<br />
10