TL-PA551 AV500+ Powerline Adapter with AC Pass Through - TP-Link
TL-PA551 AV500+ Powerline Adapter with AC Pass Through - TP-Link
TL-PA551 AV500+ Powerline Adapter with AC Pass Through - TP-Link

You also want an ePaper? Increase the reach of your titles
YUMPU automatically turns print PDFs into web optimized ePapers that Google loves.
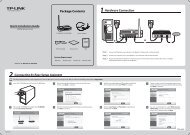
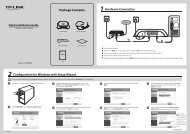
<strong>TL</strong>-<strong>PA551</strong><br />
<strong>AV500+</strong> <strong>Powerline</strong> <strong>Adapter</strong> <strong>with</strong> <strong>AC</strong> <strong>Pass</strong> <strong>Through</strong><br />
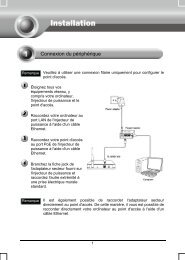
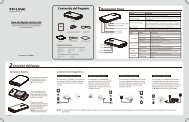
Join an existing secured <strong>Powerline</strong> AV Network:<br />
<strong>Powerline</strong> adapter A and <strong>Powerline</strong> adapter B form a HomeplugAV Network, <strong>Powerline</strong> adapter C wants<br />
to join this network.<br />
Step 1.<br />
Step 2.<br />
Press and hold the Pair button on <strong>Powerline</strong> adapter C for one second.<br />
Press and hold the Pair button on <strong>Powerline</strong> adapter A/B for one second.<br />
(This step must be taken <strong>with</strong>in 120 seconds after step 1 is finished.)<br />
Step 3. Wait for about 60 seconds while your <strong>Powerline</strong> adapters are connecting. The Power LED on<br />
<strong>Powerline</strong> adapter A/B and C will stop flashing and become solid light when the connection is<br />
made.<br />
Note:<br />
The sequence of Step 1 and Step 2 can be exchanged.<br />
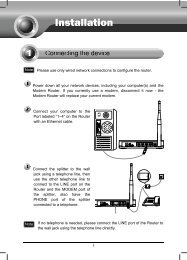
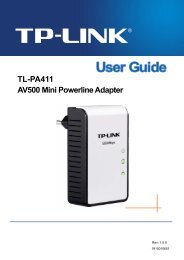
Leave an existing secured <strong>Powerline</strong> AV Network:<br />
As the figure above shown, <strong>Powerline</strong> adapter A, B and C have formed a HomeplugAV Network. The<br />
user wants to remove one device (<strong>Powerline</strong> adapter A) from this network.<br />
Step 1. Press and hold the Pair button on <strong>Powerline</strong> adapter A for at least 10 seconds. <strong>Powerline</strong><br />
adapter A will reset and restart. (The Power LED of <strong>Powerline</strong> adapter A will momentarily<br />
extinguish during resetting, flash during restarting then illuminate steadily.)<br />
Step 2. Wait for the reset to complete.<br />
21