


You also want an ePaper? Increase the reach of your titles
YUMPU automatically turns print PDFs into web optimized ePapers that Google loves.
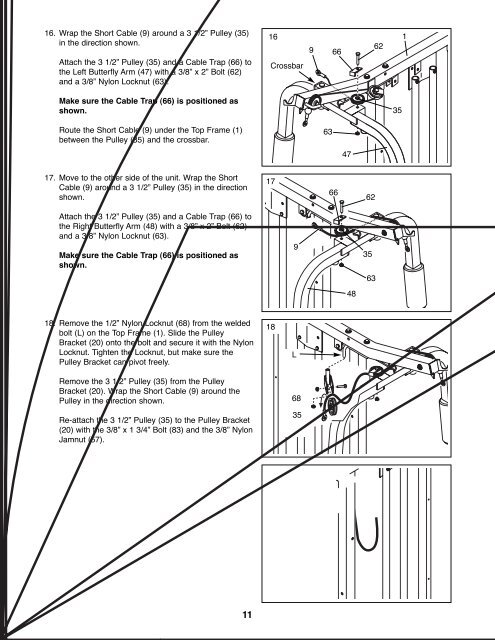
16. Wrap the Short Cable (9) around a 3 1/2Ó Pulley (35)<br />
in the direction shown.<br />
Attach the 3 1/2Ó Pulley (35) and a Cable Trap (66) to<br />
the Left Butterfly Arm (47) with a 3/8Ó x 2Ó Bolt (62)<br />
and a 3/8Ó Nylon Locknut (63).<br />
16<br />
Crossbar<br />
9<br />
66<br />
62<br />
1<br />
Make sure the Cable Trap (66) is positioned as<br />
shown.<br />
35<br />
Route the Short Cable (9) under the Top Frame (1)<br />
between the Pulley (35) and the crossbar.<br />
63<br />
47<br />
17. Move to the other side of the unit. Wrap the Short<br />
Cable (9) around a 3 1/2Ó Pulley (35) in the direction<br />
shown.<br />
17<br />
66<br />
62<br />
Attach the 3 1/2Ó Pulley (35) and a Cable Trap (66) to<br />
the Right Butterfly Arm (48) with a 3/8Ó x 2Ó Bolt (62)<br />
and a 3/8Ó Nylon Locknut (63).<br />
Make sure the Cable Trap (66) is positioned as<br />
shown.<br />
9<br />
35<br />
63<br />
48<br />
18. Remove the 1/2Ó Nylon Locknut (68) from the welded<br />
bolt (L) on the Top Frame (1). Slide the Pulley<br />
Bracket (20) onto the bolt and secure it with the Nylon<br />
Locknut. Tighten the Locknut, but make sure the<br />
Pulley Bracket can pivot freely.<br />
Remove the 3 1/2Ó Pulley (35) from the Pulley<br />
Bracket (20). Wrap the Short Cable (9) around the<br />
Pulley in the direction shown.<br />
Re-attach the 3 1/2Ó Pulley (35) to the Pulley Bracket<br />
(20) with the 3/8Ó x 1 3/4Ó Bolt (83) and the 3/8Ó Nylon<br />
Jamnut (57).<br />
18<br />
L<br />
68<br />
35<br />
11


