


Create successful ePaper yourself
Turn your PDF publications into a flip-book with our unique Google optimized e-Paper software.
Frame Assembly<br />
1<br />
1. Before beginning assembly, make sure you have<br />
read and understood the information on page 5.<br />
Locate and open the parts bag labeled ÒFRAME<br />
ASSEMBLY.Ó<br />
Press a 2Ó Square Outer Cap (51) onto each end of<br />
the Stabilizer (5).<br />
5<br />
51<br />
Insert two 5/16Ó x 2 3/4Ó Carriage Bolts (14) up<br />
through the Stabilizer (5) and place it flat on the floor.<br />
51<br />
14<br />
2. Press a 2Ó Square Inner Cap (21) into the end of the<br />
Base (8).<br />
2<br />
A<br />
Insert two 5/16Ó x 2 1/2Ó Carriage Bolts (52) up<br />
through the Base (8).<br />
Place the Base (8) on the floor with the holes in the<br />
mounting bracket (A) over the Carriage Bolts (14) in<br />
the Stabilizer (5).<br />
14<br />
5<br />
52<br />
8<br />
21<br />
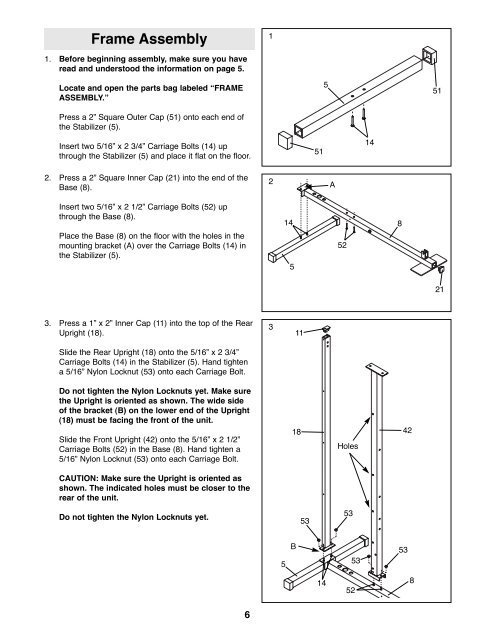
3. Press a 1Ó x 2Ó Inner Cap (11) into the top of the Rear<br />
Upright (18).<br />
Slide the Rear Upright (18) onto the 5/16Ó x 2 3/4Ó<br />
Carriage Bolts (14) in the Stabilizer (5). Hand tighten<br />
a 5/16Ó Nylon Locknut (53) onto each Carriage Bolt.<br />
Do not tighten the Nylon Locknuts yet. Make sure<br />
the Upright is oriented as shown. The wide side<br />
of the bracket (B) on the lower end of the Upright<br />
(18) must be facing the front of the unit.<br />
Slide the Front Upright (42) onto the 5/16Ó x 2 1/2Ó<br />
Carriage Bolts (52) in the Base (8). Hand tighten a<br />
5/16Ó Nylon Locknut (53) onto each Carriage Bolt.<br />
CAUTION: Make sure the Upright is oriented as<br />
shown. The indicated holes must be closer to the<br />
rear of the unit.<br />
3<br />
11<br />
18 42<br />
Holes<br />
Do not tighten the Nylon Locknuts yet.<br />
53<br />
53<br />
5<br />
B<br />
53<br />
53<br />
14<br />
52<br />
8<br />
6


