


Create successful ePaper yourself
Turn your PDF publications into a flip-book with our unique Google optimized e-Paper software.
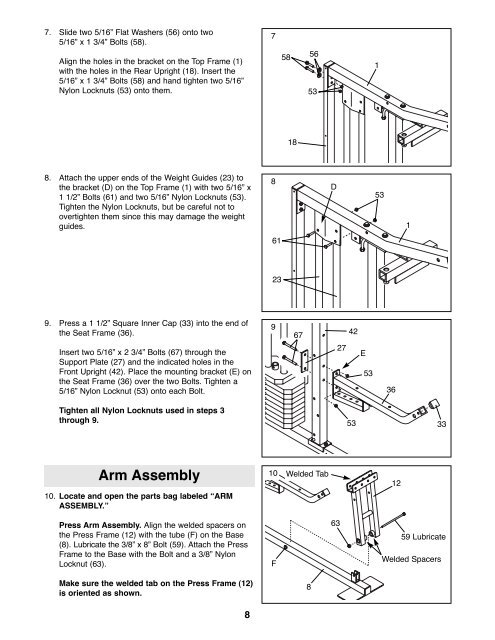
7. Slide two 5/16Ó Flat Washers (56) onto two<br />
5/16Ó x 1 3/4Ó Bolts (58).<br />
Align the holes in the bracket on the Top Frame (1)<br />
with the holes in the Rear Upright (18). Insert the<br />
5/16Ó x 1 3/4Ó Bolts (58) and hand tighten two 5/16Ó<br />
Nylon Locknuts (53) onto them.<br />
7<br />
58<br />
56<br />
53<br />
1<br />
18<br />
8. Attach the upper ends of the Weight Guides (23) to<br />
the bracket (D) on the Top Frame (1) with two 5/16Ó x<br />
1 1/2Ó Bolts (61) and two 5/16Ó Nylon Locknuts (53).<br />
Tighten the Nylon Locknuts, but be careful not to<br />
overtighten them since this may damage the weight<br />
guides.<br />
8<br />
D<br />
53<br />
1<br />
61<br />
23<br />
9. Press a 1 1/2Ó Square Inner Cap (33) into the end of<br />
the Seat Frame (36).<br />
Insert two 5/16Ó x 2 3/4Ó Bolts (67) through the<br />
Support Plate (27) and the indicated holes in the<br />
Front Upright (42). Place the mounting bracket (E) on<br />
the Seat Frame (36) over the two Bolts. Tighten a<br />
5/16Ó Nylon Locknut (53) onto each Bolt.<br />
9<br />
67<br />
42<br />
27<br />
E<br />
53<br />
36<br />
Tighten all Nylon Locknuts used in steps 3<br />
through 9.<br />
53<br />
33<br />
Arm Assembly<br />
10. Locate and open the parts bag labeled ÒARM<br />
ASSEMBLY.Ó<br />
10<br />
Welded Tab<br />
12<br />
Press Arm Assembly. Align the welded spacers on<br />
the Press Frame (12) with the tube (F) on the Base<br />
(8). Lubricate the 3/8Ó x 8Ó Bolt (59). Attach the Press<br />
Frame to the Base with the Bolt and a 3/8Ó Nylon<br />
Locknut (63).<br />
F<br />
63<br />
59 Lubricate<br />
Welded Spacers<br />
Make sure the welded tab on the Press Frame (12)<br />
is oriented as shown.<br />
8<br />
8


