You also want an ePaper? Increase the reach of your titles
YUMPU automatically turns print PDFs into web optimized ePapers that Google loves.
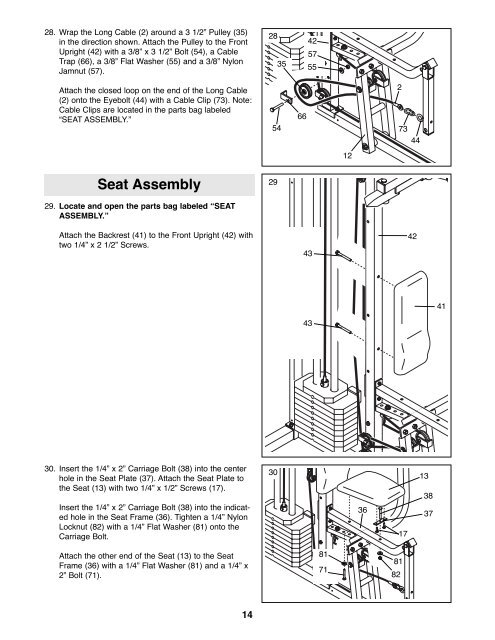
28. Wrap the Long Cable (2) around a 3 1/2Ó Pulley (35)<br />
in the direction shown. Attach the Pulley to the Front<br />
Upright (42) with a 3/8Ó x 3 1/2Ó Bolt (54), a Cable<br />
Trap (66), a 3/8Ó Flat Washer (55) and a 3/8Ó Nylon<br />
Jamnut (57).<br />
28<br />
35<br />
42<br />
57<br />
55<br />
Attach the closed loop on the end of the Long Cable<br />
(2) onto the Eyebolt (44) with a Cable Clip (73). Note:<br />
Cable Clips are located in the parts bag labeled<br />
ÒSEAT ASSEMBLY.Ó<br />
54<br />
66<br />
2<br />
73<br />
44<br />
12<br />
Seat Assembly<br />
29<br />
29. Locate and open the parts bag labeled ÒSEAT<br />
ASSEMBLY.Ó<br />
Attach the Backrest (41) to the Front Upright (42) with<br />
two 1/4Ó x 2 1/2Ó Screws.<br />
43<br />
42<br />
41<br />
43<br />
30. Insert the 1/4Ó x 2Ó Carriage Bolt (38) into the center<br />
hole in the Seat Plate (37). Attach the Seat Plate to<br />
the Seat (13) with two 1/4Ó x 1/2Ó Screws (17).<br />
Insert the 1/4Ó x 2Ó Carriage Bolt (38) into the indicated<br />
hole in the Seat Frame (36). Tighten a 1/4Ó Nylon<br />
Locknut (82) with a 1/4Ó Flat Washer (81) onto the<br />
Carriage Bolt.<br />
30<br />
36<br />
17<br />
13<br />
38<br />
37<br />
Attach the other end of the Seat (13) to the Seat<br />
Frame (36) with a 1/4Ó Flat Washer (81) and a 1/4Ó x<br />
2Ó Bolt (71).<br />
81<br />
71<br />
81<br />
82<br />
14


