T-shirt with shoulder yoke - My Label 3D Fashion Pattern Software
T-shirt with shoulder yoke - My Label 3D Fashion Pattern Software
T-shirt with shoulder yoke - My Label 3D Fashion Pattern Software

Create successful ePaper yourself
Turn your PDF publications into a flip-book with our unique Google optimized e-Paper software.
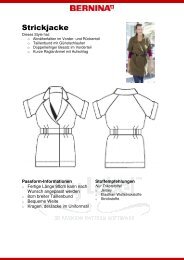
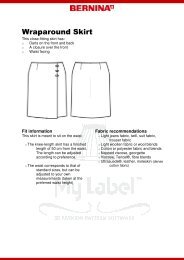
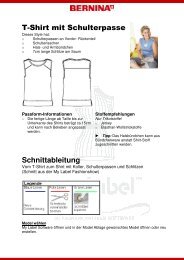
T-Shirt <strong>with</strong> Shoulder Yoke<br />
This style has:<br />
o Shoulder <strong>yoke</strong>s on the front and back<br />
o Shoulder flap<br />
o Neck and sleeve ribbing<br />
o 7cm long vents at the hem<br />
Fit information<br />
o The finished length from waist to<br />
bottom edge of T-<strong>shirt</strong> is approx.<br />
15cm and can be adjusted if preferred.<br />
Fabric recommendations<br />
Only knitted fabrics!<br />
o Jersey<br />
o Elastane/wool knits<br />
Tip: The neck ribbing may be cut from<br />
ribbing instead of <strong>shirt</strong> fabric.<br />
Style variant<br />
From T-<strong>shirt</strong> to <strong>shirt</strong> <strong>with</strong> <strong>yoke</strong>, <strong>shoulder</strong> flaps and vents<br />
(<strong>Pattern</strong> from the <strong>My</strong> <strong>Label</strong> <strong>Fashion</strong>show)<br />
Select model<br />
Open <strong>My</strong> <strong>Label</strong> software and open or re-create the desired model in the Model Drawer.<br />
1
Select style<br />
o In the Style Drawer, under the heading ‘Shirts’, select the T-<strong>shirt</strong>.<br />
o Increase the neckline to a max. measurement of 47cm.<br />
o The sleeves are not required.<br />
o The ribbing pattern pieces for the armhole are added later by hand.<br />
Length = armhole width minus 2cm plus 1.6cm seam allowance<br />
Width = neck ribbing width plus 1.6cm seam allowance.<br />
Please note: The use of vents reduces the total length of the <strong>shirt</strong> by 7cm. If this is not<br />
desired, then increase the Finished Length in the Style Properties in advance.<br />
Stitch variant on your computer using stitch placement .<br />
Detailed instructions can be found in the Appendix.<br />
1. Back <strong>yoke</strong><br />
Start off by determining the width of the back <strong>yoke</strong> by drawing a horizontal line. This<br />
should lie in the approximate middle of the armhole, but can be higher or lower if<br />
preferred.<br />
2. Front <strong>yoke</strong><br />
Draw slightly diagonal lines (parallel to the <strong>shoulder</strong>) from the neck edge to the armhole.<br />
Since the pattern pieces are cut out to the fabric fold, the markings need only be drawn<br />
on one <strong>shoulder</strong>.<br />
3.Marking hem and top of vent<br />
Draw the new hemline about 7cm above the existing hem edge and add the vent<br />
markings at double height (14cm).<br />
Please note: After printing the pattern pieces, check these lines and markings and<br />
correct if necessary.<br />
2
Print out pattern pieces<br />
Cut out only the front and back sections and the neck ribbing. Position and print these<br />
out. When positioning the pattern pieces, select short sleeves and place onto one half of<br />
the front or back in order to reduce paper use.<br />
After printing, check the added lines. These must be the same on the front and the<br />
back.<br />
Lengthen the grain on the front and back via the <strong>yoke</strong>.<br />
Cut out pattern pieces and make alterations by hand.<br />
Print out the pattern pieces, and then cut out the centre front and centre back. Then cut<br />
out the <strong>yoke</strong>.<br />
<strong>Pattern</strong> pieces for sleeve ribbing<br />
Measure armhole on paper pattern (<strong>with</strong>out seam allowance).<br />
Cut the pattern pieces <strong>with</strong> the following measurements.<br />
Width = neck ribbing width plus 1.6cm seam allowance.<br />
Length = armhole width minus 2-3cm plus 1.6cm seam allowance<br />
<strong>Pattern</strong> piece for <strong>shoulder</strong> flaps<br />
Cut the pattern piece <strong>with</strong> the following measurements.<br />
Width = 5cm plus 1.6cm seam allowance<br />
Length = <strong>shoulder</strong> length plus 1.6cm seam allowance<br />
Before cutting, check the fit of the redesigned front and back sections.<br />
3
Add seam allowance:<br />
o Add a 1.6cm seam allowance to the front and back <strong>yoke</strong><br />
o Add a 1.6cm seam allowance to the front and back sections<br />
o Suggestion: Add or increase cross-markings.<br />
o Suggestion: Rename pattern pieces.<br />
Fabric requirement<br />
Fabric key<br />
Fabric, right Fabric, wrong<br />
side<br />
side<br />
Symbols and Markings Key<br />
CF CB<br />
B9<br />
Lining, right<br />
side<br />
Lining, wrong<br />
side<br />
Interfacing<br />
Centre Front<br />
Centre Back<br />
Sheet<br />
Numbering<br />
Reference points –<br />
help in combining the<br />
individual sheets<br />
grain<br />
Marking<br />
points on<br />
front<br />
sections<br />
Marking<br />
points on back<br />
sections<br />
Pleating in<br />
direction of<br />
arrow<br />
Marking of dart ends<br />
(1cm before the dart<br />
tip in each case)<br />
Button<br />
marking<br />
The figure shows one way to lay out the pattern pieces on a folded length of fabric.<br />
Since the pattern pieces are created according to your own measurements and<br />
personal preferences, they may differ in size and shape from the pattern layout.<br />
4
Fabric 140cm wide<br />
Materials and miscellaneous<br />
o<br />
o<br />
Shoulder tape<br />
Double needle for the hem.<br />
Cutting out<br />
o<br />
o<br />
o<br />
o<br />
o<br />
o<br />
o<br />
1 x front to fold<br />
2 x front <strong>yoke</strong><br />
1 x back to fold<br />
1 x centre back <strong>yoke</strong> to fold<br />
2 x <strong>shoulder</strong> flaps lengthwise<br />
1 x neck ribbing<br />
2 x armhole ribbing<br />
Preparation<br />
Lay out paper pattern pieces on fabric as per the cutting-layout illustration. Transfer all<br />
markings to the fabric after the pieces have been cut out.<br />
Please note:<br />
Since only fabrics <strong>with</strong> a lot of stretch are suitable for this style; all seams should<br />
be sewn <strong>with</strong> an overlocker.<br />
Tip: Should you have neither an overlocker nor an overlock stitch on your sewing<br />
machine, select a narrow, elastic zig-zag stitch.<br />
Stabilise the <strong>shoulder</strong> seams <strong>with</strong> <strong>shoulder</strong> tape.<br />
Sewing instructions<br />
Yoke and <strong>shoulder</strong> seam<br />
With right sides facing, sew the back <strong>yoke</strong> to the back section according to the<br />
markings.<br />
With right sides facing, sew the front <strong>yoke</strong> to the front section according to the markings.<br />
Iron seam allowances towards the <strong>yoke</strong>. Use edge-stitching if preferred.<br />
Lay out <strong>shoulder</strong> seams <strong>with</strong> right sides facing and sew together.<br />
5
Shoulder flap<br />
Sew together the strips of fabric lengthwise <strong>with</strong> right sides facing; iron seam apart and<br />
turn.<br />
The seam line should lie in the middle of the underside of the flap. Press.<br />
Neck and sleeve ribbing<br />
Sew together the neck and sleeve ribbing at the narrow sides in each case. Trim the<br />
seams to 0.5cm and press apart. Fold centred together lengthwise (wrong side of fabric<br />
is now inside) and press.<br />
Position <strong>shoulder</strong> flap onto T-<strong>shirt</strong><br />
Position the seam line of the flaps onto the <strong>shoulder</strong> seams.<br />
Pin and baste in place to the seam allowance of the neckline.<br />
Sew on neck ribbing<br />
For better results, the seam allowances of the neckline and the neck ribbing can be cut<br />
to 1cm.<br />
Divide the neck ribbing and the neckline of the T-<strong>shirt</strong> into four and mark <strong>with</strong> pins or<br />
<strong>with</strong> basting thread. Pin or baste the ribbing, beginning at centre back, according to the<br />
markings to the neckline. Sew in the neck ribbing; it must be stretched a little. Iron the<br />
seam allowance towards the T-<strong>shirt</strong> and edge-stitch from the right side. Take care not to<br />
include the <strong>shoulder</strong> flaps in the edge-stitching.<br />
6
Side seams and vent<br />
First iron the 7cm wide hem on the front and back section to mark it. Then straightstitch<br />
the side seam <strong>with</strong> right sides facing above and below the vent markings. Neaten the<br />
side seam up to the vent marking <strong>with</strong> the overlocker.<br />
Now fold the hem into half at the open side seams. Fold vent seam allowances to wrong<br />
side, topstitch and press. (See figure below).<br />
Work armhole<br />
Baste the <strong>shoulder</strong> flaps onto the seam allowance of the armholes.<br />
Divide the sleeve ribbing and the neckline into four and mark <strong>with</strong> pins or <strong>with</strong> basting<br />
thread. Pin or baste the ribbing to the armhole, beginning at the side seam and<br />
according to the markings. Sew in the arm ribbing; it must be stretched a little here. Iron<br />
the seam allowance towards the T-<strong>shirt</strong> and edge-stitch onto the T-<strong>shirt</strong>. The<br />
topstitching begins and ends underneath the <strong>shoulder</strong> flap so that it can be moved to<br />
the side and thus is not sewn over.<br />
Sew hem<br />
Sew the hem <strong>with</strong> a coverstitch machine or a double needle. Carefully cut back any<br />
remaining seam allowance.<br />
You will find further detailed information in your <strong>My</strong> <strong>Label</strong> program under<br />
Help> Sewing techniques. This option offers detailed instructions on how to sew belt<br />
loops, collars, pockets, linings (and much more) properly. In addition, the basics of<br />
sewing techniques for beginners are explained.<br />
7