Quick Steps for Installing Trams Back Office
Quick Steps for Installing Trams Back Office
Quick Steps for Installing Trams Back Office

Create successful ePaper yourself
Turn your PDF publications into a flip-book with our unique Google optimized e-Paper software.
2<br />
<strong>Installing</strong> <strong>Trams</strong> <strong>Back</strong><br />
<strong>Office</strong><br />
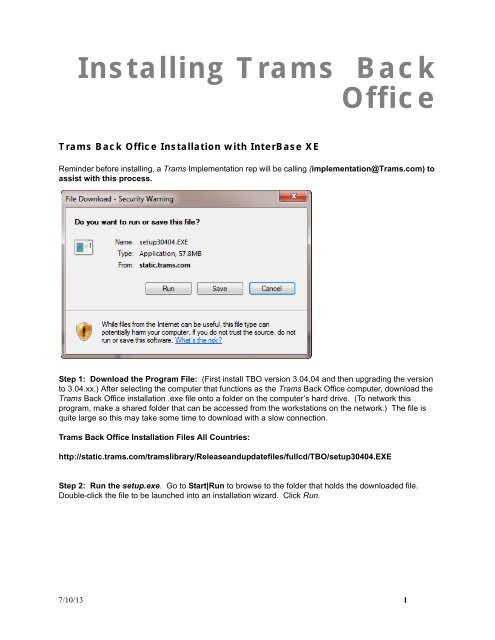
<strong>Trams</strong> <strong>Back</strong> <strong>Office</strong> Installation with InterBase XE<br />
Reminder be<strong>for</strong>e installing, a <strong>Trams</strong> Implementation rep will be calling (implementation@<strong>Trams</strong>.com) to<br />
assist with this process.<br />
Step 1: Download the Program File: (First install TBO version 3.04.04 and then upgrading the version<br />
to 3.04.xx.) After selecting the computer that functions as the <strong>Trams</strong> <strong>Back</strong> <strong>Office</strong> computer, download the<br />
<strong>Trams</strong> <strong>Back</strong> <strong>Office</strong> installation .exe file onto a folder on the computer’s hard drive. (To network this<br />
program, make a shared folder that can be accessed from the workstations on the network.) The file is<br />
quite large so this may take some time to download with a slow connection.<br />
<strong>Trams</strong> <strong>Back</strong> <strong>Office</strong> Installation Files All Countries:<br />
http://static.trams.com/tramslibrary/Releaseandupdatefiles/fullcd/TBO/setup30404.EXE<br />
Step 2: Run the setup.exe. Go to Start|Run to browse to the folder that holds the downloaded file.<br />
Double-click the file to be launched into an installation wizard. Click Run.<br />
7/10/13 1
Installation<br />
Step 3. Select Next at the Welcome Screen and Agree at the Software License Agreement <strong>for</strong>m.<br />
Step 4. Select the components to install (default selections are already checked <strong>for</strong> stand-alone<br />
users and servers). Select <strong>Trams</strong> License Manager only when installing program on server (a single<br />
computer is Interbase Client/Server. If ClientBase is already installed on the server, the selection is IB client<br />
only.) The server installs Interbase Client & Server. If setting up multi-user workstations, select the<br />
Interbase Client Only option <strong>for</strong> the workstations.<br />
Step 5. Select the Destination folders (where <strong>Trams</strong> <strong>Back</strong> <strong>Office</strong> files are to loaded). We strongly<br />
2 7/10/13
Installation<br />
recommend using the default destination folder:<br />
For XP/2003 Server, the path would be this:<br />
C:\Documents and Settings\All Users\Application Data\<strong>Trams</strong>\Database\<strong>Trams</strong>.ib<br />
For Vista, Windows 7 and Windows 2008 Server, the path would be:<br />
C:\ProgramData\<strong>Trams</strong>\Database\<strong>Trams</strong>.ib<br />
Click Next.<br />
Step 6. Select the Country you wish to install.<br />
Step 7. Enter the serial number and access code found in the welcome email received from <strong>Trams</strong>.<br />
Please contact the <strong>Trams</strong> Marketing Department at marketing@<strong>Trams</strong>.com or support@<strong>Trams</strong>.com if it<br />
7/10/13 3
Installation<br />
cannot be located. Click Next.<br />
Step 6. Enter the serial number and access code <strong>for</strong> Interbase Server. Clicking Next verifies the<br />
access code, and serial number <strong>for</strong> the number of users and computers <strong>for</strong> which Interbase has been<br />
purchased (this serial number and access code are in the welcome email). Click OK. Another screen pops<br />
up that says requires that the Interbase Serial # and Access code now need to be entered as the system is<br />
now ready to install Interbase.<br />
Step 7. Select Next to install files.<br />
Step 8. Restart the computer be<strong>for</strong>e continuing.<br />
Step 9: Run the CBPlusup.exe file <strong>for</strong> encryption purposes by clicking here.<br />
Step 10: After installation is complete, a blank database with the filename of TRAMS.ib is created. When<br />
launching <strong>Trams</strong> <strong>Back</strong> <strong>Office</strong> you see the screen, shown below, defaulting to your <strong>Trams</strong> alias, asking <strong>for</strong><br />
a User Name and Password. Your password was sent to you under separate cover.<br />
This completes the installation of TBO version 3.04.04. Now you need to update your program by<br />
going here and following the directions to upgrade to newest version of TBO.<br />
Multiuser Installation<br />
Go to each workstation and browse to the shared folder where the <strong>Trams</strong> <strong>Back</strong> <strong>Office</strong> installation setup.exe.<br />
Use the install components of InterBase Client Only, <strong>Trams</strong> <strong>Back</strong> <strong>Office</strong>, and <strong>Trams</strong> <strong>Back</strong> <strong>Office</strong><br />
Documentation on each of the computers with access to <strong>Trams</strong> <strong>Back</strong> <strong>Office</strong>.<br />
After each workstation has <strong>Trams</strong> <strong>Back</strong> <strong>Office</strong>, point the Alias to the correct database file. Go to Start|All<br />
Programs|<strong>Trams</strong> <strong>Back</strong> <strong>Office</strong> Alias Utility. Go into the <strong>Trams</strong> Alias, change the path to point to the<br />
<strong>Trams</strong>.ib, located on the server using the <strong>for</strong>mat required <strong>for</strong> the network:<br />
4 7/10/13
Installation<br />
Remote via TCP/IP<br />
For XP/Windows 2003 Server, the default path is this:<br />
Server Name: C:\Documents and Settings\All Users\Application Data\<strong>Trams</strong>\Database\<strong>Trams</strong>.ib<br />
For Vista/Windows 7/2008 Server, the default path is this:<br />
Server Name:C:\ProgramData\<strong>Trams</strong>\Database\<strong>Trams</strong>.ib<br />
For Agencies Using ClientBase and Adding<br />
<strong>Trams</strong> <strong>Back</strong> <strong>Office</strong><br />
If the agency has been using ClientBase and have decided to add <strong>Trams</strong> <strong>Back</strong> <strong>Office</strong>, follow these<br />
instructions:<br />
1. Upgrade the ClientBase program to latest version.<br />
2. On the Server, proceed with the <strong>Trams</strong> <strong>Back</strong> <strong>Office</strong> Installation as outlined above (make sure to install<br />
correct latest version.<br />
3. When installation is complete on Server, go to Start|Programs|<strong>Trams</strong> <strong>Back</strong> <strong>Office</strong> and run the utility<br />
TBO Update.<br />
4. Proceed to install <strong>Trams</strong> <strong>Back</strong> <strong>Office</strong> as outlined above on all workstations.<br />
For help, please email implementation@<strong>Trams</strong>.com.<br />
7/10/13 5
Installation<br />
6 7/10/13