SketchUp to Unity Workflow Steps.pdf - BIM Wiki
SketchUp to Unity Workflow Steps.pdf - BIM Wiki
SketchUp to Unity Workflow Steps.pdf - BIM Wiki

Create successful ePaper yourself
Turn your PDF publications into a flip-book with our unique Google optimized e-Paper software.
<strong>SketchUp</strong> <strong>to</strong> <strong>Unity</strong> <strong>Workflow</strong> <strong>Steps</strong> (Edit 0 8… )<br />
Table of Contents<br />
<br />
<br />
<br />
<br />
<br />
<br />
<br />
Exporting <strong>SketchUp</strong> Models in<strong>to</strong> <strong>Unity</strong> 3D (With Texture)<br />
Export the <strong>SketchUp</strong> Model<br />
Importing in<strong>to</strong> <strong>Unity</strong> 3D<br />
Information on Collada (.dae) and <strong>SketchUp</strong> (.skp) File Types<br />
COLLADA (.dae) File Type<br />
<strong>SketchUp</strong> (.skp) File Type<br />
Resources<br />
Exporting <strong>SketchUp</strong> Models in<strong>to</strong> <strong>Unity</strong> 3D (With Texture)<br />
(Updated 6/17/2013)<br />
Currently the best format for bringing models with textures (including Google Earth images) is through<br />
Au<strong>to</strong>desk FBX format. If you have <strong>SketchUp</strong> Pro v8 or the current <strong>SketchUp</strong> Make (2013) program, you<br />
can export within <strong>SketchUp</strong> as an FBX.<br />
The workflow below will outline FBX export and import.<br />
Information at the end of the page cover Collada and <strong>SketchUp</strong> formats. If you cannot get the new (free)<br />
<strong>SketchUp</strong> Make, you can use a third party program such as Blender or an Au<strong>to</strong>desk Plugin for FBX in<br />
order <strong>to</strong> transfer files. The forum thread listed in Resources can be helpful for troubleshooting.<br />
Export the <strong>SketchUp</strong> Model<br />
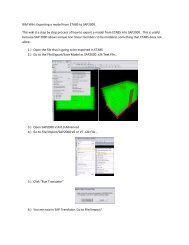
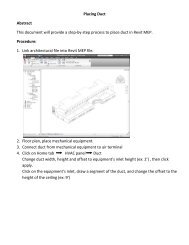
1. Go <strong>to</strong> File --> Export --> 3D Model (Figure 1)
Figure 1: Open the Export Window for the 3D Model<br />
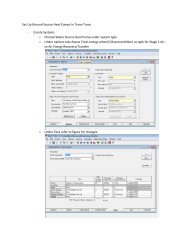
2. Name your file and set the location you would like <strong>to</strong> save it <strong>to</strong>. Select FBX as your file type in the<br />
drop down menu.<br />
3. Select Options before exporting (Figure 3.1). Select "Export two-sided faces" & "Export texture maps"<br />
and change units <strong>to</strong> Meters (Figure 3.2). If desired change the Y-Z axis (it won't change looks, but might<br />
be confusing when trying <strong>to</strong> move model in <strong>Unity</strong> Space). Press "Ok" in the Options Window.
Figure 3.1: Location of Options but<strong>to</strong>n in Export Window<br />
Figure 3.2: Option selections<br />
Importing in<strong>to</strong> <strong>Unity</strong> 3D<br />
5. BEFORE Importing: Find your export folder, next <strong>to</strong> the FBX file should be a folder with the<br />
exported materials/textures.<br />
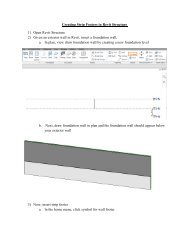
6. Open <strong>Unity</strong>. Within the Project Browser right-click on the Assets folder and create a folder for your<br />
textures and name it, for your own organizational needs. (Figure 6)
Select all textures in the folder created with your FBX file and drag them in<strong>to</strong> your new folder within<br />
<strong>Unity</strong> (they will all be imported in<strong>to</strong> <strong>Unity</strong>). When you import the FBX file, <strong>Unity</strong> will search all folders<br />
for the correct material name associated with the model before creating one, so feel free <strong>to</strong> create as many<br />
layers of folders as necessary.<br />
Figure 6: Create a new Assets Folder (Name it Textures) and drag and drop all textures in<strong>to</strong> folder.<br />
7. In the <strong>to</strong>p menu, select "Assets" --> "Import New Asset..." --> find your FBX file for import. (these last<br />
few steps are outlined in more detail on the Revit <strong>to</strong> <strong>Unity</strong> <strong>Wiki</strong>page<br />
Note: If you import the FBX first, <strong>Unity</strong> will create materials for each texture assigned and when<br />
you import those textures, you will have duplicates, and each will need <strong>to</strong> be manually changed.<br />
The default route of the textures will be in the "Materials" folder. For complex geometry,<br />
manually changing textures is not practical and deleting the newly created materials not possible,<br />
without deleting the whole Materials folder, and any other materials assigned.<br />
8. Select your new asset, the preview should show all imported textures. Within the Inspec<strong>to</strong>r, change the<br />
Scale Fac<strong>to</strong>r <strong>to</strong> 1. Hit "Apply" and drag your model from the Project browser in<strong>to</strong> the Hierarchy of the<br />
desired Scene.
Information on Other <strong>SketchUp</strong> Export File Types<br />
COLLADA (.dae) File Type<br />
<br />
<br />
<br />
<br />
<br />
<br />
<br />
Will transfer Google Earth Images intact without stretching or misplacing them.<br />
Will transfer base geometry.<br />
Will break down base geometry in<strong>to</strong> surfaces that can be selected, edited and grouped in 3D<br />
Studio Max.<br />
Collada has a smaller file size because it will only export geometry and not textures and materials.<br />
Will not export default, sun, sky, camera, and import symbol that need <strong>to</strong> be deleted later in 3D<br />
Studio Max.<br />
Will export the default <strong>SketchUp</strong> materials applied <strong>to</strong> the model in<strong>to</strong> a folder next <strong>to</strong> the exported<br />
model file with generic names as .JPEGs.<br />
These material files will not import in<strong>to</strong> 3D Studio Max well. These are recommended <strong>to</strong> be<br />
deleted and replaced with accurate materials and textures.<br />
<strong>SketchUp</strong> (.skp) File Type<br />
<br />
<br />
<br />
<br />
Will export a default sun, sky, camera, and import symbol that will need <strong>to</strong> be deleted in 3D<br />
Studio Max.<br />
Exports the model as a whole and does not break it down in<strong>to</strong> editable surfaces.<br />
Will transfer some of <strong>SketchUp</strong>'s default materials, but not all of them.<br />
Will have a larger file size because of carrying the sun, sky, camera, and materials.<br />
Resources<br />
<strong>Unity</strong> Forum Thread<br />
http://forum.unity3d.com/threads/99965-How-<strong>to</strong>-Import-a-Sketchup-(-skp)-Model-in<strong>to</strong>-<strong>Unity</strong>-(with-<br />
Textures)