Beam System in REVIT.pdf - BIM Wiki
Beam System in REVIT.pdf - BIM Wiki
Beam System in REVIT.pdf - BIM Wiki

Create successful ePaper yourself
Turn your PDF publications into a flip-book with our unique Google optimized e-Paper software.
Creat<strong>in</strong>g a <strong>Beam</strong> <strong>System</strong> <strong>in</strong> <strong>REVIT</strong> Structure 2010: This document will give a step by step explanation of<br />
how to <strong>in</strong>sert beams <strong>in</strong>to an exist<strong>in</strong>g structural system on <strong>REVIT</strong> Structure.<br />
The importance of this <strong>BIM</strong> wiki is that it allows for a simple and easy addition of evenly spaced<br />
beams to a structural system. This will save huge amounts of time when model<strong>in</strong>g a structure <strong>in</strong><br />
<strong>REVIT</strong> Structure.<br />
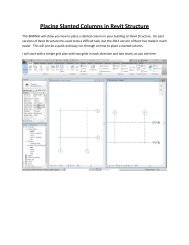
1. Start by open<strong>in</strong>g a <strong>REVIT</strong> Structure model. This model should have columns and girders already<br />
<strong>in</strong> place.<br />
2. Go to the Level that you want to add the beams to.<br />
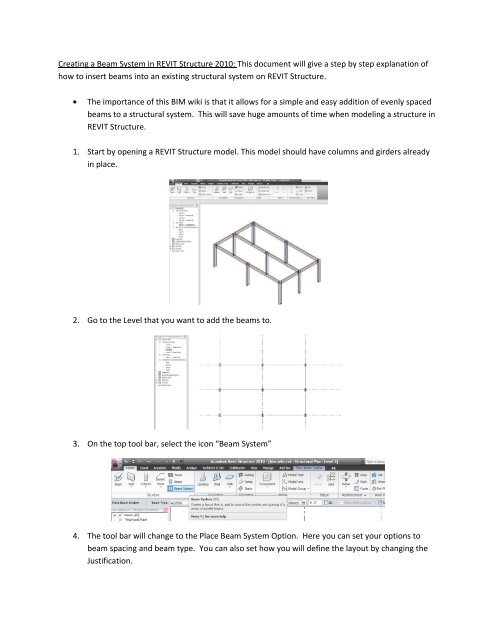
3. On the top tool bar, select the icon “<strong>Beam</strong> <strong>System</strong>”<br />
4. The tool bar will change to the Place <strong>Beam</strong> <strong>System</strong> Option. Here you can set your options to<br />
beam spac<strong>in</strong>g and beam type. You can also set how you will def<strong>in</strong>e the layout by chang<strong>in</strong>g the<br />
Justification.
5. When you have chosen the sett<strong>in</strong>gs that you want click the “Create Sketch” icon. Aga<strong>in</strong> the tool<br />
bar will change to “Create <strong>Beam</strong> <strong>System</strong> Boundary”, giv<strong>in</strong>g you a variety of options <strong>in</strong> which you<br />
can layout the beam system.<br />
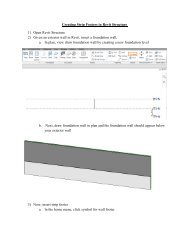
6. Select “Boundary L<strong>in</strong>e”. The Level view should become grey. Now draw the boundary of where<br />
you want the beams to be added.<br />
a. Keep <strong>in</strong> m<strong>in</strong>d that the first l<strong>in</strong>e draw <strong>in</strong>dicates the direction <strong>in</strong> which the beams will<br />
span.<br />
7. When you are f<strong>in</strong>ished draw<strong>in</strong>g the outl<strong>in</strong>e of where you want the beams, select the “F<strong>in</strong>ish<br />
<strong>Beam</strong> <strong>System</strong>” on the top right of the screen.<br />
8. The beams you just created will now appear.
9. One of the good features of <strong>Beam</strong> <strong>System</strong>s is that you can select <strong>in</strong>dividual beams to change<br />
their properties or even delete them without affect<strong>in</strong>g the other beams that were created with<br />
it. As well as select<strong>in</strong>g the beams <strong>in</strong>dividually it is possible to select all of them with a s<strong>in</strong>gle click<br />
of the system outl<strong>in</strong>e.