Create successful ePaper yourself
Turn your PDF publications into a flip-book with our unique Google optimized e-Paper software.
Choose a name; preferably include material and any information that shows the <strong>walls</strong>pecification so that you won’t get mixed up with different <strong>walls</strong> that you create.Go to structure: edit
In the preview section on the bottom left you can see the cross section of the wall.If you edit the upper layers, exterior material would change. Structure is shownbetween the core boundary rows and the layers on the bottom are interior materials.You can also change the sequence of layers by hitting up and down while keeping theorder of finishing descending to the outside; otherwise you will receive an error. Youalso can add to the layers by insert or delete any of them which you find unnecessary.In this example we want to keep the Function of exterior material as Finish, and changethe material to another type of brick. Click on Masonry- Brick, the Material section willopen.
Duplicate the default one and name it. Hit Edit in front of structure and you will see thesection of the wall. Hit any of the listed layers and the related part would turn blue.
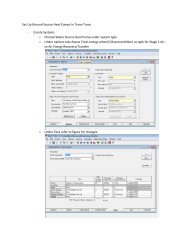
Offset menu determines how much each layer will be placed related to the wall line.Sample height is 20’ by default; change it if you may have taller <strong>walls</strong>.To create your costume <strong>stacked</strong> wall, hit on the name of the default types listed and alist of basic <strong>walls</strong> would come up, choose the customized wall that you have alreadycreated for first 10’. And write down 10’ in the Height column. You can offset the wall ifyou want it to be pushed in or out a little.Hit flip if you want the interior material outside or vice versa.Choose any other basic wall that you want to be <strong>stacked</strong> on top of each other, movethem up and down, insert and delete any of them until you’re satisfied with the section.If you want the wall to have for example 10’ of brick, 2’ of IEFS, the rest be concrete anda short overhang on top, specify the height of the <strong>walls</strong> that you are certain about andchose variable for the height of the type that may change.
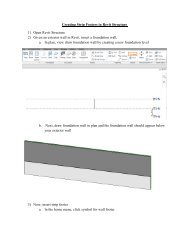
For example in the multipurpose room with sloped roof I couldn’t exactly know theheight of the wall, in different sides of the space. I specified the first 10’ and theconcrete wall on top remained variable.At the end hit ok and you have a new <strong>stacked</strong> wall. To use it scroll all the way down tothe end of drop down menu to find <strong>stacked</strong> <strong>walls</strong> and choose yours.