Worksets in Revit MEP.pdf - BIM Wiki
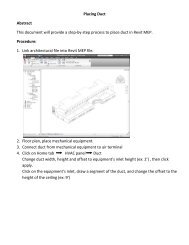
Worksets in Revit MEP.pdf - BIM Wiki
Worksets in Revit MEP.pdf - BIM Wiki

You also want an ePaper? Increase the reach of your titles
YUMPU automatically turns print PDFs into web optimized ePapers that Google loves.
<strong>Worksets</strong><br />
Autodesk <strong>Revit</strong> projects can be subdivided <strong>in</strong>to<br />
worksets. A workset is typically a discrete<br />
function area, such as HVAC, electrical, plumb<strong>in</strong>g,<br />
or pip<strong>in</strong>g. Only one user can edit each workset at a<br />
given time. All team members can view worksets<br />
owned by other team members, but they cannot<br />
make changes to them.<br />
Team members add<strong>in</strong>g and chang<strong>in</strong>g elements <strong>in</strong><br />
worksets can save their work to a local file on the<br />
network or their own hard drive, and publish work<br />
to a central file whenever they choose. They can<br />
update their local files at any time with the latest<br />
changes other team members have published.
Creat<strong>in</strong>g <strong>Worksets</strong><br />
1. Open your local copy of the central model.<br />
2. Click Collaborate tab → <strong>Worksets</strong> panel →<br />
3. In the <strong>Worksets</strong> dialog, click New.<br />
4. In the New Workset dialog, enter a name for the new workset.<br />
5. To display the workset <strong>in</strong> all project views, select Visible <strong>in</strong> All Views.<br />
Note: Clear this option if you want the workset to display only <strong>in</strong> views where you specifically turn on its visibility. (You can also change the visibility of<br />
worksets later <strong>in</strong> the Visibility/Graphics dialog on the View tab.)<br />
Note: If you are sett<strong>in</strong>g up a workshared model for your team and want to assign owners to each workset, each team member must open a local copy of the<br />
central model, select the workset <strong>in</strong> the <strong>Worksets</strong> dialog, and then select Yes <strong>in</strong> the Editable column.<br />
6. Click OK.<br />
7. When you f<strong>in</strong>ish creat<strong>in</strong>g worksets, click OK to close the <strong>Worksets</strong> dialog.<br />
8. If you have added only one new workset, <strong>Revit</strong> <strong>MEP</strong> prompts you to make the new workset active. Click Yes or No.<br />
Add<strong>in</strong>g Elements to a Workset<br />
1. Select the workset from the Active Workset drop-down menu on the status bar or the Collaborate tab → <strong>Worksets</strong> panel<br />
2. If you want all elements that were not created <strong>in</strong> the active workset to display as gray:<br />
Click Collaborate tab → <strong>Worksets</strong> panel →<br />
3. Add the necessary elements to the draw<strong>in</strong>g area.<br />
Reassign<strong>in</strong>g an Element to a Different Workset<br />
1. In the draw<strong>in</strong>g area, select an element.<br />
2. On the Properties Palette, locate the Workset parameter under Identity Data.<br />
3. Click <strong>in</strong> the Value column for the parameter, and select a new workset.
Synchroniz<strong>in</strong>g with the Central Model<br />
1. Click Collaborate tab → Synchronize panel →<br />
Note: You have the option to simply Synchronize now, or to Synchronize and Modify Sett<strong>in</strong>gs,<br />
which allows you to modify the synchronize with central sett<strong>in</strong>gs.<br />
2. Verify the location of the central model.<br />
3. Select Compact Central Model to reduce file size when sav<strong>in</strong>g.<br />
4. Under After synchroniz<strong>in</strong>g, rel<strong>in</strong>quish the follow<strong>in</strong>g worksets and elements,<br />
select from the follow<strong>in</strong>g options:<br />
‣ To make your changed worksets and elements available to other users, select the<br />
appropriate check boxes.<br />
‣ To synchronize the changes to central but keep the worksets and elements editable,<br />
clear the appropriate check boxes.<br />
5. If desired, enter a comment that is saved to the central model.<br />
Note: You can see all comments us<strong>in</strong>g the Show History tool found on the Synchronize Panel of the Collaborate tab.<br />
6. Verify that ‘Save Local File before and after synchroniz<strong>in</strong>g with central’ is selected to ensure your local file rema<strong>in</strong>s synchronized<br />
with central.<br />
7. Click OK.<br />
Your changes are saved to the central model and any changes from other team members are copied to your local model.<br />
Load<strong>in</strong>g Updates from the Central Model<br />
1. Click Collaborate tab → Synchronize panel →<br />
Note: You can load updates from the central model without publish<strong>in</strong>g your changes to the central model.