LP 1.6 Series - Kilotech
LP 1.6 Series - Kilotech
LP 1.6 Series - Kilotech

Create successful ePaper yourself
Turn your PDF publications into a flip-book with our unique Google optimized e-Paper software.
6<br />
1. Installation Procedures<br />
1.1 Cautions<br />
A) Environment : This scale must be installed in a dry and liquid free environment.<br />
B) Location : This scale must be placed on a flat and stable surface. Please keep the scale<br />
away from oscillating fans, ventilation systems, or drafts as these air disturbances can be<br />
picked-up by the scale and may cause incorrect weight readings.<br />
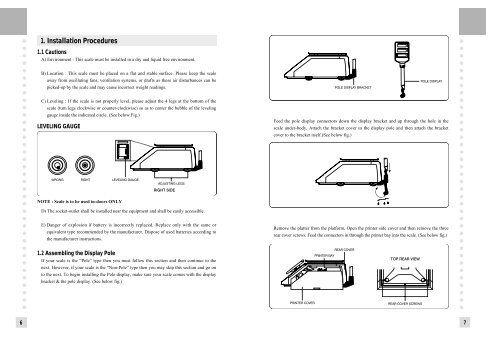
C) Leveling : If the scale is not properly level, please adjust the 4 legs at the bottom of the<br />
scale (turn legs clockwise or counter-clockwise) so as to center the bubble of the leveling<br />
gauge inside the indicated circle. (See below Fig.)<br />
LEVELING GAUGE<br />
NOTE : Scale is to be used in-doors ONLY<br />
D) The socket-outlet shall be installed near the equipment and shall be easily accessible.<br />
E) Danger of explosion if battery is incorrectly replaced. Replace only with the same or<br />
equivalent type recommended by the manufacturer. Dispose of used batteries according to<br />
the manufacturer instructions.<br />
1.2 Assembling the Display Pole<br />
If your scale is the “Pole” type then you must follow this section and then continue to the<br />
next. However, if your scale is the “Non-Pole” type then you may skip this section and go on<br />
to the next. To begin installing the Pole display, make sure your scale comes with the display<br />
bracket & the pole display. (See below fig.)<br />
Feed the pole display connectors down the display bracket and up through the hole in the<br />
scale under-body. Attach the bracket cover to the display pole and then attach the bracket<br />
cover to the bracket itself.(See below fig.)<br />
Remove the platter from the platform. Open the printer side cover and then remove the three<br />
rear cover screws. Feed the connectors in through the printer bay into the scale. (See below fig.)<br />
7