Owners Manual - Jackson Systems
Owners Manual - Jackson Systems
Owners Manual - Jackson Systems

Create successful ePaper yourself
Turn your PDF publications into a flip-book with our unique Google optimized e-Paper software.
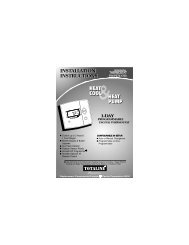
T180<br />
Programmable Thermostat<br />
Owner’s <strong>Manual</strong><br />
TA/TB180
CONTENTs<br />
Page<br />
General .............................................................................................................................. 4<br />
Front Panel Reference ...................................................................................................... 5<br />
Display Reference ............................................................................................................. 6<br />
Saving Changes ................................................................................................................ 10<br />
UP and DOWN Button Operation ...................................................................................... 11<br />
System Button Operation .................................................................................................. 11<br />
Fan Button Operation ........................................................................................................ 13<br />
Program Button Operation ................................................................................................. 14<br />
Function Overview ................................................................................................ 14<br />
Setting the Clock and Day ...................................................................................... 15<br />
Setting the Temperature Display ............................................................................. 15<br />
Programming Time & Temperature Settings ............................................................. 16<br />
Factory Program ................................................................................... 16<br />
Custom Program ................................................................................... 17<br />
Copy Feature ........................................................................ 18<br />
Time & Temperature Programming Example ............................ 19<br />
Overriding the Program ......................................................................................... 20<br />
Setting up a Temporary Hold .................................................................. 20<br />
Setting up a Permanent Hold .................................................................. 21<br />
Turning off a Hold.................................................................................... 21<br />
Custom Program Worksheet ............................................................................................. 22<br />
PAGE 3
!<br />
CAUTION!<br />
• FOLLOW TA/TB180 INSTALLATION INSTRUCTIONS BEFORE PROCEEDING.<br />
• READ THESE INSTRUCTIONS CAREFULLY BEFORE ATTEMPTING TO OPERATE THIS<br />
THERMOSTAT.<br />
• Retain these instructions for future reference. This product, when installed, will be part of an<br />
engineered system whose specifications and performance characteristics are not designed or<br />
controlled by PECO.<br />
• If at any time your system does not operate properly, contact a qualified service person.<br />
• Care should be used to avoid static discharge to the thermostat.<br />
IMPORTANT NOTE<br />
This thermostat was shipped with factory-default settings. Your thermostat’s installer may have<br />
configured the thermostat differently from the factory-default settings, and may have modified or<br />
disabled certain features. Contact the installer or a service technician if you have questions about<br />
the thermostat’s configuration.<br />
PAGE 4
GENERAL<br />
The T180 Thermostat is a wall-mounted digital control for 2 or 4 pipe fan coil applications. The<br />
thermostat can be set for 7-day, 5/2-day, 5/1/1-day, or 1-day programmable operation. Different<br />
heating and cooling setpoints and times are programmable for 4 time periods per day. The<br />
thermostat can also be set to nonprogrammable (manual) operation. The T180 Thermostat has<br />
connections for occupancy sensors and door switches, to automatically activate the thermostat’s<br />
setback mode.<br />
The T180 Thermostat does not need batteries to store user-configured settings in memory. During<br />
power loss its internal memory saves the settings and clock for unlimited time.<br />
PAGE 5
Front panel Reference<br />
1 Liquid Crystal Display with a blue backlight<br />
2 UP ▲and DOWN ▼Buttons<br />
3 SYSTEM Button<br />
4 FAN Button<br />
5 PROGRAM Button<br />
1<br />
2<br />
4<br />
3<br />
SYSTEM FAN PROGRAM<br />
5<br />
PAGE 6
DISPLAY REFERENCE<br />
8<br />
2<br />
1<br />
6<br />
3<br />
4<br />
7<br />
5<br />
PAGE 7
1 System Mode Display<br />
HEAT – indicates the system is in heating mode.<br />
COOL – indicates the system is in cooling mode.<br />
AUTO – indicates the system will automatically changeover between heating and cooling modes<br />
as the room temperature varies.<br />
OFF – turns off the entire system.<br />
SETBACK – indicates the heating or cooling system is operating in setback mode. Setback mode<br />
is an energy saving feature that can be either manually activated by the thermostat’s user, or<br />
automatically activated by an occupancy sensor or door switch.<br />
2 Temperature Display<br />
Default display: Digits display the current room temperature.<br />
During programming: Digits are used to set the desired temperatures.<br />
3 Time and Day Display<br />
Default display: Digits indicate the current time, and day abbreviations indicate the current day.<br />
During programming: Digits and days are used to program time periods.<br />
CLOCK – lights up during programming when the clock is being set.<br />
24Hr – lights up during programming to indicate time will be displayed in 24-hour clock format.<br />
AM / PM – indicates 12-hour clock format.<br />
PAGE 8
DISPLAY REFERENCE (cont.)<br />
4 Programming Commands<br />
SET – enters thermostat into custom program mode which allows you to specify a unique times<br />
and temperatures for a particular day or group of days.<br />
COPY – simplifies programming by allowing you to copy all of an individual day’s settings to<br />
another day or group of day.<br />
DFLT – restores the thermostat to the factory program.<br />
5 Time Period Indicators<br />
WAKE, DAY, EVE, and SLEEP are the names given to the four time periods per day. Each time<br />
period has its own unique setpoint temperatures.<br />
6 Fan Operation Indicators<br />
FAN – “FAN” will be always be lit in conjunction with “ON” or “AUTO”.<br />
ON – indicates constant, continuous fan operation.<br />
Auto – indicates fan is only on with heating or cooling demand.<br />
Hi – indicates high speed fan; always lit in conjunction with “ON” or “AUTO”.<br />
M – indicates medium speed fan; always lit in conjunction with “ON” or “AUTO”.<br />
Lo – indicates low speed fan; always lit in conjunction with “ON” or “AUTO”.<br />
PAGE 9
7 Program Override Commands<br />
HOLD – indicates thermostat is in manual operation. (Programmed settings are off, but not lost.)<br />
HOLD HRS – during programming, lights up in conjunction with clock digits; allows program to be<br />
put on hold for up to 24 hours.<br />
HOLD DAYS – during programming, lights up in conjunction with the clock digits; allows program<br />
to be put on hold for up to 99 days.<br />
HOLD ON – indicates thermostat is in permanent manual operation.<br />
OFF – turns off the hold and resumes programmed settings.<br />
8 Service Indicator<br />
The wrench symbol is displayed when there is a temperature sensor error or condensate overflow<br />
error. It indicates there is an open or a short connection to the sensor switch. When this occurs,<br />
the thermostat will disable all outputs and illuminate the wrench symbol. A service technician<br />
should be called to determine the cause of the error.<br />
PAGE 10
SAVING CHANGES<br />
As you navigate your thermostat, be aware of the thermostat’s save and exit protocol:<br />
• The thermostat automatically saves all the changes you make, as you make them.<br />
• When you are in the SYSTEM or FAN menus:<br />
– If you push a button that is not applicable to the current menu, all changes are saved and<br />
the thermostat goes to the menu associated with the button that was pushed.<br />
– If the thermostat is idle for five seconds, the thermostat times out, saves all changes, and<br />
returns to the thermostat’s default display.<br />
• When you are in the PROGRAM menu:<br />
– If you push a button that is not applicable to the current menu, nothing happens (your<br />
programming is not interrupted).<br />
– If the thermostat is idle for fifteen seconds, the thermostat times out, saves all changes,<br />
and returns to the thermostat’s default display.<br />
– When you have finished the last step of programming a setting, pressing PROGRAM<br />
saves your setting and returns the thermostat to the default display.<br />
PAGE 11
▲AND ▼BUTTON OPERATION<br />
The ▲and ▼buttons function in two ways:<br />
• When you are in the default display, you can press ▲to increase, or ▼to decrease, the<br />
current temperature setpoint. This will override programmed temperature settings until the next<br />
programmed time period (Wake, Day, Evening, or Sleep).<br />
• When you are in the PROGRAM menu, you can press ▲to scroll up, or ▼to scroll down,<br />
through the menu, time, and temperature options.<br />
System Button Operation<br />
Pressing SYSTEM will light up the five system mode options described below. Press SYSTEM<br />
to scroll through the options. As you scroll, the current option will be blinking. To select the<br />
blinking option, wait for the five-second timeout, which saves your option and returns you to the<br />
thermostat’s default display.<br />
MENU<br />
HEAT<br />
COOL<br />
AUTO<br />
OFF<br />
DESCRIPTION<br />
The thermostat operates as a Heating Only thermostat.<br />
The thermostat operates as a Cooling Only thermostat.<br />
The thermostat automatically selects the appropriate Heat or Cool mode<br />
depending upon the setpoint (desired temperature) and zone temperature<br />
(actual temperature).<br />
Turns the system off by disabling all thermostat outputs.<br />
PAGE 12
System Button Operation (cont.)<br />
MENU<br />
DESCRIPTION<br />
SETBACK Setback mode is an energy saving feature that minimizes the heating and<br />
cooling when the room is not occupied. Setback mode overrides the<br />
programmed time and temperature settings by telling the thermostat to<br />
instead use the setback setpoint for heating and cooling. The setback<br />
setpoint temperatures are factory default or installer-selected during<br />
installation. During setback mode, when a demand for heating or cooling<br />
exists, the fan will run at the lowest speed.<br />
• Automatic setback mode: If your thermostat is connected to an occupancy<br />
sensor or door switch, setback mode is automatically turned on and off by<br />
the sensor or door switch.<br />
• <strong>Manual</strong> setback mode: Select SETBACK in the SYSTEM menu. Setback<br />
temperature settings will remain in effect until you manually turn off<br />
setback mode. Selecting HEAT, COOL, or AUTO in the SYSTEM menu<br />
will turn off setback and resume your programmed time and temperature<br />
settings.<br />
Note: SETBACK appears on your menu only if this feature was enabled by<br />
your thermostat’s installer.<br />
PAGE 13
Fan Button Operation<br />
Pressing FAN will light up the six fan mode options described below. Press FAN to scroll through<br />
the options. As you scroll, the current option will be blinking. To select the blinking option, wait<br />
for the five-second timeout, which saves your option and returns you to the thermostat’s default<br />
display.<br />
MENU<br />
ON Hi<br />
ON M<br />
ON Lo<br />
AUTO Hi<br />
AUTO M<br />
AUTO Lo<br />
DESCRIPTION<br />
High speed fan is on continuously, even if no demand for heating or cooling<br />
exists.<br />
Medium speed fan is on continuously, even if no demand for heating or<br />
cooling exists.<br />
Low speed fan is on continuously, even if no demand for heating or cooling<br />
exists.<br />
High speed fan cycles with active demand for heating and cooling.<br />
Medium speed fan cycles with active demand for heating and cooling.<br />
Low speed fan cycles with active demand for heating and cooling.<br />
PAGE 14
Program Button Operation<br />
Function Overview<br />
Pressing PROGRAM lights up five program mode options, described below. Press ▲or ▼buttons<br />
to scroll through the options. As you scroll, the current option will be blinking. To select the blinking<br />
option, press PROGRAM again and you will be taken to the menu associated with that option.<br />
MENU<br />
DESCRIPTION<br />
CLOCK Sets the current time and day. (See “Setting the Clock & Day” page 15)<br />
°F / °C Use this option to change the temperature display to Fahrenheit or Celsius.<br />
Your thermostat’s default temperature display setting is Fahrenheit. (See<br />
“Setting the Temperature Display” page 15)<br />
SET<br />
Use to specify the time and temperature programming for a particular day<br />
or group of days. Also allows you to reset the thermostat to the factory<br />
default ENERGY STAR program. (See “Programming Time & Temperature<br />
Settings” page 16)<br />
COPY<br />
Simplifies programming by allowing you to copy a particular day’s program<br />
to another day or group of days. (See “Programming Time & Temperature<br />
Settings” page 16)<br />
HOLD<br />
Puts the thermostat in manual operation for a permanent or temporary<br />
time period. Overrides your programmed settings, but does not lose them.<br />
(See “Overriding the Program” page 20)<br />
PAGE 15
Setting the Clock & Day<br />
1. Press PROGRAM once.<br />
2. Press ▲or ▼to scroll until “CLOCK” is blinking. To select, press PROGRAM once.<br />
3. Press ▲or ▼to scroll through “24Hr”, “AM”, “PM” options. “24Hr” sets your thermostat to a 24-<br />
hour clock. “AM” and “PM” sets your thermostat to a 12-hour clock. To select your preference,<br />
press PROGRAM once.<br />
4. Press ▲or ▼to scroll to the current hour. To select, press PROGRAM once.<br />
5. Press ▲or ▼to scroll to the current minute. To select, press PROGRAM once.<br />
6. Press ▲or ▼to scroll to the current day. To select, press PROGRAM once.<br />
Your selections have been saved and you have exited program mode. Your thermostat is ready<br />
to function with the factory preprogrammed ENERGY STAR program. If you want to change the<br />
program for your particular needs, follow the instructions in the “Programming Your Thermostat”<br />
section.<br />
Setting the Temperature Display<br />
1. Press PROGRAM once.<br />
2. Press ▲or ▼to scroll until “°F °C” is blinking. To select, press PROGRAM once.<br />
3. Both “°F” and “°C” will be lit, but only one will be blinking. Press ▲or ▼to scroll so that the<br />
preferred option is blinking. To select, press PROGRAM once.<br />
Your selection has been saved and you have exited program mode.<br />
PAGE 16
Programming Time & Temperature Settings<br />
Your thermostat’s programming feature allows you to divide up a 24-hour day into four time<br />
periods (referred to as “Wake”, “Day”, “Evening”, and “Sleep”), and give each time period its<br />
own setpoint temperatures. Your “Heat Setpoint temperature” tells your heating system the room<br />
temperature to maintain during cold weather. The “Cool Setpoint Temperature” tells your cooling<br />
system the room temperature to maintain during hot weather.<br />
Factory Program<br />
Your thermostat comes from the factory preprogrammed with all seven days of the<br />
week set to the times and temperatures shown below.<br />
Time Period Start Time Heat Setpoint<br />
Temperature<br />
Cool Setpoint<br />
Temperature<br />
Wake 6:00 am 70° F (21.0° C) 78° F (25.5° C)<br />
Day 8:00 am 62° F (16.5° C) 85° F (29.5° C)<br />
Evening 6:00 pm 70° F (21.0° C) 78° F (25.5° C)<br />
Sleep 10:00 pm 62° F (16.5° C) 72° F (22.0° C)<br />
If the factory program meets your needs, simply follow the “Setting the Clock & Day”<br />
instructions, and you’re done. If you want to change the preprogrammed times and/or<br />
temperatures, follow the instructions under “Custom Program”.<br />
PAGE 17
Custom Program<br />
Begin by planning your program. Use the “Custom Program Worksheet” to plan your<br />
program time periods and temperatures you want during each period. You must program<br />
four periods for each day. Fill in the complete table, as it will serve as a record of your<br />
programs, then follow this procedure:<br />
1. Press PROGRAM once.<br />
2. Press ▲or ▼to scroll until “SET” is blinking. To select, press PROGRAM once.<br />
3. Press ▲or ▼to scroll to the day or group of days you want to program. To select<br />
your preference, press PROGRAM once.<br />
Day / Group of Days options are:<br />
• To program each day individually, the abbreviations are: “M” is Monday,<br />
“TU” is Tuesday, “W” is Wednesday, “TH” is Thursday, “F” is Friday, “SA” is<br />
Saturday, and “SU” is Sunday.<br />
• “MTUWTHFSASU” allows you to give all 7 days of the week the identical<br />
heating & cooling program.<br />
• “MTUWTHF” allows you to give all 5 weekdays the identical heating &<br />
cooling program.<br />
• “SASU” allows you to give both weekend days the identical heating &<br />
cooling program.<br />
• “DFLT” restores all seven days of the week to the original factory<br />
PAGE 18
preprogrammed ENERGY STAR program.<br />
4. Press ▲or ▼to scroll through the four time periods. To select your preference, press<br />
PROGRAM once.<br />
5. Press ▲or ▼to scroll to the desired starting hour. To select, press PROGRAM<br />
once.<br />
6. Press ▲or ▼to scroll to the desired starting minute. To select, press PROGRAM<br />
once.<br />
7. Press ▲or ▼to scroll to the desired HEAT setpoint temperature. To select, press<br />
PROGRAM once.<br />
8. Press ▲or ▼to scroll to the desired COOL setpoint temperature. To select, press<br />
PROGRAM once.<br />
You’re now done with one time period. Your selections have been saved and you have<br />
exited program mode. Repeat steps 1 through 8 for remaining day(s) and time periods.<br />
You may also use the thermostat’s “COPY” command to copy all of an individual day’s<br />
settings to another day or group of days.<br />
Copy Feature<br />
1. Press PROGRAM once.<br />
2. Press ▲or ▼to scroll until “COPY” is blinking. To select, press PROGRAM once.<br />
3. Press ▲or ▼to scroll to the individual day you want to copy from. “DFLT” (the<br />
default Factory Program) is also a copy option. To select your preference, press<br />
PAGE 19
PROGRAM once.<br />
4. Press ▲or ▼to scroll to the day or group of days you want to copy to. To select,<br />
press PROGRAM once.<br />
Your selection has been saved and you have exited program mode.<br />
Time & Temperature Programming Example<br />
In this example, the thermostat user wants to program the weekend with a different<br />
schedule from the Factory Program. The user wants the Saturday and Sunday program<br />
to be identical.<br />
1. Press PROGRAM once.<br />
2. Press ▲or ▼to scroll until “SET” is blinking. To select, press PROGRAM once.<br />
3. Press ▲or ▼to scroll until “SASU” is blinking. To select, press PROGRAM once.<br />
4. Press ▲or ▼to scroll until “WAKE” is blinking. To select, press PROGRAM once.<br />
5. Press ▲or ▼to scroll hours to “8: ”. To select, press PROGRAM once.<br />
6. Press ▲or ▼to scroll minutes to “ :30”. To select, press PROGRAM once.<br />
7. User wants to keep same HEAT setpoint temperature. To keep unchanged, press<br />
PROGRAM once.<br />
8. User wants to keep same COOL setpoint temperature. To keep unchanged, press<br />
PROGRAM once.<br />
PAGE 20
Now you’re done setting up the Wake period, and ready to set up the other three time<br />
periods for Saturday and Sunday:<br />
• Program the Day period for SASU by repeating steps 1 through 8, but in Step 4, select<br />
“DAY”.<br />
• Program the Evening period for SASU by repeating steps 1 through 8, but in Step 4,<br />
select “EVE”.<br />
• Program the Sleep period for SASU by repeating steps 1 through 8, but in Step 4,<br />
select “SLEEP”.<br />
Now you’re done setting up all four time periods for SASU.<br />
Overriding the Program<br />
Your thermostat’s HOLD feature allows you to put the thermostat in manual operation for either<br />
a specified or indefinite length of time. HOLD will override your programmed settings, but does<br />
not lose them.<br />
Setting up a Temporary Hold<br />
You may set up a temporary hold by hours and/or days.<br />
1. Press PROGRAM once.<br />
2. Press ▲or ▼to scroll until “HOLD” is blinking. To select, press PROGRAM once.<br />
3. Press ▲or ▼to scroll through options. “DAYS” allows you to specify 0-99 days<br />
PAGE 21
hold; “HRS” allows you to specify 0-24 hours hold. To select your preference, press<br />
PROGRAM once.<br />
4. Press ▲or ▼to scroll to the desired length of time. To select, press PROGRAM<br />
once.<br />
The thermostat is now on hold for the time period you selected, unless you decide to<br />
turn it off earlier. (See “Turning off a Hold”.)<br />
Setting up a Permanent Hold<br />
1. Press PROGRAM once.<br />
2. Press ▲or ▼to scroll until “HOLD” is blinking. To select, press PROGRAM once.<br />
3. Press ▲or ▼to scroll to “ON”. To select, press PROGRAM once.<br />
The thermostat is now on hold until you manually turn off the hold. (See “Turning off a<br />
Hold”.)<br />
Turning off a Hold<br />
1. Press PROGRAM once.<br />
2. Press ▲or ▼to scroll until “HOLD” is blinking. To select, press PROGRAM once.<br />
3. Press ▲or ▼to scroll to “OFF”. To select, press PROGRAM once.<br />
The thermostat will now resume your programmed time and temperature settings.<br />
PAGE 22
Custom Program Worksheet<br />
Day Time Period Start Time Heat Setpoint<br />
Temperature<br />
Monday<br />
Tuesday<br />
Wednesday<br />
Wake<br />
Day<br />
Evening<br />
Sleep<br />
Wake<br />
Day<br />
Evening<br />
Sleep<br />
Wake<br />
Day<br />
Evening<br />
Sleep<br />
Cool Setpoint<br />
Temperature<br />
PAGE 23
Thursday<br />
Friday<br />
Saturday<br />
Sunday<br />
Wake<br />
Day<br />
Evening<br />
Sleep<br />
Wake<br />
Day<br />
Evening<br />
Sleep<br />
Wake<br />
Day<br />
Evening<br />
Sleep<br />
Wake<br />
Day<br />
Evening<br />
Sleep<br />
PAGE 24
Automation and Controls<br />
Division of PECO, Inc.<br />
PO Box 82189, Portland, OR 97282<br />
Phone: 503-233-6401<br />
Email: sales@pecomanufacturing.com<br />
www.pecomanufacturing.com<br />
© Copyright 2008. PECO, Inc. All Rights Reserved. P/N LCT180OMO9O8 PAGE 72<br />
PECO is a registered trademark of PECO, Inc. The PECO logo is a trademark and/or service mark of PECO, Inc.