DIRECTV® Receiver User Guide (D11) - DBSInstall.com
DIRECTV® Receiver User Guide (D11) - DBSInstall.com
DIRECTV® Receiver User Guide (D11) - DBSInstall.com

Create successful ePaper yourself
Turn your PDF publications into a flip-book with our unique Google optimized e-Paper software.
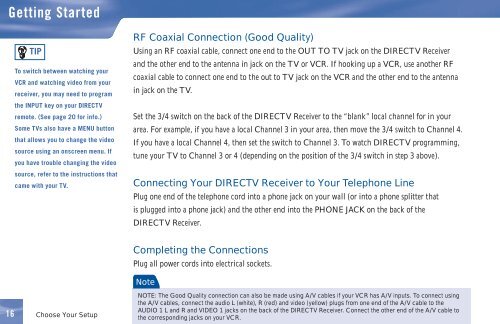
Getting Started<br />
TIP<br />
To switch between watching your<br />
VCR and watching video from your<br />
receiver, you may need to program<br />
the INPUT key on your DIRECTV<br />
remote. (See page 20 for info.)<br />
Some TVs also have a MENU button<br />
that allows you to change the video<br />
source using an onscreen menu. If<br />
you have trouble changing the video<br />
source, refer to the instructions that<br />
came with your TV.<br />
RF Coaxial Connection (Good Quality)<br />
Using an RF coaxial cable, connect one end to the OUT TO TV jack on the DIRECTV <strong>Receiver</strong><br />
and the other end to the antenna in jack on the TV or VCR. If hooking up a VCR, use another RF<br />
coaxial cable to connect one end to the out to TV jack on the VCR and the other end to the antenna<br />
in jack on the TV.<br />
Set the 3/4 switch on the back of the DIRECTV <strong>Receiver</strong> to the “blank” local channel for in your<br />
area. For example, if you have a local Channel 3 in your area, then move the 3/4 switch to Channel 4.<br />
If you have a local Channel 4, then set the switch to Channel 3. To watch DIRECTV programming,<br />
tune your TV to Channel 3 or 4 (depending on the position of the 3/4 switch in step 3 above).<br />
Connecting Your DIRECTV <strong>Receiver</strong> to Your Telephone Line<br />
Plug one end of the telephone cord into a phone jack on your wall (or into a phone splitter that<br />
is plugged into a phone jack) and the other end into the PHONE JACK on the back of the<br />
DIRECTV <strong>Receiver</strong>.<br />
16<br />
Choose Your Setup<br />
Completing the Connections<br />
Plug all power cords into electrical sockets.<br />
Note<br />
NOTE: The Good Quality connection can also be made using A/V cables if your VCR has A/V inputs. To connect using<br />
the A/V cables, connect the audio L (white), R (red) and video (yellow) plugs from one end of the A/V cable to the<br />
AUDIO 1 L and R and VIDEO 1 jacks on the back of the DIRECTV <strong>Receiver</strong>. Connect the other end of the A/V cable to<br />
the corresponding jacks on your VCR.