
Create successful ePaper yourself
Turn your PDF publications into a flip-book with our unique Google optimized e-Paper software.
<strong>Client</strong> <strong>Software</strong> <strong>Manual</strong><br />
PAGE 28/31<br />
09/12/2008<br />
HARDWARE SUPPORT IN BLANCCO – DATA CLEANER+ AND PRO<br />
Instructions for IDE hard drives<br />
IDE hard drives are sensitive to the bus to which they are attached. There are several simple rules<br />
for any system where the storage subsystem is IDE-based.<br />
• Try to avoid keeping two hard drives on the same IDE bus. Connecting two hard drives to<br />
the same bus causes significant performance loss especially if there is high activity<br />
addressed for both devices simultaneously (e.g. as <strong>Blancco</strong> does during the erasure). If<br />
required, you can connect the CD ROM driver cable to the second IDE drive in order to get<br />
a secondary bus.<br />
• If you have to attach two IDE hard drives to the same bus make sure that the hard drive<br />
jumpers are set correctly. It is essential for the disks to have jumpers set to the right places<br />
in order to work properly. Try to avoid Cable Select setting (CS) that is usually set as a<br />
default. Modern hard drives are more fault tolerant but if any problems occur, changing the<br />
hard drives to MASTER (MA) and SLAVE (SL) often resolves it.<br />
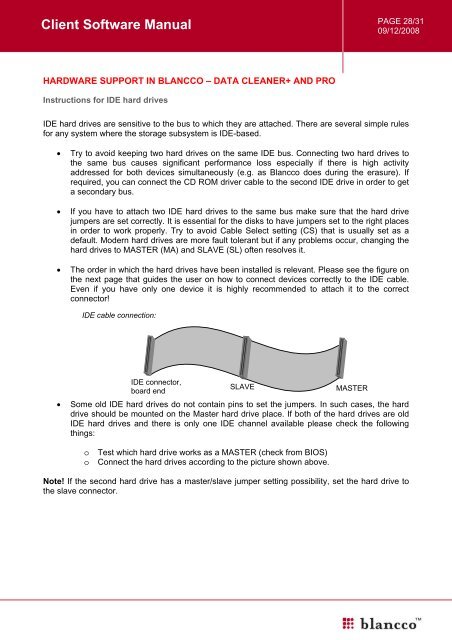
• The order in which the hard drives have been installed is relevant. Please see the figure on<br />
the next page that guides the user on how to connect devices correctly to the IDE cable.<br />
Even if you have only one device it is highly recommended to attach it to the correct<br />
connector!<br />
IDE cable connection:<br />
IDE connector,<br />
SLAVE<br />
board end<br />
MASTER<br />
• Some old IDE hard drives do not contain pins to set the jumpers. In such cases, the hard<br />
drive should be mounted on the Master hard drive place. If both of the hard drives are old<br />
IDE hard drives and there is only one IDE channel available please check the following<br />
things:<br />
o Test which hard drive works as a MASTER (check from BIOS)<br />
o Connect the hard drives according to the picture shown above.<br />
Note! If the second hard drive has a master/slave jumper setting possibility, set the hard drive to<br />
the slave connector.