Models and Parameters - Digitech
Models and Parameters - Digitech
Models and Parameters - Digitech

You also want an ePaper? Increase the reach of your titles
YUMPU automatically turns print PDFs into web optimized ePapers that Google loves.
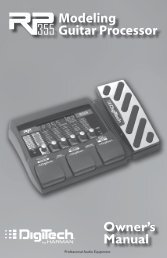
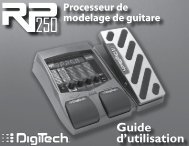
Modeling<br />
Guitar Processor<br />
User’s<br />
Manual
Manufacturer’s Name: DigiTech<br />
Manufacturer’s Address: 8760 S. S<strong>and</strong>y Parkway<br />
S<strong>and</strong>y, Utah 84070, USA<br />
DECLARATION OF CONFORMITY<br />
declares that the product:<br />
Product name: RP250<br />
Note: Product name may be suffixed by the letters EX, EU, JA, <strong>and</strong> UK.<br />
Product option: all (requires Class II power adapter that conforms to the requirements of EN60065,<br />
EN60742, or equivalent.)<br />
conforms to the following Product Specifications:<br />
Safety: IEC 60065 (1998)<br />
EMC: EN 55013 (2001 + A1)<br />
EN 55020 (1998)<br />
Supplementary Information:<br />
The product herewith complies with the requirements of the Low Voltage Directive 72/23/EEC <strong>and</strong> the EMC Directive<br />
89/336/EEC as amended by Directive 93/68/EEC.<br />
Vice-President of Engineering-MI<br />
8760 S. S<strong>and</strong>y Parkway<br />
S<strong>and</strong>y, Utah 84070, USA<br />
Date: August 15, 2006<br />
European Contact: Your local DigiTech / Johnson Sales <strong>and</strong> Service Office or<br />
Harman Music Group<br />
8760 South S<strong>and</strong>y Parkway<br />
S<strong>and</strong>y, Utah 84070 USA<br />
Ph: (801) 568-8800<br />
Fax: (801) 568-7583
Table of Contents<br />
Section One - Introduction<br />
Getting Acquainted .......................................................... 1<br />
Included Items .................................................................. 1<br />
About the RP250 ............................................................. 2<br />
Performance Mode ....................................................... 2<br />
Bypass Mode .................................................................. 2<br />
Tuner Mode ..................................................................... 2<br />
Tone Library Knob ........................................................ 4<br />
Effects Library Knob ..................................................... 4<br />
Master Level Knob ........................................................ 4<br />
X-Edit TM Editor/Librarian ............................................. 4<br />
Presets ............................................................................. 5<br />
A Guided Tour of the RP250 ........................................ 6<br />
Front Panel ..................................................................... 6<br />
Rear Panel .....................................................................10<br />
Getting Started ...............................................................12<br />
Making Connections ......................................................12<br />
Mono Operation - Amplifier ....................................12<br />
Stereo Operation ........................................................13<br />
Applying Power ..............................................................15<br />
Section Two - Editing Functions<br />
Editing/Creating Presets ...............................................16<br />
Storing/Copying/Naming a Preset ..............................17<br />
Section Three - <strong>Models</strong> <strong>and</strong> <strong>Parameters</strong><br />
About the <strong>Models</strong> ..........................................................19<br />
Model Definitions ..........................................................20<br />
Pickup ...............................................................................20<br />
Wah ...................................................................................20<br />
Compressor ....................................................................21<br />
Distortion ........................................................................21<br />
Amplifier ...........................................................................23<br />
Cabinet .............................................................................25<br />
EQ. .....................................................................................26<br />
Noise Gate ......................................................................26<br />
Chorus/FX. ......................................................................27<br />
Chorus. ..........................................................................27<br />
Flanger ...........................................................................28<br />
Phaser ............................................................................28<br />
Vibrato ............................................................................29<br />
Rotary Speaker ............................................................29<br />
VibroPan .........................................................................30<br />
Tremolo ..........................................................................30<br />
Panner ............................................................................30<br />
Envelope Filter .............................................................31<br />
AutoYa TM ........................................................................31<br />
YaYa .............................................................................31<br />
Step Filter ......................................................................32<br />
DigiTech Whammy ..................................................32<br />
Pitch Shift ......................................................................33<br />
Detune ...........................................................................33<br />
Intelligent Pitch Shifting (IPS) ....................................34<br />
Delay .................................................................................35<br />
Reverb ..............................................................................36
Section Four - Other Functions<br />
Drum Machine ................................................................38<br />
Aux Input .........................................................................39<br />
Expression Pedal ............................................................39<br />
Factory Reset ..................................................................40<br />
Expression Pedal Calibration ......................................41<br />
Section Five - Appendix<br />
Specifications ...................................................................42<br />
Expression Pedal - Assignable <strong>Parameters</strong> ...............44<br />
Tone LIbrary ....................................................................46<br />
Effects Library .................................................................47<br />
Preset List ........................................................................48
Warranty<br />
We at DigiTech ® are very proud of our products <strong>and</strong> back up each one we sell with the following warranty:<br />
1. The warranty registration card must be mailed within ten days after purchase date to validate this<br />
warranty.<br />
2. DigiTech warrants this product, when used solely within the U.S., to be free from defects in materials <strong>and</strong><br />
workmanship under normal use <strong>and</strong> service.<br />
3. DigiTech liability under this warranty is limited to repairing or replacing defective materials that show<br />
evidence of defect, provided the product is returned to DigiTech WITH RETURN AUTHORIZATION,<br />
where all parts <strong>and</strong> labor will be covered up to a period of one year. A Return Authorization number may<br />
be obtained from DigiTech by telephone. The company shall not be liable for any consequential damage as a<br />
result of the product’s use in any circuit or assembly.<br />
4. Proof-of-purchase is considered to be the burden of the consumer.<br />
5. DigiTech reserves the right to make changes in design, or make additions to, or improvements upon this<br />
product without incurring any obligation to install the same on products previously manufactured.<br />
6. The consumer forfeits the benefits of this warranty if the product’s main assembly is opened <strong>and</strong> tampered<br />
with by anyone other than a certified DigiTech technician or, if the product is used with AC voltages outside<br />
of the range suggested by the manufacturer.<br />
7. The foregoing is in lieu of all other warranties, expressed or implied, <strong>and</strong> DigiTech neither assumes nor<br />
authorizes any person to assume any obligation or liability in connection with the sale of this product. In no<br />
event shall DigiTech or its dealers be liable for special or consequential damages or from any delay in the<br />
performance of this warranty due to causes beyond their control.<br />
NOTE: The information contained in this manual is subject to change at any time without notification. Some<br />
information contained in this manual may also be inaccurate due to undocumented changes in the product or<br />
operating system since this version of the manual was completed. The information contained in this version of<br />
the owner’s manual supersedes all previous versions.
Section 1 - Introduction<br />
Getting Acquainted<br />
Congratulations on your purchase of the RP250. You now have an incredibly advanced modeling<br />
guitar processor that can keep up with your creative impulses <strong>and</strong> even increase them. Armed<br />
with DigiTech ® ’s patented AudioDNA2 ® custom audio DSP chip, the RP250 gives you a huge<br />
selection of tones <strong>and</strong> effects, right at your fingertips. When you easily dial up a tone or effect<br />
from the Tone Library or the Effects Library, you’ll appreciate the accuracy in each model, <strong>and</strong> the<br />
dynamic interaction in each tone. Add USB support for computer recording <strong>and</strong> a built-in drum<br />
machine, <strong>and</strong> you have the RP250: the key to unlock your creative potential.<br />
Included Items<br />
Before you get started, please make sure that the following items have been included:<br />
• RP250<br />
• PS0913B Power Supply<br />
• Warranty Card<br />
The utmost care was taken while your RP250 was being manufactured. Everything should be<br />
included <strong>and</strong> in perfect working order. If anything is missing, contact the factory at once. Please<br />
help us become acquainted with you <strong>and</strong> your needs by completing your warranty card or registering<br />
online at www.digitech.com. It is your safeguard should a problem arise with your RP250.<br />
Disclaimer: DigiTech, Lexicon, Whammy, YaYa, AutoYa, <strong>and</strong> Johnson Amplification are trademarks of Harman<br />
International Industries, Inc. Other product names modeled in this product are trademarks of their respective<br />
companies that do not endorse <strong>and</strong> are not associated or affiliated with DigiTech or Harman International<br />
Industries, Inc. They are trademarks of other manufacturers <strong>and</strong> were used merely to identify products whose<br />
sounds were reviewed in the creation of this product.<br />
1
2<br />
About the RP250<br />
Performance Mode<br />
When you first apply power to the RP250, it powers up in Performance mode. Performance mode<br />
provides access to all of the presets within the RP250 via the Up <strong>and</strong> Down Footswitches.<br />
Knob 1 selects a tone from the Tone Library, Knob 2 selects an effect from the Effects Library,<br />
Knob 3 adjusts the Effects Level, <strong>and</strong> Knob 4 adjusts the Master Level (volume).<br />
Bypass Mode<br />
The RP250 presets can be bypassed via a true analog bypass circuit for a clean, unprocessed guitar<br />
signal. To bypass the RP250, press both Footswitches simultaneously. The Display reads Bypass<br />
indicating the preset is bypassed. Press either Footswitch to exit Bypass <strong>and</strong> return the RP250<br />
to the last preset used.<br />
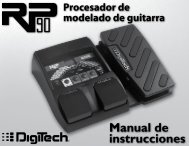
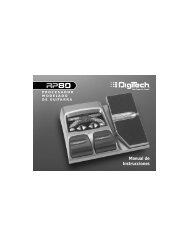
Tuner Mode<br />
The Tuner in the RP250 allows you to quickly tune or check the tuning on your guitar. Enter<br />
Tuner mode by pressing <strong>and</strong> holding both Footswitches simultaneously. The Display briefly<br />
shows tuner indicating that you are in Tuner mode. To begin tuning, play a note on your guitar<br />
(a harmonic at the 12th fret usually works best). The Display shows the note being played. The<br />
Matrix LEDs indicate whether you are sharp or flat. The top 5 red LEDs indicate the note is sharp<br />
<strong>and</strong> should be tuned down. The bottom 5 red LEDs indicate the note is flat <strong>and</strong> should be tuned<br />
up. The center green LED indicates the note is in tune. The output is muted in Tuner mode. The<br />
Expression Pedal controls the guitar volume while tuning. Exit tuner mode by pressing either<br />
Footswitch.
Display shows<br />
note played<br />
Top LEDs indicate<br />
note is sharp<br />
Green LED indicates<br />
note is in tune<br />
Bottom LEDs indicate<br />
note is flat<br />
In Tuner mode, you can change your tuning reference. The default factory setting is A=440 Hz<br />
(displayed as A=440). Rotating Knob 1 selects alternate dropped tunings. Alternate tunings are A<br />
= Ab, A = G, <strong>and</strong> A = Gb. The display window briefly flashes the current tuning reference.<br />
3
4<br />
Tone Library (Knob 1)<br />
In Performance mode, this knob selects a variety of genre-based amp tone defaults ranging from<br />
Blues to Metal to Country. Behind the scenes, the Compressor, Distortion, Amp/Cabinet model,<br />
<strong>and</strong> EQ are configured to create a specified tone with a single click of this knob. You can further<br />
refine the sound by editing the preset (see Editing/Creating Presets on page 16). Changing between<br />
different Tone Library defaults does not change the Chorus/FX, Delay or Reverb, letting you experiment<br />
with different amp styles quickly in the context of the current effect chain.<br />
Effects Library (Knob 2)<br />
In Performance mode, this knob selects a variety of post-amplifier model effect chains (Chorus,<br />
Chorus + Delay, Delay + Reverb, etc.). You can further refine the sound by editing the preset (see<br />
Editing/Creating Presets on page 16). Changing between different Effects Library defaults does not<br />
change the Compressor, Distortion, Amp/Cabinet model, <strong>and</strong> EQ settings, letting you experiment<br />
with different effect chains quickly in the context of the current amp tone.<br />
Effects Level (Knob 3)<br />
In Performance mode, this knob changes the relative level of the post-amp effects (Chorus/FX,<br />
Delay, <strong>and</strong> Reverb). This can be thought of as an effects mix control, where turning this knob<br />
clockwise increases the level of these effects <strong>and</strong> turning it counter-clockwise decreases the level<br />
of these effects.<br />
Master Level (Knob 4)<br />
This knob controls the overall output volume of all of the RP250 (Presets, Drum Machine, <strong>and</strong><br />
USB playback).<br />
X-Edit TM Editor/Librarian<br />
You can edit your RP250 with your computer, using the X-Edit TM Editor/Librarian. Download X-<br />
Edit TM , USB drivers, <strong>and</strong> documentation from www.digitech.com. Open the readme file for detailed<br />
instructions about installing <strong>and</strong> using this software.
Presets<br />
Presets are named <strong>and</strong> numbered locations of programmed sounds which reside in the RP250.<br />
Presets are recalled with the Footswitches. The active effects in each preset are indicated by<br />
lighted LEDs in the Effect Matrix. The RP250 comes with 60 User presets (1-60) <strong>and</strong> 60 Factory<br />
presets (61-120). The User presets are locations where your creations may be stored. The<br />
Factory presets do not allow you to store any changes to them. From the factory, the 60 User<br />
presets are exact duplicates of the 60 Factory presets. This allows you to create your own presets<br />
without losing the sounds that came with the RP250.<br />
The Tone Library knob, Effects Library knob, <strong>and</strong> Effects Level knob make it easy to<br />
quickly load preset tones, effects, <strong>and</strong> effects chains.<br />
1. Select a tone<br />
with the<br />
Tone Library knob<br />
2. Select an effect<br />
or effects chain with the<br />
Effects Library knob<br />
3. Adjust the<br />
effects level with the<br />
Effects Level knob<br />
To learn about storing changes to presets, see page 17.<br />
5
6<br />
A Guided Tour of the RP250<br />
Front Panel<br />
5 6<br />
4<br />
3<br />
2<br />
1<br />
7<br />
8
1. Footswitches<br />
These two Footswitches are used to select presets, access the Tuner, or bypass the RP250. The<br />
Footswitch on the right will select the next preset up, <strong>and</strong> the Footswitch on the left will select<br />
the next preset down. Pressing both Footswitches together will bypass the currently selected<br />
preset. Pressing <strong>and</strong> holding both Footswitches will access the Tuner. Press either Footswitch to<br />
exit Bypass or Tuner mode.<br />
2. Knobs 1-4<br />
These four knobs perform various functions, depending on which mode is currently active <strong>and</strong><br />
what (if anything) is being edited. The functions are listed below:<br />
Tone Library (Knob 1)<br />
1. In Performance mode, this knob selects from a library of preset amp tones.<br />
(See page 46 for a list of preset amp tones.)<br />
2. When editing a preset, this knob changes the Amp or Effect model for the selected row.<br />
3. When editing an Effect row, press this knob to turn on or bypass the effect.<br />
4. When the Drums row is selected, this knob selects the first pattern of each drum pattern<br />
style (Rock, Blues, Jazz, etc.).<br />
Effects Library (Knob 2)<br />
1. In Performance mode, this knob selects from a library of preset effect configurations. (See<br />
page 47 for a list of preset effect configurations.)<br />
2. When editing a preset, this knob modifies the parameter listed in the column<br />
directly above it for the selected Effect row.<br />
3. When the Drums row is selected, this knob selects the different drum patterns available.<br />
4. When the Expression row is selected, this knob selects which parameter is assigned to the<br />
Expression Pedal.<br />
7
8<br />
Effects Level (Knob 3)<br />
1. In Performance mode, this knob adjusts the overall level of post amp model effects (Chorus/Mod,<br />
Delay, <strong>and</strong> Reverb).<br />
2. When editing a preset, this knob modifies the parameter listed in the column directly<br />
above it for the selected Effect row.<br />
3. When the Drums row is selected, this knob adjusts the playback Tempo of the drum<br />
machine.<br />
4. When the Expression row is selected, this knob selects the heel value for the Expression<br />
Pedal<br />
Master Level (Knob 4)<br />
1. In Performance mode, this knob adjusts the output level of the RP250.<br />
2. When editing a preset, this knob modifies the parameter listed in the column directly<br />
above it for the selected Effect row.<br />
3. When the Drums row is selected, this knob adjusts the drum machine playback level.<br />
4. When the Expression row is selected, this knob sets the toe value for the Expression<br />
Pedal.<br />
3. Edit buttons<br />
These buttons navigate up <strong>and</strong> down the matrix, selecting the row of parameters which the<br />
knobs will edit. Press one of these buttons to step through the Effect rows, <strong>and</strong> return to the<br />
preset name display. See page 16 for more information about editing presets.<br />
4. Matrix<br />
The matrix provides information regarding the current preset <strong>and</strong> parameter edit functions. In<br />
Performance mode, the LEDs running down the left side of the Matrix provide a visual indication<br />
of which effects are in use for the currently selected preset. While editing a preset, the LEDs<br />
indicate the Effect row currently selected for editing. In Tuner mode, the LEDs indicate whether<br />
the note played is sharp, flat, or in tune.
5. Display<br />
The Display provides information for different functions depending on the mode that has been<br />
selected. In Performance mode, the Display will show the currently selected preset name <strong>and</strong><br />
number. In Edit mode, the Display will show the name <strong>and</strong> value of the parameter being adjusted.<br />
In Tuner mode, the Display will show the note played.<br />
6. Drums<br />
The Drums button is used to turn on <strong>and</strong> off the RP250’s built-in drum machine. When the<br />
Drums button is turned on, the Drums LED lights <strong>and</strong> the selected drum pattern plays continuously.<br />
Select the Drums row using the Edit buttons <strong>and</strong> use Knobs 1-4 to change the style,<br />
pattern, tempo, <strong>and</strong> level of the drum machine. See page 38 for more information about the drum<br />
machine <strong>and</strong> a list of patterns.<br />
7. Store<br />
The Store button is used to save your custom edits to the user presets. See page 17 for more<br />
information about storing presets.<br />
8. Expression Pedal<br />
The Expression Pedal provides real-time control of the RP250’s Volume, Wah, or the assigned<br />
effect parameter. Almost every parameter is available for Expression Pedal control. The<br />
Expression Pedal is equipped with a V-switch that activates or deactivates the Wah feature when<br />
you apply extra pressure to the toe. See page 20 for more information about Wah models; see<br />
page 41 to learn about adjusting V-switch sensitivity <strong>and</strong> calibrating the Expression Pedal; refer to<br />
pages 44-45 for a list of parameters you can link to the Expression Pedal.<br />
9
10<br />
Rear Panel<br />
1. Input<br />
Connect your instrument to this high-impedance TS input.<br />
1 2 3 4 5 6 7<br />
2. Amp / Mixer<br />
This button optimizes the RP250’s outputs for use when plugged into a guitar amp or a mixer/<br />
recording device. When set to Mixer (“In” position), speaker compensation is turned on <strong>and</strong> the<br />
outputs are optimized for connecting to a mixer, recording device or headphones. When set to<br />
Amp (“Out” position), the outputs are optimized for running directly in to the input of a guitar<br />
amp.<br />
3. Left (Mono) <strong>and</strong> Right Outputs<br />
Connect the Left (Mono) output to the input of a single amplifier (or mixer input) for mono<br />
operation. Connect the Left <strong>and</strong> Right outputs to the inputs of 2 amplifiers (or 2 mixer channels)<br />
for stereo operation.
4. Headphones<br />
Connect a pair of stereo headphones to this 1/8" jack. For proper frequency response, the Amp/<br />
Mixer switch should be set to Mixer (“In” position) when using headphones.<br />
Note: The Headphones output can have either a mono or stereo signal, depending on what 1/4"<br />
outputs are connected. If neither (or both) 1/4" outputs are connected, the Headphones output<br />
will be in stereo. If a cable is connected to the Left (Mono) 1/4" output only, the Headphones<br />
output will be in mono.<br />
5. Aux In<br />
Connect the headphone output of an MP3 or CD player using a stereo 1/8" cable to this 1/8"<br />
stereo TRS jack for rehearsing with your favorite pre-recorded material. Adjust the output level<br />
of your playback device <strong>and</strong> the RP250’s Master Level knob for the proper volume balance.<br />
6. USB Port<br />
The USB port is for connecting the RP250 to a computer <strong>and</strong> serves two purposes: (1) for use<br />
with the downloadable X-Edit Editor/Librarian software, <strong>and</strong> (2) for streaming audio to <strong>and</strong><br />
from the computer. Audio streaming is limited to 2 channels up <strong>and</strong> 2 channels down from the<br />
computer at 44.1kHz, 16 bit <strong>and</strong> 24 bit. A utility panel in the Editor/Librarian controls the direct/<br />
playback mix with any recording software the RP250 is connected to.<br />
Note: You can download the X-Edit Editor/Librarian software <strong>and</strong> USB drivers at www.digitech.<br />
com.<br />
7. Power Input<br />
Connect only the DigiTech ® PS0913B power supply to this jack.<br />
11
12<br />
Getting Started<br />
Making Connections<br />
There are several different connection options available with the RP250. Before connecting the<br />
RP250, make sure that the power to your amplifier <strong>and</strong> the RP250 is turned off. There is no<br />
power switch on the RP250. To turn the RP250 on or off, connect or disconnect the included<br />
PS0913B power supply from the Power Input jack.<br />
Mono Operation - Amplifier<br />
Connect your guitar to the Input of the RP250. Connect a single mono instrument cable from<br />
the Left (Mono) output of the RP250 to the instrument input or effect return on your amplifier.<br />
Set the Amp/Mixer switch to Amp.<br />
NOTE: When using a<br />
guitar amp, it may be best<br />
to connect the guitar to the<br />
Input of the RP250 <strong>and</strong> the<br />
Output of the RP250 to the<br />
effect return of the amplifier.<br />
Guitar Amp Input/Effect Return<br />
Left (Mono)<br />
Output Input<br />
Amp/Mixer<br />
switch set to<br />
Amp.
Stereo Operation<br />
For stereo operation connect the guitar to the Input of the RP250. Connect one cable to the<br />
RP250’s Left (Mono) output, <strong>and</strong> another cable to the RP250’s Right output. Connect one cable<br />
to the input of one amplifier, channel of a mixer, or power amp. Connect the second cable to a<br />
second amplifier, second channel of a mixer, or power amp. If connecting to a mixing console, set<br />
the pan controls of the mixer channels hard left <strong>and</strong> right in order to retain stereo separation. If<br />
connecting to a mixer, set the Amp/Mixer switch to Mixer. If connecting to two amplifiers, set<br />
the Amp/Mixer switch to Amp.<br />
Stereo Amp Setup<br />
Amp/Mixer<br />
switch set to<br />
Amp.<br />
Guitar Amp Input/Effect Returns<br />
Outputs Input<br />
NOTE: When using a guitar amp,<br />
it may be best to connect the guitar<br />
to the Input of the RP250 <strong>and</strong><br />
the Output of the RP250 to the<br />
effect return of the amplifier.<br />
13
14<br />
Mixer<br />
1 2 3 4 5 6<br />
Stereo Mixer Setup<br />
Outputs<br />
Amp/Mixer switch<br />
set to Mixer<br />
Instrument Input<br />
Powered<br />
Studio Monitor<br />
Computer Recording Setup<br />
USB<br />
Outputs<br />
Amp/Mixer switch<br />
set to Mixer<br />
Powered<br />
Studio Monitor<br />
Instrument Input
Applying Power<br />
Before applying power to anything, set your amp(s) to a clean tone <strong>and</strong> set the tone controls to<br />
a flat EQ response (on most amps, this would be 0 or 5 on the tone controls). Then follow the<br />
steps listed below.<br />
1. Turn the amp volume all the way down.<br />
2. Connect the plug of the PS0913B power supply to the power jack on the rear panel of the<br />
RP250.<br />
3. Connect the other end of the PS0913B power supply to an AC outlet. Turn the RP250’s Master<br />
Level knob (Knob 4) down to “0”.<br />
4. Turn the power of your amplifier(s) to the on position <strong>and</strong> adjust the volume(s) to a normal<br />
playing level.<br />
5. Gradually increase the RP250’s Master Level knob to achieve the desired volume.<br />
4. Turn amp volume up<br />
1. Turn amp volume down<br />
2. Connect PS0913B to power jack<br />
3. Connect PS0913B to AC outlet<br />
<strong>and</strong> turn the RP250’s Master<br />
Level to “0”<br />
5. Turn the RP250’s Master Level to the<br />
desired listening volume<br />
15
16<br />
Section Two - Editing Functions<br />
Editing/Creating Presets<br />
The RP250 is designed to make preset editing <strong>and</strong> creation easy <strong>and</strong> intuitive. When creating<br />
your own sound, you must first start with an existing preset. Note that the preset you begin<br />
with doesn’t have to be in the memory location you intend to have it reside, since you can store<br />
it to any User preset location during the store procedure.<br />
The easiest way to start is by using the Tone Library <strong>and</strong> Effects Library knobs. The Tone<br />
Library knob will let you select from a variety of pre-programmed amp/distortion tones (see<br />
page 46) based on different musical styles. The Effects Library knob will then let you select<br />
from a palette of effects chains (see page 47), from simple delays to full multi-effect signals with<br />
modulation, delay <strong>and</strong> reverb. Use the Effects Level Knob to easily increase or decrease the<br />
Chorus/FX, Delay <strong>and</strong> Reverb levels if desired. Using these three controls should get you close<br />
to a sound you are after. From there you can then use the Edit buttons to navigate through the<br />
individual effects for some fine tune edits.<br />
To edit <strong>and</strong> create a preset:<br />
1. Use the Footswitches to select the preset you wish to edit.<br />
2. If you are trying to find something different from the existing presets, begin by using the Tone<br />
Library, Effects Library <strong>and</strong> Effects Level knobs to get close to a sound you want.<br />
3. Press the Edit Up/Down buttons to begin selecting the individual Effects rows to edit their<br />
parameters.<br />
4. To bypass or enable an Effect row, press the Tone Library knob.<br />
5. Use Knobs 2-4 to modify the effects’ parameter settings.<br />
6. Select the Pickup row <strong>and</strong> use Knob 4 to adjust the Preset Level.
Anytime a stored value within a preset is changed, the Store button LED lights up. This indicates<br />
that you need to store the changes. Changing presets, or turning the power off before storing any<br />
changes, erases any changes made <strong>and</strong> the RP250 will revert to the stored values for the preset.<br />
Storing/Copying/Naming a Preset<br />
Once the preset has been modified to your liking, you may store your settings to any of the<br />
60 User preset locations (presets 1-60). The following steps outline the procedure for storing<br />
changes to a preset or copying a preset to a different location:<br />
1. Press the Store button once. The Store button LED blinks <strong>and</strong> the first character in the Display<br />
flashes, indicating that you can now name your custom creation.<br />
2. Use Knob 1 to select the alpha-numeric character <strong>and</strong> Knob 2 to select the next character<br />
location.<br />
2. Use Knobs to<br />
name Preset<br />
1. Press Store;<br />
characters in Display<br />
flash individually<br />
3. Once the desired name is shown in the display, press the Store button again to enter the second<br />
stage of the storing process. The Display begins to flash.<br />
17
4. Select the User preset location where your new sound will reside using the Up <strong>and</strong> Down<br />
Footswitches. The display alternates between showing the preset name <strong>and</strong> User preset number<br />
about to be overwritten.<br />
4. Select destination<br />
with Footswitches<br />
5. Press the Store button again to save the changes.<br />
3. Press Store again;<br />
Preset number flashes<br />
The procedure for copying one preset to another preset location is the same. Use the Footswitches<br />
to select the preset that you want to copy, then follow steps 1-4 for storing a preset as<br />
described above. Press either Edit button at any time to abort the Store procedure.<br />
18
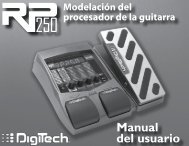
Section Three - <strong>Models</strong> <strong>and</strong> <strong>Parameters</strong><br />
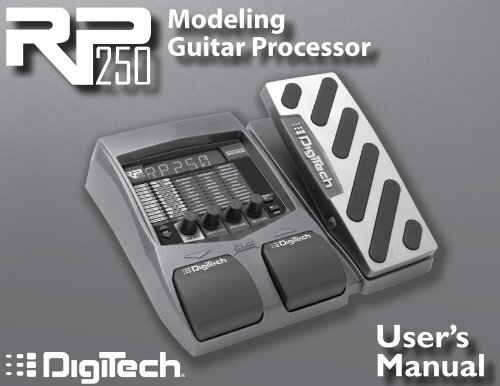
About the <strong>Models</strong><br />
The RP250 can be thought of as several different “virtual” amplifiers <strong>and</strong> individual, high-tech<br />
stompboxes in a single programmable package. With stompboxes, the order in which they are<br />
connected affects the overall sound. The RP250 has placed the Amp <strong>and</strong> Effect models in an order<br />
for optimum results. The following diagram shows the order in which they are connected.<br />
Pickup<br />
Simulator<br />
Noise Gate<br />
Wah Compressor<br />
Chorus/<br />
Modulation<br />
(Whammy)<br />
Distortion<br />
Volume<br />
Pre<br />
Chorus/<br />
Modulation<br />
Amp<br />
Modeling<br />
Delay Reverb<br />
EQ<br />
Volume<br />
Post<br />
Cabinet<br />
Model<br />
19
20<br />
Model Definitions<br />
Each Amp <strong>and</strong> Effect model within the RP250 can be programmed to suit your personal taste<br />
<strong>and</strong> application. Underst<strong>and</strong>ing how these components alter the sound, <strong>and</strong> how each parameter<br />
alters the effect, will help you achieve the sound you are looking for. The following overview of the<br />
RP250’s effects outlines what each effect <strong>and</strong> parameter does.<br />
Pickup<br />
The Pickup Simulator provides the thick tone of a humbucker pickup to a guitar with single coil<br />
pickups, or the bright, edgy sound of a single coil pickup to a guitar with a humbucker. This gives<br />
you the best of both worlds without having to change guitars during a performance.<br />
Pickup Model - Knob 1 selects the Pickup model to be simulated. Values include: SC>Hb<br />
(gives a single coil pickup the warm tone of a humbucker), <strong>and</strong> Hb>SC (gives a humbucker<br />
the unique sound of a single coil). Press this knob to turn Pickup modeling on <strong>and</strong> off.<br />
Preset Level - Knob 4 adjusts the preset’s level.<br />
Wah<br />
Wah is an effect controlled by an Expression Pedal making the guitar sound as if it’s saying “Wah.”<br />
Wah Model - Knob 1 selects the Wah model. Values include: FuLrnG (DigiTech ® Full<br />
Range Wah sweeps the entire spectrum of audible frequencies), CrYwah (Cry Wah is a traditional<br />
sounding Wah), <strong>and</strong> clyde(based on a Vox ® Clyde McCoyTM Wah). Press this knob<br />
to turn Wah models on <strong>and</strong> off.<br />
Wah Minimum - Knob 2 adjusts the Wah Pedal Minimum. Ranges from 0 (toe up) to 99<br />
(toe down).<br />
Wah Maximum - Knob 3 adjusts the Wah Pedal Maximum. Ranges from 0 (toe up) to<br />
99 (toe down).
Wah Level - Knob 4 adjusts the Wah Level. Ranges from 0dB to +12dB.<br />
Compressor<br />
A Compressor is used to increase sustain, tighten up guitars, <strong>and</strong> prevent the signal from clipping<br />
the input of other effects. It sets a maximum boundary for the strength of a signal.<br />
Comp Model - Knob 1 selects one of two Compressor models: DIGCMP (DigiTech ®<br />
Compressor) or CSCOMP (Based on a Boss ® CS-2 Compressor/Sustainer). Press this knob<br />
to turn the Compressor on <strong>and</strong> off.<br />
Sustain - Knob 2 adjusts the amount of sustain. Ranges from 0 to 99.<br />
Tone/Attack - Knob 3 adjusts the tone for the DigiTech Compressor, or attack for the<br />
Boss CS-2. Ranges from 0 to 99.<br />
Compressor Level - Knob 4 adjusts the Level from the Compressor. Ranges from 0 to<br />
99.<br />
Attack (X-EditTM only for DigiComp) - Adjusts the amount of time the Compressor takes<br />
to respond to a signal that exceeds the threshold. Ranges from 0 to 99.<br />
Distortion<br />
The RP250 models the tones of 13 popular distortion stompboxes, each of which can be tweaked<br />
<strong>and</strong> modified, just like the real thing.<br />
Distortion Model - Knob 1 selects one of 13 Distortion models. Press this knob to turn<br />
the Distortion on <strong>and</strong> off.<br />
21
22<br />
scream - Based on an Ibanez ® TS-9<br />
808 - Based on an Ibanez TS-808 Tube<br />
Screamer<br />
oddriv - Based on a Guyatone ® Overdrive<br />
OD-2<br />
dod250 - Based on a DOD ® 250<br />
Overdrive/Preamp<br />
rodent - Based on a Pro Co RAT TM<br />
mxdist - Based on an MXR ® Distortion +<br />
DSDist - Based on a Boss ® DS-1 TM Distortion<br />
grunge - DigiTech ® Grunge<br />
zone - Based on a Boss MT-2 Metal Zone ®<br />
death - DigiTech Death Metal<br />
gonklt - Based on a DOD Gonkulator Ring<br />
Mod<br />
fuzz - Based on an Arbiter ® Fuzz Face TM<br />
big pi - Based on an Electro-Harmonix ® Big<br />
Muff Pi ®<br />
DigiTech <strong>and</strong> DOD are trademarks of Harman International Industries, Inc. Other product names modeled in this product are<br />
trademarks of their respective companies that do not endorse <strong>and</strong> are not associated or affiliated with DigiTech or Harman<br />
International Industries, Inc. They are trademarks of other manufacturers <strong>and</strong> were used merely to identify products whose<br />
sounds were reviewed in the creation of this product.<br />
Knobs 2, 3, <strong>and</strong> 4 have the following functions for the various Distortion models:<br />
Dist.<br />
Model<br />
Knob 2<br />
(Gain)<br />
Knob 3<br />
(Tone)<br />
Knob 4<br />
(Level)<br />
P4<br />
(X-Edit TM<br />
only)<br />
P5<br />
(X-Edit<br />
only)<br />
P6<br />
(X-Edit<br />
only)<br />
Scream Drive Tone Level -- -- --<br />
808 Overdrive Tone Level -- -- --<br />
oddriv Drive -- Level -- -- --<br />
DOD250 Gain -- Level -- -- --<br />
rodent Distortion Filter Level -- -- --
Dist.<br />
Model<br />
Knob 2<br />
(Gain)<br />
Knob 3<br />
(Tone)<br />
Knob 4<br />
(Level)<br />
P4<br />
(X-Edit TM<br />
only)<br />
P5<br />
(X-Edit<br />
only)<br />
P6<br />
(X-Edit<br />
only)<br />
mxdist Distortion -- Output -- -- --<br />
dsdist Gain Tone Level -- -- --<br />
Grunge Grunge Face Loud Butt -- --<br />
zone Gain Mid Level Level Low Mid Freq High<br />
death Low Mid Level High -- --<br />
gonklt Gunk<br />
(Dist Gain)<br />
Smear (Ring<br />
Mod Level)<br />
Suck<br />
(Dist Level)<br />
Heave<br />
(Output Lvl)<br />
-- --<br />
fuzz Fuzz -- Volume -- -- --<br />
big pi Sustain Tone Volume -- -- --<br />
Amplifier<br />
Amp Modeling is a technology which applies the tone of several popular modern <strong>and</strong> vintage<br />
amps. Amp Modeling also includes an acoustic guitar simulation.<br />
Amp Model - Knob 1 selects one of the classic, modern, <strong>and</strong> DigiTech custom Amp models.<br />
Press this knob to turn Amp <strong>and</strong> Cabinet modeling on <strong>and</strong> off. Note that when you<br />
select an Amp model, the default Cabinet model is automatically selected. You can, however,<br />
change the Cabinet model after selecting an Amp model.<br />
23
24<br />
57chmp - Based on a ‘57 Fender ® Tweed Champ ®<br />
57dlux - Based on a ‘57 Fender Tweed Deluxe<br />
59BMAn - Based on a ‘59 Fender Tweed<br />
Bassman ®<br />
65twin - Based on a ‘65 Fender Blackface Twin<br />
Reverb ®<br />
65dlxr - Based on a ‘65 Fender Blackface<br />
Deluxe Reverb ®<br />
68plex - Based on a ‘68 Marshall ® 100 Watt<br />
Super Lead (plexi)<br />
77mstr - Based on a ‘77 Marshall Master<br />
Volume<br />
800jcm - Based on an ‘83 Marshall JCM800<br />
900jcm - Based on a ‘93 Marshall JCM900<br />
VXac15 - Based on a ‘62 Vox ® AC15<br />
topbst - Based on a ‘63 Vox AC30 Top Boost<br />
hiwtag - Based on a ‘69 Hiwatt ® Custom 100<br />
DR103<br />
mark2c - Based on an ‘81 Mesa Boogie ®<br />
Mark II C<br />
rectfr - Based on an ‘01 Mesa Boogie Dual<br />
Rectifier<br />
match - Based on a ‘96 Matchless TM HC30<br />
digslo - DigiTech ® Solo<br />
digmtl - DigiTech Metal<br />
digbrt - DigiTech Bright<br />
digcln - DigiTech Clean<br />
diggan - DigiTech Gain<br />
ACdred - Dreadnaught acoustic<br />
direct - No amp model<br />
DigiTech is a trademark of Harman International Industries, Inc. Other product names modeled in this product are trademarks<br />
of their respective companies that do not endorse <strong>and</strong> are not associated or affiliated with DigiTech or Harman International<br />
Industries, Inc. They are trademarks of other manufacturers <strong>and</strong> were used merely to identify products whose sounds were<br />
reviewed in the creation of this product.
Cabinet - Knob 2 selects the speaker Cabinet model.<br />
chmp18 - Based on a 1x8 ‘57 Fender ® Tweed<br />
Champ ®<br />
dlx112 - Based on a 1x12 ‘57 Fender Tweed<br />
Deluxe ®<br />
twn212 - Based on a 2x12 ‘65 Fender Blackface<br />
Twin Reverb ®<br />
brt212 - Based on a 2x12 ‘63 Vox ® AC30 Top<br />
Boost w/ Jensen ® Blue Backs<br />
bmn410 - Based on a 4x10 ‘59 Fender Tweed<br />
Bassman ®<br />
cls412 - Based on a 4x12 Marshall ® 1969<br />
Straight w/ Celestion ® G12-T70<br />
Grn412 - Based on a 4x12 Marshall 1969 Slant<br />
w/ Celestion 25W Greenbacks<br />
vtg412 - Based on a 4x12 Johnson ® Straight w/<br />
Celestion Vintage 30’s<br />
digslo - 4x12 DigiTech ® Solo<br />
digbrt - 2x12 DigiTech Bright<br />
digmtl - 4x12 DigiTech Metal<br />
digrck - 4x12 DigiTech Rock<br />
digalt - 4x12 DigiTech Alt Rock<br />
digvtg - 4x12 DigiTech Vintage<br />
direct - No cabinet model<br />
DigiTech <strong>and</strong> Johnson Amplification are trademarks of Harman International Industries, Inc. Other product names modeled in<br />
this product are trademarks of their respective companies that do not endorse <strong>and</strong> are not associated or affiliated with Digi-<br />
Tech or Harman International Industries, Inc. They are trademarks of other manufacturers <strong>and</strong> were used merely to identify<br />
products whose sounds were reviewed in the creation of this product.<br />
Amp Gain - Knob 3 adjusts the Gain (distortion) for the selected Amp model (not available<br />
for Acoustic). The Gain parameter ranges from 0 to 99.<br />
Amp Level - Knob 4 adjusts the Level (volume) of the selected Amp model. The Level<br />
parameter ranges from 0 to 99.<br />
25
EQ<br />
The RP250’s EQ helps further shape your tone with Bass, Midrange, <strong>and</strong> Treble controls. To help<br />
get you started, there are four preset EQ curves: Mid Boost (midbst), Scoop (ScooP), Bright<br />
(Bright), <strong>and</strong> Warm (WarM) that can be selected using Knob 1. Bass, Midrange, <strong>and</strong> Treble<br />
parameters range from -12dB to +12dB.<br />
EQ Model - Knob 1 selects between 4 different EQ modes (Mid Boost, Scoop, Bright, <strong>and</strong><br />
Warm), each with different frequency centers for Mid <strong>and</strong> Treble. Pressing this knob turns<br />
the EQ on <strong>and</strong> off.<br />
Bass - Knob 2 adjusts the amount of low end level (Bass).<br />
Mid - Knob 3 adjusts the midrange level.<br />
Mid Freq (X-EditTM only) - This parameter selects the frequency that the Mid parameter<br />
adjusts. Ranges from 300 Hz to 5000 Hz.<br />
Treb - Knob 4 adjusts the high end level (Treble).<br />
Treb Freq (X-Edit only) - This parameter selects the frequency that the Treb parameter<br />
adjusts. Ranges from 500 Hz to 8000 Hz.<br />
Noise Gate<br />
A Noise Gate is designed to eliminate noise while you are not playing, or provide an auto volume<br />
swell effect.<br />
Gate Model - Knob 1 selects between the DigiTech<br />
26<br />
® noise gate or the volume swell effect.<br />
Values include: gate (Selects the noise gate) <strong>and</strong> swell (Selects the volume swell effect.)<br />
Press this knob to turn the noise gate on <strong>and</strong> off.<br />
Threshold/Swell Sensitivity - Knob 2 sets the signal strength (Threshold) required to
open or close the Noise Gate, or the Swell Sensitivity for the Auto Swell. Both parameters<br />
range from 0 (opens easily/high sensitivity) to 99 (requiring strong signals to open/high sensitivity).<br />
Attack Time - Knob 3 sets the attack time. Ranges from 0 (shorter attack time) to 99<br />
(longer attack time).<br />
Release - Knob 4 sets the Release parameter. Ranges from 0 to 99.<br />
Attenuation (X-EditTM only) - Sets the Attenuation parameter. Ranges from 0 to 99.<br />
Chorus/FX<br />
The Chorus/FX row in the RP250 is a multi-function module, allowing you to select Effect models<br />
such as Chorus, Flanger, Phaser, Tremolo, Panner, Vibrato, Rotary Speaker, YaYa, AutoYa,<br />
SynthTalk, Envelope Filter (auto wah), Detune, Pitch Shift, <strong>and</strong> Whammy effects. When the<br />
Chorus/FX row is selected, Knob 1 is used to choose the Effect model. Press this knob to turn<br />
these Effect models on <strong>and</strong> off. Only one of the effects in this row can be used at a time. After<br />
selecting the type of effect in this module, Knobs 2-4 can then be used to adjust the individual<br />
parameters associated with the selected effect. The following list describes each Effect model <strong>and</strong><br />
its parameters in more detail:<br />
Chorus<br />
A Chorus adds a short delay to your signal. The delayed signal is modulated in <strong>and</strong> out of tune<br />
<strong>and</strong> then mixed back with the original signal to create a thicker sound. The RP250 includes the<br />
following Chorus Effect models: Ce CHS (based on the classic Boss ® CE-2 Chorus), CHOruS<br />
(DigiTech ® ’s Dual Chorus), <strong>and</strong> MCHOrS (DigiTech’s famous Multi Chorus ® ).<br />
Speed - Knob 2 adjusts the rate (Speed) of the modulation. Ranges from 0 to 99.<br />
Depth - Knob 3 adjusts the Depth of the modulation. Ranges from 0 to 99.<br />
Level - Knob 4 controls the level of the effect (DigiTech Chorus models only). Ranges<br />
27
28<br />
from 0 to 99.<br />
Waveform (X-Edit TM only for DigiTech Chorus models) - Selects a waveform: triang,<br />
Sine, or Square.<br />
Flanger<br />
A Flanger uses the same principle as a Chorus but uses a shorter delay time <strong>and</strong> adds regeneration<br />
(or repeats) to the modulating delay. This results in an exaggerated up <strong>and</strong> down sweeping motion<br />
to the effect. The RP250 includes the following Flanger Effect models: fLangr (the DigiTech<br />
Flanger), <strong>and</strong> mxFLgr (based on an MXR ® Flanger).<br />
Knobs 2, 3, <strong>and</strong> 4 have the following functions for the Flanger models:<br />
Flanger<br />
Model<br />
Knob 2<br />
(Speed)<br />
Knob 3<br />
(Depth)<br />
Knob 4<br />
(Regen)<br />
P5<br />
(X-Edit TM<br />
only)<br />
P6<br />
(X-Edit<br />
only)<br />
flangr Speed Depth Regen Waveform Level<br />
mxflgr Speed Width Regen Manual --<br />
Phaser (PHaser)<br />
A phaser splits the incoming signal, <strong>and</strong> then changes the phasing of the signal. This signal is then<br />
taken in <strong>and</strong> out of phase <strong>and</strong> mixed back in with the original signal. As the phasing changes, different<br />
frequencies get canceled resulting in a warm sort of twisting sound.<br />
Knobs 2, 3, <strong>and</strong> 4 have the following functions for the two Phaser models:<br />
Speed - Knob 2 adjusts the rate (Speed) of the modulation. Ranges from 0 to 99.
Depth - Knob 3 adjusts the Depth of the modulation. Ranges from 0 to 99.<br />
Regeneration - Knob 4 controls the regeneration of the effect. Ranges from 0 to 99.<br />
Waveform (X-Edit TM only) - Selects a waveform: triang, Sine, or Square.<br />
Level (X-Edit only) - Controls the level of the effect. Ranges from 0 to 99.<br />
Vibrato (viBrat)<br />
A Vibrato effect modulates the pitch of the incoming signal at an even rate.<br />
Speed - Knob 2 adjusts the rate (Speed) at which the pitch modulates. Ranges from 0 to<br />
99.<br />
Depth - Knob 3 adjusts the intensity (Depth) of the modulating pitch. Ranges from 0 to<br />
99.<br />
Rotary Speaker (rOtArY)<br />
Rotary Speaker is an emulation of a device that included a spinning horn <strong>and</strong> woofer. The rotation<br />
of these two speakers produced an interesting combination of the sound panning from side to<br />
side. This produced a slight pitch change due to the speed of the sound coming towards, <strong>and</strong> then<br />
going away from the listener.<br />
Speed- Knob 2 adjusts the rate (Speed) of the spinning speakers. Ranges from 0 to 99.<br />
Intensity - Knob 3 controls the intensity of the effect. Ranges from 0 to 99.<br />
Doppler - Knob 4 controls the Pitch Shift effect that is the ratio between the horn <strong>and</strong> the<br />
rotor positions. Ranges from 0 to 99.<br />
Crossover (X-EditTM only)- Selects the crossover frequency between the horn <strong>and</strong> rotor.<br />
Ranges from 0 (200 Hz) to 99 (1600 Hz).<br />
29
VibroPan (vibpan)<br />
A vibrato is an effect that modulates the pitch of the incoming signal. This will take the whole signal<br />
slightly in <strong>and</strong> out of tune at a steady pace. The VibroPan also incorporates an automatic panner<br />
with the vibrato effect that creates a lush chorus-like sound.<br />
Speed - Knob 2 adjusts how fast the signal is being modulated.<br />
Depth - Knob 3 adjusts the amount of pitch change.<br />
Vibrato/Pan- Knob 4 adjusts the amount of panning incorporated with the vibrato effect.<br />
When the “Vib” control is at “0”, this effect is a st<strong>and</strong>ard vibrato. As the Level parameter is<br />
turned up, the phase difference of the vibrato signal sent to the two channels is changed until<br />
a full stereo image is obtained at “99”.<br />
Waveform (X-Edit TM only) - Selects a waveform: triang, Sine, or Square.<br />
Tremolo (trMoLO)<br />
A Tremolo effect modulates the volume of the signal at an even rate.<br />
Speed - Knob 2 adjusts the rate (Speed) at which the volume modulates. Ranges from 0 to<br />
99.<br />
Depth - Knob 3 adjusts the intensity (Depth) of the modulating volume. Ranges from 0 to<br />
99.<br />
Waveform - Knob 4 selects a waveform: triang, Sine, or Square.<br />
Panner (PAnner)<br />
An Auto Panner modulates the sound from left to right at an even rate.<br />
Speed - Knob 2 adjusts the rate (Speed) at which the signal pans from side to side. Ranges<br />
from 0 to 99.<br />
30
Depth - Knob 3 adjusts the intensity (Depth) of the changing pan. Ranges from 0 to 99.<br />
Waveform - Knob 4 selects a waveform: triang, Sine, or Square.<br />
Envelope Filter (envlOp)<br />
The Envelope Filter is a dynamic Wah effect that alters your sound based upon how hard you play.<br />
Sensitivity - Knob 2 adjusts the sensitivity or the input signal required to trigger the Wah<br />
effect. Ranges from 0 to 99.<br />
Range - Knob 3 controls the range of the Envelope effect. Ranges from 0 to 99.<br />
AutoYa (AutOYA)<br />
An AutoYa combines the characteristics of a Wah <strong>and</strong> a Flanger together creating an almost human<br />
vowel characteristic as if the guitar were saying “Yah.” The AutoYa automatically provides this<br />
animation to the sound at an even rate.<br />
Speed - Knob 2 adjusts the speed of the AutoYa sweep. Ranges from 0 to 99.<br />
Intensity - Knob 3 adjusts the intensity of the AutoYa effect. Ranges from 0 to 99.<br />
Range - Knob 4 adjusts the throaty quality of the AutoYa effect. Ranges from 0 to 49.<br />
YaYa (yaya)<br />
The YaYa is another effect exclusive to DigiTech ® products. Like the AutoYa, it combines the<br />
characteristics of a wah <strong>and</strong> a flanger together providing a unique talk box type of effect, but is<br />
controlled by the Expression Pedal.<br />
Pedal - Knob 2 adjusts the Ya pedal position. Ranges from 0 to 99.<br />
Intensity - Knob 3 adjusts the intensity of the YaYa effect. Ranges from 0 to 99.<br />
31
32<br />
Range - Knob 4 adjusts the throaty quality of the YaYa effect. Ranges from 0 to 49.<br />
Step Filter (stpflt)<br />
The Step Filter is like an automatic “r<strong>and</strong>om wah” with a square waveform.<br />
Speed - Knob 2 adjusts the speed of the Wah effect. Ranges from 0 to 99.<br />
Intensity - Knob 3 controls the intensity of the Wah effect. Ranges from 0 to 99.<br />
DigiTech Whammy (wHammy)<br />
The DigiTech Whammy TM is an effect that uses an Expression Pedal to bend the pitch of the incoming<br />
signal, or add a bendable harmony with the original signal. As the Pedal is moved, the note<br />
bends either up or down. When DigiTech Whammy is selected, it is automatically placed before<br />
the Amp modeling as shown in the block diagram on page 19.<br />
Shift Amount - Knob 2 selects the interval <strong>and</strong> direction of the pitch bend. Choices are<br />
as follows:<br />
Whammy TM (no Dry Signal)<br />
oct up (1 octave above)<br />
2octup (2 octaves above)<br />
2nd dn (a second below)<br />
rv2ndn (a second below reversed pedal action)<br />
4th dn (a fourth below)<br />
oct dn (an octave below)<br />
2octdn (2 octaves below)<br />
DIVeBM (Dive Bomb)<br />
Harmony Bends (Dry Signal Added)<br />
m3>Mj3 (a minor third to a Major third)<br />
2ndmj3 (a second above to a Major third above)<br />
3rd4th (a third above to a fourth above)<br />
4th5th (a fourth above to a fifth above)<br />
5thoct (a fifth above to an octave above)<br />
hoctup (one octave above)<br />
hoctdn (one octave down)<br />
octu>d (octave up/down)
Pedal Position - Knob 3 provides a manual control of the Whammy pedal position.<br />
Ranges from 0 to 99.<br />
Mix - Knob 4 adjusts the Whammy mix. Ranges from 0 to 99.<br />
Pitch Shift (PitCH)<br />
A Pitch Shifter copies the incoming signal, then shifts the pitch of the copy to a different note. The<br />
shifted note is then mixed back with the original signal, sounding as if two guitars were playing<br />
different notes.<br />
Shift Amount - Knob 2 selects the interval of the shifted pitch. Ranges from -24 (2<br />
octaves below) to 24 (2 octaves above).<br />
Mix - Knob 4 controls the mix level of the shifted pitch. Ranges from 0 to 99.<br />
Detune (Detune)<br />
A Detuner makes a copy of your incoming signal, takes the copied signal slightly out of tune from<br />
the original, then mixes the two signals together. The result is a doubling type of effect as if two<br />
guitars were playing the same part together.<br />
Shift Amount - Knob 2 adjusts the amount of pitch difference applied to the copied signal.<br />
Ranges from -24 to 24 cents.<br />
Level - Knob 4 controls the mix of the detuned note. Ranges from 0 to 99.<br />
33
34<br />
Intelligent Pitch Shifting (IPS)<br />
Intelligent Pitch Shifting makes a copy of the incoming signal, <strong>and</strong> then changes the pitch of the<br />
copied note to a diatonically correct interval specified by the Amount parameter. An Intelligent<br />
Pitch Shifter sharpens or flattens the shifted pitch in order to keep the specified interval within<br />
the selected key <strong>and</strong> scale creating a true harmony.<br />
Shift - Knob 2 selects the amount or harmony interval for the Intelligent Pitch Shifter. Interval<br />
choices include:<br />
OCt Dn (octave down)<br />
7tH Dn (a seventh below)<br />
6tH Dn (a sixth below)<br />
5tH Dn (a fifth below)<br />
4tH Dn (a fourth below)<br />
3rD Dn (a third below)<br />
2nD Dn (a second below)<br />
2nD uP (a second above)<br />
3rD uP (a third above)<br />
4tH uP (a fourth above)<br />
5tH uP (a fifth above)<br />
6tH uP (a sixth above)<br />
7tH uP (a seventh above)<br />
OCt uP (an octave above)<br />
Key - Knob 3 selects the musical key that the IPS uses. Key choices range from the Key of E<br />
(KeY e) through the Key of Eb (KeY e∫).<br />
Scale - Knob 4 selects the scale the IPS will use. Scale choices include: Major (MAJOr),<br />
Minor (MInOr), Dorian (DOrIAn), Mixolydian (MIXLYd), Lydian (LYDIAn), <strong>and</strong> Harmonic<br />
Minor (HMInor).<br />
Level (X-Edit TM only) - Adjusts the IPS Level (IPSLVL) of all the pitch-altering effects in<br />
this module. Ranges from 0 to 99.
Delay<br />
Delay is an effect that will record a portion of the incoming signal, <strong>and</strong> then play it back a short<br />
time later. The recording can repeat just once or several times.<br />
Delay Model - Knob 1 selects one of the 5 different Delay models. Values include:<br />
algdly (DigiTech ® Analog Delay), digdly (DigiTech Digital Delay), moddly (DigiTech<br />
Modulated Delay), pngdly (DigiTech Pong Delay), <strong>and</strong> tapdly (DigiTech Tape Delay). Press<br />
this knob to turn the Delay models on <strong>and</strong> off.<br />
Knobs 2, 3, <strong>and</strong> 4 have the following functions for the various Delay models:<br />
Delay<br />
Model<br />
Knob 2<br />
(Time)<br />
Knob 3<br />
(Repeats)<br />
Knob 4<br />
(Level)<br />
P4<br />
(X-Edit TM<br />
only)<br />
P5<br />
(X-Edit<br />
only)<br />
algdly Time Repeats Delay Level -- --<br />
digdly Time Repeats Level Duck Thresh Duck Level<br />
moddly Time Repeats Delay Level Depth --<br />
pngdly Time Repeats Delay Level Duck Thresh Duck Level<br />
tapdly Time Repeats Level Wow Flutter<br />
Time - Knob 2 adjusts the length of time between repeats. Ranges from 10 ms to 5 seconds.<br />
Repeats - Knob 3 adjusts the number of times the delayed signal will repeat. Ranges from<br />
0 to 99/rpthld (Repeat Hold).<br />
Delay Level / Level - Knob 4 adjusts the volume of the delayed signal. Ranges from 0 to<br />
99.<br />
35
36<br />
Duck Thresh (X-Edit TM only) - Adjusts the level the input signal must reach before the<br />
delayed signal is attenuated. Ranges from 0 to 99.<br />
Depth (X-Edit only) - Adjusts the intensity of the modulation (chorusing) in the delay<br />
repeats. Ranges from 0 to 99.<br />
Wow (X-Edit only) - Adjusts low frequency modulation (below about 6 Hz) that would be<br />
caused by tape speed variation. Ranges from 0 to 99.<br />
Duck Level (X-Edit only) - Adjusts the amount of attenuation applied to the delayed signal.<br />
Ranges from 0 to 99.<br />
Flutter (X-Edit only) - Adjusts a higher frequency modulation (from about 6 to 30 Hz) that<br />
would be caused by tape speed variation. Ranges from 0 to 99.<br />
Reverb<br />
Using reverb in recorded program material gives the listener a sense that the material is being performed<br />
in an actual room or hall. It is this similarity to actual acoustic spaces that makes reverberation<br />
a useful tool in recorded music. The RP250 features genuine Lexicon ® reverbs, whose rich,<br />
lush effects have been heard in countless songs, soundtracks, <strong>and</strong> live performances for decades.<br />
Reverb Model<br />
Knob 1 selects the Reverb model or acoustic space. Press this knob to turn the Reverb<br />
models on <strong>and</strong> off. The following models are available:<br />
twinrv- Based on a Fender ®<br />
Twin Reverb<br />
lexamb - Lexicon ® Ambience<br />
lexstd - Lexicon Studio<br />
lexrom - Lexicon Room<br />
lexhal - Lexicon Hall<br />
emtplt - Based on an<br />
EMT240 Plate
Reverb<br />
Model<br />
Knob 2<br />
(Decay)<br />
Knob 3<br />
(Liveliness)<br />
Knob 4<br />
(Reverb<br />
Level)<br />
P4<br />
(X-Edit TM<br />
only)<br />
twinrv -- -- Reverb --<br />
lexamb Decay Liveliness Reverb Level Predelay<br />
lexstd Decay Liveliness Reverb Level Predelay<br />
lexrom Decay Liveliness Reverb Level Predelay<br />
lexhal Decay Liveliness Reverb Level Predelay<br />
emtplt Decay Liveliness Reverb Level Predelay<br />
Decay - Knob 2 adjusts the length of time the reverb is audible. Ranges from 0 to 99.<br />
Liveliness - Knob 3 adjusts the amount of high frequency content in the reverberation tails.<br />
Ranges from 0 to 99.<br />
Reverb / Reverb Level - Knob 4 adjusts the volume of the reverb signal. Ranges from 0 to<br />
99.<br />
Predelay (X-EditTM only) - Adjusts the amount of time it takes for the initial sound to reach<br />
the first reflective surface in the simulated environment. Ranges from 0 to 15.<br />
37
38<br />
Section Four - Other Functions<br />
Drum Machine<br />
The RP250 includes a built-in drum machine loaded with 60 useful patterns <strong>and</strong> 5 metronome settings<br />
that are easily accessible at the touch of a button (the Drums button, specifically). Pressing<br />
the Drums button will enable the drum machine <strong>and</strong> start playback of the selected drum pattern<br />
(except when in Store or Bypass mode). When the Drums row is selected (using the Edit buttons),<br />
Knob 1 scrolls through the first patterns for each drum style, Knob 2 scrolls through all<br />
the drum patterns, Knob 3 adjusts the Tempo of the drum pattern <strong>and</strong> Knob 4 adjusts the Level<br />
of the drum pattern. Press the Drums button again to stop playback of the drum loop.<br />
Drum Pattern List<br />
Beats (8th beat) 1-5 jazz 1-4<br />
Beats (16th beat) 6-8 hiphp 1-4<br />
rock 1-8 world 1-4<br />
hrock 1-8 Met 4/4<br />
metal 1-8 Met 3/4<br />
blues 1-8 Met 5/8<br />
groov 1-4 Met 7/8<br />
cntry 1-4 met mtrnom
Aux Input<br />
The Aux Input allows you to connect an MP3 or CD player to the RP250 <strong>and</strong> jam with your favorite<br />
artists. The signal from your MP3 or CD player is output through the left, right, <strong>and</strong> headphone<br />
outputs of the RP250. To use the Aux Input, connect the headphone output of your MP3 or CD<br />
player to the Aux Input on the rear panel of the RP250 using an 1/8" stereo cable, <strong>and</strong> press<br />
play on your MP3 or CD player. Use the playing device’s volume control <strong>and</strong> the RP250’s Master<br />
Level knob to balance the levels.<br />
Expression Pedal<br />
The Expression Pedal on the RP250 can be linked to control the RP250’s Volume, Wah, Whammy,<br />
YaYa, or almost any of the RP250’s other parameters in real time with your foot. When<br />
a parameter has been linked to the Expression Pedal, a minimum (heel) <strong>and</strong> maximum (toe) value<br />
can also be specified. Apply extra pressure to the toe of the Expression Pedal to activate the<br />
V-switch, <strong>and</strong> the Expression Pedal switches between the linked parameter <strong>and</strong> the Wah. The<br />
procedure for linking a parameter to the Expression Pedal is as follows:<br />
1. Press either Edit button until the Expression row has been selected (indicated by the LED lighting<br />
on the Expression row). eXP appears in the display.<br />
2. Rotate Knob 2 until the desired parameter appears in the Display. See page 44 for a complete<br />
list of parameters that can be linked to the Expression Pedal.<br />
3. Rotate Knob 3 to select the minimum (heel) value the assigned parameter will reach with the<br />
Expression Pedal in the toe up position.<br />
4. Rotate Knob 4 to select the maximum (toe) value the assigned parameter will reach with the<br />
Expression Pedal in the toe down position.<br />
5. Store your Expression Pedal assignment to your preset. See page 17 for more information on<br />
the storing procedure.<br />
39
40<br />
Factory Reset<br />
This function resets the RP250 to its original factory settings. This procedure erases all custom<br />
User presets, <strong>and</strong> recalibrates the Expression Pedal.<br />
ATTENTION: Performing this function will erase all user-programmed data. All<br />
such data will be lost forever! Be sure you want to erase the memory <strong>and</strong> start fresh<br />
before continuing with this procedure.<br />
The procedure for performing a Factory Reset is as follows:<br />
1. Press <strong>and</strong> hold the Store button while powering up the RP250.<br />
2. When the display prompts you with FACrSt, release the Store button, which is now flashing.<br />
3. Press <strong>and</strong> hold the flashing Store button for 3 seconds until rStOrD appears in the display <strong>and</strong><br />
release (The Factory Reset procedure takes approximately 20 seconds). The Expression Pedal<br />
calibration procedure now commences.
Expression Pedal Calibration<br />
The Expression Pedal on the RP250 needs to be recalibrated for use after a factory reset has been<br />
performed. This calibration procedure is automatically entered after a factory reset procedure.<br />
(You can also initiate the calibration procedure by pressing <strong>and</strong> holding both Footswitches for<br />
approximately 5 seconds.) In the event the Pedal’s calibration fails, or if the Pedal does not function<br />
properly, it can be re-calibrated using the Pedal Calibration procedure. This will not erase the User<br />
presets. The procedure for Calibrating the Expression Pedal is as follows:<br />
1. Press <strong>and</strong> hold the Up/Down Footswitches until PDLCAL appears in the display (BYPASS <strong>and</strong><br />
tuner will be displayed before PDLCAL is accessed)<br />
2. When the Display prompts you with tOe Dn, rock the Expression Pedal forward (toe down)<br />
<strong>and</strong> press either Footswitch.<br />
3. When the Display prompts you with tOe uP, rock the Expression Pedal back (toe up) <strong>and</strong><br />
press either Footswitch.<br />
4. The Display now prompts you to calibrate the V-Switch sensitivity (VSwxxx), where XXX is the<br />
current V-Switch threshold. Rock the Expression Pedal forward <strong>and</strong> press firmly on the toe<br />
once to turn the V-Switch on (wah On), <strong>and</strong> again to turn the V-Switch off (wahOFF).<br />
5. If the V-Switch is too sensitive, press the right Up Footswitch to raise the threshold (range is<br />
0-200). Keep testing the V-Switch sensitivity <strong>and</strong> adjust the threshold until it only engages when<br />
you want it to (too sensitive a setting will lead to the V-Switch falsely triggering on or off when<br />
using the Expression Pedal).<br />
6. When the V-Switch sensitivity is set to your satisfaction, press both Up/Down Footswitches<br />
simultaneously to exit.<br />
Note: If the Display shows errOr, an error has occurred <strong>and</strong> steps 2 through 5 should<br />
be repeated.<br />
41
42<br />
Section 5 - Appendix<br />
Specifications<br />
General Specifications<br />
A/D/A Converter: 24-bit high performance audio<br />
Sampling Frequency: 44.1 kHz<br />
DSP Section: AudioDNA2 DSP Processor<br />
Simultaneous Effects: 11<br />
Preset Memory: 60 User Presets (1-60) / 60 Factory Presets (61-120)<br />
Drum Machine: 60 Patterns<br />
Dimensions: 8.25” Length x 9.375” Width x 2.125” Height<br />
Unit Weight: 3.3 lbs.<br />
Analog Input Connections:<br />
Guitar Input: 1/4” Unbalanced (TS)<br />
Input Impedance: 500k Ohms<br />
Aux Input: 1/8” Stereo (TRS)<br />
Analog Output Connections:<br />
Left/Right Outputs: 1/4” Impedance Unbalanced<br />
Left/Right Output Impedance: 500 Ohms per side<br />
Maximum Output: +10dBu<br />
Headphones: 1/8” Stereo (TRS) – 13.6mW per channel @ 50 Ohms
Digital Connections:<br />
Universal Serial Bus (USB): Type B, supports USB2.0 Full Speed<br />
RP250 USB Recording Specifications:<br />
Sample Rate: 44.1 kHz<br />
Bit depth: supports 16-bit or 24-bit (depends on setup in Recording Software)<br />
Power Requirements:<br />
US <strong>and</strong> Canada: 120 VAC, 60 Hz Adapter: PS0913B-120<br />
Japan: 100 VAC, 50/60 Hz Adapter: PS0913B -100<br />
Europe: 230 VAC, 50 Hz Adapter: PS0913B -230<br />
UK: 240 VAC, 50 Hz Adapter: PS0913B -240<br />
Minimum Windows® PC Computer System Requirements:<br />
Windows® XP w/Service Pack 2 <strong>and</strong> .NET 2.0 installed<br />
500 MHz processor speed (1.2 GHz recommended)<br />
128 MB RAM (512MB recommended)<br />
Minimum Mac Computer System Requirements:<br />
OS 10.4 or higher<br />
450 MHz CPU<br />
256 MB RAM<br />
43
44<br />
Expression Pedal - Assignable <strong>Parameters</strong><br />
Disclaimer: DigiTech, Lexicon, Whammy, YaYa, AutoYa, <strong>and</strong> Johnson Amplification are trademarks of Harman International Industries,<br />
Inc. Other product names modeled in this product are trademarks of their respective companies that do not endorse <strong>and</strong><br />
are not associated or affiliated with DigiTech or Harman International Industries, Inc. They are trademarks of other manufacturers<br />
<strong>and</strong> were used merely to identify products whose sounds were reviewed in the creation of this product.
46<br />
Tone Library
Effects Library<br />
47
48<br />
Preset List
DigiTech®<br />
8760 South S<strong>and</strong>y Parkway<br />
S<strong>and</strong>y, Utah 84070<br />
PH (801) 566-8800<br />
FAX (801) 566-7005<br />
http://www.digitech.com<br />
Printed in China<br />
RP250 User’s Manual 18-0432V-B<br />
©2006 Harman International Industries, Incorporated, all rights reserved.<br />
DigiTech <strong>and</strong> the RP250 are trademarks of the Harman Music Group. Other product names<br />
modeled in this product are trademarks of their respective companies that do not endorse<br />
<strong>and</strong> are not associated or affiliated with DigiTech. They are trademarks of other manufacturers<br />
<strong>and</strong> were used merely to identify products whose sounds were reviewed in the<br />
creation of this product.