ClientBase Online Manual
ClientBase Online Manual
ClientBase Online Manual

Create successful ePaper yourself
Turn your PDF publications into a flip-book with our unique Google optimized e-Paper software.
xxx<br />
<strong>ClientBase</strong> <strong>Online</strong><br />
<strong>Manual</strong><br />
March, 2013
Table of Contents<br />
Set Up to Use <strong>ClientBase</strong> <strong>Online</strong> .......................................................... 17<br />
Introduction .................................................................................................17<br />
My Computer Can Do More............................................................................ 17<br />
What is <strong>ClientBase</strong> <strong>Online</strong> .............................................................................. 17<br />
It’s About Building and Maintaining Relationships ......................................... 18<br />
What Can <strong>ClientBase</strong> Do................................................................................. 18<br />
How Do I Learn the Benefits of this Valuable Tool ....................................... 18<br />
Log Into <strong>ClientBase</strong> & Run Diagnostics ....................................................19<br />
Create a Shortcut for CBO on Your Desktop.................................................... 20<br />
Forgot My User Name/Password ................................................................20<br />
Set Up to Use <strong>ClientBase</strong> <strong>Online</strong> ................................................................21<br />
Set Up Agency Branch Settings .................................................................22<br />
Branch Settings ................................................................................................. 22<br />
Create User Logins and Permissions ..........................................................27<br />
Import Profile Data From an ASCII (.txt) File ...........................................38<br />
Using the <strong>ClientBase</strong> Import Wizard ................................................................ 39<br />
Set Up Settings (Global Defaults) ..............................................................42<br />
Default Field Values for New Profiles.............................................................. 44<br />
Profile More Field Categories........................................................................... 45<br />
Marketing Categories and Marketing Codes..................................................... 46<br />
User Defined Fields........................................................................................... 46<br />
Communication Defaults................................................................................... 47<br />
Group Lists........................................................................................................ 47<br />
Membership ID Fields....................................................................................... 48<br />
Merge to PNR Settings...................................................................................... 48<br />
Merge to PNR Rules ......................................................................................... 51<br />
Set Up a New PNR Rule ................................................................................... 51<br />
Auto-Case Converter Settings........................................................................... 52<br />
Document Templates......................................................................................... 53<br />
Reminder Alarm Settings.................................................................................. 55<br />
Client Survey Settings....................................................................................... 55<br />
Default Field Values for Res Cards................................................................... 55<br />
Res Card More Fields Categories...................................................................... 57<br />
Res Card Insurance Prompting.......................................................................... 58<br />
Res Card Tax and Commission Defaults .......................................................... 59<br />
Default Field Values for New Invoices............................................................. 59<br />
Batch Reminder Settings................................................................................... 60<br />
Host Codes ........................................................................................................ 62<br />
Travel Types...................................................................................................... 62<br />
Live Connect Providers..................................................................................... 63<br />
Live Connect Logins ......................................................................................... 63<br />
Header and Footer - Invoices or Trip Proposals ............................................... 63<br />
How to Set Up User Level Logos in Headers/Footers...................................... 65<br />
<strong>ClientBase</strong> 3/25/13 3
Required/Optional Fields................................................................................... 67<br />
Getting to Know <strong>ClientBase</strong>.................................................................. 69<br />
Introduction ................................................................................................ 69<br />
<strong>ClientBase</strong> Main Screen ........................................................................... 69<br />
Meet the Browser Items ............................................................................. 70<br />
Meet the File Managers, Tools, Help, Log Out ......................................... 70<br />
Profiles File Manager ........................................................................................ 70<br />
Activities File Manager ..................................................................................... 71<br />
Res Cards File Manager .................................................................................... 72<br />
Help ................................................................................................................... 76<br />
Meet the Menu Items ................................................................................. 76<br />
Merge Options ................................................................................................... 76<br />
Res Card ........................................................................................................... 77<br />
Note, Mailer, Reminder..................................................................................... 77<br />
Reports............................................................................................................... 78<br />
Meet the Search Filters .............................................................................. 79<br />
Simple Search.................................................................................................... 79<br />
Advanced Search ............................................................................................... 80<br />
Meet the Navigation Bar ............................................................................ 80<br />
Select Columns.................................................................................................. 81<br />
Sort by Columns ................................................................................................ 81<br />
Saved Searches .................................................................................................. 81<br />
Meet the Search Results ............................................................................. 81<br />
An In-Depth Look at Client Profiles .................................................... 83<br />
Introduction ................................................................................................ 83<br />
Types of Client Profiles ............................................................................. 83<br />
Create a New Client Profile ....................................................................... 83<br />
Anatomy of a Profile .................................................................................. 86<br />
Menu Bar ........................................................................................................... 87<br />
Header Information............................................................................................ 88<br />
Profile Indicators ............................................................................................... 89<br />
Date Fields......................................................................................................... 89<br />
Detailed Review of Information Links............................................................. 89<br />
General Info Link .............................................................................................. 90<br />
Remarks Link .................................................................................................... 96<br />
Marketing Codes Link....................................................................................... 97<br />
Family Members/Employees Link .................................................................... 98<br />
Activities Link .................................................................................................101<br />
Credit Cards Link ............................................................................................102<br />
Loyalty Programs Link....................................................................................103<br />
Res Card Link..................................................................................................103<br />
Travel History Link .........................................................................................104<br />
<strong>ClientBase</strong> 3/25/13 4
Groups Link..................................................................................................... 105<br />
Attachments Link ............................................................................................ 105<br />
PNR Entries Link ............................................................................................ 106<br />
More Fields Link............................................................................................. 106<br />
Using the Profile Manager to Manage Your Profiles ....................... 109<br />
Introduction ...............................................................................................109<br />
Search Profiles................................................................................................. 109<br />
Date Fields....................................................................................................... 109<br />
Simple Search Filters ...................................................................................... 110<br />
Advanced Search............................................................................................. 110<br />
Search Results Screen ..................................................................................... 111<br />
Navigation Bar ................................................................................................ 112<br />
Select Columns................................................................................................ 113<br />
Sort by Columns.............................................................................................. 113<br />
Query Results Count ....................................................................................... 113<br />
Save Searches for Easy Access .................................................................113<br />
Using Date Formulas in Your Saved Searches ............................................... 114<br />
Adding New Profiles ................................................................................115<br />
Case Converter ..........................................................................................116<br />
Global Modify ..........................................................................................118<br />
Putting Profiles to Work for You ....................................................... 121<br />
Introduction ...............................................................................................121<br />
Merge to Document ..................................................................................121<br />
Using to Merge Document .............................................................................. 121<br />
Create a Mailer................................................................................................ 123<br />
Merge to Email ........................................................................................123<br />
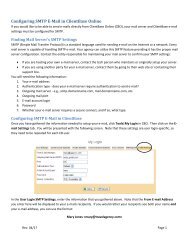
Set Up <strong>ClientBase</strong> with Mail Server’s SMTP Settings................................... 123<br />
Using Merge to E-Mail ................................................................................... 126<br />
Sending Text Messages from Any Email Program ..................................129<br />
Merge to File .............................................................................................129<br />
Using Merge to File........................................................................................ 129<br />
Merge to Printer ........................................................................................131<br />
Merge to Label ..........................................................................................132<br />
Merge to PNR ...........................................................................................133<br />
Using the Merge to PNR Feature .................................................................... 133<br />
GDS Selection Link ........................................................................................ 136<br />
Additional Entries Link................................................................................... 136<br />
An In-Depth Look at Activities........................................................... 137<br />
Introduction ...............................................................................................137<br />
Overview of Activities Types ...................................................................137<br />
Notes................................................................................................................ 137<br />
<strong>ClientBase</strong> 3/25/13 5
Reminders........................................................................................................139<br />
Mailers.............................................................................................................143<br />
Mailer Entry Screen.........................................................................................144<br />
Using the Activity Manager to Manage Your Activities................... 147<br />
Introduction .............................................................................................. 147<br />
Search for Your Activities ....................................................................... 147<br />
Simple Activity Search....................................................................................148<br />
Advanced Activity Searches............................................................................149<br />
Activities Results Screen.................................................................................150<br />
Navigation Bar.................................................................................................151<br />
Select Columns................................................................................................151<br />
Sort by Columns ..............................................................................................151<br />
Saving Searches for Easy Access ....................................................................151<br />
Using Date Formulas in Your Saved Searches................................................152<br />
Working with Search Results ................................................................... 153<br />
Adding New Activities ............................................................................ 154<br />
An In-Depth Look at Res Cards ......................................................... 155<br />
Introduction .............................................................................................. 155<br />
Ways to Create a New Res Card .....................................................................156<br />
Res Card General Info .....................................................................................157<br />
Res Card Menu Items ......................................................................................159<br />
Res Card Links ................................................................................................160<br />
Basic Steps to Input & Create a Res Card/Invoice in <strong>ClientBase</strong> ............ 160<br />
Passengers Link ...............................................................................................160<br />
Reservations Link............................................................................................161<br />
Generate an Invoice.........................................................................................167<br />
Refund Invoices...............................................................................................173<br />
Setting Up to Refund Invoices.........................................................................173<br />
Using Generate Refund ...................................................................................173<br />
Refund Examples.............................................................................................174<br />
Invoices Link ...................................................................................................175<br />
Itinerary Report Link.......................................................................................176<br />
Activities Link .................................................................................................176<br />
Attachments Link ............................................................................................178<br />
More Fields Link .............................................................................................179<br />
<strong>ClientBase</strong> 3/25/13 6
An In-Depth Look at Live Connect.................................................... 181<br />
Introduction ...............................................................................................181<br />
AFCNET ...................................................................................................181<br />
Set Up AFCNET Live Connect....................................................................... 181<br />
Live Connect Features Supported by AFCNET.............................................. 183<br />
Create New AFCNET Reservation in Live Connect ...................................... 183<br />
Import Existing AFCNET Reservation Made Outside of <strong>ClientBase</strong>............. 185<br />
Retrieve an Existing AFCNET Reservation for Editing or Cancelling .......... 185<br />
All About Travel .......................................................................................185<br />
Set Up All About Travel ................................................................................. 185<br />
All About Travel Live Connect Features ........................................................ 186<br />
Create New All About Travel Reservation in Live Connect .......................... 186<br />
Import Existing All About Travel Res Made Outside of CB.......................... 188<br />
Retrieve an Existing All About Travel Res to Edit/Cancel............................. 188<br />
Allianz Travel Insurance - Website (formerly Access America) .............188<br />
Set Up Allianz Travel Insurance Live Connect .............................................. 188<br />
Live Connect Features Supported by Allianz Travel Insurance ..................... 190<br />
Create New Allianz Travel Insurance Reservation in Live Connect .............. 190<br />
Amadeus AgentNet VAX (Not Available in CBO Stand Alone) .............192<br />
Set Up Amadeus AgentNet VAX.................................................................... 193<br />
Amadeus Agentnet VAX Dynamic Participating Vendors & Codes.............. 194<br />
Create New Reservation in Live Connect....................................................... 194<br />
Import Existing Reservation Made Outside of <strong>ClientBase</strong> ............................. 196<br />
Retrieve an Existing Reservation for Editing or Cancelling........................... 196<br />
Amadeus Cruise (Not Available in CBO Stand Alone) ...........................196<br />
Set Up Amadeus Cruise .................................................................................. 197<br />
Amadeus Cruise Participating Vendors & Vendor Codes .............................. 198<br />
Amadeus Cruise Live Connect Features ......................................................... 198<br />
Create Amadeus Cruise New Reservation in Live Connect ........................... 198<br />
Import Existing Amadeus Cruise Res Made Outside of CB........................... 200<br />
Retrieve an Existing Amadeus Cruise Res to Edit/Cancel.............................. 200<br />
American Express Vacations ...................................................................200<br />
Set Up American Express Vacations .............................................................. 200<br />
American Express Vacations Features........................................................... 201<br />
Create New American Express Vacations Reservation ................................. 201<br />
Import Existing Reservation Made Outside of <strong>ClientBase</strong> ............................. 203<br />
Retrieve an Existing Reservation for Editing or Cancelling........................... 204<br />
Apple Vacations ........................................................................................204<br />
Set Up Apple Vacations .................................................................................. 204<br />
Apple Vacations Live Connect Features......................................................... 205<br />
Create New Apple Reservation in Live Connect ............................................ 205<br />
Import Existing Apple Res Made Outside of <strong>ClientBase</strong> ............................... 207<br />
Retrieve an Existing Apple Res to Edit/Cancel .............................................. 207<br />
Auto Europe ..............................................................................................207<br />
Set Up Auto Europe ........................................................................................ 207<br />
<strong>ClientBase</strong> 3/25/13 7
Auto Europe Features ......................................................................................209<br />
Create New Auto Europe Reservation.............................................................209<br />
Brendan Vacations ................................................................................... 210<br />
Set Up Brendan Vacations Live Connect........................................................211<br />
Live Connect Features Supported by Brendan Vacations...............................212<br />
Create New Brendan Vacations Reservation in Live Connect........................212<br />
Casa Travel .............................................................................................. 214<br />
Set Up Casa Travel Live Connect ...................................................................214<br />
Live Connect Features Supported by Casa Travel ..........................................215<br />
Create New Casa Reservation in Live Connect...............................................215<br />
Import Existing Casa Reservation Made Outside of <strong>ClientBase</strong>.....................216<br />
Retrieve an Existing Casa Reservation for Editing or Cancelling...................217<br />
CCRATravel Hotel Booking Portal ......................................................... 219<br />
Set Up CCRATravel Hotel Booking Portal.....................................................219<br />
CCRA Travel Hotel Booking Portal Features .................................................220<br />
Create New CCRA Travel Hotel Booking Portal Reservation........................220<br />
Retrieve an Existing Reservation for Editing or Cancelling ...........................222<br />
Centrav ..................................................................................................... 222<br />
Set Up Centrav Live Connect..........................................................................222<br />
Live Connect Features Supported by Centrav.................................................224<br />
Create New Centrav Reservation in Live Connect..........................................224<br />
Import Existing Centrav Res Made Outside of <strong>ClientBase</strong>.............................225<br />
Retrieve an Existing Centrav Res to Edit/Cancel............................................226<br />
Classic Vacations ..................................................................................... 226<br />
Set Up Classic Vacations.................................................................................226<br />
Classic Vacations Live Connect Features .......................................................228<br />
Import Previously Made Classic Vacations Reservation Details ....................228<br />
Contiki Vacations ..................................................................................... 229<br />
Set Up Contiki Vacations Live Connect..........................................................229<br />
Live Connect Features Supported by Contiki Vacations.................................230<br />
Create New Contiki Vacations Reservation in Live Connect .........................230<br />
eZforex ..................................................................................................... 233<br />
Set Up eZforex.................................................................................................233<br />
eZforex Features..............................................................................................234<br />
Create New eZforex Reservation ....................................................................234<br />
<strong>ClientBase</strong> 3/25/13 8
Globus and Cosmos Family ......................................................................235<br />
Set Up Globus and Cosmos Family ................................................................ 236<br />
Globus and Cosmos Family Features.............................................................. 237<br />
Create New Globus and Cosmos Reservation................................................. 237<br />
Import Existing Globus/Cosmos Res Made Outside of CB............................ 238<br />
Retrieve an Existing Globus/Cosmos Res to Edit/Cancel............................... 239<br />
Globus Family Agent Lingo (Canada) .....................................................239<br />
Set Up Globus Family Agent Lingo................................................................ 239<br />
Globus Family Agent Lingo Features ............................................................. 240<br />
Create Globus Family Agent Lingo Reservation ............................................ 240<br />
Import Existing Reservation Made Outside of <strong>ClientBase</strong> ............................. 242<br />
Retrieve an Existing Reservation for Editing or Cancelling........................... 242<br />
GOGO Worldwide Vacations ...................................................................242<br />
Set Up GOGO Worldwide Vacations Live Connect....................................... 243<br />
Live Connect Features Supported by GOGO Worldwide Vacations.............. 244<br />
Create New GOGO Reservation in Live Connect .......................................... 244<br />
Insight Vacations ......................................................................................246<br />
Set Up Insight Vacations Live Connect .......................................................... 246<br />
Live Connect Features Supported by Insight Vacations ................................. 247<br />
Create New Insight Vacations Reservation in Live Connect.......................... 247<br />
iTravelinsured ...........................................................................................249<br />
Set Up iTravelInsured ..................................................................................... 249<br />
Travelinsured Live Connect Features ............................................................. 250<br />
Create New iTravelinsured Reservation in Live Connect............................... 250<br />
Manulife Global Travel Insurance ............................................................252<br />
Set Up Manulife Global Travel Insurance ...................................................... 252<br />
Manulife Global Travel Insurance Features.................................................... 254<br />
Create New <strong>Manual</strong> Global Travel Insurance Reservation............................. 254<br />
MHRoss.com ............................................................................................256<br />
Set Up MHRoss.com....................................................................................... 256<br />
MHRoss.com Features .................................................................................... 257<br />
Create New Global Alert Reservation............................................................. 257<br />
MLT WorldAgent Direct ..........................................................................259<br />
Set Up MLT WorldAgent Direct .................................................................... 259<br />
MLT WorldAgent Direct Live Connect Features ........................................... 261<br />
Create New MLT WorldAgent Reservation in Live Connect......................... 261<br />
Import Existing WorldAgent Res Made Outside of CB ................................. 262<br />
Pleasant Holidays ......................................................................................265<br />
Set Up Pleasant Holidays ................................................................................ 265<br />
Pleasant Holidays Live Connect Features....................................................... 266<br />
Create New Pleasant Reservation in Live Connect......................................... 266<br />
Import Existing Pleasant Reservation Made Outside of CB........................... 268<br />
Retrieve an Existing Pleasant Res to Edit/Cancel........................................... 268<br />
Hawaii World Bookings.................................................................................. 268<br />
Polar <strong>Online</strong> ..............................................................................................269<br />
<strong>ClientBase</strong> 3/25/13 9
Set Up POLAR <strong>Online</strong> ....................................................................................269<br />
Polar <strong>Online</strong> Live Connect ..............................................................................270<br />
Create New Polar Reservation in Live Connect..............................................270<br />
Import Existing Polar Reservation Made Outside of <strong>ClientBase</strong>....................271<br />
Retrieve an Existing Polar Reservation for Editing or Cancelling..................272<br />
PrimeSport ............................................................................................... 272<br />
Set Up PrimeSport...........................................................................................272<br />
PrimeSport Live Connect Features..................................................................273<br />
Create New PrimeSport Reservation in Live Connect ....................................273<br />
RBC Insurance ......................................................................................... 275<br />
Set Up RBC Insurance.....................................................................................275<br />
RBC Insurance Features ..................................................................................276<br />
Create New RBC Insurance Reservation.........................................................276<br />
Regent Seven Seas - Partner Access ........................................................ 278<br />
Set Up Regent Seven Seas - Partner Access Live Connect.............................278<br />
Regent Seven Seas - Partner Access Features.................................................279<br />
Create New Regent Seven Seas - Partner Access Reservation .......................279<br />
Retrieve an Existing Reservation for Editing or Cancelling ...........................281<br />
Sabre Cruises ........................................................................................... 283<br />
Set Up Sabre Cruises Live Connect in <strong>ClientBase</strong>..........................................283<br />
Sabre Cruises Participating Vendors and Vendor Codes ................................284<br />
Live Connect Features Supported by Sabre Cruises .......................................285<br />
Create New Sabre Cruises Reservation in Live Connect ................................285<br />
Import Existing Sabre Cruises Res Made Outside of <strong>ClientBase</strong> ...................286<br />
Retrieve an Existing Reservation Sabre Cruises to Edit/Cancel .....................287<br />
Sabre Vacations - Canada (Sirev/Revnet) ................................................ 287<br />
Additional <strong>ClientBase</strong> Set Up for Sabre Vacations - Canada .........................288<br />
Sabre Vacations - Canada Participating Vendors and Vendor Codes............290<br />
Live Connect Features Supported by Sabre Vacations-Canada ......................290<br />
Create New Sabre Vacations-Canada Res in Live Connect............................291<br />
Sabre Vacations - US ............................................................................... 292<br />
Set Up Sabre Vacations ...................................................................................293<br />
Sabre Vacations - Dynamic Participating Vendors and Vendor Codes ..........294<br />
Sabre Vacations Live Connect Features..........................................................294<br />
Create New Sabre Vacations Reservation in Live Connect ............................294<br />
Import Existing Sabre Vacations Reservation Made Outside of <strong>ClientBase</strong> ..296<br />
<strong>ClientBase</strong> 3/25/13 10
Retrieve an Existing Sabre Vacations Reservation for Editing or Cancelling 296<br />
Signature CruiseConnection .....................................................................296<br />
Set Up Signature CruiseConnection Live Connect in <strong>ClientBase</strong> .................. 297<br />
Signature CruiseConnection Participating Vendors and Vendor Codes......... 298<br />
Signature CruiseConnection Features ............................................................. 298<br />
Create New Signature CruiseConnection Reservation.................................... 298<br />
Import Existing CruiseConnection Reservation Made Outside of <strong>ClientBase</strong> 300<br />
Retrieve an Existing Reservation for Editing or Cancelling........................... 301<br />
Signature HotelConnection .......................................................................301<br />
Set Up Signature HotelConnection ................................................................. 301<br />
Signature HotelConnection Features............................................................... 302<br />
Create New Signature HotelConnection Reservation ..................................... 302<br />
Import Existing Reservation Made Outside of <strong>ClientBase</strong> ............................. 304<br />
Retrieve an Existing Reservation for Editing or Cancelling........................... 304<br />
Squaremouth Travel Insurance .................................................................305<br />
Set Up Squaremouth Travel Insurance............................................................ 305<br />
Squaremouth Travel Insurance Features ......................................................... 306<br />
Create New Squaremouth Travel Insurance Reservation ............................... 306<br />
Tandem from Passport <strong>Online</strong> ..................................................................307<br />
Set Up Tandem from Passport <strong>Online</strong> Live Connect...................................... 308<br />
Tandem from Passport <strong>Online</strong> Participating Vendors and Vendor Codes...... 308<br />
Live Connect Features Supported by Tandem from Passport <strong>Online</strong>............. 310<br />
Create New Trafalgar Reservation in Live Connect ....................................... 310<br />
Import Existing Reservation Made Outside of <strong>ClientBase</strong> ............................. 311<br />
Retrieve an Existing Reservation for Editing or Cancelling........................... 312<br />
Trafalgar ...................................................................................................313<br />
Set Up Trafalgar Live Connect ....................................................................... 313<br />
Live Connect Features Supported by Trafalgar .............................................. 314<br />
Create New Trafalgar Reservation in Live Connect ....................................... 314<br />
Transat Travel Insurance ..........................................................................315<br />
Set Up Transat Travel Insurance..................................................................... 316<br />
Transat Travel Insurance Features .................................................................. 317<br />
Create New Transat Reservation..................................................................... 317<br />
Travel Bound ............................................................................................320<br />
Set Up Travel Bound....................................................................................... 320<br />
Travel Bound Features .................................................................................... 321<br />
Create New Travel Bound Reservation........................................................... 321<br />
Import Existing Travel Bound Res Made Outside of CB ............................... 323<br />
Retrieve an Existing Travel Bound Res to Edit/Cancel .................................. 323<br />
Travel Bound - Canada .............................................................................323<br />
Set Up Travel Bound - Canada ....................................................................... 323<br />
Travel Bound Features .................................................................................... 325<br />
Create New Travel Bound Canada Reservation.............................................. 325<br />
Import Existing Travel Bound Canada Res Made Outside of CB .................. 327<br />
Retrieve an Existing Travel Bound Canada Res to Edit/Cancel ..................... 327<br />
<strong>ClientBase</strong> 3/25/13 11
Travelex Insurance Services .................................................................... 327<br />
Set Up Travelex Insurance Services................................................................327<br />
Travelex Insurance Services Live Connect Features.......................................329<br />
Create New Travelex Reservation in Live Connect ........................................329<br />
Travel Guard ............................................................................................ 331<br />
Set Up Travel Guard........................................................................................331<br />
Travel Guard Features .....................................................................................332<br />
Create New Travel Guard Reservation............................................................332<br />
Travel Guard ezTips ................................................................................ 334<br />
Travel Impressions ................................................................................... 334<br />
Set Up Travel Impressions ..............................................................................335<br />
Travel Impressions Live Connect Features .....................................................336<br />
Create New Travel Impressions Reservation in Live Connect........................336<br />
Import Existing Travel Impressions Res Made Outside of CB.......................338<br />
Retrieve an Existing Travel Impressions Res to Edit/Cancel..........................338<br />
Travel Insured .......................................................................................... 339<br />
Set Up Travel Insured......................................................................................339<br />
Travel Insured Live Connect Features.............................................................340<br />
Create New Travel Insured Reservation in Live Connect...............................340<br />
Travelport Cruise and Tour ...................................................................... 342<br />
Set Up Travelport Cruise and Tour Live Connect in <strong>ClientBase</strong>....................342<br />
Travelport Participating Vendors and Vendor Codes for Galileo Users.........345<br />
Travelport Participating Vendors and Vendor Codes for Worldspan Users ...345<br />
Live Connect Features Supported by Travelport Cruise and Tour..................346<br />
Create New Travelport Reservation in Live Connect .....................................346<br />
TravelSafe Vacation Insurance ................................................................ 349<br />
Set Up TravelSafe Vacation Insurance............................................................349<br />
TravelSafe Live Connect Features ..................................................................350<br />
Create New TravelSafe Reservation in Live Connect.....................................350<br />
TravTech CruiseBase ............................................................................... 352<br />
Set Up TravTech CruiseBase ..........................................................................352<br />
TravTech CruiseBase Vendors and Vendor Codes .........................................354<br />
TravTech CruiseBase Live Connect Features .................................................354<br />
Create New CruiseBase Reservation in Live Connect ....................................354<br />
Import Existing CruiseBaseReservation Made Outside of <strong>ClientBase</strong> ...........356<br />
Retrieve an Existing CruiseBase Res to Edit/Cancel ......................................356<br />
<strong>ClientBase</strong> 3/25/13 12
Tripology ..................................................................................................356<br />
Set Up Tripology Live Connect ...................................................................... 357<br />
Live Connect Features Supported by Tripology ............................................. 358<br />
Import a Lead from Tripology ........................................................................ 358<br />
VacationSelect ..........................................................................................359<br />
Set Up VacationSelect..................................................................................... 359<br />
VacationSelect - Dynamic Participating Vendors and Vendor Codes............ 361<br />
VacationSelect Live Connect Features ........................................................... 361<br />
Create New VacationSelect Reservation in Live Connect.............................. 361<br />
Import Existing VacationSelect Res Made Outside of <strong>ClientBase</strong>................. 363<br />
Retrieve an Existing VacationSelect Res to Edit/Cancel................................ 363<br />
VAX VacationAccess Vacations ..............................................................363<br />
Set Up VAX Vacation Access Vacations ....................................................... 364<br />
VAX Tour - Dynamic Participating Vendors and Vendor Codes................... 365<br />
VAX VacationAccess Vacations Live Connect Features ............................... 365<br />
Create New VAX Reservation in Live Connect ............................................. 365<br />
Import Existing VAX Reservation Made Outside of <strong>ClientBase</strong> ................... 367<br />
Retrieve an Existing VAX Reservation for Editing or Cancelling ................. 367<br />
Walt Disney Parks and Resorts .................................................................367<br />
Set Up Walt Disney Parks and Resorts ........................................................... 368<br />
Walt Disney Parks and Resorts Features......................................................... 369<br />
Create New Walt Disney Reservation in Live Connect.................................. 369<br />
Using Inventory.................................................................................... 371<br />
Introduction ...............................................................................................371<br />
Selling Inventory ......................................................................................371<br />
Searching for Inventory................................................................................... 372<br />
Pulling From Inventory ................................................................................... 372<br />
Allocating Inventory Across Sync Primary and Sync Copy Databases ...373<br />
Using the Res Card Manager to Manage Your Res Cards .............. 377<br />
Introduction ...............................................................................................377<br />
Search for Your Res Cards .......................................................................377<br />
Simple Res Card Search.................................................................................. 378<br />
Advanced Res Card Search............................................................................. 379<br />
Results Screen ................................................................................................. 380<br />
Navigation Bar ................................................................................................ 381<br />
Select Columns................................................................................................ 381<br />
Sort by Columns.............................................................................................. 381<br />
Saving Searches for Easy Access .............................................................381<br />
Using Date Formulas in Your Saved Searches ............................................... 382<br />
Working with Search Results ...................................................................383<br />
Creating New Res Cards ...........................................................................383<br />
<strong>ClientBase</strong> 3/25/13 13
An In-Depth Look at Vendor and Service Provider Profiles........... 385<br />
Introduction .............................................................................................. 385<br />
Create a New Vendor/Service Provider Profile ....................................... 386<br />
Anatomy of a Vendor|Service Provider Profile ....................................... 386<br />
Menu Bar .........................................................................................................387<br />
Header Information..........................................................................................387<br />
Profile Indicators .............................................................................................388<br />
Detailed Review of Links ........................................................................ 388<br />
General Info Link ............................................................................................388<br />
Remarks Link ..................................................................................................393<br />
Agency Remarks Link.....................................................................................393<br />
Marketing Codes Link.....................................................................................393<br />
Employees Link...............................................................................................394<br />
Activities Link .................................................................................................396<br />
Travel History Link .........................................................................................396<br />
Groups Link.....................................................................................................397<br />
Attachments Link ............................................................................................397<br />
An In-Depth Look at Agent Profiles................................................... 399<br />
Introduction .............................................................................................. 399<br />
Create a New Agent Profile ..................................................................... 400<br />
Anatomy of an Agent Profile ................................................................... 400<br />
Menu Bar .........................................................................................................401<br />
Header Information..........................................................................................401<br />
Profile Indicators .............................................................................................401<br />
Detailed Review of Links................................................................................401<br />
General Info Link ............................................................................................402<br />
Remarks Link ..................................................................................................407<br />
Family Members Link .....................................................................................407<br />
Activities Link .................................................................................................410<br />
Travel History Link .........................................................................................410<br />
Groups Link.....................................................................................................411<br />
Attachment Link..............................................................................................411<br />
PNR Entries Link.............................................................................................412<br />
More Fields Link .............................................................................................412<br />
An In-Depth Look at Other Profiles................................................... 415<br />
Introduction .............................................................................................. 415<br />
Create a New Other Profile ...................................................................... 416<br />
Anatomy of an Other Profile .................................................................... 416<br />
Header Information..........................................................................................416<br />
Menu Bar .........................................................................................................417<br />
Header Information..........................................................................................417<br />
Profile Indicator...............................................................................................417<br />
<strong>ClientBase</strong> 3/25/13 14
Detailed Review of Links ........................................................................417<br />
General Info Link............................................................................................ 418<br />
Remarks Link .................................................................................................. 423<br />
Employees Link............................................................................................... 424<br />
Activities Link................................................................................................. 426<br />
Groups Link..................................................................................................... 426<br />
Attachments Link ............................................................................................ 426<br />
An In-Depth Look at PNR Import ..................................................... 429<br />
PNR Import For Amadeus ........................................................................429<br />
Setup Instructions............................................................................................ 429<br />
Steps To Import a PNR from Amadeus .......................................................... 429<br />
PNR Import For Apollo/Galileo ...............................................................431<br />
Setup Instructions............................................................................................ 431<br />
Steps to Import an Apollo/Galileo PNR ...................................................431<br />
Trams Back Office Users and the Apollo PNR Import................................... 433<br />
PNR Import For Sabre ..............................................................................433<br />
Setup Instructions............................................................................................ 433<br />
Steps to Import a Sabre PNR ....................................................................433<br />
Trams Back Office Users and the Sabre PNR Import..................................... 435<br />
Set Up PNR Import For Worldspan ..........................................................436<br />
Setup Instructions............................................................................................ 436<br />
Steps to Import a Worldspan PNR ............................................................436<br />
Synchronize the Primary Database with a Trams Hosted Copy..... 439<br />
What Is <strong>ClientBase</strong> Synchronization ......................................................439<br />
What is Trams Sync Web Service ..........................................................439<br />
How It Works ...........................................................................................439<br />
Synchronization Frequently Asked Questions ..........................................440<br />
What Can I Do in the Primary database That I Can’t Do in the Sync Copies440<br />
Where Can I Find Information in My Program Concerning Sync ................ 440<br />
What If I Change the Same Profile in Each Database Between Synchronizations440<br />
What Happens If I Delete a Record in One Database and Before Synchronizing,<br />
Change the Record in the Other Database................................................... 440<br />
What Does NOT Synchronize ....................................................................... 441<br />
Do Invoices Generated from the Res Card in the Sync Copy Database<br />
Synchronize to the Primary Database.......................................................... 441<br />
What If I Do an End of Period in My Primary database, and Before I Sync Out<br />
to My Branch Database, Someone in the Branch Office Generates an Invoice<br />
from the Res Card Within That Same Closed Period................................... 441<br />
Can I Log into Trams Back Office From Any DB Other Than the Primary Database441<br />
How Do I Allocate Inventory Across Sync Primary and Sync Copy Databases441<br />
<strong>ClientBase</strong> 3/25/13 15
<strong>ClientBase</strong> 3/25/13 16
Chapter<br />
1<br />
Set Up to Use <strong>ClientBase</strong> <strong>Online</strong><br />
This section provides a general overview of <strong>ClientBase</strong> <strong>Online</strong>, how it fits into<br />
agency operations, what it is, and what it can do for your agency and front-line<br />
agents. It also outline the steps you need to successfully implement your new<br />
program.<br />
Introduction<br />
Look around your desk. What do you see Pictures of family, a phone, a calendar from one of the<br />
cruise lines, facial tissue. But wait! What’s that behind all those Post-it notes It’s a computer! In<br />
most cases, it was put there as a terminal for a Computer Reservation System (CRS), or as it’s called<br />
now days, Global Distribution System (GDS). If you are like many agents, you use it to book travel<br />
for clients and to find information on airfares, seats, hotel rooms, car rentals, etc. You may even use<br />
it to handle e-mail and browse the web, but not much more.<br />
My Computer Can Do More<br />
That brings us to the point we want to make. The computer is a powerful tool that may not be being<br />
used to its full potential. That’s where software comes in. Software programs are the different “hats”<br />
that your computer can wear to help you do things.<br />
<strong>ClientBase</strong> turns your computer into a customer relationship management tool. Other software<br />
programs allow you to design illustrations, navigate the internet, manage your accounting<br />
information, write books or even print information on worldwide destinations. The list of things that<br />
software programs can do continues to grow and grow. Many of them can be running along with<br />
your GDS simultaneously, and with a simple click of the mouse on your task bar, you can move<br />
among them. All of this can be a great benefit to you at work, but it starts with you being open to a<br />
new way of working and to new tools that may help you do your job better -- even make your job<br />
easier.<br />
What is <strong>ClientBase</strong> <strong>Online</strong><br />
<strong>ClientBase</strong> is a tool for selling travel. It’s an easy-to-use marketing database system developed<br />
specifically for travel agents. The program gives you flexibility in maintaining the marketing and<br />
travel demographic components of your clientele. Not just another software program, <strong>ClientBase</strong><br />
represents an evolving solution to your customer relationship management (CRM) needs an<br />
automated reservation card feature.<br />
17
<strong>ClientBase</strong> <strong>Online</strong> Introduction & Setup<br />
It’s About Building and Maintaining Relationships<br />
<strong>ClientBase</strong> organizes all the client information you decide is relevant for marketing, and gives you an<br />
easy way to access that information quickly. From the outside, <strong>ClientBase</strong> is a powerful tool<br />
designed to help you sell travel to people. Inside, you will find key features that assist you in building<br />
and maintaining lasting relationships with your clients, while providing contact management and an<br />
automated Res Card system.<br />
You know how important it is to maintain a good relationship with your clients, especially if you are<br />
a travel professional specializing in leisure travel. You succeed by creating a bond, building trust and<br />
by matching the right travel products and services with your customers. However, keeping track of<br />
the increasing quantity of leisure travelers and complexity of travel packages is a difficult task. You<br />
need an easy-to-use tool that allows you to access the pertinent information you have stored for<br />
every client. <strong>ClientBase</strong> is that tool.<br />
What Can <strong>ClientBase</strong> Do<br />
<strong>ClientBase</strong> helps your agency build, organize and utilize information about your clients so you can<br />
sell more travel. It helps your agents qualify customers, work more efficiently and organize<br />
schedules. Below are just a few of the things that can be done with <strong>ClientBase</strong>:<br />
- Agents share valuable client profile data because <strong>ClientBase</strong> is running on a network.<br />
- Shares the Trams Back Office database (if you have this accounting program) and provides Agents<br />
live access to Travel & Payment History.<br />
- Controls Agent Access with Built-In Security.<br />
- Streamlines marketing with Point-and-Click Codes<br />
- Generates targeted client lists with flexible queries.<br />
- Prints Custom Letters or sends E-mails quickly and easily with Document Templates.<br />
- Saves time and duplication with Merge to PNR.<br />
- Communicates quickly with targeted clients using e-mail blast.<br />
- Organizes agent activities with Activity Manager.<br />
- Accesses automated Res Cards that generate invoices directly in Trams Back Office (without any<br />
data entry in CRS).<br />
How Do I Learn the Benefits of this Valuable Tool<br />
This documentation has been designed for both the front-line agents and the agency management<br />
and marketing teams. It is accessible electronically via our website (www.trams.com), and within<br />
your <strong>ClientBase</strong> <strong>Online</strong> program Help Files.<br />
On the Trams website at www.sabretravelnetwork.com/trams under the Training|<strong>ClientBase</strong><br />
<strong>Online</strong>|Documentation link, access the <strong>ClientBase</strong> Browser QuickStart Training Program (same<br />
look, just a different product), an all-inclusive training package for owners/managers to quickly<br />
implement <strong>ClientBase</strong> in your agency and maximize its many CRM benefits. Trams also offers a<br />
series of on-line training sessions on our Training WebEx <strong>ClientBase</strong> link on our website. These<br />
courses break the program down into digestible bites and provide live hands-on instruction within a<br />
small group. Recorded WebEx classes on <strong>ClientBase</strong> <strong>Online</strong> features are also available. You can<br />
actually learn the whole program by listening to these recordings in the order they are posted. Look<br />
18
<strong>ClientBase</strong> <strong>Online</strong> Introduction & Setup<br />
under the Training link for all training options.<br />
If you have purchased support, we offer unlimited technical support e-mailing support@trams.com<br />
or calling 310-641-8726. If not, attend the daily live WebEx <strong>ClientBase</strong> Q&A to get your questions<br />
answered.<br />
Let’s face it, everyone learns in different ways and at different paces. Here at Trams, we provide<br />
you with a multitude of ways to learn <strong>ClientBase</strong> because the sooner you begin reaping the benefits<br />
of <strong>ClientBase</strong>, the sooner you’ll be SELLING MORE TRAVEL. We’re sure of it.<br />
Log Into <strong>ClientBase</strong> & Run Diagnostics<br />
<strong>ClientBase</strong> requires Microsoft Internet Explorer version 6.0 or greater. Do not use any other<br />
browser. For this reason, the first time you log into the program you must run the <strong>ClientBase</strong><br />
Diagnostics to make sure it passes all areas. Take these steps to set up <strong>ClientBase</strong> in IE 7.0 or<br />
above:<br />
1) When the Internet Explorer window displays more than the IE toolbar, such as the Google toolbar,<br />
both toolbars must disable pop-ups in order to generate invoices within the <strong>ClientBase</strong> product.<br />
2) Also, depending upon your Internet Explorer settings, you may be prompted for User Login<br />
Authentication information.<br />
3) You are prompted for User Login Authentication information. To remove this prompt: Go to<br />
Tools|Security and Trusted sites. Check the green check mark to make this a trusted site and click<br />
Sites and add your CB URL to the Intranet zone (e.g. https://www.clientbaseonline.com).<br />
4) Next click on Default Level and make sure the Security Level for this Zone is set to Low.<br />
5) Please contact our support department at support@Trams.com if any of these items fail as<br />
certain features in <strong>ClientBase</strong> may not work as designed and you have signed up for full support. If<br />
you do not have support, attend our daily live WebEx Q&A session to get help with this.<br />
If you have support, please contact our support department at support@Trams.com if any of these<br />
items fail as certain features in <strong>ClientBase</strong> may not work as designed. If you do not have support,<br />
19
<strong>ClientBase</strong> <strong>Online</strong> Introduction & Setup<br />
attend our daily live WebEx Q&A session to get help with this.<br />
Create a Shortcut for CBO on Your Desktop<br />
Here is a good little tip for agencies that are launching CBO from outside of Sabre. Create a shortcut<br />
on the desktop for the purpose of launching CBO (rather than going to www.clientbaseonline.com<br />
each time). Right-mouse click on the desktop and click Create New|Shortcut and add the URL below<br />
(replace xxxx below with the PCC for your agency). Save.<br />
http://www.clientbaseonline.com/login/<br />
Launch CBO now with the desktop shortcut!<br />
Note: There is enhanced password login security for <strong>ClientBase</strong> <strong>Online</strong> so that if a user fails to enter<br />
the correct password after three attempts, the user is locked out for 30 minutes. After three failed<br />
attempts the user is prompted with the message: Your account has been locked for 30 minutes due<br />
to too many unsuccessful login attempts. If logged out and the user needs access before the 30<br />
minute timeframe is complete, an administrative user can change the password to clear the lock.<br />
Note: There is a warning message alerting users that the session is about to end. After being idle<br />
in <strong>ClientBase</strong> for thirty minutes you will receive the message, Your <strong>ClientBase</strong> session will time out<br />
in 10 minutes and return to the home page if there is no additional activity. If you are still working in<br />
your session click OK to continue. If the OK to continue is not clicked the session will end and take<br />
you back to the home page.<br />
Forgot My User Name/Password<br />
The login page for <strong>ClientBase</strong> has a linked called Forgot my User Name/Password. If an agent has<br />
forgotten either their <strong>ClientBase</strong> Login or Password, they can click this link and <strong>ClientBase</strong> will<br />
generate a new, unique CB password and email to the agent accordingly. For this feature to work<br />
20
<strong>ClientBase</strong> <strong>Online</strong> Introduction & Setup<br />
as designed, the each User Login must be configured with proper email settings and each User<br />
Login record must have a unique email address captured so that <strong>ClientBase</strong> can verify what email<br />
address this login information can be sent to.<br />
Setup:<br />
1) Log into <strong>ClientBase</strong> version as SYSDBA and setup User Logins for each user, following the<br />
directions below. Make sure the default email client is set to SMTP and enter SMTP email settings.<br />
These settings are needed in order for CB to send an email with login information automatically.<br />
2) Verify that each User Login record has a valid email address within the User Settings link. This is<br />
the email that a forgotten login or password can be sent to.<br />
Using this Feature:<br />
When a user logs into <strong>ClientBase</strong> <strong>Online</strong>, if the system detects that the user's e-mail address was<br />
not completed in the user profile, the user is prompted to add it. In order for all user logins to have<br />
an e-mail address when the Forgot my Login Name/Password feature is used, upon login if e-mail<br />
address is missing from the user profile a screen appears with the message: E-mail address was not<br />
entered in this user's login settings. Please enter e-mail address. Below the message is a box to<br />
enter the e-mail address, then click Save.<br />
If an agent has forgotten the login or password, they can click Forgot my User Name/Password on<br />
the <strong>ClientBase</strong> login page. As an added layer of security a PCC in also required when a using the<br />
forgot password feature. When the Forgot my Login Name/Password link is clicked, the forgot<br />
password screen is displayed with the message <strong>ClientBase</strong> <strong>Online</strong> will locate your User Login based<br />
on e-mail address and PCC, then reset your password and e-mail it to you. The e-mail and PCC<br />
fields are also displayed. Enter the e-mail address and PCC and click Send. The message is then<br />
displayed, Your password has been reset and an email with your User Name and new password has<br />
been sent to the email address provided. Next, check your e-mail and login in using the new<br />
password sent. After logging in with the new password immediately you will be prompted to change<br />
it for security purposes.<br />
If an invalid e-mail and/or PCC for your user login is entered, upon clicking send you are prompted,<br />
The e-mail address and PCC you entered does not match to any existing User Login. Please contact<br />
your database administrator.<br />
Set Up to Use <strong>ClientBase</strong> <strong>Online</strong><br />
Before agents can use <strong>ClientBase</strong> <strong>Online</strong>, some setup needs to be completed by the database<br />
administrator in <strong>ClientBase</strong> <strong>Online</strong> or in <strong>ClientBase</strong> Windows if you are using that version of<br />
<strong>ClientBase</strong> with <strong>ClientBase</strong> <strong>Online</strong>. All setup except entering invoice numbers and password<br />
resets need to be done in <strong>ClientBase</strong> Windows if you are using that program together with<br />
<strong>ClientBase</strong> <strong>Online</strong>. If you are not using <strong>ClientBase</strong> Windows together with CBO, all setup is done<br />
within the <strong>ClientBase</strong> <strong>Online</strong> program.<br />
Suggested setup order:<br />
1) Agency Branch Settings<br />
2) Create Agent Logins/Permissions for Users (after you create Agent Profiles for each user and<br />
link them to the correct Branch).<br />
3) Import Data<br />
4) Other Settings<br />
21
<strong>ClientBase</strong> <strong>Online</strong> Introduction & Setup<br />
Set Up Agency Branch Settings<br />
In <strong>ClientBase</strong>, click Tools on the main menu bar and select Settings to view a complete listing of all<br />
Agency level settings. Click on Branch Settings and double-click on the branch.<br />
Branch Settings<br />
Access and update Branch settings including General Info, Branch PNR Entries, Invoice Remarks<br />
and Invoice Settings directly in <strong>ClientBase</strong>.<br />
<strong>ClientBase</strong> has a centralized database which means that all branches associated with the agency<br />
are included within one database. The program comes with an unlimited number of branch records<br />
and for reporting purposes, this feature makes it extremely convenient to analyze the database by<br />
branch entries. Each client and agent profile has a field where the branch number can be entered.<br />
This entry is not a mandatory field in the client and agent profile, but we do suggest it be linked to the<br />
agent profile if possible.<br />
GENERAL: Trams considers the 0 Branch as the main branch and 1, 2, 3, etc. as Branch 1, 2, etc.<br />
Click on branch entry to Add/Modify branch information. <strong>ClientBase</strong> has its own separate sequence<br />
22
<strong>ClientBase</strong> <strong>Online</strong> Introduction & Setup<br />
of invoice/refund numbers for use when generating invoices/refunds in the Res Card. If your agency<br />
starts generating invoices/refunds from the <strong>ClientBase</strong> Res Card, enter the starting invoice and<br />
refund number here and the system automatically assigns the next sequential invoice/refund<br />
number each time an invoice/refund is generated.<br />
Note to Trams Back Office Users. Since Trams Back Office does not allow duplicate invoice or<br />
refund numbers, be sure to start a series of numbers not currently in use in Trams Back Office (the<br />
system allows up to 9 digits). All the fields in this screen are shared with Trams Back Office except<br />
for Next Sales Invoice Number and Refund Number.<br />
BRANCH PNR ENTRIES: Click Branch PNR Entries to add/modify/delete PNR entries at the<br />
branch level. These tables allow you to capture any PNR entries or remarks you would like included<br />
when sending data to a PNR. The branch level entries tab is where information can be included in<br />
a PNR regardless of the agent, client or traveler selected. Examples are the communication<br />
information for the branch or an appreciation message for the client’s business.<br />
CRS: Choose CRS (GDS) system from the drop-down menu.<br />
Description of Entry: Enter a free-flow description.<br />
Always Move this Entry: By checking this box, the entry always moves (is check off automatically)<br />
when you do a move to PNR. If this box is not checked, moving the entry is optional (and you'll need<br />
to check it off).<br />
Display on Selection Screen: Within each PNR entry or PNR rule that is set as Always Move This<br />
Rule, an option is included called Display on Selection Screen. The PNR selection screen appears<br />
when you use the Merge to PNR feature, and allows you to select the specific profile data to be<br />
included and sent to the current PNR. For PNR entries that should always move regardless of the<br />
profile or PNR, this Display on Selection Screen can be unchecked so that the selection screen is<br />
less complicated for the agent to review.<br />
PNR Entry: Enter the PNR entry exactly as you would in your reservation system, using text and<br />
special characters and press Save.<br />
INVOICE/TRIP PROPOSAL REMARKS: For your invoices or trip proposals, add unlimited remarks<br />
for this branch in the form of a table list that agents can pick and choose from depending on the type<br />
of reservation. Enter any remarks you want to appear on invoices or trip proposals by clicking Add.<br />
23
<strong>ClientBase</strong> <strong>Online</strong> Introduction & Setup<br />
(Click entry to Modify/Delete.)<br />
Description: Create a description for agents that accurately describes this particular remark.<br />
Always Print: If you want this to always print on an invoice, check here. If you want the agent to<br />
choose whether it prints or not, leave blank.<br />
Remark: Enter the remark you want printed on the invoice or trip proposal. Highlight the remark<br />
and click Modify to edit a remark, or click Delete to remove a remark.<br />
INVOICE SETTINGS: Set Branch invoice defaults:<br />
Default Invoice Format: Set the Res Card invoice default as Invoice Only which is a shorter invoice<br />
format that does not included all itinerary level information; or Itin/Invoice which is a longer invoice<br />
format that does include all the itinerary level information.<br />
Language: From the drop-down, select the language used for invoice.<br />
Include Summary of All Reservations: Set the Res Card invoice default by checking if you want<br />
reservation details including balance due date to appear on the invoice.<br />
Preview Invoice Before Printing: Set the Res Card invoice default by checking if you always want<br />
a preview invoice (highly recommended) to be printed before actually generating the invoice.<br />
24
<strong>ClientBase</strong> <strong>Online</strong> Introduction & Setup<br />
Include Service Provider Graphics: Set the Res Card invoice defaults by checking here if you want<br />
service provider graphics included when an invoice is printed.<br />
Hide Reservation Vendor Name: Gives you greater flexibility in customizing the print out of an<br />
invoice. If this setting is checked, then the Vendor Name for each individual reservation within the<br />
Res Card being invoice will not be printed, only the Service Provider Names.<br />
Hide Reservation Totals (Include Only Invoice Totals): Gives you greater flexibility in<br />
customizing the print out of an invoice. If this setting is checked, then each individual reservation<br />
amount will not be printed, only the sum of all reservations being invoiced.<br />
Print Service Fee as Invoice Total Line Item: Clicking here gives you greater flexibility in<br />
customizing the print out Service Fees on an invoice. If checked, this setting adds any reservations<br />
with a Travel Category of Service Fee and prints them as a single total amount listed within the<br />
Invoice Totals just underneath Reservation Totals, rather than listing as a separate reservation<br />
within the body of the invoice.<br />
Service Fee Label: This is a free-flow field that allows for up to 25 characters and provides you with<br />
the ability to customize how agency service fees are labeled on the invoice.<br />
Display Zero Balance when Invoice reservations are not paid in full: This setting pertains to<br />
options for handling the balance as it appears on an Invoice when all Reservations have been<br />
invoiced in full but not paid in full. If checked, then regardless of payment status, once all<br />
Reservations have been invoiced in full then Balance $0 will appear on the Invoice in the grey<br />
payment box. If unchecked (which is the default) then when all Reservations have been invoiced in<br />
full, but not paid in full, then we do not display Balance: $ 0.00 in the grey payment box.<br />
Print Reservation in Condensed Format: The following Print Reservation in Condensed Format<br />
are broken down by Travel Category:<br />
Print Air Reservation in Condensed Format, Print Hotel Reservation in Condensed Format, Print Car<br />
Reservation in Condensed Format, Print Cruise Reservation in Condensed Format, Print Insurance<br />
Reservation in Condensed Format, Print Miscellaneous Reservation in Condensed Format, Print<br />
Rail Reservation in Condensed Format, Print Tour Reservation in Condensed Format, and Print<br />
Transportation Reservation in Condensed Format.<br />
If checked, upon invoicing a reservation for that Travel Category, a summary of basic Reservation<br />
information is included, rather than a detailed listing of all Reservation and Service Provider level<br />
information. This setting may be desired for reservations that you would like to place less emphasis<br />
on when printing invoices for your client. For example, if you are invoicing a cruise vacation, you<br />
may choose to place a greater emphasis on the cruise reservation and less emphasis on the<br />
Insurance, Airport, Hotel, etc.<br />
Here is a listing of the reservation details included if Print Reservation in Condensed Format is<br />
checked. All other Reservation and Service Provider level data is omitted from the printed version of<br />
the invoice.<br />
- Vendor Name, Passenger Name/s, Start Date, End Date<br />
If Supplier, ARC or Comm Track Show as Paid: Res Amount, This Invoice, Prior Invoice and Balance<br />
If Comm Track Not Show as Paid: Amount Details<br />
25
<strong>ClientBase</strong> <strong>Online</strong> Introduction & Setup<br />
TRIP PROPOSAL SETTINGS: Set Branch invoice defaults:<br />
Include Itinerary Remarks: Check here for a longer trip proposal format that does include all the<br />
itinerary level information.<br />
Include Service Provider Graphics: Check here if you want service provider graphics included<br />
when a trip proposal is printed.<br />
Hide Reservation Vendor Name: Gives you greater flexibility in customizing the print out of a trip<br />
proposal. If this setting is checked, then the Vendor Name for each individual reservation within the<br />
Res Card being printed will not be printed, only the Service Provider Names.<br />
Hide Reservation Totals (Include Only Invoice Totals): Gives you greater flexibility in<br />
customizing the print out of a trip proposal. If this setting is checked, then each individual reservation<br />
amount will not be printed, only the sum of all reservations being invoiced.<br />
Print Service Fee as Invoice Total Line Item: Gives you greater flexibility in customizing the print<br />
out Service Fees. If checked, this setting adds any reservations with a Travel Category of Service<br />
Fee and prints them as a single total amount listed within the Invoice Totals just underneath<br />
Reservation Totals, rather than listing as a separate reservation within the body of the invoice.<br />
Service Fee Label: This is a free-flow field that allows for up to 25 characters and provides you with<br />
the ability to customize how agency service fees are labeled.<br />
Print Reservation in Condensed Format: The following Print Reservation in Condensed Format<br />
are broken down by Travel Category:<br />
Print Air Reservation in Condensed Format, Print Hotel Reservation in Condensed Format, Print Car<br />
Reservation in Condensed Format, Print Cruise Reservation in Condensed Format, Print Insurance<br />
Reservation in Condensed Format, Print Miscellaneous Reservation in Condensed Format, Print<br />
Rail Reservation in Condensed Format, Print Tour Reservation in Condensed Format, and Print<br />
Transportation Reservation in Condensed Format.<br />
If checked, upon running a trip proposal, a reservation for that Travel Category, a summary of basic<br />
Reservation information is included, rather than a detailed listing of all Reservation and Service<br />
Provider level information. This setting may be desired for reservations that you would like to place<br />
26
<strong>ClientBase</strong> <strong>Online</strong> Introduction & Setup<br />
less emphasis on when printing for your client. For example, if you are invoicing a cruise vacation,<br />
you may choose to place a greater emphasis on the cruise reservation and less emphasis on the<br />
Insurance, Airport, Hotel, etc.<br />
Here is a listing of the reservation details included if Print Reservation in Condensed Format is<br />
checked. All other Reservation and Service Provider level data is omitted from the printed version<br />
of the trip proposal: Vendor Name, Passenger Name/s, Start Date, End Date; if Supplier, ARC or<br />
Comm Track Show as Paid: Res Amount, This Invoice, Prior Invoice and Balance; and if Comm<br />
Track Not Show as Paid: Amount Details.<br />
Create User Logins and Permissions<br />
The <strong>ClientBase</strong> administrator has complete ability to Add, Modify and Delete all User Logins (with<br />
the exception of SYSDBA and SYNCUSER). Each User Login record includes both default settings<br />
and Advanced Permissions. IMPORTANT: Before you begin setting User Logins, make sure to<br />
create an Agent Profile from the main <strong>ClientBase</strong> screen for each agent that is going to log in and<br />
make sure to associate the profile with a branch. Do this by going to Profiles and click on the profile<br />
icon and Agent:<br />
The only information you need to enter into the Agent Profile is the full agent name in the Name field.<br />
By default the agent profile defaults to 0 Branch, but if this is not the correct branch, make sure to<br />
modify that entry as well. If you use Trams Back Office, put the agent sine in the Interface ID field.<br />
27
<strong>ClientBase</strong> <strong>Online</strong> Introduction & Setup<br />
Now go to Tools|Settings|User Logins and Add to setup user logins and permissions.<br />
USER SETTINGS - Click Add to add a new User Login for each <strong>ClientBase</strong> user within your agency.<br />
Login name: Name that is used to log into <strong>ClientBase</strong>. This should not include any spaces in the user<br />
name and should be fairly short in length. This field is NOT case sensitive.<br />
Sabre PCC (for Sabre Red Workspace users only: Be sure to include each<br />
agent's proper Sabre "PCC" and "Agent ID" and check the box called "Enable<br />
SSO". By entering this Sabre login data into the <strong>ClientBase</strong> <strong>Online</strong> User Login<br />
record, each user will get auto logged into <strong>ClientBase</strong> <strong>Online</strong> upon successfully<br />
logging into Sabre Red Workspace.<br />
Upon creating a new user record the Sabre PCC defaults to the agency's<br />
primary PCC but can be changed if multiple locations use different PCC's.<br />
Upon entering a Sabre PCC the system validates that the PCC entered is not<br />
already in use by any other agency. Upon creating a new User Login and<br />
saving, the system does not allow you to leave the Sabre PCC field blank.<br />
Sabre PCC field is 4 characters, alphanumeric (non case-sensitive).<br />
Enable SSO (for Sabre Red Workspace users only): <strong>ClientBase</strong> <strong>Online</strong> is<br />
currently accessible within the Sabre Red Workspace. In order to access the<br />
<strong>ClientBase</strong> <strong>Online</strong> tab you must first launch Sabre Red Workspace and log in<br />
using a Sabre assigned PCC, Agent ID, and Password. <strong>ClientBase</strong> <strong>Online</strong> also<br />
has its own login screen, but the login screen can be bypassed, allowing<br />
automatic logging into <strong>ClientBase</strong> <strong>Online</strong>, if the <strong>ClientBase</strong> <strong>Online</strong> User Login<br />
record is properly setup.<br />
Once logged into Sabre Red Workspace the <strong>ClientBase</strong> <strong>Online</strong> tab is<br />
accessed by selecting Tools|Customer Management|<strong>ClientBase</strong> <strong>Online</strong>.<br />
28
The <strong>ClientBase</strong> <strong>Online</strong> application will launch and an attempt to log into<br />
<strong>ClientBase</strong> <strong>Online</strong> Introduction & Setup<br />
<strong>ClientBase</strong> <strong>Online</strong> will occur. In order for the auto login to occur, you must<br />
have an individual <strong>ClientBase</strong> <strong>Online</strong> User Login created and that login must<br />
be SSO enabled and contain your Sabre PCC and Agent Sign.<br />
Once the <strong>ClientBase</strong> <strong>Online</strong> User Login is configured for Single Sign On, after<br />
successfully logging into Sabre Red Workspace, CBO will then verify that the<br />
log in is SSO enabled and attempt to match the PCC and Sabre Agent ID.<br />
Once verification is complete the user is automatically logged into <strong>ClientBase</strong><br />
<strong>Online</strong>.<br />
If the user logs into Sabre Red Workspace, but the <strong>ClientBase</strong> <strong>Online</strong> User<br />
login is not SSO enabled, user will receive the message, "The Agent ID you<br />
have entered is not Single Sign On enabled. Please click here to sign in using<br />
the <strong>ClientBase</strong> <strong>Online</strong> login page." Clicking the link will take the user to the<br />
<strong>ClientBase</strong> <strong>Online</strong> login page where user can login using their <strong>ClientBase</strong><br />
<strong>Online</strong> user Login Name and password.<br />
If the user logs into Sabre Red Workspace but the Sabre Agent ID or PCC do<br />
not match what was entered in the <strong>ClientBase</strong> <strong>Online</strong> User Login record, user<br />
will receive the message, "<strong>ClientBase</strong> <strong>Online</strong> cannot find a match to the Agent<br />
ID and PCC you are using. Please click here to sign in using the <strong>ClientBase</strong><br />
<strong>Online</strong> login page." Clicking the link will take the user to the <strong>ClientBase</strong> <strong>Online</strong><br />
login page where user can login using their <strong>ClientBase</strong> <strong>Online</strong> user Login<br />
Name and password.<br />
Add <strong>ClientBase</strong> <strong>Online</strong> to the Favorites menu in Sabre Red Workspace:<br />
Make <strong>ClientBase</strong> <strong>Online</strong> part of your favorite SRW applications by selecting<br />
the Favorites menu option and clicking the Add button. Up to 15 frequently<br />
used applications can be added to the Favorites menu. Click the checkbox<br />
next to <strong>ClientBase</strong> <strong>Online</strong> and then apply the changes. The application is now<br />
saved under the Favorites group.<br />
29
<strong>ClientBase</strong> <strong>Online</strong> Introduction & Setup<br />
CBO Enabled: This field is used to identify which users are allowed to log into CBO. Check the box<br />
for this field for each user that is allowed to log into CBO. All user logins created in CBO will have<br />
this field checked by default. User logins created in <strong>ClientBase</strong> Windows or Trams Back Office and<br />
synced will not have this field checked by default. A user with an authorization of Manager will need<br />
to log into CBO and update this setting for each user that will log into CBO.<br />
Upon logging into CBO if the user login is not "CBO Enabled," the user is prompted, "This User Login<br />
exists but has not been enabled for use with CBO. This User is allowed to log in until 07/28/xx. After<br />
this date this user will no longer be allowed to log in to CBO. Please contact your CBO system<br />
administrator to enable your login."<br />
A three week time period is being given to CBO enable user logins. After 07/28/xx, any user that is<br />
not CBO enabled will receive the following prompt when trying to log in: "This User Login exists but<br />
has not been enabled for use with CBO. Please contact your CBO system administrator to enable<br />
your login."<br />
Your serial number and access code determine the number of user licenses that you have available,<br />
based on your sales agreement. The SYSDBA user will always be CBO enabled and does not count<br />
as a license. If you attempt to CBO enable a user but have used all of your user licenses, CBO<br />
Enabling will not be granted and the prompt will appear, "Sorry, you cannot give permission to CBO<br />
Enabled to next user, your current number of CBO Enabled users is XX and your limit is XX."<br />
If you would like to increase your number of licenses, please contact your sales rep.<br />
Sabre Agent ID: If you or your agent has a Sabre Agent ID when logging into Sabre Red Workspace,<br />
enter it here.<br />
Password: CBO passwords are independent from <strong>ClientBase</strong> Windows passwords (if you are using<br />
that program). In other words, a password change in one system will NOT change the other and vice<br />
versa. Remember however that CBO password must meet the stronger requirements:<br />
Medium Strength - Passwords must contain:<br />
- A minimum of 7 characters<br />
- A maximum of 8 characters<br />
- At least one alpha character (a-z, A-Z)<br />
- At least one numeric character (0-9)<br />
- Cannot be a repeat of last 4 passwords<br />
High Strength - Passwords must contain:<br />
- A minimum of 7 characters<br />
- A maximum of 8 characters<br />
- At least one lower case alpha character (a-z)<br />
- At least one upper case alpha character (A-Z)<br />
- At least one numeric character (0-9)<br />
- At least one special character (!,@,#,$,%,^,&,*,_,-,+,= etc.)<br />
- No character may be used more than once, regardless of case<br />
- Cannot be a repeat of last 4 passwords<br />
<strong>ClientBase</strong> Windows Users: If you are setting up CBO users in <strong>ClientBase</strong> Windows, the password<br />
you insert will need to be changed in CBO by the user. Upon logging into CBO, the user will be<br />
30
<strong>ClientBase</strong> <strong>Online</strong> Introduction & Setup<br />
prompted to enter the old password (the one you set up in CBW) and change it. This will not sync<br />
over to <strong>ClientBase</strong> Windows and needs to follow the format listed above.<br />
User Name: User's full name. This field, the User Title, and the Email fields can be used in document<br />
templates.<br />
Title: Job title of the new user.<br />
Email: Email of the new users.<br />
Automatically Update Email Calendar for Uncompleted Reminders: Select a setting for the field.<br />
Never - Reminders are never sent to the Outlook calendar<br />
All Reminders - All Open Reminders are sent to the Outlook calendar<br />
Only Reminders set for a Time - Only Open Reminders with a selected Start Time are sent<br />
to the Outlook calendar<br />
Only Reminders set with an Alarm - Only Open Reminders with the Set Alarm Box<br />
checked are sent to the Outlook calendar<br />
The user’s e-mail address is used for sending Reminders to the Outlook Calendar. If the user does<br />
not have an e-mail address entered in the User Settings, Never is the only setting that can be<br />
entered for this field.<br />
Usage: When creating or Editing Reminders a checkbox, Update E-mail Calendar after Saving<br />
Changes” is visible. When checked, updates are sent to user’s e-mail address. This box is checked<br />
by default when the setting from User Settings here is All Reminders or Only for Reminders when<br />
time is set.<br />
Upon saving the Reminder, an email is sent to the user. The e-mail appears as a meeting request<br />
and includes a link to the Activity. Click the Accept button to save the Reminder to the Outlook<br />
calendar.<br />
Agent Profile: IMPORTANT! Associate the user with a specific agent profile from the drop-down<br />
menu. This stamps transactions with the agent's information, thus eliminating the need to manually<br />
add agent information each time. An audit trail of the agent's activity is available as a result. Make<br />
sure there is an agent profile created and associated for this login. All that's required is the agent<br />
name in the Name field and the correct branch selected within.<br />
Authorization: This field defaults to User but includes an option of Manager. Logins with the<br />
authorization of Manager are able to edit existing User Login permissions; use the Profile Import;<br />
Global Modify and Case Converter features.<br />
Security Level: Select the desired security level from the pull-down menu where default permissions<br />
have been already established. Click Advanced to customize the settings for each particular user.<br />
Disable Account: Placing a checkmark in the box denies the agent access to the program. The signin<br />
is no longer valid. This box is checked when the agent name cannot be deleted because there<br />
are entries pointing to that name in the database.<br />
Advanced Security Level<br />
Be aware that the functionality presently available in the security area of <strong>ClientBase</strong> includes:<br />
Advanced|Profile Rights - Read/Write/Delete<br />
31
<strong>ClientBase</strong> <strong>Online</strong> Introduction & Setup<br />
Advanced|Activity Rights - Read/Write/Delete<br />
Advanced|Res Card Rights - Read/Write/Delete<br />
Advanced|Branch Rights - Check any branch/s you want the user to access.<br />
Profile Tabs: Uncheck any area you don’t want the user to access.<br />
32
Advanced|Other Restrictions: Check off any feature to restrict user access.<br />
<strong>ClientBase</strong> <strong>Online</strong> Introduction & Setup<br />
Notes:<br />
1) View Activities for Own Profiles: This setting has two options:<br />
View Own Activities Using - Activity Login Name: Use this setting to allow users to only view<br />
activities where they are listed as the Login Name on the activity.<br />
View Own Activities Using - Profile Primary Agent: Use this setting to allow users to view<br />
activities of profiles where they are the Primary Agent of the profile the activity is attached to,<br />
regardless of who is listed in the activity for the Login Name. For example, an activity has user Mary<br />
Smith as the Login Name, however Susan Jones in the primary agent of the profile the activity is<br />
attached to. Using this setting Susan is allowed to view the activity.<br />
2) View Own Activities Only: This setting has two options:<br />
View Own Activities Using - Activity Login Name: Use this setting to allow users to only view<br />
activities where they are listed as the Login Name on the activity.<br />
View Own Activities Using - Profile Primary Agent: Use this setting to allow users to view<br />
activities of profiles where they are the Primary Agent of the profile the activity is attached to,<br />
regardless of who is listed in the activity for the Login Name. For example, an activity has user Mary<br />
Smith as the Login Name, however Susan Jones in the primary agent of the profile the activity is<br />
attached to. Using this setting Susan is allowed to view the activity.<br />
3) Disable ability to view full Credit Card Numbers for all Profiles: To further reduce the display of full<br />
credit card numbers while working within the system, when this user setting is checked, only the<br />
masked version of the credit card number is shown in the following locations in the system:<br />
Profiles - Cards Tab<br />
33
<strong>ClientBase</strong> <strong>Online</strong> Introduction & Setup<br />
Res Card - Reservations|Payment Due Date Tab<br />
Invoicing Screen - Invoice Payment Section<br />
Merge to PNR Selection Screen<br />
Merge to PNR Preview Screen<br />
Live Connect Screen<br />
As a reminder that the credit card number will not be passed when using Merge to PNR or Live<br />
Connect, when this setting is checked the program prompts with message, By checking "Disable<br />
ability to view full Credit Card Numbers for all Profiles for this User, Credit Card entries will not be<br />
included in Merge to PNR and Live Connect, since the full Credit Number must result at the end of<br />
these features."<br />
When Disable ability to view full Credit Card Numbers is unchecked, a masked version of the credit<br />
card number is shown in all areas above with the following exceptions:<br />
Profile - Cards Tab: A masked version of the credit card number is shown with a lock icon next<br />
to it. User must click the lock to view the full credit card number. When lock is clicked user is<br />
prompted, "Do you really need to see customer Credit Card number To keep customer data safe<br />
you should minimize the number of moments when sensitive data are visible. Keep in mind that<br />
your access will be logged." Click Yes if you wish to continue and view the full number. This will<br />
also create an Edit Log documenting the User who viewed the number, the Date and Time the<br />
number was viewed and a Description (noting that credit card number was viewed). Click No to<br />
remain on the screen with the masked version.<br />
Merge to PNR data sent (whether clipboard or API) will send the full credit card number<br />
Live Connect data sent will send the full credit card number<br />
By disabling the ability to view full credit card numbers for all User Profiles, that credit card entries<br />
will not be included in Merge to PNR and Live Connect. Full credit card numbers must display at the<br />
end of these features.<br />
SAVED SEARCH DEFAULTS<br />
Each file manager (Profile, Activity, and Res Card) comes with a default set of folders, which<br />
represent a stored set of query or search filters. In addition to the default folders, your agency and<br />
agents can create their own custom folders. This area of the user login allows you to identify which<br />
folder should be opened by default (within each manager) when first signing into <strong>ClientBase</strong>.<br />
Choose from the drop-down menu folders you want to see when first entering <strong>ClientBase</strong> with this<br />
login.<br />
34
<strong>ClientBase</strong> <strong>Online</strong> Introduction & Setup<br />
PROFILE DEFAULTS<br />
Each profile type is made up of several links of information. Under Profile Defaults, select which link<br />
first appears when viewing each type of profile. For example, you may want your agents to see<br />
marketing information first thing every time they retrieve a leisure client profile. If so, click the down<br />
arrow next to Leisure and select Marketing to select any link for a profile type.<br />
COMMUNICATION DEFAULTS<br />
The agency is no longer confined to its four walls. With so many outside agents and employees<br />
working from distant locations, customers come with many different area codes and even from<br />
different countries. Agent users have the opportunity to save default phone information as part of<br />
their log in. Note: If this screen is left blank, then information that is listed under Settings is used.<br />
LIVE CONNECT<br />
This set-up area is for agencies who want to use Live Connect in the Res Card.<br />
Set up for some Live Connect agent logins can be done in two ways - globally under Settings (if all<br />
agents share the same user name, password or account number), or individually. When Live<br />
35
<strong>ClientBase</strong> <strong>Online</strong> Introduction & Setup<br />
Connect is launched, the system first looks to see if there is login information at the User Login level,<br />
and if not, then looks for the login information at the Settings (global defaults) level. Set up Live<br />
Connect individual logins here or have each agent enter his own logins under Tools|My Login.<br />
Live Connect Provider: Select from the drop-down list.<br />
User Name, Password and Account Number: Enter the necessary fields based upon the login<br />
information provided to you by the Live Connect provider.<br />
Setting up Individual Login Information: To set up Live Connect for each user login, click on the Live<br />
Connect tab in the User Setting. Click Add to add a Live Connect Provider User.<br />
(For a complete overview of use Live Connect, please refer to the chapter An In-Depth Look at Live<br />
Connect.)<br />
PNR IMPORT<br />
You may be instructed to enter information here for PNR Import to work with your login. See section,<br />
An In-Depth Look at PNR Import.<br />
E-MAIL SETTINGS<br />
<strong>ClientBase</strong> uses the SMTP (Simple Messaging Text Protocol) to send emails. Complete the User<br />
Login SMTP Settings obtained from the entity responsible for maintaining your mail server (ISP).<br />
From E-Mail Address: Enter the email address for the user login you are setting up. The address<br />
entered here appears as the from address for all emails sent from this user. If you wish to change<br />
this address frequently, do so at the email level when you are sending it out.<br />
In the From E-Mail field, if you type joyce@Trams.com and a message is sent, you see the From<br />
field saying joyce@Trams.com. Some people prefer it to look like this instead, Joyce Smith. To<br />
have it appear like this, type Joyce Smith instead of just joyce@Trams.com.<br />
You can also use your company name or department name; for example, Travel With the<br />
Stars or Star Travel Marketing.<br />
Outgoing Mail Server (SMTP): Enter the outgoing mail server name determined in your steps above.<br />
Examples: mail.domainname.com, smtp.domainname.com, or gomail.wspan.com).<br />
Port: This setting defines the TCP/IP port which your email application listens on for incoming mail.<br />
If left blank, this setting uses port 25 by default, which is the Internet standard for receiving SMTP<br />
mail. In some situations, you may have chosen to move the SMTP service to another port. Perhaps<br />
36
<strong>ClientBase</strong> <strong>Online</strong> Introduction & Setup<br />
you already have a service on port 25, and you do not want the services to conflict over the port<br />
assignment. In such a case, enter the port <strong>ClientBase</strong> should use.<br />
The default port for encrypted connections is 465 and unencrypted is 25. <strong>ClientBase</strong> will<br />
automatically set the port to these defaults when choosing a Secure Connection setting.<br />
Authentication Type: Set to Default, a setting used to authenticate your connection to the SMTP mail<br />
server by forcing a USER name and password.<br />
None: If your agency is hosting your own email server and the network login has been configured<br />
to handle the authentication to the SMTP Server automatically, set this field to None.<br />
E-Mail Account Login and Password: Use when Login Type is set to Default. Enter your E-Mail<br />
account login and password here.<br />
Secure Connection: <strong>ClientBase</strong> Merge to Email feature supports SSL/TLS secure connections. A<br />
drop-down enables you to select from four options: None, TLS (if available), TLS, and SSL.<br />
The type of connection you select is determined by the type of security supported by your email<br />
provider or Internet Service Provider (ISP). Please contact your ISP to find out which setting is<br />
correct for your email account.<br />
SSL: Use SSL for encrypting email sent via SMTP.<br />
TLS: Use TLS for encrypting email sent via SMTP.<br />
TLS, if available: Attempt to use TLS for encrypting email sent via SMTP. If the server does not<br />
support TLS, SSL will be attempted instead.<br />
None: You do not wish encrypt your email(s) or your SMTP server does not support SSL/TLS.<br />
TLS (Transport Layer Security) is quickly becoming the common standard for encrypting emails.<br />
SSL (Secure Sockets Layer) is the predecessor to TLS. There are very few differences between SSL<br />
and TLS. TLS's encryption is a little stronger, however, both types are almost identical, with only<br />
minor technical differences in the way the email is encrypted and transmitted.<br />
The default port for encrypted connections is 465 and unencrypted is 25. <strong>ClientBase</strong> will<br />
automatically set the port to these defaults when choosing a Secure Connection setting. Here are<br />
some settings for common ISP’s:<br />
AOL<br />
Authentication Type: Default<br />
Outgoing Mail Server: smtp.aol.com<br />
Port: 465 or 587<br />
Secure Connection: SSL<br />
AT&T Yahoo<br />
Authentication Type: Default<br />
Outgoing Mail Server: smtp.att.yahoo.com<br />
Port: 465 or 587<br />
37
<strong>ClientBase</strong> <strong>Online</strong> Introduction & Setup<br />
Secure Connection: SSL<br />
GMail (Also works for Google Apps)<br />
Authentication Type: Default<br />
Outgoing Mail Server: smtp.gmail.com<br />
Port: 587 (may also be 465)<br />
Account Login: Full e-mail address (e.g., name@gmail.com)<br />
Password: Your Gmail password<br />
Secure Connection: TLS, if available<br />
GoDaddy<br />
Authentication Type: Default<br />
Outgoing Mail Server: smtpout.secureserver.com<br />
Port: 80<br />
Account Login: Full e-mail address (e.g., name@gmail.com)<br />
Password: Your GoDaddy e-mail password<br />
Secure Connection: SSL<br />
Hotmail<br />
Authentication Type: Default<br />
Outgoing Mail Server: smtp.live.com<br />
Port: 465 or 587<br />
Secure Connection: SSL<br />
Yahoo<br />
Authentication Type: Default<br />
Outgoing Mail Server: smtp.mail.yahoo.com<br />
Port: 465 or 587<br />
Secure Connection: SSL<br />
Note that the free version of Yahoo mail does not support SMTP. You must subscribe to Yahoo Mail<br />
Plus or Business.<br />
Import Profile Data From an ASCII (.txt) File<br />
Agencies may use many different software programs to maintain customer data such as names,<br />
addresses, phone numbers and marketing information. Ideally, most agencies implementing<br />
38
<strong>ClientBase</strong> <strong>Online</strong> Introduction & Setup<br />
<strong>ClientBase</strong> prefer to electronically "import" customer information to the <strong>ClientBase</strong> profiles rather<br />
than manually re-entering it. Later, when the <strong>ClientBase</strong> database is up and running, agencies may<br />
want to import other miscellaneous electronic files as well, such as a purchased mailing list.<br />
Although <strong>ClientBase</strong> can't anticipate every possible program used, if your agency has a database of<br />
customer information in a program that can put that information into an ASCII (American Standard<br />
Code for Information Interchange) file (.txt), chances are an electronic "import" is possible...and<br />
easy!<br />
Only the Manager Authorization has permission to do a Profile Import.<br />
Using the <strong>ClientBase</strong> Import Wizard<br />
The <strong>ClientBase</strong> import utility can only import tab or comma delimited ASCII text files. This means<br />
that the file you are importing must be saved in .txt format and use a carriage return between each<br />
profile record, and either a tab or comma between each field within each record. If the file you would<br />
like to import is not in this format, use a program like Excel to open the file and then save in .txt<br />
format.<br />
Step 1: Start the Import Wizard. Agencies that obtain profile data in a tab or comma delimited<br />
ASCII file (.txt file) can import these profiles directly into <strong>ClientBase</strong> as a user with administrative<br />
permissions and clicking Tools|Import.<br />
A wizard steps the user through the following steps making it very simple to map the fields included<br />
in the ASCII file to the profile fields included in a <strong>ClientBase</strong> profile. All profiles imported via the<br />
Import feature are appended to any existing profiles within your current database. (The import<br />
feature does not currently update existing profiles.)<br />
Step 2: Retrieve the .txt file that you would like to import by clicking Browse.<br />
First Line is Header: If the first line is a table header, check in this box to read the headers for the<br />
file.<br />
Delimiter: The default is set to Tab. From the drop-down menu, indicate whether the file to import<br />
is comma delimited.<br />
Click Upload File to continue.<br />
39
<strong>ClientBase</strong> <strong>Online</strong> Introduction & Setup<br />
Step 3: Map Profile General Information<br />
Interface ID Filter: From the drop-down menu, select Import as is (DO NOT FILTER) which brings<br />
over all special characters such as dashes, parentheses, etc.; or Only Grab Alpha-Numeric<br />
Characters which strips all special characters from Interface ID. by dropping dashes, brackets, etc.<br />
(In order to easily and consistently identify an existing customer or vendor within different<br />
applications used within the agency (your GDS, your Back Office etc.), a unique ID should be<br />
assigned to each profile. This ID is called the "Interface ID". As an example, this field is associated<br />
with the interfacing of records generated from the GDS (Front Office) to the agency accounting<br />
system (Back Office). If your agency works with client or vendor data within multiple systems then<br />
we strongly suggest creating a unique Interface ID for each profile.)<br />
Click on each <strong>ClientBase</strong> Field to assign a field in your ASCII file. Upon clicking a specific field for<br />
importing to, notice two buttons that are used to describe how that data can be imported.<br />
Update Rule: Options are Insert All Profiles, Update if Interface ID Matches, or Update if Profile No<br />
matches. If Update if Interface ID Matches or Update if Profile No is the option selected, these fields<br />
must be mapped. Clicking Next to advance forward is not allowed until a mapping is set.<br />
Map: Mapping is used when a data field exists and is populated in the file while importing. You want<br />
to bring the data in "as is" to a field in the database. Select the name of the field that exists in the<br />
source file from the drop-down.<br />
Constant: Use this feature when using the same value for every profile being imported. If all the<br />
files being imported are Leisure profiles, set the Profile Type field as a constant with a value of<br />
Leisure.<br />
Reset: Click to reset any mapping or constant value for that field.<br />
Make sure to save each mapping or constant value. Repeat this process for each <strong>ClientBase</strong> field<br />
you want to populate. After mapping or setting your constant for each field click Next to continue.<br />
Step 4: Map Communication Entries<br />
Default Country Code/Area Code: Enter a default country and area code.<br />
Click on each <strong>ClientBase</strong> Field to assign a field in your ASCII file. Upon clicking a specific field for<br />
importing to, notice two buttons that are used to describe how that data can be imported.<br />
Map: Mapping is used when a data field exists and is populated in the file while importing. You want<br />
40
<strong>ClientBase</strong> <strong>Online</strong> Introduction & Setup<br />
to bring the data in "as is" to a field in the database. Select the name of the field that exists in the<br />
source file from the drop-down,<br />
Constant: Use this feature when using the same value for every profile being imported.<br />
Reset: Click to reset any mapping or constant value for that field.<br />
Make sure to save each mapping or constant value. Repeat this process for each <strong>ClientBase</strong> field<br />
you want to populate. After mapping or setting your constant for each field click Next to continue.<br />
Step 5: Map Address Entries<br />
Click on each <strong>ClientBase</strong> Field to assign a field in your ASCII file. Upon clicking a specific field for<br />
importing to, notice two buttons that are used to describe how that data can be imported.<br />
Map: Mapping is used when a data field exists and is populated in the file while importing. You want<br />
to bring the data in "as is" to a field in the database. Select the name of the field that exists in the<br />
source file from the drop-down,<br />
Constant: Use this feature when using the same value for every profile being imported.<br />
Reset: Click to reset any mapping or constant value for that field.<br />
Make sure to save each mapping or constant value. Repeat this process for each <strong>ClientBase</strong> field<br />
you want to populate. After mapping or setting your constant for each field click Next to continue.<br />
Step 6: Map Marketing Entries<br />
If you have Marketing Entries to map or for which to set a constant, click Add Marketing Code.<br />
Choose the marketing table you want to use. Notice two buttons that are used to describe how that<br />
data can be imported.<br />
Map: Mapping is used when a data field exists and is populated in the file while importing. You want<br />
to bring the data in "as is" to a field in the database. Select the name of the field that exists in the<br />
source file from the drop-down,<br />
Constant: Use this feature when using the same value for every profile being imported.<br />
Reset: Click to reset any mapping or constant value for that field.<br />
Make sure to save each mapping or constant value. Repeat this process for each <strong>ClientBase</strong> field<br />
you want to populate. After mapping or setting your constant for each field click Next to continue.<br />
Step 7: Map Profile Remarks<br />
If you have remarks of additional fields that you have not found a place for, click Add Remark. By<br />
41
<strong>ClientBase</strong> <strong>Online</strong> Introduction & Setup<br />
default the <strong>ClientBase</strong> remarks field is selected. Notice two buttons that are used to describe how<br />
that data can be imported.<br />
Map: Mapping is used when a data field exists and is populated in the file while importing. You want<br />
to bring the data in "as is" to a field in the database. Select the name of the field that exists in the<br />
source file from the drop-down,<br />
Constant: Use this feature when using the same value for every profile being imported.<br />
Reset: Click to reset any mapping or constant value for that field.<br />
Make sure to save each mapping or constant value. Repeat this process for each <strong>ClientBase</strong> field<br />
you want to populate. After mapping or setting your constant for each field click Next to continue.<br />
Step 8: Review Summary and Import your records. Upon completing the wizard's 7 steps above,<br />
click the Finish button and the summary page will display a message "Importing profiles. Please<br />
wait." When this message disappears, the import is complete and you can scroll to the bottom of the<br />
summary page to view the number of profiles successfully imported.<br />
Set Up Settings (Global Defaults)<br />
Now that you have set up Branch Entries, User Logins/Permissions, and have imported any ASCII<br />
files, you are ready to set up additional Settings. Most of these are global (meaning that when you<br />
set them up, they apply to all who use <strong>ClientBase</strong>), unless otherwise specified. Go to Tools|Settings<br />
to customize these features.<br />
42
<strong>ClientBase</strong> <strong>Online</strong> Introduction & Setup<br />
43
<strong>ClientBase</strong> <strong>Online</strong> Introduction & Setup<br />
Default Field Values for New Profiles<br />
When creating new profiles in <strong>ClientBase</strong> you have the ability to default a value into the following<br />
fields: Courtesy Title, City, State, Zip, Country, Salutation, Interface ID. Use the settings within this<br />
area to identify the defaults for your agency.<br />
Courtesy Title/Zip Code/City/State/Country/Salutation: A default value can be assigned by<br />
selecting from the drop-down for these areas.<br />
InterfaceID: In the InterfaceID area, choose from the drop-down menu a format for generating the<br />
default Interface ID.<br />
or<br />
or<br />
or<br />
with starting number set by agency, therefore allowing for sequential Interface ID<br />
numbering to go as high as 9,999,999,999, or<br />
: The Interface ID you are generating in <strong>ClientBase</strong> can be based on the Full Name field,<br />
First Name field, Last Name field, the Residential Phone field, or a combination of the all those fields<br />
(from 1-10 alpha-numeric characters). N uses a character from the name field, F uses a character<br />
from the first name field, L uses a character from the last name field, and a digit uses that position<br />
from the residential phone field (0 signifies the 10th digit of the phone number). Select a sample mask<br />
from the drop-down menu or create any mask that you desire. We recommend using the Interface<br />
ID mask of NNN4567890 which uses the first 3 letters of the client's last name, and the last 7 digits<br />
of the client's phone number. (If no phone number exists, an Interface ID is generated with just the<br />
44
<strong>ClientBase</strong> <strong>Online</strong> Introduction & Setup<br />
first 3 characters of the client's last name.)<br />
Sample Masks:<br />
Mask Name field Phone field InterfaceID<br />
NNN4567890 MEYER/SHARON +1 (310) 641-8726 MEY6418726<br />
NNNNNNNNNN ROSEN/LEE +1 (310) 641-8726 ROSENLEE<br />
N6N7N8N9N0 PALLEY/DAN +1 (310) 641-8726 P1A8L7L2E6<br />
FFFF-LLLLL SMITH/JANE +1 (310) 555-1234 JANE-SMITH<br />
NN-4567890 SMITH/JOHN +1 (310) 987-6543 SM-9876543<br />
Note: Characters from the name, first name, and last name fields are taken from left to right. Slashes<br />
and spaces are skipped. Any characters that is not an "N", not an "F", not an "L", and not a digit from<br />
"0" to "9" are treated as a constant. See last two samples above where "-" is in the mask.<br />
Require Unique, Non Blank I/F ID On New Profiles: If this box is checked, you will NOT be able<br />
to create a "new" profile if the Interface ID field of the profile being created is an Interface ID that has<br />
already been used for an existing profile in the system.<br />
Profile More Field Categories<br />
More Fields are available for further customizing <strong>ClientBase</strong> to your agency’s needs. If you can’t<br />
find a place in <strong>ClientBase</strong> to store information, create a field, and its drop-down menu items yourself.<br />
Perhaps you want to create a pull-down menu for special services such as “meet and greet” or<br />
“wheelchair assist.” Social security numbers or driver’s license numbers can be stored here or any<br />
other information that does not fit into one of the other pre-designed fields.<br />
Fields stored in the More Fields tab include a field name and an optional drop-down list of defaults<br />
entries. More field categories is where to assign a field name. Go to Tool|Settings|User-Defined<br />
Fields|More Field Items to create the drop-down list of defaults. (Hint: Consider using a marketing<br />
code or group name instead of a more field to track temporary information because More Fields are<br />
difficult to remove and the Windows user can use the Global Modify feature to remove Group names<br />
and Marketing Codes.)<br />
A Format Type is available in the Profile More Fields default settings to allow you to specify what<br />
characters are entered into the field.<br />
Enter number of characters allowed<br />
in the Max Length field.<br />
Format Type displays a drop selection of options which are:<br />
o None (More Fields will continue to work as it does currently)<br />
o Letters Only<br />
o Numbers Only<br />
o Letters and Numbers Only.<br />
A different format option can be selected for each Profile More Field. A field length can also be set<br />
for a More Field by entering the number of characters allowed in the Max Length field. Maximum<br />
45
<strong>ClientBase</strong> <strong>Online</strong> Introduction & Setup<br />
number of characters for a More Field is 80 characters. These formatting options can only be used<br />
when adding new Profile More Field categories. Existing Profile More Field categories cannot be<br />
formatted.<br />
When a Profile More field is formatted, when entering a value for the More Field, the value can only<br />
be entered using the format designated for that category. If an incorrect value is entered a message<br />
is displayed informing you of the proper format. So if the More Field was formatted to accept numbers<br />
only and an alpha character is entered into the field, the message would appear, Invalid Entry.<br />
Format Type is Numbers Only.<br />
Note: The Format Options menu is read only for sync copies.<br />
Marketing Categories and Marketing Codes<br />
Marketing categories and codes are used to capture clients' travel preferences and demographics in<br />
the client profile. Use Add, Modify (after clicking and editing entry), and Delete to customize<br />
Marketing Categories. You will not be able to delete a Marketing Category if Marketing Codes are<br />
connected to it. To customize Marketing Codes, choose the Category from the drop-down and add<br />
a Marketing Item. The Marketing Partner ID is left blank unless you have been instructed to enter<br />
this item. To modify an entry, click it to select, edit and Modify. Click Delete after clicking on entry<br />
to remove.<br />
User Defined Fields<br />
Many of the drop-down menus in <strong>ClientBase</strong> can be customized for your agency in an area called<br />
User-Defined Fields. From the drop-down menu click on the Field to modify. Add a new drop-down<br />
menu item, or modify/delete an existing one by clicking once on the entry. Check if you want to allow<br />
Free Flow into the field. Click Save to save entry.<br />
Click on the Field to<br />
modify.<br />
Fields that can be customized are: Aircraft Type; Bedding; Booking Method; Car Pref. Special<br />
Options; Cards; City Codes; City State Zip; Class of Service; Communication Description; Courtesy<br />
Title; Cruise Pref. Dinning Preference; Cruise Pref. Ship Size; Employee Position; Family/Tvlr.<br />
Relationship; Fly Pref; Special Option; Hotel Pref. Bedding Type; Hotel Pref. Room Locations; Hotel<br />
Pref. Special Needs; Issuing City; Issuing Country/Citizenship; Mailer Type; Marketing Source; Meal<br />
Service; Profile More Field Items; Rail Provider; Referred By; Reminder Type; Res Card More Field<br />
Items; Res Cards: Destination; Res Card: Itemize Amt Description; Reservation Cycle; Reservation<br />
Status; Seat Type; Segment Passenger Status; Special Date Type; Subject for Mailer; Subject for<br />
Note; Subject for Reminder, and Train Type.<br />
46
Communication Defaults<br />
<strong>ClientBase</strong> <strong>Online</strong> Introduction & Setup<br />
All profiles in <strong>ClientBase</strong> contain a communications table in the general information tab. Each<br />
communication entry includes a type which can be Phone, Fax, Email or Web Site. Each type allows<br />
for an unlimited number of entries, but only one “primary” entry for each. Phone and fax type entries<br />
include a country code, area code, prefix and suffix. (Note: Country code, area code, and<br />
communication descriptions can be overwritten in the User Settings Communication Default tab<br />
under Tools|My Login, or by the SYSDBA in Tools|Settings|User Logins.)<br />
Enter the desired default country code and area code here in the communications default. Once<br />
completed, if a phone or fax number is entered without a country code or area code, these defaults<br />
are filled in automatically. In addition, each communication entry includes a description field, and a<br />
default entry can be captured here for each communication type.<br />
You can also default for each setting whether you want the Include Marketing Permission Setting to<br />
be visible for each communication type, and set a default of checked or uncheck for this type (except<br />
for Website).This area can be customized directly from <strong>ClientBase</strong>, including your Phone, Fax, Email<br />
and Web site default settings. From this area you can setup default Country Code and Area Code,<br />
as well as your default communication descriptions and marketing permission settings. Upon<br />
completing your default settings click Save.<br />
Group Lists<br />
<strong>ClientBase</strong> has the ability to add group names to Client, Vendor, Agent and Other profiles, and to<br />
Invoices, Payments, Res Cards, and Inventory. Since this is a table shared by Trams Back Office<br />
users, a change in here changes the TBO group table as well. Click Add to add a new group name,<br />
and check off the areas you want this group to appear on so you can tag entries. Use Add, Modify<br />
and Delete to customize group lists.<br />
47
<strong>ClientBase</strong> <strong>Online</strong> Introduction & Setup<br />
Membership ID Fields<br />
If the agency needs Membership ID fields for use in the client profile, this is where these are setup.<br />
Display Membership ID/Associate ID: Check here to make these fields visible for entry in the client<br />
profile.<br />
Format Type: From the drop-down, determine how the ID should be entered - None, Letters Only,<br />
Numbers Only or Letters and Numbers Only.<br />
Max Length: Determine the maximum length of the entry by putting a number in this area.<br />
Merge to PNR Settings<br />
Merge to PNR Settings can be customized directly from <strong>ClientBase</strong>. Merge to PNR Settings allows<br />
you to store custom settings for each GDS which is then applied when using the Merge to PNR<br />
feature. From the Merge to PNR Settings area, first select the desired Reservation System<br />
(Amadeus, Apollo, Galileo, Sabre or Worldspan). Once selected, you can customize Special Keys,<br />
48
<strong>ClientBase</strong> <strong>Online</strong> Introduction & Setup<br />
Fonts, Email Symbols, method of sending data, order of PNR Entries and Passenger Name formats.<br />
Special Keys: Find the characters especially designed for the CRS system. Since these special<br />
characters may be used when formatting your data in <strong>ClientBase</strong>, it's important to include any you<br />
want to use in the special keys field. If any are missing, click Special Keys and find the special<br />
character to bring into <strong>ClientBase</strong>. An easier way to do this is to use the Windows copy command<br />
to copy the character from your CRS; then use the Windows paste command to<br />
paste into the special keys field. Any special keys captured here are made available on a toolbar<br />
when creating PNR rules or entering PNR entries into any of the PNR entry tables.<br />
Font and Size: Select the desired font and size on entries (we suggest leaving the default).<br />
E-Mail@Symbol: Enter the GDS email symbol.<br />
Order of Entries: A listing of all possible PNR rules and entry tables appears here for you to<br />
designate the order in which they should be listed when merging a profile to a PNR. A default order<br />
is included, but can be modified.<br />
Clipboard: How <strong>ClientBase</strong> works with each GDS varies. Here's some hints on setting up for each.<br />
Amadeus: Leave the "Use Clipboard" unchecked if you are using the APS or Vista platforms of<br />
Amadeus. Amadeus has 3 platforms - APS (which stands for Amadeus Pro Software), Vista, and<br />
ProWeb. The Amadeus tool we use for Merge to PNR and PNR Import is called Amadeus +Script<br />
and is available with both APS and Vista platforms. (If the agency's APS or Vista platform did not<br />
come with this +Script tool activated, then contact the Amadeus support desk to turn it on. Amadeus<br />
has agreed to waive an fees associated with +Scripts for all Trams customers, so there is no cost,<br />
just a phone call to the support desk.) Note: ProWeb can only be used with a clipboard for Merge<br />
to PNR.<br />
You do need to download the following files to get the Amadeus Merge to PNR feature to work<br />
properly:<br />
1) For all users, download and unzip the following cbbcomps utility<br />
ftp.Trams.com/pub/updates/utilities/CBBComps.zip<br />
49
<strong>ClientBase</strong> <strong>Online</strong> Introduction & Setup<br />
2) Run on each workstation to install and register the necessary Amadeus files for Merge to PNR<br />
and PNR Import features to work.<br />
3) Verify your APS or Vista +Script tool is activated.<br />
Apollo/Galileo: Leave Use Clipboard unchecked.<br />
Sabre Agencies:<br />
1) For all users, download and unzip the following cbbcomps utility:<br />
ftp.Trams.com/pub/updates/utilities/CBBComps.zip<br />
2) Run on each workstation to install and register the necessary Sabre files for Merge to PNR and<br />
PNR Import features to work.<br />
Sabre Red Workspace Users: An API is the tool <strong>ClientBase</strong> uses to connect to the Sabre Host. In<br />
order for PNR Import (and Merge to PNR) to work, you must enable the MySabre API within Sabre<br />
Red. Select Tools|Options|Sabre System|Advanced and check Sabre Emulator API:<br />
Worldspan: Leave Use Clipboard checked.: The Windows clipboard method is used to copy/paste<br />
data to a PNR if <strong>ClientBase</strong> does not have a way to transmit data directly to the GDS PNR, (see<br />
Merge to PNR directions in section Putting Profiles to Use for You for more details.<br />
Send as one transmission: If you check this setting, <strong>ClientBase</strong> strings together as many entries<br />
as it can into one transmission with the use of end items at the end of each line. This reduces the<br />
number of hits and potentially the delay created by transmitting each line separately. Please note<br />
that Sabre only allows 30 entries strung together in one transmission, so depending on the number<br />
of entries included in a given merge to PNR, the entries may be broken into multiple transmissions.<br />
Passenger Name Format: Customize the default name format to add a middle initial, middle name,<br />
or remove the courtesy title etc. In addition to being able to use any of these merge fields, Courtesy<br />
Title, First Name, Last Name, Middle Initial, Middle Name, No. of Passengers, and Find the<br />
character, there is also a checkbox called Combine same Last Name entries which allows you to set<br />
whether common name entries appear as one or many name entries.<br />
To modify this default PNR Custom Rule, start with the same format you would type into your GDS,<br />
and select any Merge Field to include by clicking the field and Insert. You may choose to include<br />
merge fields that aren’t always completed in every profile. An example of this is Courtesy Title. If<br />
the field is completed, you want it included; but if it’s not, you don’t want to include the formatting with<br />
a blank space. To handle this, PNR rules uses left and right brackets [ ] to surround a set of<br />
characters within a rule, and designate that if the merge field within those brackets is blank, then<br />
50
<strong>ClientBase</strong> <strong>Online</strong> Introduction & Setup<br />
don’t include any of the characters between the brackets.<br />
Merge to PNR Rules<br />
Merge to PNR Rules allow you to customize how data stored within your <strong>ClientBase</strong> profiles gets<br />
formatted for each GDS upon using the Merge to PNR feature. From the Merge to PNR Rules area,<br />
first select the desired Reservation System (Amadeus, Apollo, Galileo, Sabre or Worldspan). Once<br />
selected, a listing of all current PNR Rules is displayed. Click on any of the existing rules to modify<br />
the rule and use Add to add a new rule.<br />
<strong>ClientBase</strong> comes with default entries for all the main PNR entries for each CRS. There is no limit<br />
to the information that can be entered into a PNR as long as it is formatted correctly for your CRS.<br />
If you do not find the desired entry in the set of default entries, follow the directions under PNR rules<br />
to add the desired entry to the selection, or modify any existing entries.<br />
A rule is simply a way of designating how certain fields of information captured in a profile should be<br />
formatted when sent to a PNR. <strong>ClientBase</strong> comes defaulted with standard rules for each CRS,<br />
formatted for sending the following fields of profile data: Bill To Address; Ship To Address; Interface<br />
ID; Phone Numbers; Credit Cards; Frequent Flyer Numbers; and Email.<br />
To retrieve the details for any of the default rules, click the rule to Modify. The contents of each rule<br />
is captured in the area called PNR Custom Rule and is made up of free-flow text, special characters<br />
and merge fields. Review each rule and verify that the formats used in the defaults match the formats<br />
used within your agency when building PNR's. To modify any text, simply type over it. To add an<br />
additional merge field, place your cursor where you would like it to land within the rule, then highlight<br />
the merge field in the Available Fields area and click Insert.<br />
Set Up a New PNR Rule<br />
1. Description of Rule: Enter a brief description of the type of information you want included in this<br />
rule. This description appears on the PNR selection screen when using the merge to PNR feature.<br />
2. Field Groups: Select the type of profile data you want to format for your CRS PNR’s. Click the<br />
arrow located to the right of this field to select from a drop-down list of choices. Each field group<br />
includes a designated list of profile fields available for use within a PNR rule. These profile fields<br />
appear in the Available Fields area when the field group is selected. Available field groups include<br />
51
<strong>ClientBase</strong> <strong>Online</strong> Introduction & Setup<br />
Primary Address, Bill to Address, Ship to Address, Secondary Address, Alternate Address, Phone,<br />
Fax, Email, Passenger Miscellaneous, Credit Card, Frequent Flier, Hotel Program, Other Cards, Car<br />
Program, Miscellaneous, User Login, Primary Agent, Profile Mixed Fields (create a rule with<br />
combination of merge fields), Branch and Res Card Invoice.<br />
3. Always Move This Rule: When checked, this field sets the rule to always move this entry into a<br />
PNR; left unchecked, the entry is optional.<br />
4. Display on Selection Screen: Within each PNR entry or PNR rule that is set as Always Move<br />
This Rule, an option is included called display on selection screen. The PNR selection screen is the<br />
first screen that appears when you merge to PNR, and allows you to select the specific profile data<br />
to be included and sent to the current PNR. For PNR entries that should always move regardless of<br />
the profile or PNR, this Display on Selection Screen can be unchecked so that the first selection<br />
screen is less complicated for the agent to review. These unchecked rules now appear on the<br />
second Additional Entries screen in the merge to PNR, and are automatically moved into the PNR.<br />
5. PNR Custom Rules: Enter the exact format to be entered in the PNR when this rule is selected<br />
using the combination of free-flow text, special characters, and merge fields from the list of available<br />
fields. Refer to your current scripts, GDS format guide and back office format documentation to<br />
create the custom rule.<br />
Handling Blank Merge Fields<br />
When setting up rules, you may choose to include merge fields that aren’t always completed in every<br />
profile. Such fields include Courtesy Title, Apt/Suite, or Company Name. If the field is completed,<br />
you want it included; but if it’s not, you don’t want to include the formatting with a blank space. To<br />
handle this, the PNR rules uses left and right brackets [ ] to surround a set of characters within a<br />
rule, and designate that if the merge field within those brackets is blank, then don’t include any of the<br />
characters between the brackets. Here’s an example:<br />
The brackets around [5/§] suggest that if this is an leisure profile so the<br />
Company Name Merge Field is blank, then don’t include the 5/ or end item formatting either.<br />
Auto-Case Converter Settings<br />
Within this area a listing of the following profile fields is available for automatic case handling: Name,<br />
First Name, Last Name, Courtesy Title, Address 1, Address 2, Apt/Suite, City, Country, Passenger<br />
First Name, Passenger Last Name, Passenger Courtesy Title, and Passenger Relationship/Title. By<br />
placing a check into any of these fields, as you are working within your <strong>ClientBase</strong> Browser profiles,<br />
the first letter of each word entered will be automatically capitalized and the remaining letters will be<br />
automatically set to lower case. If you would like the auto-case converter turned off for any of these<br />
52
<strong>ClientBase</strong> <strong>Online</strong> Introduction & Setup<br />
fields, remove the check from the box preceding the field.<br />
To override the system's automatic case handling for entries such as McLeod or NE (where the auto<br />
case handling reverts to Mcleod and Ne), tab past the field then move back into it (by using<br />
), as the automatic case handling is turned off for a field once entries exist within it.<br />
Another option is to enter McLeod as Mc Leod and NE as N.E., since spaces and punctuation allow<br />
for capitalization.<br />
Tip: If you have many profiles that have already been created by solid caps or all lower case letters,<br />
use the Case Converter in Tools to convert these first before setting this up.<br />
Document Templates<br />
To modify an existing template, click on the template from the listing. The template contents appear<br />
in the screen below the listing for editing.<br />
Use New to create a new template and Delete to remove an existing template. Insert Merge fields<br />
into your template by first putting your cursor within the template body where the merge field is<br />
desired, then clicking on the merge field from the listing to the right. Use Save to overwrite an<br />
existing template and Save As to save as a new template name.<br />
53
<strong>ClientBase</strong> <strong>Online</strong> Introduction & Setup<br />
If you have selected the Document Format of HTML, a new screen appears.<br />
A formatting toolbar is included that makes formatting your text, inserting links, pictures and tables<br />
very easy. Please note this HTML formatting is only included when the template is launched via<br />
Merge to Email. All Templates launched through the Merge to Doc Template feature are converted<br />
to Plain Text upon converting to MS Word.<br />
Note to <strong>ClientBase</strong> Window Users: Document Templates are shared across <strong>ClientBase</strong> <strong>Online</strong><br />
(and <strong>ClientBase</strong> Browser), and <strong>ClientBase</strong> Windows and changes made in either are reflected and<br />
can be launched in both. Please note one very important difference between Document Templates<br />
created/modified in <strong>ClientBase</strong> Windows and Document Templates created/modified in <strong>ClientBase</strong><br />
<strong>Online</strong> (or Browser). The Windows version saves Document Templates as rtf (Rich Text Format),<br />
which means the text can be formatted with different fonts and color etc. and that graphics can be<br />
inserted. Since web applications do not utilize rtf (HTML editing will be coming soon), <strong>ClientBase</strong><br />
has to open any existing Document Template and convert to txt (Plain Text). Therefore if a<br />
Document Template is created or modified in the Windows version and then modified in the Browser<br />
version, the Browser version will convert it to plain text (stripping all formatting and graphics) and<br />
save it as plain text.<br />
To avoid losing formatting features within Document Templates created in the Windows version, we<br />
prompt with a warning message before overwriting an rtf Document Template with plain text. If you<br />
utilize formatting within your Document Templates then we recommend you make all changes to<br />
existing Templates through the Windows version and only add new Templates via the Browser<br />
version.<br />
54
<strong>ClientBase</strong> <strong>Online</strong> Introduction & Setup<br />
Reminder Alarm Settings<br />
By default the alarms are activated globally. To disable alarms, check Disabled.<br />
Client Survey Settings<br />
Check the box next to any of the marketing tables that you want to include in when printing a Client<br />
Survey. There is also an option of Print only codes selected for profile, which when selected, does<br />
not print all marketing codes available, but just the codes that have already been checked off. These<br />
defaults can be overwritten each time a client survey is printed.<br />
Default Field Values for Res Cards<br />
In this area you can further customize your Res Cards and how they default upon creating new Res<br />
55
<strong>ClientBase</strong> <strong>Online</strong> Introduction & Setup<br />
Cards and Reservations.<br />
RES CARD DEFAULTS<br />
Reservation Cycle: Set to default to any of User Definable drop-down options.<br />
Default All Family Members for Leisure Profiles: Check here if you want all Family Members to<br />
automatically be displayed as passengers when you create a new Res Card.<br />
Default Tab Displayed: Select the tab you want to default when entering the Res Card, Reservations,<br />
Invoices, Activities, Agent Remarks, Client Feedback, Attachments, More Fields, or Edit History.<br />
RESERVATION DEFAULTS<br />
Booking Status: Select Confirmed, Quoted, or Canceled from the drop-down menu.<br />
Host Code: If you are using the IC/Host Utility to export invoices to a Host agency, set a default Host<br />
Code that automatically populates whenever adding a new Reservation. The Host Code currently<br />
defaults blank, but click the drop-down and select a default Host Code from the list. (Host Codes are<br />
created under Settings|Host Codes.)<br />
Filter Vendor Profiles for Travel Category Selected: If you have associated Vendor profiles with a<br />
Travel Category in the General Information tab of the Vendor profiles, check here to display only<br />
those vendor profiles of that particular Travel Category for selection off the drop-down menu.<br />
Filter Service Provider Profiles for Travel Category Selected: If you have associated Service Provider<br />
profiles with a Travel Category in the General Information tab of the Service Provider profiles, check<br />
here to display only those Service Provider profiles of that particular Travel Category for selection off<br />
the drop-down menu.<br />
Default Service Provider Name to Vendor Name: If you do not want the Vendor name to<br />
automatically drop into the Service Provider name field in a reservation, uncheck this option.<br />
Reservations Imported from PNR Default to Invoiced Outside of CB: If you do not want the Invoiced<br />
Outside of CB to be automatically checked off when you do a PNR import, uncheck this option.<br />
56
<strong>ClientBase</strong> <strong>Online</strong> Introduction & Setup<br />
Automatically Launch Live Connect for Live Connect Vendors: If you do not want Live Connect<br />
vendors to be automatically launched when creating a reservation, uncheck this area.<br />
Print Address on Itin/Invoice for Hotel/Car/Insurance/Miscellaneous/Tour/Transportation: Check or<br />
uncheck options for printing addresses on the itinerary/invoice for Hotel, Car, Insurance,<br />
Miscellaneous, Tour, or, Transportation.<br />
Print Cruise Itin Option: Select the default Cruise Itinerary Option from drop-down, Sort by Date/List<br />
Arrive then Depart or Do Not Sort by Date/List Arrive then Depart.<br />
Print Itemization Option: Choose the following from the drop-down for printing itemization details,<br />
Print All Itemization Details, Summarize by Passenger, Summarize by Category/Passenger,<br />
Summarize by Description/Passenger, or Do not Print Itemization.<br />
Res Card More Fields Categories<br />
Res Card More Fields are used for capturing any type of trip data that the Res Card currently is not<br />
prompting for, giving you the ultimate flexibility in tracking trip information. Res Card More Fields can<br />
be linked to a Trams Back Office UDID (User Defined Interface Data) field too, so upon invoicing in<br />
<strong>ClientBase</strong>, the more field entry automatically populates the appropriate TBO UDID field. When<br />
setting up the Res Card More Fields, you have the ability to link a Profile More Field to a Res Card<br />
More Field which means upon creating a new Res Card, the Res Card More Field automatically is<br />
completed with the entry in the profile more field.<br />
This means if certain client data is being captured in a profile more field and being merged into a<br />
PNR via the PNR rules for the purpose of completing a TBO UDID, you can invoice from <strong>ClientBase</strong><br />
and automatically complete that data into any new Res Cards, and upon invoicing complete the TBO<br />
UDID with no extra steps.<br />
Setup Res Card More Fields categories and items by following these steps:<br />
1) Go to More Field Categories to assign a field name by going to Settings|Res Card More Field<br />
Categories, and complete the following fields:<br />
No. The system will assign a number.<br />
After entering field name, field format, put maximum field length<br />
and if using UDID’s in TBO, associate the entry with a UDID.<br />
Category Name: Enter a descriptive name.<br />
Format Type/Max Length: Allows you to specify what characters are entered into the field.<br />
Selection of options are:<br />
**None (Res Card More Fields will continue to work as it does currently)<br />
**Letters Only<br />
**Numbers Only<br />
**Letters and Numbers Only<br />
A different format option can be selected for each Res Card More Field.<br />
A field length can also be set for a Res Card More Field by entering the number of characters allowed<br />
in the Max Length field. Maximum number of characters for a More Field is 80 characters. The new<br />
57
<strong>ClientBase</strong> <strong>Online</strong> Introduction & Setup<br />
formatting options can only be used when adding new Res Card More Field categories.<br />
When a Res Card More field is formatted, when entering a value for the More Field, the value can<br />
only be entered using the format designated for that category. If an incorrect value is entered a<br />
message is displayed informing you of the proper format. So if the More Field was formatted to<br />
accept numbers only and an alpha character is entered into the field, the message would appear,<br />
Invalid Entry. Format Type is Numbers Only.<br />
Notes: Existing Res Card More Field categories cannot be formatted.<br />
The new Format Options menu is read only for sync copies.<br />
UDID No.: To link a specific UDID (User Defined Interface Data) from Trams Back Office to a Res<br />
Card More Field so that upon invoicing, a Res Card the value in the Res Card More Field<br />
automatically populates the value in the TBO UDID, select from the drop-down menu. When the<br />
reservation is invoiced, the UDID fields in TBO are populated and appear on TBO invoices/reports,<br />
although they do not appear on invoices generated in <strong>ClientBase</strong>. This field can be left blank.<br />
2. Go to Settings|User Defined Fields|Res Card More Field Items and use Add, Modify, and<br />
Delete to setup the drop-down list of defaults by completing the following fields:<br />
Category: Select the desired Res Card More Field category name by selecting from the drop-down<br />
menu. This listing was created when you created the more field categories above.<br />
Code: Type in the desired code. Click OK.<br />
3. Repeat these steps for each Res Card More Field code that you would like to include for each Res<br />
Card More Field category.<br />
To learn how to use the Res Card More Fields, please refer to chapter, An In-Depth Look at Res<br />
Cards.<br />
Res Card Insurance Prompting<br />
From this area you have the ability to Turn on Insurance Waiver Prompts for both invoices and<br />
itineraries. When these settings are checked, upon issuing an invoice or itinerary, agents are<br />
prompted if no insurance exists within the Res Card's reservations (including itemization and Service<br />
Provider records). From this area you can set a default insurance vendor for when your agents<br />
choose to accept the insurance prompt. This simply defaults a new insurance reservation with that<br />
58
<strong>ClientBase</strong> <strong>Online</strong> Introduction & Setup<br />
vendor. Capture an Insurance Waiver Message (up to 512 characters). This message prints on<br />
each invoice or itinerary when no insurance exists and the agent declines insurance for this Res<br />
Card.<br />
Res Card Tax and Commission Defaults<br />
<strong>ClientBase</strong> Res Card reservations have the ability to capture up to 4 different Tax Rates/Codes and<br />
a Commission. These settings establish the default rates when a new reservation is first created.<br />
These defaults can be overridden on a reservation-by-reservation basis. If you are not a TBO user,<br />
designate which taxes go to which tax fields when invoicing from <strong>ClientBase</strong>. The commission rate<br />
for vendors used in reservations is defaulting to the vendor commission field in the vendor profile. If<br />
the vendor default commission is blank, then the commission defaults to the amount entered in the<br />
field called Comm Rate. Note: Canadian users find additional fields to accommodate the GST/HST/<br />
VAT rate. The GST/HST/VAT Tax codes are used for PNR Import.<br />
Hint: Want to fill in taxes and commissions on an reservation-by-reservation basis, leave blank.<br />
Default Field Values for New Invoices<br />
These Settings provide you the ability to set defaults for each invoicing field when invoicing from the<br />
59
<strong>ClientBase</strong> <strong>Online</strong> Introduction & Setup<br />
<strong>ClientBase</strong> Res Card. The following defaults can be set.<br />
Form of Payment can be set to default to either Cash, Check, Credit Card, CC Merchant or No<br />
Default. Please Note that if the default Form of Payment is set to Credit Card or CC Merchant, the<br />
system automatically defaults the credit card number to the first credit card entry within the profile<br />
being invoiced.<br />
Trip Balance Due Date can be set to default to either the Earliest Reservation Final Payment Due<br />
Date or No Default.<br />
Save All Invoices To Branch X allows an agency to setup multiple branches with different headers/<br />
footers, default remarks and format settings within <strong>ClientBase</strong> but still save all invoices to a single<br />
branch in Trams Back Office. This setting works well for agencies with IC's that want different invoice<br />
defaults in <strong>ClientBase</strong> but still need all accounting data to land in one branch.<br />
Travel Category Defaults allows you to set a default Travel Type for each reservation Travel<br />
Category.<br />
Travel Type/Submit To Defaults allows you to set a default Submit To setting for each Travel Type<br />
as well as a default setting for printing within Invoice Totals when that Travel Type is set to Comm<br />
Track.<br />
Batch Reminder Settings<br />
Since many times an agent creates multiple reminders at one time after booking a reservation to help<br />
remember common tasks such as collecting deposit, final payment, checking for documents,<br />
sending welcome home letters, etc., you can create a global set of Batched Reminders that can be<br />
launched from within a Res Card to create multiple reminders all at one time.<br />
Although you can add unlimited batches to this area, a default cruise/tour batch has been created for<br />
you which contains the reminders, Deposit Due, Final Payment Due, Validate Int’l Security<br />
Information, Send Gift, Check for Documents, and Welcome Home. To create a batch reminder:<br />
1) Go to Tools|Settings|Batch Reminder.<br />
60
2) Highlight the default Cruise/Tour Batched Reminder and click Edit on its right.<br />
<strong>ClientBase</strong> <strong>Online</strong> Introduction & Setup<br />
Click here to add a new<br />
batch.<br />
Click Edit for each Reminder included within this batch and review and update accordingly. Upon<br />
customizing each Reminder and adding any additional Reminders, click Save Changes.<br />
3) Click Add New Batch to create a new set of Batched Reminders if desired.<br />
4) Name the Batch and Enter a Description (i.e., Cruise Booking Reminders, Default Reminders for<br />
a Cruise Reservation).<br />
5) A Batch of Reminders can include any number of Reminders from 1 to 100. Click Add to create<br />
the first reminder for the batch and the following fields appear:<br />
Reminder Date: These Global Reminder settings need to use date entries as Merge fields so that<br />
upon launching the Batched Reminders from within a Res Card the appropriate Reminder Date can<br />
be defaulted. This defaulted date for the Reminder can be overwritten at the time of launching the<br />
Batched Reminders, just before Creating and Saving them to the Res Card Activities tab.<br />
Default Date Using: Select Current Date, Res Card Create Date, Res Card Start Date, or Res Card<br />
Return Date.<br />
Plus/Minus: Select plus or minus from the drop-down.<br />
61
<strong>ClientBase</strong> <strong>Online</strong> Introduction & Setup<br />
Number of Days: Enter a number from 1 to 2000<br />
Create Reminder: Select Always or Optional. Upon launching a Batch of Reminders from a Res<br />
Card, a listing of the default Reminders appears. In order to be created, each Reminder within the<br />
listing must be selected. If this field is set to Always, then the selection box for this Reminder will be<br />
checked by default. If this field is set to Optional, then the selection box for this Reminder will not be<br />
checked by default.<br />
The remaining fields are identical to those fields included in a single Reminder Record. Complete<br />
each field and the Reminder defaults accordingly upon launching the Batched Reminders from within<br />
a Res Card. Enter default entries for: Timeless, Start Time, Duration, Login Name, Priority, Private,<br />
Reminder Type, Subject, Set Alarm, Completed and Remarks. Click OK to save your first Reminder<br />
within this Batch.<br />
6) Continue to add as many default Reminders as you would like included within this Batch of<br />
Reminders by repeating Step 5 above.<br />
7) After each default Reminder is created for this batch, click Save Changes to save the Batch.<br />
Create more than one Batch of Reminders if desired. For example, if you would like different default<br />
Reminders for a Tour booking then for a Cruise booking, or for a particular Group booking, then add<br />
another Batch of Reminders accordingly.<br />
Host Codes<br />
If you are sending invoices to a Host agency and need to track reservations booked through the Host,<br />
you need to set Host Codes. To ensure continuity across reservations, this field is not free flow, but<br />
is populated by selecting from a drop-down list created in Tools|Settings|Host Codes. Use Add,<br />
Modify and Delete to customize your list of possible Host Codes. Go to Tools|Settings|Default<br />
Field Values for Res Cards and set a default Host Code for new Reservations if desired.<br />
Once your Host Codes have been established, upon creating new Res Card Reservations, track the<br />
Host Code as desired. Upon generating an invoice for each reservation, the Host Code is saved<br />
within the invoice booking record accordingly. Agencies using the IC/Host utility to export invoices<br />
for their Host agency can now include invoices issues from <strong>ClientBase</strong> Browser.<br />
Travel Types<br />
Customize the Invoice Travel Types to correspond to those in your own accounting system if you do<br />
not have Trams Back Office. <strong>ClientBase</strong> comes with 25 default Travel Types. Note: For agencies<br />
using Trams Back Office, we recommend all Travel Types be edited from TBO, rather than<br />
<strong>ClientBase</strong> as links to General Ledger accounts exist.<br />
To edit those defaults:<br />
1) Go to Tools|Settings|Travel Types. Here, you can modify each of the default types.<br />
2) Select the travel type edit and click Modify. Travel types are user-defined and used upon invoicing<br />
to designate the type of travel the invoice is being generated for. Travel type is a merge field available<br />
for use when setting up your PNR Rules.<br />
3) Under travel category from the drop-down menu, link this travel type to the appropriate travel<br />
category. Travel categories are pre-defined (Air, Hotel, Car, Cruise, Tour, Rail, Transportation,<br />
Insurance, Service Fee & Miscellaneous) and used to categorize each reservation captured in<br />
<strong>ClientBase</strong>.<br />
3) Type the name of the new travel type.<br />
62
<strong>ClientBase</strong> <strong>Online</strong> Introduction & Setup<br />
5) Click Save.<br />
Live Connect Providers<br />
Access and update your listing of Live Connect Providers directly in <strong>ClientBase</strong>. You may want to<br />
add a new one between <strong>ClientBase</strong> releases, or be notified of a change to the provider’s URL. Click<br />
Add to add a new provider, add the Name, URL, Travel Category and Import XML source. The<br />
Include Authentication area is only checked if the Live Connect Provider setup instructions specifies<br />
so. (When implemented, it allows for <strong>ClientBase</strong> to first authenticate the User Login and Password<br />
via the booking engine's authentication security layer, obtain an authentication code, and then repost<br />
to the booking engine URL with the authentication code in addition to the login and client data. This<br />
setting is required by Sabre Cruise Live Connect.)<br />
Click on entry to Modify an existing Live Connect Provider or Make Inactive.<br />
Live Connect Logins<br />
Access and update agency level Live Connect Login information directly from <strong>ClientBase</strong>.<br />
Keep in mind that any Live Connect Login and Password information captured at this level applies<br />
to all <strong>ClientBase</strong> User Logins. To capture unique Live Connect Login information per user, use the<br />
Live Connect tab within the <strong>ClientBase</strong> User Login record (Tools|Settings|User Logins|Live<br />
Connect tab or in Tools|My Login).<br />
Header and Footer - Invoices or Trip Proposals<br />
Add or update global level Headers and Footers for Invoices and Trip Proposals directly from<br />
<strong>ClientBase</strong>. These Headers and Footers can be used to set your page margins, recreate your<br />
agency letterhead and standardize your Invoices and Trip Proposals through the use of<br />
63
<strong>ClientBase</strong> <strong>Online</strong> Introduction & Setup<br />
customizable Text, Graphics and Merge Fields. Agencies with multiple branches have the option of<br />
setting up just one global header/footer and use the branch merge fields for customization by branch.<br />
Go to Tools|Settings|Headers and Footers to update or create your agency level Headers and<br />
Footers. (Invoices and Trip Proposal Headers and Footers must be set up separately.)<br />
HEADER/FOOTER TABS<br />
Click the desired tab to setup the headers and footers. The report header is the header on the first<br />
page of the report; the report footer is the footer on the last page in the report. The page header is<br />
for each page of the report, and the page footer is for each page of the report. If you have a Report<br />
Header/Footer and Page Header/Footer all setup, each prints on each of the pages you designate.<br />
Add Text: Use Add Text to insert text into the header or footer. A text box appears in the upper left<br />
corner. Size it and move it by using the 2-directional and 4-directional arrows. To type and format<br />
text, double-click the text box. A screen appears to enter your desired text, align the text, add merge<br />
fields (see below), and set the font. Click OK to go back to the main screen.<br />
Add Picture: Use Add Picture File to insert a graphic file. Use the browse feature to locate the<br />
graphic file on any drive/directory and click Open once located. (Use *.jpg, *.jpeg, *.bmp, *.ico, and<br />
*.emf type graphic files within headers and footers.) Double-click the graphic to access dialog box to<br />
set size and page alignment, or highlight the graphic to click and drag, size, and position it properly.<br />
Tip: Make sure the graphic is properly sized before importing it.<br />
Add RTF: An rtf box provides slightly more formatting than a text box. Notice the formatting toolbar<br />
and merge fields.<br />
HEADER/FOOTER MERGE FIELDS<br />
Use the Add Text or Add RTF button to create any text box. Size it and move it by using the 2-<br />
64
<strong>ClientBase</strong> <strong>Online</strong> Introduction & Setup<br />
directional and 4-directional arrows. Double-click within the box to enter text and click the Insert<br />
Merge Field to obtain a listing of all the merge fields available.<br />
Note: Res Card Bill To and Res Card Ship To merge fields appear in the text box as one line, but<br />
when merged can take up to 5 lines of address information, so be sure provide a large enough text<br />
box when using these merge fields.<br />
PAGE HEADERS/FOOTERS, PRINT OPTION<br />
On All Pages: Appears on all pages regardless of the number of pages. If Report Headers/Footers<br />
exist, the Page Header appears just below the Report Header, and the Page Footer appears just<br />
above the Report Footer.<br />
On First Page Only: Appears on just the first page, or if a single page document appears on that<br />
single page. If Report Headers/Footers exist, the Page Header appears just below the Report<br />
Header and the Page Footer appears just above the Report Footer on Page 1.<br />
Skip First Page: Appears only starting with Page 2 of the document. If it's a single page document,<br />
then it does not appear.<br />
MERGE FIELDS WITHIN HEADERS/FOOTERS - INVOICES/TRIP PROPOSALS<br />
Invoices Only Merge Fields: Invoice Agent, Invoice Agent Address, Invoice Agent City, State Zip,<br />
Invoice Agent Primary Phone, Invoice Agent Primary Fax, Invoice Agent Primary Email, and Invoice<br />
Agent Primary WebSite.<br />
Invoices and Trip Proposals Merge Fields: Login Agent, Login Agent Address, Login Agent City,<br />
State, Zip, Login Agent Primary Phone, Login Agent Primary Fax, Login Agent Primary Email, Login<br />
Agent Primary WebSite, Res Card Agent, Res Card Agent Address, Res Card Agent City, State, Zip,<br />
Res Card Agent Primary Phone, Res Card Agent Primary Fax, Res Card Agent Primary Email, Res<br />
Card Agent Primary WebSite, and Res Card No.<br />
Page Margins: Set the left, right, top, and bottom margins for Invoice.<br />
How to Set Up User Level Logos in Headers/Footers<br />
Logos can be added to Headers and Footers at the user level for use on Invoices, Itineraries, Trip<br />
Proposals, Trip Statements and Receipts. Some agencies have the need for an agent to have his or<br />
her own unique branding to appear on Invoice, Statements, etc. (such as agents that are<br />
Independent Contractors). To use the agent logo feature, it is necessary to add the agent's logo to<br />
the Agent's profile and to add the Primary Agent Logo merge field to Headers and Footers.<br />
The agent's user login must be associated with an agent profile. Verify that the Agent Profile field is<br />
completed in the user login settings. If Agent Profile is missing from the user profile, the SYSDBA<br />
user must login and complete it. (Tools|Settings|User Logins.)<br />
Next, query and select the agent profile, click the Attachments tab and Add. There are two<br />
Attachment Types of Logo and General (for attachments other than logos). Select Logo, then<br />
Browse for Attachment and select the agent's logo image. Agent's logo image must be a *.jpg, *.jpeg,<br />
*.bmp, *.ico, or *.emf type graphic file. Make sure it's the correct size before you import it. Complete<br />
65
<strong>ClientBase</strong> <strong>Online</strong> Introduction & Setup<br />
the Description field and click OK to save.<br />
After saving the agent logo, select the desired Header and Footer (Invoice, Trip Proposal, Receipt,<br />
etc.). Double-click on the global logo image to open the Picture Designer. Do not change the current<br />
logo image. Click the down arrow on the Merge Field, select Primary Agent Logo from the drop down<br />
and click OK to save.<br />
Repeat these steps to add the Primary Agent Logo merge field to each Header and Footer (Invoice,<br />
Trip Proposal, Receipt, etc.).<br />
If a logo exists in the Agent Profile, that logo is merged on to the document as long as the Primary<br />
Agent Logo merge field is in the Header and Footer. If no logo exists in the Agent Profile, or if the<br />
agent's user login does not have an assigned Agent Profile, the agency's usual Header and Footer<br />
is used (Branch level or the Global level).<br />
In addition to the setup needed in CBB/CBO to use this feature, it may also be necessary to increase<br />
the Tomcat configuration to allow larger POST request processing. Changing the Tomcat<br />
configuration should be handled by your IT administrator only. Click here for configuration<br />
instructions to for the administrator.<br />
66
<strong>ClientBase</strong> <strong>Online</strong> Introduction & Setup<br />
Required/Optional Fields<br />
Database administrators can designate certain fields within a Profile, Activity or Res Card record as<br />
a mandatory field that must be completed for the record to be saved. By default no fields in a Profile,<br />
Activity or Res Card are set as mandatory, but by going into and selecting the record type, set any<br />
field as either Required, which means you cannot save the record without completing this field; or<br />
as Optional which means you get a prompt when saving the record and if this field is left blank, the<br />
system still saves the record.<br />
After choosing the Required/Optional Fields setting, click on the blue Profile, Activity, Res Card, or<br />
All links to navigate around the screen. Clicking these links expands the screen to provide the<br />
individual selections for each category. Click on an icon to change the given property for each<br />
selection. Click Save upon completion of selections.<br />
Note: The Family Members/Employee tab in Profile Required Fields helps track passenger<br />
information for TSA Requirements. Information needed to meet TSA Requirements such as Gender,<br />
Middle Name, and Birth Date (day, month and year) are located under a new Family Members/<br />
Employee section under Tools|Settings|Required/Optional Fields. Other fields which can be set to<br />
67
<strong>ClientBase</strong> <strong>Online</strong> Introduction & Setup<br />
Required or Optional are Relationship, Courtesy Title, First Name, Last Name, Citizenship, Primary<br />
Passport Number, Primary Passport Issue Date, Primary Passport Issue City and Primary Passport<br />
Expiration. After adding or editing a passenger record and saving it, prompting will occur if any of the<br />
required/optional fields are missing information.<br />
When using Required fields for Birthday Month, Birthday Day and Birthday Year:<br />
**If Birthday Day is required or optional, the Birthday Month is set to Required.<br />
**If Birthday Year is required or optional, the Birthday Month and Birthday Day will be set to Required.<br />
**If Birthday Month is not Required, then both Birthday Day and Birthday Year will be cleared.<br />
68
Chapter<br />
2<br />
Getting to Know <strong>ClientBase</strong><br />
This section provides a general overview of <strong>ClientBase</strong>. The features of the program<br />
are broadly discussed in this chapter with an in-depth look at each of the features<br />
and its application within your agency in succeeding sections.<br />
Introduction<br />
At the heart of <strong>ClientBase</strong> is the ability to locate, modify and use the information held within an<br />
agency’s database. Your database contains a wealth of knowledge on past and present customer<br />
and vendor relationships. Being able to easily access and use this valuable information to maintain<br />
existing relationships and build new ones may very well establish the future success of your agency.<br />
<strong>ClientBase</strong> is the tool of choice to easily access, manage, update and use this valuable database<br />
information. We’ll show you how!<br />
<strong>ClientBase</strong> Main Screen<br />
The first screen to appear after logging on is the main screen. To become better acquainted with<br />
the <strong>ClientBase</strong> features, it may be helpful to think of the screen as being divided into six sections:<br />
1. Browser Items<br />
2. File Managers, Tools, Help, Log off<br />
3. Menu Items<br />
4. Search (Query) Filters<br />
5. Navigation Bar<br />
6. Search (Query) Results<br />
69
Getting To Know <strong>ClientBase</strong><br />
Meet the Browser Items<br />
Meet the File Managers, Tools, Help, Log Out<br />
The File Managers consists of Profiles, Activities, and Res Cards. Profiles provide quick access to<br />
vital information about your clients (Leisure or Corporate), Service Provider, Vendor, Agent and<br />
Other profiles (non-travel related entities, such as the electric company or landlord). From this area<br />
locate, add, or modify profile records.<br />
Activities allow you to easily manage activity data (Notes, Reminders and Mailers) and provides<br />
query filters and results listed by Activity. Res Cards Manager allow you to easily manage Res Card<br />
data, and provides query filters and results listed by Res Cards.<br />
Profiles File Manager<br />
When clicking Profiles, search (or query) filters appear or select a link which contains a stored set of<br />
70
Getting To Know <strong>ClientBase</strong><br />
query filters (Global or Personal Saved Searches) from the drop-down menus. You can also use a<br />
simple or advanced search to enter a custom search. (To view all profiles, click Find.)<br />
When querying a profile, enter the first few letters and the system automatically displays all names<br />
that are possible matches. For example, if you are searching for the client, Janet Sharp, type Sharp<br />
in the Profile Name/Company field and the system automatically displays any profile with the last<br />
name of Sharp. If you type Sharp/J, <strong>ClientBase</strong> further filters the names showing only those with<br />
Sharp as the last name and the first names that start with a "J". This works for all Profile Types and<br />
all Profile name fields.<br />
Global and Personal Saved Searches<br />
The Global Saved Searches represent a set of search filters and column arrangements that have<br />
been saved and named. With a single click of the mouse from these drop-down menus, these links<br />
automatically complete search filters and display results after clicking Find. The Personal Saved<br />
Searches represent folders that have been saved by you and can only be seen and utilized on your<br />
own login.<br />
To retrieve a specific profile, click View next to the entry or the action menu icon (gear). This icon is<br />
displayed to the right of View and is listed for each record in the query. It has been designed to allow<br />
you to perform a variety of actions for that one record without having to open the record first - saving<br />
you a few extra clicks of the mouse.<br />
Activities File Manager<br />
When opening Activities, search filters are entered by default or you may select a link which contains<br />
a stored set of search fields (Global or Personal Saved Searches) from the drop-down menus. You<br />
can also use the simple or advanced filters to enter a custom search. (Clicking Find displays all<br />
71
Getting To Know <strong>ClientBase</strong><br />
activities.)<br />
The Global Saved Searches represent a set of search filters and column arrangements that have<br />
been saved and named. With a single click of the mouse from these drop-down menus, these links<br />
automatically complete search filters and display results after clicking Find. The Personal Saved<br />
Searches represent folders that have been saved by you and can only be seen and utilized on your<br />
own login.<br />
To retrieve a specific activity, click View next to the entry or the action menu icon (gear).<br />
Edit takes you directly into the activity, or Go to Profile takes you directly into the profile for which the<br />
activity was created. A new activity can be created at any time in Profiles, Activities, or Res Cards<br />
by clicking the Note, Mailer or Reminder menu item on the menu bar.<br />
Res Cards File Manager<br />
Res Cards replace the paper index Res Card and file folders that have for years cluttered agencies.<br />
In the past, agents entered details of many leisure type reservations (client information, confirmation<br />
numbers, itineraries, vendor information, remarks, etc.) on cards or yellow paper pads. Agents kept<br />
these cards somewhere on their desk or somewhere in the file. That “somewhere” translated into<br />
precious time spent searching for Res Cards, especially when the booking agent was not available<br />
and another agent had to locate the card.<br />
With Res Cards, you now have a tool to organize and maintain reservation information in a central<br />
database. If agents get in the habit when talking with clients or vendor/service providers of entering<br />
the details directly into the Res Card rather than jotting the notes on paper when a customer calls,<br />
any agent is able to answer questions or update information by accessing the customer’s Res Card.<br />
(This data provides valuable reports for management as well.)<br />
72
Getting To Know <strong>ClientBase</strong><br />
Clicking Res Cards allows you to search and manage the database for Res Cards. Stored searches<br />
Global and Personal Saved Searches<br />
for the Res Card Manager are available for selection from the drop-down Global Saved Searches<br />
and Personal Saved Searches as well as the simple and advanced search areas to enter a custom<br />
search. From this area, locate, add, modify or delete Res Cards. Upon entering Res Cards and<br />
clicking Find, by default the system displays active Res Cards.<br />
To retrieve a specific Res Card, click View next to the entry or the action menu icon (gear).<br />
Edit takes you directly into the Res Card, Invoice takes you directly into the generate invoice area of<br />
the Res Card, and Go to Profile takes you directly into the profile for which the Res Card was created.<br />
Res Cards automate your manual reservation data and provide the means to generate itineraries<br />
and invoices for customers and track client balances.<br />
Tools<br />
Page History: The page history area "remembers" the last places you have navigated to in the<br />
program. To quickly hop back into a recently visited area, simple click on that link.<br />
Settings: Access the ability to customize Settings, Branch Settings, and User Logins.<br />
Mask Credit Card Number: Remove (purge) credit card information for Payments, Booking<br />
CommTrack CC Numbers and Reservation Deposit CC Numbers no longer of use. Masking a credit<br />
card number removes the full encrypted credit card number and replaces it with a masked version<br />
of the number. To use this feature the database must be credit card encrypted. The feature can be<br />
disabled for any user by selecting the user login settings under Advanced|Other Restrictions and<br />
checking the box Disable Ability to Mask Credit Card Number. Select Tools|Mask Credit Card<br />
Number. In the Records to Mask field, choose the type of record to remove from the drop down.<br />
Options for removal are:<br />
73
Getting To Know <strong>ClientBase</strong><br />
*Payments (EFT, CC, CC Merchant)<br />
*Booking CommTrack CC Numbers<br />
*Reservation Deposit CC Numbers (This option appears in CBB only.)<br />
In the Purge As Of field, enter the Purge Date. For example, if you want to remove records prior to<br />
01/01/2011, the Purge Date is 12/31/2010. Records are removed by date as follows:<br />
*Payments (by Payment Date)<br />
*Booking CommTrack CC Numbers (by Depart Date)<br />
*Reservation Deposit CC Numbers (by Deposit Due Date)<br />
After entering the purge date click the Mask Credit Card Number button. A message appears<br />
indicating what type of records will be masked and as of what date. Click Yes to continue or No to<br />
return to the selection criteria.<br />
Trams Back Office Users: If your database is also used with Trams Back Office, do not purge using<br />
the options of Payments or Booking CommTrack CC Numbers, as these affect accounting data and<br />
therefore removal must occur in Trams Back Office. If either option is chosen, upon clicking the mask<br />
button to precede you will receive the warning, "Permanent masking of payment entries will affect<br />
accounting history and should be managed in Trams Back Office." Please note that if you continue,<br />
you risk ruining your accounting data.<br />
Sync Users: The feature can only be used from the Primary database.<br />
Import Profile: Import data into <strong>ClientBase</strong> in the form of an ASCII (.txt) file. Directions are in<br />
section entitled, Set Up to Use <strong>ClientBase</strong>.<br />
Case Converter: <strong>ClientBase</strong> has the ability to convert cases of some of the fields in the program.<br />
For complete directions on this feature, go to section, Using the Profile Manager to Manager Your<br />
Profiles.<br />
Global Modify: <strong>ClientBase</strong> has the ability to globally modify some of the fields in the program. For<br />
complete directions on this feature, go to section, Using the Profile Manager to Manager Your<br />
Profiles.<br />
My Login: By going to Tools|My Login, each user has the ability to update their own default<br />
settings including Query Folder Defaults, Profile Defaults, Communication Defaults, Live Connect<br />
settings, PNR Import Settings, Email Settings, as well as User Name, Title, Email and Login<br />
Password.<br />
User Settings: Only the User Name, Title, Email and Password can be changed from this area.<br />
Saved Search Defaults: Each file manager (Profile, Activity, and Res Card) comes with a default<br />
set of folders, which represent a stored set of search filters. In addition to the default folders, your<br />
agency and agents can create their own custom folders. This area of the user login allows you to<br />
identify which folder should be opened by default (within each manager) when first signing into<br />
74
Getting To Know <strong>ClientBase</strong><br />
<strong>ClientBase</strong>. Choose from the drop-down menu the types of transactions you want to see when first<br />
entering <strong>ClientBase</strong> with this login.<br />
Profile Defaults: Each profile type is made up of several links information. Under Profile Defaults,<br />
select which link fist appears when viewing each type of profile. For example, you may to see<br />
marketing information first thing, every time they retrieve a leisure client profile. If so, click the down<br />
arrow next to Leisure and select Marketing. You can select any link for any profile type.<br />
Communication Defaults: The agency is no longer confined to its four walls. With so many outside<br />
agents and employees working from distant locations, customers come with many different area<br />
codes and even from different countries. Agent users have the opportunity to save default phone<br />
information as part of their log in. Note: If this screen is left blank, then information that is listed<br />
under Settings (Global Defaults) is used.<br />
Live Connect: This set-up setting area is for agencies who want to use Live Connect in the Res<br />
Card. Set up for Live Connect agent logins can be done in two ways - globally (if all agents share<br />
the same user name, password or account number), or individually. When Live Connect is<br />
launched, the system first looks to see if there is login information at the User Login level, and if not,<br />
then looks for the login information at the Settings (Global Defaults) level.<br />
Live Connect Provider: Select from the drop-down list.<br />
User Name, Password and Account Number: Enter the necessary fields based upon the login<br />
information provided to you by the Live Connect provider.<br />
Setting up Individual Login Information: To set up Live Connect for each user login, click on the Live<br />
Connect tab in the User Setting. Click Add to add a Live Connect Provider User.<br />
(For a complete overview of use Live Connect, please refer to the chapter An In-Depth Look at Live<br />
Connect.)<br />
PNR Import - If you are using PNR Import, you may be asked to use this area. See An In-Depth<br />
Look at PNR Import for more details.<br />
Email Settings<br />
<strong>ClientBase</strong> uses the SMTP (Simple Messaging Text Protocol) to send emails. Complete the User<br />
Login SMTP Settings obtained from the entity responsible for maintaining your mail server (ISP). For<br />
75
Getting To Know <strong>ClientBase</strong><br />
complete directions on setting this up, see section, Putting Your Profiles to Work for You or Setup to<br />
Use <strong>ClientBase</strong>.<br />
ABOUT - Clicking About provides you with further details on the <strong>ClientBase</strong> configuration including<br />
Application Version, Database Type (IB or Oracle) and version, Agency Serial #, Expiration Date and<br />
Max # of Simultaneous Users, and Private Label Version.<br />
Help<br />
Provides on-line program topics that explain different areas of the program with directions on usage.<br />
Log Out<br />
Returns user to the Sign In area.<br />
Meet the Menu Items<br />
Merge Options<br />
In any of the File Managers, after searching for a Profile, Activity, or a Res Card, a Merge Items<br />
feature shows up:<br />
Merge To Document: Launch a Document Template (setup by default) from the results of a search<br />
into Wordpad, MS Word, Open Office, etc. to view, edit and print the document with all fields merged.<br />
You can also Merge to Doc inside a client profile. Please see section on Putting Your Profiles to Work<br />
for You for exact directions on how this is done.<br />
Merge To Email: Launch an Email from the results of a search. Please see section Putting Your<br />
Profiles to Work for You for exact directions on how this is done.<br />
Merge To File: Export the results of a search for use in other applications such as MS Word, Excel,<br />
etc. to run labels or reports, and print from your local workstation. Arrange and sort columns as<br />
desired before printing.<br />
Merge To Printer: Print the results of a search from the Profile, Activity, or Res Card Manager.<br />
76
Getting To Know <strong>ClientBase</strong><br />
Merge To Label: From the results of a search from the Profile, Activity or Res Card Manager, merge<br />
to labels.<br />
Create Profile<br />
After clicking Create Profile, you can create a new profile. Most important to capture in the beginning<br />
is Name, Address, Phone, and Email and then Save. Complete directions on entering new profiles<br />
and the anatomy of a profile are found in the section, An In-Depth Look at a Client Profile.<br />
Want a quick way to create a profile Use the following hot keys:<br />
Alt shift L = New Leisure<br />
Alt shift C = New Corporate<br />
Alt shift S = New Service Provider<br />
Alt shift V = New Vendor<br />
Alt shift A = New Agent<br />
Alt shift O = New Other<br />
Res Card<br />
Create a Res Card for any profile by clicking on this menu option. Associate the Res Card with a<br />
profile by clicking on the three dots to the right of the Prepared For field. Learn more about Res<br />
Cards in the section entitled, An In-Depth Look at Res Cards.<br />
Note, Mailer, Reminder<br />
Create a note, mailer, reminder from the results of a search. Please see section An In-Depth Look<br />
at Activities for exact directions on how this is done.<br />
77
Getting To Know <strong>ClientBase</strong><br />
Reports<br />
Currently only the Client Survey and the Profile Statistics Reports are available for use in <strong>ClientBase</strong>,<br />
but check back soon for additional reports.<br />
CLIENT SURVEY<br />
The Client Survey report shows contact and marketing information an agency currently has on record<br />
for a client in <strong>ClientBase</strong>. The survey is given to clients to verify and/or update their information. The<br />
survey can be printed or e-mailed right from <strong>ClientBase</strong>. Users may define what marketing tables<br />
and codes are included on the client survey printout.<br />
Set up the client survey defaults in under Tools|Settings|Client Survey Report Settings. Check<br />
the box next to any of the marketing tables that you want to include in Client Survey. There is also<br />
an option of Print only codes selected for profile, which when selected, does not print all marketing<br />
codes available, but just the codes that have already been checked off. These defaults can be<br />
overwritten each time a client survey is printed.<br />
STATISTICS REPORTS<br />
Statistics reports provide a bird's eye view of the marketing and demographic data captured in the<br />
database, including summaries with totals and percentages. To run Statistics Reports, from the<br />
Profiles Manager, query the desired records, and then select Reports|Profile|Statistics from the<br />
menu bar and select the desired report. Reports are run from the Current Results in Profile Manager.<br />
Marketing Code Statistics - For each Marketing Category Item, view Profile Count, Profile Matches,<br />
and % (Profile Count/Profile Matches).<br />
Profile Statistics - Report provides a breakdown of the number of profiles created and the number<br />
of profiles modified for each user, broken out by profile type. Report is run from the current results in<br />
the profile manager, with the option to "Include Only Users That Have Stats".<br />
Referred by Statistics - For each Referred By Item, view Profile Count, Profile Matches, and %<br />
(Profile Count/Profile Matches).<br />
Geographic Statistics - For each Zip Code, City and State, view Profile Count, Profile Matches, and<br />
% (Profile Count/Profile Matches).<br />
Birthday Statistics - For each Month/Date, view Profile Count, Profile Matches, and % (Profile<br />
Count/Profile Matches).<br />
Special Date Statistics - For each Special Date Type, view Profile Count, Profile Matches, and %<br />
78
Getting To Know <strong>ClientBase</strong><br />
(Profile Count/Profile Matches).<br />
Completed Fields Statistics - For primary fields captured with the General Information folder, view<br />
a Profile Count, Matches and % (Profile Count/Profile Match) for those fields.<br />
Meet the Search Filters<br />
Your database holds a wealth of information on your customers - marketing activities,<br />
communication and address information, family/employee preferences, and more. This information<br />
is of little value unless you can quickly and easily access the data you need. The search (query)<br />
feature provides filters to quickly sift through your data to match your required search criteria.<br />
Simple Search<br />
You have the ability to do simple or complex searches based on the selected search filters in the<br />
Profile, Activity or Res Card Managers.<br />
Simple Search<br />
Quickly locate a profile or a group of profiles by completing one or two search filters in the simple<br />
search area. The drop-down field to the left identifies what you want to search by, and the blank field<br />
to the right provides an area to type in search data. If you choose to use both fields, then the criteria<br />
is strung together with an "and", not an "or", and only those profiles that meet both query fields are<br />
displayed as a match.<br />
When querying a profile, enter the first few letters and the system automatically displays all names<br />
that are possible matches. For example, if you are searching for the client, Jane Smith, type Smith<br />
in the Last Name field and the system automatically displays any profile with the last name of Smith.<br />
If you type Smith/J, <strong>ClientBase</strong> further filters the names showing only those with Smith as the last<br />
name and the first names that start with a "J". This works for all Profile Types and all Profile name<br />
fields.<br />
All leisure clients with the last name starting with "smith" appear in the results area. Select the client<br />
name you want and click Find.<br />
Simple Search<br />
79
Getting To Know <strong>ClientBase</strong><br />
Advanced Search<br />
Advanced Search provides additional filters that allow you to more narrowly define what you are<br />
looking for. Search filters are selected by clicking Go to Advanced Search, then Enter Data to Search<br />
by, and completing as many of the search fields as desired in the General Info, Marketing, Activities,<br />
Family/Employee, Res Cards or More Field links. Each field selected is strung together with an “and”<br />
that more narrowly defines the search. For example, you have just received a hot cruise special to<br />
Europe and want to get a number of all past and potential cruise clients interested in Europe and<br />
living in the 90045 zip code to see if you should do a mailing. Select Leisure under Profile Type;<br />
“90045” in the Zip Code field; “Europe” and "Cruise" under Marketing categories and click OK. You<br />
have selected the filters to search your database for all leisure clients who expressed an interest in<br />
cruising and want to go to Europe and live in the 90045 zip code area. When you click OK, all clients<br />
in the database meeting the search criteria are displayed on the results screen .<br />
Use any of these links<br />
to search in Advanced Search<br />
Be sure to Reset<br />
to refresh criteria<br />
Meet the Navigation Bar<br />
The Navigation Bar provides a means to jump to various profiles in the search results screen by using<br />
First, Previous, Next and Last. To obtain a number of entries in the results of a search, click Count.<br />
The program only displays so many results at one time, so use First, Previous, Next, Last to navigate.<br />
Also on this bar are Select Columns, Sort by Columns, and Saved Searches.<br />
80
Select Columns<br />
Click Select Columns to choose columns displayed in the search results screen.<br />
Getting To Know <strong>ClientBase</strong><br />
To change a column, move the highlighted column over to the other side by using the > or < arrow.<br />
By using the shift key and mouse, select as many consecutive entries as you want to move; by using<br />
the control key and your mouse, select non-consecutive entries to move. Use the >> or
Getting To Know <strong>ClientBase</strong><br />
menu icon (gear) to activate the following items for this profile only: View, Delete, View Activities,<br />
Merge to PNR, Merge to Document, Merge to Email, Launch Live Connect, New Res Card, create a<br />
Note, Mailer or Reminder.<br />
82
Chapter<br />
3<br />
An In-Depth Look at Client<br />
Profiles<br />
This chapter familiarizes you with setting up, maintaining and using client profiles.<br />
Introduction<br />
In today's marketplace travel agencies are finding a need to shift their focus away from being order<br />
takers and processing transactions. To survive and profit, it has become imperative for an agency<br />
to practice CRM or Customer Relationship Management. An agency services clients and strengthen<br />
these relationships in order to build and retain client loyalty. The information collected within the<br />
leisure and corporate profiles provide an important tool to achieve this goal.<br />
Types of Client Profiles<br />
There are two types of client profiles in <strong>ClientBase</strong> - Leisure and Corporate. A Leisure profile is<br />
created for each leisure client’s household. A client profile holds any number of family members.<br />
For example, an agency created an leisure profile for Mr. & Mrs. John Smith. The family members<br />
are John, the primary contact; Karen, his wife; James, his son; and Jesse, his daughter, and are<br />
included as part of the Smith profile under the link, Family Members. Whenever anyone in the<br />
household calls the agency to travel, John’s profile is accessed and used to confirm or add vital<br />
information for any family member.<br />
Corporate profiles are created for each of your commercial clients. Each profile may contain any<br />
number of employees who are company travelers. These are listed in the client profile under the<br />
Employee link. Many times a traveler listed under a corporate profile also has an leisure profile in<br />
your database as well, since customer needs are different for leisure and corporate travel.<br />
Create a New Client Profile<br />
New client profiles can be created by clicking on Create Profile on the menu bar and selecting<br />
83
An In-Depth Look at a Client Profile<br />
Leisure or Corporate.<br />
Want a quick way to create a profile Use the following hot keys:<br />
Alt shift L = New Leisure<br />
Alt shift C = New Corporate<br />
Alt shift S = New Service Provider<br />
Alt shift V = New Vendor<br />
Alt shift A = New Agent<br />
Alt shift O = New Other<br />
After clicking Create Profile, you can enter information on a new leisure client. There is one profile<br />
per paying party. Most important to capture in the beginning is Name, Additional Name (if applicable,<br />
see below) Address, Phone, and Email and then Save.<br />
Additional Name: This field is for capturing another name within a single household when creating<br />
a new profile. For example, John Smith has a wife Mary but Mary still uses her maiden name of<br />
Jones. All correspondence should be addressed to both John and Mary. Enter John's name in the<br />
Last/First fields and enter Mary Jones in the new additional name field. Mailing label would appear<br />
as:<br />
84
An In-depth Look at a Client Profile<br />
John Smith<br />
Mary Jones<br />
Address<br />
City, State Zip<br />
The additional name field is a one line field and can contain up to 80 characters. This field can be<br />
merged to Documents, Labels and E-mails. It is also now a part of Level 2 Profile queries and level<br />
2 Res Card queries. When creating a new profile the additional name entry is also added to the<br />
Family Members tab by default.<br />
OPEN WIZARD: The Profile Wizard to create new Leisure and Corporate profiles gives agents a<br />
more efficient way to enter the most common profile data, as well as all data the agency has flagged<br />
as required data for a customer. (The goal is to minimize the data entry fields for faster initial entry.<br />
Complete data entry can be done by editing the profile after the wizard is complete.) The wizard<br />
accesses four areas:<br />
Profile Info<br />
Family Member Info<br />
Credit Card Info<br />
Loyalty Programs<br />
1) Click the create profile icon, and select Leisure or Corporate to launch the create profile screen.<br />
2) Click Open Wizard. The wizard profile screen was modified to display the fields of the basic profile<br />
information to be captured such as General Info, Address, Communications and Additional<br />
Information. As always, the user is prompted of any Required Fields that must be completed. The<br />
Special Dates, Web ID, Web Password and Website fields are only displayed on the profile screen<br />
if they are flagged as Required Fields. Complete the profile information and click the Open Wizard<br />
button to advance to the next screen. Note: If using the wizard, the user must click Open Wizard<br />
AND NOT the Save button. Clicking Save does not take the user through the profile wizard, but<br />
instead saves the current profile data entered and takes you to the profile view screen.<br />
3) Next, the More Fields data entry screen is the displayed if and only if there are any More Field<br />
categories that are flagged as required. Complete the required information and click Next to<br />
advance the wizard to the next screen.<br />
85
An In-Depth Look at a Client Profile<br />
4) The Marketing Categories data entry screen is display next if and only if there are any Marketing<br />
Codes that are flagged as required. Complete the required information and click Back to go back to<br />
the previous data entry screen, Finish if there isn’t any further profile data required, or click Next to<br />
advance the wizard to the next screen.<br />
5) Enter the Family Member/Employee information. The wizard will allow entry of data for up to five<br />
family members/employees. After the data for Family Member/Employee #1 is entered, to display<br />
the data entry screen for Family Member/Employee #2, click the magnifying glass icon on the<br />
header. Repeat the step for each family member/employee. When all Family Member/Employee<br />
data is completed, click Back to go back to the previous data entry screen, Finish if there isn’t any<br />
further profile data required or click Next to advance the wizard to the next screen.<br />
6) Enter the Credit Card information for the profile. The wizard allows entry of data for up to three<br />
credit cards. When all credit card information is completed, click Back to go back to the previous<br />
data entry screen, Finish if there isn’t any further profile data required or click Next to advance the<br />
wizard to the next screen.<br />
7) Next, enter the Loyalty program information for the profile. The wizard allows entry of data for up<br />
to three Loyalty programs. When all Loyalty program information is completed, click Back to go back<br />
to the previous data entry screen or Finish. Profile is now complete.<br />
Anatomy of a Profile<br />
A client profile in <strong>ClientBase</strong> stores an unlimited amount of information about your customers. To<br />
organize all this information and make it easily accessible to all users, each profile is made up of<br />
86
An In-depth Look at a Client Profile<br />
these key areas, Menu Items, Header Info, Indicator Icons, and Information Links.<br />
Menu Bar<br />
Profile Header<br />
Info Links<br />
Let’s explore each of these key areas:<br />
Menu Bar<br />
The menu bar contains links to features - Merge Options<br />
Merge To Document enables you to launch a Document Template from the results of a query into<br />
Wordpad, MS Word, Open Office, etc. to view, edit and print the document with all fields merged.<br />
Merge To Email launches an email message for the profile you are in. Merge To Label enables you<br />
87
An In-Depth Look at a Client Profile<br />
to create a label for this profile.<br />
PNR (Merge to PNR) enables you to pass client data to your reservation system's PNR.<br />
Res Card (Create a New Res Card) activates the Res Card feature to enter trip data.<br />
Live Connect (Merge to Live Connect) activates a Live Connect screen to enter your Vendor and<br />
Live Connect Provider and launches you into the Live Connect booking site without having to create<br />
a new Res Card first. Upon importing the reservation, a brand new Res Card with all the imported<br />
data therein is created.<br />
You can also create a Note, Mailer, or Reminder from the menu bar for the profile you are in, or link<br />
to another profile by using the three dots next to Profile field.<br />
At very top of screen, notice the menu bar that contains Tools, Help and Log Out. Under Tools,<br />
Page History shows a trail of the past areas in <strong>ClientBase</strong> that have been navigated to in the<br />
program, as well as a link to each manager. To jump to any previous area in this history, simply click<br />
on its hyperlink. Click Help to access useful information about program features.<br />
Click Log Out to leave the program or log in as a different user.<br />
For complete instructions on Merge to Document, Merge to Email, Merge to Label, and Merge to<br />
PNR, please see chapter, Putting Profiles to Work for You.<br />
For complete instructions on creating a new Res Card and PNR Import, please see chapters, An In-<br />
Depth Look at Res Cards and An In-Depth Look at Live Connect.<br />
Creation of Note/Mailer/Reminder is found in chapter, An In-Depth Look at Activities.<br />
Header Information<br />
The header conveniently displays pertinent information including the current mailing address,<br />
communication entries captured for this profile, Email and Website addresses, Interface ID, Primary<br />
Agent assigned to this profile and the date it was created. By confirming the accuracy of this<br />
information and adding any new details each time a customer calls, the user ensures that the client<br />
data (and agency marketing data) is always up-to-date.<br />
88
An In-depth Look at a Client Profile<br />
Profile Indicators<br />
Profile indicator icons to the right of the arrows appear if the customer has an active Res Card<br />
indicating travel arrangements are in the works (that’s the top, yellow icon). The middle icon alerts<br />
you that this client has previously purchased travel. The third icon (a finger with a red string) alerts<br />
you if there are any open reminders for this client. None of the above icons appear in the profile if<br />
the client has no active Res Card, open reminder or past travel history with your agency. Click on<br />
any of these icons to immediately move into that profile area, i.e. by clicking on the Res Card icon,<br />
you’ll get into the Res Card link.<br />
Date Fields<br />
Complete a date field using any one of the following formats or double-click on calendar date on<br />
drop-down:<br />
1) mmddyy or mmddyyyy (separators are not required)<br />
2) ddmmmyy or ddmmmyyyy<br />
3) 0 (for current month, day and year date)<br />
4) mm (defaults to current day and year)<br />
5) mmdd (defaults to current year)<br />
6) mm-dd-yy, mm/dd/yy, mm.dd.yy (-, / and . are valid separators)<br />
7) m-d-yy, m/d/yy, m.d.yy<br />
You can also select a date from the drop-down calendar.<br />
Detailed Review of Information Links<br />
Each client profile contains the following information links: General Info, Remarks, Marketing<br />
Codes, Family Members/Employees, Activities, Credit Cards, Loyalty Programs, Res Cards, Travel<br />
History, Groups, Attachments, PNR Entries, and More Fields.<br />
89
An In-Depth Look at a Client Profile<br />
General Info Link<br />
The General Information link displays the primary client data for this household or business.<br />
The following fields are in the General Information link:<br />
ADDRESS RECORDS<br />
A client profile can include unlimited addresses which may be designated as: Primary, Bill To, Ship<br />
To, Secondary Address and Alternate Address. Only one address though may be designated as<br />
Primary, one as Bill To, and one as Ship To. When creating a new address, click Add Address, fill<br />
in correct address details and choose the address type(s).<br />
This area contains the following fields:<br />
ADDRESS<br />
Address Line 1: Enter first line of address.<br />
Address Line 2: Enter second line of address.<br />
Apt/Suite: Enter apartment or suite number.<br />
Zip/City/State/Country: Enter the zip code, city, state, and country of the address. (If the Database<br />
Administrator has set up the Zip Code field in the Windows version of <strong>ClientBase</strong>, when you enter a<br />
Zip Code, the default City, State and Country populates automatically. On the Edit screen of an<br />
address record, the Zip Code field is now positioned in front of the City and State to facilitate this<br />
feature.)<br />
Description: Enter description if desired.<br />
Address Type<br />
Primary/Bill To/Ship To/Alternate: One address record can represent multiple Address Types. Click<br />
to select.<br />
90
An In-depth Look at a Client Profile<br />
Secondary: The Secondary Address choice also offers a date option. This is particularly useful<br />
because it allows entry of a specific time frame your client may be residing at the Secondary<br />
Address. After clicking Secondary Address, select the From and Through months from the dropdown<br />
menu.<br />
Save/Cancel: Click Save to accept new information or Cancel.<br />
To modify an entry, click Edit next to the address you wish to alter, make changes, and click Save.<br />
To remove an entry, click Edit next to the address you wish to remove, and click Delete.<br />
COMMUNICATIONS<br />
The standardized format for unlimited communication entries in <strong>ClientBase</strong> provides a platform upon<br />
which this information can be easily accessed. When creating a communication, click on Add<br />
Communication, fill in correct communication details, and click Save.<br />
This area contains the following fields:<br />
Passenger: From the drop-down menu choose what passenger this communication entry is<br />
connected with (if applicable).<br />
Type: Options include Email, Fax, Phone, Web, Facebook, Twitter, Linked In, Google Plus.<br />
Communication Type options include Social Media. This begins the first phase of social media<br />
integration. Fields are now available to begin capturing social media information in order to connect<br />
to social media profiles/page(s) in a future release.)<br />
Begin capturing information by clicking Additional Communications and click Add. Select a<br />
passenger and click the drop down to choose a Type from the list. The new types for social media<br />
use are:<br />
Facebook<br />
Twitter<br />
Linked In<br />
91
An In-Depth Look at a Client Profile<br />
Google Plus<br />
After choosing the Type, enter the User ID (example: facebook.com/JohnSmith). User ID format will<br />
vary depending upon the social media type. Next, select a Description. User defined descriptions<br />
can be created for specific use with social media. For example, customer John Smith may have a<br />
personal profile in Facebook, along with a business page for his company. A description of "Profile"<br />
and another of "Page" could be added to differentiate between whether the User ID entered is for<br />
the customer's profile or his business page.<br />
Example Formats for capturing user's social media information:<br />
Facebook: For a profile - facebook.com/username (facebook.com/JohnSmith); For a page -<br />
facebook.com/page name (facebook.com/SabreTravel)<br />
Twitter: Twitter.com/username (Twitter.com/JohnSmith)<br />
Linked In: linkedin.com/pub/8/b8a/205<br />
(Numerical string in the URL is the Linked In ID)<br />
Google Plus: plus.google.com/117474227900375467167<br />
(Numerical string in the URL is the Google+ ID)<br />
Just like all other communication types, social media communication types have a Marketing<br />
Permission checkbox. Marketing Permission is checked by default.<br />
Note: For emails, a green check appears if the entry has been granted marketing permission.<br />
Profile’s Primary: Indicate if this is the primary phone number, fax, Email, or Web address, since<br />
only one entry per communication type may be designated as Primary.<br />
Value: You need only type the 7 digits of the Fax number or Phone number if in your area code, as<br />
<strong>ClientBase</strong> version adds a default country code and area code to the number when saved. For<br />
numbers outside your area code, type in the 10 digit area code and number (no other typing is<br />
necessary). For Email and Web entries, type these exactly as you want it to appear.<br />
Description: Choose a description if desired from drop-down menu. These options were setup by<br />
the database administrator in the Windows version of <strong>ClientBase</strong>.<br />
Save/Cancel: Click Save to accept new information or Cancel.<br />
As alternative methods of communicating with customers continue to expand (e.g. cell phones,<br />
beepers, additional Emails, etc.), you may find your phone tables growing increasingly lengthy for<br />
customer profiles. You have the ability to maintain an unlimited number of communication entries.<br />
To modify an entry, click Edit next to the communication you wish to alter, make changes, and click<br />
Save. To remove an entry, click Edit next to the communication you wish to remove, and click<br />
Delete.<br />
92
An In-depth Look at a Client Profile<br />
SPECIAL DATES<br />
These fields are particularly useful to record unique dates for each specific customer. Imagine the<br />
marketing possibilities, when several months before an anniversary, birthday or vacation time, your<br />
agency suggests as a gift, a trip reflecting the client’s preferences. To add unlimited special dates<br />
click on Add Special Date, fill in special date details, and click Save.<br />
Date: Select month from drop-down menu, type day and year.<br />
Comment: Type a comment if desired.<br />
Save/Cancel: Click Save to accept new information or Cancel.<br />
You have the ability to maintain an unlimited number of Special Dates. To modify an entry, click Edit<br />
next to the special date you wish to alter, make changes, and click Save. To remove an entry, click<br />
Edit next to the special date you wish to remove, and click Delete.<br />
Note: A change was made within the internal workings of the program in a previous version that<br />
removed the Special Date Type "Birthday" from Special Dates under the hood and moved it into a<br />
dedicated field. This change was to keep birthdates at the passenger level where they needed to<br />
be and not at a profile level. Although you will not see any visual changes from this, certain birthday<br />
queries may take extra time to process. This could happen in instances where the dates searched<br />
for in the query cross months or years. Example, if the query is to find all birthdays between<br />
December 27, 2011 and January 3, 2012, this query could run slower than it did in previous versions.<br />
Attention Report Writers:<br />
Any reports written that use <strong>ClientBase</strong> data (Crystal Reports for example) that involve birthdates<br />
will need adjustments, as the internal change made will affect your reports.A new passenger table<br />
was created. Birthdate was then removed from the special date table and moved into the new<br />
passenger table. The passenger table contains three BIRTHDATE integer fields. All existing records<br />
were migrated to these fields.<br />
o BIRTHMDYMONTH<br />
o BIRTHMDYDAY<br />
o BIRTHMDYYEAR<br />
Here are some example SQL statements that show how special dates were queried in previous<br />
versions as compared to version 3.7.<br />
SAMPLE 1: PASSENGER Birthdays in the month of June<br />
OLD version:<br />
SELECT P.* FROM SPECIALDATE S JOIN PASSENGER P ON<br />
S.PASSENGER_LINKNO=P.PASSENGERNO WHERE S.MONTHDAY STARTS WITH '06';<br />
93
An In-Depth Look at a Client Profile<br />
NEW version:<br />
SELECT * FROM PASSENGER WHERE BIRTHMDYMONTH=6;<br />
SAMPLE 2: PASSENGER Birthdays between June 1 June 14<br />
OLD version:<br />
SELECT P.* FROM SPECIALDATE S JOIN PASSENGER P ON<br />
S.PASSENGER_LINKNO=P.PASSENGERNO WHERE S.MONTHDAY between '0601' and '0614';<br />
NEW version:<br />
SELECT * FROM PASSENGER WHERE BIRTHMDYMONTH=6 AND BIRTHMDYDAY BETWEEN<br />
1 AND 14;<br />
SAMPLE 3: PASSENGER Birthdays in 1963<br />
OLD version:<br />
SELECT P.* FROM SPECIALDATE S JOIN PASSENGER P ON<br />
S.PASSENGER_LINKNO=P.PASSENGERNO WHERE S.YEARMONTHDAY starts with '1963';<br />
NEW version:<br />
SELECT * FROM PASSENGER WHERE BIRTHMDYYEAR=1963;<br />
SAMPLE 4: PASSENGER Birthdays in 14-FEB-1963<br />
OLD version:<br />
SELECT P.* FROM SPECIALDATE S JOIN PASSENGER P ON<br />
S.PASSENGER_LINKNO=P.PASSENGERNO WHERE S.YEARMONTHDAY='19630214';<br />
NEW version:<br />
SELECT * FROM PASSENGER WHERE BIRTHMDYYEAR=1963 and BIRTHMDYMONTH=2 and<br />
BIRTHMDYDAY=14;<br />
ADDITIONAL INFO<br />
These fields provide general information about the profile. To edit fields in this area, click Edit, make<br />
changes, and click Save.<br />
General Information<br />
Company: In a Corporate Profile, enter the name. Any printed reports or labels can include the<br />
Company name entered in the General Info link.<br />
Last Name: Enter the last name of primary contact in household or business. Any printed reports<br />
or labels can include the First and Last Name entered in the General Info link.<br />
First Name: Enter the first name of the primary contact in this field.<br />
M.I.: Enter the middle initial of the primary contact in the field.<br />
Courtesy Title: Mr., Mrs., Mr. & Mrs., Ms., Dr. are all examples of courtesy titles. The drop-down<br />
menu allows you to select from a lengthy standardized list. This courtesy title is printed on mailing<br />
labels or on letters in the Document Templates (currently only now in the Windows version of<br />
<strong>ClientBase</strong>. This field is customized by the database administrator.<br />
94
An In-depth Look at a Client Profile<br />
Additional Info<br />
Interface ID: Important! This field allows the interfacing of records generated from the CRS (Front<br />
Office) to the agency accounting system (Back Office). If your agency's system requires that this<br />
field exist (for example, Trams Back Office does) then create an Interface ID as directed by the<br />
agency and complete this box.<br />
Primary Agent: This field defaults to the login agent at the time the profile is created. It can be<br />
modified to represent the appropriate agent considered primary to the customer (by clicking on the<br />
drop-down menu), or left blank.<br />
Salutation: The name used to greet the customer. For example, if Mr. Henry Wilkenson likes to be<br />
called “Hank,” enter Hank in this field. If Mrs. Emily Anderson likes to be called “Mrs. Anderson,”<br />
enter Mrs. Anderson in this field. Or, if you have a couple and want to include both names when<br />
addressing letters, enter Hank and Emily, or Mr. & Mrs. Anderson.<br />
Branch No.: For agencies with multiple branches, select from a drop-down menu the branch where<br />
this profile is created, or with which you want the profile associated. Branches are setup by the<br />
database administrator in the Windows version of <strong>ClientBase</strong>.<br />
Referred By: By using the drop-down menu, select how this client was referred to your agency.<br />
Statistic reporting can be obtained from <strong>ClientBase</strong> to get a bird’s eye view of how new customers<br />
are learning of your agency. What a great way to evaluate the effectiveness of your advertising.<br />
This field is user-definable by the database administrator in the Windows version of <strong>ClientBase</strong>.<br />
Web ID/Web Password: If your agency is interested in using your website to collect and update<br />
customer information, these fields may become important, as most systems require a Web ID and<br />
Password to provide access to this type of customer information.<br />
Profile Status<br />
Create User/Create Date: These fields default to the system date and the user logged in at the time<br />
the profile is created. Both of these fields can be modified. Agencies use the Create Date field to<br />
query for new customers so that “Welcome to the Agency Letters” and travel surveys can be mailed.<br />
These fields are also used to query for management reports reflecting user productivity in creating<br />
new client profiles.<br />
Profile Status: Indicate whether a customer profile is Inactive from the drop-down menu. By default<br />
95
An In-Depth Look at a Client Profile<br />
all profiles start with an Active status. An Inactive status is included so that you can flag a customer<br />
as inactive without having to delete the profile. When querying the <strong>ClientBase</strong> database, only<br />
profiles marked as Active are included in the search. Locate Inactive Profiles by using Level 2<br />
Query.<br />
Save/Cancel: Click Save to accept new information or Cancel.<br />
Remarks Link<br />
The Remarks link provides a full-page view of the unlimited remarks and provides tremendous<br />
flexibility for entering comments in each customer profile. To add or edit a remark, click Edit Text,<br />
add text or make edits, and click Save or Cancel. The great thing about remarks is that the first few<br />
lines can be viewed from anywhere in the profile.<br />
96
An In-depth Look at a Client Profile<br />
Marketing Codes Link<br />
The Marketing Codes link provides the means of tracking client interests and travel preferences,<br />
while arming agents with key information to use during the qualifying process of selling leisure travel.<br />
Marketing tables are powerful links to clients with common travel interests when planning a direct<br />
mail campaign or planning group travel. Reports showing the travel preferences of your customers<br />
are extremely valuable in matching up customers and their interests with travel specials.<br />
To add or modify the client’s marketing preferences, click Edit. Check or uncheck any marketing<br />
codes, and click Save or Cancel. These Marketing tables and codes are “global,” meaning the same<br />
codes are available for use in every profile for every user. Remember that customer’s needs often<br />
change. Removing, or editing marketing information when no longer valid is as important as<br />
entering new information.<br />
97
An In-Depth Look at a Client Profile<br />
Family Members/Employees Link<br />
It’s one profile per paying party. All<br />
members of the profile are listed here.<br />
The Family/Employee Members link is designed for entering detailed information on specific<br />
individuals who are part of a particular household or business. The link is called Family Members<br />
when working with an Leisure profile, and Employees when working with a Corporate profile.<br />
Add a new family member/employee by clicking Add Family Member. Let’s take a look at how to<br />
organize information for each family member/employee by going through each field of the Add/<br />
Modify screen.<br />
Passenger/Employee<br />
Relationship: By choosing from a drop-down menu, these user-definable items setup by the<br />
database administrator in the Windows version of <strong>ClientBase</strong> can be inserted. By identifying the<br />
traveler as a daughter or son in Leisure Profiles; Sales Rep or V.P. in Corporate Profiles, agents<br />
have an advantage when talking to a customer and can personalize their service.<br />
Last Name: Enter the legal last name of family member/employee.<br />
First Name: Enter the legal first name of the Family Member/Employee in this field. This provides<br />
you with the correct information for booking purposes.<br />
M. I.: Enter a middle initial.<br />
Courtesy Title: Mr., Mrs., Mr. & Mrs., Ms., Dr. are all examples of courtesy titles. The drop-down<br />
menu allows you to select from a customized list (setup by System database administrator). This<br />
courtesy title can printed on mail labels and letters.<br />
Birthdate<br />
Date (mm dd, yyyy): Enter traveler’s birthdate including Month, Day and Year, or any combination<br />
of those date fields. (If agent knows only month, enter it, then query the database by month, and<br />
send out your birthday cards!)<br />
98
An In-depth Look at a Client Profile<br />
Notice the read only field to the Family/Employee record called Age. This field is auto calculated<br />
base on the entries in the birthdate fields. This field requires at least a year be entered into the<br />
birthdate entry and calculates based on the following logic:<br />
- If Year but no Month and Day, Jan 1st of year is used to calculate Age.<br />
- If Month and Year but no Day, 1st of the month is used to calculate Age.<br />
- If Day and Year but no Month, Jan and day is used to calculate Age.<br />
- If no year then the Age field is left blank.<br />
Passports<br />
Passport Number #1 & #2: For up to 2 passports, enter traveler’s passport number.<br />
Expiration: Enter traveler’s passport expiration date in date format listed below; or double-click on<br />
the date from the drop-down calendar. This is the field to query on to send out letters alerting<br />
customers that passports are about to expire.<br />
Date Fields Formats<br />
Complete a date field using any one of the following formats or double-click on calendar date:<br />
1) mmddyy or mmddyyyy (separators are not required); i.e., 021410<br />
2) ddmmmyy or ddmmmyyyy<br />
3) 0 (for current month, day and year date)<br />
4) mm (defaults to current day and year)<br />
5) mmdd (defaults to current year)<br />
6) mm-dd-yy, mm/dd/yy, mm.dd.yy (-, / and . are valid separators)<br />
7) m-d-yy, m/d/yy, m.d.yy<br />
Country of Origin: Enter the passport Country of Origin from the drop-down menu.<br />
Remarks: Enter unlimited free-flowing information pertaining to this traveller.<br />
Preferred Airlines/Preferred Car Rentals/Preferred Cruise Lines/Preferred Hotels/Preferred<br />
Tours: Passenger Travel Preferences are captured at the vendor level as well as by Travel<br />
Category. In the past when a travel preference was created for a passenger it applied to the travel<br />
99
An In-Depth Look at a Client Profile<br />
category, not a vendor. For example, if a passenger had an air preference of business class but liked<br />
first class for one of his/her preferred airlines, there wasn't a way to capture both. Now the business<br />
class air preference can be captured as the global preference for the travel category as well as<br />
capturing first class as the preference for the specific preferred vendor. Even though preferences<br />
are now captured at the vendor level, it is not mandatory to select preferred preferences for a vendor.<br />
It is also not mandatory to select preferred vendors for a passenger.<br />
To set up/modify preferences, on the Family Member/Employee screen, select a passenger and<br />
click Edit. Scroll down to the desired Travel Category. Each Travel Category shows a "Preferred"<br />
section that lists the vendors, with a "Preference" section underneath it. When a vendor is<br />
highlighted, the Preference section will change accordingly, displaying the preferences for that<br />
vendor.<br />
Search for vendor and click Find.<br />
Then move the vendor to right, but using<br />
the blue arrow.<br />
A General Preference is available to each Travel Category under Preferred. Highlight the General<br />
Preference and enter the global preferences for the category in the Preference section below it.<br />
When a preferred vendor is later added to a Travel Category, the preference settings from General<br />
Preference are defaulted as the preferences for the new vendor. Next, make adjustments to the new<br />
vendor's preferences as needed. A field, Desirability can be used as a rating for a vendor. For<br />
example, United Airlines may be a preferred airline for a corporate account but the employee<br />
traveling for the company may Dislike that airline. By entering the Desirability, if you see that the<br />
employee dislikes United, he/she could be booked on another preferred airline the corporate<br />
account uses. The Desirability field is displayed when adding or viewing a preferred vendor.<br />
Desirability options appear as a drop down to select from. Selections are: Do Not Use; Dislikes; No<br />
Preference; Favorable; or Very Favorable.<br />
All Travel Categories now use the user-defined field Special Options. Under Air Preferences, Meal<br />
Preferences was renamed to Meal Type which links to a Meal Code field that was also added. Air<br />
Craft Type was also added as a preference. For Cruise Preferences, Ship Name and Departure Port<br />
were added as user defined fields and are displayed as preference options. When using passenger<br />
columns for preferences in queries, the default global preferences are displayed in the query.<br />
Save/Cancel: Click Save to accept new information or Cancel to leave area without saving<br />
changes.<br />
Copy Family Member/Employee Record to Another Profile<br />
In <strong>ClientBase</strong>, you have the ability to copy a family member or employee record from one profile and<br />
paste it into another profile. All data captured within the family member/employee record is pasted<br />
including: Relationship, Title, First Name, Middle Initial, Last Name, Birth Date, Communication<br />
Entries, Passport Entries, Remarks, Cards, Air-Car-Cruise-Hotel-Tour-General Preferences and all<br />
PNR Entries. This feature allows a user to take all passenger related entries and copy them into<br />
another profile without having to re-enter (e.g. copying a corporate traveler into a leisure profile or<br />
visa versa).<br />
To Copy a Family Member/Employee Record:<br />
1) Retrieve the desired profile containing the family member/employee record to copy.<br />
2) Click the Family/Employee link and from the passenger listing, click the action gear next to the<br />
100
An In-depth Look at a Client Profile<br />
appropriate family/employee record.<br />
3) Click Copy, to copy the employee details to the Windows clipboard.<br />
4) Close the profile, before copying anything else to the Windows clipboard, and retrieve or create<br />
the profile to copy to.<br />
5) Click the Family/Employee link. (Delete the blank default Family/Employee that has been created<br />
if applicable.) Click Switch to Detail View.<br />
6) Click Paste.<br />
Activities Link<br />
This link displays a complete history of all contacts associated with this specific client. Included are<br />
Notes (record of interaction with client), Reminders (record of scheduled past and future activities)<br />
and Mailers (record detailing mailings sent to this client).<br />
To add a new Note, Reminder or Mailer, click on the drop-down menu item Create Activity. To<br />
modify or enhance a Note, Reminder or Mailer click Edit next to the item. Click Edit|Delete to<br />
remove any item.<br />
Notice the filter buttons located directly above the Activities results screen. This allows for quick<br />
sorting of the results appearing in this link. By default ALL Activities are displayed, but options for<br />
viewing just Mailers, Notes, Reminders, or Open Reminders are available. Also, there is a Summary<br />
View and Detail View of activities in the listing.<br />
For more information on Activities including how to create them, refer to the chapters entitled, An In-<br />
101
An In-Depth Look at a Client Profile<br />
depth Look at Activities and Using the Activity Manager to Manage Your Activities.<br />
Credit Cards Link<br />
Keep track of customer’s credit cards, expiration dates, and more in your customer profile. This area<br />
summarizes every credit card for every passenger. (Actually a good tip is to enter or modify cards<br />
here rather than in the Family Member/Employee link as it is quicker.) To add a new card, click Add<br />
Card. To modify or enhance an existing card, click Edit next to the item. Click Edit|Delete to remove<br />
a card. Also, there is a Summary View and Detail View of Cards in the listing.<br />
DIRECTIONS FOR ENTERING/EDITING CREDIT CARDS:<br />
Name: From the drop-down menu, enter the passenger for whom this card is associated. If the card<br />
is associated with all profile travelers, leave blank.<br />
Card: From the drop-down, select the card type; i.e., AX or American Express.<br />
Card Number: Enter the card number.<br />
Expiration: Free flow date of expiration in date format listed below, or click on the 3 dots to access<br />
calendar from which to double-click on an expiration date.<br />
Date Fields Formats<br />
Complete a date field using any one of the following formats or double-click date on the drop-down<br />
calendar:<br />
1) mmddyy or mmddyyyy (separators are not required); i.e., 021409<br />
2) ddmmmyy or ddmmmyyyy<br />
3) 0 (for current month, day and year date)<br />
4) mm (defaults to current day and year)<br />
5) mmdd (defaults to current year)<br />
6) mm-dd-yy, mm/dd/yy, mm.dd.yy (-, / and . are valid separators)<br />
7) m-d-yy, m/d/yy, m.d.yy<br />
Name on Card: Enter the name on the card.<br />
Issued By: Free flow card issued by information.<br />
Remarks: Enter free flow remarks for this card here for reference.<br />
More Details<br />
Approx. Miles: Enter free flow approximate miles here for reference.<br />
Card Limit: Enter free flow card limit information here for reference.<br />
Save/Delete/Cancel: Click Save to accept new information, Delete to remove this card entirely if in<br />
edit mode, or Cancel leave area without saving changes.<br />
102
An In-depth Look at a Client Profile<br />
Loyalty Programs Link<br />
Keep track of Frequent Flyer, Car, Cruise, Hotel and Other frequent traveler type loyalty account<br />
information and more in your customer profile. This area summarizes every card for every<br />
passenger. (Actually a good tip is to enter or modify cards here rather than in the Family Member/<br />
Employee link as it is quicker.) To add a new card, click Add Card. To modify or enhance an existing<br />
card, click Edit next to the item. Click Edit|Delete to remove a card. Also, there is a Summary View<br />
and Detail View of Cards in the listing.<br />
Directions for Entering/Editing Loyalty Program Cards:<br />
Frequent Flyer, Car, Cruise, Air, Hotel, etc.<br />
Name: From the drop-down menu, enter the passenger for whom this card is associated. If the card<br />
is associated with all profile travelers, leave blank.<br />
Card Type: From the drop-down menu, choose the type of card, Car Program, Frequent Flyer, Hotel<br />
Program, or Other.<br />
Card: From the drop-down, select the card; i.e., AA-American Airlines Frequent Flyer.<br />
Card Number: Enter the card number.<br />
Expiration: Free flow date of expiration or click on the 3 dots to access calendar from which to<br />
double-click on an expiration date if applicable.<br />
Name on Card: Enter the name on the card.<br />
Issued By: Free flow card issued by information.<br />
Remarks: Enter free flow remarks for this card here for reference.<br />
More Details<br />
Approx. Miles: Enter free flow approximate miles here for reference.<br />
Card Limit: Enter free flow card limit information here for reference.<br />
Save/Delete/Cancel: Click Save to accept new information, Delete to remove this card entirely if in<br />
edit mode, or Cancel leave area without saving changes.<br />
Res Card Link<br />
This link contains all the Res Cards that were created for this customer. A Res Card allows you to<br />
automate your manual reservation data (bookings made outside of your CRS), generate itineraries,<br />
103
An In-Depth Look at a Client Profile<br />
tracks reservation totals, invoiced totals and uninvoiced balances.<br />
To add a new Res Card, click on the drop-down menu item Create Res Card or Create Res Card<br />
with Live Connect. To modify or enhance a Res Card click View next to the line item.<br />
Notice the filter buttons located directly above the Res Card results screen. This allows for quick<br />
sorting of the results appearing in this link. By default ALL Res Cards are displayed, but options for<br />
viewing just Active, Departed, or Canceled Res Cards are available. Also, there is a Summary View<br />
and Detail View of Res Cards in the listing.<br />
For more information on Res Cards including directions on how to create or edit them, refer to the<br />
chapters entitled, An In-depth Look at Res Cards, and Using the Res Card Manager to Manage Your<br />
Res Cards.<br />
Travel History Link<br />
The Travel History link is a read-only screen which displays a list of issued invoices for this client<br />
providing easy access to the client's past travel history, number of invoices issued, sum total of<br />
bookings, average booking amount and the total commission.<br />
Filters<br />
Sort: Select the way you want data sorted by using the drop-down menu to select Issue Date, Depart<br />
Date, Travel Category, Passenger Name, First Inside Agent, Invoice #, Invoice Type, Invoice Status,<br />
Ticket#, or Ticket Confirm #.<br />
Issue Date: Enter the from and to Issue Date by clicking on the drop-down menu to access a<br />
calendar and double-clicking on the desired date, or free flowing the date using date format listed<br />
below.<br />
Tvl Cat.: Filter the results per travel category by checking/unchecking the travel category buttons,<br />
Air, Hotel, Car, Cruise, Tour, Rail, Transport, Insurance, Service Fee, or Other.<br />
Click Search to display desired query, and notice a Summary View or Detail View of the listing is<br />
104
An In-depth Look at a Client Profile<br />
available for your convenience.<br />
Groups Link<br />
Profiles may be associated with a specific Group that has been created by the agency. There is no<br />
limit to how many groups one profile may be associated with. This group table is shared with Trams<br />
Back Office. To add a new group to the client’s profile, click Add Group to select group name from<br />
the drop-down menu. To modify or enhance a group, click on Edit next to the group entry. Click Edit<br />
next to the group entry, and then Delete to remove a group name from a profile.<br />
Note: If you enter into the free flow area and there is a partial match within the drop-down choices,<br />
if you click the drop-down list, you are taken to that match first. Also, if you make a partial entry into<br />
the free flow area and it matches one of the items in the drop-down list, upon tabbing out, the field<br />
is completed automatically.<br />
Attachments Link<br />
To enhance the amount and type of information accessible in a <strong>ClientBase</strong> profile, a feature is<br />
included in all profile types allowing you to point to other files available on your local or network drive.<br />
These files are referred to as Attachments.<br />
To access an attachment at the client level, click the Attachment link.<br />
In Attachments, click on Add. Any file type can<br />
be added.<br />
To add a new Attachment click Add Attachment, and Browse for Attachment to identity the File Path<br />
of the file. The File Path includes the drive where the file is located, any directories or subdirectories,<br />
and the name of the file. Choose to compress the file by clicking in the Compression<br />
box. Enter a brief description of the attachment, if desired. Click Save.<br />
To view a saved Attachment, highlight the attachment, and click Open next to the attachment.<br />
<strong>ClientBase</strong> uses Windows Associations to view the file type, load the appropriate software, and<br />
retrieve the specified file. Every file has an extension (e.g., .doc, .jpg, .bmp, .html, etc.) must be<br />
associated with a specific Windows software program such as Word, Paint Shop Pro, Internet<br />
Explorer, etc. to be viewed. Although this association is created automatically by Windows when<br />
various software programs are installed, if a workstation does not have a software program<br />
associated with the type of file an Attachment is pointing to, then the file cannot be viewed from the<br />
Attachment created in <strong>ClientBase</strong>.<br />
105
An In-Depth Look at a Client Profile<br />
Since a copy of the file has been stored within the <strong>ClientBase</strong> database when it is opened at a<br />
workstation, it is loaded temporarily into a temp directory. If any changes are made to the original<br />
file or the temporary file, the attachment in <strong>ClientBase</strong> must be re-directed to the new file, or the old<br />
file will still be displayed. This is done by using Edit and browsing for the updated file. Once this is<br />
done, the copy of the file saved in the <strong>ClientBase</strong> database will be updated.<br />
Click Edit, then Delete, next to the attachment to remove it.<br />
PNR Entries Link<br />
<strong>ClientBase</strong> PNR entry tables are included at the Branch, Profile, Agent, and Passenger/Employee.<br />
As a <strong>ClientBase</strong> user, you may presently create these entries at the profile and agent level only.<br />
PNR entries setup at the branch level, as well as any number of PNR Rules (simply a way of<br />
designating how certain fields of information captured in a profile should be formatted when sent to<br />
a PNR) are setup by the administrator in the Windows version of <strong>ClientBase</strong>.<br />
Store any number of miscellaneous PNR Entries to include when using the Merge to PNR feature<br />
for this client. Any PNR entries captured here at the profile level is included regardless of which<br />
family member/employee is travelling.<br />
CRS: Choose your CRS system from the drop-down menu.<br />
Description of Entry: Enter a free-flow “Description” field.<br />
Always Move: By checking Always Move, the entry always moves when you do a merge to CRS. If<br />
not selected, moving the entry is optional.<br />
Display on Screen: When selected, the entry automatically displays on the front screen when<br />
Merging to the PNR. If not selected, the entry is displayed on the Additional Entries link. Within each<br />
PNR Entry or PNR Rule that is set to Always Move, an option is included called "Display on Screen".<br />
The PNR Selection Screen is the screen that appears when you use the Merge to PNR feature and<br />
allows you to select the specific profile data to be included and sent to the current PNR. For PNR<br />
entries that should always move regardless of the profile or PNR, this "Display on Screen" can be<br />
set to False, so that the Selection Screen is less complicated for the agent to review. Any of these<br />
entries that have not been designated to display on the selection screen can be viewed, if desired,<br />
by clicking the "Additional Entries Link" in the Merge to PNR feature.<br />
PNR Entry: Enter the PNR entry the way you would in your reservation system and then Save.<br />
For more information on moving data from <strong>ClientBase</strong> to your GDS PNR, please refer to chapter<br />
entitled, Putting Profiles to Work for you.<br />
More Fields Link<br />
If you want to track it, and <strong>ClientBase</strong> doesn’t ask for it, here is where your database administrator<br />
created customized fields of information. Items like Social Security Numbers, client UDID’s and<br />
106
An In-depth Look at a Client Profile<br />
other miscellaneous information that you want to track, can be captured in these fields.<br />
To tag a profile with a More Field, click Edit, and from the drop-down menus next to the More Field<br />
Categories, select the More Field item you want to use. Then click Save. To untag a More Field<br />
Item, simply highlight the item and click Delete on the keyboard.<br />
Note: If you enter into the free flow area and there is a partial match within the drop-down choices,<br />
if you click the drop-down list, you are taken to that match first. Also, if you make a partial entry into<br />
the free flow area and it matches one of the items in the drop-down list, upon tabbing out, the field<br />
is completed automatically.<br />
107
An In-Depth Look at a Client Profile<br />
108
Chapter<br />
4<br />
Using the Profile Manager to<br />
Manage Your Profiles<br />
This chapter demonstrates how to use the Profiles feature in <strong>ClientBase</strong>.<br />
Introduction<br />
Located on the main screen of <strong>ClientBase</strong> are Profile, Activities, and Res Cards links. Clicking on<br />
Profiles allows you to search and manage your database of profiles. Stored links and searches for<br />
Profiles appear, as well as your search results displayed by profile.<br />
Profiles provide a user with quick access to vital information about clients, vendors, agents and other<br />
profiles. From this area, not only can you go into the profile to access every detail of the record, you<br />
can also locate, add, or modify profile records; as well as Merge to Doc, Merge to File, or Print.<br />
Search Profiles<br />
When Profiles is first opened, either select a link which contains a stored set of search fields (Global<br />
or Personal Saved Searches) from the drop-down menus, or use the simple search or advanced<br />
search area to enter a custom search. (Clicking Find produces a list of all profiles.)<br />
The Global Saved Searches or Personal Saved Searches are accessible to anyone for general<br />
viewing. They include Leisure Clients, Corporate Clients, Vendors, Agents, Other, All Profiles,<br />
Service Providers, and any links with a customized set of query filters that were setup and saved.<br />
By clicking on any of these links, you see the completed filters used for this stored search, and a<br />
listing on the results screen of all profiles meeting the criteria of the selected searches. You can also<br />
locate profiles by using the simple search area or the advanced search area.<br />
Date Fields<br />
Complete a date field using any one of the following formats or choose a date from drop-down<br />
calendar:<br />
1) mmddyy or mmddyyyy (separators are not required)<br />
2) ddmmmyy or ddmmmyyyy<br />
3) 0 (for current month, day and year date)<br />
4) mm (defaults to current day and year)<br />
109
Using the Profile Manager to Manage Your Profiles<br />
5) mmdd (defaults to current year)<br />
6) mm-dd-yy, mm/dd/yy, mm.dd.yy (-, / and . are valid separators)<br />
7) m-d-yy, m/d/yy, m.d.yy<br />
Simple Search Filters<br />
The simple search area allows you to quickly locate a profile or a group of profiles by completing one<br />
or two filters.<br />
The drop-down menu fields identify what you want to search by and are completed by selecting from<br />
the following: Profile Type, Profile Name, Company, Last Name, Family/Traveler Name, Phone,<br />
FAX, Email, Web, Family/Traveler Phone, Interface ID, City, State, and Zip Code.<br />
The blank fields allow you to type in what you want to search for and are completed by choosing<br />
from the drop-down, or typing in free-flow information. To prevent spelling errors, it is suggested<br />
that you type no more than 3 or 4 characters in the free-flowing fields.<br />
If both fields are used in this search, then the results match both criteria, not either/or. This means<br />
the search filters are strung together with an “and” not an “or”. After completing or changing data in<br />
the filters, click Find. The system automatically sifts through the database and displays the matching<br />
profiles in the results screen.<br />
For example, you are looking for a leisure client, John Smith. Set the first field to Profile Type and<br />
pick Leisure from the drop-down menu in the field to the right. (Additional Profile Types are<br />
Corporate, Service Provider, Agent, Vendor and Other.) Then set the second field to Profile Name,<br />
type in “smith” and click Find. John’s profile appears in the results screen, and can be entered by<br />
clicking View. If any other profiles start with "smith", these would appear in the results screen as<br />
well.<br />
Or much easier, when querying a name, enter the first few letters and the system automatically<br />
displays all names that are possible matches. For example, searching for the client John Smith, type<br />
Smith in the Last Name field and the system will automatically display any profile with the last name<br />
of Smith. If you type Smith/J, it will further filter the names showing only those with Smith as the last<br />
name and the first names that start with a "J". This works for all Profile Types and all Profile name<br />
fields.<br />
Advanced Search<br />
The Advanced Search provides additional filters that allow you to more narrowly define your search.<br />
Search filters are selected by clicking Go To Advanced Search, then Enter Data to Search by, and<br />
110
completing as many of the search criteria fields as desired:<br />
Using the Profile Manager to Manage Your Profiles<br />
Use any of these links<br />
to seach in Advanced Search<br />
Be sure to Reset<br />
to refresh criteria<br />
Since this area “remembers” the last search, click Reset to clear an old search. Always do this first<br />
when doing an advanced search, as there may be data remaining in other search links that you can’t<br />
see.<br />
Presently the General Info, Marketing Codes, Activities, Family/Employee, Res Card, and More<br />
Field and Travel History profile links are available at this time for selection criteria entry. Search<br />
across all fields of information. Like the simple search area, the selection criteria entered within a<br />
link or across links are strung together with “ands”, so the resulting profiles must match all criteria.<br />
By clicking OK, the query is completed and a list of profiles matching the search appears on the<br />
Results Screen.<br />
Example: You want to see how many new client profiles were created this month. By using the<br />
Advanced Search area, fill in the Profile Create Date fields with the month parameters and click OK<br />
to run the query.<br />
When using Marketing Codes as selection criteria in the advanced search area, you use multiple<br />
marketing tables and even multiple marketing codes within your search criteria. Any codes entered<br />
are “anded” together across the tables, but “or’d” together within a table. For example, if you place<br />
a check in the Cruise code within the What Type table, and a check in the Deluxe code within the<br />
What Budget table, you only get clients that are coded for both codes, or, in other words, Deluxe<br />
Cruisers. If you place a check in the Cruise code and a check in the Tour code within the same What<br />
Type table, you get clients that are coded with either Cruise or Tour. The results include any clients<br />
that are either interested in Cruises or Tours and are deluxe budgeted.<br />
You see a summary of the search in the gray area directly above the Results Screen by scrolling<br />
down.<br />
Search Results Screen<br />
After you have completed a search, the Results Screen not only provides a count and list of search<br />
results, but also easy access to a specific profile. To receive a count of the query results, click Count.<br />
111
Using the Profile Manager to Manage Your Profiles<br />
To retrieve a specific profile, click View next to the entry or the action menu icon (gear).<br />
This icon is displayed to the right of View and is listed for each record in the query. It has been<br />
designed to allow you to perform a variety of actions for that one record without having to open the<br />
record first - saving you a few extra clicks of the mouse.<br />
Click the icon and the following options appear:<br />
From the Profile Search Results:<br />
View (Leisure, Corporate, Vendor, Agent or Other): Takes you directly to the Edit Additional Info<br />
section of the selected profile for modifying without having to first view the profile and selecting Edit<br />
Additional Info.<br />
Delete: Delete a profile. The system first prompts with the message, Delete this Profile Yes or No.<br />
If Yes is selected, then the system checks to see if any Invoices, Payments, Res Cards, Activities<br />
or Inventory exist for the profile. If not, then the profile is deleted. If Invoices, Payments, Res Cards,<br />
Activities or Inventory exist for the profile, the system prompts that these records must be deleted<br />
before the profile can be deleted. Note: Profiles can be set to Inactive as an alternative to deleting.<br />
View Activities: Take you directly to the activities tab for the selected profile without having to open<br />
the profile first.<br />
Merge to PNR: Activates Merge to PNR for the selected profile without having to open the profile<br />
first.<br />
Merge to Document: Activates Merge to Document Template for the selected profile.<br />
Merge to Email: Activates Merge to Email for the selected profile.<br />
Live Connect: Activates a Live Connect screen to enter your Vendor and Live Connect Provider<br />
and launches you into the Live Connect booking site without having to create a new Res Card first.<br />
Upon importing the reservation, a brand new Res Card with all the imported data therein is created.<br />
New Res Card: Activates Res Card creation for the selected profile without having to enter a profile<br />
first.<br />
New Note: Activates Note creation screen for the selected profile.<br />
New Mailer: Activates Mailer creation screen for the selected profile.<br />
New Reminder: Activates Reminder creation screen for the selected profile.<br />
Navigation Bar<br />
The Navigation Bar provides a means to jump to various profiles in the results screen by using First,<br />
Previous, Next and Last. Click Count to get a number of results in the query. Also on this bar are<br />
Select Columns, Sort by Columns, and Saved Searches.<br />
112
Select Columns<br />
Using the Profile Manager to Manage Your Profiles<br />
Click Select Columns to choose columns to display in the query results screen.<br />
To change a column, move the highlighted column over to the other side by using the > or < arrow.<br />
By using the shift key and mouse, select as many consecutive entries as you want to move; by using<br />
the control key and your mouse, select non-consecutive entries to move. Use the >> or
Using the Profile Manager to Manage Your Profiles<br />
1) Using an easy or advanced search, enter search filters and run your search.<br />
2) Customize and sort the columns used in the search, by following the directions above.<br />
3) When satisfied with the search results and the look of the results screen, click Saved Searches.<br />
This screen appears:<br />
4) From the drop-down Level menu, choose whether you want the search to be Personal (for your<br />
own use only), or Global (for the use of everyone in the agency).<br />
5) Name the search.<br />
6) Click OK. The new search folder is located in the list for Global Saved Searches or Personal<br />
Saved Searches in the Saved Searches screen, or from the drop-downs at top of the program<br />
screen.<br />
To replace an existing saved search folder with a new one, first perform the new search, adjusting<br />
the columns/sorts to your specifications, and then click Replace. This area also contains the ability<br />
to Open a Search (View), Rename a Search (Rename), or Delete a Search (Delete).<br />
Note: <strong>ClientBase</strong> saves the filters and results layout, not the search results. The next time you use<br />
the saved search, any new data that has been added since it was created, is included in the new<br />
search.<br />
Using Date Formulas in Your Saved Searches<br />
Since searches can be saved and retrieved for frequent use, the date fields in all searches allow for<br />
date formulas. This means any field that has a date, can also contain a formula for that date. The<br />
date formula function allows you to create a search and then save it without identifying a specific<br />
month, day and year in the From and To date fields. Instead, the search is processed with a formula<br />
for the month, day, day of the week, and year based upon the date the report is processed.<br />
Remember: Make sure the system date and time are correct.<br />
Benefit: When entering a date formula, your system converts it to the intended time period allowing<br />
you to run searches and/or save them for future use without the need to modify dates.<br />
Example: The following tables contain sample formulas for specifying dates. Mix and match the<br />
absolute and relative parameters in the function. All date formulas start with an = sign. The first<br />
number specifies the day of the month, the second number specifies the month, and the third<br />
number specifies the year. So if you only have the first number filled in, this means you want this<br />
114
Using the Profile Manager to Manage Your Profiles<br />
report to reoccur on this day every month, in every year.<br />
DATE FORMULAS<br />
If You Want This<br />
Enter This<br />
1 st day of this month: =1,0,0<br />
Last day of this month: =31,0,0<br />
1 st day of this year: =1,1,0<br />
Last day of this year: =31,12,0<br />
Seven days from now: =+7,0,0<br />
Last Monday (will show today<br />
if today is Monday)<br />
A week from last Monday<br />
Next Monday<br />
=Mon<br />
=Mon-1<br />
=Mon+1<br />
Three months from now =0,+3,0<br />
Six months ago: =0,-6,0<br />
One year from now =0,0,+1<br />
Adding New Profiles<br />
When a customer contacts the agency, the first thing an agent does is check the Profile Manager<br />
(by clicking the Profiles tab) to determine if that customer is in the database. Do this by searching<br />
in the Profile Manager as detailed above. Avoid creating duplicate profiles! If a client is not in the<br />
agency’s <strong>ClientBase</strong> database, the agent creates a new customer profile. This can be done by<br />
clicking Create Profile on the menu bar, and selecting the appropriate profile type - Leisure,<br />
Corporate, Service Provider, Vendor, Agent, or Other.<br />
When you have entered a brand-new profile screen, fill out the profile details, and click Save or<br />
Cancel which aborts the process.<br />
Entering information for anyone who contacts the agency is essential, particularly the address and<br />
communication methods such as phone, cell phone, Email, etc. At the very least, the agent should<br />
complete the address and communication information, and if your agency has Trams Back Office, it<br />
115
Using the Profile Manager to Manage Your Profiles<br />
is very important to complete the Interface ID field as well.<br />
Helpful tip: Want a quick way to create a profile Use the following hot keys:<br />
Alt shift L = New Leisure<br />
Alt shift C = New Corporate<br />
Alt shift S = New Service Provider<br />
Alt shift V = New Vendor<br />
Alt shift A = New Agent<br />
Alt shift O = New Other<br />
Please refer to the chapter An In-Depth Look at Client Profiles for directions on completing profile<br />
fields.<br />
Case Converter<br />
The Case Converter uses the results of a current search and automatically converts the case for<br />
selected fields. Use Profile Manager searches to find the profiles you would like to run the case<br />
116
Using the Profile Manager to Manage Your Profiles<br />
converter on and then click Case Converter under Tools.<br />
Conversion Type: This determines how you would like the case converter utility to change the case<br />
of the selected fields. Select either Upper Case First Letter of Each Word, Upper Case all Letters,<br />
or Lower Case all Letters.<br />
Fields to Convert: Place a check into each field you would like the system to convert, including<br />
Profile, Address and Passenger fields.<br />
Include Records: Allows you to determine what profiles should be converted. Select either All<br />
Results in Current Manager or Select Results in Current Manager. (You must search for the profiles<br />
you would like case converted before running this.)<br />
Global Convert Now: Run the case conversion. Records Modified will display the number of<br />
records affected by the conversion.<br />
Special Note: There is a Auto-Case Converter setting in Tools|Settings. Within this area a listing<br />
of the following profile fields is available for automatic case handling: Name, First Name, Last Name,<br />
Courtesy Title, Address 1, Address 2, Apt/Suite, City, Country, Passenger First Name, Passenger<br />
117
Using the Profile Manager to Manage Your Profiles<br />
Last Name, Passenger Courtesy Title, and Passenger Relationship/Title.<br />
By placing a check into any of these fields, as you are working within your <strong>ClientBase</strong> Browser<br />
profiles, the first letter of each word entered will be automatically capitalized and the remaining<br />
letters will be automatically set to lower case. If you would like the auto-case converter turned off<br />
for any of these fields, remove the check from the box preceding the field.<br />
Global Modify<br />
By clicking the Global Modify under Tools, you have the ability change multiple profiles<br />
simultaneously without having to enter each profile to make the desired change, i.e., adding a<br />
Marketing Code.<br />
Step 1: Use the Profile Manager Simple or Advanced Search to query the desired profiles you would<br />
like to modify.<br />
Step 2: To modify all query results select Global Modify under the Tools menu. To modify just select<br />
results, first click on the profiles you would like to modify to highlight in blue (to deselect click the<br />
118
Using the Profile Manager to Manage Your Profiles<br />
profile again to remove the blue highlighting), then select Global Modify under the Tools menu.<br />
Step 3: Click the desired tab depending on whether you want to modify Activity Fields, Profile Fields,<br />
Marketing Fields, or Profile Groups.<br />
First select area you want to modify using<br />
the tabs. Then using the drop-down, pick<br />
the field to modify. Do you want to do it<br />
for all results in results screen or selected<br />
results<br />
Step 4: Select the field you would like to modify from the drop down listing, and then enter the new<br />
value you would like all profiles to be updated with.<br />
Step 5: Identify whether you want All Results or just Selected Results in the Profile Manager to be<br />
modified. (By holding down the control key and clicking entries on the results screen, you can select<br />
just some of the entries to be modified.)<br />
Step 6: Click Global Modify Now once you are sure you have the proper profiles identified and once<br />
you are sure you have the proper changes selected. You will be prompted that there is no un-do<br />
feature before continuing.<br />
Important Note: Global Modify is a powerful feature that makes mass updating a simple process.<br />
Improper use of Global Modify could cause permanent loss of valuable profile data that cannot be<br />
undone. Only Users with the Authorization setting of "Manager" will have access to Global Modify.<br />
Be sure to only authorize this for Users that should have this type of functionality and have been<br />
119
Using the Profile Manager to Manage Your Profiles<br />
properly trained on it.<br />
120
Chapter<br />
5<br />
Putting Profiles to Work for You<br />
This section demonstrates how to use the powerful <strong>ClientBase</strong> features, Merge to<br />
Document, Merge to Email, Merge to File, Merge to Print, Merge to Label, and<br />
Merge to PNR.<br />
Introduction<br />
Your agency has built a valuable database by consistently collecting and recording client data. Now<br />
it is time to put that data to work for you. Save valuable time by merging client profile data into<br />
PNR’s, document templates, labels, and files. Print out the results of queries for telemarketing or<br />
reference. By using the stored data in the profiles instead of manually typing client information each<br />
time, you not only cut work time, but also reduce the chances of typing errors.<br />
Also learn how to use the Case Converter feature to clean up names and addresses that may be in<br />
different cases. Need to globally change many profiles at one time Learn how to use Global<br />
Modify.<br />
Merge to Document<br />
Sending personalized letters frequently helps build stronger relationships with clients. That's one of<br />
the things that <strong>ClientBase</strong> does best. A library of documents customized by the database<br />
administrator makes it easy to print personalized letters for your customers from Wordpad, Microsoft<br />
Word, Open Office, etc. The speed and ease of this feature gives agents reason to be more proactive<br />
in their communication with customers, thus building customer loyalty.<br />
Using to Merge Document<br />
The first step in using the Merge to Doc feature is to use the Profile Manager to find the profile(s) to<br />
merge with the document. When merging information into a document template, you have several<br />
choices. Merge the information to a document from the search results screen by:<br />
1) Selecting the desired profile and clicking the action gear in the Profile Manager, and Merge to<br />
Document.<br />
121
Putting Your Profiles to Work for You<br />
2) From within a client profile, clicking the Merge Options|Merge To Document drop-down on the<br />
menu bar.<br />
3) Searching for a group of profiles in the Profile Manager and clicking the Merge Options|Merge<br />
To Document on menu bar.<br />
When you click Merge To Document or the action menu icon (gear in profile entry in Profile Results<br />
Screen) and Merge to Document, a merge to document dialog box appears.<br />
Browse for different document templates set up by the database administrator by using the dropdown<br />
menu. After selecting the document template, click Create Word Document. Based on the<br />
selected template, a letter or a set of letters is merged with information from each client's profile into<br />
the Microsoft Word, Wordpad, Open Office, etc. application while you are still in the browser. View<br />
the document with all fields merged. From here the document can be edited, if desired, and printed.<br />
The program you have associated with .doc type files within your Windows settings determines the<br />
program used upon clicking Create Word Document. To change the program associated with .doc<br />
type files, browse for a .doc file from My Computer, right click on the file and select properties. From<br />
the General tab click Change next to Opens with and select from the drop-down list of choices.<br />
If Merge to Document is launched from the results of a search, then one large document is created<br />
with page breaks separating the results for each profile included in the search.<br />
122
Putting Your Profiles to Work for You<br />
<strong>ClientBase</strong> Windows Users: Users need to be granted permission to print document templates by<br />
the database administrator. Make changes in a Primary-Sync database or a Non-Sync activated<br />
database. Also, depending upon your Internet Explorer settings, you may be prompted for User<br />
Login Authentication information before launching the merged document. This only happens on a<br />
very specific setup. To remove this prompt, take the following steps within the Internet Explorer<br />
settings:<br />
1) Go to Tools|Internet Options|Security.<br />
2) Click Local Intranet.<br />
3) Click Sites.<br />
4) Click Advanced.<br />
5) Add your <strong>ClientBase</strong> URL to the Intranet zone (e.g. http://www.xxxxxxx).<br />
Create a Mailer<br />
Create Mailers:<br />
Whether printing a single letter from within a profile, or a large group of letters from the results of a<br />
query, <strong>ClientBase</strong> makes it easy to track mailings to your clients. This icon automatically creates a<br />
mailer record for every customer included in the query results. Whether it’s one result or 500 results,<br />
a unique mailer record is attached to each profile for historical purposes. The mailers can be viewed<br />
from within the client profile by clicking the activities tab, and can also be queried and printed from<br />
the Activities Manager by date or subject.<br />
Merge to Email<br />
Before you can use Merge to Email in <strong>ClientBase</strong>, some setup is required. SMTP is a standard<br />
protocol (language) used for sending email on the Internet. Every mail server is capable of handling<br />
SMTP email. Your agency can utilize this SMTP feature providing it has the proper mail server<br />
configuration. A User Login stores the details necessary to send email via SMTP and you can setup<br />
with these settings either through the email settings link in <strong>ClientBase</strong>, by going to Tools|My Login,<br />
or by the database administrator in your User Login record in the Windows version of <strong>ClientBase</strong>.<br />
Set Up <strong>ClientBase</strong> with Mail Server’s SMTP Settings<br />
Click Merge to Email from within any profile to launch the email composition screen. From this email<br />
123
Putting Your Profiles to Work for You<br />
screen click the Settings link or go to Tools|My Login on menu bar.<br />
<strong>ClientBase</strong> uses the SMTP (Simple Messaging Text Protocol) to send emails. Complete the User<br />
Login SMTP Settings obtained from the entity responsible for maintaining your mail server (ISP).<br />
From E-Mail Address: Enter the email address for the user login you are setting up. The address<br />
entered here appears as the from address for all emails sent from this user. If you wish to change<br />
this address frequently, do so at the email level when you are sending it out.<br />
In the From E-Mail field, if you type joyce@Trams.com and a message is sent, you see the From<br />
field saying joyce@Trams.com. Some people prefer it to look like this instead, Joyce Smith. To<br />
have it appear like this, type Joyce Smith instead of just<br />
joyce@Trams.com. You can also use your company name or department name; for example,<br />
Travel With the Stars or Star Travel Marketing.<br />
Outgoing Mail Server (SMTP): Enter the outgoing mail server name determined in your steps<br />
above. Examples: mail.domainname.com, smtp.domainname.com, or gomail.wspan.com).<br />
Port: This setting defines the TCP/IP port which your email application listens on for incoming mail.<br />
If left blank, this setting uses port 25 by default, which is the Internet standard for receiving SMTP<br />
mail. In some situations, you may have chosen to move the SMTP service to another port. Perhaps<br />
you already have a service on port 25, and you do not want the services to conflict over the port<br />
assignment. In such a case, enter the port <strong>ClientBase</strong> should use.<br />
The default port for encrypted connections is 465 and unencrypted is 25. <strong>ClientBase</strong> will<br />
automatically set the port to these defaults when choosing a Secure Connection setting.<br />
Authentication Type: Set to Default, a setting used to authenticate your connection to the<br />
SMTP mail server by forcing a USER name and password.<br />
None: If your agency is hosting your own email server and the network login has been configured<br />
to handle the authentication to the SMTP Server automatically, set this field to None.<br />
E-Mail Account Login and Password: Use when Login Type is set to Default. Enter your E-Mail<br />
account login and password here.<br />
Secure Connection: <strong>ClientBase</strong> Merge to Email feature supports SSL/TLS secure connections. A<br />
drop-down enables you to select from four options: None, TLS (if available), TLS, and SSL.<br />
124
Putting Your Profiles to Work for You<br />
The type of connection you select is determined by the type of security supported by your email<br />
provider or Internet Service Provider (ISP). Please contact your ISP to find out which setting is<br />
correct for your email account.<br />
SSL: Use SSL for encrypting email sent via SMTP.<br />
TLS: Use TLS for encrypting email sent via SMTP.<br />
TLS, if available: Attempt to use TLS for encrypting email sent via SMTP. If the server does not<br />
support TLS, SSL will be attempted instead.<br />
None: You do not wish encrypt your email(s) or your SMTP server does not support SSL/TLS.<br />
TLS (Transport Layer Security) is quickly becoming the common standard for encrypting emails.<br />
SSL (Secure Sockets Layer) is the predecessor to TLS. There are very few differences between SSL<br />
and TLS. TLS's encryption is a little stronger, however, both types are almost identical, with only<br />
minor technical differences in the way the email is encrypted and transmitted.<br />
The default port for encrypted connections is 465 and unencrypted is 25. <strong>ClientBase</strong> will<br />
automatically set the port to these defaults when choosing a Secure Connection setting. Here are<br />
some settings for common ISP’s:<br />
AOL<br />
Authentication Type: Default<br />
Outgoing Mail Server: smtp.aol.com<br />
Port: 465 or 587<br />
Secure Connection: SSL<br />
AT&T Yahoo<br />
Authentication Type: Default<br />
Outgoing Mail Server: smtp.att.yahoo.com<br />
Port: 465 or 587<br />
Secure Connection: SSL<br />
GMail (Also works for Google Apps)<br />
Authentication Type: Default<br />
Outgoing Mail Server: smtp.gmail.com<br />
Port: 587 (may also be 465)<br />
Account Login: Full e-mail address (e.g., name@gmail.com)<br />
Password: Your Gmail password<br />
Secure Connection: TLS, if available<br />
GoDaddy<br />
125
Putting Your Profiles to Work for You<br />
Authentication Type: Default<br />
Outgoing Mail Server: smtpout.secureserver.com<br />
Port: 80<br />
Account Login: Full e-mail address (e.g., name@gmail.com)<br />
Password: Your GoDaddy e-mail password<br />
Secure Connection: SSL<br />
Hotmail<br />
Authentication Type: Default<br />
Outgoing Mail Server: smtp.live.com<br />
Port: 465 or 587<br />
Secure Connection: SSL<br />
Yahoo<br />
Authentication Type: Default<br />
Outgoing Mail Server: smtp.mail.yahoo.com<br />
Port: 465 or 587<br />
Secure Connection: SSL<br />
Note that the free version of Yahoo mail does not support SMTP. You must subscribe to Yahoo Mail<br />
Plus or Business.<br />
Using Merge to E-Mail<br />
Merge to Email can be launched 1) From the results of a search for multiple profiles using Simple<br />
Search or Advanced Search; or 2) From within a single profile by clicking the action gear next to the<br />
client’s name in the Profile Manager or within a client profile by clicking Merge to Email on the<br />
toolbar.<br />
E-Mail addresses are kept in the communication entry area found in the general information link of<br />
all types of profiles.<br />
1) Using Merge to E-Mail from the results of a search: When merging information into an email,<br />
merge the information to multiple emails from the search results area by clicking Merge To Labels<br />
on the Menu Options drop-down. A dialog box appears. Select how emails are to be sorted by<br />
selecting Name, First Name, Last Name, and Email (default). Choose Primary E-Mail Only or All E-<br />
126
Mails in Profile. By default only emails with marketing permission is checked off.<br />
Putting Your Profiles to Work for You<br />
2) Using Merge to E-Mail for a single profile: Click the menu bar Merge Options|Merge To E-<br />
mail inside the client’s profile,<br />
or directly from the profile search results screen, by clicking the Action Gear located beside the<br />
selected profile entry. If more than one email exists within the profile, a grid appears allowing you<br />
to select the desired emails you would like to send to.<br />
3) Preparing Emails to Send:<br />
For each email being sent, notice the Profile Name, Address, Phone and Fax Numbers. To get to<br />
other emails in the series, use the navigation buttons, First, Previous, Next, and Last. Any data<br />
entered into the first email entry screen appears automatically in the other emails in the series.<br />
To: Includes each individual email address matching your criteria.<br />
Subject: Type the subject of the email. Any email sent MUST have a subject.<br />
CC: Enter any email that you want to receive a copy of this email. (Remember, this appears<br />
automatically in the other emails in the series.)<br />
Priority: Select a priority label from the drop-down menu of Highest, High, Normal, Low and Lowest.<br />
Mode: From the drop-down, select, Plain Text or HTML. If you select HTML, two tabs appear, one<br />
127
Putting Your Profiles to Work for You<br />
labeled Compose and one labeled HTML.<br />
Use the Compose tab to type and format your HTML without knowing how to code HTML. A<br />
formatting toolbar is included that makes formatting your text, inserting links, pictures and tables<br />
very easy. Use the HTML tab if you have Raw HTML that you would like to paste into the email.<br />
Anything entered into the Compose tab will then be formatted in raw HTML upon clicking the HTML<br />
tab. Anything entered into the HTML tab will then be formatted upon clicking the Compose tab.<br />
Use the Preview button to preview the email message prior to sending. Use the Load Template<br />
button to select and load a Document Template set up in Tools|Settings|Document Templates.<br />
Please note that Document Templates have been enhanced to allow formatting in HTML as well,<br />
but this formatting is only included when the template is launched via Merge to Email. All Templates<br />
launched through the Merge to Doc Template feature are converted to Plain Text upon converting<br />
to MS Word.<br />
Insert Field/Load Template: Complete your message by using any of the global document<br />
templates setup by the database administrator in the Windows version of <strong>ClientBase</strong>. Use Load<br />
Doc Template to select from a listing of global templates or use the Insert Fields to insert merge<br />
fields in combination with free-flow text.<br />
Tip: If you select Salutation|Courtesy Title Last Name, or Salutation|First Name, or<br />
Salutation|Name as a merge field, the | character included in the Salutation means that if the<br />
Salutation field is not completed within one of the resulting profiles, then for just that profile, you want<br />
it to use the merge field following the |. For any of the name field merge fields, if the email is linked<br />
to a passenger, then the passenger’s name fields will be merged. If the email is not linked to a<br />
passenger, then the profile name fields will be merged.<br />
Preview: This option allows you to preview message in its formatted state before sending.<br />
Attachments: Add an attachment to email by clicking Browse to locate the attachment, and then<br />
Attach.<br />
Mailer: To keep a history of any emails sent, be sure to create a Mailer record by clicking on the<br />
Mailer link. These mailers then create a history within each profile whenever an email is sent.<br />
Mail Date/Time: By default, the date and time are auto-filled. These can be changed manually by<br />
using the drop-downs.<br />
128
Putting Your Profiles to Work for You<br />
Subject: Choose a subject for the mailer from the drop-down menu with items setup by the<br />
database administrator in the Windows version of <strong>ClientBase</strong>. By choosing from the drop-downs,<br />
consistency is assured for reporting and querying purposes.<br />
Body: By default, the mailer retains a copy of the body of the email.<br />
Click OK to save.<br />
4) Sent Emails<br />
All emails sent from <strong>ClientBase</strong> create an email job at your SMTP server which can be monitored by<br />
clicking the All Email Jobs link. This link allows you to monitor jobs that have not yet been completed<br />
to view the status. If you want to cancel an email job before it is finished, you can do so by clicking<br />
the Cancel link next to the job. Purge Inactive then deletes any jobs from the listing once they have<br />
been cancelled. All email jobs that have completed successfully are automatically be purged from<br />
the listing. To return to your email upon viewing this log, click Done.<br />
Sending Text Messages from Any Email Program<br />
You can input a person’s cell phone number followed by the @ sign and a proper domain depending<br />
on the carrier (AT&T, Verizon, Sprint, etc.) as an email address, and this indeed will send it as text<br />
message to them. To do this:<br />
1. Enter it as an email address entry.<br />
2. Ask for the cell carrier.<br />
3. Enter a description of SMS (or something like that) to help locate it.<br />
Example: If my cell is 310-293-4444 and my carrier is AT&T, then email me a text at<br />
3102934444@txt.att.net.<br />
Merge to File<br />
Use the results of a profile, activity, or Res Card query to Merge to File. This enables you to create<br />
an ASCII delimited or text (.txt) file which can be used in other applications such as MS Word, Excel,<br />
etc. to run labels or reports, and print from your local workstation.<br />
Using Merge to File<br />
1) The first step in using the Merge to File feature is to search in the Profile, Activity, or Res Card<br />
Manager to find the list of records to be included in the ASCII export.<br />
129
Putting Your Profiles to Work for You<br />
2) Designate the fields to include within the file for each record in your results. The fields to include<br />
are based upon the current columns displayed within your query results. To change the fields to<br />
include, use Select Columns to add or remove the fields within columns as desired.<br />
3) Designate the sort order to include within the file for each record. This sorting within the ASCII<br />
export is determined by the current sorting of the current query results. To change the sorting, use<br />
Sort by Columns to setup to three levels of sorting criteria.<br />
4) Click Merge To Labels on the Menu Options drop-down to run the export. A dialog box appears<br />
prompting you for the following information:<br />
File Name: Enter the name to assign the file. (No need to enter the drive, directory or file extension<br />
as you are prompted for that information later.)<br />
Include Field Name: This is checked by default and determines whether field headers describing<br />
the fields of data in each record are included in the file.<br />
ASCII File Type: Select either Comma delimited or Tab delimited. This character separates each<br />
field included within each record in the file.<br />
Results to Merge: If you want to include all entries in the result screen, click All Results in Current<br />
Manager. If you want to pick specific entries to include in the file and have clicked on these entries<br />
in the result screen before you merged to file, click Selected Results in Current Manager and<br />
Generate Labels.<br />
5) Click Create Mailer to include a record in clients’ profile automatically that their names were<br />
included in the file. We suggest you always create a mailer so you can track what was sent to a<br />
130
Putting Your Profiles to Work for You<br />
client or on behalf of a client.<br />
Select a subject and type a description of mailing in remarks area if desired.<br />
6) Click Export to begin the export process. You are prompted with the option of opening the file or<br />
saving it to your computer. If you choose to save it to your computer, a window appears giving you<br />
the ability to set the file extension, and select the drive and directory where you would like to save<br />
the file. If you choose to open the file, you are prompted with a listing of program choices to view the<br />
data.<br />
Note: In order to use this feature, permission must be granted by the database administrator.<br />
Merge to Printer<br />
Need to print out the results of a Profile, Activity, or Res Card search for marketing, management or<br />
reference purposes Simply search your database to obtain the desired search results, arrange and<br />
sort your columns as desired by clicking Select Columns, and Sort Columns, and click Merge To<br />
Labels on the Menu Options drop-down to print the list. Upon clicking Merge to Printer, a dialog box<br />
appears with the following options:<br />
Include Field Name: Defaults with this option checked and determines whether the field names<br />
appear as a heading at the top of the report.<br />
131
Putting Your Profiles to Work for You<br />
Resize/Enter Size: Defaults to 10 point font, but can be changed to the font size desired.<br />
Refresh/Print/Close: Refresh refreshes your preview based upon the current settings. Print<br />
prompts with your default printer settings. Close closes the window without printing.<br />
Note: Users need to be granted permission to print by the system database administrator<br />
(SYSDBA).<br />
Merge to Label<br />
By using the Merge to Labels feature in <strong>ClientBase</strong>, create labels that can be printed out for specific<br />
client searches.<br />
1) First search for the clients you want to print labels for by using Global Saved Queries, Personal<br />
Saved Queries, or using the Simple Search or Advanced Search.<br />
2) Click Merge To Labels on the Menu Options drop-down.<br />
From the Label drop-down, select your labels; from the Sort by drop-down, select how you want<br />
your labels sorted - by Name, First Name, Last Name, City, State, Zip Code, Country, Fam/Emp First<br />
Name or Fam/Emp Last Name. If you want to print labels for all entries in the result screen, click All<br />
Results in Current Manager and Generate Labels.<br />
If you want to pick specific entries to print labels for and have clicked on these entries in the result<br />
screen before you merged to labels , click Selected Results in Current Manager and Generate<br />
Labels.<br />
132
Putting Your Profiles to Work for You<br />
4) Print.<br />
Merge to PNR<br />
No more multiple entries or databases! <strong>ClientBase</strong> provides you with the ability to move customer<br />
information (maintained in <strong>ClientBase</strong> profiles) to your reservation system's PNR. Watch your<br />
marketing database grow as you become more efficient in collecting and using the database<br />
information to build PNR’s. You'll be surprised at how quickly existing customer information gets<br />
updated, and how quickly new customer information gets added when you use <strong>ClientBase</strong> as the<br />
source for building PNR’s. Also, watch your customer loyalty grow as you quickly access customer<br />
information instead of asking for the same information over and over again.<br />
Any field captured in a client profile can be formatted for your CRS PNR. This is done via a PNR<br />
Rule. PNR Rules are maintained through the Settings menu. In addition to client profile fields, the<br />
Merge to PNR feature also includes any entries captured within PNR Entry tables. PNR Entry tables<br />
are stored at four levels - the Branch level, the Agent level, the Client Profile level and the Client<br />
Passenger level.<br />
This means you have complete flexibility on the amount of information you would like automatically<br />
formatted for a PNR while working in a <strong>ClientBase</strong> profile. Although all PNR Entries captured at any<br />
level are included within the Merge to PNR feature, at this time you can only update these PNR<br />
Entries within <strong>ClientBase</strong> at the Agent and Profile levels.<br />
Using the Merge to PNR Feature<br />
Before you use the Merge to PNR feature there is a one-time file download (GDS API Files) that<br />
must be done on the user’s workstation. Note: The user must have administrative rights on the<br />
computer to download and run this file. Click here for complete instructions for each GDS.<br />
http://www.trams.com/home/support/misc_downloads/#cbbcbogdsapifiles<br />
Using Merge to PNR<br />
1) Open a PNR on your computer. You may start checking availability and actually have a<br />
reservation ready in the PNR, but when it is time to add client name and address information, toggle<br />
into <strong>ClientBase</strong>. (Some agencies like to start in <strong>ClientBase</strong>, Merge to PNR, and then toggle into the<br />
PNR to check availability, and create reservation.)<br />
2) Search to find the client’s profile. To Merge to PNR from the Results Screen, click the action menu<br />
133
Putting Your Profiles to Work for You<br />
icon (gear) in Profile Manager, and Merge to PNR.<br />
(If the client’s profile is not in the system, create one.) If you are inside the profile, update any<br />
address, phone and Email information, and click PNR in the menu bar.<br />
3) First time users select the platform to use to send profile information to the GDS, and download<br />
the platform applet. The very first time you use the Merge to the PNR feature, you are presented<br />
with a screen from which to pick this platform one time only:<br />
Unless you are using Worldspan, you are using an API (Application Protocol Interface). Select the<br />
appropriate platform and click Next. For users selecting an API platform, an applet is downloaded<br />
on your computer so that PNR data can integrate with your workstation:<br />
Important Note: Make sure to check off Always trust content from Trams Products and Services.<br />
That way you won’t see this dialog every time you do a Merge to PNR. In the future whenever you<br />
delete cookies or files from your Internet Explorer, you will be asked again to download this applet.<br />
4) After you have downloaded the applet (for API platform users only), you are prompted with a<br />
134
Putting Your Profiles to Work for You<br />
series of checkboxes in the PNR Builder Selection Screen. Scroll down to select everything you<br />
need including passengers and credit card/frequent flyer information. The gray area recaps<br />
(previews) entries which have been setup by the database administrator to always move into the<br />
PNR. Select the information you want to move to a PNR by scrolling down and checking or<br />
unchecking any optional entries. Click Cancel to abort the Merge to PNR process, Refresh to see<br />
an edited version of the gray recap screen at the top of the selection screen, or Preview.<br />
5) Clicking Preview takes you to a PNR screen where you can edit and get a full-page preview of<br />
any entries you have approved. The screen displays all information in the exact format that it will<br />
land into your current PNR. Information on this screen can be modified, but does not permanently<br />
update your <strong>ClientBase</strong> profile.<br />
6) Pressing Send to PNR does the following depending on your CRS:<br />
Sabre Red Workspace, APS, Vista, and Apollo/Galileo Users: When clicking Finish, the<br />
previewed information is pasted into your current PNR. If this occurs successfully, a confirming<br />
message appears. Use your normal Windows command () to toggle into your CRS, hit<br />
Display All and view the updated PNR.<br />
Amadeus Users: Amadeus has 3 platforms - APS (which stands for Amadeus Pro Software), Vista,<br />
and ProWeb. The Amadeus tool we use for Merge to PNR and PNR Import is called Amadeus<br />
+Script and is available with both APS and Vista platforms. (If the agency's APS or Vista platform<br />
did not come with this +Script tool activated, then contact the Amadeus support desk to turn it on.<br />
Amadeus has agreed to waive an fees associated with +Scripts for all Trams customers, so there is<br />
no cost, just a phone call to the support desk.) Since +Scripts is unavailable with ProWeb, the Merge<br />
to PNR via API, but does work via clipboard (as well as PNR Import function via API) DOES NOT<br />
work with it.<br />
Sabre Red Workspace Users: An API is the tool <strong>ClientBase</strong> uses to connect to the Sabre Host. In<br />
order for PNR Import (and Merge to PNR) to work, you must enable the Sabre Emulator API<br />
emulator within Sabre Red. Select Tools|Options|Sabre System|Advanced and check Sabre<br />
135
Putting Your Profiles to Work for You<br />
Emulator API:<br />
Worldspan Users: If characters to be pasted exceed 1000 characters, then copy to clipboard is<br />
broken into multiple packets. Upon clicking Send to PNR, the system prompts with a message, 1 of<br />
X of the PNR information is ready for pasting. At this point the user must toggle to Worldspan and<br />
paste the first packet of information. If there are more packets, than the user must toggle back to<br />
<strong>ClientBase</strong>, click OK, and paste the remaining packets.<br />
Nexion Users: Nexion offers an InternetView connection to the GDS's. Since it is Internet based,<br />
Merge to PNR via clipboard is the only GDS related function of <strong>ClientBase</strong> that works with it.<br />
GDS Selection Link<br />
If you need to change the GDS platform with which you are working, click the GDS Selection link.<br />
You are prompted to download a new applet if applicable.<br />
Additional Entries Link<br />
Within each PNR Entry or PNR Rule that is set to Always Move, an option is included called "Display<br />
on Selection Screen". The PNR Selection Screen is the screen that appears when you use the<br />
Merge to PNR feature and allows you to select the specific profile data to be included and sent to<br />
the current PNR. For PNR entries that should always move regardless of the profile or PNR, this<br />
Display on Selection Screen can be unchecked so that the Selection Screen is less complicated for<br />
the agent to review. Any of these entries that have not been designated to display on the selection<br />
screen can be viewed, if desired, by clicking Additional Entries.<br />
136
Chapter<br />
6<br />
An In-Depth Look at Activities<br />
This chapter demonstrates how to use Reminders, Notes, and Mailers to increase<br />
agent productivity and enhance customer relationships.<br />
Introduction<br />
One of the most difficult challenges today's travel agency faces is how to keep current clients loyal<br />
and develop long-time relationships with new customers. <strong>ClientBase</strong> is designed to help agencies<br />
achieve these goals by tracking all types of client contacts in a well-organized manner by creating<br />
an electronic history. In addition, users can easily setup follow up reminders, note specific<br />
interactions - such as a phone call or Email received from a client, and track all correspondence<br />
associated with a specific profile. This chapter shows you how easy this is to do.<br />
Overview of Activities Types<br />
Notes<br />
Each time a contact is made by the agency with your customer, valuable information is received.<br />
These contacts should be documented in the form of a Note. A Note in <strong>ClientBase</strong> is contained<br />
within a client profile and is similar to a “post-it note,” complete with date of contact, User Login and<br />
remarks.<br />
A profile can have any number of Notes attached to it. This allows any agent interacting with the<br />
customer to view all past contacts. For example, Clara Adam’s calls the agency saying she’ll be a<br />
day or two late with her final deposit. Sharon creates a note, documenting the call. Not only is<br />
Clara’s Note “filed” in her profile in the Activities link, but it can be used, along with other Notes, to<br />
run reports.<br />
Notes can be created from different areas in <strong>ClientBase</strong>:<br />
- Create a Note in the Profile Manager by clicking the action gear next to the selected profile.<br />
- Create a Note by clicking on Note menu bar everywhere in the program. Make sure to associate<br />
the Note with a profile by clicking the 3 dots next to that field if it is not already associated with the<br />
137
An In-depth Look at Activities<br />
correct profile.<br />
- Create a Note in a profile, by using the icon on the menu bar or by clicking on the Activities link,<br />
and Create Activity.<br />
NOTE ENTRY SCREEN<br />
Note General Info<br />
Date of Note: Defaults to today’s date. Enter a different date by typing into field in any of the date<br />
formats listed below or click on the three dots next to the date field and double-click a date from the<br />
calendar.<br />
Date Fields<br />
Complete a date field using any one of the following formats or selecting a date from the drop-down<br />
calendar:<br />
1) mmddyy or mmddyyyy (separators are not required)<br />
2) ddmmmyy or ddmmmyyyy<br />
3) 0 (for current month, day and year date)<br />
4) mm (defaults to current day and year)<br />
5) mmdd (defaults to current year)<br />
6) mm-dd-yy, mm/dd/yy, mm.dd.yy (-, / and . are valid separators)<br />
138
An In-depth Look at Activities<br />
7) m-d-yy, m/d/yy, m.d.yy<br />
Profile: Defaults to selected profile or if not defaulted, associate this note with a profile by clicking<br />
on the three dots next to the entry. Query for a specific profile by entering a few letters of the profile’s<br />
name, or last name and clicking Search. Click the radio button next to the name you want to use,<br />
and OK.<br />
Start Time: Defaults to the current time.<br />
Login Name: Defaults to the user logged in at the time of creating the Note. Choose a different<br />
User by clicking on the drop-down menu.<br />
Reservation: Defaults to selected Res Card (if inside a Res Card). Enter a Res Card to associate<br />
this note with or a different Res Card by clicking on the three dots next to the entry. Query for a<br />
specific Res Card by entering a few letters of the Res Card No. or Res Card Trip Name and clicking<br />
Search. Click the radio button next to the Res Card you want to use, and OK.<br />
Create Date: Date defaults to current date and is "hard-coded" so cannot be changed.<br />
NOTE<br />
Subject: Enter the subject of the Note by selecting from the drop-down menu. Subjects are setup<br />
in Global Defaults by the database administrator in the Windows version of <strong>ClientBase</strong>. Consistent<br />
subjects across all Users’ Notes allow for valuable reporting.<br />
Private: Check this box if you want the note to be private (not suggested). Only the sign-in agent<br />
and database administrator can access the Note.<br />
Remarks: Enter any additional free-flow remarks or instructions in the text box at the bottom of the<br />
Note entry screen.<br />
Save/Cancel: Click Save to accept new information, or Cancel leave area without saving changes.<br />
Reminders<br />
Sharon, an agent, creates a Reminder to call Ken Able next week to do a trip inquiry follow-up. Jean,<br />
another agent, creates a Reminder to check on documents for Hank Adams. Mary, yet another<br />
agent, creates a Reminder to welcome the Andersons home from their Hawaii honeymoon.<br />
Reminders allow you to schedule future tasks. As with Notes, Reminders are created and attached<br />
to a Client Profile. Any profile can have any number of Reminders attached to it. All Reminders<br />
created appear on a daily To-Do list located in the Activity Manager.<br />
139
An In-depth Look at Activities<br />
Reminders can be created from different areas in <strong>ClientBase</strong>:<br />
- Create a Reminder in the Profile Manager by clicking the action gear next to the selected profile.<br />
Create a Reminder by clicking Reminder the menu bar everywhere in the program. Make sure to<br />
associate the Reminder with a profile (if not associated with correct profile) by clicking the 3 dots<br />
next to that field.<br />
- Create a Reminder in a profile, by clicking Reminder menu bar or by clicking on Activities link, and<br />
Create Activity.<br />
REMINDER ENTRY SCREEN<br />
Reminder General Info<br />
Date of Reminder: Defaults to today’s date. Enter a different date by keying in a different date in<br />
140
An In-depth Look at Activities<br />
format as listed below, or click on the three dots next to the date field and double-click on a date from<br />
the calendar.<br />
Date Fields Formats<br />
Complete a date field using any one of the following formats or select date from drop-down calendar:<br />
1) mmddyy or mmddyyyy (separators are not required); i.e., 021410<br />
2) ddmmmyy or ddmmmyyyy<br />
3) 0 (for current month, day and year date)<br />
4) mm (defaults to current day and year)<br />
5) mmdd (defaults to current year)<br />
6) mm-dd-yy, mm/dd/yy, mm.dd.yy (-, / and . are valid separators)<br />
7) m-d-yy, m/d/yy, m.d.yy<br />
To Do (Timeless): Check here for this Reminder to appear on your To-Do list with no specific time<br />
for completion indicated.<br />
Profile: Defaults to selected profile (if inside the Profile Activity link). Enter a different profile or<br />
associate this reminder with a profile by clicking on the three dots next to the entry. Query for a<br />
specific profile by entering a few letters of the profile’s name, or last name and clicking Search. Click<br />
the radio button next to the name you want to use, and OK.<br />
Start Time: Enter time if you want to setup an alarm. Defaults to current time if Timeless To-Do is<br />
not checked. The time you enter here appears on your To-Do List in the Activity Manager.<br />
Duration: Enter duration of the Reminder to appear on your To-Do List in the Activity Manager with<br />
the duration you specify or .<br />
Res Card: Associate this reminder with a Res Card by clicking on the three dots next to the entry.<br />
Query for a specific Res Card by entering a few numbers of the Res Card number, or a few letters<br />
of the Res Card Trip Title and clicking Search. Click the radio button next to the name you want to<br />
use, and OK.<br />
141
An In-depth Look at Activities<br />
Login Name: Defaults to the user currently logged into the system. Choose a different user by<br />
clicking on the drop-down menu.<br />
Create Date: Date Reminder is created. Date is "hard-coded" and cannot be changed.<br />
Completed: Check here when Reminder is completed, and fill in correct Completed Date. Entering<br />
a Complete Date takes this Reminder off the To-Do list.<br />
Set Alarm: To further assist with remembering important tasks, reminders include an optional<br />
alarm. This alarm, like the alarm which awakens you each morning, activates at the time designated<br />
within the reminder (regardless of where you are in the <strong>ClientBase</strong> program, or any other program)<br />
as long as <strong>ClientBase</strong> is running on your PC.<br />
Click Yes and a list of active alarms appears. Choose the desired Reminder and click Edit to view<br />
the details. Alarms can be set for Reminders only when To Do (Timeless) is not checked. This<br />
alarm activates at the time designated within the reminder as long as <strong>ClientBase</strong> is running. When<br />
an alarm is activated, user is prompted, “You have active alarms. Select Yes to view, or No to<br />
ignore.” When Yes is selected, there are three options to choose from:<br />
1) Off: Turns off the alarm but keeps the reminder open and on to-do list.<br />
2) Snooze: Reschedules the alarm for a future time.<br />
3) View: Allows you to work the reminder as you would from the Activity Manager.<br />
Alarms can be set for single Reminders as well as Batched Reminders. When creating a single<br />
reminder enter the Start Time of the Reminder, click the “Set Alarm” checkbox and then select the<br />
time the alarm should activate prior to the Start Time. To create alarms for Batched Reminders,<br />
select Tools|Settings|Batched Reminders. When adding a new batch or editing an existing batch,<br />
once the Batched Reminder setup screen is displayed, enter the Start Time of the Reminder, click<br />
the “Set Alarm” checkbox and in the Duration select the time the alarm should activate prior to the<br />
Start Time.<br />
Update E-mail Calendar after Saving Changes: When checked updates are sent to user’s e-mail<br />
address. This box is checked by default when the setting from User Settings is "All Reminders" or<br />
"Only for Reminders when time is set" (see below.)<br />
Upon saving the Reminder, an email is sent to the user. The e-mail appears as a meeting request<br />
and includes a link to the Activity. Click the Accept button to save the Reminder to the Outlook<br />
calendar.<br />
Setup this Option: Automatically Update Email Calendar for Uncompleted Reminders, was added<br />
to Tools|Settings|User Logins under the User Settings tab for each user. Select a setting for the<br />
field.<br />
<br />
<br />
Never - Reminders are never sent to the Outlook calendar<br />
All Reminders - All Open Reminders are sent to the Outlook calendar<br />
Only Reminders set for a Time - Only Open Reminders with a selected Start Time are sent<br />
to the Outlook calendar<br />
Only Reminders set with an Alarm - Only Open Reminders with the Set Alarm Box<br />
checked are sent to the Outlook calendar<br />
The user’s e-mail address is used for sending Reminders to the Outlook Calendar. If the user does<br />
not have an e-mail address entered in the User Settings, Never is the only setting that can be<br />
142
An In-depth Look at Activities<br />
entered for this field.<br />
Reminder<br />
Reminder Type: Enter the type of follow-up for the Reminder by clicking on the drop-down menu<br />
and picking from a customized list. Such types may include phone call, Email, letter, etc. Reminder<br />
types are customized and setup in Global Defaults by the database administrator in the Windows<br />
version of <strong>ClientBase</strong>.<br />
Priority: Click on the drop-down menu to mark this Reminder with a priority level: High, Medium,<br />
or Low. Priority level can be used as search criteria in both Level 2 Queries of the Activity Manager.<br />
All contact results viewed in both the Activity Manager are listed in order by date, then time, then<br />
priority level, starting from High to Medium to Low.<br />
Private: Click here if you want the note to be private (not suggested). Only the sign-in agent and<br />
database administrator can access the Reminder.<br />
Subject: Enter the subject of the Reminder by clicking the drop-down menu and picking from a<br />
customized list.<br />
Remarks: Enter any additional remarks or instructions in the text box at the bottom of the Reminder<br />
entry screen. This is a very important section - this area will contain a history for everyone of what<br />
happened with this particular reminder.<br />
Save/Cancel: Click Save to accept new information, or Cancel leave area without saving changes.<br />
Note: Reminder and Alarm times throughout the program display times based on the local time and<br />
stored in the database in GMT (Greenwich Mean Time). This allows users that are in different time<br />
zones but using the same database to always see the Reminder Activities and Alarms in their own<br />
local time. For example, if a user in Los Angeles creates a Reminder for 11 am, a user in Dallas will<br />
see it as 1 pm. Your Windows regional settings are used to display Reminders in your local time<br />
zone.<br />
Mailers<br />
Agent Sharon wants to handle her trip inquiries by mailing out brochures. She then creates a Mailer<br />
which keeps a record of this item within the client’s profile. Mailers provide tracking capability for<br />
every printed communication your agency sends to clients using documents, labels or Email. As<br />
with Notes and Reminders, Mailers are created and attached to a Client Profile. Any profile can have<br />
any number of Mailers attached to it.<br />
Mailers can be created from many areas in <strong>ClientBase</strong>:<br />
- Create a Mailer in the Profile Manager by clicking the action gear next to the selected entry.<br />
- Create a Mailer by clicking Mailer on the menu bar anywhere. Make sure to associate the Mailer<br />
with a profile by clicking the 3 dots next to that field.<br />
- Create a mailer in a profile, by clicking Mailer on the menu bar or by clicking on Activities link, and<br />
143
An In-depth Look at Activities<br />
Create Activity.<br />
Mailer Entry Screen<br />
Mailer General Info<br />
Date of Mailer: Defaults to today’s date. Enter a different date by keying in a different date in date<br />
format listed below, or click on the three dots next to the date field and double-click a date from the<br />
calendar.<br />
Date Fields Formats<br />
Complete a date field using any one of the following formats or click date from drop-down calendar:<br />
1) mmddyy or mmddyyyy (separators are not required); i.e., 021409<br />
2) ddmmmyy or ddmmmyyyy<br />
3) 0 (for current month, day and year date)<br />
4) mm (defaults to current day and year)<br />
5) mmdd (defaults to current year)<br />
144
An In-depth Look at Activities<br />
6) mm-dd-yy, mm/dd/yy, mm.dd.yy (-, / and . are valid separators)<br />
7) m-d-yy, m/d/yy, m.d.yy<br />
Profile: Defaults to selected profile. Enter a different profile or associate this mailer with a profile<br />
by clicking on the three dots next to the entry. Query for a specific profile by entering a few letters<br />
of the profile’s name, or last name and clicking Search. Click the radio button next to the name you<br />
want to use, and OK.<br />
Start Time: Defaults to the current time.<br />
Reservation: Defaults to selected Res Card (if inside the Res Card). Enter a different Res Card<br />
or associate this mailer with a Res Card by clicking on the three dots next to the entry. Query for a<br />
specific Res Card by entering a few letters/numbers of the Res Card No. or Res Card Trip Title and<br />
clicking Search. Click the radio button next to the Res Card you want to use, and OK.<br />
Login Name: Defaults to the user logged in at the time of creating the Mailer. Choose a different<br />
User by clicking on the drop-down menu.<br />
Create Date: Date defaults to current date and is "hard-coded" so cannot be changed.<br />
Response Date: Check here when client response to the mailer, and fill in correct Response Date.<br />
Mailer<br />
Mailer Type: This field is 25 characters (alphanumeric) and allows for selecting from a user-defined<br />
drop down list, and comes defaulting with the following:<br />
- Promotion (Email)<br />
- Promotion (Print Mail)<br />
- Trip Correspondence<br />
- General Correspondence<br />
145
An In-depth Look at Activities<br />
Mailer ID: This field is 30 characters (alphanumeric) and is indexed for maximum performance<br />
when used for querying purposes.<br />
Subject: Enter the subject of the Mailer by selecting from the drop-down menu. Subjects are setup<br />
in Global Defaults by the database administrator in the Windows version of <strong>ClientBase</strong>. Consistent<br />
subjects across all Users’ Mailers allow for valuable reporting.<br />
Link to Details: Allows for capturing a URL as a method for providing more details on the mailing<br />
that was sent to this client. Upon creating Mailers this Link to Details can be populated so that as<br />
users view a particular Mailer they can click the Go To button next to this new field and the system<br />
automatically launches IE and navigates to that URL.<br />
Remarks: Enter any additional free-flow remarks or instructions in the text box at the bottom of the<br />
Mailer entry screen.<br />
Save/Cancel: Click Save to accept new information, or Cancel leave area without saving changes.<br />
146
Chapter<br />
7<br />
Using the Activity Manager to<br />
Manage Your Activities<br />
This chapter demonstrates how to use the Activity Manager to manage key customer<br />
contacts and keep organized.<br />
Introduction<br />
Agent productivity is a requirement for agency success. To be productive, an agent must manage<br />
relationships with agency customers, record key contacts with customers, follow up on leads, and<br />
administer agent tasks and To-Do lists. Wow, that sounds like a lot for an agent to do!<br />
Fortunately, the <strong>ClientBase</strong> Activity Manager provides the tools to achieve these goals in the form of<br />
Notes, Reminders and Mailers. Agents learn how to use these powerful tools to develop habits<br />
which ensure their own increased productivity. An agent who is well-organized and productive is<br />
likely to have a following of happy customers. Your agency’s marketing and management team<br />
benefit as well.<br />
Search for Your Activities<br />
After users begin using Notes, Reminders and Mailers (as detailed in chapter, An In-Depth Look at<br />
Activities) to document vital customer contacts, they will want to start each work day by signing into<br />
<strong>ClientBase</strong> and clicking on the Activities Manager in the <strong>ClientBase</strong> header.<br />
Click Find and <strong>ClientBase</strong> searches the database for the User Login’s open reminders and the<br />
search results screen immediately displays a list of the Reminders (or tasks) the agent needs to<br />
147
Using the Activity Manager to Manage Your Activities<br />
complete each day. The agent can also click on any of the saved Global or Personal Searches as<br />
well.<br />
To retrieve a specific activity, click View next to the entry or the action menu icon (gear). This gear<br />
is displayed to the right of View and is listed for each record in the query. It has been designed to<br />
allow you to perform a variety of actions for that one record without having to open the record first -<br />
saving you a few extra clicks of the mouse. Click the gear and the following options appear:<br />
Edit: Takes you directly to the edit activity screen without having to open the activity first and then<br />
clicking Edit.<br />
Go To Profile: Takes you directly to the profile the selected Activity is attached to.<br />
On top of the results screen, notice the search areas. A user can use simple or advanced search<br />
filters to find activities. These searches can be quite valuable as productivity and management tools.<br />
Simple Activity Search<br />
A simple activity search contains four fields which are strung together with an “and”. In the example<br />
below, the query is setup for Sharon and All Notes with From Date 01/01/2012 and To Date 01/31/<br />
12. After setting up the selection criteria, and clicking Find, the results appear in the search results<br />
screen.<br />
Simple Search<br />
148
Using the Activity Manager to Manage Your Activities<br />
The following are simple search filters:<br />
Login Name: Defaults to the sign-in user. Choose a different user by clicking on the drop-down<br />
menu. This is particularly useful if someone is absent, and you want to help them with To-Do items.<br />
Select: Choose from the drop-down menu. Choices are: Notes and Open Reminders, Notes and<br />
Closed Reminders, All Notes and All Reminders, All Notes, Open Reminders Only, Open<br />
Reminders with Alarms, All Reminders, Mailers w/o Responses, Mailers w/Responses, All Mailers,<br />
and All Notes, Reminders, and Mailers.<br />
From Date/To Date: To select a specific date range for the query, enter the from date here. Use a<br />
date format listed below, or double-click on the date from the calendar on the drop-down menu.<br />
Date Fields Formats<br />
Complete a date field using any one of the following formats or click on date from drop-down:<br />
1) mmddyy or mmddyyyy (separators are not required); i.e., 021410<br />
2) ddmmmyy or ddmmmyyyy<br />
3) 0 (for current month, day and year date)<br />
4) mm (defaults to current day and year)<br />
5) mmdd (defaults to current year)<br />
6) mm-dd-yy, mm/dd/yy, mm.dd.yy (-, / and . are valid separators)<br />
7) m-d-yy, m/d/yy, m.d.yy<br />
Find: After you have setup the search, click Find to run.<br />
Advanced Activity Searches<br />
The Go to Advanced Search area of the Activity Manager gives you the ability to search your<br />
database of Notes, Reminders and Mailers by virtually any field captured in these records, and<br />
includes the ability to search by a particular client as well. This allows you to track the type of<br />
marketing tasks scheduled, when and if they have been completed, which agents are completing<br />
them, the mailings that are being sent and the response to those mailings. The options are endless.<br />
Go to Advanced Search, and enter selection criteria into the following screen. Since this area<br />
Enter Profile<br />
data to search<br />
by as well.<br />
149
Using the Activity Manager to Manage Your Activities<br />
“remembers” the last search run, click Reset to clear. Like the simple search area, the fields are<br />
strung together with “ands” across the fields, but within the field you can use “or” to narrow down<br />
your search even further. After setting up the search, click OK to activate the specialized list.<br />
The advanced search area contains the following filters to select Activities under the Activities link.<br />
ACTIVITY TYPE<br />
Reminders/Mailers/Notes: Check which type of Activity you want to include.<br />
Completed: From the drop-down menu, select Completed/Responded, or Not Completed/Not<br />
Responded.<br />
Completed From/Through: Choose a range for the Activity date by entering in date format listed<br />
below, or double-click on date from drop-down calendar.<br />
ACTIVITY DATE<br />
From/Through: Choose a range for the Activity creation date by entering in date format as listed<br />
above, or double-click on the date from the drop-down calendar.<br />
To Do: Check here to query To-Do’s.<br />
Duration From/To: Choose the Activities by time duration by clicking on the drop-down menu.<br />
ACTIVITY DETAIL<br />
Login Name: The login name defaults to the sign-in agent, or choose from the drop-down menu.<br />
Priority: Choose the priority type from the drop-down menu.<br />
Private: Choose those Activities which were marked private by checking here.<br />
Reminder Type: Select from the drop-down menu the customized Reminder types.<br />
Create From/Through: Select a range for those Activities created within a certain time frame by<br />
typing in date in date format listed below or double-click on the date from the drop-down menu<br />
calendar.<br />
Subject: Choose Activities by subject from the drop-down menu.<br />
Alarmset: To select activities with alarms, check here.<br />
Click OK to process or Cancel.<br />
You can also use general profile data as filters by clicking the Profile link.<br />
Activities Results Screen<br />
After you have completed your search, the results screen not only provides a count and list of query<br />
results, but also easy access to a specific activity. Click Count to obtain a number of total results.<br />
150
Using the Activity Manager to Manage Your Activities<br />
Navigation Bar<br />
The Navigation Bar provides a means to jump to various activities in the query results screen by<br />
using First, Previous, Next, Last, Select Columns, Sort by Columns and Saved Searches.<br />
Select Columns<br />
Click Select Columns to choose which columns you want displayed in your query results screen.<br />
To change a column, move the highlighted column over to the other side by using the > or < arrow.<br />
By using the shift key and mouse, select as many consecutive entries as you want to move; by using<br />
the control key and your mouse, select non-consecutive entries to move. Use the >> or
Using the Activity Manager to Manage Your Activities<br />
Saved Searches in the Saved Searches screen, or from the drop-downs at top of the program<br />
screen.<br />
To replace an existing saved folder with a new one, first perform the new search, adjusting the<br />
columns/sorts to your specifications, and then click Replace. This area also contains the ability to<br />
open a search (View), Replace or Rename a search, or Delete a search folder.<br />
Note: <strong>ClientBase</strong> saves the filters and results layout, not the search results. The next time you use<br />
the saved search, any new data that has been added since it was created, is included in the new<br />
search.<br />
Using Date Formulas in Your Saved Searches<br />
Since searches can be saved and retrieved for frequent use, the date fields in all searches allow for<br />
date formulas. This means any field that has a date, can also contain a formula for that date. The<br />
date formula function allows you to create a search and then save it without identifying a specific<br />
month, day and year in the From and To date fields. Instead, the search is processed with a formula<br />
for the month, day, day of the week, and year based upon the date the report is processed.<br />
Remember: Make sure the system date and time are correct.<br />
Benefit: When entering a date formula, your system converts it to the intended time period allowing<br />
you to run searches and/or save them for future use without the need to modify dates.<br />
Example: The following tables contain sample formulas for specifying dates. Mix and match the<br />
absolute and relative parameters in the function. All date formulas start with an = sign. The first<br />
number specifies the day of the month, the second number specifies the month, and the third<br />
number specifies the year. So if you only have the first number filled in, this means you want this<br />
report to reoccur on this day every month, in every year.<br />
DATE FORMULAS<br />
If You Want This<br />
Enter This<br />
1 st day of this month: =1,0,0<br />
Last day of this month: =31,0,0<br />
1 st day of this year: =1,1,0<br />
Last day of this year: =31,12,0<br />
Seven days from now: =+7,0,0<br />
Last Monday (will show today<br />
if today is Monday)<br />
A week from last Monday<br />
Next Monday<br />
=Mon<br />
=Mon-1<br />
=Mon+1<br />
Three months from now =0,+3,0<br />
Six months ago: =0,-6,0<br />
One year from now =0,0,+1<br />
152
Using the Activity Manager to Manage Your Activities<br />
Working with Search Results<br />
As mentioned previously, at the beginning of each day, users click on the Activity Manager to<br />
access their To-Do lists. By clicking on the desired saved search or using the simple search,<br />
<strong>ClientBase</strong> searches the database for the login user’s open reminders and the results screen<br />
immediately displays an organized list of the Reminders (or tasks) that the user needs to complete<br />
that day:<br />
A user views the Reminder and its details by clicking View next to the desired entry. Once inside<br />
the Reminder, click Edit in the entry to modify or enhance a Reminder (perhaps change the To-Do<br />
date). Click Edit, then Delete to remove a Reminder.<br />
Check the Completed box located within the Reminder record to indicate when a Reminder has<br />
been completed. This brings up a date field to enter a date. Click Find to remove it from your “to<br />
do” list. The completed record "lives" within the profile’s Activity link for future reference.<br />
Contact info is located<br />
in Reminder header.<br />
Add a remark and change date if you<br />
cannot contact client.<br />
Add any remarks to reminder and click Completed when done.<br />
You may not remember what you have done without remark.<br />
153
Using the Activity Manager to Manage Your Activities<br />
Note: When creating or Editing Reminders a checkbox, Update E-mail Calendar after Saving<br />
Changes” is visible. When checked, updates are sent to user’s e-mail address. This box is checked<br />
by default when the setting from User Settings in Tools|My Login is All Reminders or Only for<br />
Reminders when time is set.<br />
Once you've developed the habit of following up on travel inquires, begin using Reminders to<br />
organize other marketing and administrative tasks, such as payment deadlines, checking for<br />
documents, and welcome home calls. Reminders are also used to jog your memory of personal<br />
obligations such as dentist appointments, picking up dry cleaning, etc. Since all Reminders need to<br />
be attached to some type of profile, use your Agent profile in <strong>ClientBase</strong> to create these type of<br />
personal Reminders.<br />
Retrieve the profiles of your most loyal customers and schedule at least 4 or 5 occasions each year<br />
to reach out and touch them. Remind them often of how valuable they are. Use things like birthdays,<br />
anniversaries, annual vacation times and holidays as a reason to communicate with your customers.<br />
Every time you put your agency in front of your customers, you re-enforce your relationship,<br />
reminding them you are their travel professional.<br />
Adding New Activities<br />
Please refer to the chapter entitled An In-Depth Look at Activities to learn how to create Notes,<br />
Reminders, and Mailers in <strong>ClientBase</strong>. Remember anywhere in the program these functions are<br />
located on the menu bar. Just click on icon and associate the activity with the appropriate profile to<br />
create.<br />
154
Chapter<br />
8<br />
An In-Depth Look at<br />
Res Cards<br />
This chapter provides a detailed overview of the Res Card feature in<br />
<strong>ClientBase</strong>.<br />
Introduction<br />
As your agency implements <strong>ClientBase</strong> and begins reaping the rewards of improved customer<br />
relationships and effective marketing programs, your leisure travel sales should start increasing. To<br />
help you better manage this increasing volume of business and track the leads generated by your<br />
marketing programs, the Res Card has been created. Think of the <strong>ClientBase</strong> Res Card as a home<br />
for the many details involved in planning each and every trip for your customers and as a tool that<br />
helps you manage the entire trip planning process.<br />
Regardless of the technology agents use or don’t use, regardless of your niche or type of business,<br />
regardless of how long agents have been in the business, there are certain fundamental<br />
3/25/13 155
An In-Depth Look at Res Cards<br />
components involved in the trip planning process. The <strong>ClientBase</strong> Res Card has been designed to<br />
help agents through each process with the objective of making agents more efficient and effective.<br />
In the past, agents may have concentrated more of their attention on just the booking process, but<br />
with the advent of airline commission caps, there has been a new emphasis on leisure bookings and<br />
a greater need to manage these leisure sales.<br />
The Res Card feature in <strong>ClientBase</strong> provides a perfect tool to integrate all processes in trip planning.<br />
By setting up a Res Card, an agent can document the client’s first call by creating a Res Card and<br />
scheduling a follow-up call (listed on the daily To-Do list) with a Reminder. Once the customer is<br />
considering the trip, the agent captures details of reservations and prints out trip proposals,<br />
itineraries, and invoices while tracking invoiced and uninvoiced balances. By using the Live Connect<br />
feature in <strong>ClientBase</strong>, agents have the ability to book reservations via on-line booking engines and<br />
then pull all that reservation detail back into the Res Card. Additional notes and reminders can be<br />
created to remind an agent of a final payment date or a document confirmation. When the customer<br />
returns home, the agent documents his remarks and suggestions.<br />
Since each Res Card represents one trip, customers are likely to have multiple Res Cards in their<br />
profiles at any one time in the Res Card profile link. Depending on your agency’s needs, you can<br />
enter as much or as little trip information on each Res Card as desired. When talking with your<br />
clients and vendors, get in the habit of entering the information directly into the Res Card rather than<br />
jotting the notes on paper and then transferring the information into the computer. What a time saver<br />
this is, and everyone has access to this information.<br />
Click the Res Card link in the client profile to find a summary of the Res Cards created for this client.<br />
Each Res Card represents a different trip for the customer.<br />
Ways to Create a New Res Card<br />
To create a new Res Card in <strong>ClientBase</strong>:<br />
1) Create a Res Card by clicking on Res Card on the menu bar anywhere in the program. Make<br />
3/25/13 156
An In-depth Look at Res Cards<br />
sure the Prepared For field is correct. Click the three dots next to the field to associate the Res Card<br />
with a profile.<br />
2) Create a Res Card by clicking on the action gear next to the profile in the results screen, then<br />
New Res Card:<br />
3) Create a Res Card after booking a Live Connect reservation by clicking on the action gear by the<br />
selected profile in the Profile Manager and Live Connect. No need to create a Res Card first.<br />
4) Create a Res Card after booking a Live Connect reservation by clicking on Live Connect on the<br />
menu bar inside a client profile. No need to create a Res Card first.<br />
Res Card General Info<br />
When you first create a Res Card, you are presented with a screen for general information input and<br />
cannot access the other links until you Save (** stands for required fields):<br />
Header: At the top of the screen is a header which can be seen in any of the Res Card links. This<br />
includes Agent, Status, Reservation Cycle, Trip Name, Trip Start Date, Trip End Date, and in a<br />
stand-out color Res Card Number, Reservation Total, Invoiced Total, and Balance.<br />
**Agent: Defaults to log-in agent or enter another agent name from the drop-down menu. This field<br />
3/25/13 157
An In-Depth Look at Res Cards<br />
represents the agent primarily responsible for managing this trip.<br />
**Create Date: Defaults to today’s date or enter another date. By clicking on the down arrow,<br />
double-click on the desired day from the calendar, or enter date use date format listed below.<br />
**Branch: Defaults to the branch entered into the log-in agent’s profile or enter branch from the<br />
drop-down menu.<br />
**Status: Enter the status of the trip from the drop-down menu. Choices are Active, Departed, or<br />
Cancelled.<br />
Reservation Cycle: Enter where the trip is in the reservation cycle from the drop-down menu.<br />
Default choices are Lead, Booked, Under Deposit, Paid-In-Full, Returned From Trip, or are<br />
customized by the database administrator in the Windows version of <strong>ClientBase</strong>.<br />
Marketing Source: Enter the marketing source for the trip from the drop-down menu setup by the<br />
database administrator.<br />
Group: Enter the group name for trip from the drop-down menu setup by the database<br />
administrator.<br />
Region/Destination: The Region field includes a hard-coded set of Regions and is populated by<br />
selecting from a drop-down listing. (See below for the list of Regions). The Destination field is a User-<br />
Defined field and includes a set of default values which can be customized by the agency under<br />
Settings|User Defined Fields|Res Card: Destinations. The user-definable Destinations also<br />
include the ability to be linked to one of the hard-coded Regions. Upon creating a Res Card, if the<br />
Region field is completed first then upon selecting a Destination the drop-down listing will only<br />
include a subset of those Destinations linked to that Region. If "Allow Freeflow" is not checked<br />
(forcing the Users to select from the drop down listing) then multiple Destinations can selected and<br />
inserted into one Res Card. These new Region and Destination fields have been added to the Level<br />
2 Searches and the Inventory query.<br />
Hard Code Regions include: Africa, Asia, Australia & New Zealand, Bermuda & Caribbean,<br />
Canada, Egypt & Middle East, Europe, Mexico & Central America, South America & Antarctica,<br />
South Pacific, and United States.<br />
**Prepared For: Click on the three dots next to this field to query for the customer for which this<br />
Res Card is being created. Enter data into the search field, click Search. Then select the correct<br />
profile and click OK.<br />
Go to Profile: Once the Res Card general information is saved, whenever you reenter this link, see<br />
a Go to Profile button. This allows you to toggle into the customer profile from this area of the Res<br />
Card. To jump back into the Res Card from the customer profile, use the Record History Res Card<br />
hyperlink.<br />
Trip Name: Enter the name of the trip. Highly suggested so you can find the card in profile and<br />
in the Res Card Manager.<br />
Locator No.: Enter a record locator number if available.<br />
Trip Start Date/Trip End Date: For reference, these dates appear on the General Info summary<br />
screen and are pulled from the Reservation (Service Provider) area of the Res Card.<br />
Ship To/Bill To Addresses: The Client Ship to and Bill to Addresses default to addresses setup in<br />
the client profile. These fields can be modified.<br />
Agent Remarks: Enter free-flowing Agent Remarks for personal agent reference in this area.<br />
3/25/13 158
An In-depth Look at Res Cards<br />
Client Feedback About Trip: After the customer returns from the trip, enter unlimited, free-flowing<br />
client feedback comments in the Client Feedback About Trip area.<br />
** Represents only mandatory fields within a Res Card.<br />
After filling in the General Info area, and clicking Save, a new view appears:<br />
Res Card Menu Items<br />
Header<br />
Res Card<br />
Links<br />
This view includes Res Card Menu Items, a header, and Res Card links to input more data on this<br />
trip.<br />
Res Card Menu Items<br />
Generate Invoice: After trip data has been entered, click here to generate an invoice. See details<br />
in section below, Generate Invoice.<br />
Trip Proposal: After trip data has been entered, click here to generate a trip proposal. This client<br />
report uses the same format settings as the Generate Invoice feature below, but simply prints a client<br />
quote and does not generate an invoice or update trip balances in any way. This is the perfect way<br />
to provide a format-friendly printout of reservations you have made, but does not have to coincide<br />
with receiving payment from your client. Currently, this format can only be printed.<br />
Headers and Footers are created for Trip Proposals by going to Tools|Settings|Headers and<br />
Footers - Trip Proposals. Format customization and default Remarks are created under<br />
Tools|Branch Settings|Trip Proposal Settings and Invoice/Trip Proposal Remarks. (See<br />
section entitled <strong>ClientBase</strong> Intro and Setup for complete setup instructions.)<br />
PNR: Import PNR data from your GDS into a trip. See details in section An In-Depth Look at PNR.<br />
Live Connect: Use Live Connect to book or bring in reservations for selected Live Connect<br />
3/25/13 159
An In-Depth Look at Res Cards<br />
Providers. See details in section An In-Depth Look at Live Connect.<br />
Note: Create a note on this trip for reference that is saved in the Res Card Activities link (and client<br />
profile). See details in section below, Activities Link.<br />
Mailer: Create a mailer on this trip for reference that is saved in the Res Card Activities link (and<br />
client profile). See details in section below, Activities Link.<br />
Reminders: From the drop-down, create a single reminder or Batched Reminders that are saved<br />
in the Res Card Activities link (and client profile). See details in section below, Activities Link.<br />
Res Card Links<br />
Res Card links include the following: General Info, Passengers, Reservations, Invoices,<br />
Itinerary Report, Activities, Attachments, and More Files. Complete details on these links are<br />
outlined below.<br />
Basic Steps to Input & Create a Res Card/Invoice in<br />
<strong>ClientBase</strong><br />
These are just suggestions which can be used as a foundation for your own invoicing process. Click<br />
this link for another set of <strong>ClientBase</strong> invoice instructions (they apply to both CBO and CBB users).<br />
CREATE Res Card/INVOICE STEP ONE: For every invoice interaction, find the client profile using<br />
Profile simple search and Find. Click View to enter the client profile. Make sure the profile contains<br />
the following info: Accurate address, phone and email information.<br />
CREATE Res Card/INVOICE STEP TWO: Click the Family Member link in the profile and make<br />
sure anyone traveling is entered - you only need to enter the legal First/Last Name to start. Add a<br />
new Family Member if appropriate.<br />
CREATE Res Card/INVOICE SETUP THREE: Click the Cards link in the profile and make sure any<br />
credit card or other card information is entered, with proper expiration dates. Edit or Add card if<br />
appropriate.<br />
CREATE Res Card/INVOICE STEP FOUR: Click the Res Card item on menu bar.<br />
CREATE Res Card/INVOICE STEP FIVE: In new Res Card, choose appropriate Reservation Cycle<br />
(always use drop-downs if available), enter a meaningful Trip Name (so you can find Res Card in<br />
Profile or Res Card Manager), and in the Agent Remarks area type in any notes about this trip (these<br />
don't print anywhere, they are just for your reference). Click Save.<br />
CREATE Res Card/INVOICE STEP SIX: Click on Passenger link and add passengers who are<br />
traveling one at a time from drop-down. Make sure you see all passengers listed. Want to add a<br />
passenger that is not in the profile Click Add, type name and Save. Note: If you are doing a PNR<br />
Import or importing a Live Connect booking, you can skip this step.<br />
Passengers Link<br />
View the current list of passengers by clicking the Passengers link. Identify passengers traveling by<br />
3/25/13 160
An In-depth Look at Res Cards<br />
clicking Add Passenger.<br />
Click on the drop-down menu by Passenger to reveal a list of travelers contained in the client profile<br />
under the Family Members/Employee link. You can also free-flow a passenger name in this area if<br />
passenger is not part of the client profile. Under Type, signify if the passenger is Adult, Child, or<br />
Infant. Click in the Primary box, if this traveler is the Primary traveler. Save updates Res Card with<br />
the new traveler information. To update, edit or delete passengers, click Edit next to the passenger’s<br />
name in Passengers link, update and Save, or Delete a passenger.<br />
CREATE Res Card/INVOICE STEP SEVEN) Click the Reservation Link and Add Reservation to<br />
enter reservation details. Select the Reservation Type from drop-down. Type in a few letters of<br />
vendor's name, hit the tab key, and choose from drop-down. Enter confirmation #, pricing, and any<br />
other details and Save. (If you enter a deposit or final payment due date, these will create reminders<br />
upon saving when you click Create Reminders later on or use the Batched Reminders icon on the<br />
menu bar to create more than these two types all at once.) After saving, scroll down to bottom of<br />
webpage until you get to Service Provider area and click View and Edit. Here you can add more info<br />
to your reservation. A Service Provider is what the vendor sells (i.e., Princess Cruise Lines may sell<br />
the cruise, insurance, a tour, etc.). These all go in one reservation and are added one at time if you<br />
want them listed, under the Service Provider Area. Enter the dates of travel, and fill in any other info<br />
you want to put on invoice. Continue adding Service Providers. Click Save and Close Service<br />
Provider. Note: If you don’t want to list every service provider separately, type a Remark in the<br />
reservation stating what the pricing is for; something like Pricing is all inclusive for cruise, taxes,<br />
insurance, hotel, etc. There is an area too where you can actually break out the cost for each of<br />
these vendor items in the reservation under Itemize (see below).<br />
Reservations Link<br />
The Reservations link is where all the reservation details for the trip are created and stored. Each<br />
Res Card or trip can have any number of reservation records. To add a new trip reservation, click<br />
Add Reservation and select what type of reservation you wish to create - Air, Hotel, Car, Cruise<br />
Insurance, Miscellaneous, Rail, Tour, or Service Fee. To modify or enhance an existing trip<br />
reservation, click Edit next to the reservation. Click Delete while in the reservation to remove it.<br />
3/25/13 161
An In-Depth Look at Res Cards<br />
To enter a reservation, click the Reservations link and Add. Depending on what type of reservation<br />
you are creating, the data entry screens vary, so not every field is outlined here for you. A hotel<br />
Put reservations in the order<br />
you want them to appear<br />
on invoice.<br />
reservation contains hotel data entry fields, a car reservation contains car data entry fields, a cruise<br />
contains cruise data entry fields, etc. A reservation input screen contains several sections -<br />
Reservation (to enter reservation details), Passenger (to include or not include passengers in this<br />
reservation), Charge As (per person, per room, per cabin, per car, per day, etc.), Tax, Payment Due<br />
Date (to enter Deposit and Final Payment Dates and automatically create Reminders), Itin/Invoice<br />
Remarks (to enter free-flowing Itinerary/Invoice Remarks), Agent Remarks (to enter free-flowing<br />
Agent remarks), and Service Provider details.<br />
Date Reserved: Enter the date this booking is reserved. By clicking on the down arrow, you can<br />
select a date by double-clicking the desired day from the calendar, or enter date in format as listed<br />
below.<br />
Booking Status: A drop down list of Confirmed, Cancelled and Quoted are available choices. The<br />
Confirmation Status is not free-flow and cannot be left blank, as the entry selected now has an impact<br />
on the Reservation Total included in the Res Card Balances displayed for the Res Card.<br />
Reservations with a status of Confirmed increase the Reservation Total and can be invoiced.<br />
Reservations with a status of Quoted do not increase the Reservation Total, and cannot be invoiced,<br />
although can be included in all formats of the Trip Itinerary. Reservations with a status of Cancelled<br />
do not increase the Reservation Totals and cannot be invoiced, and do not appear on Trip Itineraries.<br />
3/25/13 162
An In-depth Look at Res Cards<br />
Vendor: Click the three dots next to the Vendor field and enter the first two or three letters of the<br />
vendor’s name into the query area and select desired name from the drop-down menu. Click<br />
Refresh. If the vendor is not in the menu, you receive a message, No matching profiles. Create a<br />
new vendor profile by clicking Profiles on the menu bar. Use Tools|Page History to get back to the<br />
reservation.<br />
Confirmation #: Enter the confirmation # for this booking.<br />
Record Locator: Enter a record locator # if available.<br />
Booking Method: Enter the source of the booking from the drop-down menu which has been<br />
customized by the database administrator.<br />
Reservation Status: Enter the status of this booking from the drop-down menu created by the<br />
database administrator.<br />
Duration: Enter number of nights of trip.<br />
No. of Pax/No. of Nights/No. of Rooms/No. of Cars/No. of Policies/No. of Units, etc:<br />
Depending on the travel type enter the appropriate number.<br />
Invoiced out of CB: There are certain cases where reservation data captured in <strong>ClientBase</strong> may<br />
have been invoiced outside, for example invoiced through the GDS. So that these types of<br />
reservations are not invoiced twice in error (once in GDS, then again in <strong>ClientBase</strong>), we have added<br />
this check box and updated the Res Card balances at the top of a Res Card accordingly. Res Card<br />
balances at the top of a Res Card remain the same unless a Reservation exists that has been<br />
designated as "Invoiced out of CB". If a reservation exists with the designation of "Invoiced out of<br />
CB," then the Res Card balances now reflect Res Total, Invoiced in CB, Invoiced out of CB, and<br />
Balance.<br />
Issued Through ARC/BSP: If this reservation was created in Windows version of <strong>ClientBase</strong>, this<br />
area may say Yes on the Res Card General Info summary screen. You do not have the ability at<br />
this time to mark this reservation as Issued through ARC, but the ARC fields are in place at this time<br />
to input manual data in at the passenger level if you choose to do so.<br />
Passengers: Indicates passengers that have been selected in the Passenger link. (In Rail or Airline<br />
transactions, click on the Passengers button to select passengers.)<br />
Charge As: Select from drop-down menu the Charged As Per Person, Per Night, Per Day, Per Car,<br />
Per Cabin, Per Policy, Per Room, or Per Unit box (where applicable). You have the ability to Itemize<br />
per passenger by clicking Add Itemized Amount.<br />
3/25/13 163
An In-Depth Look at Res Cards<br />
You have several different format options that determine how the Itemization is sorted and printed<br />
on your invoice for your customer including the following:<br />
- Print all Itemization Details (prints itemization as it has in the past)<br />
- Summarize by Passenger (lists totals by passenger)<br />
- Summarize by Category/Passenger (lists each passenger as a column broken down by Tvl<br />
Category)<br />
- Summarize by Description/Passenger (lists each passenger as a column broken down by<br />
Description)<br />
- Do not Print Itemization (allows you to itemize for your internal records but doesn't print on the<br />
invoice)<br />
All existing Reservations with Itemization will default to "Print all Itemization Details", which prints<br />
itemization as it has to date. To change this default format for new Reservations, go to<br />
Tools|Settings|Default Field Values for Res Cards and from the Reservation area set the Print<br />
Itemization Option to the desired format by selecting from the drop-down listing. This setting simply<br />
sets the default for new Reservation Itemization entries, but can be tailored on a reservation by<br />
reservation basis to whatever format is desired for that reservation. Use the Edit button next to Print<br />
Itemization Option within the Itemization Edit screen of a Reservation to change this default.<br />
Notice the Travel Category drop-down list. This field is not mandatory when entering itemized<br />
amounts, nor does it print on the invoice. Make sure your itemized amounts equal the total fare<br />
amounts.<br />
Base Fare/Tax/Commission: Enter the amount of this booking. The tax and commission fields can<br />
be either entered with a dollar amount or a percentage.<br />
Tax: If present these totals are either hard-coded (defaulted by database administrator), or can be<br />
changed by clicking Edit.<br />
Deposit Due Date/Final Deposit Due Date: If you have entered the date the deposit is due in the<br />
General Info link, you can click on Create Reminders, and select the reminders you want to create<br />
that automatically appear in your daily To-Do list. These reminders also appear in the Res Card’s<br />
Activities link, as well as in the client’s profile link, Activities.<br />
Itin/Invoice Remarks: Remarks entered in the General Info link appear here.<br />
Agent Remarks: Remarks entered in the General Info link appear here.<br />
**Capture and invoice ARC/BSP type transactions through the CB Res Card using a field called<br />
Issued through ARC. If set to Yes, then pricing is not captured at the reservation pricing level, but<br />
instead at the passenger pricing level of the reservation. To enter an ARC type transaction into a<br />
reservation, first create a new Reservation, enter the Vendor and other reservation fields and set the<br />
Issued through ARC to Yes. Complete any remaining reservation fields except for pricing, and click<br />
Save. Upon clicking Save, your reservation will be summarized along with a listing of the<br />
passengers and a new Edit button next to each passenger record. Click Edit to enter all passenger<br />
level ticket and pricing details. After capturing all ARC reservation details, and upon invoicing, you<br />
have the ability to invoice each ARC transaction as a separate invoice booking and the Submit To<br />
field includes the setting of ARC. Please note that a ticket number must be captured within each<br />
passenger pricing record in order for you to have the option of invoicing ARC type reservations.<br />
3/25/13 164
Service Provider<br />
An In-depth Look at Res Cards<br />
The Service Provider area of a reservation record is where information entered here appears on trip<br />
proposals, itineraries and invoices generated for this reservation and can be used for reporting<br />
purposes. One reservation record can have one or more service providers. For example, a Disney<br />
Cruise reservation record can include just one service provider, Disney Cruise Lines, or perhaps<br />
more than one, the Disney Magic and the Contemporary Resort. The amount of detail you want to<br />
capture is up to you.<br />
To edit a Service Provider, click Edit. To add a new Service Provider, click Add Service Provider,<br />
and choose what type - Air, Hotel, Car, Cruise, Insurance, Miscellaneous, Rail, Tour, or Service Fee.<br />
Depending on the selected Travel Type, the general area of the Service Provider contains the<br />
following entry fields.<br />
These arrows give you the ability to change the order in which<br />
multiple Service Providers within one Reservation are displayed.<br />
Highlight any Service Provider in your listing and click the Up<br />
arrow to move it up in the listing or click the Down arrow to move<br />
it down in the listing. These changes are saved permanently<br />
within the Reservation and are reflected in the order designated<br />
when printing an Invoice.<br />
General Info:<br />
For Air, a separate service provider record may be completed for each segment or leg in the itinerary<br />
with numerous fields available such as Code, Airline, Flight Number, Depart/Arrival City, Departure/<br />
Arrival Terminal, Depart/Arrive Times, Dates, Equipment, Meal Service, Duration, Mileage, etc.<br />
For Hotel, entry fields include Property, Room Type, Check In and Out Dates, Room Description,<br />
and Smoking, etc.<br />
Car entry fields include Car Company, Start Date, End Date, Car Category, Pick-Up Time, Drop-Off<br />
Time, and Car Description, etc.<br />
Cruise entry fields include Ship, Start Date, End Date, Category, Deck, Cabin/Room, Dining, and<br />
Smoking, etc.<br />
Depending on the other selected categories, appropriate travel type entry fields appear.<br />
Itin/Invoice Remarks: Enter any free-flowing remarks that you want to appear about this Service<br />
Provider on the printed Itinerary and/or invoice.<br />
Service Provider Agent Remarks: Enter any free-flowing agent remarks that you want to appear<br />
about this Service Provider.<br />
Service Provider Allocated Pricing: Enter Total Fare, Base, Tax (%), and Commission (%) into<br />
these fields to keep for your own reference.<br />
Once all areas of a Service Provider record have been completed, click Save. To enter additional<br />
Service Provider records, click Add Service Provider, enter details and click Save. To modify a<br />
3/25/13 165
An In-Depth Look at Res Cards<br />
Service Provider click Edit. To delete a Service Provider record, click Edit and then Delete.<br />
Note: Once the Res Card general information is saved, see a hyperlink on the Prepared for field.<br />
Clicking on the hyperlink toggles into the customer profile from this area of the Res Card. To jump<br />
back into the Res Card from the customer profile, use Tools|Page History.<br />
Copy a Reservation record from one Res Card to another Res Card: When copying a<br />
Reservation record from one Res Card to another, all data captured within the reservation record,<br />
except for passenger related fields is copied, and includes vendor level information as well as<br />
Service Provider Level information. To copy a Reservation Record, retrieve the Res Card to select<br />
the Reservations link, highlight the Reservation record to copy and click on the action gear icon and<br />
click Copy. Next, close the Res Card, and retrieve or create the Res Card you would like to copy<br />
to, select the Reservations link and click Paste Reservation.<br />
Copy an Entire Res Card from One Profile to Another Profile: When copying an entire Res Card<br />
from one profile to another, all data captured within the Res Card, except for Date Created, Invoices,<br />
Activities, Client Feedback about Trip, Profile and Passenger related fields is copied, including all<br />
General Trip level information, all Reservation Records and Agent Remarks. To copy an entire Res<br />
Card, retrieve the profile the original Res Card was created for, select the Res Card link, highlight<br />
the Res Card you would like to copy (do not open the Res Card) and click the action gear Icon and<br />
click Copy. Next, close the profile, and retrieve or create the profile you would like to copy to, select<br />
the Res Card link and click Paste Res Card.<br />
CREATE Res Card/INVOICE STEP EIGHT: Once you have create reservations (remember, it’s<br />
one new reservation for each new vendor), and you have edited or added your Service Providers<br />
and you have clicked on Save Service Provider, on next screen click Create Reminders so that the<br />
deposits/final payments will appear on your To-Do list in the Activity Manager to handle, OR create<br />
3/25/13 166
An In-depth Look at Res Cards<br />
multiple reminders by clicking the Reminder icon on the menu bar and Create Batched Reminders.<br />
Click Proceed and Close Reservation. If you need to add another reservation for another vendor,<br />
follow the instructions above to repeat.<br />
CREATE Res Card/INVOICE STEP NINE: After all reservations have been created, click the<br />
Generate Invoice icon on menu bar at top of screen. Select any remarks you want to appear on<br />
bottom of invoice by clicking Remarks, enter a Trip Balance Due Date if applicable, choose the Form<br />
of Payment and pick cc# from drop-down, and in the This Invoice area, put amount of this invoice<br />
(for a deposit just pick the first reservation, for final payment each reservation needs to have correct<br />
Submit To/Travel Type. If the Submit to is Commission Track, make sure to check off Showed as<br />
Paid, a little checkbox that appears only with Commission Track Submit To so that totals appear on<br />
the invoice. (This may have been preset by database administrator.) Preview. If the amounts or<br />
other information doesn’t look right in preview, return to reservation and correct. Otherwise click<br />
Generate Invoice to issue the invoice. The invoice will launch into an Adobe Acrobat Reader for<br />
printing. When you close out of the pdf, you’ll land in the Res Card invoice link where you can print<br />
invoice, or email it to your client. Invoices now reside permanently in Invoice link for reprinting or<br />
emailing.<br />
Generate an Invoice<br />
To create an invoice for any reservation record or combination of reservation records that have not<br />
been invoiced in full, click Generate Invoice icon on the menu bar from anywhere in the Res Card.<br />
Enter the invoice details including payment information, invoice remarks, then invoice totals and<br />
agent rates for each reservation record to include in the invoice.<br />
First, check off the reservations you want to include on this invoice. If the reservation has ARC/BSP<br />
checked, each passenger included in an ARC/BSP reservation is listed as a separate line item within<br />
the invoice screen, but all need to be invoiced at the same time creating a separate booking for each<br />
3/25/13 167
An In-Depth Look at Res Cards<br />
ARC/BSP document in Trams Back Office.<br />
*Indicates required fields and fields required for Trams Back Office.<br />
Issue Date: Defaults to today’s date, but can be changed by clicking on the three dots next to the<br />
field and double-clicking on any date from the calendar; or free-flow the date in using one of the<br />
following date formats.<br />
Remarks: Click Remarks to choose from a table of remarks setup by the database administrator in<br />
the Windows version of <strong>ClientBase</strong>. Check the remark/s to use with this particular invoice, and then<br />
click OK. Note: Free-flow remarks can be added to this area.<br />
Trip Balance Due Date: Enter a date to appear on the invoice for the trip balance due date. Click<br />
on the three dots next to the field and double-click on any date from the calendar; or free-flow the<br />
date in using the date formats listed above.<br />
Invoice For/Branch/Locator No/Group: This information is pulled from areas of the Res Card and<br />
is used for reference.<br />
*Form of Payment: From the drop-down menu, choose Cash, Check, Credit Card, or CCMerchant.<br />
Note: Use these fields only if you have one form of payment for the invoice reservations. If you<br />
have different forms of payment for reservations, use the fields contained within the Booking<br />
Payment, making sure to put the correct Submit to and Travel Type for each FOP. (To reflect a cash<br />
payment on the <strong>ClientBase</strong> invoice, your agency must allow Cash Payment from Invoice in Trams<br />
Back Office. If this option is not checked off in TBO, <strong>ClientBase</strong> will not print Paid by Cash on the<br />
invoice.)<br />
*Check/CC Number: Enter check or credit card number for payment. (If credit card number exists<br />
in the profile, a drop-down menu appears to choose the card.)<br />
RESERVATIONS: Each reservation is listed in this area in detail.<br />
*Indicates required fields and fields required for Trams Back Office.<br />
Reservation Summary: For each reservation included are: Category, Vendor, Passenger,<br />
Confirmation No, Depart Date, Return Date, Passenger Name, Start Ticket No, and End Ticket No,<br />
and Agent.<br />
3/25/13 168
An In-depth Look at Res Cards<br />
*Invoice Totals: Base/Tax/Comm/Total Fare: Summarizes reservation totals for this invoice.<br />
Select Submit to, Supplier or Commission Track from drop-down menu, and make sure the Travel<br />
Type is correct.<br />
Not Invoiced - Base/Tax/Comm: This area reflects what has not been invoiced for this Res Card.<br />
This Invoice: This is where to input the totals for your invoice. In the Base Fare field, enter the<br />
amount of this invoice, and tab to continue. Next, enter any taxes for this invoice, and, finally, enter<br />
the commission received for this invoice. (If no taxes or commission are being collected for this<br />
invoice, input 0.)<br />
*Submit to: From drop-down menu, choose appropriate Submit To. Trams Back Office users want<br />
to choose the one that corresponds with Trams Back Office Submits To.<br />
*Travel Type: This defaults from the reservation, but can be changed from drop-down menu.<br />
Trams Back Office users want to choose the one that corresponds with Trams Back Office travel<br />
types.<br />
Agent/Amount/%Rate: The agent is pulled in from the Res Card, but can be changed from the<br />
drop-down menu. Adjust Amount or %Rate if necessary (this is being pulled from the agent profile).<br />
The primary agent for the Res Card is defaulted at the time of invoicing as the agent for the invoice.<br />
Users with their Advanced Permission set to Disable Ability to view Agent Commission when<br />
invoicing can now add More Agents upon invoicing. Agent Rates and Amounts are still hidden on<br />
the main invoicing screen as well as in the More Agents screen, but multiple agents can now be<br />
added to the Invoice record by Users with this limited permission setting.<br />
This user setting for Disable Ability to view Agent Commission when Invoicing is stored within the<br />
User Login record and can be updated by the SYSDBA login by going to Tools|Settings|User<br />
Logins|Advanced Permissions|Other Restrictions. All Agent Commission defaults work the<br />
same whether Disable Ability to view Agent Commission when Invoicing is checked or not. If it is<br />
checked these default commission rates/amounts cannot be overwritten at the time of invoicing.<br />
Here is a brief summary of how Agent Rates and Amounts default:<br />
Upon generating an invoice the system looks at both the Res Card Agent profile and the Client's<br />
profile for Agent Rate defaults as they have been established within Trams Back Office (TBO).<br />
1.) The Res Card Agent Commission Rate defaults based on Commission Rate settings stored<br />
within the Agent profile. The system first looks for an Inside Rate then an Outside by Travel Type. If<br />
none exists, it then looks for an Inside Rate then an Outside rate stored within the General tab of the<br />
Agent profile.<br />
2.) In addition to defaulting the Res Card Agent and its default commission rates, the system also<br />
looks for default Agent Commission rates stored within the Client profile that the invoice is being<br />
issued for. The system automatically checks the client profile for any default Agent rates and<br />
includes those defaults within the More Agents listing if any exist.<br />
Booking Payment/Form of Payment/Check/CC Number: Use this area if reservations in this<br />
invoice have different forms of payment. There is a Booking Payment entry area under each<br />
reservation. (If the invoice has the same form of payment for reservations, use the Form of Payment<br />
and Check/CC Number fields above.) From the drop-down menu, select the Form of Payment, and<br />
enter Check/CC Number - if credit card number exists in the profile, a drop-down menu appears to<br />
3/25/13 169
An In-Depth Look at Res Cards<br />
choose the card.<br />
Cancel: Click to abort invoicing process.<br />
* Indicates required fields and required fields for TBO.<br />
Preview Invoice Before Printing: When you click Preview Invoice, view the invoice totals and<br />
other details before it is generated to ensure accuracy. Make sure these totals are correct, because<br />
you may not have the ability to void it or change totals.<br />
Customize Format: Default invoice format settings are stored at the Branch level<br />
(Tools|Settings|Branch Settings|Invoice Settings), but these defaults can be overwritten on an<br />
invoice-by-invoice basis by clicking Customize Format. From this area you can customize the<br />
following settings for just the current invoice being generated:<br />
Default Invoice Format: Set the Res Card invoice default as Invoice Only which is a shorter invoice<br />
format that does not included all itinerary level information; or Itin/Invoice which is a longer invoice<br />
format that does include all the itinerary level information.<br />
Language: From the drop-down, select the language used for invoice.<br />
Include Summary of All Reservations: Set the Res Card invoice default by checking if you want<br />
3/25/13 170
eservation details including balance due date to appear on the invoice.<br />
An In-depth Look at Res Cards<br />
Preview Invoice Before Printing: Set the Res Card invoice default by checking if you always want<br />
a preview invoice (highly recommended) to be printed before actually generating the invoice.<br />
Include Service Provider Graphics: Set the Res Card invoice defaults by checking here if you<br />
want service provider graphics included when an invoice is printed.<br />
Hide Reservation Vendor Name: Gives you greater flexibility in customizing the print out of an<br />
invoice. If this setting is checked, then the Vendor Name for each individual reservation within the<br />
Res Card being invoice will not be printed, only the Service Provider Names.<br />
Hide Reservation Totals (Include Only Invoice Totals): Gives you greater flexibility in<br />
customizing the print out of an invoice. If this setting is checked, then each individual reservation<br />
amount will not be printed, only the sum of all reservations being invoiced.<br />
Print Service Fee as Invoice Total Line Item: Gives you greater flexibility in customizing the print<br />
out Service Fees on an invoice. If checked, this setting adds any reservations with a Travel Category<br />
of Service Fee and prints them as a single total amount listed within the Invoice Totals just<br />
underneath Reservation Totals, rather than listing as a separate reservation within the body of the<br />
invoice.<br />
Service Fee Label: This is a free-flow field that allows for up to 25 characters and provides you with<br />
the ability to customize how agency service fees are labeled on the invoice.<br />
Print Reservation in Condensed Format: The following Print Reservation in Condensed Format<br />
are broken down by Travel Category:<br />
Print Air Reservation in Condensed Format, Print Hotel Reservation in Condensed Format, Print Car<br />
Reservation in Condensed Format, Print Cruise Reservation in Condensed Format, Print Insurance<br />
Reservation in Condensed Format, Print Miscellaneous Reservation in Condensed Format, Print<br />
Rail Reservation in Condensed Format, Print Tour Reservation in Condensed Format, and Print<br />
Transportation Reservation in Condensed Format.<br />
If checked, upon invoicing a reservation for that Travel Category, a summary of basic Reservation<br />
information is included, rather than a detailed listing of all Reservation and Service Provider level<br />
information. This setting may be desired for reservations that you would like to place less emphasis<br />
on when printing invoices for your client. For example, if you are invoicing a cruise vacation, you<br />
may choose to place a greater emphasis on the cruise reservation and less emphasis on the<br />
Insurance, Airport, Hotel, etc.<br />
Here is a listing of the reservation details included if Print Reservation in Condensed Format is<br />
checked. All other Reservation and Service Provider level data is omitted from the printed version<br />
of the invoice.<br />
- Vendor Name, Passenger Name/s, Start Date, End Date<br />
If Supplier, ARC or Comm Track Show as Paid: Res Amount, This Invoice, Prior Invoice and Balance<br />
If Comm Track Not Show as Paid: Amount Details<br />
Generate Invoice: By clicking Generate Invoice from the preview screen, an invoice in the form of<br />
a pdf is created in Adobe Acrobat, and can be printed out or saved to your hard drive. By closing<br />
out of this window, you’ll end up in the Res Card invoice link, where you are able to email the invoice<br />
3/25/13 171
An In-Depth Look at Res Cards<br />
to the customer. (Important: Make sure you have your popup blockers disabled so that you can<br />
see this invoice. Go to Tools|Popup Blocker in Internet Explorer to disable. If you still cannot view<br />
your invoice, you may also have a quicklink bar from Yahoo, Google, etc. that also has a popup<br />
blocker. Make sure this is disabled as well.) Make sure this has been made a trusted site in Internet<br />
Explorer by going to Tools|Internet Options|Security. Invoicing does not work with any other<br />
browser than Internet Explorer version 6.0 or above.<br />
When you close out of the generated pdf, you will land in the Invoice Link where invoices can be<br />
printed or emailed. Found here as well is a summary of what has been invoiced thus far, as well as<br />
what has yet to be invoiced.<br />
Email an Invoice<br />
Any invoices issued via <strong>ClientBase</strong> appear in the Res Card Invoice listing and can be emailed to the<br />
client by clicking the email link next to the desired invoice in the Res Card invoice link. Upon clicking<br />
the email link within the invoice listing, a Merge to Email screen appears with the following default<br />
message:<br />
Thank you for booking with "Res Card Branch Agency Name". Attached please find your invoice with<br />
your reservations details. Please review and notify us immediately if you have questions or any<br />
difficulty opening the attachment.<br />
Thank you,<br />
"Res Card Primary Agent Name"<br />
In addition to this default message, the Primary email address entry defaults within the "To" field and<br />
the pdf version of the invoice is linked as an attachment. Complete the Subject line and any further<br />
customization within the body of the email and click Send Current to email the invoice.<br />
When an email is launched from the invoice listing, the following Res Card level merge fields can be<br />
inserted into body of the message: Res Card Create Date, Res Card Primary Agent, Res Card<br />
Group, Res Card Branch No, Res Card Branch Agency Name, Res Card Region, Res Card Start<br />
Date, Res Card End Date, and Res Card Locator.<br />
If you would like to create your own templates for use when emailing an invoice from <strong>ClientBase</strong>,<br />
use the Windows version to create the template and copy and paste any of the Res Card merge<br />
fields above for further customizing the body of the message. Refer to your on-line Help (within the<br />
Tools button) for further information on setting up the Merge to Email feature.<br />
Note: You can only email and invoice directly from <strong>ClientBase</strong> is you have setup your email to work<br />
3/25/13 172
An In-depth Look at Res Cards<br />
with SMTP. Please refer to the section, Set Up <strong>ClientBase</strong> with Mail Server’s SMTP Settings.<br />
Refund Invoices<br />
There is a check box, Include Refunds, in the Invoice Screen. By checking this box you have the<br />
ability to refund any reservations that were invoiced to date. Upon checking the Include Refunds<br />
check box, a new column of totals appear next the reservation totals allowing you to choose whether<br />
to invoice any uninvoiced amount, or to refund any amounts that were invoiced to date.<br />
This feature allows you to include both sales and refunds on one invoice. Therefore, you can refund<br />
a cancelled reservation and invoice a service fee all at the same time on the same invoice. You can<br />
also refund one reservation and invoice another that has been booked in its place. If there are more<br />
refunds than sales, a Refund Invoice is generated. If there are more sales than refunds, a Sales<br />
Invoice is generated.<br />
Setting Up to Refund Invoices<br />
Before generating any refund invoices you must first setup your Refund Invoice Number series.<br />
Select Tools|Settings|Branch Settings and double-click the branch record you want to generate<br />
refunds in. In the Next Refund Invoice field, enter your starting number in the refund invoice number<br />
series. Make sure the number series you select is not already being used in Trams Back Office, or<br />
does not conflict with a refund number series used by any other invoicing tool such as your GDS.<br />
Repeat these steps for each branch for which refund invoices are generated.<br />
All users will have the ability to generate refund invoices by default. To disable this feature for a user<br />
you need to update their User Login. To do this the System Administrator must log into the database<br />
as SYSDBA. From Tools|Settings|User Logins, select the user you would like to disable the<br />
refund invoice setting for and click the Advanced button and then Other Restrictions. Check the box<br />
next to the setting Disable Refunding an Invoice from Res Card and save.<br />
Using Generate Refund<br />
If a refund is a result of a Reservation being cancelled, be sure to retrieve the reservation in the Res<br />
Card and change the Booking Status to Cancelled. The Res Card Balance is updated accordingly.<br />
If a refund is a result of a fare change, be sure to retrieve the reservation in the Res Card and change<br />
the fares accordingly. The Res Card balance is updated accordingly. To generate the refund, click<br />
on the Generate Invoice button. Check the Include Refunds box on the invoicing screen. Enter your<br />
invoice details and use the refund column to refund any reservation amount that was invoiced<br />
3/25/13 173
An In-Depth Look at Res Cards<br />
previously. Use the Generate Invoice button to generate the invoice. If you are using Trams Back<br />
Office, the invoice is saved automatically. As mentioned above, if the invoice has more refunds than<br />
sales, a Refund Invoice is issued. If the invoice has more sales than refunds, a Sales Invoice is<br />
issued.<br />
Refund Examples<br />
Full Refund - Res Card with only one reservation what is Paid in full and Invoiced in full<br />
Step 1: Open the Res Card and retrieve the reservation. Change the Reservation's Booking Status<br />
to Cancelled. The Res Card balance is updated accordingly and shows the full amount as a minus.<br />
If the trip is completely cancelled, change the Res Card Status to Cancelled.<br />
Step 2: Generate Invoice. Include Refunds must be checked off. Complete the invoice payment<br />
fields with the original form of payment. In the Reservation Total, click on the Refund option. This<br />
field will then populate with the original. Invoice amount. (Matches the amount in the Invoiced to Date<br />
field.) Review screen for accuracy. Invoice shows the refunded amount.<br />
Reservation Price Changed - Deposit Invoice Previously Issued<br />
Step 1: Open the Reservation and modify to the new amount. No Refund Invoice required since the<br />
correct amount will be shown with the final payment. Res Card totals will be updated accordingly.<br />
Step 2: If the client want to see the modified cost of the trip, Reprint Invoice from Res Card Invoices<br />
tab. All changes including the adjusted amount will be reflected. Print or email to customer.<br />
Partial Refund - Res Card with One Reservation/Paid in Full/Final Invoice Issued<br />
Step 1: Open reservation and adjust the price to the new lower amount. Do NOT change Booking<br />
Status - still a valid booking.<br />
Step 2: Review Res Card totals from main screen - verify accuracy (it will show a minus amount).<br />
Step 3: Complete Invoice Payment fields with the original form of payment<br />
Step 4: In the Reservation Total, click on the Sale option. This field will then populate with the<br />
refunded amount due back to the customer.<br />
Note: If you select Refund, it will be the full amount of the sale. In this case, it's only the partial refund.<br />
Refund with Multiple Reservations (Multiple Bookings with a Single Refund)<br />
Step 1: Open the Res Card and retrieve the reservation. Change the Reservation's Booking Status<br />
to Cancelled. Leave Res Card as Active since only the one booking is cancelled.<br />
Step 2: Select the reservation to Refund in the Invoice screen and refund the cancelled reservation.<br />
At same time, can Invoice active reservation payments as a Sale.<br />
Refund with Vendor Penalty - Invoicing a Cancelled Booking with Supplier Penalty<br />
Step 1: Copy the original booking using the Copy and Paste Buttons in the Res Card. Create a copy<br />
of the original, cancelled booking to use in recording the penalty amount.<br />
Step 2: Update Copied Booking by adding key data.<br />
--Add the passengers. The copied booking defaults to no passengers.<br />
--Change the booking amount to the amount of the penalty. Enter $0.00 as the commission unless<br />
3/25/13 174
An In-depth Look at Res Cards<br />
the agency gets to keep any of its commission. If so, enter the amount the agency keeps.<br />
--Delete the individual Service Providers (not applicable for this booking).<br />
--Add a Service Provider for the Service Fee.<br />
Step 3: Open the original reservation and change status to 'Cancelled'. Leave the rest of the<br />
information as originally entered. Review amounts for accuracy. Change the Res Card status to<br />
Cancelled.<br />
Step 4: Generate the Refund Invoice and check off Include Refunds. In the Form of Payment<br />
section, choose the type of payment that will be refunded (cash, check, credit card). Select the<br />
original booking, and at the payment amount, choose 'Refund', and enter the amount originally<br />
invoiced. Select the cancellation fee booking, and at the payment amount, choose Sale and invoice<br />
the full amount.<br />
Preview the invoice to ensure the net refund is correct, then generate the invoice. The Res Card<br />
shows a zero dollar balance.<br />
Reminder: If an invoice has more refunds than sales, a Refund Invoice is issued. If the invoice has<br />
more sales than refunds, then a Sales Invoice is issued. All invoices issued in <strong>ClientBase</strong> are<br />
available in Trams Back Office.<br />
Invoices Link<br />
View all existing invoices by clicking on the Res Card Invoices link. Scroll across to view invoice<br />
details, and to get a copy of the invoice, click Reprint, or click Email to email a copy.<br />
Void an Invoice: Void an Invoice directly from <strong>ClientBase</strong> by highlighting the desired invoice from<br />
the invoice listing and clicking Void. Upon clicking Void, the system prompts with a message Track<br />
Voided Invoice Yes/No/Cancel:<br />
Yes: Voids the invoice (and potentially corresponding payments), updates the un-invoiced balance<br />
for the Res Card and tracks the void with an audit trail.<br />
No: Voids the invoice (and potentially corresponding payments), updates the un-invoiced balance<br />
for the Res Card and leaves no audit trail.<br />
Cancel: Cancels the voiding process and returns you to the invoice listing without any changes.:<br />
Each User Login can be prohibited from being able to Void an Invoice by updating the Advanced<br />
Permission settings for that User. The SYSDBA user must be logged in to update Advanced<br />
3/25/13 175
An In-Depth Look at Res Cards<br />
Permission settings and can do so by going to Tools|Settings|User Logins. Select the desired<br />
User Login, click on Advanced (next to Security Levels) and click on Other Restrictions. Place a<br />
check next to Disable Ability to Void an Invoice generated through Res Card, to disable this feature.<br />
*Special Note for Agencies that use Trams Back Office (TBO): If an invoice has any Cash, Check<br />
or CC Merchant Client FOP or any Vendor FOP applied, then the invoice cannot be voided via CBB<br />
until the payment has been voided via TBO first. If an invoice has been paid by Credit Card than the<br />
system will automatically Void the Credit Card payment while Voiding the Invoice. If an End of Period<br />
exists for the period in which the Invoice was issued, or payment applied than the system will not<br />
allow the User to void the payment.<br />
Itinerary Report Link<br />
To create and print out an itinerary for a client, click the Itinerary Report link. The itinerary is hardcoded<br />
in <strong>ClientBase</strong>, and can be edited by copying it into word processing program such as MS<br />
Word and printed from there. Or, click Remarks to select any canned remarks that were previously<br />
set up, and you want to include on the Itinerary. Click Print.<br />
Activities Link<br />
To add a Note, Reminder, or Mailer for a trip, click Create Activity and Note, Reminder, or Mailer.<br />
After clicking the link, view a summary of all Notes, Reminders, and Mailers created for a customer’s<br />
trip. A Note documents any contact you had with a client about the trip such as a phone call or Email.<br />
A Reminder creates an entry, such as a final payment or check for documents. This entry also<br />
appears on the user’s daily To-Do List in the Activity Manager and in the Activity link in client’s profile.<br />
Mailers are like entries in a marketing “log.” They are a historical record that is created automatically<br />
whenever a label, document template, Email or mail merge file is created for a client or group of<br />
clients.<br />
3/25/13 176
An In-depth Look at Res Cards<br />
To add a new Note|Reminder|Mailer, click the icon on the menu bar or Create Activity. To modify<br />
or enhance an existing Note|Reminder|Mailer, click Edit next to the Note|Reminder|Mailer. Click<br />
Delete while in Edit to remove an Activity.<br />
Notes, Mailers and Reminders (single or batched) can also be created at any time by clicking the<br />
Res Card menu bar.<br />
Once these are created, they "live" in the Activities link in the Res Card AND in the profile. Please<br />
see the section, An In-Depth Look at Activities for more details.<br />
Launching a Batch of Reminders from within a Res Card<br />
Upon entering a Res Card in <strong>ClientBase</strong>, you can create Reminders to help you track the many<br />
administrative and/or marketing tasks you need to complete for this trip. In the past, you would add<br />
a Reminder for each item you wanted to track one at a time. Now, if you have a Batch of Reminders<br />
that you would like to use as your default template of Reminders for this trip, you can highlight the<br />
Reminder button on the Res Card menu bar and select Create Batched Reminders to create multiple<br />
Reminders at one time.<br />
Step One: From the Res Card that you would like to create your Reminders, highlight the<br />
Reminders button on the Res Card menu bar and select Create Batched Reminders. A listing of the<br />
Batched Reminders setup under Tools|Settings appear.<br />
Step Two: Select the desired batch you would like the system to default for this Res Card by<br />
highlighting and clicking on the desired name.<br />
Step Three: A listing of all of the default Reminders included within the selected batch appears with<br />
the Date of Reminder defaulting based upon the merge field used. If any of the reminders in the<br />
listing do not have a Date Completed, then the merge field used was left blank within the current Res<br />
3/25/13 177
An In-Depth Look at Res Cards<br />
Card. In order for these reminders to be created, you must Edit the specific reminder within the<br />
listing and enter the date by hand.<br />
From this listing you have the ability to Edit, Check and Uncheck, or Add to any of the default<br />
reminders. Check each of the reminders within the listing to make sure the defaults are all correct.<br />
If you would like to change any of the defaulting reminders, click Edit for the desired reminder and<br />
update the fields accordingly. Click the box under the column called Create to place a check or<br />
remove a check next to each specific reminder. Only those reminders containing a check are<br />
created. These check defaults are based upon the Always/Optional setting established when the<br />
Batch was created under Settings. Click Add to add new reminders if you'd like any additional<br />
reminders to those the batch defaulted for you.<br />
Step Four: When all of the reminders in the listing meet your needs, click Create Reminders and<br />
all of the reminders will be created and saved within the Activities link of the Res Card. Upon<br />
completion, you will land in the Activities link with an updated listing of all activities for this Res Card,<br />
including the new reminders just created using your batch.<br />
Attachments Link<br />
To enhance the amount and type of information accessible in a Res Card, a feature is included in<br />
Res Cards allowing you to point to other files available on your local or network drive. These files<br />
are referred to as Attachments.<br />
To access an attachment at the Res Card level, click the Attachment link. To add a new Attachment<br />
click Add Attachment, and Browse for Attachment to identity the File Path of the file. The File Path<br />
includes the drive where the file is located, any directories or sub-directories, and the name of the<br />
file. Choose to compress the file by clicking in the Compression box. Enter a brief description of the<br />
attachment, if desired. Click Save.<br />
To view a saved Attachment, highlight the attachment, and click Open next to the attachment.<br />
<strong>ClientBase</strong> uses Windows Associations to view the file type, load the appropriate software, and<br />
retrieve the specified file. Every file has an extension (e.g., .doc, .jpg, .bmp, .html, etc.) must be<br />
associated with a specific Windows software program such as Word, Paint Shop Pro, Internet<br />
Explorer, etc. to be viewed. Although this association is created automatically by Windows when<br />
various software programs are installed, if a workstation does not have a software program<br />
associated with the type of file an Attachment is pointing to, then the file cannot be viewed from the<br />
Attachment created in <strong>ClientBase</strong>.<br />
Since a copy of the file has been stored within the <strong>ClientBase</strong> database when it is opened at a<br />
workstation, it is loaded temporarily into a temp directory. If any changes are made to the original<br />
file or the temporary file, the attachment in <strong>ClientBase</strong> must be re-directed to the new file, or the old<br />
file will still be displayed. This is done by using Edit and browsing for the updated file. Once this is<br />
done, the copy of the file saved in the <strong>ClientBase</strong> database will be updated.<br />
Click Edit, then Delete, next to the attachment to remove it.<br />
3/25/13 178
An In-depth Look at Res Cards<br />
More Fields Link<br />
If you want to track it, and the <strong>ClientBase</strong> Res Card doesn’t have a place for it, here is where you<br />
can create customized fields of information. More Fields for Res Cards are set up under<br />
Tools|Settings|Res Card More Field Categories and the drop-downs are set up under<br />
Tools|Settings|User Defined Fields|Res Card More Field Items. To tag a Res Card with a More<br />
Field, click Edit, and from the drop-down menus next to the More Field Categories, select the More<br />
Field item you want to use. Then click Save. To untag a More Field Item, simply highlight the item<br />
and click Delete on the keyboard.<br />
3/25/13 179
An In-Depth Look at Res Cards<br />
3/25/13 180
Chapter<br />
9<br />
An In-Depth Look at Live Connect<br />
This chapter provides a detailed overview of using the Live Connect<br />
feature in <strong>ClientBase</strong>.<br />
Introduction<br />
One of the most innovative features in <strong>ClientBase</strong> is Live Connect which is found in the Res Card.<br />
Save time and improve efficiency by transmitting selected client information to a booking engine online.<br />
Then electronically transmit back reservation details and automatically complete the<br />
reservation form with what’s been booked to generate invoices.<br />
Note to ALL <strong>ClientBase</strong> Users: New Live Connects Providers are added between <strong>ClientBase</strong><br />
releases all the time. View the newest list on the Trams website here:<br />
http://static.trams.com/tramslibrary/liveconnect/index.html<br />
Note to Trams Back Office and <strong>ClientBase</strong> Windows Users: (As <strong>ClientBase</strong> shares a database<br />
with Trams Back Office, the invoices generated from the Res Card automatically become part of the<br />
invoices shared with Trams Back Office.) <strong>ClientBase</strong> continues to add more on-line booking<br />
engines to connect to via Live Connect. All Live Connect Provider settings, including login<br />
information and vendor profile setup can be done in <strong>ClientBase</strong> Windows, or if a user has been<br />
granted administrative permission can be done in <strong>ClientBase</strong> under Tools|Settings (only in a<br />
Primary-Sync database (<strong>ClientBase</strong> Windows) or a Non-Sync activated database in<br />
<strong>ClientBase</strong>).<br />
AFCNET<br />
If you are not currently registered to book AFCNET on-line, go to www.afcnet.com/profile.php to<br />
enroll. Upon completion of the registration you will receive a User ID and Password and can take<br />
the following steps to setup <strong>ClientBase</strong>.<br />
Set Up AFCNET Live Connect<br />
Upon receiving User ID and Password, take the following steps to setup <strong>ClientBase</strong> for Live<br />
Connect.<br />
Step 1) Once you have obtained accurate login information, you need to add this Live Connect<br />
3/25/13 181
An In-Depth Look at Live Connect<br />
Provider into <strong>ClientBase</strong> by going to Tools|Settings|Live Connect Providers and clicking Add.<br />
Provider Name: Type AFCNET.<br />
URL: Type http://www.afcnet.com/login.php<br />
Travel Category: Select Air from the drop-down.<br />
Import XML from: Select HTML Source.<br />
Live Connect Provider: Select AFCNET from the drop-down list.<br />
Step 2) Each user can put in his own login information under Tools|My Login|Live Connect or<br />
enter one set of login information for a Live Connect provider for all agents by going to<br />
Tools|Settings|Live Connect Login. Click Add and enter the following information:<br />
User Name and Password: Enter the necessary fields based upon the login information provided<br />
to you when you contacted AFCNET. (The Agency Number and Code is not applicable.)<br />
Step 3) Retrieve the AFCNET vendor profile from the Profile Manager (or create one if not in your<br />
database). From the General Info link, click the Live Connect Providers button. Click Add, and<br />
select AFCNET booking engine from the drop-down list. The Vendor Code is 24526036. In the<br />
Travel Category profile field, select Air from the drop-down menu.<br />
3/25/13 182
An In-Depth Look at Live Connect<br />
Live Connect Features Supported by AFCNET<br />
AFCNET supports the following Live Connect Features:<br />
CREATE NEW RESERVATION (Launch, Book & Import New Reservation)<br />
Automatically logs you in to booking engine with User Login data from <strong>ClientBase</strong>.<br />
Populates booking engine with profile data from <strong>ClientBase</strong>.<br />
Sends reservation details from booking engine’s confirmation page to <strong>ClientBase</strong><br />
reservation record.<br />
IMPORT EXISTING RESERVATION (Imports new reservation booked outside of<br />
<strong>ClientBase</strong>)<br />
Uses confirmation number to automatically pass all reservation details from booking<br />
engine to <strong>ClientBase</strong> reservation record.<br />
Allows user to browse for reservation and upon retrieval sends reservation details<br />
from booking engine’s confirmation page to <strong>ClientBase</strong> reservation record.<br />
RETRIEVE RESERVATION - Retrieves existing reservation previously imported via Live<br />
Connect for viewing or editing. Upon editing, imports updated reservations details.<br />
Create New AFCNET Reservation in Live Connect<br />
Step 1) Retrieve the desired client profile, create a new Res Card and after entering basic Res Card<br />
info, launch Live Connect by clicking Live Connect on the menu bar. (You can also launch Live<br />
Connect from the Profile action gear.)<br />
Step 2) Complete the Live Connect settings by identifying the vendor, the Live Connect Provider<br />
and appropriate Login information.<br />
Step 3) Click the Create New Reservation button.<br />
3/25/13 183
An In-Depth Look at Live Connect<br />
Step 4) Select any Profile, Passenger, Branch and Res Card information you want to use to book<br />
the reservation. This data is NOT passed to booking site, but you are able to view it at the top left<br />
of your booking screen and can highlight it, copy, and paste it into the booking fields to save you time<br />
during the booking process. Click Connect to launch the on-line booking engine.<br />
Step 5) Although still in <strong>ClientBase</strong>, you are now on-line at the AFCNET booking site. Complete<br />
the reservations using instructions supplied by AFCNET upon registration. When the reservation is<br />
confirmed, it automatically imports into the <strong>ClientBase</strong> reservation. All reservation data booked online<br />
is now located in the reservation fields in <strong>ClientBase</strong>.<br />
3/25/13 184
An In-Depth Look at Live Connect<br />
Import Existing AFCNET Reservation Made Outside of <strong>ClientBase</strong><br />
Create a new reservation and click Import Existing Reservation. Enter the confirmation number or<br />
leave blank. If you have entered a confirmation number, the system automatically retrieves and<br />
imports the reservation. If no confirmation number is entered, when in the website, instead of<br />
creating a new reservation, go to the retrieve reservation area. Once the reservation details are<br />
showing, click Import and the details of the reservation are imported into the <strong>ClientBase</strong> Reservation<br />
record.<br />
Retrieve an Existing AFCNET Reservation for Editing or Cancelling<br />
To edit or cancel an existing reservation using Live Connect, follow these steps:<br />
Step 1) Launch Live Connect from inside the reservation to edit or cancel in <strong>ClientBase</strong>.<br />
Step 2) A dialog box appears. Click Retrieve Reservation.<br />
Step 3) Live Connect launches the booking engine site. Edit or cancel the reservation using<br />
instructions supplied by the booking engine, and click Import Reservation. All reservation data<br />
edited or cancelled online is now located in the reservation fields in <strong>ClientBase</strong>.<br />
All About Travel<br />
Sign up with All About Travel at www.allabouthawaii.com and click the Agent Login tab. Click the<br />
link for Don't have a password yet. Fill out the forms and fax them back to us, or call us at 1-800-<br />
274-8687 and Press 9.<br />
Set Up All About Travel<br />
Step 1) Once you have obtained accurate login information, you need to add this Live Connect<br />
Provider into <strong>ClientBase</strong> by going to Tools|Settings|Live Connect Providers and clicking Add.<br />
Fill in the following fields:<br />
Name of the Provider: In blank field provided, type the name of the Provider.<br />
Status: Leave the default of Active. If you ever want to make it Inactive, go back in this area to turn<br />
off.<br />
URL: Type https://www.allabouthawaii.com/trams/clientbase.rescard<br />
Travel Category: Select Tour.<br />
3/25/13 185
An In-Depth Look at Live Connect<br />
Import XML from: Select HTML Source.<br />
Include Authentication: Leave blank.<br />
Click Save.<br />
Step 2) Each user can put in his own login information under Tools|My Login|Live Connect or<br />
enter one set of login information for a Live Connect provider for all agents by going to<br />
Tools|Settings|Live Connect Login. Click Add and enter the following information:<br />
User Name/Password/Account Number: Enter your user name, password and your ARC number<br />
as the Account Number.<br />
Step 3) Retrieve the All About Travel vendor profile from the Profile Manager (or create one if not<br />
in your database). From the General Info link, click the Live Connect Providers button. Click Add,<br />
and select the All About Travel booking engine from the drop-down list. The Vendor Code is blank.<br />
In the Travel Category profile field, select Tour from the drop-down menu.<br />
All About Travel Live Connect Features<br />
CREATE NEW RESERVATION (Launch, Book & Import New Reservation)<br />
Populates booking engine with User Login data and profile data from<br />
<strong>ClientBase</strong>.<br />
Sends reservation details from booking engine’s confirmation page to<br />
<strong>ClientBase</strong> reservation record.<br />
IMPORT EXISTING RESERVATION (Imports new reservation booked outside<br />
of <strong>ClientBase</strong>)<br />
Uses confirmation number to automatically pass all reservation details from<br />
booking engine to <strong>ClientBase</strong> reservation record.<br />
Allows user to browse for reservation and upon retrieval sends reservation<br />
details from booking engine’s confimation page to <strong>ClientBase</strong> reservation<br />
record.<br />
RETRIEVE RESERVATION - Retrieves exisiting reservation previously imported<br />
via Live Connect for viewing or editing. Upon editing, imports updated reservations<br />
details.<br />
Create New All About Travel Reservation in Live Connect<br />
Step 1) Retrieve the desired client profile, create a new Res Card and after entering basic Res Card<br />
info, launch Live Connect by clicking Live Connect on the menu bar. (You can also launch Live<br />
3/25/13 186
An In-Depth Look at Live Connect<br />
Connect from the Profile action gear.)<br />
Step 2) Complete the Live Connect settings by identifying the vendor, the Live Connect Provider<br />
and appropriate Login information.<br />
Step 3) Click the Create New Reservation button.<br />
Step 4) Select any Profile, Passenger, Branch and Res Card information you want to use to book<br />
the reservation and click Connect to launch the on-line booking engine.<br />
Step 5) Although you are still in <strong>ClientBase</strong>, you are now on-line at the Live Connect Provider’s<br />
3/25/13 187
An In-Depth Look at Live Connect<br />
booking site running the on-line booking engine through a <strong>ClientBase</strong> window.<br />
Complete the reservation and when the reservation is confirmed, click Import Reservation from the<br />
confirmation page. All reservation data booked on-line is now located in the reservation fields in<br />
<strong>ClientBase</strong>.<br />
Import Existing All About Travel Res Made Outside of CB<br />
Step 1) Create a new Res Card or open an existing one and launch Live Connect by clicking the<br />
Live Connect icon.<br />
Step 2) Complete the Live Connect settings by identifying the vendor, the Live Connect Provider and<br />
appropriate Login information if not auto-populated.<br />
Step 3) Enter the confirmation number for the reservation you want to import and click Import<br />
Existing Reservation.<br />
Step 4) Depending on the Live Connect Provider, the system either locates the reservation using<br />
the confirmation number and automatically import all reservation details, or takes you to the Live<br />
Connect Provider's site for you to use its Retrieve Reservation feature to locate the reservation.<br />
Upon displaying the existing reservation, click Import Reservation and the reservation details are<br />
imported into the <strong>ClientBase</strong> Res Card.<br />
Retrieve an Existing All About Travel Res to Edit/Cancel<br />
To edit or cancel an existing reservation using Live Connect, follow these steps:<br />
Step 1) Launch Live Connect from inside the Live Connect reservation to edit or cancel. Click Live<br />
Connect.<br />
Step 2) Confirm all Live Connect settings including confirmation number, and click Retrieve<br />
Reservation.<br />
Step 3) Live Connect launches the booking engine site. Edit or cancel the reservation using<br />
instructions supplied by the booking engine, and click Import Reservation. All reservation data<br />
edited or cancelled online is now located in the reservation fields in <strong>ClientBase</strong>.<br />
Allianz Travel Insurance - Website (formerly Access America)<br />
To use Live Connect to purchase trip insurance with Allianz Global Assistance, you must be licensed<br />
to sell Allianz Travel Insurance. If you are not currently licensed to sell Allianz Travel Insurance -<br />
Website, navigate to www.allianztravelinsurance.com and click on the Become a Partner link<br />
from the home page.<br />
Set Up Allianz Travel Insurance Live Connect<br />
Upon receiving User ID and Password, take the following steps to setup <strong>ClientBase</strong> for Live<br />
Connect.<br />
Step 1) Once you have obtained accurate login information, you need to add this Live Connect<br />
3/25/13 188
An In-Depth Look at Live Connect<br />
Provider into <strong>ClientBase</strong> by going to Tools|Settings|Live Connect Providers and clicking Add.<br />
Upon receiving your Account Number and Account Type, take the following steps to setup<br />
<strong>ClientBase</strong> for Live Connect.<br />
Provider Name: Enter Allianz Travel Insurance<br />
URL: Enter https://www.allianztravelinsurance.com/Trams.aspx<br />
Travel Category: Select Insurance from the drop-down.<br />
Import XML from: Select HTML Source.<br />
Click OK to save.<br />
Step 2) Set up for Live Connect agent logins can be done in two ways - globally (if all agents share<br />
the same user name, password or account number), or individually. When Live Connect is<br />
launched, the system first looks to see if there is login information at the User Login level, and if not,<br />
then looks for the login information at the Global Defaults level.<br />
Set Up Global Agent Login Information: To enter one set of login information for a Live Connect<br />
provider for all agents to share, go to Tools|Settings|Live Connect Login. Click Add and enter the<br />
following information:<br />
Option 1: Select Allianz Travel as the Live Connect Provider. Enter your Login name as the User<br />
Name; enter your Password; enter the agency Account Number and you must enter ACCAM as<br />
the Agency Code.<br />
Option 2: Select Allianz Travel as the Live Connect Provider. Enter your Login name as the User<br />
Name and enter your Password.<br />
Option 3: Select Allianz Travel as the Live Connect Provider. Enter your agency Account<br />
Number and you must enter ACCAM as the Agency Code.<br />
Set Up Individual Agent Login Information: Users can set up their own logins by going to<br />
Tools|MyLogin|Live Connect and clicking Add.<br />
Option 1: Select Allianz Travel as the Live Connect Provider. Enter your Login name as the User<br />
Name; enter your Password; enter the agency Account Number and you must enter ACCAM as<br />
the Agency Code.<br />
Option 2: Select Allianz Travel as the Live Connect Provider. Enter your Login name as the User<br />
Name and enter your Password.<br />
Option 3: Select Allianz Travel as the Live Connect Provider. Enter your agency Account<br />
3/25/13 189
An In-Depth Look at Live Connect<br />
Number and you must enter ACCAM as the Agency Code.<br />
Step 3) Create a vendor profile in <strong>ClientBase</strong> for Access America. From the Profile Manager,<br />
retrieve the Allianz Travel Insurance vendor profile (or create one). From the General Info tab, click<br />
Live Connect Providers. From here, click Add, and select the desired booking engine (Access<br />
America) from the drop-down list. The vendor code is left blank. Click OK to save.<br />
Live Connect Features Supported by Allianz Travel Insurance<br />
Allianz Travel Insurance supports the following Live Connect Features:<br />
CREATE NEW RESERVATION (Launch, Book & Import New Reservation)<br />
Automatically logs you in to booking engine with User Login data from <strong>ClientBase</strong>.<br />
Populates booking engine with profile data from <strong>ClientBase</strong>.<br />
Sends reservation details from booking engine’s confirmation page to <strong>ClientBase</strong><br />
reservation record.<br />
IMPORT EXISTING RESERVATION (Imports new reservation booked outside of<br />
<strong>ClientBase</strong>)<br />
Uses confirmation number to automatically pass all reservation details from booking<br />
engine to <strong>ClientBase</strong> reservation record.<br />
Allows user to browse for reservation and upon retrieval sends reservation details<br />
from booking engine’s confirmation page to <strong>ClientBase</strong> reservation record.<br />
RETRIEVE RESERVATION - Retrieves existing reservation previously imported via Live<br />
Connect for viewing or editing. Upon editing, imports updated reservations details.<br />
Create New Allianz Travel Insurance Reservation in Live Connect<br />
Step 1) Retrieve the desired client profile, create a new Res Card and after entering basic Res Card<br />
info, launch Live Connect by clicking Live Connect on the menu bar. (You can also launch Live<br />
3/25/13 190
An In-Depth Look at Live Connect<br />
Connect from the Profile action gear.)<br />
Step 2) Complete the Live Connect settings by identifying the vendor, the Live Connect Provider<br />
and appropriate Login information.<br />
Step 3) Click the Create New Reservation button.<br />
Step 4) Select any Profile, Passenger, Branch and Res Card information you want to use to book<br />
the reservation and click Connect to launch the on-line booking engine.<br />
Step 5) The system prompts with the reservation records included in this Res Card. Click each<br />
3/25/13 191
An In-Depth Look at Live Connect<br />
reservation to insure. Again, this step is designed to save time during the insurance booking<br />
process, as less fields need to be completed manually. Any missing or incomplete data can be<br />
updated on the website confirming the insurance booking. Click Connect.<br />
Step 6) Although you are still in <strong>ClientBase</strong>, you are now on-line at the Live Connect Provider’s<br />
booking site running the on-line booking engine through a <strong>ClientBase</strong> window. Complete the<br />
reservation and when the reservation is confirmed, click Import Reservation from the confirmation<br />
page.<br />
Amadeus AgentNet VAX (Not Available in CBO Stand Alone)<br />
If your agency uses the Amadeus AgentNet site to book VAX (Vacation Access) reservations<br />
including Agentnet VAX - Dynamic, launch Amadeus AgentNet VAX through the <strong>ClientBase</strong> Live<br />
Connect, and benefit from the seamless passing of customer information and importing of<br />
reservation data to your database AND continue to get your AgentNet booking credits/ incentives<br />
accordingly. To use AgentNet with Live Connect in <strong>ClientBase</strong>, use the AgentNet user login and<br />
password supplied by Vacation.com or Amadeus. If you need one and are a Vacation.com member,<br />
obtain user login information by contacting Vacation.com Member Services at 800-843-0733.<br />
Otherwise contact an Amadeus Sales Representative.<br />
3/25/13 192
An In-Depth Look at Live Connect<br />
Set Up Amadeus AgentNet VAX<br />
Step 1) Once you have obtained accurate login information, you need to add this Live Connect<br />
Provider into <strong>ClientBase</strong> by going to Tools|Settings|Live Connect Providers and clicking Add.<br />
Fill in the following fields:<br />
Name of the Provider: In blank field provided, type the name of the Provider.<br />
Status: Leave the default of Active. If you ever want to make it Inactive, go back in this area to turn<br />
off.<br />
URL: Type https://amadeus.agentnet.com/anet/thirdparty/gotrisept.jsp<br />
Travel Category: Select Tour.<br />
Import XML from: Select HTML Source.<br />
Include Authentication: Leave blank.<br />
Click Save.<br />
Step 2) Each user can put in his own login information under Tools|My Login|Live Connect or<br />
enter one set of login information for a Live Connect provider for all agents by going to<br />
Tools|Settings|Live Connect Login. Click Add and enter the following information:<br />
Live Connect Provider: Select Amadeus AgentNet VAX from the drop-down list.<br />
User Name, Password: <strong>ClientBase</strong> only passes the username and password. Enter the necessary<br />
fields based upon the login information provided to you when you enrolled.<br />
Step 3) Create vendor profiles in <strong>ClientBase</strong> if they do not exist for the following vendors. From the<br />
profile manager, retrieve the vendor profile (or create if it is not in database). In the General Info<br />
area, click Live Connect Providers. From here, click Add, and select Amadeus AgentNet VAX or<br />
Amadeus AgentNet Dynamic from the drop-down list and insert the Vendor Code. If you use both<br />
links, you must make the profile with both. Save.<br />
3/25/13 193
An In-Depth Look at Live Connect<br />
Amadeus Agentnet VAX Dynamic Participating Vendors & Codes<br />
CODE VENDOR NAME LIVE CONNECT PROVIDER<br />
BST Blue Sky Tours Amadeus AgentNet VAX - Dynamic<br />
FJ1 Funjet Vacations Amadeus AgentNet VAX - Dynamic<br />
GP1 Grand Pineapple Beach Resorts Amadeus AgentNet VAX - Dynamic<br />
MMT MGM Mirage Vacations - Air/Hotel Amadeus AgentNet VAX - Dynamic<br />
SAB Sandals and Beaches Resorts Amadeus AgentNet VAX - Dynamic<br />
STN Showtime Tours of Nevada Amadeus AgentNet VAX - Dynamic<br />
TPV TNT Vacations powered by Funjet Amadeus AgentNet VAX - Dynamic<br />
AMW US Airways Vacations Amadeus AgentNet VAX - Dynamic<br />
VE1 Vacation Express Amadeus Agentnet VAX - Dynamic<br />
Amadeus AgentNet VAX supports the following Live Connect features:<br />
CREATE NEW RESERVATION (Launch, Book & Import New Reservation)<br />
Populates booking engine with User Login data and profile data from<br />
<strong>ClientBase</strong>.<br />
Sends reservation details from booking engine’s confirmation page to<br />
<strong>ClientBase</strong> reservation record.<br />
IMPORT EXISTING RESERVATION (Imports new reservation booked outside<br />
of <strong>ClientBase</strong>)<br />
Uses confirmation number to automatically pass all reservation details from<br />
booking engine to <strong>ClientBase</strong> reservation record.<br />
Allows user to browse for reservation and upon retrieval sends reservation<br />
details from booking engine’s confimation page to <strong>ClientBase</strong> reservation<br />
record.<br />
RETRIEVE RESERVATION - Retrieves exisiting reservation previously imported<br />
via Live Connect for viewing or editing. Upon editing, imports updated reservations<br />
details.<br />
Create New Reservation in Live Connect<br />
Step 1) Retrieve the desired client profile, create a new Res Card and after entering basic Res Card<br />
info, launch Live Connect by clicking Live Connect on the menu bar. (You can also launch Live<br />
3/25/13 194
An In-Depth Look at Live Connect<br />
Connect from the Profile action gear.)<br />
Step 2) Complete the Live Connect settings by identifying the vendor, the Live Connect Provider<br />
and appropriate Login information.<br />
Step 3) Click the Create New Reservation button.<br />
Step 4) Select any Profile, Passenger, Branch and Res Card information you want to use to book<br />
the reservation and click Connect to launch the on-line booking engine.<br />
Step 5) Although you are still in <strong>ClientBase</strong>, you are now on-line at the Live Connect Provider’s<br />
3/25/13 195
An In-Depth Look at Live Connect<br />
booking site running the on-line booking engine through a <strong>ClientBase</strong> window.<br />
Complete the reservation and when the reservation is confirmed, click Import Reservation from the<br />
confirmation page. All reservation data booked on-line is now located in the reservation fields in<br />
<strong>ClientBase</strong>.<br />
Import Existing Reservation Made Outside of <strong>ClientBase</strong><br />
Step 1) Create a new Res Card or open an existing one and launch Live Connect by clicking the<br />
Live Connect icon.<br />
Step 2) Complete the Live Connect settings by identifying the vendor, the Live Connect Provider and<br />
appropriate Login information if not auto-populated.<br />
Step 3) Enter the confirmation number for the reservation you want to import and click Import<br />
Existing Reservation.<br />
Step 4) Depending on the Live Connect Provider, the system either locates the reservation using<br />
the confirmation number and automatically import all reservation details, or takes you to the Live<br />
Connect Provider's site for you to use its Retrieve Reservation feature to locate the reservation.<br />
Upon displaying the existing reservation, click Import Reservation and the reservation details are<br />
imported into the <strong>ClientBase</strong> Res Card.<br />
Retrieve an Existing Reservation for Editing or Cancelling<br />
To edit or cancel an existing reservation using Live Connect, follow these steps:<br />
Step 1) Launch Live Connect from inside the Live Connect reservation to edit or cancel. Click Live<br />
Connect.<br />
Step 2) Confirm all Live Connect settings including confirmation number, and click Retrieve<br />
Reservation.<br />
Step 3) Live Connect launches the booking engine site. Edit or cancel the reservation using<br />
instructions supplied by the booking engine, and click Import Reservation. All reservation data<br />
edited or cancelled online is now located in the reservation fields in <strong>ClientBase</strong>.<br />
Amadeus Cruise (Not Available in CBO Stand Alone)<br />
Any <strong>ClientBase</strong> customer, regardless of GDS, is welcome to use Amadeus Cruise free of charge to<br />
book cruises using Live Connect. If you are not currently registered to book Amadeus Cruise online,<br />
call 1-888-AMADEUS, or email salesinquires@amadeus.com. (Current Amadeus Cruise users<br />
3/25/13 196
An In-Depth Look at Live Connect<br />
may contact your Amadeus Account Manager.) Upon registering you are provided with Amadeus<br />
Agent Signs and Duty Codes, and are directed to download one file from the Amadeus Cruise<br />
website (version must be 3.4 or higher). Since this particular Live Connect provider is half web/half<br />
client application, this file is required to connect to Amadeus Cruise in a <strong>ClientBase</strong> Live Connect<br />
reservation.<br />
Set Up Amadeus Cruise<br />
Upon receiving Amadeus Agent Signs and Duty Codes, take the following steps to setup <strong>ClientBase</strong><br />
for Live Connect.<br />
Step 1) Create a Live Connect Provider for Amadeus Cruise if none exists by going to<br />
Tools|Settings||Live Connect Providers, and clicking Add. (It’s a good idea to check if the URL is<br />
correct.)<br />
Provider Name: Enter Amadeus Cruise.<br />
URL: Enter http://us.amadeuscruise.com/cruise.asp<br />
If you experience problems with this URL, use this one instead:<br />
http://us.amadeuscruise.com/deprecated/cruise.asp<br />
Travel Category: Enter Cruise from the drop-down menu.<br />
Import XML from: Enter HTML Source<br />
Step 2) Each user can put in his own login information under Tools|My Login|Live Connect or<br />
enter one set of login information for a Live Connect provider for all agents by going to<br />
Tools|Settings|Live Connect Login. Click Add and enter the following information:<br />
Live Connect Provider: Select Amadeus Cruise to connect to the cruise booking engine, then<br />
complete the remaining fields, and save.<br />
Agent Sign: Enter the unique Amadeus Cruise assigned agency user name.<br />
Account Number: Enter the unique assigned agency code (duty code).<br />
Step 3) Create vendor profiles in <strong>ClientBase</strong> if they do not exist for the following vendors. From the<br />
profile manager, retrieve the vendor profile (or create if it is not in database). In the General Info<br />
area, click Live Connect Providers. From here, click Add, and select Amadeus Cruise from the dropdown<br />
list and insert the Vendor Code.<br />
3/25/13 197
An In-Depth Look at Live Connect<br />
Amadeus Cruise Participating Vendors & Vendor Codes<br />
Code Vendor Name Live Connect Provider<br />
AZA Azamara Amadeus Cruise<br />
CCL Carnival Cruise Lines Amadeus Cruise<br />
CEL Celebrity Cruises Amadeus Cruise<br />
CST Costa Cruise Lines Amadeus Cruise<br />
CUN Cunard Amadeus Cruise<br />
FOL Fred Olsen Amadeus Cruise<br />
HAL Holland America Lines Westours Amadeus Cruise<br />
MSC MSC Cruises Amadeus Cruise<br />
NCL Norwegian Cruise Lines Amadeus Cruise<br />
OCL Oceania Amadeus Cruise<br />
POC P&O Amadeus Cruise<br />
PCL Princess Cruises Amadeus Cruise<br />
RCC Royal Caribbean International Amadeus Cruise<br />
SBN Seabourne Cruise Lines Amadeus Cruise<br />
Amadeus Cruise Live Connect Features<br />
Amadeus Cruise supports the following Live Connect Features:<br />
CREATE NEW RESERVATION (Launch, Book & Import New Reservation)<br />
Automatically logs you in to booking engine with User Login data from <strong>ClientBase</strong>.<br />
Populates booking engine with profile data from <strong>ClientBase</strong>.<br />
Sends reservation details from booking engine’s confirmation page to <strong>ClientBase</strong><br />
reservation record.<br />
IMPORT EXISTING RESERVATION (Imports new reservation booked outside of<br />
<strong>ClientBase</strong>)<br />
Uses confirmation number to automatically pass all reservation details from booking<br />
engine to <strong>ClientBase</strong> reservation record.<br />
Allows user to browse for reservation and upon retrieval sends reservation details from<br />
booking engine’s confimation page to <strong>ClientBase</strong> reservation record.<br />
RETRIEVE RESERVATION - Retrieves existing reservation previously imported via Live<br />
Connect for viewing or editing. Upon editing, imports updated reservations details.<br />
Create Amadeus Cruise New Reservation in Live Connect<br />
Step 1) Retrieve the desired client profile, create a new Res Card and after entering basic Res Card<br />
info, launch Live Connect by clicking Live Connect on the menu bar. (You can also launch Live<br />
3/25/13 198
An In-Depth Look at Live Connect<br />
Connect from the Profile action gear.)<br />
Step 2) Complete the Live Connect settings by identifying the vendor, the Live Connect Provider<br />
and appropriate Login information.<br />
Step 3) Click the Create New Reservation button.<br />
Step 4) Select any Profile, Passenger, Branch and Res Card information you want to use to book<br />
the reservation and click Connect to launch the on-line booking engine.<br />
Step 5) Although you are still in <strong>ClientBase</strong>, you are now on-line at the Live Connect Provider’s<br />
3/25/13 199
An In-Depth Look at Live Connect<br />
booking site running the on-line booking engine through a <strong>ClientBase</strong> window. Upon completion of<br />
the reservation, click the yellow end transaction symbol (at least twice) and then Import Reservation,<br />
and all reservation details are imported back into the <strong>ClientBase</strong> reservation record.<br />
Note: If insurance is part of the booking record a separate Service Provider record is created for it<br />
in <strong>ClientBase</strong>.<br />
Import Existing Amadeus Cruise Res Made Outside of CB<br />
Step 1) Create a new Res Card or open an existing one and launch Live Connect by clicking the<br />
Live Connect icon.<br />
Step 2) Complete the Live Connect settings by identifying the vendor, the Live Connect Provider and<br />
appropriate Login information if not auto-populated.<br />
Step 3) Enter the confirmation number for the reservation you want to import and click Import<br />
Existing Reservation.<br />
Step 4) Depending on the Live Connect Provider, the system either locates the reservation using<br />
the confirmation number and automatically import all reservation details, or takes you to the Live<br />
Connect Provider's site for you to use its Retrieve Reservation feature to locate the reservation.<br />
Upon displaying the existing reservation, click Import Reservation and the reservation details are<br />
imported into the <strong>ClientBase</strong> Res Card.<br />
Retrieve an Existing Amadeus Cruise Res to Edit/Cancel<br />
To edit or cancel an existing reservation using Live Connect, follow these steps:<br />
Step 1) Launch Live Connect from inside the Live Connect reservation to edit or cancel. Click Live<br />
Connect.<br />
Step 2) Confirm all Live Connect settings including confirmation number, and click Retrieve<br />
Reservation.<br />
Step 3) Live Connect launches the booking engine site. Edit or cancel the reservation using<br />
instructions supplied by the booking engine, and click Import Reservation. All reservation data<br />
edited or cancelled online is now located in the reservation fields in <strong>ClientBase</strong>.<br />
American Express Vacations<br />
You need to be an American Express agency to use American Express Vacations Live Connect.<br />
Set Up American Express Vacations<br />
Step 1) American Express Vacations uses the Travel Impressions Live Connect Provider. Create<br />
a new or check that a Live Connect Provider for Travel Impressions exists by going to<br />
Tools|Settings|Live Connect Providers and clicking Add. (Make sure the URL is correct if<br />
3/25/13 200
An In-Depth Look at Live Connect<br />
Provider is present.)<br />
Provider Name: Enter Travel Impressions.<br />
URL: https://quest.travimp.com/phase1/agents.html<br />
Travel Category: Select Tour from the drop-down.<br />
Import XML from: Select HTML Source.<br />
Step 2) User Login Data does not populate in Live Connect so no set up is required, but create a<br />
vendor profile in <strong>ClientBase</strong> if one does not exist. From the profile manager, retrieve the American<br />
Express Vacations vendor profile (or create if it is not in database). From the General Info tab, click<br />
Live Connect Providers. From there, click Add, and select Travel Impressions from the drop-down<br />
list. The vendor code is left blank. Save.<br />
American Express Vacations Features<br />
American Express Vacations supports the following Live Connect features:<br />
CREATE NEW RESERVATION (Launch, Book & Import New Reservation)<br />
Populates booking engine with User Login data from <strong>ClientBase</strong>.<br />
Populates booking engine with profile data from <strong>ClientBase</strong>.<br />
Sends reservation details from booking engine’s confirmation page to<br />
<strong>ClientBase</strong> reservation record.<br />
IMPORT EXISTING RESERVATION (Imports new reservation booked outside<br />
of <strong>ClientBase</strong>)<br />
Uses confirmation number to automatically pass all reservation details from<br />
booking engine to <strong>ClientBase</strong> reservation record.<br />
Allows user to browse for reservation and upon retrieval sends reservation<br />
details from booking engine’s confimation page to <strong>ClientBase</strong> reservation<br />
record.<br />
RETRIEVE RESERVATION - Retrieves exisiting reservation previously imported via<br />
Live Connect for viewing or editing. Upon editing, imports updated reservations<br />
details.<br />
Create New American Express Vacations Reservation<br />
Step 1) Retrieve the desired client profile, create a new Res Card and after entering basic Res Card<br />
info, launch Live Connect by clicking Live Connect on the menu bar. (You can also launch Live<br />
3/25/13 201
An In-Depth Look at Live Connect<br />
Connect from the Profile action gear.)<br />
Step 2) Select American Express Vacations from the drop-down menu by Connect To (if not<br />
defaulted), and then click Create New Reservations.<br />
Step 3) Select any customer information to use to book the American Express Vacations<br />
reservation. This data is NOT passed to American Express Vacations, but you are able to view it at<br />
the top of your booking screen and can highlight it, copy, and paste it into the booking fields to save<br />
you time during the booking process. Click Connect.<br />
3/25/13 202
An In-Depth Look at Live Connect<br />
Step 4) Although still in <strong>ClientBase</strong>, you are now on-line at the booking site. A page appears which<br />
verifies your ARC or CLIA #, User Name, login, and password the first time you sign in (and is prepopulated<br />
with this data thereafter).<br />
Enter your ARC or<br />
CLIA #, your user<br />
name and password,<br />
and click Submit to<br />
continue.<br />
Create the booking by clicking Make a Reservation with all passenger information (none is passed<br />
to site through <strong>ClientBase</strong>, but you can highlight, copy and paste information at top of screen into<br />
booking fields) and when the reservation is confirmed, click Import Reservation at the top of the<br />
<strong>ClientBase</strong> screen. All reservation data booked on-line is now located in the reservation.<br />
Import Existing Reservation Made Outside of <strong>ClientBase</strong><br />
First, create a new reservation and click Import Existing Reservation. Enter the confirmation number<br />
or leave blank. If you have entered a confirmation number, the system automatically retrieves and<br />
imports the reservation. If no confirmation number is entered, when in American Express Vacations<br />
website, instead of creating a new reservation, go to the retrieve reservation area. Once the<br />
reservation details are showing, click Import and the details of the reservation are imported into<br />
<strong>ClientBase</strong>.<br />
3/25/13 203
An In-Depth Look at Live Connect<br />
Retrieve an Existing Reservation for Editing or Cancelling<br />
To edit or cancel an existing reservation using Live Connect, follow these steps:<br />
Step 1) Launch Live Connect from inside the reservation to edit or cancel in <strong>ClientBase</strong>.<br />
Step 2) A dialog box appears. Click Retrieve Reservation.<br />
Step 3) Live Connect launches the booking engine site. Edit or cancel the reservation using<br />
instructions supplied by the booking engine, and click Import Reservation. All reservation data<br />
edited or cancelled online is now located in the reservation fields in <strong>ClientBase</strong>.<br />
Apple Vacations<br />
If you are not currently registered to book Apple Vacations on-line, go to<br />
http://qa-bookonline.applevacations.com/ to download the electronic booking contract. Upon<br />
completion of the registration you will receive a User ID and Password and can take the following<br />
steps to setup <strong>ClientBase</strong>.<br />
Set Up Apple Vacations<br />
Step 1) Once you have obtained accurate login information, you need to add this Live Connect<br />
Provider into <strong>ClientBase</strong> by going to Tools|Settings|Live Connect Providers and clicking Add.<br />
Fill in the following fields:<br />
Name of the Provider: In blank field provided, type the name of the Provider.<br />
Status: Leave the default of Active. If you ever want to make it Inactive, go back in this area to turn<br />
off.<br />
URL: Type https://abe.applevacations.com/abe/TramsInterface<br />
Travel Category: Select Tour.<br />
Import XML from: Select HTML Source.<br />
Include Authentication: Leave blank.<br />
Click Save.<br />
Step 2) Create a vendor profile in <strong>ClientBase</strong> if one does not exist. From the profile manager,<br />
3/25/13 204
An In-Depth Look at Live Connect<br />
retrieve the Apple Vacations vendor profile (or create if it is not in database). In the General Info<br />
area, click Live Connect Providers. From here, click Add, and select provider from the drop-down<br />
list. The vendor code is left blank. Save.<br />
Apple Vacations Live Connect Features<br />
CREATE NEW RESERVATION (Launch, Book & Import New Reservation)<br />
__ Populates booking engine with User Login data and profile data from<br />
<strong>ClientBase</strong>.<br />
Sends reservation details from booking engine’s confirmation page to<br />
<strong>ClientBase</strong> reservation record.<br />
IMPORT EXISTING RESERVATION (Imports new reservation booked outside<br />
of <strong>ClientBase</strong>)<br />
Uses confirmation number to automatically pass all reservation details from<br />
booking engine to <strong>ClientBase</strong> reservation record.<br />
Allows user to browse for reservation and upon retrieval sends reservation<br />
details from booking engine’s confimation page to <strong>ClientBase</strong> reservation<br />
record.<br />
RETRIEVE RESERVATION - Retrieves exisiting reservation previously imported<br />
via Live Connect for viewing or editing. Upon editing, imports updated reservations<br />
details.<br />
Create New Apple Reservation in Live Connect<br />
Step 1) Retrieve the desired client profile, create a new Res Card and after entering basic Res Card<br />
info, launch Live Connect by clicking Live Connect on the menu bar. (You can also launch Live<br />
Connect from the Profile action gear.)<br />
Step 2) Complete the Live Connect settings by identifying the vendor, the Live Connect Provider<br />
3/25/13 205
An In-Depth Look at Live Connect<br />
and appropriate Login information.<br />
Step 3) Click the Create New Reservation button.<br />
Step 4) Select any Profile, Passenger, Branch and Res Card information you want to use to book<br />
the reservation. This data is NOT passed to booking site, but you are able to view it at the top left<br />
of your booking screen and can highlight it, copy, and paste it into the booking fields to save you time<br />
during the booking process. Click Next to launch the on-line booking engine.<br />
Step 5) Although you are still in <strong>ClientBase</strong>, you are now on-line at the Live Connect Provider’s<br />
booking site running the on-line booking engine through a <strong>ClientBase</strong> window. You need to do two<br />
steps before importing the reservation.<br />
Depress OK and Go before<br />
you click Import<br />
Reservation to bring in.<br />
Complete the reservation and when the reservation is confirmed, click Import Reservation from the<br />
confirmation page. All reservation data booked on-line is now located in the reservation fields in<br />
<strong>ClientBase</strong>.<br />
3/25/13 206
Import Existing Apple Res Made Outside of <strong>ClientBase</strong><br />
An In-Depth Look at Live Connect<br />
Step 1) Create a new Res Card or open an existing one and launch Live Connect by clicking the<br />
Live Connect icon.<br />
Step 2) Complete the Live Connect settings by identifying the vendor, the Live Connect Provider<br />
and appropriate Login information if not autopopulated.<br />
Step 3) Enter the confirmation number for the reservation you want to import and click Import<br />
Existing Reservation.<br />
Step 4) Depending on the Live Connect Provider, the system either locates the reservation using<br />
the confirmation number and automatically import all reservation details, or takes you to the Live<br />
Connect Provider's site for you to use its Retrieve Reservation feature to locate the reservation.<br />
Upon displaying the existing reservation, click Import Reservation and the reservation details are<br />
imported into the <strong>ClientBase</strong> Res Card.<br />
Retrieve an Existing Apple Res to Edit/Cancel<br />
To edit or cancel an existing reservation using Live Connect, follow these steps:<br />
Step 1) Launch Live Connect from inside the Live Connect reservation to edit or cancel. Click Live<br />
Connect.<br />
Step 2) Confirm all Live Connect settings including confirmation number, and click Retrieve<br />
Reservation.<br />
Step 3) Live Connect launches the booking engine site. Edit or cancel the reservation using<br />
instructions supplied by the booking engine, and click Import Reservation. All reservation data<br />
edited or cancelled online is now located in the reservation fields in <strong>ClientBase</strong>.<br />
Auto Europe<br />
To use Live Connect to sell Auto Europe, you must be an Auto Europe appointed agency and<br />
establish user logins and passwords for selling Auto Europe on-line. If are not already registered,<br />
please visit http://www.Auto Europe.com/global-agent-signup.cfm to sign up online, or call your<br />
Auto Europe sales representative for more assistance. You need to provide your company address<br />
information and your IATA or CLIA number when completing this form. After you have submitted<br />
the form, Auto Europe will contact you to provide a Global Agent User Account number and a Global<br />
Agent Password which you need to set up Live Connect in <strong>ClientBase</strong><br />
Set Up Auto Europe<br />
Step 1) Create a new or check that a Live Connect Provider for Auto Europe exists by going to<br />
Tools|Settings|Live Connect Providers and clicking Add. (Make sure the URL is correct if<br />
3/25/13 207
An In-Depth Look at Live Connect<br />
Provider is present.)<br />
Provider Name: Enter Auto Europe.<br />
URL: Enter https://www.autoeurope.com/global-agent/Trams.cfm<br />
Travel Category: Enter TOUR (important) from the drop-down menu.<br />
Import XML from: Enter HTML Source.<br />
IMPORTANT: The Travel Category must be set to Tour!<br />
Step 2) Each user can put in his own login information under Tools|My Login|Live Connect or<br />
enter one set of login information for a Live Connect provider for all agents by going to<br />
Tools|Settings|Live Connect Login. Click Add and enter the following information:<br />
Live Connect Provider: Select Auto Europe from the drop-down list.<br />
User Name, Password and Account Number: In the User ID field, enter the User Name and<br />
Password provided by Auto Europe when you signed up. The Account Number field in <strong>ClientBase</strong><br />
is left blank. Save.<br />
Step 3) Create a vendor profile in <strong>ClientBase</strong> if one does not exist. From the profile manager,<br />
retrieve the Auto Europe vendor profile (or create if it is not in database). In the General Info area,<br />
click Live Connect Providers. From here, click Add, and select provider from the drop-down list. The<br />
vendor code is left blank. Save.<br />
3/25/13 208
An In-Depth Look at Live Connect<br />
Auto Europe Features<br />
Auto Europe support the following Live Connect Features:<br />
CREATE NEW RESERVATION (Launch, Book & Import New Reservation)<br />
Populates booking engine with User Login data from <strong>ClientBase</strong>.<br />
Populates booking engine with profile data from <strong>ClientBase</strong>.<br />
Sends reservation details from booking engine’s confirmation page to<br />
<strong>ClientBase</strong> reservation record.<br />
IMPORT EXISTING RESERVATION (Imports new reservation booked outside<br />
of <strong>ClientBase</strong>)<br />
Uses confirmation number to automatically pass all reservation details from<br />
booking engine to <strong>ClientBase</strong> reservation record.<br />
Allows user to browse for reservation and upon retrieval sends reservation<br />
details from booking engine’s confimation page to <strong>ClientBase</strong> reservation<br />
record.<br />
RETRIEVE RESERVATION - Retrieves exisiting reservation previously imported<br />
via Live Connect for viewing or editing. Upon editing, imports updated reservations<br />
details.<br />
Create New Auto Europe Reservation<br />
Step 1) Retrieve the desired client profile, create a new Res Card and after entering basic Res Card<br />
info, launch Live Connect by clicking Live Connect on the menu bar. (You can also launch Live<br />
Connect from the Profile action gear.)<br />
Step 2) Complete the Live Connect settings by identifying the vendor, the Live Connect Provider<br />
and appropriate Login information.<br />
3/25/13 209
An In-Depth Look at Live Connect<br />
Step 3) Click the Create New Reservation button.<br />
Step 4) Select any Profile, Passenger, Branch and Res Card information you want to use to book<br />
the reservation and click Connect to launch the on-line booking engine.<br />
Step 5) Although you are still in <strong>ClientBase</strong>, you are now on-line at the Live Connect Provider’s<br />
booking site running the on-line booking engine through a <strong>ClientBase</strong> window. Upon completion of<br />
the reservation, click the Import Reservation, and all reservation details are imported back into the<br />
<strong>ClientBase</strong> reservation record.<br />
Brendan Vacations<br />
If you are not currently registered to book Brendan Vacations as a new agency set-up, please visit:<br />
http://www.tltc.com/agencyupdates/ or call 1-800-421-8446. Upon completion of the registration<br />
3/25/13 210
An In-Depth Look at Live Connect<br />
you will receive a User ID and Password and can take the following steps to setup <strong>ClientBase</strong>.<br />
Set Up Brendan Vacations Live Connect<br />
Upon receiving User ID and Password, take the following steps to setup <strong>ClientBase</strong> for Live<br />
Connect.<br />
Step 1) Once you have obtained accurate login information, you need to make sure this Live<br />
Connect Provider is in <strong>ClientBase</strong> by going to Tools|Settings|Live Connect Providers and clicking<br />
Add if not present (make sure the URL below is correct).<br />
Provider Name: Type Brendan Vacations.<br />
URL: Type: https://book.itropics.com/BookingWizard/TramsLiveConnect.aspxsc=BVUSAS<br />
Travel Category: Select Tour from the drop-down.<br />
Import XML from: Select HTML Source.<br />
Step 2) Each user can put in his own login information under Tools|My Login|Live Connect or<br />
enter one set of login information for a Live Connect provider for all agents by going to<br />
Tools|Settings|Live Connect Login. Click Add and enter the following information:<br />
User Name and Password: Enter the necessary fields based upon the login information provided<br />
to you when you contacted Brendan Vacations. (The Agency Number and Code is not applicable.)<br />
Step 3) Retrieve the Brendan Vacations vendor profile from the Profile Manager (or create one if<br />
not in your database). From the General Info link, click the Live Connect Providers button. Click<br />
Add, and select Brendan Vacations booking engine from the drop-down list. There is no Vendor<br />
Code. In the Travel Category profile field, select Tour from the drop-down menu.<br />
3/25/13 211
An In-Depth Look at Live Connect<br />
Live Connect Features Supported by Brendan Vacations<br />
Brendan Vacations supports the following Live Connect Features:<br />
CREATE NEW RESERVATION (Launch, Book & Import New Reservation)<br />
Automatically logs you in to booking engine with User Login data from <strong>ClientBase</strong>.<br />
Populates booking engine with profile data from <strong>ClientBase</strong>.<br />
Sends reservation details from booking engine’s confirmation page to <strong>ClientBase</strong><br />
reservation record.<br />
IMPORT EXISTING RESERVATION (Imports new reservation booked outside of<br />
<strong>ClientBase</strong>).<br />
Uses confirmation number to automatically pass all reservation details from booking<br />
engine to <strong>ClientBase</strong> reservation record.<br />
Allows user to browse for reservation and upon retrieval sends reservation details from<br />
booking engine’s confirmation page to <strong>ClientBase</strong> reservation record.<br />
RETRIEVE RESERVATION - Retrieves existing reservation previously imported via Live<br />
Connect for viewing or editing. Upon editing, imports updated reservations details.<br />
Create New Brendan Vacations Reservation in Live Connect<br />
Step 1) Retrieve the desired client profile, create a new Res Card and after entering basic Res Card<br />
info, launch Live Connect by clicking Live Connect on the menu bar. (You can also launch Live<br />
Connect from the Profile action gear.)<br />
Step 2) Complete the Live Connect settings by identifying the vendor, the Live Connect Provider<br />
and appropriate Login information.<br />
3/25/13 212
An In-Depth Look at Live Connect<br />
Step 3) Click the Create New Reservation button.<br />
Step 4) Select any Profile, Passenger, Branch and Res Card information you want to use to book<br />
the reservation. Click Connect to launch the on-line booking engine.<br />
Step 5) Although still in <strong>ClientBase</strong>, you are now on-line at the Brendan Vacations booking site.<br />
Complete the reservations using instructions supplied by Brendan Vacations upon registration.<br />
When the reservation is confirmed, it automatically imports into the <strong>ClientBase</strong> reservation. All<br />
reservation data booked on-line is now located in the reservation fields in <strong>ClientBase</strong>.<br />
If you need help using the Brendan Vacations booking site, call 1-800-421-8446.<br />
3/25/13 213
An In-Depth Look at Live Connect<br />
Casa Travel<br />
If you are not currently registered to book Casa Travel on-line, go to www.Casa Travel.com/<br />
profile.php to enroll. Upon completion of the registration you will receive a User ID and Password<br />
and can take the following steps to setup <strong>ClientBase</strong>.<br />
Set Up Casa Travel Live Connect<br />
Upon receiving User ID and Password, take the following steps to setup <strong>ClientBase</strong> for Live<br />
Connect.<br />
Step 1) Once you have obtained accurate login information, you need to add this Live Connect<br />
Provider into <strong>ClientBase</strong> by going to Tools|Settings|Live Connect Providers and clicking Add.<br />
Provider Name: Type Casa Travel.<br />
URL: Type http://www.casatravel.com/login.php<br />
Travel Category: Select Air from the drop-down.<br />
Import XML from: Select HTML Source.<br />
Step 2) Each user can put in his own login information under Tools|My Login|Live Connect or<br />
enter one set of login information for a Live Connect provider for all agents by going to<br />
Tools|Settings|Live Connect Login. Click Add and enter the following information:<br />
User Name and Password: Enter the necessary fields based upon the login information provided<br />
to you when you contacted Casa Travel. (The Agency Number and Code is not applicable.)<br />
Step 3) Retrieve the Casa Travel vendor profile from the Profile Manager (or create one if not in<br />
your database). From the General Info link, click the Live Connect Providers button. Click Add, and<br />
select Casa Travel booking engine from the drop-down list. The Vendor Code is 24512795. In the<br />
Travel Category profile field, select Air from the drop-down menu.<br />
3/25/13 214
An In-Depth Look at Live Connect<br />
Live Connect Features Supported by Casa Travel<br />
Casa Travel supports the following Live Connect Features:<br />
CREATE NEW RESERVATION (Launch, Book & Import New Reservation)<br />
Automatically logs you in to booking engine with User Login data from <strong>ClientBase</strong>.<br />
Populates booking engine with profile data from <strong>ClientBase</strong>.<br />
Sends reservation details from booking engine’s confirmation page to <strong>ClientBase</strong><br />
reservation record.<br />
IMPORT EXISTING RESERVATION (Imports new reservation booked outside of<br />
<strong>ClientBase</strong>)<br />
Uses confirmation number to automatically pass all reservation details from booking<br />
engine to <strong>ClientBase</strong> reservation record.<br />
Allows user to browse for reservation and upon retrieval sends reservation details<br />
from booking engine’s confirmation page to <strong>ClientBase</strong> reservation record.<br />
RETRIEVE RESERVATION - Retrieves existing reservation previously imported via Live<br />
Connect for viewing or editing. Upon editing, imports updated reservations details.<br />
Create New Casa Reservation in Live Connect<br />
Step 1) Retrieve the desired client profile, create a new Res Card and after entering basic Res Card<br />
info, launch Live Connect by clicking Live Connect on the menu bar. (You can also launch Live<br />
Connect from the Profile action gear.)<br />
Step 2) Complete the Live Connect settings by identifying the vendor, the Live Connect Provider<br />
and appropriate Login information.<br />
Step 3) Click the Create New Reservation button.<br />
3/25/13 215
An In-Depth Look at Live Connect<br />
Step 4) Select any Profile, Passenger, Branch and Res Card information you want to use to book<br />
the reservation. This data is NOT passed to booking site, but you are able to view it at the top of<br />
your booking screen and can highlight it, copy, and paste it into the booking fields to save you time<br />
during the booking process. Click Connect to launch the on-line booking engine.<br />
Step 5) Although still in <strong>ClientBase</strong>, you are now on-line at the Casa Travel booking site. Complete<br />
the reservations using instructions supplied by Casa Travel upon registration. When the reservation<br />
is confirmed, it automatically imports into the <strong>ClientBase</strong> reservation. All reservation data booked<br />
on-line is now located in the reservation fields in <strong>ClientBase</strong>.<br />
Import Existing Casa Reservation Made Outside of <strong>ClientBase</strong><br />
Create a new reservation and click Import Existing Reservation. Enter the confirmation number or<br />
leave blank. If you have entered a confirmation number, the system automatically retrieves and<br />
imports the reservation. If no confirmation number is entered, when in the website, instead of<br />
3/25/13 216
An In-Depth Look at Live Connect<br />
creating a new reservation, go to the retrieve reservation area. Once the reservation details are<br />
showing, click Import and the details of the reservation are imported into the <strong>ClientBase</strong> Reservation<br />
record.<br />
Retrieve an Existing Casa Reservation for Editing or Cancelling<br />
To edit or cancel an existing reservation using Live Connect, follow these steps:<br />
Step 1) Launch Live Connect from inside the reservation to edit or cancel in <strong>ClientBase</strong>.<br />
Step 2) A dialog box appears. Click Retrieve Reservation.<br />
Step 3) Live Connect launches the booking engine site. Edit or cancel the reservation using<br />
instructions supplied by the booking engine, and click Import Reservation. All reservation data<br />
edited or cancelled online is now located in the reservation fields in <strong>ClientBase</strong>.<br />
3/25/13 217
An In-Depth Look at Live Connect<br />
3/25/13 218
CCRATravel Hotel Booking Portal<br />
If you are not currently registered to use CCRATravel Hotel Booking Portal, go to<br />
www.ccratravel.com and click the link in the bottom left corner. Upon registering as a new user,<br />
login credentials are provided. Note: Current users can activate using this feature by updating your<br />
Agency profile under My Account. Just check Yes on the Enable Trams option.<br />
Set Up CCRATravel Hotel Booking Portal<br />
Step 1) Once you have obtained accurate login information, you need to add this Live Connect<br />
Provider into <strong>ClientBase</strong> by going to Tools|Settings|Live Connect Providers and clicking Add.<br />
Provider Name: Enter CCRATravel Hotel Booking Portal.<br />
URL: Enter https://www.ccratravel.com/app/Onelink.Portalaction=LogIn<br />
Travel Category: Enter Hotel from the drop-down menu.<br />
Import XML from: Enter HTML Source.<br />
Step 2) Each user can put in his own login information under Tools|My Login|Live Connect or<br />
enter one set of login information for a Live Connect provider for all agents by going to<br />
Tools|Settings|Live Connect Login. Click Add and enter the following information:<br />
Live Connect Provider: Select CCRATravel Hotel Booking Portal from the drop-down list.<br />
User Name and Password: Enter the User Name and Password provided to you when you<br />
registered. The account number and agency code are not applicable.<br />
Step 3) Retrieve the CCRA vendor profile from the Profile Manager (or create one if not in your<br />
database). From the General Info link, click the Live Connect Providers button. Click Add, and<br />
select the CCRA booking engine from the drop-down list. The vendor code is left blank. In the<br />
Travel Category profile field, select Hotel from the drop-down menu. (If you use individual hotel<br />
vendors when booking CCRA, you need to query each of these and tag them with the CCRA URL.<br />
3/25/13 219
An In-Depth Look at Live Connect<br />
CCRA Travel Hotel Booking Portal Features<br />
CCRATravel Hotel Booking Portal supports the following Live Connect Features:<br />
CREATE NEW RESERVATION (Launch, Book & Import New Reservation)<br />
Populates booking engine with User Login data from <strong>ClientBase</strong>.<br />
Populates booking engine with profile data from <strong>ClientBase</strong>.<br />
Sends reservation details from booking engine’s confirmation page to<br />
<strong>ClientBase</strong> reservation record.<br />
IMPORT EXISTING RESERVATION (Imports new reservation booked outside<br />
of <strong>ClientBase</strong> only for cancelling, no modification once booking has been<br />
made.<br />
<br />
Uses confirmation number to automatically pass all reservation details from<br />
booking engine to <strong>ClientBase</strong> reservation record.<br />
Allows user to browse for reservation and upon retrieval sends reservation<br />
details from booking engine’s confimation page to <strong>ClientBase</strong> reservation<br />
record.<br />
RETRIEVE RESERVATION - Retrieves exisiting reservation previously imported<br />
via Live Connect for viewing or editing. Upon editing, imports updated reservations<br />
details.<br />
Create New CCRA Travel Hotel Booking Portal Reservation<br />
Step 1) Retrieve the desired client profile, create a new Res Card and after entering basic Res Card<br />
info, launch Live Connect by clicking Live Connect on the menu bar. (You can also launch Live<br />
Connect from the Profile action gear.)<br />
3/25/13 220
An In-Depth Look at Live Connect<br />
Step Two: Select CCRA from the vendor drop-down. Verify the default Login information and select<br />
Create New Reservation.<br />
A window appears with your default login information. The Connect To should read CCRATravel<br />
Hotel Booking Portal. If it does not, click the drop down arrow and select it from the list. Any of the<br />
login information defaulting in this window can be changed if desired. Use the Create New<br />
Reservations button to book a new reservation.<br />
Step Three: Select the desired client information to pass to CCRATravel Hotel Booking Portal.<br />
Prior to connecting you to the CCRATravel Hotel Booking Portal site, a client selection screen<br />
appears, allowing you to select the desired client data you would like to automatically pass to<br />
CCRATravel Hotel Booking Portal. Passing this data helps you save time during the booking<br />
process, as fewer fields need to be completed by hand. Click Connect to proceed.<br />
3/25/13 221
An In-Depth Look at Live Connect<br />
Step Four: Although still in <strong>ClientBase</strong>, you are now on-line at the CCRA booking site.<br />
Finish confirming your Reservation and upon receiving a confirmation number click Import<br />
Reservation to bring the reservation details into your <strong>ClientBase</strong> database for managing further.<br />
Note: If you want to use separate Hotel Vendors, the system will have you search for the hotel<br />
profile you have booked. If you do not find it in your system after you have queried, you must create<br />
a hotel profile and click the Live Connect button in the Vendor Profile before you save it to link<br />
CCRATravel Hotel Booking Portal to it by clicking Add. If you used the CCRATravel Hotel Booking<br />
Portal Profile at the reservation level to launch Live Connect, the hotel booking will come into<br />
<strong>ClientBase</strong> with the hotel name in the Service Provider area of the reservation.<br />
This reservation information is now available for you to invoice, to create Reminders to track the<br />
administrative tasks involved in managing the trip and to report on for future marketing purposes.<br />
Retrieve an Existing Reservation for Editing or Cancelling<br />
To cancel an existing reservation using Live Connect, follow these steps:<br />
Step 1) Launch Live Connect from inside the reservation to cancel in <strong>ClientBase</strong>.<br />
Step 2) A dialog box appears. Click Retrieve Reservation.<br />
Step 3) Live Connect launches the booking engine site. Cancel the reservation using instructions<br />
supplied by the booking engine.<br />
Centrav<br />
If you are not currently registered to book Centrav on-line, go to www.centrav.com/profile.php<br />
to enroll. Upon completion of the registration you will receive a User ID and Password and can take<br />
the following steps to setup <strong>ClientBase</strong>.<br />
Set Up Centrav Live Connect<br />
Step 1) Once you have obtained accurate login information, you need to add this Live Connect<br />
3/25/13 222
An In-Depth Look at Live Connect<br />
Provider into <strong>ClientBase</strong> by going to Tools|Settings|Live Connect Providers and clicking Add.<br />
Fill in the following fields:<br />
Provider Name: Type Centrav.<br />
URL: Type http://www.centrav.com/login.php<br />
Travel Category: Select Air from the drop-down.<br />
Import XML from: Select HTML Source.<br />
Step 2) Each user can put in his own login information under Tools|My Login|Live Connect or<br />
enter one set of login information for a Live Connect provider for all agents by going to<br />
Tools|Settings|Live Connect Login. Click Add and enter the following information:<br />
Live Connect Provider: Select Centrav to connect to the cruise booking engine, then complete the<br />
remaining fields, and save.<br />
User Name and Password: Enter the necessary fields based upon the login information provided<br />
to you when you contacted Centrav. (The Agency Number and Agency Code is not applicable.)<br />
Step 3) Retrieve the Centrav vendor profile from the Profile Manager (or create one if not in your<br />
database). From the General Info link, click the Live Connect Providers button. Click Add, and<br />
select Centrav booking engine from the drop-down list. The Vendor Code is 24518550. In the<br />
Travel Category profile field, select Air from the drop-down menu.<br />
3/25/13 223
An In-Depth Look at Live Connect<br />
Live Connect Features Supported by Centrav<br />
Centrav supports the following Live Connect Features:<br />
CREATE NEW RESERVATION (Launch, Book & Import New Reservation)<br />
Automatically logs you in to booking engine with User Login data from <strong>ClientBase</strong>.<br />
Populates booking engine with profile data from <strong>ClientBase</strong>.<br />
Sends reservation details from booking engine’s confirmation page to <strong>ClientBase</strong><br />
reservation record.<br />
IMPORT EXISTING RESERVATION (Imports new reservation booked outside of<br />
<strong>ClientBase</strong>)<br />
Uses confirmation number to automatically pass all reservation details from booking<br />
engine to <strong>ClientBase</strong> reservation record.<br />
Allows user to browse for reservation and upon retrieval sends reservation details<br />
from booking engine’s confirmation page to <strong>ClientBase</strong> reservation record.<br />
RETRIEVE RESERVATION - Retrieves existing reservation previously imported via Live<br />
Connect for viewing or editing. Upon editing, imports updated reservations details.<br />
Create New Centrav Reservation in Live Connect<br />
Step 1) Retrieve the desired client profile, create a new Res Card and after entering basic Res Card<br />
info, launch Live Connect by clicking Live Connect on the menu bar. (You can also launch Live<br />
Connect from the Profile action gear.)<br />
Step 2) Complete the Live Connect settings by identifying the vendor, the Live Connect Provider<br />
and appropriate Login information.<br />
3/25/13 224
An In-Depth Look at Live Connect<br />
Step 3) Click the Create New Reservation button.<br />
Step 4) Select any Profile, Passenger, Branch and Res Card information you want to use to book<br />
the reservation. This data is NOT passed to booking site, but you are able to view it at the top of<br />
your booking screen and can highlight it, copy, and paste it into the booking fields to save you time<br />
during the booking process. Click Connect to launch the on-line booking engine.<br />
Step 5) Although still in <strong>ClientBase</strong>, you are now on-line at the Centrav booking site. Complete the<br />
reservations using instructions supplied by Centrav upon registration. When the reservation is<br />
confirmed, it automatically imports into the <strong>ClientBase</strong> reservation. All reservation data booked online<br />
is now located in the reservation fields in <strong>ClientBase</strong>.<br />
Import Existing Centrav Res Made Outside of <strong>ClientBase</strong><br />
Create a new reservation and click Import Existing Reservation. Enter the confirmation number or<br />
leave blank. If you have entered a confirmation number, the system automatically retrieves and<br />
3/25/13 225
An In-Depth Look at Live Connect<br />
imports the reservation. If no confirmation number is entered, when in the website, instead of<br />
creating a new reservation, go to the retrieve reservation area. Once the reservation details are<br />
showing, click Import and the details of the reservation are imported into the <strong>ClientBase</strong> Reservation<br />
record.<br />
Retrieve an Existing Centrav Res to Edit/Cancel<br />
To edit or cancel an existing reservation using Live Connect, follow these steps:<br />
Step 1) Launch Live Connect from inside the reservation to edit or cancel in <strong>ClientBase</strong>.<br />
Step 2) A dialog box appears. Click Retrieve Reservation.<br />
Step 3) Live Connect launches the booking engine site. Edit or cancel the reservation using<br />
instructions supplied by the booking engine, and click Import Reservation. All reservation data<br />
edited or cancelled online is now located in the reservation fields in <strong>ClientBase</strong>.<br />
Classic Vacations<br />
As you know, Classic Vacations does not have a website where you can book transactions, but they<br />
have built a link to their internal booking system, so that you can retrieve reservations after they are<br />
made via phone and import them into a Res Card.<br />
You must be registered to use Classic Vacations with Live Connect.<br />
The only way to enroll your agency is to complete the enrollment form below and once completed,<br />
fax it to 408.882.8452.<br />
Classic for Agents Enrollment Form.<br />
After your request has been received, you will receive a confirmation of receipt. Please allow 2 - 3<br />
weeks to process and receive an email notification with your User ID and password.<br />
Notes: Classic Vacations only provides a User ID and Password to Owner/Manager level agents for<br />
each agency. There are no exceptions to this, as this is a precautionary measure to protect Agency<br />
Owners and Managers*.<br />
*Classic for Agents reserves the right to verify all information provided is accurate.<br />
Set Up Classic Vacations<br />
Step 1) Once you have obtained accurate login information, you need to add this Live Connect<br />
Provider if it does not already exist into <strong>ClientBase</strong> by going to Tools|Settings|Live Connect<br />
3/25/13 226
An In-Depth Look at Live Connect<br />
Providers and clicking Add.<br />
Fill in the following fields:<br />
Name of the Provider: In blank field provided, type the name of the Provider.<br />
Status: Leave the default of Active. If you ever want to make it Inactive, go back in this area to turn<br />
off.<br />
URL: Enter https://www.classicvacations.com/DexReservationViewer<br />
Travel Category: Select Tour.<br />
Import XML from: Select HTML Source.<br />
Include Authentication: Leave blank.<br />
Click Save.<br />
Step 2) Each agent should make sure to go into MyLogin|Live Connect and delete out any Classic<br />
login that exists there as there are no longer individual logins.<br />
Thereafter, the database administrator goes to Tools|Settings|Live Connect Providers to enter<br />
the User Name and Password and account number which everyone in agency will use.<br />
Step 3) Create a vendor profile in <strong>ClientBase</strong> if one does not exist. From the profile manager,<br />
retrieve the provider’s vendor profile (or create if it is not in database). In the General Info area, click<br />
Live Connect Providers. From here, click Add, and select provider from the drop-down list. The<br />
vendor code is left blank. Save.<br />
3/25/13 227
An In-Depth Look at Live Connect<br />
Classic Vacations Live Connect Features<br />
CREATE NEW RESERVATION (Launch, Book & Import New Reservation)<br />
Populates booking engine with User Login data from <strong>ClientBase</strong>.<br />
Populates booking engine with profile data from <strong>ClientBase</strong>.<br />
Sends reservation details from booking engine’s confirmation page to<br />
<strong>ClientBase</strong> reservation record.<br />
IMPORT EXISTING RESERVATION (Imports new reservation booked outside<br />
of <strong>ClientBase</strong>)<br />
Uses confirmation number to automatically pass all reservation details from<br />
booking engine to <strong>ClientBase</strong> reservation record.<br />
Allows user to browse for reservation and upon retrieval sends reservation<br />
details from booking engine’s confimation page to <strong>ClientBase</strong> reservation<br />
record.<br />
RETRIEVE RESERVATION - Retrieves exisiting reservation previously imported<br />
via Live Connect for viewing or editing. Upon editing, imports updated reservations<br />
details.<br />
Import Previously Made Classic Vacations Reservation Details<br />
Step 1) Retrieve the desired client profile, create a new Res Card and after entering basic Res Card<br />
info, launch Live Connect by clicking Live Connect on the menu bar. (You can also launch Live<br />
Connect from the Profile action gear.)<br />
Step 2) Complete the Live Connect settings by identifying the vendor, the Live Connect Provider and<br />
appropriate Login information if not auto-populated.<br />
3/25/13 228
An In-Depth Look at Live Connect<br />
Step 3) Enter the confirmation number for the reservation you want to import and click Import<br />
Existing Reservation.<br />
Step 4) Depending on the Live Connect Provider, the system either locates the reservation using<br />
the confirmation number and automatically import all reservation details, or takes you to the Live<br />
Connect Provider's site for you to use its Retrieve Reservation feature to locate the reservation.<br />
Upon displaying the existing reservation, click Import Reservation and the reservation details are<br />
imported into the <strong>ClientBase</strong> Res Card.<br />
Contiki Vacations<br />
To register with Contiki Vacations to make bookings as a new agency set-up, please visit:<br />
http://www.tltc.com/agencyupdates or call Contiki Vacations 1-866-266-8454. Upon completion<br />
of the registration you will receive a User ID and Password and can take the following steps to setup<br />
<strong>ClientBase</strong>.<br />
Set Up Contiki Vacations Live Connect<br />
Upon receiving User ID and Password, take the following steps to setup <strong>ClientBase</strong> for Live<br />
Connect.<br />
Step 1) Once you have obtained accurate login information, you need to make sure this Live<br />
Connect Provider is in <strong>ClientBase</strong> by going to Tools|Settings|Live Connect Providers and clicking<br />
Add if not present (make sure the URL below is correct).<br />
Provider Name: Type Contiki Vacations.<br />
URL: Type https://book.contiki.com/BookingWizard/TramsLiveConnect.aspxsc=CHUSAS<br />
3/25/13 229
An In-Depth Look at Live Connect<br />
Travel Category: Select Tour from the drop-down.<br />
Import XML from: Select HTML Source.<br />
Step 2) Each user can put in his own login information under Tools|My Login|Live Connect or<br />
enter one set of login information for a Live Connect provider for all agents by going to<br />
Tools|Settings|Live Connect Login. Click Add and enter the following information:<br />
User Name and Password: Enter the necessary fields based upon the login information provided<br />
to you when you contacted Contiki Vacations. (The Agency Number and Code is not applicable.)<br />
Step 3) Retrieve the Contiki Vacations vendor profile from the Profile Manager (or create one if not<br />
in your database). From the General Info link, click the Live Connect Providers button. Click Add,<br />
and select Contiki Vacations booking engine from the drop-down list. There is no Vendor Code. In<br />
the Travel Category profile field, select Tour from the drop-down menu.<br />
Live Connect Features Supported by Contiki Vacations<br />
Contiki Vacations supports the following Live Connect Features:<br />
CREATE NEW RESERVATION (Launch, Book & Import New Reservation)<br />
Automatically logs you in to booking engine with User Login data from <strong>ClientBase</strong>.<br />
Populates booking engine with profile data from <strong>ClientBase</strong>.<br />
Sends reservation details from booking engine’s confirmation page to <strong>ClientBase</strong><br />
reservation record.<br />
IMPORT EXISTING RESERVATION (Imports new reservation booked outside of<br />
<strong>ClientBase</strong>).<br />
Uses confirmation number to automatically pass all reservation details from booking<br />
engine to <strong>ClientBase</strong> reservation record.<br />
Allows user to browse for reservation and upon retrieval sends reservation details from<br />
booking engine’s confirmation page to <strong>ClientBase</strong> reservation record.<br />
RETRIEVE RESERVATION - Retrieves existing reservation previously imported via Live<br />
Connect for viewing or editing. Upon editing, imports updated reservations details.<br />
Create New Contiki Vacations Reservation in Live Connect<br />
Step 1) Retrieve the desired client profile, create a new Res Card and after entering basic Res Card<br />
info, launch Live Connect by clicking Live Connect on the menu bar. (You can also launch Live<br />
3/25/13 230
An In-Depth Look at Live Connect<br />
Connect from the Profile action gear.)<br />
Step 2) Complete the Live Connect settings by identifying the vendor, the Live Connect Provider<br />
and appropriate Login information.<br />
Step 3) Click the Create New Reservation button.<br />
Step 4) Select any Profile, Passenger, Branch and Res Card information you want to use to book<br />
the reservation. Click Connect to launch the on-line booking engine.<br />
Step 5) Although still in <strong>ClientBase</strong>, you are now on-line at the Contiki Vacations booking site.<br />
3/25/13 231
An In-Depth Look at Live Connect<br />
Complete the reservations using instructions supplied by Contiki Vacations upon registration. When<br />
the reservation is confirmed, it automatically imports into the <strong>ClientBase</strong> reservation. All reservation<br />
data booked on-line is now located in the reservation fields in <strong>ClientBase</strong>.<br />
If you need help using the Contiki Vacations booking site, call Contiki Vacations at 1-866-266-8454.<br />
3/25/13 232
eZforex<br />
To use Live Connect to purchase foreign currency with eZforex.com, you must be registered to sell<br />
eZforex.com and have a User Name and Password for logging onto its site. To obtain your User<br />
Name and Password, you can either call 877-ezforex or register online at http://www.ezforex.com/<br />
contact.asp, and set up <strong>ClientBase</strong>:<br />
Set Up eZforex<br />
Step 1) Once you have obtained accurate login information, you need to add this Live Connect<br />
Provider into <strong>ClientBase</strong> by going to Tools|Settings|Live Connect Providers and clicking Add.<br />
Provider Name: Enter eZforex.<br />
URL: Enter http://www.ezforex.com/cblogin.asp<br />
Travel Category: N/A.<br />
Import XML from: N/A.<br />
Step 2) Each user can put in his own login information under Tools|My Login|Live Connect or<br />
enter one set of login information for a Live Connect provider for all agents by going to<br />
Tools|Settings|Live Connect Login. Click Add and enter the following information:<br />
Live Connect Provider: Select eZforex from the drop-down list.<br />
User Name/Password: Enter your account number and password given to you upon registration.<br />
Click OK.<br />
Step 3) Retrieve the eZforex vendor profile from the Profile Manager (or create one if not in your<br />
database). From the General Info link, click the Live Connect Providers button. Click Add, and<br />
select the eZforex booking engine from the drop-down list. The vendor code is left blank. In the<br />
Travel Category profile field, select Other from the drop-down menu.<br />
3/25/13 233
An In-Depth Look at Live Connect<br />
eZforex Features<br />
eZforex supports the following Live Connect Features:<br />
CREATE NEW RESERVATION (Launch, Book & Import New Reservation)<br />
Populates booking engine with User Login data from <strong>ClientBase</strong>.<br />
Populates booking engine with profile data from <strong>ClientBase</strong>.<br />
Sends reservation details from booking engine’s confirmation page to<br />
<strong>ClientBase</strong> reservation record.<br />
IMPORT EXISTING RESERVATION (Imports new reservation booked outside<br />
of <strong>ClientBase</strong>)<br />
Uses confirmation number to automatically pass all reservation details from<br />
booking engine to <strong>ClientBase</strong> reservation record.<br />
Allows user to browse for reservation and upon retrieval sends reservation<br />
details from booking engine’s confimation page to <strong>ClientBase</strong> reservation<br />
record.<br />
RETRIEVE RESERVATION - Retrieves exisiting reservation previously imported<br />
via Live Connect for viewing or editing. Upon editing, imports updated reservations<br />
details.<br />
Create New eZforex Reservation<br />
Step 1) Retrieve the desired client profile, create a new Res Card and after entering basic Res Card<br />
info, launch Live Connect by clicking Live Connect on the menu bar. (You can also launch Live<br />
Connect from the Profile action gear.)<br />
Step 2) Complete the Live Connect settings by identifying the vendor, the Live Connect Provider<br />
and appropriate Login information.<br />
3/25/13 234
An In-Depth Look at Live Connect<br />
Step 3) Click the Create New Reservation button.<br />
Step 4) Select any Profile, Passenger, Branch and Res Card information you want to use to book<br />
the reservation. Click Connect to launch the on-line booking engine.<br />
Step 5) Although still in <strong>ClientBase</strong>, you are now on-line at the eZforex booking site. Complete the<br />
reservations using instructions supplied by eZforex upon registration. When the reservation is<br />
confirmed, it automatically imports into the <strong>ClientBase</strong> reservation. All reservation data booked online<br />
is now located in the reservation fields in <strong>ClientBase</strong>.<br />
Globus and Cosmos Family<br />
If you are currently not registered with Globus and Cosmos Family, contact your Inside Sales<br />
consultant at 1.866.270.9850. They will set you up with your username and password. After you are<br />
registered, simply logon to www.globusjourneys.com/agents and click the Travel Agent Admin<br />
link on the left hand navigation. Upon creating a User Name and Password for each agent in your<br />
office, set up <strong>ClientBase</strong> for Live Connect.<br />
3/25/13 235
An In-Depth Look at Live Connect<br />
Set Up Globus and Cosmos Family<br />
Step 1) Once you have obtained accurate login information, you need to add this Live Connect<br />
Provider if it does not already exist into <strong>ClientBase</strong> by going to Tools|Settings|Live Connect<br />
Providers and clicking Add.<br />
Provider Name: Enter Globus and Cosmos.<br />
URL: Enter https://agents.globusfamily.com/trams-agent/<br />
Travel Category: Enter Tour from the drop-down menu.<br />
Import XML from: Enter HTML Source.<br />
Step 2) Each user can put in his own login information under Tools|My Login|Live Connect or<br />
enter one set of login information for a Live Connect provider for all agents by going to<br />
Tools|Settings|Live Connect Login. Click Add and enter the following information:<br />
Live Connect Provider: Select Globus and Cosmos from the drop-down list.<br />
User Name, Password: Enter the necessary fields based upon the login information provided to<br />
you when you contacted Globus and Cosmos Family.<br />
Account Number: Not applicable<br />
Click OK to save.<br />
Step 3) Create a separate vendor profile in <strong>ClientBase</strong> if one does not exist--one for Globus and one<br />
for Cosmos, Avalon Waterways, Brennan Vacations, and Monograms. From the profile manager,<br />
retrieve each vendor profile (or create if it is not in database). From the General Info link, click Live<br />
Connect Providers. From here, click Add, and select Globus and Cosmos Family from the dropdown<br />
list. The vendor code is left blank. Click OK.<br />
3/25/13 236
An In-Depth Look at Live Connect<br />
Globus and Cosmos Family Features<br />
Globus and Cosmos Family supports the following Live Connect features:<br />
CREATE NEW RESERVATION (Launch, Book & Import New Reservation)<br />
Populates booking engine with User Login data from <strong>ClientBase</strong>.<br />
Populates booking engine with profile data from <strong>ClientBase</strong>.<br />
Sends reservation details from booking engine’s confirmation page to<br />
<strong>ClientBase</strong> reservation record.<br />
IMPORT EXISTING RESERVATION (Imports new reservation booked outside<br />
of <strong>ClientBase</strong>)<br />
Uses confirmation number to automatically pass all reservation details from<br />
booking engine to <strong>ClientBase</strong> reservation record.<br />
Allows user to browse for reservation and upon retrieval sends reservation<br />
details from booking engine’s confimation page to <strong>ClientBase</strong> reservation<br />
record.<br />
RETRIEVE RESERVATION - Retrieves exisiting reservation previously imported via<br />
Live Connect for viewing or editing. Upon editing, imports updated reservations<br />
details.<br />
Create New Globus and Cosmos Reservation<br />
Step 1) Retrieve the desired client profile, create a new Res Card and after entering basic Res Card<br />
info, launch Live Connect by clicking Live Connect on the menu bar. (You can also launch Live<br />
Connect from the Profile action gear.)<br />
Step 2) Complete the Live Connect settings by identifying the vendor, the Live Connect Provider<br />
and appropriate Login information. (If you have set up your logins in Tools|MyLogin|Live Connect,<br />
3/25/13 237
An In-Depth Look at Live Connect<br />
login information will auto-populate.)<br />
Step 3) Click the Create New Reservation button.<br />
Step 4) Select any Profile, Passenger, Branch and Res Card information you want to use to book<br />
the reservation and click Connect to launch the on-line booking engine.<br />
Step 5) Although you are still in <strong>ClientBase</strong>, you are now on-line at the Live Connect Provider’s<br />
booking site running the on-line booking engine through a <strong>ClientBase</strong> window. Complete the<br />
reservation and when the reservation is confirmed, click Import Reservation from the confirmation<br />
page.<br />
Import Existing Globus/Cosmos Res Made Outside of CB<br />
First, create a new reservation and click Import Existing Reservation. Enter the confirmation number<br />
3/25/13 238
An In-Depth Look at Live Connect<br />
or leave blank. If you have entered a confirmation number, the system automatically retrieves and<br />
imports the reservation. If no confirmation number is entered, when in Globus and Cosmos Family<br />
website, instead of creating a new reservation, go to the retrieve reservation area. Once the<br />
reservation details are showing, click Import and the details of the reservation are imported into<br />
<strong>ClientBase</strong>.<br />
Retrieve an Existing Globus/Cosmos Res to Edit/Cancel<br />
To edit or cancel an existing reservation using Live Connect, follow these steps:<br />
Step 1) Launch Live Connect from inside the reservation to edit or cancel in <strong>ClientBase</strong>.<br />
Step 2) A dialog box appears. Click Retrieve Reservation.<br />
Step 3) Live Connect launches the booking engine site. Edit or cancel the reservation using<br />
instructions supplied by the booking engine, and click Import Reservation. All reservation data<br />
edited or cancelled online is now located in the reservation fields in <strong>ClientBase</strong>.<br />
Globus Family Agent Lingo (Canada)<br />
If you are currently not registered with the Globus Family Agent Lingo, visit the travel agent section<br />
of any of the brands at www.agentlingo.ca, or call your regional Inside Sales team member directly,<br />
or call 800.268.1639. Upon creating a User Name and Password for each agent in your office, set<br />
up <strong>ClientBase</strong> for Live Connect.<br />
Set Up Globus Family Agent Lingo<br />
Step 1) Once you have obtained accurate login information, you need to add this Live Connect<br />
Provider if it does not already exist into <strong>ClientBase</strong> by going to Tools|Settings|Live Connect<br />
Providers and clicking Add.<br />
Provider Name: Enter Globus Family Agent Lingo<br />
URL: Enter https://agents.globusfamily.ca/trams-agent/<br />
Travel Category: Enter Tour from the drop-down menu.<br />
Import XML from: Enter HTML Source.<br />
Step 2) Each user can put in his own login information under Tools|My Login|Live Connect or<br />
enter one set of login information for a Live Connect provider for all agents by going to<br />
Tools|Settings|Live Connect Login. Click Add and enter the following information:<br />
3/25/13 239
An In-Depth Look at Live Connect<br />
Live Connect Provider: Select Globus Family Agent Lingo from the drop-down list.<br />
User Name, Password: Enter the necessary fields based upon the login information provided to<br />
you when you contacted Globus.<br />
Account Number: Not applicable<br />
Click OK to save.<br />
Step 3) Create a separate vendor profile in <strong>ClientBase</strong> if one does not exist--one for Globus and one<br />
for Cosmos, Avalon Waterways, Brennan Vacations, and Monograms. From the profile manager,<br />
retrieve each vendor profile (or create if it is not in database). From the General Info link, click Live<br />
Connect Providers. From here, click Add, and select Globus and Cosmos Family from the dropdown<br />
list. The vendor code is left blank. Click OK.<br />
Globus Family Agent Lingo Features<br />
Globus Family Agent Lingo supports the following Live Connect features:<br />
CREATE NEW RESERVATION (Launch, Book & Import New Reservation)<br />
Populates booking engine with User Login data from <strong>ClientBase</strong>.<br />
Populates booking engine with profile data from <strong>ClientBase</strong>.<br />
Sends reservation details from booking engine’s confirmation page to<br />
<strong>ClientBase</strong> reservation record.<br />
IMPORT EXISTING RESERVATION (Imports new reservation booked outside<br />
of <strong>ClientBase</strong>)<br />
Uses confirmation number to automatically pass all reservation details from<br />
booking engine to <strong>ClientBase</strong> reservation record.<br />
Allows user to browse for reservation and upon retrieval sends reservation<br />
details from booking engine’s confimation page to <strong>ClientBase</strong> reservation<br />
record.<br />
RETRIEVE RESERVATION - Retrieves exisiting reservation previously imported via<br />
Live Connect for viewing or editing. Upon editing, imports updated reservations<br />
details.<br />
Create Globus Family Agent Lingo Reservation<br />
Step 1) Retrieve the desired client profile, create a new Res Card and after entering basic Res Card<br />
info, launch Live Connect by clicking Live Connect on the menu bar. (You can also launch Live<br />
3/25/13 240
An In-Depth Look at Live Connect<br />
Connect from the Profile action gear.)<br />
Step 2) Complete the Live Connect settings by identifying the vendor, the Live Connect Provider<br />
and appropriate Login information. (If you have set up your logins in Tools|MyLogin|Live Connect,<br />
login information will auto-populate.)<br />
Step 3) Click the Create New Reservation button.<br />
Step 4) Select any Profile, Passenger, Branch and Res Card information you want to use to book<br />
the reservation and click Connect to launch the on-line booking engine.<br />
3/25/13 241
An In-Depth Look at Live Connect<br />
Step 4) Although still in <strong>ClientBase</strong>, you are now on-line at the booking site.<br />
Create the reservation with the passenger information passed from <strong>ClientBase</strong> by clicking Make a<br />
Booking and use the instructions supplied by Globus when you registered. When the reservation is<br />
confirmed, click Import Reservation at the top of the <strong>ClientBase</strong> screen. All reservation data booked<br />
on-line is now located in the reservation.<br />
For technical issues: WebTechSupport@globusandcosmos.com.<br />
Import Existing Reservation Made Outside of <strong>ClientBase</strong><br />
First, create a new reservation and click Import Existing Reservation. Enter the confirmation number<br />
or leave blank. If you have entered a confirmation number, the system automatically retrieves and<br />
imports the reservation. If no confirmation number is entered, when in Globus Family website,<br />
instead of creating a new reservation, go to the retrieve reservation area. Once the reservation<br />
details are showing, click Import and the details of the reservation are imported into <strong>ClientBase</strong>.<br />
Retrieve an Existing Reservation for Editing or Cancelling<br />
To edit or cancel an existing reservation using Live Connect, follow these steps:<br />
Step 1) Launch Live Connect from inside the reservation to edit or cancel in <strong>ClientBase</strong>.<br />
Step 2) A dialog box appears. Click Retrieve Reservation.<br />
Step 3) Live Connect launches the booking engine site. Edit or cancel the reservation using<br />
instructions supplied by the booking engine, and click Import Reservation. All reservation data<br />
edited or cancelled online is now located in the reservation fields in <strong>ClientBase</strong>.<br />
GOGO Worldwide Vacations<br />
If you are not currently registered to book GOGO Worldwide Vacations on-line, logon to<br />
www.gogowwv.com and click Register. Upon registering you are provided with a GOGO UserName and<br />
Password.<br />
3/25/13 242
An In-Depth Look at Live Connect<br />
Set Up GOGO Worldwide Vacations Live Connect<br />
Upon receiving User ID and Password, take the following steps to setup <strong>ClientBase</strong> for Live<br />
Connect.<br />
Step 1) Once you have obtained accurate login information, you need to add this Live Connect<br />
Provider if it does not already exist into <strong>ClientBase</strong> by going to Tools|Settings|Live Connect<br />
Providers and clicking Add.<br />
Provider Name: Enter GOGO Worldwide Vacations<br />
URL: Enter https://secure.gogowwv.com/bookingenginesecure2/securelogin.asp<br />
Travel Category: Enter Tour from the drop-down menu.<br />
Import XML from: Enter HTML Source.<br />
Step 2) Each user can put in his own login information under Tools|My Login|Live Connect or<br />
enter one set of login information for a Live Connect provider for all agents by going to<br />
Tools|Settings|Live Connect Login. Click Add and enter the following information:<br />
Live Connect Provider: Select GOGO Worldwide Vacations from the drop-down list.<br />
User Name/Password: Enter the User Name and Password and Account Number (ARC) based upon the<br />
login information provided to you when you contacted GOGO Worldwide Vacations. (The Agency<br />
Code is not applicable.) Click OK to save.<br />
Step 3) Create a separate vendor profile in <strong>ClientBase</strong> if one does not exist--one for GOGO. From<br />
the profile manager, retrieve each vendor profile (or create if it is not in database). From the General<br />
Info link, click Live Connect Providers. From here, click Add, and select GOGO from the drop-down<br />
list. The vendor code is left blank. Click OK.<br />
3/25/13 243
An In-Depth Look at Live Connect<br />
Live Connect Features Supported by GOGO Worldwide Vacations<br />
GOGO Worldwide Vacations supports the following Live Connect Features:<br />
CREATE NEW RESERVATION (Launch, Book & Import New Reservation)<br />
Automatically logs you in to booking engine with User Login data from <strong>ClientBase</strong>.<br />
Populates booking engine with profile data from <strong>ClientBase</strong>.<br />
Sends reservation details from booking engine’s confirmation page to <strong>ClientBase</strong><br />
reservation record.<br />
IMPORT EXISTING RESERVATION (Imports new reservation booked outside of<br />
<strong>ClientBase</strong>).<br />
Uses confirmation number to automatically pass all reservation details from booking<br />
engine to <strong>ClientBase</strong> reservation record.<br />
Allows user to browse for reservation and upon retrieval sends reservation details from<br />
booking engine’s confirmation page to <strong>ClientBase</strong> reservation record.<br />
RETRIEVE RESERVATION - Retrieves existing reservation previously imported via Live<br />
Connect for viewing or editing. Upon editing, imports updated reservations details.<br />
Create New GOGO Reservation in Live Connect<br />
Step 1) Retrieve the desired client profile, create a new Res Card and after entering basic Res Card<br />
info, launch Live Connect by clicking Live Connect on the menu bar. (You can also launch Live<br />
Connect from the Profile action gear.)<br />
Step 2) Complete the Live Connect settings by identifying the vendor, the Live Connect Provider<br />
and appropriate Login information.<br />
3/25/13 244
An In-Depth Look at Live Connect<br />
Step 3) Click the Create New Reservation button.<br />
Step 4) Select any Profile, Passenger, Branch and Res Card information you want to use to book<br />
the reservation. Click Connect to launch the on-line booking engine.<br />
Step 5) Although still in <strong>ClientBase</strong>, you are now on-line at the GOGO booking site. Complete the<br />
reservations using instructions supplied by GOGO upon registration. When the reservation is<br />
confirmed, it automatically imports into the <strong>ClientBase</strong> reservation. All reservation data booked online<br />
is now located in the reservation fields in <strong>ClientBase</strong>.<br />
3/25/13 245
An In-Depth Look at Live Connect<br />
Insight Vacations<br />
If you are not currently registered to book Insight Vacations as a new agency set-up, please visit:<br />
http://www.tltc.com/agencyupdates/ or call 1-888-680-1241. Upon completion of the registration<br />
you will receive a User ID and Password and can take the following steps to setup <strong>ClientBase</strong>.<br />
Set Up Insight Vacations Live Connect<br />
Upon receiving User ID and Password, take the following steps to setup <strong>ClientBase</strong> for Live<br />
Connect.<br />
Step 1) Once you have obtained accurate login information, you need to make sure this Live<br />
Connect Provider is in <strong>ClientBase</strong> by going to Tools|Settings|Live Connect Providers and clicking<br />
Add if not present (make sure the URL below is correct).<br />
Provider Name: Type Insight Vacations.<br />
URL: Type: https://book.insightvacations.com/BookingWizard/<br />
TramsLiveConnect.aspxsc=IVUSAS<br />
Travel Category: Select Tour from the drop-down.<br />
Import XML from: Select HTML Source.<br />
Step 2) Each user can put in his own login information under Tools|My Login|Live Connect or<br />
enter one set of login information for a Live Connect provider for all agents by going to<br />
Tools|Settings|Live Connect Login. Click Add and enter the following information:<br />
User Name and Password: Enter the necessary fields based upon the login information provided<br />
to you when you contacted Insight Vacations. (The Agency Number and Code is not applicable.)<br />
Step 3) Retrieve the Insight Vacations vendor profile from the Profile Manager (or create one if not<br />
in your database). From the General Info link, click the Live Connect Providers button. Click Add,<br />
and select Insight Vacations booking engine from the drop-down list. There is no Vendor Code. In<br />
the Travel Category profile field, select Tour from the drop-down menu.<br />
3/25/13 246
Live Connect Features Supported by Insight Vacations<br />
Insight Vacations supports the following Live Connect Features:<br />
An In-Depth Look at Live Connect<br />
CREATE NEW RESERVATION (Launch, Book & Import New Reservation)<br />
Automatically logs you in to booking engine with User Login data from <strong>ClientBase</strong>.<br />
Populates booking engine with profile data from <strong>ClientBase</strong>.<br />
Sends reservation details from booking engine’s confirmation page to <strong>ClientBase</strong><br />
reservation record.<br />
IMPORT EXISTING RESERVATION (Imports new reservation booked outside of<br />
<strong>ClientBase</strong>).<br />
Uses confirmation number to automatically pass all reservation details from booking<br />
engine to <strong>ClientBase</strong> reservation record.<br />
Allows user to browse for reservation and upon retrieval sends reservation details from<br />
booking engine’s confirmation page to <strong>ClientBase</strong> reservation record.<br />
RETRIEVE RESERVATION - Retrieves existing reservation previously imported via Live<br />
Connect for viewing or editing. Upon editing, imports updated reservations details.<br />
Create New Insight Vacations Reservation in Live Connect<br />
Step 1) Retrieve the desired client profile, create a new Res Card and after entering basic Res Card<br />
info, launch Live Connect by clicking Live Connect on the menu bar. (You can also launch Live<br />
Connect from the Profile action gear.)<br />
Step 2) Complete the Live Connect settings by identifying the vendor, the Live Connect Provider<br />
and appropriate Login information.<br />
Step 3) Click the Create New Reservation button.<br />
3/25/13 247
An In-Depth Look at Live Connect<br />
Step 4) Select any Profile, Passenger, Branch and Res Card information you want to use to book<br />
the reservation. Click Connect to launch the on-line booking engine.<br />
Step 5) Although still in <strong>ClientBase</strong>, you are now on-line at the Insight Vacations booking site.<br />
Complete the reservations using instructions supplied by Insight Vacations upon registration. When<br />
the reservation is confirmed, it automatically imports into the <strong>ClientBase</strong> reservation. All reservation<br />
data booked on-line is now located in the reservation fields in <strong>ClientBase</strong>.<br />
If you need help using the Insight Vacations booking site, call 1-888-680-1241.<br />
3/25/13 248
An In-Depth Look at Live Connect<br />
iTravelinsured<br />
If you are already licensed to sell iTravelInsured, your user name is the iTravelInsured Account<br />
number, and the password is Trams (lower case). If not currently licensed to sell iTravelInsured,<br />
contact iTravelInsured directly at 866-347-6673 or go to http://www.itravelinsured.net and click<br />
Registration Form. The form is a pdf/adobe file format. Print the registration form, complete it and<br />
send it to iTravelInsured. Within 24 hours, iTravelInsured will contact you with a user name and<br />
password.<br />
Set Up iTravelInsured<br />
Step 1) Once you have obtained accurate login information, you need to add this Live Connect<br />
Provider if it does not already exist into <strong>ClientBase</strong> by going to Tools|Settings|Live Connect<br />
Providers and clicking Add.<br />
Fill in the following fields:<br />
Name of the Provider: In blank field provided, type the name of the Provider.<br />
Status: Leave the default of Active. If you ever want to make it Inactive, go back in this area to turn<br />
off.<br />
URL: Type https://www.itravelinsured.com/UnAuth/Trams.aspx<br />
Travel Category: Select Insurance.<br />
Import XML from: Select HTML Source.<br />
Include Authentication: Leave blank.<br />
Click Save.<br />
Step 2) Each user can put in his own login information under Tools|My Login|Live Connect or<br />
enter one set of login information for a Live Connect provider for all agents by going to<br />
Tools|Settings|Live Connect Login. Click Add and enter the following information:<br />
Live Connect Provider: Select iTravelInsured from the drop-down list.<br />
User Name: Enter the user name provided to you when registering with iTravelInsured. If already<br />
licensed to sell iTravelInsured, the user name is the iTravelInsured Account number.<br />
Password: Enter the password provided to you when registering with iTravelInsured. If already<br />
licensed to sell iTravelInsured, the password is Trams (lower case). All other fields are left blank.<br />
3/25/13 249
An In-Depth Look at Live Connect<br />
Save.<br />
Step 3) Create a separate vendor profile in <strong>ClientBase</strong> if one does not exist for iTravelInsured. From<br />
the profile manager, retrieve the vendor profile (or create if not in database). In the General Info<br />
area, click Live Connect Providers. From here, click Add, and select provider from the drop-down<br />
list. The vendor code is left blank. Save.<br />
Travelinsured Live Connect Features<br />
CREATE NEW RESERVATION (Launch, Book & Import New Reservation)<br />
Populates booking engine with User Login data and profile data from<br />
<strong>ClientBase</strong>.<br />
Sends reservation details from booking engine’s confirmation page to<br />
<strong>ClientBase</strong> reservation record.<br />
IMPORT EXISTING RESERVATION (Imports new reservation booked outside<br />
of <strong>ClientBase</strong>)<br />
Uses confirmation number to automatically pass all reservation details from<br />
booking engine to <strong>ClientBase</strong> reservation record.<br />
Allows user to browse for reservation and upon retrieval sends reservation<br />
details from booking engine’s confimation page to <strong>ClientBase</strong> reservation<br />
record.<br />
RETRIEVE RESERVATION - Retrieves exisiting reservation previously imported<br />
via Live Connect for viewing or editing. Upon editing, imports updated reservations<br />
details.<br />
Create New iTravelinsured Reservation in Live Connect<br />
Step 1) Retrieve the desired client profile, create a new Res Card and after entering basic Res Card<br />
info, launch Live Connect by clicking Live Connect on the menu bar. (You can also launch Live<br />
3/25/13 250
An In-Depth Look at Live Connect<br />
Connect from the Profile action gear.)<br />
Step 2) Complete the Live Connect settings by identifying the vendor, the Live Connect Provider<br />
and appropriate Login information.<br />
Step 3) Click the Create New Reservation button.<br />
Step 4) Select any Profile, Passenger, Branch and Res Card information you want to use to book<br />
the reservation and click Connect to launch the on-line booking engine.<br />
Step 5) The system prompts with the reservation records included in this Res Card. Click each<br />
3/25/13 251
An In-Depth Look at Live Connect<br />
reservation to insure. Again, this step is designed to save time during the insurance booking<br />
process, as less fields need to be completed manually. Any missing or incomplete data can be<br />
updated on the website confirming the insurance booking. Click Connect.<br />
Step 6) Although you are still in <strong>ClientBase</strong>, you are now on-line at the Live Connect Provider’s<br />
booking site running the on-line booking engine through a <strong>ClientBase</strong> window. Complete the<br />
reservation and when the reservation is confirmed, click Import Reservation from the confirmation<br />
page.<br />
Manulife Global Travel Insurance<br />
All agencies wishing to use Manulife Global Travel Insurance Live Connect should contact<br />
ctssupport@manulife.com.<br />
Set Up Manulife Global Travel Insurance<br />
Upon receiving a User ID and Account Number for your agency, take the following steps to setup<br />
<strong>ClientBase</strong> for Live Connect.<br />
Step 1) Once you have obtained accurate login information, you need to add this Live Connect<br />
Provider if it does not already exist into <strong>ClientBase</strong> by going to Tools|Settings|Live Connect<br />
3/25/13 252
An In-Depth Look at Live Connect<br />
Providers and clicking Add.<br />
Provider Name: Manulife Global Travel Insurance.<br />
Status: Active.<br />
URL: https://www.igoinsured.com/travelweb/login.aspxtwa=LIVECON<br />
Travel Category: Insurance.<br />
Import XML from: HTML Source.<br />
Include Authentication, etc.: Not applicable.<br />
Step 2) Each user can put in his own login information under Tools|My Login|Live Connect or<br />
enter one set of login information for a Live Connect provider for all agents by going to<br />
Tools|Settings|Live Connect Login. Click Add and enter the following information:<br />
Live Connect Provider: Select Manulife Global Travel Insurance from the drop-down list.<br />
User Name, Password and Agency Code Enter the necessary fields based upon the login<br />
information provided to you when you contacted provider (the Agency # is not applicable).<br />
Step 3) Create a separate vendor profile in <strong>ClientBase</strong> if one does not exist for Manulife Global<br />
Travel Insurance. From the profile manager, retrieve the vendor profile (or create if not in database).<br />
In the General Info area, click Live Connect Providers. From here, click Add, and select provider<br />
from the drop-down list. The vendor code is left blank. Save.<br />
3/25/13 253
An In-Depth Look at Live Connect<br />
Manulife Global Travel Insurance Features<br />
Manulife Global Travel Insurance supports the following Live Connect features:<br />
CREATE NEW RESERVATION (Launch, Book & Import New Reservation)<br />
Populates booking engine with User Login data from <strong>ClientBase</strong>.<br />
Populates booking engine with profile data from <strong>ClientBase</strong>.<br />
Sends reservation details from booking engine’s confirmation page to<br />
<strong>ClientBase</strong> reservation record.<br />
IMPORT EXISTING RESERVATION (Imports new reservation booked outside<br />
of <strong>ClientBase</strong>)<br />
Uses confirmation number to automatically pass all reservation details from<br />
booking engine to <strong>ClientBase</strong> reservation record.<br />
Allows user to browse for reservation and upon retrieval sends reservation<br />
details from booking engine’s confimation page to <strong>ClientBase</strong> reservation<br />
record.<br />
RETRIEVE RESERVATION - Retrieves exisiting reservation previously imported<br />
via Live Connect for viewing or editing. Upon editing, imports updated reservations<br />
details.<br />
Create New <strong>Manual</strong> Global Travel Insurance Reservation<br />
Step 1) Retrieve the desired client profile, create a new Res Card and after entering basic Res Card<br />
info, launch Live Connect by clicking Live Connect on the menu bar. (You can also launch Live<br />
Connect from the Profile action gear.)<br />
Step 2) Complete the Live Connect settings by identifying the vendor, the Live Connect Provider<br />
and appropriate Login information.<br />
3/25/13 254
An In-Depth Look at Live Connect<br />
Step 3) Click the Create New Reservation button.<br />
Step 4) Select any Profile, Passenger, Branch and Res Card information you want to use to book<br />
the reservation and click Connect to launch the on-line booking engine.<br />
Step 5) The system prompts with the reservation records included in this Res Card. Click each<br />
reservation to insure. Again, this step is designed to save time during the insurance booking<br />
process, as less fields need to be completed manually. Any missing or incomplete data can be<br />
updated on the website confirming the insurance booking. Click Connect.<br />
Step 6) Although you are still in <strong>ClientBase</strong>, you are now on-line at the Live Connect Provider’s<br />
booking site running the on-line booking engine through a <strong>ClientBase</strong> window. Complete the<br />
reservation and when the reservation is confirmed, click Import Reservation from the confirmation<br />
3/25/13 255
An In-Depth Look at Live Connect<br />
page.<br />
All reservation data booked on-line is now located in the reservation fields in <strong>ClientBase</strong>. Need help<br />
booking in Manulife Global Travel Insurance Call Manulife Global Travel Insurance at 1-866-298-<br />
2722.<br />
MHRoss.com<br />
To use Live Connect to purchase MHRoss.com insurance, you must be an authorized MHRoss.com<br />
representative and be assigned a User Login, Password, and Account Number for use. To become<br />
an authorized agency, and/or to obtain a User Login, Password, and Account number, call, Sheri A.<br />
Machat at 866-453-9826 Ext 1.<br />
Set Up MHRoss.com<br />
Upon receiving a User ID and password for each agent in your office, take the following steps to<br />
setup <strong>ClientBase</strong> for Live Connect.<br />
Step 1) Once you have obtained accurate login information, you need to add this Live Connect<br />
Provider into <strong>ClientBase</strong> by going to Tools|Settings|Live Connect Providers and clicking Add.<br />
Provider Name: MHRoss.com<br />
Status: Active.<br />
URL: https://advantage.mhross.com/tramsaffiliate.phpapp=newenrl<br />
Travel Category: Insurance.<br />
Import XML from: HTML Source.<br />
Include Authentication, etc.: Not applicable.<br />
3/25/13 256
An In-Depth Look at Live Connect<br />
Step 2) Each user can put in his own login information under Tools|My Login|Live Connect or enter<br />
one set of login information for a Live Connect provider for all agents by going to Tools|Settings|Live<br />
Connect Login. Click Add and enter the following information:<br />
Live Connect Provider: Select MHRoss.com from the drop-down.<br />
User Name, Password and Account Number: Enter the necessary fields based upon the login<br />
information provided to you when you contacted provider (the Agency Code is not applicable). Click<br />
OK.<br />
Step 3) Retrieve the MHRoss.com vendor profile from the Profile Manager (or create one if not in<br />
your database). From the General Info link, click the Live Connect Providers button. Click Add, and<br />
select the MHRoss.com booking engine from the drop-down list. The vendor code is blank. In the<br />
Travel Category profile field, select Insurance from the drop-down menu. Save.<br />
MHRoss.com Features<br />
MHRoss.com supports the following Live Connect features:<br />
CREATE NEW RESERVATION (Launch, Book & Import New Reservation)<br />
Populates booking engine with User Login data from <strong>ClientBase</strong>.<br />
Populates booking engine with profile data from <strong>ClientBase</strong>.<br />
Sends reservation details from booking engine’s confirmation page to<br />
<strong>ClientBase</strong> reservation record.<br />
IMPORT EXISTING RESERVATION (Imports new reservation booked outside<br />
of <strong>ClientBase</strong>)<br />
Uses confirmation number to automatically pass all reservation details from<br />
booking engine to <strong>ClientBase</strong> reservation record.<br />
Allows user to browse for reservation and upon retrieval sends reservation<br />
details from booking engine’s confimation page to <strong>ClientBase</strong> reservation<br />
record.<br />
RETRIEVE RESERVATION - Retrieves exisiting reservation previously imported<br />
via Live Connect for viewing or editing. Upon editing, imports updated reservations<br />
details.<br />
Create New Global Alert Reservation<br />
Step 1) Retrieve the desired client profile, create a new Res Card and after entering basic Res Card<br />
info, launch Live Connect by clicking Live Connect on the menu bar. (You can also launch Live<br />
3/25/13 257
An In-Depth Look at Live Connect<br />
Connect from the Profile action gear.)<br />
Step 2) Complete the Live Connect settings by identifying the vendor, the Live Connect Provider<br />
and appropriate Login information.<br />
Step 3) Click the Create New Reservation button.<br />
Step 4) Select any customer information to use to book the reservation. This data is automatically<br />
passed to MHRoss.com and saves time during the booking process, as less fields need to be<br />
completed manually. Click Connect.<br />
3/25/13 258
An In-Depth Look at Live Connect<br />
Step 5) The system prompts with the reservation records included in this Res Card. Check off each<br />
reservation to insure. Again, this step is designed to save time during the insurance booking<br />
process. Any missing or incomplete data can be updated on the HMRoss.com website confirming<br />
the insurance booking. Click Connect.<br />
Step 6) Although still in <strong>ClientBase</strong>, you are now on-line at the booking site. Complete the<br />
reservations and when the reservation is confirmed, click Import Reservation.<br />
All reservation data booked on-line is now located in the reservation fields in <strong>ClientBase</strong>.<br />
Need technical help Contact Damian Murtha, MHross.com at 800-888-0432.<br />
MLT WorldAgent Direct<br />
WorldAgent Direct includes the booking sites for Continental Airlines Vacations, Worry-Free<br />
Vacations (also known as MLT Vacations) and Delta Vacations. If not currently registered to book<br />
WorldAgent Direct on-line, go to www.worldagentdirect.com to register and obtain a WorldAgent<br />
Direct user name and password.<br />
Set Up MLT WorldAgent Direct<br />
Step 1) Once you have obtained accurate login information, you need to add this Live Connect<br />
3/25/13 259
An In-Depth Look at Live Connect<br />
Provider into <strong>ClientBase</strong> by going to Tools|Settings|Live Connect Providers and clicking Add.<br />
Fill in the following fields:<br />
Name of the Provider: Enter MLT WorldAgent Direct.<br />
URL: Type https://www.worldagentdirect.com/trams.do<br />
Travel Category: Select Tour.<br />
Import XML from: Select HTML Source.<br />
Include Authentication: Leave blank.<br />
Click Save.<br />
Step 2) Each user can put in his own login information under Tools|My Login|Live Connect or<br />
enter one set of login information for a Live Connect provider for all agents by going to<br />
Tools|Settings|Live Connect Login. Click Add and enter the following information:<br />
Step 3) Next, setup three vendor profiles - one for Worry-Free Vacations, one for United Vacations,<br />
and one for Delta Vacations. From the profile manager, retrieve the vendor profile for Worry-Free<br />
Vacations (or create the vendor profile if it is does not exist). From the General Info link, click Live<br />
Connect Providers. From here, click Add, then select the WorldAgent Direct booking engine from<br />
the drop-down list. The vendor code is MLT, and click OK.<br />
Next, retrieve the vendor profile for United Vacations. From the General Info Tab, click Live Connect<br />
Providers. From here, click Add, then select the WorldAgent Direct booking engine from the dropdown<br />
list. The vendor code is UAV. Click OK.<br />
Finally, retrieve the vendor profile for Delta Vacations. From the General Info Tab, click Live<br />
Connect Providers. From here, click Add, then select the WorldAgent Direct booking engine from<br />
the drop-down list. The vendor code is NWV. Click OK.<br />
3/25/13 260
An In-Depth Look at Live Connect<br />
MLT WorldAgent Direct Live Connect Features<br />
MLT WorldAgent supports the following Live Connect Features:<br />
CREATE NEW RESERVATION (Launch, Book & Import New Reservation)<br />
Populates booking engine with User Login data from <strong>ClientBase</strong>.<br />
Populates booking engine with profile data from <strong>ClientBase</strong>.<br />
Sends reservation details from booking engine’s confirmation page to<br />
<strong>ClientBase</strong> reservation record.<br />
IMPORT EXISTING RESERVATION (Imports new reservation booked outside<br />
of <strong>ClientBase</strong>)<br />
Uses confirmation number to automatically pass all reservation details from<br />
booking engine to <strong>ClientBase</strong> reservation record.<br />
Allows user to browse for reservation and upon retrieval sends reservation<br />
details from booking engine’s confimation page to <strong>ClientBase</strong> reservation<br />
record.<br />
RETRIEVE RESERVATION - Retrieves exisiting reservation previously imported<br />
via Live Connect for viewing or editing. Upon editing, imports updated reservations<br />
details.<br />
Create New MLT WorldAgent Reservation in Live Connect<br />
Step 1) Retrieve the desired client profile, create a new Res Card and after entering basic Res Card<br />
info, launch Live Connect by clicking Live Connect on the menu bar. (You can also launch Live<br />
Connect from the Profile action gear.)<br />
Step 2) Complete the Live Connect settings by identifying the vendor, the Live Connect Provider<br />
and appropriate Login information.<br />
3/25/13 261
An In-Depth Look at Live Connect<br />
Step 3) Click the Create New Reservation button.<br />
Step 4) Select any Profile, Passenger, Branch and Res Card information you want to use to book<br />
the reservation. Click Connect to launch the on-line booking engine.<br />
Step 5) Although still in <strong>ClientBase</strong>, you are now on-line at the MLT booking site. Complete the<br />
reservations using instructions supplied by MLT upon registration. When the reservation is<br />
confirmed, it automatically imports into the <strong>ClientBase</strong> reservation. All reservation data booked online<br />
is now located in the reservation fields in <strong>ClientBase</strong>.<br />
Import Reservation<br />
Import Existing WorldAgent Res Made Outside of CB<br />
Step 1) Create a new Res Card or open an existing one and launch Live Connect by clicking the<br />
Live Connect icon.<br />
Step 2) Complete the Live Connect settings by identifying the vendor, the Live Connect Provider and<br />
appropriate Login information if not auto-populated.<br />
Step 3) Do not enter a confirmation number for the reservation you want to import, but find the area<br />
3/25/13 262
An In-Depth Look at Live Connect<br />
to retrieve the reservation. Once the reservations details are showing, click Import Existing<br />
Reservation.<br />
3/25/13 263
An In-Depth Look at Live Connect<br />
3/25/13 264
Pleasant Holidays<br />
If you are not currently registered to book Pleasant Holidays on-line, go to www.pleasantagent.com<br />
and click Create a Log In. Upon registering as a new user, you are provided a User Name and<br />
Password. Once you have submitted your request, Pleasant Holidays will activate your log on within<br />
one business day.<br />
NOTE - Hawaii World: If you connect via the Pleasant connection and sign on to<br />
Pleasantagent.com you can retrieve the Hawaii World bookings that you made via the Hawaii World<br />
reservation department to bring into <strong>ClientBase</strong>.<br />
Set Up Pleasant Holidays<br />
Upon receiving a User Name and Password for each agent in your office, take the following steps<br />
to setup <strong>ClientBase</strong> for Live Connect.<br />
Step 1) Once you have obtained accurate login information, you need to add this Live Connect<br />
Provider if it does not already exist into <strong>ClientBase</strong> by going to Tools|Settings|Live Connect<br />
Providers and clicking Add.<br />
Fill in the following fields:<br />
Name of the Provider: In blank field provided, type the name of the Provider.<br />
Status: Leave the default of Active. If you ever want to make it Inactive, go back in this area to turn<br />
off.<br />
URL: Type https://www.pleasantholidays.com/PleasantHolidaysWeb/TRAMSEntry.do<br />
Travel Category: Select Tour.<br />
Import XML from: Select HTML Source.<br />
Include Authentication: Leave blank.<br />
Click Save.<br />
Step 2) Each user can put in his own login information under Tools|My Login|Live Connect or<br />
enter one set of login information for a Live Connect provider for all agents by going to<br />
3/25/13 265
An In-Depth Look at Live Connect<br />
Tools|Settings|Live Connect Login. Click Add and enter the following information:<br />
Live Connect Provider: Select Pleasant Holiday from the drop-down.<br />
User Name, Password and Account Number: Enter the User ID and password data provided<br />
when you contacted provider.<br />
Step 3) Create a separate vendor profile in <strong>ClientBase</strong> if one does not exist for Pleasant Holidays.<br />
From the profile manager, retrieve the vendor profile (or create if not in database). In the General<br />
Info area, click Live Connect Providers. From here, click Add, and select provider from the dropdown<br />
list. The vendor code is left blank. Save. Note: Cruise Bookings are not supported by<br />
Pleasant Holidays booking engine and hence not eligible for Live Connect.<br />
Pleasant Holidays Live Connect Features<br />
CREATE NEW RESERVATION (Launch, Book & Import New Reservation)<br />
Populates booking engine with User Login data and profile data from<br />
<strong>ClientBase</strong>.<br />
Sends reservation details from booking engine’s confirmation page to<br />
<strong>ClientBase</strong> reservation record.<br />
IMPORT EXISTING RESERVATION (Imports new reservation booked outside<br />
of <strong>ClientBase</strong>)<br />
Uses confirmation number to automatically pass all reservation details from<br />
booking engine to <strong>ClientBase</strong> reservation record.<br />
Allows user to browse for reservation and upon retrieval sends reservation<br />
details from booking engine’s confimation page to <strong>ClientBase</strong> reservation<br />
record.<br />
RETRIEVE RESERVATION - Retrieves exisiting reservation previously imported<br />
via Live Connect for viewing or editing. Upon editing, imports updated reservations<br />
details.<br />
Create New Pleasant Reservation in Live Connect<br />
Step 1) Retrieve the desired client profile, create a new Res Card and after entering basic Res Card<br />
info, launch Live Connect by clicking Live Connect on the menu bar. (You can also launch Live<br />
3/25/13 266
An In-Depth Look at Live Connect<br />
Connect from the Profile action gear.)<br />
Step 2) Complete the Live Connect settings by identifying the vendor, the Live Connect Provider<br />
and appropriate Login information.<br />
Step 3) Click the Create New Reservation button.<br />
Step 4) Select any Profile, Passenger, Branch and Res Card information you want to use to book<br />
the reservation and click Connect to launch the on-line booking engine.<br />
Step 5) Although you are still in <strong>ClientBase</strong>, you are now on-line at the Live Connect Provider’s<br />
3/25/13 267
An In-Depth Look at Live Connect<br />
booking site running the on-line booking engine through a <strong>ClientBase</strong> window.<br />
Complete the reservation and when the reservation is confirmed, click Import Reservation from the<br />
confirmation page. All reservation data booked on-line is now located in the reservation fields in<br />
<strong>ClientBase</strong>.<br />
Import Existing Pleasant Reservation Made Outside of CB<br />
Step 1) Create a new Res Card or open an existing one and launch Live Connect by clicking the<br />
Live Connect icon.<br />
Step 2) Complete the Live Connect settings by identifying the vendor, the Live Connect Provider and<br />
appropriate Login information if not autopopulated.<br />
Step 3) Enter the confirmation number for the reservation you want to import and click Import<br />
Existing Reservation.<br />
Step 4) Depending on the Live Connect Provider, the system either locates the reservation using<br />
the confirmation number and automatically import all reservation details, or takes you to the Live<br />
Connect Provider's site for you to use its Retrieve Reservation feature to locate the reservation.<br />
Upon displaying the existing reservation, click Import Reservation and the reservation details are<br />
imported into the <strong>ClientBase</strong> Res Card.<br />
Retrieve an Existing Pleasant Res to Edit/Cancel<br />
To edit or cancel an existing reservation using Live Connect, follow these steps:<br />
Step 1) Launch Live Connect from inside the Live Connect reservation to edit or cancel. Click Live<br />
Connect.<br />
Step 2) Confirm all Live Connect settings including confirmation number, and click Retrieve<br />
Reservation.<br />
Step 3) Live Connect launches the booking engine site. Edit or cancel the reservation using<br />
instructions supplied by the booking engine, and click Import Reservation. All reservation data<br />
edited or cancelled online is now located in the reservation fields in <strong>ClientBase</strong>.<br />
Hawaii World Bookings<br />
If you connect via the Pleasant connection and sign on to Pleasantagent.com, you can retrieve the<br />
Hawaii World bookings that you made via the Hawaii World reservation department to bring into<br />
<strong>ClientBase</strong>.<br />
3/25/13 268
An In-Depth Look at Live Connect<br />
Polar <strong>Online</strong><br />
If you are not currently registered to use POLAR <strong>Online</strong>, go to http://www.princess.com, and click<br />
on the Onesource link and Register Your Agency in the footer of the page. Upon registering as a<br />
new user, login credentials are provided. After receiving this information for each agent, take the<br />
following steps.<br />
Set Up POLAR <strong>Online</strong><br />
Step 1) Once you have obtained accurate login information, you need to add this Live Connect<br />
Provider if it does not already exist into <strong>ClientBase</strong> by going to Tools|Settings|Live Connect<br />
Providers and clicking Add.<br />
Fill in the following fields:<br />
Name of the Provider: In blank field provided, type the name of the Provider.<br />
Status: Leave the default of Active. If you ever want to make it Inactive, go back in this area to turn<br />
off.<br />
URL: Type https://book.princess.com/BookingSystem/<br />
multiBrandLogin.jspcompany=PC§ion=presSignOn<br />
Travel Category: Select Cruise.<br />
Import XML from: Select HTML Source.<br />
Include Authentication: Leave blank.<br />
Click Save.<br />
Step 2) You do not have to set up agent logins for use with POLAR <strong>Online</strong> (see login information<br />
below), but you do need to create a vendor profile in <strong>ClientBase</strong> if one does not exist. From the<br />
Profile Manager, retrieve the Princess Cruise Lines vendor profile (or create if not in database).<br />
From the General Info area, click Live Connect Providers. From here click Add, then select POLAR<br />
<strong>Online</strong> from the drop-down list. The vendor code is blank. Save.<br />
3/25/13 269
An In-Depth Look at Live Connect<br />
Polar <strong>Online</strong> Live Connect<br />
CREATE NEW RESERVATION (Launch, Book & Import New Reservation)<br />
Populates booking engine with User Login data and profile data from<br />
<strong>ClientBase</strong>.<br />
Sends reservation details from booking engine’s confirmation page to<br />
<strong>ClientBase</strong> reservation record.<br />
IMPORT EXISTING RESERVATION (Imports new reservation booked outside<br />
of <strong>ClientBase</strong>)<br />
Uses confirmation number to automatically pass all reservation details from<br />
booking engine to <strong>ClientBase</strong> reservation record.<br />
Allows user to browse for reservation and upon retrieval sends reservation<br />
details from booking engine’s confimation page to <strong>ClientBase</strong> reservation<br />
record.<br />
RETRIEVE RESERVATION - Retrieves exisiting reservation previously imported<br />
via Live Connect for viewing or editing. Upon editing, imports updated reservations<br />
details.<br />
Create New Polar Reservation in Live Connect<br />
Step 1) Retrieve the desired client profile, create a new Res Card and after entering basic Res Card<br />
info, launch Live Connect by clicking Live Connect on the menu bar. (You can also launch Live<br />
Connect from the Profile action gear.)<br />
Step 2) Select Princess Cruise Lines as the Vendor and Polar <strong>Online</strong> from the drop-down menu by<br />
Connect To. (You do not need to enter any login information as this is entered at the POLAR <strong>Online</strong><br />
Web site.<br />
Step 3) Click the Create New Reservation button.<br />
3/25/13 270
An In-Depth Look at Live Connect<br />
Step 4) Select any Profile, Passenger, Branch and Res Card information you want to use to book<br />
the reservation. This data is NOT passed to POLAR <strong>Online</strong>, but you are able to view it at the top of<br />
your booking screen and can highlight it, copy, and paste it into the booking fields to save you time<br />
during the booking process. Click Connect to launch the on-line booking engine.<br />
Step 5) Although you are still in <strong>ClientBase</strong>, you are now on-line at the Live Connect Provider’s<br />
booking site running the on-line booking engine through a <strong>ClientBase</strong> window.<br />
Complete the reservation and when the reservation is confirmed, click Import Reservation from the<br />
confirmation page. All reservation data booked on-line is now located in the reservation fields in<br />
<strong>ClientBase</strong>.<br />
Import Existing Polar Reservation Made Outside of <strong>ClientBase</strong><br />
Step 1) Create a new Res Card or open an existing one and launch Live Connect by clicking the<br />
Live Connect icon.<br />
Step 2) Complete the Live Connect settings by identifying the vendor, the Live Connect Provider<br />
and appropriate Login information if not autopopulated.<br />
Step 3) Do not enter a confirmation number for the reservation but browse for the reservation you<br />
want to import and click Import Existing Reservation.<br />
3/25/13 271
An In-Depth Look at Live Connect<br />
Retrieve an Existing Polar Reservation for Editing or Cancelling<br />
To edit or cancel an existing reservation using Live Connect, follow these steps:<br />
Step 1) Launch Live Connect from inside the Live Connect reservation to edit or cancel. Click Live<br />
Connect.<br />
Step 2) Confirm all Live Connect settings including confirmation number, and click Retrieve<br />
Reservation.<br />
Step 3) Live Connect launches the booking engine site. Edit or cancel the reservation using<br />
instructions supplied by the booking engine, and click Import Reservation. All reservation data<br />
edited or cancelled online is now located in the reservation fields in <strong>ClientBase</strong>.<br />
PrimeSport<br />
To use Live Connect to purchase PrimeSport event tickets and packages, register with PrimeSport<br />
via their web site at www.primesport.com. Use the Travel Agent Login link (located near the top<br />
right corner of the PrimeSport.com home page) to set up your account for the first time and create<br />
your Login and Password. There are no fees to register or use the PrimeSport booking engine.<br />
Set Up PrimeSport<br />
Upon receiving a User Name and Password for each agent in your office, take the following steps to<br />
setup <strong>ClientBase</strong> for Live Connect.<br />
Step 1) Once you have obtained accurate login information, you need to add this Live Connect<br />
Provider if it does not already exist into <strong>ClientBase</strong> by going to Tools|Settings|Live Connect<br />
Providers and clicking Add.<br />
Fill in the following fields:<br />
Name of the Provider: In blank field provided, type the name of the Provider.<br />
Status: Leave the default of Active. If you ever want to make it Inactive, go back in this area to turn<br />
off.<br />
URL: Type http://www.primesport.com/iprotour/Trams.asp<br />
Travel Category: Select Tour.<br />
Import XML from: Select HTML Source.<br />
3/25/13 272
An In-Depth Look at Live Connect<br />
Include Authentication: Leave blank.<br />
Click Save.<br />
Step 2) Each user can put in his own login information under Tools|My Login|Live Connect or<br />
enter one set of login information for a Live Connect provider for all agents by going to<br />
Tools|Settings|Live Connect Login. Click Add and enter the following information:<br />
Live Connect Provider: Select PrimeSport from the drop-down list.<br />
User Name, Password and Account Number: Enter the email address you used to register as<br />
the User Name and enter password. Account Number is left blank.<br />
Step 3) Create a vendor profile in <strong>ClientBase</strong> for PrimeSport if one does not exist. From the profile<br />
manager, retrieve the PrimeSport vendor profile (or create if it is not in database). From the General<br />
Info tab, click Live Connect Providers. From here, click Add, then select PrimeSport from the dropdown<br />
list. The vendor code is left blank. Save.<br />
PrimeSport Live Connect Features<br />
CREATE NEW RESERVATION (Launch, Book & Import New Reservation)<br />
Populates booking engine with User Login data and profile data from<br />
<strong>ClientBase</strong>.<br />
Sends reservation details from booking engine’s confirmation page to<br />
<strong>ClientBase</strong> reservation record.<br />
IMPORT EXISTING RESERVATION (Imports new reservation booked outside<br />
of <strong>ClientBase</strong>)<br />
Uses confirmation number to automatically pass all reservation details from<br />
booking engine to <strong>ClientBase</strong> reservation record.<br />
Allows user to browse for reservation and upon retrieval sends reservation<br />
details from booking engine’s confimation page to <strong>ClientBase</strong> reservation<br />
record.<br />
RETRIEVE RESERVATION - Retrieves exisiting reservation previously imported<br />
via Live Connect for viewing or editing. Upon editing, imports updated reservations<br />
details.<br />
Create New PrimeSport Reservation in Live Connect<br />
Step 1) Retrieve the desired client profile, create a new Res Card and after entering basic Res Card<br />
info, launch Live Connect by clicking Live Connect on the menu bar. (You can also launch Live<br />
3/25/13 273
An In-Depth Look at Live Connect<br />
Connect from the Profile action gear.)<br />
Step 2) Complete the Live Connect settings by identifying the vendor, the Live Connect Provider<br />
and appropriate Login information. (If you have set up your logins in Tools|MyLogin|Live Connect,<br />
login information will auto-populate.)<br />
Step 3) Click the Create New Reservation button.<br />
Step 4) Select any Profile, Passenger, Branch and Res Card information you want to use to book<br />
the reservation and click Connect to launch the on-line booking engine.<br />
3/25/13 274
An In-Depth Look at Live Connect<br />
Step 5) Although you are still in <strong>ClientBase</strong>, you are now on-line at the Live Connect Provider’s<br />
booking site running the on-line booking engine through a <strong>ClientBase</strong> window. Complete the<br />
reservation and when the reservation is confirmed, click Import Reservation from the confirmation<br />
page.<br />
All reservation data booked on-line is now located in the reservation fields in <strong>ClientBase</strong>.<br />
RBC Insurance<br />
To use Live Connect to sell RBC Travel Insurance, you must be a RBC Insurance appointed agency<br />
and establish user logins and passwords for selling RBC Insurance on-line. If not currently licensed<br />
to sell RBC Travel Insurance, contact RBC Travel Insurance Company directly at 1-800-387-4357.<br />
Set Up RBC Insurance<br />
Upon receiving an account number, take the following steps to setup <strong>ClientBase</strong> for Live Connect.<br />
Step 1) Once you have obtained accurate login information, you need to add this Live Connect<br />
Provider if it does not already exist into <strong>ClientBase</strong> by going to Tools|Settings|Live Connect<br />
Providers and clicking Add.<br />
Fill in the following fields:<br />
Provider Name: Enter RBC Insurance.<br />
3/25/13 275
An In-Depth Look at Live Connect<br />
URL: https://www3.worldprotect.com/cgi-bin/rbaccess/rbcgilf00<br />
Travel Category: Insurance<br />
Import XML from: N/A<br />
Step 2) Each user can put in his own login information under Tools|My Login|Live Connect or<br />
enter one set of login information for a Live Connect provider for all agents by going to<br />
Tools|Settings|Live Connect Login. Click Add and enter the following information:<br />
Live Connect Provider: Select the appropriate RBC Insurance Live Connect provider to connect<br />
to its booking engine.<br />
Account Number: Enter the account number.<br />
Step 3) Create a vendor profile in <strong>ClientBase</strong> for RBC Insurance if one does not exist. From the<br />
profile manager, retrieve the vendor profile (or create if it is not in database). From the General Info<br />
area, click Live Connect Providers. From here, click Add, then select provider from the drop-down<br />
list. The vendor code is left blank. Save.<br />
RBC Insurance Features<br />
RBC Insurance supports the following Live Connect Features:<br />
CREATE NEW RESERVATION (Launch, Book & Import New Reservation)<br />
Populates booking engine with User Login data from <strong>ClientBase</strong>.<br />
Populates booking engine with profile data from <strong>ClientBase</strong>.<br />
Sends reservation details from booking engine’s confirmation page to<br />
<strong>ClientBase</strong> reservation record.<br />
IMPORT EXISTING RESERVATION (Imports new reservation booked outside<br />
of <strong>ClientBase</strong>)<br />
Uses confirmation number to automatically pass all reservation details from<br />
booking engine to <strong>ClientBase</strong> reservation record.<br />
Allows user to browse for reservation and upon retrieval sends reservation<br />
details from booking engine’s confimation page to <strong>ClientBase</strong> reservation<br />
record.<br />
RETRIEVE RESERVATION - Retrieves exisiting reservation previously imported<br />
via Live Connect for viewing or editing. Upon editing, imports updated reservations<br />
details.<br />
Create New RBC Insurance Reservation<br />
Step 1) Retrieve the desired client profile, create a new Res Card and after entering basic Res Card<br />
info, launch Live Connect by clicking Live Connect on the menu bar. (You can also launch Live<br />
3/25/13 276
An In-Depth Look at Live Connect<br />
Connect from the Profile action gear.)<br />
Step 2) Complete the Live Connect settings by identifying the vendor, the Live Connect Provider<br />
and appropriate Login information. (If you have set up your logins in Tools|MyLogin|Live Connect,<br />
login information will auto-populate.)<br />
Step 3) Click the Create New Reservation button.<br />
Step 4) Select any Profile, Passenger, Branch and Res Card information you want to use to book<br />
the reservation and click Connect to launch the on-line booking engine.<br />
Step 5) The system prompts with the reservation records included in this Res Card. Click each<br />
3/25/13 277
An In-Depth Look at Live Connect<br />
reservation to insure. Again, this step is designed to save time during the insurance booking<br />
process, as less fields need to be completed manually. Any missing or incomplete data can be<br />
updated on the website confirming the insurance booking. Click Connect.<br />
Step 6) Although you are still in <strong>ClientBase</strong>, you are now on-line at the Live Connect Provider’s<br />
booking site running the on-line booking engine through a <strong>ClientBase</strong> window. Complete the<br />
reservation and when the reservation is confirmed, click Import Reservation from the confirmation<br />
page.<br />
Regent Seven Seas - Partner Access<br />
If you are not currently registered to book Regent Seven Seas - Partner Access on-line, go to the<br />
Travel Agent Center at www.rssc.com, sign in, and click Book a Cruise with Partner Access.<br />
Complete and submit the Partner Access Service Request Form. Your log-in information will be e-<br />
mailed to you.<br />
Set Up Regent Seven Seas - Partner Access Live Connect<br />
Upon receiving login information for each agent in your office, take the following steps to setup<br />
<strong>ClientBase</strong> for Live Connect.<br />
Step 1) Create a Live Connect Provider for Regent Seven Seas if none exists by going to<br />
Tools|Settings|Live Connect Providers and clicking Add. (It’s a good idea to check if the URL is<br />
correct.)<br />
Provider Name: Enter Regent Seven Seas - Partner Access.<br />
3/25/13 278
URL: Enter https://rssc.com/agent/webservices/tramslivehandler.ashx<br />
Travel Category: Enter Cruise from the drop-down menu.<br />
Import XML from: Enter HTML Source.<br />
An In-Depth Look at Live Connect<br />
Step 2) Users can set up their own logins by going to Tools|MyLogin|Live Connect and clicking<br />
Add.<br />
Live Connect Provider: Select Regent Seven Seas - Partner Access to connect to its booking<br />
engine.<br />
User Name, Password: Enter the necessary fields based upon the login information provided to<br />
you when you contacted Regent Seven Seas - Partner Access.<br />
Account Number: Not applicable<br />
Save.<br />
Step 3) Create a vendor profile in <strong>ClientBase</strong> if one does not exist. From the profile manager,<br />
retrieve the Regent Seven Seas vendor profile (or create if it is not in database). From the General<br />
Info tab, click Live Connect Providers. From here, click Add, and select Regent Seven Seas -<br />
Partner Access from the drop-down list. The vendor code is left blank. Click OK.<br />
Regent Seven Seas - Partner Access Features<br />
Regent Seven Seas - Partner Access supports following Live Connect features:<br />
CREATE NEW RESERVATION (Launch, Book & Import New Reservation)<br />
Populates booking engine with User Login data from <strong>ClientBase</strong>.<br />
Populates booking engine with profile data from <strong>ClientBase</strong>.<br />
Sends reservation details from booking engine’s confirmation page to<br />
<strong>ClientBase</strong> reservation record.<br />
IMPORT EXISTING RESERVATION (Imports new reservation booked outside<br />
of <strong>ClientBase</strong>)<br />
Uses confirmation number to automatically pass all reservation details from<br />
booking engine to <strong>ClientBase</strong> reservation record.<br />
Allows user to browse for reservation and upon retrieval sends reservation<br />
details from booking engine’s confirmation page to <strong>ClientBase</strong> reservation<br />
record.<br />
RETRIEVE RESERVATION - Retrieves existing reservation previously imported via<br />
Live Connect for viewing or editing. Upon editing, imports updated reservations<br />
details.<br />
Create New Regent Seven Seas - Partner Access Reservation<br />
Step 1) Retrieve the desired client profile, create a new Res Card and after entering basic Res Card<br />
info, launch Live Connect by clicking Live Connect on the menu bar. (You can also launch Live<br />
3/25/13 279
An In-Depth Look at Live Connect<br />
Connect from the Profile action gear.)<br />
Step 2) Select Regent Seven Seas - Partner Access from the drop-down menu by Connect To (if<br />
not defaulted), and then click Create New Reservations.<br />
Step 3) Select any Profile, Passenger, Branch and Res Card information you want to use to book<br />
the reservation. This data is NOT passed to booking site, but you are able to view it at the top left<br />
of your booking screen and can highlight it, copy, and paste it into the booking fields to save you time<br />
during the booking process. Click Connect to launch the on-line booking engine.<br />
Step 4) Although still in <strong>ClientBase</strong>, you are now on-line at the Regent booking site. Complete the<br />
3/25/13 280
An In-Depth Look at Live Connect<br />
reservations using instructions supplied by Regent upon registration. When the reservation is<br />
confirmed, it automatically imports into the <strong>ClientBase</strong> reservation. All reservation data booked online<br />
is now located in the reservation fields in <strong>ClientBase</strong>.<br />
Retrieve an Existing Reservation for Editing or Cancelling<br />
To edit or cancel an existing reservation using Live Connect, follow these steps:<br />
Step 1) Launch Live Connect from inside the reservation to edit or cancel in <strong>ClientBase</strong>.<br />
Step 2) A dialog box appears. Click Retrieve Reservation.<br />
Step 3) Live Connect launches the booking engine site. Edit or cancel the reservation using<br />
instructions supplied by the booking engine, and click Import Reservation. All reservation data<br />
edited or cancelled online is now located in the reservation fields in <strong>ClientBase</strong>.<br />
3/25/13 281
An In-Depth Look at Live Connect<br />
3/25/13 282
Sabre Cruises<br />
To use Sabre Cruises, complete the following directions:<br />
1) Every <strong>ClientBase</strong> customer is a Sabre customer and has a PCC. If you know your PCC, go to<br />
Step 2. If you do not know your PCC, email implementation@trams.com to obtain it.<br />
2) Once you know your Sabre PCC, contact leisure.epr@sabre.com to get a temporary password.<br />
You will be able to change the temporary password once you log in the first time at<br />
www.sabre.cruises.com. If additional users are needed send a reply via email to<br />
leisure.epr@sabrecom when you receive your temporary password, or go to<br />
www.sabrecruises.com|Register Now|Request for additional users.<br />
3) IMPORTANT: You need to contact each cruise vendor you are using to inform them that you will<br />
be using Sabre Cruises. Click here for a list of cruise vendors and contact phone numbers.<br />
4) If a passcode reset/reactivation is needed (because you are locked out), contact<br />
leisure.epr@sabre.com or call 800-413-5771.<br />
5) Now set up <strong>ClientBase</strong> to use Sabre Cruises.<br />
Set Up Sabre Cruises Live Connect in <strong>ClientBase</strong><br />
Step 1) Once you have obtained accurate login information, you need to add this Live Connect<br />
Provider if it does not already exist into <strong>ClientBase</strong> by going to Tools|Settings|Live Connect<br />
Providers and clicking Add.<br />
Fill in the following fields:<br />
Name of the Provider: In blank field provided, type the name of the Provider.<br />
Status: Leave the default of Active. If you ever want to make it Inactive, go back in this area to turn<br />
off.<br />
URL: Type https://cruises.sabre.com/SCDO/<br />
Travel Category: Select Cruise.<br />
Import XML from: Select HTML Source.<br />
Include Authentication: Check off and select SiteMinder. The Authentication URL is:<br />
3/25/13 283
An In-Depth Look at Live Connect<br />
https://eservices.sabre.com/tools/Community/<br />
Community.aspform_action=ComDisplay&Com_Id=448&cust_type=Trams<br />
Click Save.<br />
Step 2) Login information is not passed from <strong>ClientBase</strong> to Sabre Cruise, so there is no reason to<br />
save your login information in <strong>ClientBase</strong>. You will be prompted once to use your regular Sabre<br />
login, password and PCC (Pseudo City Code) after you click on Connect upon launching Live<br />
Connect.<br />
Step 3) When registering, Sabre Cruises provided you with a list of participating vendors and vendor<br />
codes. From Profiles, retrieve the vendor profile (or create if it is not in database). From the General<br />
Info area, click Live Connect Providers. From here, click Add, then select provider, Sabre Cruises,<br />
from the drop-down list. Add a vendor code from the list below. Save.<br />
Sabre Cruises Participating Vendors and Vendor Codes<br />
CODE VENDOR NAME LIVE CONNECT PROVIDER<br />
AZ Azamara Sabre Cruises<br />
CV Carnival Cruise Lines Sabre Cruises<br />
CB Celebrity Cruises Sabre Cruises<br />
CO Costa Cruise Lines Sabre Cruises<br />
CS Crystal Cruises Sabre Cruises<br />
CU Cunard Cruises Sabre Cruises<br />
DS Disney Cruise Line Sabre Cruises<br />
HA Holland America Line Sabre Cruises<br />
MSC MSC Cruises Sabre Cruises<br />
NC Norwegian Cruise Line Sabre Cruises<br />
PC Princess Cruises Sabre Cruises<br />
OE Oceania Cruise Line Sabre Cruises<br />
RE Regent Seven Seas Cruise Line Sabre Cruises<br />
RC Royal Caribbean International Sabre Cruises<br />
VR Viking River Cruises Sabre Cruises<br />
Note: The following Sabre Cruises cruise lines only accept US residents when using immigration<br />
data. If traveler is not a US resident, you are unable to complete the reservation on Crystal Cruises,<br />
Norwegian Cruise Lines, Regent Seven Seas Cruises, and Seabourn Cruise Line.<br />
3/25/13 284
Live Connect Features Supported by Sabre Cruises<br />
Sabre Cruises supports the following Live Connect features:<br />
An In-Depth Look at Live Connect<br />
CREATE NEW RESERVATION (Launch, Book & Import New Reservation)<br />
__ Automatically logs you in to booking engine with User Login data from<br />
<strong>ClientBase</strong>.<br />
Populates booking engine with profile data from <strong>ClientBase</strong>.<br />
Sends reservation details from booking engine’s confirmation page to<br />
<strong>ClientBase</strong> reservation record.<br />
IMPORT EXISTING RESERVATION (Imports new reservation booked outside<br />
of <strong>ClientBase</strong>)<br />
Uses confirmation number to automatically pass all reservation details from<br />
booking engine to <strong>ClientBase</strong> reservation record.<br />
Allows user to browse for reservation and upon retrieval sends reservation<br />
details from booking engine’s confimation page to <strong>ClientBase</strong> reservation<br />
record.<br />
RETRIEVE RESERVATION - Retrieves existing reservation previously imported via Live<br />
Connect for viewing or editing. Upon editing, imports updated reservations details.<br />
Create New Sabre Cruises Reservation in Live Connect<br />
Step 1) Retrieve the desired client profile, create a new Res Card and after entering basic Res Card<br />
info, launch Live Connect by clicking Live Connect on the menu bar. (You can also launch Live<br />
Connect from the Profile action gear.)<br />
Step 2) Complete the Live Connect settings by identifying the vendor, the Live Connect Provider<br />
and appropriate Login information.<br />
3/25/13 285
An In-Depth Look at Live Connect<br />
Step 3) Click the Create New Reservation button.<br />
Step 4) Select any Profile, Passenger, Branch and Res Card information you want to use to book<br />
the reservation and click Connect to launch the on-line booking engine.<br />
Step 5) Although you are still in <strong>ClientBase</strong>, you are now on-line at the Live Connect Provider’s<br />
booking site running the on-line booking engine through a <strong>ClientBase</strong> window.<br />
Complete the reservation and when the reservation is confirmed, click Import Reservation from the<br />
confirmation page. All reservation data booked on-line is now located in the reservation fields in<br />
<strong>ClientBase</strong>.<br />
You are still<br />
within the<br />
<strong>ClientBase</strong><br />
program when<br />
you use Live<br />
Connect.<br />
Import Existing Sabre Cruises Res Made Outside of <strong>ClientBase</strong><br />
Step 1) Create a new Res Card or open an existing one and launch Live Connect by clicking the<br />
3/25/13 286
An In-Depth Look at Live Connect<br />
Live Connect icon.<br />
Step 2) Complete the Live Connect settings by identifying the vendor, the Live Connect Provider<br />
and appropriate Login information if not autopopulated.<br />
Step 3) Enter the confirmation number for the reservation you want to import and click Import<br />
Existing Reservation.<br />
Step 4) Depending on the Live Connect Provider, the system either locates the reservation using<br />
the confirmation number and automatically import all reservation details, or takes you to the Live<br />
Connect Provider's site for you to use its Retrieve Reservation feature to locate the reservation.<br />
Upon displaying the existing reservation, click Import Reservation and the reservation details are<br />
imported into the <strong>ClientBase</strong> Res Card.<br />
Retrieve an Existing Reservation Sabre Cruises to Edit/Cancel<br />
To edit or cancel an existing reservation using Live Connect, follow these steps:<br />
Step 1) Launch Live Connect from inside the Live Connect reservation to edit or cancel. Click Live<br />
Connect.<br />
Step 2) Confirm all Live Connect settings including confirmation number, and click Retrieve<br />
Reservation.<br />
Step 3) Live Connect launches the booking engine site. Edit or cancel the reservation using<br />
instructions supplied by the booking engine, and click Import Reservation. All reservation data<br />
edited or cancelled online is now located in the reservation fields in <strong>ClientBase</strong>.<br />
Sabre Vacations - Canada (Sirev/Revnet)<br />
Anyone can use Sabre Vacations - Canada for Live Connect, but you must be registered. If you<br />
don’t already have a Sabre account follow all the registration steps below to use Sabre Vacations.<br />
If you already have a Sabre account, start at Step 6. (If you want more information about Sabre<br />
Vacations - Canada prior to registering, go to the Sabre Vacations - Canada community page on the<br />
eServices website.)<br />
Step 1. Register online for access to obtain one at the Sabre Leisure portal<br />
www.sabreleisure.com.<br />
Step 2. You will receive a confirmation email with a Sabre assigned pseudo city code.<br />
Step 3. Then register online for Sabre Vacations by going to www.sabrevacations.com.<br />
Step 4. Before you register online for access, set up accounts with each tour operator for billing<br />
purposes and tell each operator you will be booking thru Sabre Vacations (see tour operator list<br />
below). If you are an existing agency, in most cases the supplier will already have the accounts set<br />
up for you. You will just need to advise them that you will be using Sabre Vacations.<br />
Step 5. Upon receipt of your login information from Sabre Vacation, email<br />
sabrevacations@sabre.com to turn on access to Trams for you. Include your Customer Name,<br />
Sabre Pseudo City and Agency Phone Number. Live Connect will not work without this step.<br />
Step 6. Once you have obtained accurate login information, you need to add this Live Connect<br />
Provider if it does not already exist into <strong>ClientBase</strong> by going to Tools|Settings|Live Connect<br />
3/25/13 287
An In-Depth Look at Live Connect<br />
Providers and clicking Add.<br />
Fill in the following fields:<br />
Name of the Provider: In blank field provided, type the name of the Provider.<br />
Status: Leave the default of Active. If you ever want to make it Inactive, go back in this area to turn<br />
off.<br />
URL: Type https://secured.softvoyage.com/cgi-bin/sab/entrance.cgi<br />
Travel Category: Select Tour.<br />
Import XML from: Select HTML Source.<br />
Click Save.<br />
Step 7. You now need to register. You need to tag one vendor you are going to use with Sabre<br />
Vacations. Search for the vendor profile, Funjet, (or create if it is not in database). From the General<br />
Info area, click Live Connect Providers. From here, click Add, then select provider, Sabre Vacations,<br />
from the drop-down list and add the vendor code FJ1.<br />
Step 8. Go into any client profile and click Live Connect on the menu bar.<br />
Step 9. From the Connect To drop-down, select Sabre Vacations - Canada and Create a New<br />
Reservation.<br />
Step 10. On this webpage, click If you do not have an account with Sabre Vacations, please register<br />
here to obtain your Sabre Vacations ID and password.<br />
Additional <strong>ClientBase</strong> Set Up for Sabre Vacations - Canada<br />
Upon receiving login information for Sabre Vacations - Canada, take the following steps to setup<br />
<strong>ClientBase</strong> for Live Connect.<br />
Step 1) Each user can put in his own login information under Tools|My Login|Live Connect or<br />
enter one set of login information for a Live Connect provider for all agents by going to<br />
Tools|Settings|Live Connect Login. Click Add and enter the following information:<br />
Live Connect Provider: Select Sabre Vacations from the drop-down list.<br />
User Name, Password, Account Number: Enter the necessary fields based upon the login<br />
information provided to you when you contacted Sabre Vacations. Account number is not<br />
applicable.<br />
Agency Code: Enter your Pseudo City Code.<br />
3/25/13 288
An In-Depth Look at Live Connect<br />
Step 2) When registering, Sabre Vacations provided you with a list of participating vendors and<br />
vendor codes. From Profiles, retrieve the vendor profile (or create if it is not in database). From the<br />
General Info area, click Live Connect Providers. From here, click Add, then select provider, Sabre<br />
Vacations, from the drop-down list. Add a vendor code from the list below. Save.<br />
Step 3) When registering, Sabre Vacations provided you with a list of participating vendors and<br />
vendor codes. From Profiles, retrieve the vendor profile (or create if it is not in database). From the<br />
General Info area, click Live Connect Providers. From here, click Add, then select provider, Sabre<br />
Vacations, from the drop-down list. Add a vendor code from the list below. Save.<br />
3/25/13 289
An In-Depth Look at Live Connect<br />
Sabre Vacations - Canada Participating Vendors and Vendor Codes<br />
CODE VENDOR NAME LIVE CONNECT PROVIDER<br />
ACV Air Canada Vacations (Canada) Sabre Vacations - Canada<br />
VAT Air Transat Holidays (Canada) Sabre Vacations - Canada<br />
ALB Albatours (Canada) Sabre Vacations - Canada<br />
FUN Fun Sun Sabre Vacations - Canada<br />
NOL Nolitours Sabre Vacations - Canada<br />
SGN Signature Vacations (Canada) Sabre Vacations - Canada<br />
SQV Sunquest Vacations Sabre Vacations - Canada<br />
SWG Sunwing (Canada) Sabre Vacations - Canada<br />
THN The Holiday Network Sabre Vacations - Canada<br />
TMR Tours Mont-Royal (Canada) Sabre Vacations - Canada<br />
TMA Tours Maison/Vacances Sunquest (Canada) Sabre Vacations - Canada<br />
TTT Titan Tours Sabre Vacations - Canada<br />
VAR Varaplaya Sabre Vacations - Canada<br />
WJV West Jet Vacations Sabre Vacations - Canada<br />
Live Connect Features Supported by Sabre Vacations-Canada<br />
Sabre Vacations - Canada supports the following Live Connect features:<br />
CREATE NEW RESERVATION (Launch, Book & Import New Reservation)<br />
Automatically logs you in to booking engine with User Login data from<br />
<strong>ClientBase</strong>.<br />
Populates booking engine with profile data from <strong>ClientBase</strong>.<br />
Sends reservation details from booking engine’s confirmation page to<br />
<strong>ClientBase</strong> reservation record.<br />
IMPORT EXISTING RESERVATION (Imports new reservation booked outside<br />
of <strong>ClientBase</strong>)<br />
Uses confirmation number to automatically pass all reservation details from<br />
booking engine to <strong>ClientBase</strong> reservation record.<br />
Allows user to browse for reservation and upon retrieval sends reservation<br />
details from booking engine’s confimation page to <strong>ClientBase</strong> reservation<br />
record.<br />
RETRIEVE RESERVATION - Retrieves existing reservation previously imported via Live<br />
Connect for viewing or editing. Upon editing, imports updated reservations details.<br />
3/25/13 290
Create New Sabre Vacations-Canada Res in Live Connect<br />
An In-Depth Look at Live Connect<br />
Step 1) Retrieve the desired client profile, create a new Res Card and after entering basic Res Card<br />
info, launch Live Connect by clicking Live Connect on the menu bar. (You can also launch Live<br />
Connect from the Profile action gear.)<br />
Step 2) Complete the Live Connect settings by identifying the vendor, the Live Connect Provider<br />
and appropriate Login information.<br />
Step 3) Click the Create New Reservation button.<br />
Step 4) Select any Profile, Passenger, Branch and Res Card information you want to use to book<br />
3/25/13 291
An In-Depth Look at Live Connect<br />
the reservation and click Connect to launch the on-line booking engine.<br />
Step 5) Although you are still in <strong>ClientBase</strong>, you are now on-line at the Live Connect Provider’s<br />
booking site running the on-line booking engine through a <strong>ClientBase</strong> window.<br />
You are still within the<br />
<strong>ClientBase</strong> program when<br />
you use Live Connect.<br />
Sabre Vacations - US<br />
If you are a Sabre subscriber, sign up with Sabre Vacations by clicking the Sabre Vacations button<br />
from either the Travel Products menu on the Sabre Red agent booking portal, or via the Sabre<br />
Vacations community page on the Agency eServices information website. Sabre Vacations is a<br />
private labeled version of VAX VacationAccess and by using Sabre Vacations Live Connect you<br />
receive credit towards your Sabre productivity agreement for each booking!<br />
Take these steps is you are not a Sabre subscriber:<br />
1) Every <strong>ClientBase</strong> customer is a Sabre customer and has a PCC. If you know your PCC, go to<br />
Step 2 below. If you do not know your PCC, email implementation@trams.com to obtain it.<br />
3/25/13 292
An In-Depth Look at Live Connect<br />
2) Once you know your Sabre PCC, contact leisure.epr@sabre.com to get a temporary password.<br />
You will be able to change the temporary password once you log in the first time at<br />
https://login.vaxsbr.vaxvacationaccess.com/default.aspx. If additional users are needed send<br />
a reply via email to leisure.epr@sabrecom when you receive your temporary password or you can<br />
do so at the Sabre Vacations website.<br />
3) If a passcode reset/reactivation is needed (because you are locked out), contact<br />
leisure.epr@sabre.com or call 800-413-5771.<br />
4) Now set up <strong>ClientBase</strong> for use with Sabre Vacations.<br />
Set Up Sabre Vacations<br />
Upon receiving login information for each agent in your office, take the following steps to setup<br />
<strong>ClientBase</strong> for Live Connect.<br />
Step 1) Once you have obtained accurate login information, you need to add this Live Connect<br />
Provider if it does not already exist into <strong>ClientBase</strong> by going to Tools|Settings|Live Connect<br />
Providers and clicking Add.<br />
Fill in the following fields:<br />
Name of the Provider: In blank field provided, type the name of the Provider.<br />
Status: Leave the default of Active. If you ever want to make it Inactive, go back in this area to turn<br />
off.<br />
URL: Type https://login.vaxsbr.vaxvacationaccess.com/default.aspx<br />
Travel Category: Select Tour.<br />
Import XML from: Select HTML Source.<br />
Include Authentication: None.<br />
Click Save.<br />
Step 2) When registering, Sabre Vacations provided you with a list of participating vendors and<br />
vendor codes. From Profiles, retrieve the vendor profile (or create if it is not in database). From the<br />
General Info area, click Live Connect Providers. From here, click Add, then select provider, Sabre<br />
Vacations, from the drop-down list. Add a vendor code from the list below. Save.<br />
3/25/13 293
An In-Depth Look at Live Connect<br />
Sabre Vacations - Dynamic Participating Vendors and Vendor Codes<br />
CODE VENDOR NAME LIVE CONNECT PROVIDER<br />
AET American Express Vacations Sabre Vacations<br />
BST Blue Sky Tours Sabre Vacations<br />
FJ1 Funjet Vacations Sabre Vacations<br />
MMT MGM Mirage Vacations Sabre Vacations<br />
PRV Palace Resorts Sabre Vacations<br />
SAB Sandals and Beaches Resorts Sabre Vacations<br />
WNT Southwest Airlines Vacations Sabre Vacations<br />
TPV TNT Vacations powered by Funjet Sabre Vacations<br />
TIM Travel Impressions Sabre Vacations<br />
UNT Universal Parks & Resorts Vacations Sabre Vacations<br />
AMW US Airway Vacations Sabre Vacations<br />
VE1 Vacations Express Sabre Vacations<br />
Sabre Vacations Live Connect Features<br />
CREATE NEW RESERVATION (Launch, Book & Import New Reservation)<br />
Populates booking engine with User Login data and profile data from<br />
<strong>ClientBase</strong>.<br />
Sends reservation details from booking engine’s confirmation page to<br />
<strong>ClientBase</strong> reservation record.<br />
IMPORT EXISTING RESERVATION (Imports new reservation booked outside<br />
of <strong>ClientBase</strong>)<br />
Uses confirmation number to automatically pass all reservation details from<br />
booking engine to <strong>ClientBase</strong> reservation record.<br />
Allows user to browse for reservation and upon retrieval sends reservation<br />
details from booking engine’s confimation page to <strong>ClientBase</strong> reservation<br />
record.<br />
RETRIEVE RESERVATION - Retrieves exisiting reservation previously imported<br />
via Live Connect for viewing or editing. Upon editing, imports updated reservations<br />
details.<br />
Create New Sabre Vacations Reservation in Live Connect<br />
Step 1) Retrieve the desired client profile, create a new Res Card and after entering basic Res Card<br />
info, launch Live Connect by clicking Live Connect on the menu bar. (You can also launch Live<br />
3/25/13 294
An In-Depth Look at Live Connect<br />
Connect from the Profile action gear.)<br />
Step 2) Complete the Live Connect settings by identifying the vendor, the Live Connect Provider<br />
and appropriate Login information.<br />
Step 3) Click the Create New Reservation button.<br />
Step 4) Select any Profile, Passenger, Branch and Res Card information you want to use to book<br />
the reservation and click Connect to launch the on-line booking engine.<br />
Step 5) Although you are still in <strong>ClientBase</strong>, you are now on-line at the Live Connect Provider’s<br />
3/25/13 295
An In-Depth Look at Live Connect<br />
booking site running the on-line booking engine through a <strong>ClientBase</strong> window.<br />
Complete the reservation and when the reservation is confirmed, click Import Reservation from the<br />
confirmation page. All reservation data booked on-line is now located in the reservation fields in<br />
<strong>ClientBase</strong>.<br />
Import Existing Sabre Vacations Reservation Made Outside of <strong>ClientBase</strong><br />
Step 1) Create a new Res Card or open an existing one and launch Live Connect by clicking the<br />
Live Connect icon.<br />
Step 2) Complete the Live Connect settings by identifying the vendor, the Live Connect Provider and<br />
appropriate Login information if not autopopulated.<br />
Step 3) Enter the confirmation number for the reservation you want to import and click Import<br />
Existing Reservation.<br />
Step 4) Depending on the Live Connect Provider, the system either locates the reservation using<br />
the confirmation number and automatically import all reservation details, or takes you to the Live<br />
Connect Provider's site for you to use its Retrieve Reservation feature to locate the reservation.<br />
Upon displaying the existing reservation, click Import Reservation and the reservation details are<br />
imported into the <strong>ClientBase</strong> Res Card.<br />
Retrieve an Existing Sabre Vacations Reservation for Editing or Cancelling<br />
To edit or cancel an existing reservation using Live Connect, follow these steps:<br />
Step 1) Launch Live Connect from inside the Live Connect reservation to edit or cancel. Click Live<br />
Connect.<br />
Step 2) Confirm all Live Connect settings including confirmation number, and click Retrieve<br />
Reservation.<br />
Step 3) Live Connect launches the booking engine site. Edit or cancel the reservation using<br />
instructions supplied by the booking engine, and click Import Reservation. All reservation data<br />
edited or cancelled online is now located in the reservation fields in <strong>ClientBase</strong>.<br />
Signature CruiseConnection<br />
This feature is only available to agencies who belong to Signature Travel Network as the<br />
CruiseConnection booking engine is exclusive to this group. For more information on<br />
3/25/13 296
An In-Depth Look at Live Connect<br />
CruiseConnection or Signature Travel Network, please contact Signature Travel Network directly at<br />
info@signaturetravelnetwork.com.<br />
Signature members can log into the Signature Intranet, www.signaturetravelnetwork.com, and<br />
find setup instructions under Support Training & Meetings, in the Communications section. Scroll<br />
down to Signature Hotels & Resorts and access the setup document.<br />
Set Up Signature CruiseConnection Live Connect in <strong>ClientBase</strong><br />
Upon receiving login information for each agent in your office, take the following steps to setup<br />
<strong>ClientBase</strong> for Live Connect.<br />
Step 1) Ensure you have Signature CruiseConnection set up correctly as a Live Connect Provider<br />
by going to Tools|Settings|Live Connect Providers, and clicking Add or Modify.<br />
Provider Name: Type Signature Travel Network Cruises.<br />
URL: Type https://cruiseconnection.signaturetravelnetwork.com/LiveConnect/login.cfm<br />
Travel Category: Select Cruise from the drop-down.<br />
Import XML from: Select HTML Source.<br />
Include Authentication: Not applicable.<br />
Step 2) Users can set up their own logins by going to Tools|MyLogin|Live Connect and clicking<br />
Add.<br />
Live Connect Provider: Select Signature CruiseConnection from the drop-down menu.<br />
User Name and Password: Enter individual Signature intranet login name and password here.<br />
Account Number: Leave blank.<br />
Agency Code: Enter agency's Signature agency key number here. Find this number on the agency<br />
profile in the Signature intranet. Click "Agency Tools" in the upper right, and find the "Agency Key"<br />
number on the right side of the profile. Click OK to save.<br />
Step 4) When registering, Signature CruiseConnection provided you with a list of participating<br />
vendors and vendor codes. Create a profile in <strong>ClientBase</strong> for each vendor and specify Signature<br />
CruiseConnection as the booking engine and enter the unique vendor identifier.<br />
First click Live Connect Providers and Add to add a Live Connect Provider. Select Signature<br />
CruiseConnection from the drop-down menu and enter the vendor code.<br />
3/25/13 297
An In-Depth Look at Live Connect<br />
Signature CruiseConnection Participating Vendors and Vendor Codes<br />
CODE VENDOR NAME LIVE CONNECT PROVIDER<br />
CV Carnival Cruise Lines Signature CruiseConnection<br />
CB Celebrity Cruises Signature CruiseConnection<br />
CO Costa Cruise Lines Signature CruiseConnection<br />
CS Crystal Cruises Signature CruiseConnection<br />
CU Cunard Cruises Signature CruiseConnection<br />
DS Disney Cruise Line Signature CruiseConnection<br />
HA Holland America Line Signature CruiseConnection<br />
IC Island Cruises Signature CruiseConnection<br />
NC Norwegian Cruise Line Signature CruiseConnection<br />
PC Princess Cruises Signature CruiseConnection<br />
RE Regent Seven Seas Cruises Signature CruiseConnection<br />
RC Royal Caribbean International Signature CruiseConnection<br />
Signature CruiseConnection Features<br />
Signature CruiseConnection supports the following Live Connect Features:<br />
CREATE NEW RESERVATION (Launch, Book & Import New Reservation)<br />
Populates booking engine with User Login data from <strong>ClientBase</strong>.<br />
Populates booking engine with profile data from <strong>ClientBase</strong>.<br />
Sends reservation details from booking engine’s confirmation page to<br />
<strong>ClientBase</strong> reservation record.<br />
IMPORT EXISTING RESERVATION (Imports new reservation booked outside<br />
of <strong>ClientBase</strong>)<br />
Uses confirmation number to automatically pass all reservation details from<br />
booking engine to <strong>ClientBase</strong> reservation record.<br />
Allows user to browse for reservation and upon retrieval sends reservation<br />
details from booking engine’s confimation page to <strong>ClientBase</strong> reservation<br />
record.<br />
RETRIEVE RESERVATION - Retrieves exisiting reservation previously imported via Live<br />
Connect for viewing or editing. Upon editing, imports updated reservations details.<br />
Create New Signature CruiseConnection Reservation<br />
Step 1) Retrieve the desired client profile, create a new Res Card and after entering basic Res Card<br />
info, launch Live Connect by clicking Live Connect on the menu bar. (You can also launch Live<br />
3/25/13 298
An In-Depth Look at Live Connect<br />
Connect from the Profile action gear.)<br />
Step 2) Complete the Live Connect settings by identifying the vendor, the Live Connect Provider<br />
and appropriate Login information.<br />
Step 3) Click the Create New Reservation button.<br />
Step 4) Select any Profile, Passenger, Branch and Res Card information you want to use to book<br />
the reservation and click Connect to launch the on-line booking engine.<br />
Step 5) Although you are still in <strong>ClientBase</strong>, you are now on-line at the Live Connect Provider’s<br />
booking site running the on-line booking engine through a <strong>ClientBase</strong> window.<br />
3/25/13 299
An In-Depth Look at Live Connect<br />
Step 6) Use Cruise Finder to find the "perfect cruise". Proceed into CruiseConnection by clicking<br />
Check Availability for All Categories below the pricing section of each offer. When prompted for<br />
passenger information, select each passenger using the CruiseConnection Search for a Client<br />
feature. Or, if the client is not in the Signature database, use Click Here to Add New Client for each<br />
passenger traveling.<br />
Step 5) Use CruiseConnection to finish confirming the reservation and upon receiving a confirmation<br />
number, click Import to bring all the reservation details into <strong>ClientBase</strong>. Use Connect to connect to<br />
Signature CruiseConnection. The CruiseConnection program looks just as it does when used<br />
outside of <strong>ClientBase</strong>, but is running within a <strong>ClientBase</strong> window. Now use CruiseConnection to<br />
complete the cruise reservation.<br />
Notice how the client information screens get completed automatically. Upon completion of the<br />
reservation and upon receiving a confirmation number, use Import Reservation, located at the top<br />
right corner of the window, and all reservation details are imported back to the <strong>ClientBase</strong><br />
reservation record. This reservation information is now available to invoice, to create Reminders to<br />
track the administrative tasks involved in managing the trip and to report on for future marketing<br />
purposes.<br />
Import Existing CruiseConnection Reservation Made Outside of <strong>ClientBase</strong><br />
First, create a new reservation in <strong>ClientBase</strong> and after clicking entering vendor information, click Live<br />
Connect and Import an Existing Reservation. Do not enter a confirmation number, but when in<br />
Signature Travel Network booking site, locate the retrieve reservation area. Once the reservation<br />
3/25/13 300
An In-Depth Look at Live Connect<br />
details are showing, click Import and the details of the reservation are imported into <strong>ClientBase</strong><br />
reservation record.<br />
Retrieve an Existing Reservation for Editing or Cancelling<br />
To edit or cancel an existing reservation using Live Connect, follow these steps:<br />
Step 1) Launch Live Connect from inside the reservation to edit or cancel in <strong>ClientBase</strong>.<br />
Step 2) A dialog box appears. Click Retrieve Reservation.<br />
Step 3) Live Connect launches the booking engine site. Edit or cancel the reservation using<br />
instructions supplied by the booking engine, and click Import Reservation. All reservation data<br />
edited or cancelled online is now located in the reservation fields in <strong>ClientBase</strong>.<br />
Signature HotelConnection<br />
This feature is only available to agencies who belong to Signature Travel Network as the Signature<br />
HotelConnection booking engine is exclusive to this group. Signature members can log into the<br />
Signature Intranet, www.signaturetravelnetwork.com, and find setup instructions under Support<br />
Training & Meetings, in the Communications section. Just scroll down to "Signature Hotels &<br />
Resorts" and access the setup document. For more information on Signature HotelConnection or<br />
Signature Travel Network, please contact Signature Travel Network directly at<br />
info@signaturetravelnetwork.com.<br />
Set Up Signature HotelConnection<br />
Step 1) Once you have obtained accurate login information, you need to add this Live Connect<br />
Provider into <strong>ClientBase</strong> by going to Tools|Settings|Live Connect Providers and clicking Add.<br />
Provider Name: Enter Signature HotelConnection.<br />
URL: Enter https://web2.sigtn.com/liveconnecthotel/login.cfm<br />
Travel Category: Select Hotel from the drop-down.<br />
Import XML from: Select HTML Source.<br />
Step 2) Each user can put in his own login information under Tools|My Login|Live Connect or<br />
enter one set of login information for a Live Connect provider for all agents by going to<br />
Tools|Settings|Live Connect Login. Click Add and enter the following information:<br />
Live Connect Provider: Select Signature HotelConnection from the drop-down list.<br />
User Name, Password and Account Number: Enter your Signature Intranet user Name and<br />
3/25/13 301
An In-Depth Look at Live Connect<br />
Password. There is no account number.<br />
Step 3) Create a vendor profile for Signature Hotels or individual hotel profiles you’ll use when<br />
launching Live Connect. From the General Info link, click Live Connect Providers. From here, click<br />
Add, and select Signature HotelConnection from the drop-down list. The vendor code is left blank.<br />
Click OK to save.<br />
Signature HotelConnection Features<br />
Signature HotelConnection support the following Live Connect Features:<br />
CREATE NEW RESERVATION (Launch, Book & Import New Reservation)<br />
Populates booking engine with User Login data from <strong>ClientBase</strong>.<br />
Populates booking engine with profile data from <strong>ClientBase</strong>.<br />
Sends reservation details from booking engine’s confirmation page to<br />
<strong>ClientBase</strong> reservation record.<br />
IMPORT EXISTING RESERVATION (Imports new reservation booked outside<br />
of <strong>ClientBase</strong>)<br />
Uses confirmation number to automatically pass all reservation details from<br />
booking engine to <strong>ClientBase</strong> reservation record.<br />
Allows user to browse for reservation and upon retrieval sends reservation<br />
details from booking engine’s confimation page to <strong>ClientBase</strong> reservation<br />
record.<br />
RETRIEVE RESERVATION - Retrieves exisiting reservation previously imported<br />
via Live Connect for viewing or editing. Upon editing, imports updated reservations<br />
details.<br />
Create New Signature HotelConnection Reservation<br />
Step 1) Retrieve the desired client profile, create a new Res Card and after entering basic Res Card<br />
info, launch Live Connect by clicking Live Connect on the menu bar. (You can also launch Live<br />
3/25/13 302
An In-Depth Look at Live Connect<br />
Connect from the Profile action gear.)<br />
Step 2) Complete the Live Connect settings by identifying the vendor, the Live Connect Provider<br />
and appropriate Login information. (Use the Signature HotelConnection vendor or the individual<br />
hotel vendors you have setup.<br />
Step 3) Click the Create New Reservation button.<br />
Step 4) Select the desired client information to pass to HotelConnection. Prior to connecting you<br />
to the Signature HotelConnection site, a client selection screen appears, allowing you to select the<br />
desired client data you would like to automatically pass to Signature HotelConnection. Passing this<br />
3/25/13 303
An In-Depth Look at Live Connect<br />
data helps you save time during the booking process, as fewer fields need to be completed by hand.<br />
Step 5) Use Hotel Finder to find the "perfect hotel". When prompted for passenger information<br />
select each passenger using the HotelConnection "Search for a Client" feature. Or, if the client is<br />
not in the Signature database, use "Click Here to Add New Client" for each passenger traveling.<br />
Step 6) Use HotelConnection to finish confirming your Reservation and upon receiving a<br />
confirmation number click "Import" to import the reservation details into your <strong>ClientBase</strong> database<br />
for managing further. Remember if you have launched Live Connect at the Res Card level so you<br />
can use separate Hotel Vendors, the system will have you search for the hotel profile you have<br />
booked. If you used the Signature Hotels Profile at the reservation level to launch Live Connect, the<br />
hotel booking will come into <strong>ClientBase</strong> with the hotel name in the Service Provider area of the<br />
reservation.<br />
This reservation information is now available for you to invoice, to create Reminders to track the<br />
administrative tasks involved in managing the trip and to report on for future marketing purposes.<br />
Import Existing Reservation Made Outside of <strong>ClientBase</strong><br />
First, create a new reservation in <strong>ClientBase</strong> and after clicking Add a New Reservation and entering<br />
vendor information, click Live Connect and Import an Existing Reservation. Do not enter a<br />
confirmation number, but when in Signature HotelConnection booking site, locate the retrieve<br />
reservation area. Once the reservation details are showing, click Import and the details of the<br />
reservation are imported into <strong>ClientBase</strong> reservation record.<br />
Retrieve an Existing Reservation for Editing or Cancelling<br />
To edit or cancel an existing reservation using Live Connect, follow these steps:<br />
Step 1) Launch Live Connect from inside the reservation to edit or cancel in <strong>ClientBase</strong>.<br />
Step 2) A dialog box appears. Click Retrieve Reservation.<br />
Step 3) Live Connect launches the booking engine site. Edit or cancel the reservation using<br />
instructions supplied by the booking engine, and click Import Reservation. All reservation data<br />
edited or cancelled online is now located in the reservation fields in <strong>ClientBase</strong>.<br />
3/25/13 304
An In-Depth Look at Live Connect<br />
Squaremouth Travel Insurance<br />
To use Live Connect to purchase trip insurance with Squaremouth Travel Insurance, you must<br />
obtain a Travel Partner Number to sell Squaremouth Travel Insurance. If not currently licensed to<br />
sell Squaremouth Travel Insurance, contact Squaremouth Travel Insurance directly at 800-240-<br />
0369 or sign up on their website at http://www.squaremouth.com/travel-partner-signup.php.<br />
Set Up Squaremouth Travel Insurance<br />
Once you obtain your Affiliate Number, take the following steps to setup <strong>ClientBase</strong> for Live<br />
Connect:<br />
Step 1) Once you have obtained accurate login information, you need to add this Live Connect<br />
Provider if it does not already exist into <strong>ClientBase</strong> by going to Tools|Settings|Live Connect<br />
Providers and clicking Add.<br />
Provider Name: Enter Squaremouth Travel Insurance.<br />
URL: Enter https://www.squaremouth.com/travel-insurance/<br />
Travel Category: Select Insurance from the drop-down.<br />
Import XML from: Select HTML Source.<br />
Step 2) Each user can put in his own login information under Tools|My Login|Live Connect or<br />
enter one set of login information for a Live Connect provider for all agents by going to<br />
Tools|Settings|Live Connect Login. Click Add and enter the following information:<br />
Live Connect Provider: Select Squaremouth Travel Insurance from the drop-down list.<br />
User Name, Password and Account Number: Leave User Name & Password blank. In Account<br />
Number, enter your Affiliate Number you obtained from Squaremouth Travel Insurance.<br />
Step 3) Create a vendor profile for Squaremouth Travel Insurance. From the General Info link, click<br />
Live Connect Providers. From here, click Add, then select the desired booking engine<br />
(Squaremouth Travel Insurance) from the drop-down list. The vendor code is left blank.<br />
3/25/13 305
An In-Depth Look at Live Connect<br />
Squaremouth Travel Insurance Features<br />
Squaremouth Travel Insurance supports the following Live Connect Features:<br />
CREATE NEW RESERVATION (Launch, Book & Import New Reservation)<br />
Populates booking engine with User Login data from <strong>ClientBase</strong>.<br />
Populates booking engine with profile data from <strong>ClientBase</strong>.<br />
Sends reservation details from booking engine’s confirmation page to<br />
<strong>ClientBase</strong> reservation record.<br />
IMPORT EXISTING RESERVATION (Imports new reservation booked outside<br />
of <strong>ClientBase</strong>)<br />
Uses confirmation number to automatically pass all reservation details from<br />
booking engine to <strong>ClientBase</strong> reservation record.<br />
Allows user to browse for reservation and upon retrieval sends reservation<br />
details from booking engine’s confimation page to <strong>ClientBase</strong> reservation<br />
record.<br />
RETRIEVE RESERVATION - Retrieves exisiting reservation previously imported<br />
via Live Connect for viewing or editing. Upon editing, imports updated reservations<br />
details.<br />
Create New Squaremouth Travel Insurance Reservation<br />
Step 1) Retrieve the desired client profile, create a new Res Card and after entering basic Res Card<br />
info, launch Live Connect by clicking Live Connect on the menu bar. (You can also launch Live<br />
Connect from the Profile action gear.)<br />
Step 2) Complete the Live Connect settings by identifying the vendor, the Live Connect Provider<br />
3/25/13 306
An In-Depth Look at Live Connect<br />
and appropriate Login information.<br />
Step 3) Click the Create New Reservation button.<br />
Step 4) Select any Profile, Passenger, Branch and Res Card information you want to use to book<br />
the reservation and click Connect to launch the on-line booking engine.<br />
Step 5) The system prompts with the reservation records included in this Res Card. Click each<br />
reservation to insure. Again, this step is designed to save time during the insurance booking<br />
process, as less fields need to be completed manually. Any missing or incomplete data can be<br />
updated on the website confirming the insurance booking. Click Connect.<br />
Step 6) Although you are still in <strong>ClientBase</strong>, you are now on-line at the Live Connect Provider’s<br />
booking site running the on-line booking engine through a <strong>ClientBase</strong> window. Complete the<br />
reservation and when the reservation is confirmed, click Import Reservation from the confirmation<br />
page.<br />
Tandem from Passport <strong>Online</strong><br />
Tandem from Passport <strong>Online</strong> is an on-line cruise booking engine. To contact Tandem from<br />
Passport <strong>Online</strong> for use, email sales@passportonlineinc.com or call (503) 626-7766 Ext. 1. After<br />
successfully completing registration, obtain a unique user name, and password for use in<br />
<strong>ClientBase</strong>.<br />
3/25/13 307
An In-Depth Look at Live Connect<br />
Set Up Tandem from Passport <strong>Online</strong> Live Connect<br />
Upon receiving User name and Password for each agent, take the following steps to setup<br />
<strong>ClientBase</strong> for Live Connect.<br />
Step 1) Once you have obtained accurate login information, you need to make sure this Live<br />
Connect Provider is in <strong>ClientBase</strong> by going to Tools|Settings|Live Connect Providers and clicking<br />
Add if not present (make sure the URL below is correct).<br />
Provider Name: Type Tandem from Passport <strong>Online</strong>.<br />
URL: Type https://secure.latesttraveloffers.net/apps/portal/cbcollect.asp<br />
Travel Category: Select Cruise from the drop-down.<br />
Import XML from: Select HTML Source.<br />
Step 2) Each user can put in his own login information under Tools|My Login|Live Connect or<br />
enter one set of login information for a Live Connect provider for all agents by going to<br />
Tools|Settings|Live Connect Login. Click Add and enter the following information:<br />
User Name and Password: Enter the necessary fields based upon the login information provided<br />
to you when you contacted Tandem by Passport <strong>Online</strong>. (The Agency Number and Code is not<br />
applicable.)<br />
Step 3) When registering, Tandem from Passport <strong>Online</strong> provided you with a list of participating<br />
vendors and vendor codes. Create a profile in <strong>ClientBase</strong> for each vendor if none exists and specify<br />
Tandem as the booking engine in the General Info link by clicking Live Connect Provider, and<br />
entering the unique vendor identifier code.<br />
Tandem from Passport <strong>Online</strong> Participating Vendors and Vendor Codes<br />
CODE VENDOR NAME LIVE CONNECT PROVIDER<br />
AZA Azamara Cruises Tandem from Passport <strong>Online</strong><br />
CCL Carnival Cruise Lines Tandem from Passport <strong>Online</strong><br />
CEL Celebrity Cruises Tandem from Passport <strong>Online</strong><br />
CST Costa Cruise Lines Tandem from Passport <strong>Online</strong><br />
3/25/13 308
An In-Depth Look at Live Connect<br />
CUN Cunard Cruises Tandem from Passport <strong>Online</strong><br />
HAL Holland America Line Tandem from Passport <strong>Online</strong><br />
MSC MSC Cruises Tandem from Passport <strong>Online</strong><br />
NCL NCL America Tandem from Passport <strong>Online</strong><br />
NCL Norwegian Cruise Lines Tandem from Passport <strong>Online</strong><br />
OCL Oceania Cruises Tandem from Passport <strong>Online</strong><br />
PCL Princess Cruises Tandem from Passport <strong>Online</strong><br />
RCC Royal Caribbean International Tandem from Passport <strong>Online</strong><br />
SBN Seabourn Cruise Line Tandem from Passport <strong>Online</strong><br />
3/25/13 309
An In-Depth Look at Live Connect<br />
Live Connect Features Supported by Tandem from Passport <strong>Online</strong><br />
Tandem supports the following Live Connect features:<br />
CREATE NEW RESERVATION (Launch, Book & Import New Reservation)<br />
Automatically logs you in to booking engine with User Login data from<br />
<strong>ClientBase</strong>.<br />
Populates booking engine with profile data from <strong>ClientBase</strong>.<br />
Sends reservation details from booking engine’s confirmation page to<br />
<strong>ClientBase</strong> reservation record.<br />
IMPORT EXISTING RESERVATION (Imports new reservation booked outside<br />
of <strong>ClientBase</strong>)<br />
Uses confirmation number to automatically pass all reservation details from<br />
booking engine to <strong>ClientBase</strong> reservation record.<br />
Allows user to browse for reservation and upon retrieval sends reservation<br />
details from booking engine’s confimation page to <strong>ClientBase</strong> reservation<br />
record.<br />
RETRIEVE RESERVATION - Retrieves existing reservation previously imported via Live<br />
Connect for viewing or editing. Upon editing, imports updated reservations details.<br />
Create New Trafalgar Reservation in Live Connect<br />
Step 1) Retrieve the desired client profile, create a new Res Card and after entering basic Res Card<br />
info, launch Live Connect by clicking Live Connect on the menu bar. (You can also launch Live<br />
Connect from the Profile action gear.)<br />
Step 2) Complete the Live Connect settings by identifying the vendor, the Live Connect Provider<br />
and appropriate Login information.<br />
3/25/13 310
An In-Depth Look at Live Connect<br />
Step 3) Click the Create New Reservation button.<br />
Step 4) Select any Profile, Passenger, Branch and Res Card information you want to use to book<br />
the reservation. Click Connect to launch the on-line booking engine.<br />
Step 5) Although still in <strong>ClientBase</strong>, you are now on-line at the Insight Vacations booking site.<br />
Complete the reservations using instructions supplied by Insight Vacations upon registration. When<br />
the reservation is confirmed, it automatically imports into the <strong>ClientBase</strong> reservation. All reservation<br />
data booked on-line is now located in the reservation fields in <strong>ClientBase</strong>.<br />
Import Existing Reservation Made Outside of <strong>ClientBase</strong><br />
First, create a new reservation in <strong>ClientBase</strong> and after clicking Add a New Reservation and entering<br />
3/25/13 311
An In-Depth Look at Live Connect<br />
vendor information, click Live Connect and Import an Existing Reservation. Enter a confirmation<br />
number, or when in the booking site, locate the retrieve reservation area. Once the reservation<br />
details are showing, click Import and the details of the reservation are imported into <strong>ClientBase</strong><br />
reservation record.<br />
Retrieve an Existing Reservation for Editing or Cancelling<br />
To edit or cancel an existing reservation using Live Connect, follow these steps:<br />
Step 1) Launch Live Connect from inside the reservation to edit or cancel in <strong>ClientBase</strong>.<br />
Step 2) A dialog box appears. Click Retrieve Reservation.<br />
Step 3) Live Connect launches the booking engine site. Edit or cancel the reservation using<br />
instructions supplied by the booking engine, and click Import Reservation. All reservation data<br />
edited or cancelled online is now located in the reservation fields in <strong>ClientBase</strong>.<br />
3/25/13 312
Trafalgar<br />
If you are not currently registered to book Trafalgar, register to make bookings as a new agency setup,<br />
by visiting http://www.tltc.com/agencyupdates/ or call Trafalgar at 1-800-854-0103. Upon<br />
completion of the registration you will receive a User ID and Password and can take the following<br />
steps to setup <strong>ClientBase</strong>.<br />
Set Up Trafalgar Live Connect<br />
Upon receiving User ID and Password, take the following steps to setup <strong>ClientBase</strong> for Live<br />
Connect.<br />
Step 1) Once you have obtained accurate login information, you need to make sure this Live<br />
Connect Provider is in <strong>ClientBase</strong> by going to Tools|Settings|Live Connect Providers and clicking<br />
Add if not present (make sure the URL below is correct).<br />
Provider Name: Type Trafalgar.<br />
URL: Type https://book.trafalgartours.com/BookingWizard/<br />
TramsLiveConnect.aspxsc=TTUSAS<br />
Travel Category: Select Tour from the drop-down.<br />
Import XML from: Select HTML Source.<br />
Step 2) Each user can put in his own login information under Tools|My Login|Live Connect or<br />
enter one set of login information for a Live Connect provider for all agents by going to<br />
Tools|Settings|Live Connect Login. Click Add and enter the following information:<br />
User Name and Password: Enter the necessary fields based upon the login information provided<br />
to you when you contacted Trafalgar. (The Agency Number and Code is not applicable.)<br />
Step 3) Retrieve the Trafalgar vendor profile from the Profile Manager (or create one if not in your<br />
database). From the General Info link, click the Live Connect Providers button. Click Add, and<br />
select Trafalgar booking engine from the drop-down list. There is no Vendor Code. In the Travel<br />
Category profile field, select Tour from the drop-down menu.<br />
3/25/13 313
An In-Depth Look at Live Connect<br />
Live Connect Features Supported by Trafalgar<br />
Trafalgar supports the following Live Connect Features:<br />
CREATE NEW RESERVATION (Launch, Book & Import New Reservation)<br />
Automatically logs you in to booking engine with User Login data from <strong>ClientBase</strong>.<br />
Populates booking engine with profile data from <strong>ClientBase</strong>.<br />
Sends reservation details from booking engine’s confirmation page to <strong>ClientBase</strong><br />
reservation record.<br />
IMPORT EXISTING RESERVATION (Imports new reservation booked outside of<br />
<strong>ClientBase</strong>).<br />
Uses confirmation number to automatically pass all reservation details from booking<br />
engine to <strong>ClientBase</strong> reservation record.<br />
Allows user to browse for reservation and upon retrieval sends reservation details from<br />
booking engine’s confirmation page to <strong>ClientBase</strong> reservation record.<br />
RETRIEVE RESERVATION - Retrieves existing reservation previously imported via Live<br />
Connect for viewing or editing. Upon editing, imports updated reservations details.<br />
Create New Trafalgar Reservation in Live Connect<br />
Step 1) Retrieve the desired client profile, create a new Res Card and after entering basic Res Card<br />
info, launch Live Connect by clicking Live Connect on the menu bar. (You can also launch Live<br />
Connect from the Profile action gear.)<br />
Step 2) Complete the Live Connect settings by identifying the vendor, the Live Connect Provider<br />
and appropriate Login information.<br />
Step 3) Click the Create New Reservation button.<br />
3/25/13 314
An In-Depth Look at Live Connect<br />
Step 4) Select any Profile, Passenger, Branch and Res Card information you want to use to book<br />
the reservation. Click Connect to launch the on-line booking engine.<br />
Step 5) Although still in <strong>ClientBase</strong>, you are now on-line at the Insight Vacations booking site.<br />
Complete the reservations using instructions supplied by Insight Vacations upon registration. When<br />
the reservation is confirmed, it automatically imports into the <strong>ClientBase</strong> reservation. All reservation<br />
data booked on-line is now located in the reservation fields in <strong>ClientBase</strong>.<br />
If you need help using the Trafalgar booking site, call Trafalgar at 1-800-854-0103.<br />
Transat Travel Insurance<br />
3/25/13 315
An In-Depth Look at Live Connect<br />
All agencies wishing to use Transat Travel Insurance Live Connect should contact their insurance<br />
Client Manager:<br />
Quebec: Louise Dufort<br />
Phone: 514-913-7503<br />
Email: Iouise.dufort@ps-travelinsurance.com<br />
Rest of Canada: Andrei Losinski<br />
Phone: 905-856-6574 x359<br />
Email: andrei.losinski@ps-travelinsurance.com<br />
Set Up Transat Travel Insurance<br />
Upon receiving a User ID and Account Number for your agency, take the following steps to setup<br />
<strong>ClientBase</strong> for Live Connect.<br />
Step 1) Once you have obtained accurate login information, you need to add this Live Connect<br />
Provider if it does not already exist into <strong>ClientBase</strong> by going to Tools|Settings|Live Connect<br />
Providers and clicking Add.<br />
Provider Name: Transat Travel Insurance<br />
Status: Active.<br />
URL: https://www.igoinsured.com/travelweb/login.aspxtwa=LIVECON<br />
Travel Category: Insurance.<br />
Import XML from: HTML Source.<br />
Include Authentication, etc.: Not applicable.<br />
Step 2) Each user can put in his own login information under Tools|My Login|Live Connect or<br />
enter one set of login information for a Live Connect provider for all agents by going to<br />
Tools|Settings|Live Connect Login. Click Add and enter the following information:<br />
Live Connect Provider: Select Transat Travel Insurance from the drop-down list.*<br />
User Name, Password and Agency Code Enter the necessary fields based upon the login<br />
information provided to you when you contacted provider (the Agency # is not applicable).<br />
Step 3) Create a vendor profile for Transat Travel Insurance. From the General Info link, click Live<br />
3/25/13 316
An In-Depth Look at Live Connect<br />
Connect Providers. From here, click Add, then select the desired booking engine (Transat Travel<br />
Insurance) from the drop-down list. The vendor code is left blank.<br />
Transat Travel Insurance Features<br />
Transat Travel Insurance supports the following Live Connect features:<br />
CREATE NEW RESERVATION (Launch, Book & Import New Reservation)<br />
Populates booking engine with User Login data from <strong>ClientBase</strong>.<br />
Populates booking engine with profile data from <strong>ClientBase</strong>.<br />
Sends reservation details from booking engine’s confirmation page to<br />
<strong>ClientBase</strong> reservation record.<br />
IMPORT EXISTING RESERVATION (Imports new reservation booked outside<br />
of <strong>ClientBase</strong>)<br />
Uses confirmation number to automatically pass all reservation details from<br />
booking engine to <strong>ClientBase</strong> reservation record.<br />
Allows user to browse for reservation and upon retrieval sends reservation<br />
details from booking engine’s confimation page to <strong>ClientBase</strong> reservation<br />
record.<br />
RETRIEVE RESERVATION - Retrieves exisiting reservation previously imported<br />
via Live Connect for viewing or editing. Upon editing, imports updated reservations<br />
details.<br />
Create New Transat Reservation<br />
Step 1) Retrieve the desired client profile, create a new Res Card and after entering basic Res Card<br />
info, launch Live Connect by clicking Live Connect on the menu bar. (You can also launch Live<br />
Connect from the Profile action gear.)<br />
3/25/13 317
An In-Depth Look at Live Connect<br />
Step 2) Complete the Live Connect settings by identifying the vendor, the Live Connect Provider<br />
and appropriate Login information.<br />
Step 3) Click the Create New Reservation button.<br />
Step 4) Select any Profile, Passenger, Branch and Res Card information you want to use to book<br />
the reservation and click Connect to launch the on-line booking engine.<br />
Step 5) The system prompts with the reservation records included in this Res Card. Click each<br />
reservation to insure. Again, this step is designed to save time during the insurance booking<br />
process, as less fields need to be completed manually. Any missing or incomplete data can be<br />
updated on the website confirming the insurance booking. Click Connect.<br />
Step 6) Although you are still in <strong>ClientBase</strong>, you are now on-line at the Live Connect Provider’s<br />
booking site running the on-line booking engine through a <strong>ClientBase</strong> window. Complete the<br />
reservation and when the reservation is confirmed, click Import Reservation from the confirmation<br />
3/25/13 318
An In-Depth Look at Live Connect<br />
page.<br />
All reservation data booked on-line is now located in the reservation fields in <strong>ClientBase</strong>. Need help<br />
booking in Transat Travel Insurance Transat Help Desk French: 1-800-752-1143 and Transat<br />
Help Desk English: 1-800-263-2356.<br />
3/25/13 319
An In-Depth Look at Live Connect<br />
Travel Bound<br />
If you are not currently registered to book with Travel Bound on-line, the Travel Bound registration<br />
site and form is here:<br />
https://booktravelbound.net/TravelAgentSite/newAgency.html<br />
Upon registering as a new user, you are provided with login information.<br />
Set Up Travel Bound<br />
Step 1) Once you have obtained accurate login information, you need to add this Live Connect<br />
Provider if it does not already exist into <strong>ClientBase</strong> by going to Tools|Settings|Live Connect<br />
Providers and clicking Add.<br />
Provider Name: Enter Travel Bound.<br />
URL: Enter https://rbs.booktravelbound.com/TramsUS<br />
Travel Category: Enter Tour from the drop-down menu.<br />
Import XML from: Enter HTML Source.<br />
Step 2) Each user can put in his own login information under Tools|My Login|Live Connect or<br />
enter one set of login information for a Live Connect provider for all agents by going to<br />
Tools|Settings|Live Connect Login. Click Add and enter the following information:<br />
Live Connect Provider: Select Travel Bound from the drop-down list.<br />
User Name/Password: Enter the necessary fields based upon the login information provided to you<br />
when you contacted Travel Bound. User name is email address and your selected password.<br />
Account Number: Enter Account Number (assigned Agent ID).<br />
Agency Code: Agent’s License Number (i.e. License/IATA/PCC Code.)<br />
Step 3) Create a vendor profile for Travel Bound if none exists. From the General Info link, click<br />
Live Connect Providers. From here, click Add, then select the desired booking engine (Travel<br />
Bound) from the drop-down list. The vendor code is left blank.<br />
3/25/13 320
An In-Depth Look at Live Connect<br />
Travel Bound Features<br />
Travel Bound supports the following Live Connect Features:<br />
CREATE NEW RESERVATION (Launch, Book & Import New Reservation)<br />
<br />
<br />
Populates booking engine with User Login data from <strong>ClientBase</strong>.<br />
Populates booking engine with profile data from <strong>ClientBase</strong>.<br />
Sends reservation details from booking engine’s confirmation page to<br />
<strong>ClientBase</strong> reservation record.<br />
IMPORT EXISTING RESERVATION (Imports new reservation booked outside<br />
of <strong>ClientBase</strong>)<br />
Uses confirmation number to automatically pass all reservation details from<br />
booking engine to <strong>ClientBase</strong> reservation record.<br />
Allows user to browse for reservation and upon retrieval sends reservation<br />
details from booking engine’s confimation page to <strong>ClientBase</strong> reservation<br />
record.<br />
RETRIEVE RESERVATION - Retrieves exisiting reservation previously imported<br />
via Live Connect for viewing or editing. Upon editing, imports updated reservations<br />
details.<br />
Create New Travel Bound Reservation<br />
Step 1) Retrieve the desired client profile, create a new Res Card and after entering basic Res Card<br />
info, launch Live Connect by clicking Live Connect on the menu bar. (You can also launch Live<br />
Connect from the Profile action gear.)<br />
Step 2) Complete the Live Connect settings by identifying the vendor, the Live Connect Provider<br />
and appropriate Login information. (If you have set up your logins in Tools|MyLogin|Live Connect,<br />
login information will auto-populate.)<br />
3/25/13 321
An In-Depth Look at Live Connect<br />
Step 3) Click the Create New Reservation button.<br />
Step 4) Select any Profile, Passenger, Branch and Res Card information you want to use to book<br />
the reservation and click Connect to launch the on-line booking engine.<br />
Step 5) Although you are still in <strong>ClientBase</strong>, you are now on-line at the Live Connect Provider’s<br />
booking site running the on-line booking engine through a <strong>ClientBase</strong> window. Create the booking<br />
and when done, exit the booking.<br />
Step 6) When the reservation is confirmed on the Thank You Page, click Import Reservation. All<br />
reservation data booked on-line is now located in the reservation fields in <strong>ClientBase</strong>.<br />
3/25/13 322
An In-Depth Look at Live Connect<br />
Import Existing Travel Bound Res Made Outside of CB<br />
Step 1) Create a new Res Card or open an existing one and launch Live Connect by clicking the<br />
Live Connect icon.<br />
Step 2) Complete the Live Connect settings by identifying the vendor, the Live Connect Provider<br />
and appropriate Login information if not auto-populated.<br />
Step 3) Enter the confirmation number for the reservation you want to import and click Import<br />
Existing Reservation.<br />
Step 4) Depending on the Live Connect Provider, the system either locates the reservation using<br />
the confirmation number and automatically import all reservation details, or takes you to the Live<br />
Connect Provider's site for you to use its Retrieve Reservation feature to locate the reservation.<br />
Upon displaying the existing reservation, click Import Reservation and the reservation details are<br />
imported into the <strong>ClientBase</strong> Res Card.<br />
Retrieve an Existing Travel Bound Res to Edit/Cancel<br />
To edit or cancel an existing reservation using Live Connect, follow these steps:<br />
Step 1) Launch Live Connect from inside the Live Connect reservation to edit or cancel. Click Live<br />
Connect.<br />
Step 2) Confirm all Live Connect settings including confirmation number, and click Retrieve<br />
Reservation.<br />
Step 3) Live Connect launches the booking engine site. Edit or cancel the reservation using<br />
instructions supplied by the booking engine, and click Import Reservation. All reservation data<br />
edited or cancelled online is now located in the reservation fields in <strong>ClientBase</strong>.<br />
Need help on Travel Bound site Agents should contact the Travel Bound Operation Support Team<br />
by calling their designated support number or send an email to fit.nyc@gta-travel.com.<br />
Travel Bound - Canada<br />
If you are not currently registered to book with Travel Bound - Canada on-line, the Travel Bound<br />
registration site and form is here:<br />
http://booktravelbound.com/TravelAgentSite/newAgency.html<br />
Upon registering as a new user, you are provided with login information.<br />
Set Up Travel Bound - Canada<br />
Upon receiving login information for each agent in your office, take the following steps to setup<br />
<strong>ClientBase</strong> for Live Connect.<br />
Step 1) Once you have obtained accurate login information, you need to add this Live Connect<br />
Provider if it does not already exist into <strong>ClientBase</strong> by going to Tools|Settings|Live Connect<br />
3/25/13 323
An In-Depth Look at Live Connect<br />
Providers and clicking Add.<br />
Provider Name: Enter Travel Bound Canada.<br />
URL: Enter https://rbs.booktravelbound.com/TramsUS<br />
Travel Category: Enter Tour from the drop-down menu.<br />
Import XML from: Enter HTML Source.<br />
Step 2) Each user can put in his own login information under Tools|My Login|Live Connect or<br />
enter one set of login information for a Live Connect provider for all agents by going to<br />
Tools|Settings|Live Connect Login. Click Add and enter the following information:<br />
Live Connect Provider: Select Travel Bound from the drop-down list.<br />
User Name/Password: Enter the necessary fields based upon the login information provided to you<br />
when you contacted Travel Bound. User name is email address and your selected password.<br />
Account Number: Enter Account Number (assigned Agent ID).<br />
Agency Code: Agent’s License Number (i.e. License/IATA/PCC Code.)<br />
Step 3) Create a vendor profile for Travel Bound if none exists. From the General Info link, click<br />
Live Connect Providers. From here, click Add, then select the desired booking engine (Travel<br />
Bound) from the drop-down list. The vendor code is left blank.<br />
3/25/13 324
An In-Depth Look at Live Connect<br />
Travel Bound Features<br />
Travel Bound supports the following Live Connect Features:<br />
CREATE NEW RESERVATION (Launch, Book & Import New Reservation)<br />
<br />
<br />
Populates booking engine with User Login data from <strong>ClientBase</strong>.<br />
Populates booking engine with profile data from <strong>ClientBase</strong>.<br />
Sends reservation details from booking engine’s confirmation page to<br />
<strong>ClientBase</strong> reservation record.<br />
IMPORT EXISTING RESERVATION (Imports new reservation booked outside<br />
of <strong>ClientBase</strong>)<br />
Uses confirmation number to automatically pass all reservation details from<br />
booking engine to <strong>ClientBase</strong> reservation record.<br />
Allows user to browse for reservation and upon retrieval sends reservation<br />
details from booking engine’s confimation page to <strong>ClientBase</strong> reservation<br />
record.<br />
RETRIEVE RESERVATION - Retrieves exisiting reservation previously imported<br />
via Live Connect for viewing or editing. Upon editing, imports updated reservations<br />
details.<br />
Create New Travel Bound Canada Reservation<br />
Step 1) Retrieve the desired client profile, create a new Res Card and after entering basic Res Card<br />
info, launch Live Connect by clicking Live Connect on the menu bar. (You can also launch Live<br />
Connect from the Profile action gear.)<br />
Step 2) Complete the Live Connect settings by identifying the vendor, the Live Connect Provider<br />
and appropriate Login information. (If you have set up your logins in Tools|MyLogin|Live Connect,<br />
login information will auto-populate.)<br />
3/25/13 325
An In-Depth Look at Live Connect<br />
Step 3) Click the Create New Reservation button.<br />
Step 4) Select any Profile, Passenger, Branch and Res Card information you want to use to book<br />
the reservation and click Connect to launch the on-line booking engine.<br />
Step 5) Although you are still in <strong>ClientBase</strong>, you are now on-line at the Live Connect Provider’s<br />
booking site running the on-line booking engine through a <strong>ClientBase</strong> window. Create the booking<br />
and when done, exit the booking.<br />
Step 6) When the reservation is confirmed on the Thank You Page, click Import Reservation. All<br />
reservation data booked on-line is now located in the reservation fields in <strong>ClientBase</strong>.<br />
3/25/13 326
Import Existing Travel Bound Canada Res Made Outside of CB<br />
An In-Depth Look at Live Connect<br />
Step 1) Create a new Res Card or open an existing one and launch Live Connect by clicking the<br />
Live Connect icon.<br />
Step 2) Complete the Live Connect settings by identifying the vendor, the Live Connect Provider<br />
and appropriate Login information if not auto-populated.<br />
Step 3) Enter the confirmation number for the reservation you want to import and click Import<br />
Existing Reservation.<br />
Step 4) Depending on the Live Connect Provider, the system either locates the reservation using<br />
the confirmation number and automatically import all reservation details, or takes you to the Live<br />
Connect Provider's site for you to use its Retrieve Reservation feature to locate the reservation.<br />
Upon displaying the existing reservation, click Import Reservation and the reservation details are<br />
imported into the <strong>ClientBase</strong> Res Card.<br />
Retrieve an Existing Travel Bound Canada Res to Edit/Cancel<br />
To edit or cancel an existing reservation using Live Connect, follow these steps:<br />
Step 1) Launch Live Connect from inside the Live Connect reservation to edit or cancel. Click Live<br />
Connect.<br />
Step 2) Confirm all Live Connect settings including confirmation number, and click Retrieve<br />
Reservation.<br />
Step 3) Live Connect launches the booking engine site. Edit or cancel the reservation using<br />
instructions supplied by the booking engine, and click Import Reservation. All reservation data<br />
edited or cancelled online is now located in the reservation fields in <strong>ClientBase</strong>.<br />
Travelex Insurance Services<br />
If already licensed to sell Travelex Insurance Services, use the Travelex location number as the<br />
account number when using Live Connect. If not currently licensed to sell Travelex, call Travelex<br />
Sales Support at 1-800-537-8052.<br />
Set Up Travelex Insurance Services<br />
Once you have a Travelex location number, take the following steps to setup <strong>ClientBase</strong> for Live<br />
Connect:<br />
Step 1) Once you have obtained accurate login information, you need to add this Live Connect<br />
Provider if it does not already exist into <strong>ClientBase</strong> by going to Tools|Settings|Live Connect<br />
3/25/13 327
An In-Depth Look at Live Connect<br />
Providers and clicking Add.<br />
Fill in the following fields:<br />
Name of the Provider: In blank field provided, type the name of the Provider.<br />
Status: Leave the default of Active. If you ever want to make it Inactive, go back in this area to turn<br />
off.<br />
URL: Type https://www.travelexinsurance.com/EntryPointTrams.aspx<br />
Travel Category: Select Insurance.<br />
Import XML from: Select HTML Source.<br />
Include Authentication: None.<br />
Click Save.<br />
Step 2) Each user can put in his own login information under Tools|My Login|Live Connect or<br />
enter one set of login information for a Live Connect provider for all agents by going to<br />
Tools|Settings|Live Connect Login. Click Add and enter the following information:<br />
Live Connect Provider: Select Travelex from the drop-down list.<br />
User Name, Password and Account Number: Enter the necessary fields based upon the login<br />
information provided to you when you contacted Travelex. )<br />
Step 3) Create a vendor profile in <strong>ClientBase</strong> for Travelex if one does not exist. From the profile<br />
manager, retrieve the vendor profile (or create if it is not in database). From the General Info area,<br />
click Live Connect Providers. From here, click Add, then select provider from the drop-down list.<br />
The vendor code is left blank. Save.<br />
3/25/13 328
An In-Depth Look at Live Connect<br />
Travelex Insurance Services Live Connect Features<br />
CREATE NEW RESERVATION (Launch, Book & Import New Reservation)<br />
Populates booking engine with User Login data and profile data from<br />
<strong>ClientBase</strong>.<br />
Sends reservation details from booking engine’s confirmation page to<br />
<strong>ClientBase</strong> reservation record.<br />
IMPORT EXISTING RESERVATION (Imports new reservation booked outside<br />
of <strong>ClientBase</strong>)<br />
Uses confirmation number to automatically pass all reservation details from<br />
booking engine to <strong>ClientBase</strong> reservation record.<br />
Allows user to browse for reservation and upon retrieval sends reservation<br />
details from booking engine’s confimation page to <strong>ClientBase</strong> reservation<br />
record.<br />
RETRIEVE RESERVATION - Retrieves exisiting reservation previously imported via Live<br />
Connect for viewing or editing. Upon editing, imports updated reservations details.<br />
Create New Travelex Reservation in Live Connect<br />
Step 1) Retrieve the desired client profile, create a new Res Card and after entering basic Res Card<br />
info, launch Live Connect by clicking Live Connect on the menu bar. (You can also launch Live<br />
Connect from the Profile action gear.)<br />
Step 2) Complete the Live Connect settings by identifying the vendor, the Live Connect Provider<br />
and appropriate Login information. (If you have set up your logins in Tools|MyLogin|Live Connect,<br />
login information will auto-populate.)<br />
Step 3) Click the Create New Reservation button.<br />
3/25/13 329
An In-Depth Look at Live Connect<br />
Step 4) Select any Profile, Passenger, Branch and Res Card information you want to use to book<br />
the reservation and click Connect to launch the on-line booking engine.<br />
Step 5) The system prompts with the reservation records included in this Res Card. Click each<br />
reservation to insure. Again, this step is designed to save time during the insurance booking<br />
process, as less fields need to be completed manually. Any missing or incomplete data can be<br />
updated on the website confirming the insurance booking. Click Connect.<br />
Step 6) Although you are still in <strong>ClientBase</strong>, you are now on-line at the Live Connect Provider’s<br />
booking site running the on-line booking engine through a <strong>ClientBase</strong> window. Complete the<br />
reservation and when the reservation is confirmed, click Import Reservation from the confirmation<br />
3/25/13 330
An In-Depth Look at Live Connect<br />
page.<br />
All reservation data booked on-line is now located in the reservation fields in <strong>ClientBase</strong>.<br />
Travel Guard<br />
If already licensed to sell Travel Guard your account number is the IATA, CLIA, or Travel Guard<br />
account number. If you are not currently licensed to sell Travel Guard, contact Travel Guard directly<br />
at 800-826-1300 or go to http://www.travelguard.com/info/salesform.asp and complete the form.<br />
Set Up Travel Guard<br />
Upon receiving an account number, take the following steps to setup <strong>ClientBase</strong> for Live Connect.<br />
Step 1) Once you have obtained accurate login information, you need to add this Live Connect<br />
Provider if it does not already exist into <strong>ClientBase</strong> by going to Tools|Settings|Live Connect<br />
Providers and clicking Add.<br />
Fill in the following fields:<br />
3/25/13 331
An In-Depth Look at Live Connect<br />
Provider Name: Enter Travel Guard.<br />
URL: http://www.travelguard.com/cgi-bin-/directSubmit.asp<br />
Travel Category: Insurance<br />
Import XML from: N/A<br />
Step 2) Each user can put in his own login information under Tools|My Login|Live Connect or<br />
enter one set of login information for a Live Connect provider for all agents by going to<br />
Tools|Settings|Live Connect Login. Click Add and enter the following information:<br />
Live Connect Provider: Select the appropriate Travel Guard Live Connect provider to connect to<br />
its booking engine.<br />
Account Number: Enter the account number.<br />
Step 3) Create a vendor profile in <strong>ClientBase</strong> for Travel Guard if one does not exist. From the profile<br />
manager, retrieve the vendor profile (or create if it is not in database). From the General Info area,<br />
click Live Connect Providers. From here, click Add, then select provider from the drop-down list.<br />
The vendor code is left blank. Save.<br />
Travel Guard Features<br />
Travel Guard supports the following Live Connect Features:<br />
CREATE NEW RESERVATION (Launch, Book & Import New Reservation)<br />
Populates booking engine with User Login data from <strong>ClientBase</strong>.<br />
Populates booking engine with profile data from <strong>ClientBase</strong>.<br />
Sends reservation details from booking engine’s confirmation page to<br />
<strong>ClientBase</strong> reservation record.<br />
IMPORT EXISTING RESERVATION (Imports new reservation booked outside<br />
of <strong>ClientBase</strong>)<br />
Uses confirmation number to automatically pass all reservation details from<br />
booking engine to <strong>ClientBase</strong> reservation record.<br />
Allows user to browse for reservation and upon retrieval sends reservation<br />
details from booking engine’s confimation page to <strong>ClientBase</strong> reservation<br />
record.<br />
RETRIEVE RESERVATION - Retrieves exisiting reservation previously imported<br />
via Live Connect for viewing or editing. Upon editing, imports updated reservations<br />
details.<br />
Create New Travel Guard Reservation<br />
Step 1) Retrieve the desired client profile, create a new Res Card and after entering basic Res Card<br />
info, launch Live Connect by clicking Live Connect on the menu bar. (You can also launch Live<br />
3/25/13 332
An In-Depth Look at Live Connect<br />
Connect from the Profile action gear.)<br />
Step 2) Complete the Live Connect settings by identifying the vendor, the Live Connect Provider<br />
and appropriate Login information. (If you have set up your logins in Tools|MyLogin|Live Connect,<br />
login information will auto-populate.)<br />
Step 3) Click the Create New Reservation button.<br />
Step 4) Select any Profile, Passenger, Branch and Res Card information you want to use to book<br />
the reservation and click Connect to launch the on-line booking engine.<br />
3/25/13 333
An In-Depth Look at Live Connect<br />
Step 5) The system prompts with the reservation records included in this Res Card. Click each<br />
reservation to insure. Again, this step is designed to save time during the insurance booking<br />
process, as less fields need to be completed manually. Any missing or incomplete data can be<br />
updated on the website confirming the insurance booking. Click Connect.<br />
Step 6) Although you are still in <strong>ClientBase</strong>, you are now on-line at the Live Connect Provider’s<br />
booking site running the on-line booking engine through a <strong>ClientBase</strong> window. Complete the<br />
reservation and when the reservation is confirmed, click Import Reservation from the confirmation<br />
page.<br />
Travel Guard ezTips<br />
TravelGuard's ezTips can now be used with <strong>ClientBase</strong>. The installation and support is all handled<br />
by TravelGuard. Contact TravelGuard (ezTips Support) at 866-729-5215 for their assistance with the<br />
installation and other questions that you may have about ezTips use.<br />
Travel Impressions<br />
If you are not currently registered with Travel Impressions, register with them by logging on to<br />
3/25/13 334
An In-Depth Look at Live Connect<br />
www.travelimpressions.com and log-in to the agent section on the website. Locate the New User<br />
Registration link. Upon creating a User Name and Password for each agent in your office, set up<br />
<strong>ClientBase</strong> for Live Connect.<br />
Set Up Travel Impressions<br />
Step 1) Once you have obtained accurate login information, you need to add this Live Connect<br />
Provider if it does not already exist into <strong>ClientBase</strong> by going to Tools|Settings|Live Connect<br />
Providers and clicking Add.<br />
Fill in the following fields:<br />
Name of the Provider: In blank field provided, type the name of the Provider.<br />
Status: Leave the default of Active. If you ever want to make it Inactive, go back in this area to turn<br />
off.<br />
URL: Type https://quest.travimp.com/phase1/agents.html<br />
Travel Category: Select Tour.<br />
Import XML from: Select HTML Source.<br />
Include Authentication: None.<br />
Click Save.<br />
NOTE: When using <strong>ClientBase</strong> Browser or <strong>ClientBase</strong> <strong>Online</strong> on Windows Vista, you’ll need to add<br />
the following Travel Impressions URLS on your trusted sites:<br />
https://quest.travimp.com<br />
http://quest.travimp.com<br />
Trusted Sites can be accessed by going to Tools|Internet Options|Security Tab|Trusted Sites<br />
icon|Sites button.<br />
Step 2) Each user can put in his own login information under Tools|My Login|Live Connect or<br />
enter one set of login information for a Live Connect provider for all agents by going to<br />
Tools|Settings|Live Connect Login. Click Add and enter the following information:<br />
Live Connect Provider: Select Travel Impressions from the drop-down list.<br />
User Name, Password and Account Number: Enter the necessary fields based upon the login<br />
3/25/13 335
An In-Depth Look at Live Connect<br />
information provided to you when you contacted provider.<br />
Step 3) Create a vendor profile in <strong>ClientBase</strong> for Travel Impressions if one does not exist. From the<br />
profile manager, retrieve the vendor profile (or create if it is not in database). From the General Info<br />
area, click Live Connect Providers. From here, click Add, then select provider from the drop-down<br />
list. The vendor code is left blank. Save.<br />
Step 4) If you are using CBB or CBO on the Windows Vista Platform, you’ll need to add the following<br />
Travel Impressions URL’s to your trusted sites:<br />
https://quest.travimp.com<br />
http://quest.travimp.com<br />
Trusted Sites can be accessed by going to in Internet Explorer by going to Tools|Internet Options|<br />
Security Tab|Trusted Sites icon| Sites button.<br />
Travel Impressions Live Connect Features<br />
CREATE NEW RESERVATION (Launch, Book & Import New Reservation)<br />
Populates booking engine with User Login data and profile data from<br />
<strong>ClientBase</strong>.<br />
Sends reservation details from booking engine’s confirmation page to<br />
<strong>ClientBase</strong> reservation record.<br />
IMPORT EXISTING RESERVATION (Imports new reservation booked outside<br />
of <strong>ClientBase</strong>)<br />
Uses confirmation number to automatically pass all reservation details from<br />
booking engine to <strong>ClientBase</strong> reservation record.<br />
Allows user to browse for reservation and upon retrieval sends reservation<br />
details from booking engine’s confimation page to <strong>ClientBase</strong> reservation<br />
record.<br />
RETRIEVE RESERVATION - Retrieves exisiting reservation previously imported via<br />
Live Connect for viewing or editing. Upon editing, imports updated reservations<br />
details.<br />
Create New Travel Impressions Reservation in Live Connect<br />
Step 1) Retrieve the desired client profile, create a new Res Card and after entering basic Res Card<br />
info, launch Live Connect by clicking Live Connect on the menu bar. (You can also launch Live<br />
3/25/13 336
An In-Depth Look at Live Connect<br />
Connect from the Profile action gear.)<br />
Step 2) Complete the Live Connect settings by identifying the vendor, the Live Connect Provider<br />
and appropriate Login information. (If you have set up your logins in Tools|MyLogin|Live Connect,<br />
login information will auto-populate.)<br />
Step 3) Click the Create New Reservation button.<br />
Step 4) Select any Profile, Passenger, Branch and Res Card information you want to use to book<br />
the reservation and click Connect to launch the on-line booking engine. (This data is NOT passed<br />
to booking site, but can be viewed in upper left-hand corner and used to cut and paste information.)<br />
3/25/13 337
An In-Depth Look at Live Connect<br />
Step 5) Although you are still in <strong>ClientBase</strong>, you are now on-line at the Live Connect Provider’s<br />
booking site running the on-line booking engine through a <strong>ClientBase</strong> window. Complete the<br />
reservation and when the reservation is confirmed, click Import Reservation from the confirmation<br />
page.<br />
All reservation data booked on-line is now located in the reservation fields in <strong>ClientBase</strong>.<br />
Import Existing Travel Impressions Res Made Outside of CB<br />
Step 1) Create a new Res Card or open an existing one and launch Live Connect by clicking the<br />
Live Connect icon.<br />
Step 2) Complete the Live Connect settings by identifying the vendor, the Live Connect Provider and<br />
appropriate Login information if not autopopulated.<br />
Step 3) Enter the confirmation number for the reservation you want to import and click Import<br />
Existing Reservation.<br />
Step 4) Depending on the Live Connect Provider, the system either locates the reservation using<br />
the confirmation number and automatically import all reservation details, or takes you to the Live<br />
Connect Provider's site for you to use its Retrieve Reservation feature to locate the reservation.<br />
Upon displaying the existing reservation, click Import Reservation and the reservation details are<br />
imported into the <strong>ClientBase</strong> Res Card.<br />
Retrieve an Existing Travel Impressions Res to Edit/Cancel<br />
To edit or cancel an existing reservation using Live Connect, follow these steps:<br />
Step 1) Launch Live Connect from inside the Live Connect reservation to edit or cancel. Click Live<br />
Connect.<br />
Step 2) Confirm all Live Connect settings including confirmation number, and click Retrieve<br />
Reservation.<br />
Step 3) Live Connect launches the booking engine site. Edit or cancel the reservation using<br />
instructions supplied by the booking engine, and click Import Reservation. All reservation data<br />
edited or cancelled online is now located in the reservation fields in <strong>ClientBase</strong>.<br />
3/25/13 338
An In-Depth Look at Live Connect<br />
Travel Insured<br />
To use Live Connect to purchase insurance with Travel Insured, you must be registered to sell<br />
Travel Insured insurance. If not currently licensed to sell Travel Insured, or have not been setup to<br />
book on-line, contact Travel Insured directly by emailing info@travelinsured.com.<br />
Set Up Travel Insured<br />
Upon receiving login information from Travel Insured, take the following steps to setup <strong>ClientBase</strong><br />
for Live Connect.<br />
Step 1) Once you have obtained accurate login information, you need to add this Live Connect<br />
Provider if it does not already exist into <strong>ClientBase</strong> by going to Tools|Settings|Live Connect<br />
Providers and clicking Add.<br />
Fill in the following fields:<br />
Name of the Provider: In blank field provided, type the name of the Provider.<br />
Status: Leave the default of Active. If you ever want to make it Inactive, go back in this area to turn<br />
off.<br />
URL: Type https://www.travelinsured.com/tramslogin.aspx<br />
Travel Category: Select Insurance.<br />
Import XML from: Select HTML Source.<br />
Include Authentication: None.<br />
Click Save.<br />
Step 2) Each user can put in his own login information under Tools|My Login|Live Connect or<br />
enter one set of login information for a Live Connect provider for all agents by going to<br />
Tools|Settings|Live Connect Login. Click Add and enter the following information:<br />
Live Connect Provider: Select Travel Insured from the drop-down list.<br />
User Name, Password and Account Number: Enter the necessary fields based upon the login<br />
information provided to you when you contacted provider.<br />
Step 3) Create a vendor profile in <strong>ClientBase</strong> for Travel Insured if one does not exist. From the<br />
profile manager, retrieve the vendor profile (or create if it is not in database). From the General Info<br />
3/25/13 339
An In-Depth Look at Live Connect<br />
area, click Live Connect Providers. From here, click Add, then select provider from the drop-down<br />
list. The vendor code is left blank. Save.<br />
Travel Insured Live Connect Features<br />
CREATE NEW RESERVATION (Launch, Book & Import New Reservation)<br />
Populates booking engine with User Login data and profile data from<br />
<strong>ClientBase</strong>.<br />
Sends reservation details from booking engine’s confirmation page to<br />
<strong>ClientBase</strong> reservation record.<br />
IMPORT EXISTING RESERVATION (Imports new reservation booked outside<br />
of <strong>ClientBase</strong>)<br />
Uses confirmation number to automatically pass all reservation details from<br />
booking engine to <strong>ClientBase</strong> reservation record.<br />
Allows user to browse for reservation and upon retrieval sends reservation<br />
details from booking engine’s confimation page to <strong>ClientBase</strong> reservation<br />
record.<br />
RETRIEVE RESERVATION - Retrieves exisiting reservation previously imported via Live<br />
Connect for viewing or editing. Upon editing, imports updated reservations details.<br />
Create New Travel Insured Reservation in Live Connect<br />
Step 1) Retrieve the desired client profile, create a new Res Card and after entering basic Res Card<br />
info, launch Live Connect by clicking Live Connect on the menu bar. (You can also launch Live<br />
Connect from the Profile action gear.)<br />
Step 2) Complete the Live Connect settings by identifying the vendor, the Live Connect Provider<br />
and appropriate Login information.<br />
3/25/13 340
An In-Depth Look at Live Connect<br />
Step 3) Click the Create New Reservation button.<br />
Step 4) Select any Profile, Passenger, Branch and Res Card information you want to use to book<br />
the reservation and click Connect to launch the on-line booking engine.<br />
Step 5) The system prompts with the reservation records included in this Res Card. Click each<br />
reservation to insure. Again, this step is designed to save time during the insurance booking<br />
process, as less fields need to be completed manually. Any missing or incomplete data can be<br />
updated on the website confirming the insurance booking. Click Connect.<br />
Step 6) Although you are still in <strong>ClientBase</strong>, you are now on-line at the Live Connect Provider’s<br />
booking site running the on-line booking engine through a <strong>ClientBase</strong> window. Complete the<br />
reservation and when the reservation is confirmed, click Import Reservation from the confirmation<br />
3/25/13 341
An In-Depth Look at Live Connect<br />
page.<br />
All reservation data booked on-line is now located in the reservation fields in <strong>ClientBase</strong>.<br />
Travelport Cruise and Tour<br />
Your agency must be registered to use Travelport Cruise and Tour through Galileo or Worldspan<br />
and have a valid User Name and Password. An agency product registration form link can be found<br />
on the homepage at www.travelportcruiseandtour.com.<br />
Set Up Travelport Cruise and Tour Live Connect in <strong>ClientBase</strong><br />
Upon receiving login information, take the following steps to setup <strong>ClientBase</strong> for Live Connect.<br />
Step 1) Create a new or check that a Live Connect Provider for Travelport exists by going to<br />
Tools|Settings|Live Connect Providers, and clicking Add. (Make sure the URL is correct if<br />
Provider is present.)<br />
3/25/13 342
An In-Depth Look at Live Connect<br />
FOR GAILEO USERS<br />
Provider Name: Type Travelport Cruise and Tour.<br />
URL: Type https://lcv.travelportcruiseandtour.com/<br />
Travel Category: Select Cruise from the drop-down.<br />
Import XML from: Select HTML Source.<br />
Include Authentication/URL: Not Applicable<br />
FOR WORLDSPAN USERS<br />
Provider Name: Type Travelport Cruise and Tour.<br />
URL: Type https://lcv-worldspan.travelportcruiseandtour.com/<br />
Travel Category: Select Cruise from the drop-down.<br />
Import XML from: Select HTML Source.<br />
Include Authentication/URL: Not Applicable<br />
Step 2) Each user can put in his own login information under Tools|My Login|Live Connect or<br />
enter one set of login information for a Live Connect provider for all agents by going to<br />
Tools|Settings|Live Connect Login. Click Add and enter the following information:<br />
Live Connect Provider: Select Travelport Cruise and Tour from the drop-down list.<br />
3/25/13 343
An In-Depth Look at Live Connect<br />
User Name, Password: Enter your user name and password.<br />
Account Number: Does not apply.<br />
Agency Code: Does not apply.<br />
Step 3) When registering, Travelport Cruise and Tour provided you with a list of participating<br />
vendors and vendor codes. Create a profile in <strong>ClientBase</strong> (if none exists) for each vendor and<br />
specify Travelport Cruise and Tour as the booking engine and enter the unique vendor identifier.<br />
First click Live Connect Providers and Add to add a Live Connect Provider. Select Travelport Cruise<br />
and Tour from the drop-down menu and enter the correct vendor code.<br />
3/25/13 344
Travelport Participating Vendors and Vendor Codes for Galileo Users<br />
An In-Depth Look at Live Connect<br />
CODE VENDOR NAME LIVE CONNECT PROVIDER<br />
CCL Carnival Cruise Line Travelport Cruise and Tour<br />
CEL Celebrity Cruises Travelport Cruise and Tour<br />
CST Costa Cruise Lines Travelport Cruise and Tour<br />
CRS Crystal Cruises Travelport Cruise and Tour<br />
CUN Cunard Cruises Travelport Cruise and Tour<br />
DCL Disney Cruise Line Travelport Cruise and Tour<br />
GGO GoGo Travelport Cruise and Tour<br />
HAL Holland America Line Travelport Cruise and Tour<br />
NCL Norwegian Cruise Line Travelport Cruise and Tour<br />
PLC Princess Cruises Travelport Cruise and Tour<br />
RCC Royal Caribbean International Travelport Cruise and Tour<br />
TIP Travel Impressions Travelport Cruise and Tour<br />
Travelport Participating Vendors and Vendor Codes for Worldspan Users<br />
CODE VENDOR NAME LIVE CONNECT PROVIDER<br />
CV Carnival Cruise Line Travelport Cruise and Tour<br />
CB Celebrity Cruises Travelport Cruise and Tour<br />
CO Costa Cruise Lines Travelport Cruise and Tour<br />
CS Crystal Cruises Travelport Cruise and Tour<br />
CU Cunard Cruises Travelport Cruise and Tour<br />
DS Disney Cruise Line Travelport Cruise and Tour<br />
GO GoGo Travelport Cruise and Tour<br />
HA Holland America Line Travelport Cruise and Tour<br />
NC Norwegian Cruise Line Travelport Cruise and Tour<br />
PC Princess Cruises Travelport Cruise and Tour<br />
RC Royal Caribbean International Travelport Cruise and Tour<br />
TI Travel Impressions Travelport Cruise and Tour<br />
3/25/13 345
An In-Depth Look at Live Connect<br />
Live Connect Features Supported by Travelport Cruise and Tour<br />
Travelport Cruise and Tour supports the following Live Connect features:<br />
CREATE NEW RESERVATION (Launch, Book & Import New Reservation)<br />
Automatically logs you in to booking engine with User Login data from<br />
<strong>ClientBase</strong>.<br />
Populates booking engine with profile data from <strong>ClientBase</strong>.<br />
Sends reservation details from booking engine’s confirmation page to<br />
<strong>ClientBase</strong> reservation record.<br />
__ IMPORT EXISTING RESERVATION (Imports new reservation booked outside<br />
of <strong>ClientBase</strong>)<br />
__ Uses confirmation number to automatically pass all reservation details from<br />
booking engine to <strong>ClientBase</strong> reservation record.<br />
__ Allows user to browse for reservation and upon retrieval sends reservation<br />
details from booking engine’s confirmation page to <strong>ClientBase</strong> reservation<br />
record.<br />
__ RETRIEVE RESERVATION - Retrieves existing reservation previously imported via Live<br />
Connect for viewing or editing. Upon editing, imports updated reservations details.<br />
Create New Travelport Reservation in Live Connect<br />
Step 1) Retrieve the desired client profile, create a new Res Card and after entering basic Res Card<br />
info, launch Live Connect by clicking Live Connect on the menu bar. (You can also launch Live<br />
Connect from the Profile action gear.)<br />
Step 2) Complete the Live Connect settings by identifying the vendor, the Live Connect Provider<br />
and appropriate Login information.<br />
3/25/13 346
An In-Depth Look at Live Connect<br />
Step 3) Click the Create New Reservation button.<br />
Step 4) Select any Profile, Passenger, Branch and Res Card information you want to use to book<br />
the reservation and click Connect to launch the on-line booking engine.<br />
Step 5) Although still in <strong>ClientBase</strong>, you are now on-line at the Travelport Cruise and Tour booking<br />
site. Complete your reservation as you normally would using Travelport’s booking features. If you<br />
are not familiar with how to use the booking tools, for Galileo, contact the North American Help Desk<br />
by calling their designated support number. This can vary by agency depending on the contract with<br />
Galileo.<br />
NO HELP designated for Worldspan users.<br />
When the reservation is confirmed, click Import Reservation. All reservation data booked on-line is<br />
now located in the <strong>ClientBase</strong> Reservation record.<br />
3/25/13 347
An In-Depth Look at Live Connect<br />
3/25/13 348
TravelSafe Vacation Insurance<br />
To use Live Connect to purchase TravelSafe Vacation Insurance, you must be an authorized<br />
TravelSafe representative with a current User ID (Travel Agency Code). If currently authorized, use<br />
your User ID to sell TravelSafe through <strong>ClientBase</strong>. The User ID is pre-printed on your current<br />
TravelSafe brochures/certificates. You also need a password and account number. Please call the<br />
TravelSafe office to receive this information. If not licensed or authorized to sell TravelSafe Vacation<br />
Insurance, please contact TravelSafe directly at 1-800-523-8020 to provide you with the necessary<br />
forms.<br />
Set Up TravelSafe Vacation Insurance<br />
Upon receiving a User ID and password for each agent in your office, take the following steps to<br />
setup <strong>ClientBase</strong> for Live Connect.<br />
Step 1) Once you have obtained accurate login information, you need to add this Live Connect<br />
Provider if it does not already exist into <strong>ClientBase</strong> by going to Tools|Settings|Live Connect<br />
Providers and clicking Add.<br />
Fill in the following fields:<br />
Name of the Provider: In blank field provided, type the name of the Provider.<br />
Status: Leave the default of Active. If you ever want to make it Inactive, go back in this area to turn<br />
off.<br />
URL: Type https://tmtsf.com/Tramsaffiliate.phpproductid=4018&app=newenrl<br />
Travel Category: Select Insurance.<br />
Import XML from: Select HTML Source.<br />
Include Authentication: None.<br />
Click Save.<br />
Step 2) Each user can put in his own login information under Tools|My Login|Live Connect or<br />
enter one set of login information for a Live Connect provider for all agents by going to<br />
Tools|Settings|Live Connect Login. Click Add and enter the following information:<br />
3/25/13 349
An In-Depth Look at Live Connect<br />
Live Connect Provider: Select TravelSave Vacation Insurance from the drop-down list.<br />
User Name, Password and Account Number: Enter the TravelSafe ID Code, Password, and<br />
account number obtained from TravelSafe here. The Agency Code is left blank.<br />
Step 3) Create a vendor profile in <strong>ClientBase</strong> for TravelSafe Vacation Insurance if one does not<br />
exist. From the profile manager, retrieve the vendor profile (or create if it is not in database). From<br />
the General Info area, click Live Connect Providers. From here, click Add, then select provider from<br />
the drop-down list. The vendor code is left blank. Save.<br />
TravelSafe Live Connect Features<br />
CREATE NEW RESERVATION (Launch, Book & Import New Reservation)<br />
Populates booking engine with User Login data and profile data from<br />
<strong>ClientBase</strong>.<br />
Sends reservation details from booking engine’s confirmation page to<br />
<strong>ClientBase</strong> reservation record.<br />
IMPORT EXISTING RESERVATION (Imports new reservation booked outside<br />
of <strong>ClientBase</strong>)<br />
Uses confirmation number to automatically pass all reservation details from<br />
booking engine to <strong>ClientBase</strong> reservation record.<br />
Allows user to browse for reservation and upon retrieval sends reservation<br />
details from booking engine’s confimation page to <strong>ClientBase</strong> reservation<br />
record.<br />
RETRIEVE RESERVATION - Retrieves exisiting reservation previously imported via Live<br />
Connect for viewing or editing. Upon editing, imports updated reservations details.<br />
Create New TravelSafe Reservation in Live Connect<br />
Step 1) Retrieve the desired client profile, create a new Res Card and after entering basic Res Card<br />
info, launch Live Connect by clicking Live Connect on the menu bar. (You can also launch Live<br />
3/25/13 350
An In-Depth Look at Live Connect<br />
Connect from the Profile action gear.)<br />
Step 2) Complete the Live Connect settings by identifying the vendor, the Live Connect Provider<br />
and appropriate Login information.<br />
Step 3) Click the Create New Reservation button.<br />
Step 4) Select any Profile, Passenger, Branch and Res Card information you want to use to book<br />
the reservation and click Connect to launch the on-line booking engine.<br />
Step 5) The system prompts with the reservation records included in this Res Card. Click each<br />
reservation to insure. Again, this step is designed to save time during the insurance booking<br />
3/25/13 351
An In-Depth Look at Live Connect<br />
process, as less fields need to be completed manually. Any missing or incomplete data can be<br />
updated on the website confirming the insurance booking. Click Connect.<br />
Step 6) Although you are still in <strong>ClientBase</strong>, you are now on-line at the Live Connect Provider’s<br />
booking site running the on-line booking engine through a <strong>ClientBase</strong> window. Complete the<br />
reservation and when the reservation is confirmed, click Import Reservation from the confirmation<br />
page.<br />
All reservation data booked on-line is now located in the reservation fields in <strong>ClientBase</strong>.<br />
TravTech CruiseBase<br />
If you are not currently registered to use TravTech CruiseBase, contact TravTech Sales at 800-531-<br />
9246 or via email at sales@travtech.com Upon registering as a new user, login credentials are<br />
provided. After receiving this information for each agent, take the following steps.<br />
Set Up TravTech CruiseBase<br />
Step 1) Once you have obtained accurate login information, you need to add this Live Connect<br />
3/25/13 352
An In-Depth Look at Live Connect<br />
Provider if it does not already exist into <strong>ClientBase</strong> by going to Tools|Settings|Live Connect<br />
Providers and clicking Add.<br />
Fill in the following fields:<br />
Name of the Provider: In blank field provided, type the name of the Provider.<br />
Status: Leave the default of Active. If you ever want to make it Inactive, go back in this area to turn<br />
off.<br />
URL: Type http://www.cruisebase.com/abc16/sd/lc/LiveConnectLogin.aspx .<br />
Travel Category: Select Cruise.<br />
Import XML from: Select HTML Source.<br />
Include Authentication: None.<br />
Click Save.<br />
Step 2) Each user can put in his own login information under Tools|My Login|Live Connect or<br />
enter one set of login information for a Live Connect provider for all agents by going to<br />
Tools|Settings|Live Connect Login. Click Add and enter the following information:<br />
Live Connect Provider: Select TravTech CruiseBase from the drop-down list.<br />
User Name, Password and Account Number: Enter the necessary fields based upon the login<br />
information provided to you when you contacted provider.<br />
Step 3) When you registered, TravTech CruiseBase provided you with a list of participating vendors<br />
and vendor codes. Locate or create a new profile in <strong>ClientBase</strong> for each vendor on the table below.<br />
From the Profile General Info area, click Live Connect Providers. Click Add and select TravTech<br />
CruiseBase the drop-down list. Enter the vendor code from the table below. Click Save.<br />
3/25/13 353
An In-Depth Look at Live Connect<br />
TravTech CruiseBase Vendors and Vendor Codes<br />
CODE VENDOR NAME LIVE CONNECT PROVIDER<br />
566 Carnival Cruise Lines TravTech CruiseBase<br />
568 Celebrity Cruises TravTech CruiseBase<br />
578 Costa Cruise Lines TravTech CruiseBase<br />
579 Crystal Cruises TravTech CruiseBase<br />
580 Cunard Line TravTech CruiseBase<br />
582 Disney Cruise Line TravTech CruiseBase<br />
608 Holland America Lines TravTech CruiseBase<br />
624 Norwegian Cruise Lines TravTech CruiseBase<br />
636 Princess Cruises TravTech CruiseBase<br />
638 Royal Caribbean International TravTech CruiseBase<br />
TravTech CruiseBase Live Connect Features<br />
CREATE NEW RESERVATION (Launch, Book & Import New Reservation)<br />
Populates booking engine with User Login data and profile data from<br />
<strong>ClientBase</strong>.<br />
Sends reservation details from booking engine’s confirmation page to<br />
<strong>ClientBase</strong> reservation record.<br />
IMPORT EXISTING RESERVATION (Imports new reservation booked outside<br />
of <strong>ClientBase</strong>)<br />
Uses confirmation number to automatically pass all reservation details from<br />
booking engine to <strong>ClientBase</strong> reservation record.<br />
Allows user to browse for reservation and upon retrieval sends reservation<br />
details from booking engine’s confimation page to <strong>ClientBase</strong> reservation<br />
record.<br />
RETRIEVE RESERVATION - Retrieves existing reservation previously imported via Live<br />
Connect for viewing or editing. Upon editing, imports updated reservations details.<br />
Create New CruiseBase Reservation in Live Connect<br />
Step 1) Retrieve the desired client profile, create a new Res Card and after entering basic Res Card<br />
info, launch Live Connect by clicking Live Connect on the menu bar. (You can also launch Live<br />
3/25/13 354
An In-Depth Look at Live Connect<br />
Connect from the Profile action gear.)<br />
Step 2) Complete the Live Connect settings by identifying the vendor, the Live Connect Provider<br />
and appropriate Login information. (If you have set up your logins in Tools|MyLogin|Live Connect,<br />
login information will auto-populate.)<br />
Step 3) Click the Create New Reservation button.<br />
Step 4) Select any Profile, Passenger, Branch and Res Card information you want to use to book<br />
the reservation and click Connect to launch the on-line booking engine.<br />
Step 5) Although still in <strong>ClientBase</strong>, you are now on-line at the booking site. Complete your<br />
3/25/13 355
An In-Depth Look at Live Connect<br />
reservation as you normally would. If you are not familiar with how to use TravTech CruiseBase,<br />
email support at helpdesk@travtech.com. When the reservation is confirmed, click Import<br />
Reservation. All reservation data booked on-line is now located in the <strong>ClientBase</strong> Reservation<br />
record.<br />
Import Existing CruiseBaseReservation Made Outside of <strong>ClientBase</strong><br />
Step 1) Create a new Res Card or open an existing one and launch Live Connect by clicking the<br />
Live Connect icon.<br />
Step 2) Complete the Live Connect settings by identifying the vendor, the Live Connect Provider and<br />
appropriate Login information if not autopopulated.<br />
Step 3) Enter the confirmation number for the reservation you want to import and click Import<br />
Existing Reservation.<br />
Step 4) Depending on the Live Connect Provider, the system either locates the reservation using<br />
the confirmation number and automatically import all reservation details, or takes you to the Live<br />
Connect Provider's site for you to use its Retrieve Reservation feature to locate the reservation.<br />
Upon displaying the existing reservation, click Import Reservation and the reservation details are<br />
imported into the <strong>ClientBase</strong> Res Card.<br />
Retrieve an Existing CruiseBase Res to Edit/Cancel<br />
To edit or cancel an existing reservation using Live Connect, follow these steps:<br />
Step 1) Launch Live Connect from inside the Live Connect reservation to edit or cancel. Click Live<br />
Connect.<br />
Step 2) Confirm all Live Connect settings including confirmation number, and click Retrieve<br />
Reservation.<br />
Step 3) Live Connect launches the booking engine site. Edit or cancel the reservation using<br />
instructions supplied by the booking engine, and click Import Reservation. All reservation data<br />
edited or cancelled online is now located in the reservation fields in <strong>ClientBase</strong>.<br />
Tripology<br />
To register FREE for Tripology, simply access www.tripology.com/agent. Upon completion of the<br />
registration, take the following steps to setup <strong>ClientBase</strong>.<br />
3/25/13 356
An In-Depth Look at Live Connect<br />
Set Up Tripology Live Connect<br />
After registering for Tripology, take the following steps to setup <strong>ClientBase</strong> for Live Connect.<br />
Step 1) Once you have obtained accurate login information, you need to add this Live Connect<br />
Provider if it does not already exist into <strong>ClientBase</strong> by going to Tools|Settings|Live Connect<br />
Providers and clicking Add:<br />
Provider Name: Type Tripology.<br />
URL: Type http://www.tripology.com/lead/clientbase/<br />
Travel Category: Select Tour from the drop-down.<br />
Import XML from: Select HTML Source.<br />
Step 2) Retrieve the Tripology vendor profile from the Profile Manager (or create one if not in your<br />
database and make sure to tag the profile with the Travel Category of Tour). From the General Info<br />
tab, click the Live Connect Providers button. Click Add, and select Tripology booking engine from<br />
the drop-down list. The Vendor Code is TRIP. In the Travel Category profile field, select Tour from<br />
the drop-down menu.<br />
3/25/13 357
An In-Depth Look at Live Connect<br />
Live Connect Features Supported by Tripology<br />
Tripology supports the following Live Connect Features:<br />
CREATE NEW RESERVATION (Launch, Book & Import New Reservation)<br />
Automatically logs you in to booking engine with User Login data from <strong>ClientBase</strong>.<br />
Populates booking engine with profile data from <strong>ClientBase</strong>.<br />
Sends reservation details from booking engine’s confirmation page to <strong>ClientBase</strong><br />
reservation record.<br />
IMPORT EXISTING RESERVATION (Imports new reservation booked outside of<br />
<strong>ClientBase</strong>)<br />
Uses confirmation number to automatically pass LEAD details from Tripology to<br />
<strong>ClientBase</strong> reservation record.<br />
Allows user to browse for reservation and upon retrieval sends reservation details<br />
from booking engine’s confirmation page to <strong>ClientBase</strong> reservation record.<br />
RETRIEVE RESERVATION - Retrieves existing reservation previously imported via Live<br />
Connect for viewing or editing. Upon editing, imports updated reservations details.<br />
Import a Lead from Tripology<br />
Step 1) When importing a lead from Tripology, create a client Res Card on any profile (you may<br />
want to create a Leisure client profile just for this process entitled Tripology, change the Reservation<br />
Cycle to Under Consideration, and click the Live Connect icon in Res Card.<br />
step 2) Select Tripology from the drop-down. No password required. Click Import Existing<br />
Reservation.<br />
Step 3) Enter the confirmation number of Tripology LEAD and click OK.<br />
3/25/13 358
An In-Depth Look at Live Connect<br />
Step 4) Being launched into the Tripology website, click Import Reservation to obtain the LEAD.<br />
Step 5) The LEAD comes in as a reservation. The name of the customer is located in the<br />
Passenger Name field and all the information about the LEAD is contained the reservation Agent<br />
Remarks tab. Click on the reservation and the Agent Remarks tab to see the LEAD’s details.<br />
Highlight the email address in the area.<br />
Step 6) Go to Profile Manager to create a new profile for the LEAD if none exists. Fill in the LEAD’s<br />
name, and paste the email. Optionally put Tripology in the Referred by Field, enter a Courtesy Title,<br />
Salutation, etc.<br />
Step 7) Go to Tools|Page History to return to the open Res Card. In the Prepared for field in the<br />
General tab, edit the name to remove the old profile name and put in the new customer’s name. Fill<br />
in the Region/Destination. This attaches the LEAD res card to the new profile. Follow up on LEAD<br />
as usual.<br />
Need Help To speak with a Tripology Relationship Manager about the program, call 800-924-<br />
0722.<br />
VacationSelect<br />
Sign up with Worldspan VacationSelect by selecting the VacationSelect link from the Go! Res<br />
Script Index Book tab. Once the login screen is launched, Worldspan agents need to enter their<br />
VacationSelect Account Number, Name, and Password. To register for a VacationSelect login, click<br />
Register Here.<br />
Note: This login is independent of the Go! login and is required for agents to shop and book on<br />
Worldspan VacationSelect from <strong>ClientBase</strong>.<br />
Set Up VacationSelect<br />
Upon receiving login information for each agent in your office, take the following steps to setup<br />
<strong>ClientBase</strong> for Live Connect.<br />
Step 1) Once you have obtained accurate login information, you need to add this Live Connect<br />
3/25/13 359
An In-Depth Look at Live Connect<br />
Provider if it does not already exist into <strong>ClientBase</strong> by going to Tools|Settings|Live Connect<br />
Providers and clicking Add.<br />
Fill in the following fields:<br />
Name of the Provider: In blank field provided, type the name of the Provider.<br />
Status: Leave the default of Active. If you ever want to make it Inactive, go back in this area to turn<br />
off.<br />
URL: Type https://login.vaxwsn.vaxvacationaccess.com/default.aspx .<br />
Travel Category: Select Tour.<br />
Import XML from: Select HTML Source.<br />
Include Authentication: None.<br />
Click Save.<br />
Step 2) When registering, VacationSelect provided you with a list of participating vendors and<br />
vendor codes. Create a profile in <strong>ClientBase</strong> for each vendor (if none exists) and specify<br />
VacationSelect as the booking engine and enter the unique vendor identifier.<br />
First click Live Connect Providers and Add to add a Live Connect Provider. Select VacationSelect<br />
from the drop-down menu and enter the VacationSelect vendor code. (If you are using<br />
VacationSelect Dynamic, enter its unique vendor identifier.)<br />
3/25/13 360
An In-Depth Look at Live Connect<br />
VacationSelect - Dynamic Participating Vendors and Vendor Codes<br />
CODE VENDOR NAME LIVE CONNECT PROVIDER<br />
BST Blue Sky Tours VacationSelect<br />
FJ1 Funjet Vacations VacationSelect<br />
MMT MGM Mirage Vacations VacationSelect<br />
SAB Sandals and Beaches Resorts VacationSelect<br />
WNT Southwest Airlines Vacations VacationSelect<br />
TPV TNT Vacations powered by Funjet VacationSelect<br />
UNT Universal Parks & Resort VacationSelect<br />
AMW US Airways Vacations VacationSelect<br />
VE1 Vacation Express VacationSelect<br />
VacationSelect Live Connect Features<br />
CREATE NEW RESERVATION (Launch, Book & Import New Reservation)<br />
Populates booking engine with User Login data and profile data from<br />
<strong>ClientBase</strong>.<br />
Sends reservation details from booking engine’s confirmation page to<br />
<strong>ClientBase</strong> reservation record.<br />
IMPORT EXISTING RESERVATION (Imports new reservation booked outside<br />
of <strong>ClientBase</strong>)<br />
Uses confirmation number to automatically pass all reservation details from<br />
booking engine to <strong>ClientBase</strong> reservation record.<br />
Allows user to browse for reservation and upon retrieval sends reservation<br />
details from booking engine’s confimation page to <strong>ClientBase</strong> reservation<br />
record.<br />
RETRIEVE RESERVATION - Retrieves exisiting reservation previously imported<br />
via Live Connect for viewing or editing. Upon editing, imports updated reservations<br />
details.<br />
Create New VacationSelect Reservation in Live Connect<br />
Step 1) Retrieve the desired client profile, create a new Res Card and after entering basic Res Card<br />
info, launch Live Connect by clicking Live Connect on the menu bar. (You can also launch Live<br />
3/25/13 361
An In-Depth Look at Live Connect<br />
Connect from the Profile action gear.)<br />
Step 2) Complete the Live Connect settings by identifying the vendor, the Live Connect Provider<br />
and appropriate Login information.<br />
Step 3) Click the Create New Reservation button.<br />
Step 4) Select any Profile, Passenger, Branch and Res Card information you want to use to book<br />
the reservation and click Connect to launch the on-line booking engine.<br />
Step 5) Although you are still in <strong>ClientBase</strong>, you are now on-line at the Live Connect Provider’s<br />
3/25/13 362
An In-Depth Look at Live Connect<br />
booking site running the on-line booking engine through a <strong>ClientBase</strong> window. Complete the<br />
reservation and when the reservation is confirmed, click Import Reservation from the confirmation<br />
page.<br />
You are still within the<br />
<strong>ClientBase</strong> program when<br />
you use Live Connect.<br />
All reservation data booked on-line is now located in the reservation fields in <strong>ClientBase</strong>.<br />
Import Existing VacationSelect Res Made Outside of <strong>ClientBase</strong><br />
Step 1) Create a new Res Card or open an existing one and launch Live Connect by clicking the<br />
Live Connect icon.<br />
Step 2) Complete the Live Connect settings by identifying the vendor, the Live Connect Provider<br />
and appropriate Login information if not autopopulated.<br />
Step 3) Enter the confirmation number for the reservation you want to import and click Import<br />
Existing Reservation.<br />
Step 4) Depending on the Live Connect Provider, the system either locates the reservation using<br />
the confirmation number and automatically import all reservation details, or takes you to the Live<br />
Connect Provider's site for you to use its Retrieve Reservation feature to locate the reservation.<br />
Upon displaying the existing reservation, click Import Reservation and the reservation details are<br />
imported into the <strong>ClientBase</strong> Res Card.<br />
Retrieve an Existing VacationSelect Res to Edit/Cancel<br />
To edit or cancel an existing reservation using Live Connect, follow these steps:<br />
Step 1) Launch Live Connect from inside the Live Connect reservation to edit or cancel. Click Live<br />
Connect.<br />
Step 2) Confirm all Live Connect settings including confirmation number, and click Retrieve<br />
Reservation.<br />
Step 3) Live Connect launches the booking engine site. Edit or cancel the reservation using<br />
instructions supplied by the booking engine, and click Import Reservation. All reservation data<br />
edited or cancelled online is now located in the reservation fields in <strong>ClientBase</strong>.<br />
VAX VacationAccess Vacations<br />
Sign up with VAX VacationAccess Vacations by going to their website at www.vacation<br />
access.com. Before using VAX Dynamic in Live Connect, some setup in <strong>ClientBase</strong> is required.<br />
3/25/13 363
An In-Depth Look at Live Connect<br />
After successfully completing registration, obtain a unique user name, agency password, and<br />
account number for use in <strong>ClientBase</strong>. (For documentation, training or questions on the use of the<br />
Vacation Access booking process, email Vaxsupport@triseptsolutions.com).<br />
Set Up VAX Vacation Access Vacations<br />
Step 1) Once you have obtained accurate login information, you need to add this Live Connect<br />
Provider if it does not already exist into <strong>ClientBase</strong> by going to Tools|Settings|Live Connect<br />
Providers and clicking Add.<br />
Fill in the following fields:<br />
Name of the Provider: In blank field provided, type the name of the Provider, VAX Tour - Dynamic.<br />
Status: Leave the default of Active. If you ever want to make it Inactive, go back in this area to turn<br />
off.<br />
URL: Type https://login.www.vaxvacationaccess.com/default.aspx .<br />
Travel Category: Select Tour.<br />
Import XML from: Select HTML Source.<br />
Include Authentication: None.<br />
Click Save.<br />
Step 2) When registered, Vacation Access Tour provided you with a list of participating vendors and<br />
vendor codes. Create a profile in <strong>ClientBase</strong> for each vendor (if none exists) and specify VAX Tour<br />
- Dynamic as the booking engine and enter the unique vendor identifier. First click Live Connect<br />
Providers and Add to add a Live Connect Provider. Select VAX Tour - Dynamic from the drop-down<br />
menu and enter the VAX Tour - Dynamic vendor code. Save.<br />
3/25/13 364
VAX Tour - Dynamic Participating Vendors and Vendor Codes<br />
An In-Depth Look at Live Connect<br />
CODE VENDOR NAME LIVE CONNECT PROVIDER<br />
AST Alaska Airlines Vacations VAX Tour - Dynamic<br />
BST Blue Sky Tours VAX Tour - Dynamic<br />
FJ1 Funjet Vacations VAX Tour - Dynamic<br />
GP1 Grand Pineapple Beach Resorts VAX Tour - Dynamic<br />
JSV JetSet Vacations VAX Tour - Dynamic<br />
MMT MGM Mirage Vacations - Air/Hotel VAX Tour - Dynamic<br />
PRV Palace Resorts VAX Tour - Dynamic<br />
PH1 Pleasant Holidays VAX Tour - Dynamic<br />
SAB Sandals and Beaches Resorts VAX Tour - Dynamic<br />
STN Showtime Tours VAX Tour - Dynamic<br />
WNT Southwest Airlines Vacations VAX Tour - Dynamic<br />
SYV Sun Country Vacations VAX Tour - Dynamic<br />
TPV TNT Vacations powered by Funjet VAX Tour - Dynamic<br />
TIM Travel Impressions VAX Tour - Dynamic<br />
UNT Universal Parks & Resorts VAX Tour - Dynamic<br />
AMW US Airway Vacations VAX Tour - Dynamic<br />
VE1 Vacation Express VAX Tour - Dynamic<br />
VAX VacationAccess Vacations Live Connect Features<br />
CREATE NEW RESERVATION (Launch, Book & Import New Reservation)<br />
__ Populates booking engine with User Login data and profile data from<br />
<strong>ClientBase</strong>. Only takes special CB Agency Code.<br />
Sends reservation details from booking engine’s confirmation page to<br />
<strong>ClientBase</strong> reservation record.<br />
IMPORT EXISTING RESERVATION (Imports new reservation booked outside<br />
of <strong>ClientBase</strong>)<br />
Uses confirmation number to automatically pass all reservation details from<br />
booking engine to <strong>ClientBase</strong> reservation record.<br />
Allows user to browse for reservation and upon retrieval sends reservation<br />
details from booking engine’s confimation page to <strong>ClientBase</strong> reservation<br />
record.<br />
RETRIEVE RESERVATION - Retrieves exisiting reservation previously imported<br />
via Live Connect for viewing or editing. Upon editing, imports updated reservations<br />
details.<br />
Create New VAX Reservation in Live Connect<br />
Step 1) Retrieve the desired client profile, create a new Res Card and after entering basic Res Card<br />
info, launch Live Connect by clicking Live Connect on the menu bar. (You can also launch Live<br />
3/25/13 365
An In-Depth Look at Live Connect<br />
Connect from the Profile action gear.)<br />
Step 2) Complete the Live Connect settings by identifying the vendor, the Live Connect Provider<br />
and appropriate Login information.<br />
Step 3) Click the Create New Reservation button.<br />
Step 4) Select any Profile, Passenger, Branch and Res Card information you want to use to book<br />
the reservation and click Connect to launch the on-line booking engine.<br />
Step 5) Although you are still in <strong>ClientBase</strong>, you are now on-line at the Live Connect Provider’s<br />
3/25/13 366
An In-Depth Look at Live Connect<br />
booking site running the on-line booking engine through a <strong>ClientBase</strong> window. Complete the<br />
reservation and when the reservation is confirmed, click Import Reservation from the confirmation<br />
page.<br />
All reservation data booked on-line is now located in the reservation fields in <strong>ClientBase</strong>.<br />
Import Existing VAX Reservation Made Outside of <strong>ClientBase</strong><br />
Step 1) Create a new Res Card or open an existing one and launch Live Connect by clicking the<br />
Live Connect icon.<br />
Step 2) Complete the Live Connect settings by identifying the vendor, the Live Connect Provider<br />
and appropriate Login information if not autopopulated.<br />
Step 3) Enter the confirmation number for the reservation you want to import and click Import<br />
Existing Reservation.<br />
Step 4) Depending on the Live Connect Provider, the system either locates the reservation using<br />
the confirmation number and automatically import all reservation details, or takes you to the Live<br />
Connect Provider's site for you to use its Retrieve Reservation feature to locate the reservation.<br />
Upon displaying the existing reservation, click Import Reservation and the reservation details are<br />
imported into the <strong>ClientBase</strong> Res Card.<br />
Retrieve an Existing VAX Reservation for Editing or Cancelling<br />
To edit or cancel an existing reservation using Live Connect, follow these steps:<br />
Step 1) Launch Live Connect from inside the Live Connect reservation to edit or cancel. Click Live<br />
Connect.<br />
Step 2) Confirm all Live Connect settings including confirmation number, and click Retrieve<br />
Reservation.<br />
Step 3) Live Connect launches the booking engine site. Edit or cancel the reservation using<br />
instructions supplied by the booking engine, and click Import Reservation. All reservation data<br />
edited or cancelled online is now located in the reservation fields in <strong>ClientBase</strong>.<br />
Walt Disney Parks and Resorts<br />
If you are not currently registered on the Disney Travel Agent Web site, go to<br />
www.disneytravelagents.com, enter your IATA in the To Register field, and click Continue.<br />
Proceed to a brief registration page to enter your e-mail address as your User Name and select a<br />
3/25/13 367
An In-Depth Look at Live Connect<br />
password. (If your ARC/IATA/CLIA number is not recognized by the Disney Web site database, you<br />
are required to fill out an agency registration form.)<br />
Set Up Walt Disney Parks and Resorts<br />
Note: This live connect providers only imports Disney from Florida, but not California.<br />
Step 1) Once you have obtained accurate login information, you need to add this Live Connect<br />
Provider if it does not already exist into <strong>ClientBase</strong> by going to Tools|Settings|Live Connect<br />
Providers and clicking Add.<br />
Fill in the following fields:<br />
Provider Name: Enter Walt Disney Parks and Resorts.<br />
URL: http://www.disneytravelagents.com<br />
Travel Category: Tour.<br />
Import XML from: HTML Source.<br />
Click Save.<br />
Step 2) You cannot set up agent logins for use with Walt Disney Parks and Resorts, but you do need<br />
to create a vendor profile in <strong>ClientBase</strong> if one does not exist. From the profile manager, retrieve the<br />
Walt Disney Parks and Resorts vendor profile (or create if it is not in database). From the General<br />
Info tab, click Live Connect Providers. From here, click Add, then select Walt Disney Parks and<br />
Resorts from the drop-down list. The vendor code is blank. Click OK.<br />
3/25/13 368
An In-Depth Look at Live Connect<br />
Walt Disney Parks and Resorts Features<br />
Walt Disney Parks and Resorts supports the following Live Connect features:<br />
CREATE NEW RESERVATION (Launch, Book & Import New Reservation)<br />
Populates booking engine with User Login data from <strong>ClientBase</strong>.<br />
Populates booking engine with profile data from <strong>ClientBase</strong>.<br />
Sends reservation details from booking engine’s confirmation page to<br />
<strong>ClientBase</strong> reservation record.<br />
IMPORT EXISTING RESERVATION (Imports new reservation booked outside<br />
of <strong>ClientBase</strong>)<br />
<br />
Uses confirmation number to automatically pass all reservation details from<br />
booking engine to <strong>ClientBase</strong> reservation record.<br />
Allows user to browse for reservation and upon retrieval sends reservation<br />
details from booking engine’s confimation page to <strong>ClientBase</strong> reservation<br />
record.<br />
RETRIEVE RESERVATION - Retrieves existing reservation previously imported<br />
via Live Connect for viewing or editing. Upon editing, imports updated reservations<br />
details.<br />
Create New Walt Disney Reservation in Live Connect<br />
Step 1) Retrieve the desired client profile, create a new Res Card and after entering basic Res Card<br />
info, launch Live Connect by clicking Live Connect on the menu bar. (You can also launch Live<br />
Connect from the Profile action gear.)<br />
Step 2) Complete the Live Connect settings by identifying the vendor, the Live Connect Provider<br />
and appropriate Login information.<br />
3/25/13 369
An In-Depth Look at Live Connect<br />
Step 3) Click the Create New Reservation button.<br />
Step 4) Select any Profile, Passenger, Branch and Res Card information you want to use to book<br />
the reservation and click Connect to launch the on-line booking engine. This data is NOT passed to<br />
Walt Disney Parks and Resorts, but you are able to view it at the top of your booking screen and can<br />
highlight it, copy, and paste it into the booking fields to save you time during the booking process.<br />
Click Connect.<br />
Step 5) Although you are still in <strong>ClientBase</strong>, you are now on-line at the Live Connect Provider’s<br />
booking site running the on-line booking engine through a <strong>ClientBase</strong> window.<br />
Complete the reservation and when the reservation is confirmed, click Import Reservation.<br />
3/25/13 370
Chapter<br />
10<br />
Using Inventory<br />
This section details using a database of inventory maintained in<br />
<strong>ClientBase</strong> Windows version and integrating items into Res Cards for easy<br />
entry with inventory control.<br />
Introduction<br />
In <strong>ClientBase</strong> Windows version, the database administrator has created inventory items for block<br />
space and for you to integrate them into the reservation area of Res Cards. The process is an easy<br />
one. Block space inventory records are created for air, cruise, hotel, rail, tour, and miscellaneous<br />
reservations. Each inventory item is entered one time, with details of the pricing, itinerary, deposit<br />
and payment due dates, as well as invoice/itinerary remarks. For use, create a reservation and pull<br />
from the list of created inventory records. All Inventory Details automatically drop into the reservation<br />
and create a link to the inventory record; therefore tracking what inventory has been taken and what<br />
is left. What a great way to manage block space and what a time saver! No more manually tracking<br />
inventory using paper controls or supplemental spreadsheet or database programs.<br />
Special Note: Inventory can be allocated across Sync Primary and Sync Copy Databases, see<br />
section below, Allocating Inventory Across Sync Primary and Sync Copy Databases.<br />
Selling Inventory<br />
Once a database of inventory records has been setup, agents in <strong>ClientBase</strong> can connect to this<br />
database of inventory while working in the Res Card (by default it has been enabled for use in the<br />
<strong>ClientBase</strong> setup area. To query inventory for a particular client's trip, create a Res Card for that<br />
client including passengers, and from the Reservations Link, click Add Reservation to select the<br />
Travel Type. Please note that Passenger details must be captured within your Res Card in order to<br />
pull from inventory, as the number of passengers and ages affect the way the default pricing is<br />
calculated. Cruise, Tour and Hotel type inventory pulls one quantity from the available inventory,<br />
while Air, Rail and Miscellaneous type inventory pulls 1 quantity per person from the available<br />
inventory.<br />
(If you are pulling more than one inventory item, check off only the passengers that are to be included<br />
in the first pull. For example, maybe you have selected 4 passengers, but only the first two are going<br />
to be in the cabin you pull. Check off these passengers for the cabin you are pulling. When you pull<br />
the second cabin (second reservation), check off the passengers who will be in that cabin.)<br />
3/25/13 371
Using Inventory<br />
From within a new reservation, click the Inventory icon.<br />
Searching for Inventory<br />
Upon launching inventory from a reservation record, inventory search filters appear by default. Use<br />
any inventory search criteria, as well as itinerary/flight/address info and inventory detail information.<br />
Each filter entered into the query fields is "anded" together with other filters, so any results match all<br />
filters. The more filters entered, the narrower the search and generally fewer results. The fewer<br />
filters entered, the more general the search and generally more results.<br />
Pulling From Inventory<br />
Upon querying a database of inventory, a one-line listing of each Inventory Detail that matches the<br />
3/25/13 372
Using Inventory<br />
criteria appears, with a visual display of the inventory detail currently highlighted at the bottom of the<br />
screen.<br />
Use the radio button or View, to call up the desired inventory detail and view the data including<br />
what's been blocked, sold and available.<br />
After locating the desired inventory item to take one of the available seats/cabins/rooms, click Pull<br />
from Inventory icon at the top of the query screen, and the system returns to the reservation record<br />
with all the inventory fields automatically filling in the reservation fields. This simultaneously links<br />
the reservation to the inventory detail, therefore allowing the agency to track what's been taken or<br />
Sold, and therefore what's now Available. Any reservation that is linked to inventory displays a link<br />
xx Quantity Pulled from Inventory" in the upper right hand corner of the reservation record.<br />
The link to that inventory detail remains permanent, unless the reservation is deleted, or the<br />
reservation status is changed to Cancelled or Quoted, at which time you are prompted for<br />
confirmation and if accepted, the link removed and the inventory replaced back into Available<br />
inventory.<br />
Each reservation record that has been made as a result of being pulled from Inventory has a link<br />
that indicates how the reservation was made (xx Qty Pulled from Inventory):<br />
Allocating Inventory Across Sync Primary and Sync Copy<br />
Databases<br />
In the past, agencies that have been synchronizing with another location were limited to creating and<br />
pulling from inventory in only the Primary location. The reason for this limitation was because of the<br />
potential to oversell inventory between synchronization processes. To overcome this danger,<br />
<strong>ClientBase</strong> has the ability to allocate available inventory across your various sync databases. Sync<br />
activated databases have an additional entry tab in Inventory Details, called Sync Database<br />
3/25/13 373
Using Inventory<br />
Allocation.:<br />
Upon creating new Inventory (or updating existing Inventory) look at the count within the Available<br />
Inventory field. Determine if this inventory should be re-allocated to other sync locations (databases)<br />
to facilitate better sales of this inventory. Click the Sync Database Allocation tab and Re-allocate to<br />
re-allocate any quantity available from your current database to any other Sync Copy database.<br />
The system allocates the inventory to the database the user is connected to. When an agent Pulls<br />
From Inventory, they are only able to pull inventory allocated to the database they are connected to.<br />
As agents use the inventory feature within the Res Card, if they determine that they have a client<br />
interested in inventory that is no longer available, they click the View Inventory Record and the Sync<br />
Database Allocation tab to see if there is available inventory in other locations (databases). If so<br />
they may suggest re-allocated some of that available inventory to locations (databases) that no<br />
longer have any available to them. To re-allocate inventory from one location (database) to another,<br />
you must connect to the database that has the available inventory. You can only re-allocate<br />
inventory from the database you are connecting to and you can only re-allocate inventory of the<br />
database has available inventory records to re-allocate.<br />
Important Note for CBB/CBO Agencies Syncing to CBW: If you are synchronizing to the<br />
<strong>ClientBase</strong> Windows application, DO NOT allocate inventory to that database unless you are OK<br />
with not being able re-allocate it back out of CBB or CBO! <strong>ClientBase</strong> Browser and <strong>ClientBase</strong><br />
<strong>Online</strong> do not yet include the Inventory Manager and therefore do not have the ability to re-allocate<br />
its unused available inventory back to other databases. This means any inventory allocated to CBB<br />
or CBO, will have to be sold via CBB or CBO, or the agency would have to connect to the <strong>ClientBase</strong><br />
Windows application in order to re-allocate it back to CBB/CBO.<br />
When pulling from Inventory, the system defaults using one of two Default Inventory Filters:<br />
1) Reservation Travel Category - this prompts the Query window with the Travel Category field<br />
defaulted to the same category selected in the Reservation.<br />
2) Res Card Group Name - this now skips the Query window and directly prompts results of ALL<br />
inventories (if any) that matches Group Name in the Res Card. You must click Query button to<br />
3/25/13 374
Using Inventory<br />
change drop-down field default back to Reservation Travel Category.<br />
3/25/13 375
Using Inventory<br />
3/25/13 376
Chapter<br />
11<br />
Using the Res Card Manager to<br />
Manage Your Res Cards<br />
This section details the use of the Res Card Manager to easily organize and manage<br />
your reservation and trip data stored neatly in your Res Cards.<br />
Introduction<br />
The purpose of the Res Card Manager is to automate the filing cabinet which has historically<br />
contained hundreds of paper index cards and file folders that have for years cluttered agencies. In<br />
the past, agents often entered details of leisure type reservations (client information, confirmation<br />
numbers, itineraries, vendor information, remarks, etc.) on cards. Agents kept these cards<br />
somewhere on their desks or somewhere in their files. That “somewhere” translated into precious<br />
time spent searching for the reservation information, especially when the booking agent was not<br />
available and someone else needed to locate the information. As agents begin automating their non-<br />
CRS reservation information into <strong>ClientBase</strong> Res Cards, the Res Card Manager provides you with a<br />
tool to organize and manage your entire database of Res Card records. Imagine viewing all of your<br />
active Res Cards with the click of a button.<br />
Search for Your Res Cards<br />
After users begin using Res Cards (as detailed in chapter, An In-Depth Look at Res Cards) to<br />
document reservation details, they’ll click on the Res Cards tab to see their active Res Cards. Click<br />
Find and <strong>ClientBase</strong> searches the database for the User Login’s active Res Cards and the Results<br />
377
Using the Res Card Manager to Manage Your Res Cards<br />
Screen immediately displays a list.<br />
To retrieve a specific Res Card, click View next to the entry or the action menu icon (gear). This icon<br />
is displayed to the right of View and is listed for each record in the search. It has been designed to<br />
allow you to perform a variety of actions for that one record without having to open the record first -<br />
saving you a few extra clicks of the mouse. Click the icon and the following options appear:<br />
View: Takes you directly to the edit Res Card screen without having to open the Res Card first and<br />
then clicking Edit.<br />
Generate Invoice: Takes you directly to the invoice screen for you to produce an invoice for the<br />
Res Card.<br />
Go To Profile: Takes you directly to the profile the selected Res Card is attached to.<br />
Delete: Delete a Res Card, but if the Res Card has invoices or Activities attached, those must be<br />
deleted first.<br />
An agent can also click on any of the saved search links either at the Global or Personal Level as<br />
well. At the top of the results screen, notice 2 links marked Global Saved Searches and Personal<br />
Saved Searches.<br />
Simple Res Card Search<br />
A simple Res Card search allows you to quickly locate a Res Card or a group of Res Cards by simply<br />
completing one or two search filters. This search contains four fields which are strung together with<br />
378
Using the Res Card Manager to Manage Your Res Cards<br />
an “and”.<br />
The drop-down menu fields identify what you want to search by and are completed by selecting from<br />
the following: Agent Name, Trip Name, Status, Reservation Cycle, Source of Booking, Locator No.,<br />
Group Name, Region. The defaults for these two fields are Agent Name and Status.<br />
The blank field allows you to make you selection from a default pull-down list or type in free-flow<br />
information if there is no pull-down list. An arrow to the right of the blank field indicates a list from<br />
a pull-down menu exists for ease of selection for that search filter. If both fields are used in the<br />
search, then the results will match both criteria, not either/or. This means the filters are strung<br />
together with an “and” not an “or.” After completing or changing data in the filters, the system<br />
automatically sifts through the database and displays the matching profiles in the results screen.<br />
For example, if Agent Sharon wants to review all her active Res Cards in the system, she sets the<br />
first field to Agent Name and selects the name Sharon from the pull-down menu list. She sets the<br />
second field to Status and selects “Active” from the pull-down menu. Finally, she clicks on Find to<br />
see a list of all her active Res Cards in the system.<br />
Advanced Res Card Search<br />
Go to Advanced Search|Enter Data to Search gives you the ability to search your database of Res<br />
Cards by virtually any field captured in these records, and includes the ability to search by a<br />
particular client as well. The search area is divided into three search layers that move from more<br />
general information at the Res Card Level to very specific, detailed search criteria at the Service<br />
Provider Level.<br />
1. Res Card Level<br />
2. Reservation Level<br />
379
Using the Res Card Manager to Manage Your Res Cards<br />
3. Service Provider Level<br />
Search for data<br />
using Profile<br />
info also.<br />
Res Card Link<br />
1. Res Card Level: Except for selecting the date range you wish to search by, the trip name and<br />
Locator #, all other search fields have a pull-down menu indicated by the arrow to the right of the<br />
field for easy selection. The Res Card query level is composed of broader search fields and<br />
generally includes a greater number of Res Cards in the results screen.<br />
2. Reservation Level: The Reservation Query level fields focus on the specific components of the<br />
reservation. From Travel Category and Vendor to Reservation Status and Payment Information, you<br />
can direct your search of your database at this level.<br />
3. Service Provider Level: The fields at the Service Provider level, when completed, can be<br />
extremely helpful as a quick reference when a customer calls in requesting information on a<br />
particular reservation. From travel category and beginning and ending dates of specific reservations<br />
such as cars and hotels, to individual client preferences such as cabin or dining preferences, these<br />
fields allow you to very narrowly define your query.<br />
PROFILE Link<br />
Use general profile data as filters when running an advanced search in the Res Card Manager. This<br />
gives you the ability to search by profile to locate Res Cards as well as enhances your ability to<br />
search your lists of Res Cards.<br />
To see a summary of the search filters click the Filter Summary which is a double up arrow in the<br />
Results Screen.<br />
Results Screen<br />
After you have completed your searches, the Results Screen not only provides a count and list of<br />
search results, but also easy access to a specific Res Card. To obtain a count of the query results,<br />
click Count. To view the next screen of Res Cards on the list, click Next directly above the results<br />
screen.<br />
380
To retrieve any Res Card, simply click View before the entry.<br />
Navigation Bar<br />
Using the Res Card Manager to Manage Your Res Cards<br />
The Navigation Bar provides a means to jump to various Res Cards in the results screen by using<br />
First, Previous, Next and Last. Also on this bar are Count, Select Columns and Sort by Columns.<br />
Select Columns<br />
Click Select Columns to choose which columns you want displayed in your query results screen.<br />
To change a column, move the highlighted column over to the other side by using the > or < arrow.<br />
By using the shift key and mouse, select as many consecutive entries as you want to move; by using<br />
the control key and your mouse, select non-consecutive entries to move. Use the >> or
Using the Res Card Manager to Manage Your Res Cards<br />
6) Click OK. The new search folder is located in the list for Global Saved Searches or Personal<br />
Saved Searches in the Saved Searches screen, or from the drop-downs at top of the program<br />
screen.<br />
To replace an existing saved folder with a new one, first perform the new search, adjusting the<br />
columns/sorts to your specifications, and then click Replace. This area also contains the ability to<br />
open a search (View), rename a search folder (Rename), or delete a search folder (Delete).<br />
Note: <strong>ClientBase</strong> saves the filters and results layout, not the search results. The next time you use<br />
the saved search folder, any new data that has been added since it was created, is included in the<br />
new search.<br />
Using Date Formulas in Your Saved Searches<br />
Since searches can be saved and retrieved for frequent use, the date fields in all searches allow for<br />
date formulas. This means any field that has a date, can also contain a formula for that date. The<br />
date formula function allows you to create a search and then save it without identifying a specific<br />
month, day and year in the From and To date fields. Instead, the search is processed with a formula<br />
for the month, day, day of the week, and year based upon the date the report is processed.<br />
Remember: Make sure the system date and time are correct.<br />
Benefit: When entering a date formula, your system converts it to the intended time period allowing<br />
you to run searches and/or save them for future use without the need to modify dates.<br />
Example: The following tables contain sample formulas for specifying dates. Mix and match the<br />
absolute and relative parameters in the function. All date formulas start with an = sign. The first<br />
number specifies the day of the month, the second number specifies the month, and the third<br />
number specifies the year. So if you only have the first number filled in, this means you want this<br />
report to reoccur on this day every month, in every year.<br />
DATE FORMULAS<br />
If You Want This<br />
Enter This<br />
1 st day of this month: =1,0,0<br />
Last day of this month: =31,0,0<br />
1 st day of this year: =1,1,0<br />
Last day of this year: =31,12,0<br />
Seven days from now: =+7,0,0<br />
Last Monday (will show today<br />
if today is Monday)<br />
A week from last Monday<br />
Next Monday<br />
=Mon<br />
=Mon-1<br />
=Mon+1<br />
Three months from now =0,+3,0<br />
Six months ago: =0,-6,0<br />
One year from now =0,0,+1<br />
382
Using the Res Card Manager to Manage Your Res Cards<br />
Working with Search Results<br />
Our most productive agent, Sharon, begins each day by accessing her “To-Do” list. Immediately<br />
after working that list, she clicks on Res Cards to select her active Res Cards to review any pending<br />
reservations. The results screen immediately displays an organized list for her to review and take<br />
any action necessary. An agent accesses the Res Card and its details by clicking View. Once<br />
inside the Res Card, the agent clicks on any of the Res Card links (General Info, Passengers,<br />
Reservations, Invoices, Activities, Itinerary Report, Attachments, or More Fields):<br />
Add a new Res Card by clicking Res Card on the menu bar. Click Edit to modify or enhance a Res<br />
Card. The Tools|Page History area allows you to jump into any of the last program screens you<br />
have been in by simply clicking on its hyperlink.<br />
Creating New Res Cards<br />
To create a new Res Card in <strong>ClientBase</strong>:<br />
1) Create a Reservation Card in the customer profile by clicking on Res Card on the menu bar or<br />
create a Res Card with Live Connect by clicking on Live Connect on the menu bar. To modify or<br />
edit an existing card, highlight the card and click View and Edit.<br />
2) Create a Reservation Card from the results of a search by clicking on the action gear and Res<br />
Card next to the entry in the results screen.<br />
2) Create a Res Card in the Res Card Manager by clicking Res Card icon on the menu bar.<br />
3) Create a Res Card after booking a Live Connect reservation by clicking on the action gear by the<br />
selected profile in the Profile Manager and Live Connect. No need to create a Res Card first.<br />
4) Create a Res Card after booking a Live Connect reservation by clicking Live Connect on the<br />
menu bar inside a client profile. No need to create a Res Card first.<br />
Please refer to the chapter entitled An In-Depth Look at Res Cards to learn further how to create<br />
Res Cards in <strong>ClientBase</strong>.<br />
383
Using the Res Card Manager to Manage Your Res Cards<br />
384
Chapter<br />
12<br />
An In-Depth Look at Vendor and<br />
Service Provider Profiles<br />
This chapter familiarizes you with how to setup, maintain and use Vendor and<br />
Service Provider Profiles.<br />
Introduction<br />
Vendor profiles provide an easily accessible source for an agency to store pertinent information<br />
about its travel suppliers. Tour operators, cruise lines, hotels and car rental companies are<br />
examples of vendor profiles that an agency uses. All the important details about this vendor are<br />
stored in one convenient place that each user has access to. Key information such as phone<br />
numbers, rep contacts, supplier addresses, commission information, specials, preferred vendor<br />
status, cancellation policies, and more may be included in the profile.<br />
Service Provider profiles represent the various components of a trip booked through a vendor. For<br />
example, the service provider for a Carnival Cruise booking would be the Carnival Destiny. Pertinent<br />
details about the Destiny are stored in this type of profile and therefore accessible to users.<br />
Feedback from other travelers can be added in and accessed by all agents to better serve future<br />
clients.<br />
Why do we go to such lengths to differentiate between the two It is so that client comments and<br />
feedback can be attached to specific service provider profiles and for invoicing purposes.<br />
In the past, agencies kept track of this vendor and service provider information in a variety of ways.<br />
Some agents use rolodexes with vendor and service provider special contact names and lists of<br />
phone numbers for each department. Other agents have links which included brochures, specials,<br />
as well as any communication information they were able to obtain for each of the vendors and<br />
service providers. Still other agents memorize vital vendor and service provider information.<br />
When a customer travels with a particular service provider and supplies your agency with feedback<br />
information on its services, how is this information distributed to agents Is there one place an agent<br />
can go that summarizes what customers felt about a particular trip or service Or one place that the<br />
agent can look for promotions that are current, or if the vendor is still preferred With <strong>ClientBase</strong>, all<br />
vendor and service provider information is in one place. By creating rich, information-filled profiles<br />
for the vendors and service providers you sell, each agent has quick access to this vital information.<br />
385
An In-Depth Look at Vendor/Service Provider Profiles<br />
Create a New Vendor/Service Provider Profile<br />
New vendor or service provider profiles can be created by clicking on the profile icon on the tool bar<br />
and selecting Service Provider or Vendor.<br />
Want a quick way to create a profile Use the following hot keys:<br />
Alt shift S = New Service Provider or Alt shift V = New Vendor.<br />
Anatomy of a Vendor|Service Provider Profile<br />
A Vendor Profile in <strong>ClientBase</strong> stores an unlimited amount of information about your vendors and<br />
service providers. To organize all this information and make it easily accessible to all users, each<br />
vendor profile is made up of these key areas: Header Info, Menu Bar, Indicator Icons, and<br />
Information Links:<br />
MENU BAR<br />
HEADER<br />
INDICATOR<br />
ICONS<br />
INFO<br />
LINKS<br />
386
An In-depth Look at Vendor/Service Provider Profiles<br />
MENU BAR<br />
HEADER<br />
INDICATOR<br />
ICONS<br />
INFO<br />
LINKS<br />
Let’s explore each of these key areas:<br />
Menu Bar<br />
The menu bar contains links to features - Merge Options, Note, Mailer and Reminder.<br />
Merge To Document enables you to launch a Document Template from the results of a query into<br />
Wordpad, MS Word, Open Office, etc. to view, edit and print the document with all fields merged.<br />
Merge To Email launches an email message for the profile you are in. Merge To Label enables you<br />
to create a label for this profile.<br />
You can also create a Note, Mailer, or Reminder from the menu bar for the profile you are in, or link<br />
to another profile by using the three dots next to Profile field.<br />
For complete instructions on Merge To Document, Merge to Email, or Merge to Label, see chapter,<br />
Putting Profiles to Work for You.<br />
Header Information<br />
The Header conveniently displays pertinent information including the current mailing address,<br />
communication entries captured for this profile, email and Website addresses, Interface ID, the date<br />
it was created, and more. By confirming the accuracy of this information and adding any new details,<br />
387
An In-Depth Look at Vendor/Service Provider Profiles<br />
the user ensures that vendor data is always up-to-date.<br />
Profile Indicators<br />
A Trams profile indicator icon to the right of the arrows appear if the agency has previously booked<br />
travel with this Vendor. The other icon (a finger with a red string) alerts you if there are any open<br />
reminders for this vendor. These icons do not appear in the profile if the agent has no open reminder<br />
or past travel history with your agency. Click on one of these icons to immediately move into that<br />
profile area, i.e. by clicking on the Travel History icon, you’ll get into the Travel History link.<br />
Detailed Review of Links<br />
Each profile contains the following information links: General Info, Remarks, Agency Remarks,<br />
Marketing, Employees, Activities, Travel History, Groups, and Attachments.<br />
General Info Link<br />
The General Information link displays vendor data.<br />
ADDRESS RECORDS<br />
A vendor/service provider profile can include unlimited addresses which may be designated as<br />
Primary, Bill To, Ship To, Second Address and Alternate Address. Only one address though may<br />
be designated as Primary, one as Bill To, and one as Ship To. When creating a new address, click<br />
on Add, fill in correct address details and choose the address type(s).<br />
This area contains the following fields:<br />
Address Line 1: First line of address.<br />
Address Line 2: Second line of address.<br />
Apt/Suite: Apartment or suite number.<br />
388
An In-depth Look at Vendor/Service Provider Profiles<br />
City/State/Zip/Country: City, state, zip code, and country of the address.<br />
Description: Enter description if desired.<br />
Primary/Bill To/Ship To/Alternate: One address record can represent multiple Address Types.<br />
Check all that apply.<br />
Second Address: The Second Address choice also offers a date option. This is particularly useful<br />
because it allows entry of a specific time frame your vendor may be at a Second Address. After<br />
checking box, choose months for From/To dates from drop-down menu.<br />
Save/Cancel: Click Save to accept new information or Cancel.<br />
To modify an entry, click Edit next to the address, and click Save. To remove an entry, click Edit<br />
next to the address you wish to remove, and click Delete.<br />
COMMUNICATIONS<br />
The standardized format for unlimited communication entries in <strong>ClientBase</strong> provides a platform upon<br />
which this information can be easily accessed. When creating a communication, click on Add<br />
Communication, fill in correct communication details, and click Save.<br />
This area contains the following fields:<br />
Passenger: From the drop-down menu choose what passenger this communication entry is<br />
connected with (if applicable).<br />
Type: Options include Email, Fax, Phone, Web, Facebook, Twitter, Linked In, Google Plus.<br />
Communication Type options include Social Media. This begins the first phase of social media<br />
integration. Fields are now available to begin capturing social media information in order to connect<br />
to social media profiles/page(s) in a future release.)<br />
Begin capturing information by clicking Additional Communications and click Add. Select a<br />
passenger and click the drop down to choose a Type from the list. The new types for social media<br />
use are:<br />
389
An In-Depth Look at Vendor/Service Provider Profiles<br />
Facebook<br />
Twitter<br />
Linked In<br />
Google Plus<br />
After choosing the Type, enter the User ID (example: facebook.com/JohnSmith). User ID format will<br />
vary depending upon the social media type. Next, select a Description. User defined descriptions can<br />
be created for specific use with social media. For example, customer John Smith may have a<br />
personal profile in Facebook, along with a business page for his company. A description of "Profile"<br />
and another of "Page" could be added to differentiate between whether the User ID entered is for<br />
the customer's profile or his business page.<br />
Example Formats for capturing user's social media information:<br />
Facebook: For a profile - facebook.com/username (facebook.com/JohnSmith); For a page -<br />
facebook.com/page name (facebook.com/SabreTravel)<br />
Twitter: Twitter.com/username (Twitter.com/JohnSmith)<br />
Linked In: linkedin.com/pub/8/b8a/205<br />
(Numerical string in the URL is the Linked In ID)<br />
Google Plus: plus.google.com/117474227900375467167<br />
(Numerical string in the URL is the Google+ ID)<br />
Just like all other communication types, social media communication types have a Marketing<br />
Permission checkbox. Marketing Permission is checked by default.<br />
Note: For emails, a green check appears if the entry has been granted marketing permission.<br />
Profile’s Primary: Indicate if this is the primary phone number, fax, Email, or Web address, since<br />
only one entry per communication type may be designated as Primary.<br />
Value: You need only type the 7 digits of the Fax number or Phone number if in your area code, as<br />
<strong>ClientBase</strong> version adds a default country code and area code to the number when saved. For<br />
numbers outside your area code, type in the 10 digit area code and number (no other typing is<br />
necessary). For Email and Web entries, type these exactly as you want it to appear.<br />
Description: Choose a description if desired from drop-down menu. These options were setup by<br />
the database administrator in the Windows version of <strong>ClientBase</strong>.<br />
Save/Cancel: Click Save to accept new information or Cancel.<br />
As alternative methods of communicating with customers continue to expand (e.g. cell phones,<br />
beepers, additional Emails, etc.), you may find your phone tables growing increasingly lengthy for<br />
customer profiles. You have the ability to maintain an unlimited number of communication entries.<br />
To modify an entry, click Edit next to the communication you wish to alter, make changes, and click<br />
Save. To remove an entry, click Edit next to the communication you wish to remove, and click<br />
Delete.<br />
390
An In-depth Look at Vendor/Service Provider Profiles<br />
ADDITIONAL INFO<br />
These fields provide general information about the profile. To edit fields in this area, click Edit, make<br />
changes, and click Save.<br />
General Information<br />
Company: Enter the name of the vendor/service provider. Any printed reports or labels can include<br />
the Company name entered in the General Info link.<br />
Last Name: Enter the last name of primary contact. Any printed reports or labels can include the<br />
First and Last Name entered in the General Info link.<br />
First Name: Enter the first name of the primary contact in this field.<br />
MI: Enter the middle initial of the primary contact in the field.<br />
Courtesy Title: Mr., Mrs., Mr. & Mrs., Ms., Dr. are all examples of courtesy titles. The drop-down<br />
menu allows you to select from a standardized, customizable list. This courtesy title is printed on<br />
mailing labels or on letters in the Document Templates<br />
Vendor Info<br />
Vendor Commission%: This field is shared with the Vendor Commission default in Trams Back<br />
Office (our back office accounting program). This Vendor Commission % field is used for defaulting<br />
the commission in a reservation record when this vendor profile is used.<br />
Vendor ID: Enter a Vendor ID number for this Vendor/Service Provider. This field is used in<br />
conjunction with imported product files for this Vendor.<br />
Preferred: If this is a preferred Vendor/Service Provider, indicate this by checking the box.<br />
Additional Information<br />
Interface ID: Important! This field allows the interfacing of records generated from the GDS (Front<br />
Office) to the agency accounting system (Back Office). If your agency's system requires that this<br />
field exist (for example, Trams Back Office does) then create an Interface ID as directed by the<br />
agency and complete this box.<br />
Salutation: The name used to greet the contact. For example, if Mr. Henry Wilkenson likes to be<br />
called “Hank,” enter Hank in this field. If Mrs. Emily Anderson likes to be called “Mrs. Anderson,”<br />
enter Mrs. Anderson in this field.<br />
Branch No.: For agencies with multiple branches, this field allows a user to select from a drop-down<br />
menu the branch at which this profile was created, or that you want the profile associated with.<br />
Branches are set up before program use.<br />
391
An In-Depth Look at Vendor/Service Provider Profiles<br />
Travel Category<br />
Enter the Travel Category (if applicable) by checking the appropriate entry.<br />
Live Connect Providers<br />
Add/Edit Live Connect Providers: Add or edit the link of a Live Connect Provider to a Vendor<br />
profile directly from <strong>ClientBase</strong>. Upon launching Live Connect for a particular vendor, a drop-down<br />
listing of Live Connect Providers is provided to select Live Connect Provider to connect to.<br />
This listing is established as a result of linking Live Connect providers to your vendor profiles. To<br />
update the list of Live Connect Providers for a particular vendor, retrieve the vendor's profile, and<br />
go to the Live Connect Provider area and click Add Provider. Select the desired Live Connect<br />
Provider from the drop down list of options and set the Vendor Code if it applies. Click Save. Use<br />
Edit to modify any existing Live Connect provider links. Please refer to your Live Connect<br />
documentation for a complete listing of participating Live Connect Providers and the vendors and<br />
vendor codes they support.<br />
Profile Status<br />
Create User/Create Date: These fields default to the system date and the user logged in at the time<br />
the profile is created. Both of these fields can be modified.<br />
Profile Status: Indicate whether a vendor profile is Inactive from the drop-down menu. By default<br />
all profiles start with an Active status. An Inactive status is included so that you can flag a vendor as<br />
inactive without having to delete the profile. When searching in the <strong>ClientBase</strong> database, only<br />
profiles marked as Active will be included in the search. Search for Inactive Profiles by using the<br />
Advanced Search option.<br />
Save/Cancel: Click Save to accept new information or Cancel.<br />
392
An In-depth Look at Vendor/Service Provider Profiles<br />
Remarks Link<br />
The Remarks link provides a full-page view of the unlimited remarks and provides tremendous<br />
flexibility for entering comments in each vendor/service provider profile. To add or edit a remark,<br />
click Edit Text, and click Save or Cancel. The great thing about remarks is that the first few lines<br />
can be viewed from anywhere in the profile. Save frequently asked information about the vendor in<br />
the remarks link, and use it to Email or read off to your customers.<br />
Agency Remarks Link<br />
Here is another area where unlimited, free-flowing Agency remarks can be entered about this<br />
Vendor/Service Provider. Whenever agents are in this profile, they can access what other agents<br />
have written about this Vendor or Service Provider. Such information is valuable so that each agent<br />
in your office can benefit from the collective experience gained by all customers and agents.<br />
To add or edit a remark, click Edit Text and click Save or Cancel.<br />
Marketing Codes Link<br />
The Marketing link provides a way to track vendors/service providers by adding data about the<br />
supplier in a manner that an agency can query. For example, in a vendor profile, check off<br />
destinations that can be booked, or a budget, or the type of travel. Then when searching for a<br />
vendor/service provider that meets the client's requirements, the agent can query on the specific<br />
Marketing Codes. To add or modify a vendor/service provider marketing code, click Edit. Check or<br />
393
An In-Depth Look at Vendor/Service Provider Profiles<br />
uncheck any marketing codes, and click Save or Cancel.<br />
These Marketing Tables and codes are “global,” meaning the same codes are available for use in<br />
every profile for every user. Remember that vendor qualifications often change. Removing<br />
marketing information when no longer valid is as important as entering new information.<br />
Employees Link<br />
The Employee link is designed for detailed information on specific individuals who are key contacts<br />
with a Vendor/Service Provider.<br />
Add a new employee by clicking Add. To modify or enhance an employee, click View in front of the<br />
employee name, and then Edit. Click Edit, then Delete to remove a employee. Let’s take a look at<br />
how to organize information for each employee by going through each field of the Add/Modify screen:<br />
Employee<br />
Relationship with Profile/Position: By choosing from a drop-down menu, these user-definable<br />
items can be inserted. By identifying the employee as the Sales Rep or Main Contact, agents have<br />
an advantage when talking to a vendor and can personalize their contacts.<br />
Last Name: Enter the legal last name of employee.<br />
First Name: Enter the first name of the employee in this field. This provides you with the correct<br />
information for booking purposes.<br />
M. I.: Enter a middle initial.<br />
Courtesy Title: Mr., Mrs., Mr. & Mrs., Ms., Dr. are all examples of courtesy titles. The drop-down<br />
menu allows you to select from a customized list. This courtesy title can printed on mail labels and<br />
letters.<br />
Birth Date: Select the month from the drop-down menu, enter the date and year.<br />
Passport Number #1 & #2: For up to 2 passports, enter traveler’s passport number.<br />
Expiration: Enter traveler’s passport expiration date in date format as listed below, or double-click<br />
394
An In-depth Look at Vendor/Service Provider Profiles<br />
on the date from the drop-down calendars.<br />
Country of Origin: Enter the passport Country of Origin from the drop-down menu.<br />
Remarks: Enter unlimited free-flowing information pertaining to this traveller.<br />
Preferred Airlines/Preferred Car Rentals/Preferred Cruise Lines/Preferred Hotels/Preferred<br />
Tours: Passenger Travel Preferences are captured at the vendor level as well as by Travel<br />
Category. In the past when a travel preference was created for a passenger it applied to the travel<br />
category, not a vendor. For example, if a passenger had an air preference of business class but liked<br />
first class for one of his/her preferred airlines, there wasn't a way to capture both. Now the business<br />
class air preference can be captured as the global preference for the travel category as well as<br />
capturing first class as the preference for the specific preferred vendor. Even though preferences<br />
are now captured at the vendor level, it is not mandatory to select preferred preferences for a vendor.<br />
It is also not mandatory to select preferred vendors for a passenger.<br />
To set up/modify preferences, on the Family Member/Employee screen, select a passenger and<br />
click Edit. Scroll down to the desired Travel Category. Each Travel Category shows a "Preferred"<br />
section that lists the vendors, with a "Preference" section underneath it. When a vendor is<br />
highlighted, the Preference section will change accordingly, displaying the preferences for that<br />
vendor.<br />
A General Preference is available to each Travel Category under Preferred. Highlight the General<br />
Preference and enter the global preferences for the category in the Preference section below it.<br />
When a preferred vendor is later added to a Travel Category, the preference settings from General<br />
Preference are defaulted as the preferences for the new vendor. Next, make adjustments to the new<br />
vendor's preferences as needed. A field, Desirability can be used as a rating for a vendor. For<br />
example, United Airlines may be a preferred airline for a corporate account but the employee<br />
traveling for the company may Dislike that airline. By entering the Desirability, if you see that the<br />
employee dislikes United, he/she could be booked on another preferred airline the corporate<br />
account uses. The Desirability field is displayed when adding or viewing a preferred vendor.<br />
Desirability options appear as a drop down to select from. Selections are: Do Not Use; Dislikes; No<br />
Preference; Favorable; or Very Favorable.<br />
395
An In-Depth Look at Vendor/Service Provider Profiles<br />
All Travel Categories now use the user-defined field Special Options. Under Air Preferences, Meal<br />
Preferences was renamed to Meal Type which links to a Meal Code field that was also added. Air<br />
Craft Type was also added as a preference. For Cruise Preferences, Ship Name and Departure Port<br />
were added as user defined fields and are displayed as preference options. When using passenger<br />
columns for preferences in queries, the default global preferences are displayed in the query.<br />
Save/Cancel: Click Save to accept new information, or Cancel to leave area without saving<br />
changes.<br />
Activities Link<br />
Any agent can see the history of contacts made with a specific Vendor/Service Provider by clicking<br />
on the Activities link, as long as they have been granted permission. This link displays a complete<br />
history of all contacts associated with this specific vendor. Included are Notes (record of interaction<br />
with vendor), Reminders (record of scheduled past and future activities) and Mailers (record detailing<br />
mailings sent to this vendor). To add a new Note, Reminder or Mailer, click on the drop-down menu<br />
Create Activity. To modify or enhance a Note, Reminder or Mailer click Edit next to the item. Click<br />
Edit|Delete to remove any item.<br />
Notice the filter buttons located directly above the Activities results screen. This allows for quick<br />
sorting of the results appearing in this link. By default ALL Activities are displayed, but options for<br />
viewing just Mailers, Notes, Reminders, or Open Reminders are available. Also, there is a Summary<br />
View and Detail View of activities in the listing.<br />
For more information on Activities including how to create them, refer to the chapters entitled, An In-<br />
Depth Look at Activities and Using the Activity Manager to Manage Your Activities.<br />
Travel History Link<br />
From this window, agents can easily review past travel purchases (which involved this vendor) as<br />
they appear in your Trams Back Office accounting system or when you start invoicing in <strong>ClientBase</strong>.<br />
Since invoices in TBO only point to a Vendor and not Service Providers, this link only appears in the<br />
396
An In-depth Look at Vendor/Service Provider Profiles<br />
vendor type profiles.<br />
Filters<br />
Sort: Select the way you want data sorted by using the drop-down menu to select Issue Date,<br />
Depart Date, Travel Category, Passenger Name, Agent, Invoice #, Invoice Type, Invoice Status, or<br />
Ticket Confirmation #.<br />
Issue Date: Enter the from and to Issue Date, by clicking on the drop-down menu to access a<br />
calendar and double-clicking on date, or free flow the date using a date format as listed below.<br />
Tvl Cat.: Filter the results per travel category by checking/unchecking the travel category buttons,<br />
Air, Hotel, Car, Cruise, Tour, Rail, Transport, Insurance, Service Fee, or Other.<br />
Click Search to display desired query. Also, there is a Summary View and Detail View of items in<br />
the listing.<br />
Groups Link<br />
Profiles may be associated with a specific group that has been created by the agency. There is no<br />
limit to how many groups one profile may be associated with. This group table is shared with Trams<br />
Back Office. To add a new group to the client’s profile, click Add Group and select group name from<br />
the drop-down menu. To modify or enhance a group, click Edit next to the group entry. Click Edit<br />
next to the group entry, and then Delete to remove a group name from a profile.<br />
Attachments Link<br />
To enhance the amount and type of information accessible in a <strong>ClientBase</strong> profile, a feature is<br />
included in all profile types allowing you to point to other files available on your local or network drive.<br />
These files are referred to as Attachments.<br />
To access an attachment, click the Attachment link. To add a new Attachment click Add Attachment,<br />
and Browse for Attachment to identity the File Path of the file. The File Path includes the drive where<br />
the file is located, any directories or sub-directories, and the name of the file. Choose to compress<br />
397
An In-Depth Look at Vendor/Service Provider Profiles<br />
the file by clicking in the Compression box. Enter a brief description of the attachment, if desired.<br />
Click Save.<br />
To view a saved attachment, highlight the attachment, and click Open next to the attachment.<br />
<strong>ClientBase</strong> uses Windows associations to view the file type, load the appropriate software, and<br />
retrieve the specified file. Every file has an extension (e.g., .doc, .jpg, .bmp, .html, etc.) that must be<br />
associated with a specific Windows software program such as Word, Paint Shop Pro, Internet<br />
Explorer, etc. to be viewed. Although this association is created automatically by Windows when<br />
various software programs are installed, if a workstation does not have a software program<br />
associated with the type of file an attachment is pointing to, then the file cannot be viewed from the<br />
attachment created in <strong>ClientBase</strong>.<br />
Since a copy of the file has been stored within the <strong>ClientBase</strong> database when it is opened at a<br />
workstation, it is loaded temporarily into a temp directory. If any changes are made to the original<br />
file or the temporary file, the attachment in <strong>ClientBase</strong> must be re-directed to the new file, or the old<br />
file will still be displayed. This is done by using Edit and browsing for the updated file. Once this is<br />
done, the copy of the file saved in the <strong>ClientBase</strong> database is updated.<br />
Click Edit, then Delete, next to the attachment to remove it.<br />
398
Chapter<br />
13<br />
An In-Depth Look at Agent<br />
Profiles<br />
This section familiarizes you with how to setup, maintain and use Agent Profiles.<br />
Introduction<br />
Agents are employees or outside agents and agent profiles are similar to other profiles. By creating<br />
an agent profile, inside and outside agents are identified in each profile or invoice created in<br />
<strong>ClientBase</strong> or interfaced into Trams Back Office (if that is your accounting system), and that<br />
information is available in searches and reports. Management also keeps in-depth information on<br />
each of its agents for personnel and resource information. Other examples include emergency<br />
contact information, payroll and tax information, and to track expertise.<br />
For instance, a manager just had a hot scuba dive special land on her desk. She knows the agency<br />
has several customers with an interest in scuba diving, but can’t recall if any of her agents have any<br />
expertise with this niche. If she has carefully maintained her agent profiles, she can simply set scuba<br />
diving as one of the marketing filters in her search. She quickly identifies just the right agent to lead<br />
her group.<br />
399
An In-Depth Look at Agent Profiles<br />
Create a New Agent Profile<br />
New agent profiles can be created by clicking on the profile icon on the tool bar and selecting Agent.<br />
Want a quick way to create a profile Use the following hot key:<br />
Alt shift A = New Agent.<br />
Anatomy of an Agent Profile<br />
Agent Profiles in <strong>ClientBase</strong> store an unlimited amount of information about agents. To organize all<br />
this information and make it easily accessible to all agents, each profile is made up of key areas<br />
(Menu Bar, Header, Indicator Icons, and Information Links).<br />
MENU BAR<br />
HEADER<br />
INDICATOR<br />
ICONS<br />
INFO<br />
LINKS<br />
Let’s explore each of these key areas:<br />
400
Menu Bar<br />
An In-depth Look at Agent Profiles<br />
The menu bar contains links to features - Merge Options, Note, Mailer and Reminder.<br />
Merge To Document enables you to launch a Document Template from the results of a query into<br />
Wordpad, MS Word, Open Office, etc. to view, edit and print the document with all fields merged.<br />
Merge To Email launches an email message for the profile you are in. Merge To Label enables you<br />
to create a label for this profile.<br />
You can also create a Note, Mailer, or Reminder from the menu bar for the profile you are in, or link<br />
to another profile by using the three dots next to Profile field.<br />
For complete instructions on Merge To Document, Merge to Email, or Merge to Label, see chapter,<br />
Putting Profiles to Work for You.<br />
Header Information<br />
The Header conveniently displays pertinent information including the current mailing address,<br />
communication entries, Email and Website addresses, groups, and the date it was created.<br />
Frequently confirm the accuracy of this information to ensure data is always up-to-date.<br />
Profile Indicators<br />
A profile indicator icon to the right of the arrows appear if the agent has previously booked travel.<br />
The other icon (a finger with a red string) alerts you if there are any open reminders for this agent.<br />
These icons do not appear in the profile if the agent has no open reminder or past travel history with<br />
your agency. Click on one of these icons to immediately move into that profile area, i.e. by clicking<br />
on the Travel History icon, you’ll get into the Travel History link.<br />
Detailed Review of Links<br />
Each agent profile contains the following information links: General Info, Remarks, Family Members,<br />
Activities, Travel History, Groups, Attachments, PNR Entries, and More Fields.<br />
401
An In-Depth Look at Agent Profiles<br />
General Info Link<br />
HEADER<br />
The General Information link displays agent data.<br />
ADDRESS RECORDS<br />
An agent profile can include unlimited addresses which may be designated as Primary, Bill To, Ship<br />
To, Second Address and Alternate Address. Only one address, though, may be designated as<br />
Primary, one as Bill To, and one as Ship To. When creating a new address, click on Add, fill in<br />
correct address details and choose the address type(s).<br />
This area contains the following fields:<br />
Address Line 1: First line of address.<br />
Address Line 2: Second line of address.<br />
Apt/Suite: Apartment or suite number.<br />
City/State/Zip/Country: City, state, zip code and country of the address.<br />
Description: Description if desired.<br />
Primary/Bill To/Ship To/Alternate: One address record can represent multiple Address Types.<br />
Choose Yes or No from drop down menu.<br />
Second Address: The Second Address choice also offers a date option. This is particularly useful<br />
because it allows entry of a specific time frame your client may be residing at the Second Address.<br />
After checking off, select month for From/through date from drop-down menu.<br />
Save/Cancel: Click Save to accept new information or Cancel.<br />
To modify an entry, click Edit next to the address you wish to change, and click Save when finished.<br />
To remove an entry, click Edit next to the address you wish to remove, and click Delete.<br />
COMMUNICATIONS<br />
The standardized format for unlimited communication entries in <strong>ClientBase</strong> provides a platform upon<br />
which this information can be easily accessed. When creating a communication, click on Add<br />
402
Communication, fill in correct communication details, and click Save.<br />
An In-depth Look at Agent Profiles<br />
This area contains the following fields:<br />
Passenger: From the drop-down menu choose what passenger this communication entry is<br />
connected with (if applicable).<br />
Type: Options include Email, Fax, Phone, Web, Facebook, Twitter, Linked In, Google Plus.<br />
Communication Type options include Social Media. This begins the first phase of social media<br />
integration. Fields are now available to begin capturing social media information in order to connect<br />
to social media profiles/page(s) in a future release.)<br />
Begin capturing information by clicking Additional Communications and click Add. Select a<br />
passenger and click the drop down to choose a Type from the list. The new types for social media<br />
use are:<br />
Facebook<br />
Twitter<br />
Linked In<br />
Google Plus<br />
After choosing the Type, enter the User ID (example: facebook.com/JohnSmith). User ID format will<br />
vary depending upon the social media type. Next, select a Description. User defined descriptions can<br />
be created for specific use with social media. For example, customer John Smith may have a<br />
personal profile in Facebook, along with a business page for his company. A description of "Profile"<br />
and another of "Page" could be added to differentiate between whether the User ID entered is for<br />
the customer's profile or his business page.<br />
Example Formats for capturing user's social media information:<br />
Facebook: For a profile - facebook.com/username (facebook.com/JohnSmith); For a page -<br />
facebook.com/page name (facebook.com/SabreTravel)<br />
403
An In-Depth Look at Agent Profiles<br />
Twitter: Twitter.com/username (Twitter.com/JohnSmith)<br />
Linked In: linkedin.com/pub/8/b8a/205<br />
(Numerical string in the URL is the Linked In ID)<br />
Google Plus: plus.google.com/117474227900375467167<br />
(Numerical string in the URL is the Google+ ID)<br />
Just like all other communication types, social media communication types have a Marketing<br />
Permission checkbox. Marketing Permission is checked by default.<br />
Note: For emails, a green check appears if the entry has been granted marketing permission.<br />
Profile’s Primary: Indicate if this is the primary phone number, fax, Email, or Web address, since<br />
only one entry per communication type may be designated as Primary.<br />
Value: You need only type the 7 digits of the Fax number or Phone number if in your area code, as<br />
<strong>ClientBase</strong> version adds a default country code and area code to the number when saved. For<br />
numbers outside your area code, type in the 10 digit area code and number (no other typing is<br />
necessary). For Email and Web entries, type these exactly as you want it to appear.<br />
Description: Choose a description if desired from drop-down menu. These options were setup by<br />
the database administrator in the Windows version of <strong>ClientBase</strong>.<br />
Save/Cancel: Click Save to accept new information or Cancel.<br />
As alternative methods of communicating with customers continue to expand (e.g. cell phones,<br />
beepers, additional Emails, etc.), you may find your phone tables growing increasingly lengthy for<br />
customer profiles. You have the ability to maintain an unlimited number of communication entries.<br />
To modify an entry, click Edit next to the communication you wish to alter, make changes, and click<br />
Save. To remove an entry, click Edit next to the communication you wish to remove, and click<br />
Delete.<br />
SPECIAL DATES<br />
These fields are particularly useful to record unique dates for each specific agent. You could add<br />
such dates as hire dates. To add unlimited special dates click on Add Special Date, fill in special<br />
date details and click Save.<br />
This area contains the following fields:<br />
Type: Select from drop-down menu. These types are customizable.<br />
Date: Select month from drop-down menu, type day and year.<br />
Comment: Type a comment if desired.<br />
404
An In-depth Look at Agent Profiles<br />
Save/Cancel: Click Save to accept new information or Cancel to abort.<br />
You have the ability to maintain an unlimited number of Special Dates. To modify an entry, click Edit<br />
next to the special date you wish to change, and click Save. To remove an entry, click Edit next to<br />
the special date to remove, and click Delete.<br />
Note: A change was made within the internal workings of the program in version 2.5 that removed<br />
the Special Date Type "Birthday" from Special Dates under the hood and moved it into a dedicated<br />
field. This change was to keep birthdates at the passenger level where they needed to be and not<br />
at a profile level. Although you will not see any visual changes from this, certain birthday queries may<br />
take extra time to process. This could happen in instances where the dates searched for in the query<br />
cross months or years. Example, if the query is to find all birthdays between December 27, 2011 and<br />
January 3, 2012, this query could run slower than it did in previous versions.<br />
Attention Report Writers:<br />
Any reports written that use <strong>ClientBase</strong> data (Crystal Reports for example) that involve birthdates<br />
will need adjustments, as the internal change made will affect your reports.A new passenger table<br />
was created. Birthdate was then removed from the special date table and moved into the new<br />
passenger table. The passenger table contains three BIRTHDATE integer fields. All existing records<br />
were migrated to these fields.<br />
o BIRTHMDYMONTH<br />
o BIRTHMDYDAY<br />
o BIRTHMDYYEAR<br />
Here are some example SQL statements that show how special dates were queried in previous<br />
versions as compared to version 3.7.<br />
SAMPLE 1: PASSENGER Birthdays in the month of June<br />
OLD version:<br />
SELECT P.* FROM SPECIALDATE S JOIN PASSENGER P ON<br />
S.PASSENGER_LINKNO=P.PASSENGERNO WHERE S.MONTHDAY STARTS WITH '06';<br />
NEW version:<br />
SELECT * FROM PASSENGER WHERE BIRTHMDYMONTH=6;<br />
SAMPLE 2: PASSENGER Birthdays between June 1 June 14<br />
OLD version:<br />
SELECT P.* FROM SPECIALDATE S JOIN PASSENGER P ON<br />
S.PASSENGER_LINKNO=P.PASSENGERNO WHERE S.MONTHDAY between '0601' and '0614';<br />
NEW version:<br />
SELECT * FROM PASSENGER WHERE BIRTHMDYMONTH=6 AND BIRTHMDYDAY BETWEEN<br />
1 AND 14;<br />
SAMPLE 3: PASSENGER Birthdays in 1963<br />
OLD version:<br />
SELECT P.* FROM SPECIALDATE S JOIN PASSENGER P ON<br />
S.PASSENGER_LINKNO=P.PASSENGERNO WHERE S.YEARMONTHDAY starts with '1963';<br />
NEW version:<br />
SELECT * FROM PASSENGER WHERE BIRTHMDYYEAR=1963;<br />
SAMPLE 4: PASSENGER Birthdays in 14-FEB-1963<br />
405
An In-Depth Look at Agent Profiles<br />
OLD version:<br />
SELECT P.* FROM SPECIALDATE S JOIN PASSENGER P ON<br />
S.PASSENGER_LINKNO=P.PASSENGERNO WHERE S.YEARMONTHDAY='19630214';<br />
NEW version:<br />
SELECT * FROM PASSENGER WHERE BIRTHMDYYEAR=1963 and BIRTHMDYMONTH=2 and<br />
BIRTHMDYDAY=14;<br />
ADDITIONAL INFO<br />
These fields provide general information about the profile. To edit fields in this area, click Edit, make<br />
changes, and click Save.<br />
General Information<br />
Profile Name: In an Agent Profile, enter the Profile Name. Any printed reports or labels can include<br />
the Profile name entered in the General Info link.<br />
Last Name: Enter the last name of agent. Any printed reports or labels can include the First and<br />
Last Name entered in the General Info link.<br />
First Name: First name of the agent.<br />
MI: Middle initial of the agent.<br />
Courtesy Title: Mr., Mrs., Mr. & Mrs., Ms., Dr. are all examples of courtesy titles. The drop-down<br />
menu allows you to select from a standardized list. This courtesy title is printed on mailing labels or<br />
on letters in the Document Templates. This field can be customized.<br />
Additional Information<br />
Interface ID: Important! This field allows the interfacing of records generated from the GDS (Front<br />
Office) to the agency accounting system (Back Office). If your agency's system requires that this<br />
field exist (for example, Trams Back Office does) then create an Interface ID as directed by the<br />
agency and complete this box.<br />
Branch No.: For agencies with multiple branches, this field allows a user to select from a drop-down<br />
menu the branch at which this profile was created, or that you want the profile associated with.<br />
Branches are set up before use of the program.<br />
Salutation: The name used to greet the contact. For example, if Mr. Henry Wilkenson likes to be<br />
called “Hank,” enter Hank in this field. If Mrs. Emily Anderson likes to be called “Mrs. Anderson,”<br />
enter Mrs. Anderson in this field.<br />
Profile Status<br />
Create User/Create Date: These fields default to the system date and the user logged in at the time<br />
the profile is created. Both of these fields can be modified.<br />
Profile Status: Indicate whether a profile is Inactive from the drop-down menu. By default all<br />
profiles start with an Active status. An Inactive status is included so that you can flag a profile as<br />
inactive without having to delete the profile. When querying the <strong>ClientBase</strong> database, only profiles<br />
marked as Active are included in the search. Use the Advanced Search area to find Inactive Profiles.<br />
Save/Cancel: Click Save to accept new information or Cancel.<br />
406
An In-depth Look at Agent Profiles<br />
Remarks Link<br />
The Remarks link provides a full-page view of the unlimited remarks and provides tremendous<br />
flexibility for entering comments in each profile. To add or edit a remark, click Edit, and click Save<br />
or Cancel. The great thing about remarks is that the first few lines can be viewed from anywhere in<br />
the profile.<br />
Family Members Link<br />
The Family/Employee Members link is designed for entering detailed information on specific<br />
individuals who are part of a particular household. Add a new family member by clicking Add. To<br />
modify or enhance a family member, click View in front of the family member name, and then Edit.<br />
Click Edit, then Delete to remove a family member.<br />
Let’s take a look at how to organize information for each family member by going through each field<br />
of the Add/Modify screen:<br />
Family Member<br />
Relationship: By choosing from a drop-down menu, these user-definable items can be inserted.<br />
Last Name: Enter the legal last name of family member/employee.<br />
407
An In-Depth Look at Agent Profiles<br />
First Name: Enter the legal first name of the Family Member/Employee in this field. This provides<br />
you with the correct information for booking purposes.<br />
M. I.: Enter a middle initial.<br />
Courtesy Title: Mr., Mrs., Mr. & Mrs., Ms., Dr. are all examples of courtesy titles. The drop-down<br />
menu allows you to select from a customized list. This courtesy title can printed on mail labels and<br />
letters.<br />
Birth Date: From the drop-down menu, enter the month, then the date and year if desired.<br />
Passport Number #1 & #2: For up to 2 passports, enter traveler’s passport number.<br />
Expiration: Enter traveler’s passport expiration date in date format listed below, or double-click on<br />
date from drop-down calendar.<br />
Date Fields Formats<br />
Complete a date field using any one of the following formats:<br />
1) mmddyy or mmddyyyy (separators are not required); i.e., 021410<br />
2) ddmmmyy or ddmmmyyyy<br />
3) 0 (for current month, day and year date)<br />
4) mm (defaults to current day and year)<br />
5) mmdd (defaults to current year)<br />
6) mm-dd-yy, mm/dd/yy, mm.dd.yy (-, / and . are valid separators)<br />
7) m-d-yy, m/d/yy, m.d.yy<br />
Country of Origin: Enter the passport Country of Origin from the drop-down menu.<br />
Save/Cancel: Click Save to accept new information or Cancel.<br />
Remarks: Enter unlimited free-flowing information pertaining to this traveller.<br />
Preferred Airlines/Preferred Car Rentals/Preferred Cruise Lines/Preferred Hotels/Preferred<br />
408
An In-depth Look at Agent Profiles<br />
Tours: Passenger Travel Preferences are captured at the vendor level as well as by Travel<br />
Category. In the past when a travel preference was created for a passenger it applied to the travel<br />
category, not a vendor. For example, if a passenger had an air preference of business class but liked<br />
first class for one of his/her preferred airlines, there wasn't a way to capture both. Now the business<br />
class air preference can be captured as the global preference for the travel category as well as<br />
capturing first class as the preference for the specific preferred vendor. Even though preferences<br />
are now captured at the vendor level, it is not mandatory to select preferred preferences for a vendor.<br />
It is also not mandatory to select preferred vendors for a passenger.<br />
To set up/modify preferences, on the Family Member/Employee screen, select a passenger and click<br />
Edit. Scroll down to the desired Travel Category. Each Travel Category shows a "Preferred" section<br />
that lists the vendors, with a "Preference" section underneath it. When a vendor is highlighted, the<br />
Preference section will change accordingly, displaying the preferences for that vendor.<br />
A General Preference is available to each Travel Category under Preferred. Highlight the General<br />
Preference and enter the global preferences for the category in the Preference section below it.<br />
When a preferred vendor is later added to a Travel Category, the preference settings from General<br />
Preference are defaulted as the preferences for the new vendor. Next, make adjustments to the new<br />
vendor's preferences as needed. A field, Desirability can be used as a rating for a vendor. For<br />
example, United Airlines may be a preferred airline for a corporate account but the employee<br />
traveling for the company may Dislike that airline. By entering the Desirability, if you see that the<br />
employee dislikes United, he/she could be booked on another preferred airline the corporate account<br />
uses. The Desirability field is displayed when adding or viewing a preferred vendor. Desirability<br />
options appear as a drop down to select from. Selections are: Do Not Use; Dislikes; No Preference;<br />
Favorable; or Very Favorable.<br />
All Travel Categories now use the user-defined field Special Options. Under Air Preferences, Meal<br />
Preferences was renamed to Meal Type which links to a Meal Code field that was also added. Air<br />
Craft Type was also added as a preference. For Cruise Preferences, Ship Name and Departure Port<br />
were added as user defined fields and are displayed as preference options. When using passenger<br />
columns for preferences in queries, the default global preferences are displayed in the query.<br />
Save/Cancel: Click Save to accept new information or Cancel to leave area without saving<br />
409
An In-Depth Look at Agent Profiles<br />
changes.<br />
Activities Link<br />
Anyone who has permission, can see the history of contacts made with a specific Agent by clicking<br />
on the Activities link. Included are Notes (record of interaction with agent), Reminders (record of<br />
scheduled past and future activities) and Mailers (record detailing mailings sent to this agent).<br />
To add a new Note, Reminder or Mailer, click on the drop-down menu Create Activity. To modify or<br />
enhance a Note, Reminder or Mailer click Edit next to the item. Click Edit|Delete to remove any<br />
item. Notice the filter buttons located directly above the Activities results screen. This allows for<br />
quick sorting of the results appearing in this link. By default ALL Activities are displayed, but options<br />
for viewing just Mailers, Notes, Reminders, or Open Reminders are available. For more information<br />
on Activities including how to create them, refer to the chapters entitled, An In-Depth Look at<br />
Activities and Using the Activity Manager to Manage Your Activities.<br />
Travel History Link<br />
From this window, agents can easily review past travel purchases which they have sold in<br />
<strong>ClientBase</strong> or Trams Back Office. These have read-only capabilities only, so no information can be<br />
altered.<br />
Filters<br />
410
An In-depth Look at Agent Profiles<br />
Sort: Select the way you want data sorted by using the drop-down menu to select Issue Date,<br />
Depart Date, Travel Category, Passenger Name, Agent, Invoice #, Invoice Type, Invoice Status, or<br />
Ticket Confirmation #.<br />
Issue Date: Enter the from and to Issue Date, by double-clicking on date from the drop-down<br />
calendar or free flow the date using date format listed below.<br />
Tvl Cat.: Filter the results per travel category by checking/unchecking the travel category buttons,<br />
Air, Hotel, Car, Cruise, Tour, Rail, Transport, Insurance, Service Fee, or Other. Click Search to<br />
display desired query. Also, there is a Summary View and Detail View of items in the listing.<br />
Groups Link<br />
Profiles may be associated with a specific group that has been created by the agency. There is no<br />
limit to how many groups one profile may be associated with. This group table is shared with Trams<br />
Back Office. To add a new group to the client’s profile, click Add Group and select a group name<br />
from the drop-down menu. To modify or enhance a group, click Edit. Click Edit and then Delete to<br />
remove a group name from a profile.<br />
Attachment Link<br />
To enhance the amount and type of information accessible in a <strong>ClientBase</strong> profile, a feature is<br />
included in all profile types allowing you to point to other files available on your local or network drive.<br />
These files are referred to as Attachments.<br />
To access an attachment at the client level, click the Attachment link. To add a new Attachment,<br />
click Add Attachment, and Browse for Attachment to identity the File Path of the file. The File Path<br />
includes the drive where the file is located, any directories or sub-directories, and the name of the<br />
file. Choose to compress the file by clicking in the Compression box. Enter a brief description of the<br />
attachment, if desired. Click Save.<br />
To view a saved Attachment, highlight the attachment, and click Open next to the attachment.<br />
<strong>ClientBase</strong> uses Windows Associations to view the file type, load the appropriate software, and<br />
retrieve the specified file. Every file has an extension (e.g., .doc, .jpg, .bmp, .html, etc.) and must be<br />
associated with a specific Windows software program such as Word, Paint Shop Pro, Internet<br />
Explorer, etc. to be viewed. Although this association is created automatically by Windows when<br />
various software programs are installed, if a workstation does not have a software program<br />
associated with the type of file an attachment is pointing to, then the file cannot be viewed from the<br />
attachment created in <strong>ClientBase</strong>.<br />
411
An In-Depth Look at Agent Profiles<br />
Since a copy of the file has been stored within the <strong>ClientBase</strong> database when it is opened at a<br />
workstation, it is loaded temporarily into a temp directory. If any changes are made to the original<br />
file or the temporary file, the attachment in <strong>ClientBase</strong> must be re-directed to the new file, or the old<br />
file will still be displayed. This is done by using Edit and browsing for the updated file. Once this is<br />
done, the copy of the file saved in the <strong>ClientBase</strong> database is updated.<br />
Click Edit, then Delete, next to the attachment to remove it.<br />
PNR Entries Link<br />
<strong>ClientBase</strong> PNR entry tables are included at the Branch, Profile, Agent, and Passenger/Employee.<br />
As a <strong>ClientBase</strong> user, you may presently create these entries at the Profile and Agent level only.<br />
PNR entries setup at the Branch Level, as well as any number of PNR Rules (simply a way of<br />
designating how certain fields of information captured in a profile should be formatted when sent to<br />
a PNR) are setup under Tools|Settings.<br />
Store any number of agent PNR Entries you want included when using the Merge to PNR feature.<br />
CRS: Choose your GDS system from the drop-down menu.<br />
Description of Entry: Enter a free-flow “Description” field.<br />
Always Move: By selecting True from the drop-down menu, the entry always moves when you do<br />
a merge to CRS. If False is selected, moving the entry is optional.<br />
Display on Screen: When True is selected, the entry automatically displays on the front screen<br />
when Merging to the PNR. If False is selected, the entry is displayed on the Additional Entries link.<br />
Within each PNR Entry or PNR Rule that is set to Always Move, an option is included called "Display<br />
on Screen". The PNR Selection Screen is the screen that appears when you use the Merge to PNR<br />
feature and allows you to select the specific profile data to be included and sent to the current PNR.<br />
For PNR entries that should always move regardless of the profile or PNR, this "Display on Screen"<br />
can be set to False, so that the Selection Screen is less complicated for the agent to review. Any of<br />
these entries that have not been designated to display on the selection screen can be viewed, if<br />
desired, by clicking the "Additional Entries Link" in the Merge to PNR feature.<br />
PNR Entry: Enter the PNR entry the way you would in your reservation system and then Save.<br />
For more information on moving data from <strong>ClientBase</strong> to your GDS PNR, see the chapter entitled,<br />
Putting Profiles to Work for You.<br />
More Fields Link<br />
If you want to track it, and <strong>ClientBase</strong> doesn’t ask for it, here is where you can create customized<br />
fields of information. Items like Social Security Numbers, client UDID’s and other miscellaneous<br />
information that you want to track, can be captured in these fields.<br />
412
An In-depth Look at Agent Profiles<br />
To tag a profile with a More Field, click Edit, and from the drop-down menus next to the More Field<br />
Categories, select the More Field item you want to use. Then click Save. To untag a More Field<br />
Item, simply highlight the item and click Delete on the keyboard.<br />
Warning: More Fields are permanent fields at this point. If you are not sure you want a permanent<br />
field, use a Marketing Code or Group instead of a More Field to link similar profiles.<br />
413
An In-Depth Look at Agent Profiles<br />
414
Chapter<br />
14<br />
An In-Depth Look at Other<br />
Profiles<br />
This section familiarizes you with how to setup, maintain and use Other Profiles.<br />
Introduction<br />
Other profiles are used for gathering information and maintaining history on individuals and<br />
companies that do not fit into one of the other profile categories. They are not leisure or corporate<br />
customers, vendors/service providers, or agents, but are individuals or companies with whom you<br />
do business that are usually not travel-related. The landlord, bank, utility companies, insurance<br />
provider and the post office are all examples of Other profiles.<br />
Why would you want to collect information on other profiles When these profiles are carefully<br />
maintained, you always have current information for billing purposes and running labels. When you<br />
need help or a special favor from one of these entities, it is always helpful to have the name, phone<br />
number or email of your contact person handy.<br />
Note: Most agents are probably not granted access to Other profiles, since there would be no need<br />
for them to access this information.<br />
415
An In-Depth Look at Other Profiles<br />
Create a New Other Profile<br />
New other profiles can be created by clicking on the profile icon on the tool bar and selecting Other.<br />
Want a quick way to create a profile Use the following hot key:<br />
Alt shift O = New Other.<br />
Anatomy of an Other Profile<br />
Other profiles in <strong>ClientBase</strong> store an unlimited amount of information about your Other entities. To<br />
organize all this information and make it easily accessible to all agents, each profile is made up of<br />
key areas (Menu Bar, Header Info, Indicator Icons, and Information links.)<br />
MENU BAR<br />
HEADER<br />
INDICATOR<br />
ICON<br />
INFO<br />
LINKS<br />
Let’s explore each of these key areas:<br />
Header Information<br />
The Header conveniently displays pertinent information including the current mailing address,<br />
416
An In-depth Look at Other Profiles<br />
communication entries captured for this profile, Email and Website addresses, and the date the<br />
profile was created. Frequently confirm the accuracy of this information to ensure data is always<br />
up-to-date.<br />
Menu Bar<br />
The menu bar contains links to features - Merge Options, Note, Mailer and Reminder.<br />
Merge To Document enables you to launch a Document Template from the results of a query into<br />
Wordpad, MS Word, Open Office, etc. to view, edit and print the document with all fields merged.<br />
Merge To Email launches an email message for the profile you are in. Merge To Label enables you<br />
to create a label for this profile.<br />
You can also create a Note, Mailer, or Reminder from the menu bar for the profile you are in, or link<br />
to another profile by using the three dots next to Profile field.<br />
For complete instructions on Merge To Document, Merge to Email, or Merge to Label, see chapter,<br />
Putting Profiles to Work for You.<br />
Header Information<br />
The Header conveniently displays pertinent information including the current mailing address,<br />
communication entries, Email and Website addresses, groups, and the date it was created.<br />
Frequently confirm the accuracy of this information to ensure data is always up-to-date.<br />
Profile Indicator<br />
An icon (a finger with a red string) alerts you if there are any open reminders for this profile. This<br />
does not appear in the profile if there is no open reminder. Click the icon to immediately move into<br />
that Activities Link.<br />
Detailed Review of Links<br />
Each profile contains the following information links: General Info, Remarks, Employees,<br />
Activities, Groups, and Attachments.<br />
417
An In-Depth Look at Other Profiles<br />
General Info Link<br />
The General Information link displays Other Profile data.<br />
HEADER<br />
The following fields are in the General Information link:<br />
ADDRESS RECORDS<br />
An Other Profile can include unlimited addresses which may be designated as Primary, Bill To, Ship<br />
To, Second Address and Alternate Address. Only one address though may be designated as<br />
Primary, one as Bill To, and one as Ship To. When creating a new address, click Add, fill in correct<br />
address details and choose the address type(s).<br />
This area contains the following fields:<br />
Address Line 1: First line of address.<br />
Address Line 2: Second line of address.<br />
Apt/Suite: Apartment or suite number.<br />
City/State/Zip/Country: City, state, Zip Code, and country of the address.<br />
Description: Enter description if desired.<br />
Primary/Bill To/Ship To/Alternate: One address record can represent multiple Address Types.<br />
Click to select.<br />
Second Address: The Second Address choice also offers a date option. This is particularly useful<br />
because it allows entry of a specific time frame your client may be residing at a Second Address.<br />
Check off and enter the appropriate month From/Through off the drop-down menu.<br />
Save/Cancel: Click Save to accept new information or Cancel to abort.<br />
To modify an entry, click Edit next to the address you wish to alter, make changes, and click Save.<br />
To remove an entry, click Edit next to the address you wish to remove, and click Delete.<br />
418
An In-depth Look at Other Profiles<br />
COMMUNICATIONS<br />
The standardized format for unlimited communication entries in <strong>ClientBase</strong> provides a platform<br />
upon which this information can be easily accessed. When creating a communication, click on Add<br />
Communication, fill in correct communication details, and click Save.<br />
This area contains the following fields:<br />
Passenger: From the drop-down menu choose what passenger this communication entry is<br />
connected with (if applicable).<br />
Type: Options include Email, Fax, Phone, Web, Facebook, Twitter, Linked In, Google Plus.<br />
Communication Type options include Social Media. This begins the first phase of social media<br />
integration. Fields are now available to begin capturing social media information in order to connect<br />
to social media profiles/page(s) in a future release.)<br />
Begin capturing information by clicking Additional Communications and click Add. Select a<br />
passenger and click the drop down to choose a Type from the list. The new types for social media<br />
use are:<br />
Facebook<br />
Twitter<br />
Linked In<br />
Google Plus<br />
After choosing the Type, enter the User ID (example: facebook.com/JohnSmith). User ID format will<br />
vary depending upon the social media type. Next, select a Description. User defined descriptions<br />
can be created for specific use with social media. For example, customer John Smith may have a<br />
personal profile in Facebook, along with a business page for his company. A description of "Profile"<br />
and another of "Page" could be added to differentiate between whether the User ID entered is for<br />
the customer's profile or his business page.<br />
419
An In-Depth Look at Other Profiles<br />
Example Formats for capturing user's social media information:<br />
Facebook: For a profile - facebook.com/username (facebook.com/JohnSmith); For a page -<br />
facebook.com/page name (facebook.com/SabreTravel)<br />
Twitter: Twitter.com/username (Twitter.com/JohnSmith)<br />
Linked In: linkedin.com/pub/8/b8a/205<br />
(Numerical string in the URL is the Linked In ID)<br />
Google Plus: plus.google.com/117474227900375467167<br />
(Numerical string in the URL is the Google+ ID)<br />
Just like all other communication types, social media communication types have a Marketing<br />
Permission checkbox. Marketing Permission is checked by default.<br />
Note: For emails, a green check appears if the entry has been granted marketing permission.<br />
Profile’s Primary: Indicate if this is the primary phone number, fax, Email, or Web address, since<br />
only one entry per communication type may be designated as Primary.<br />
Value: You need only type the 7 digits of the Fax number or Phone number if in your area code, as<br />
<strong>ClientBase</strong> version adds a default country code and area code to the number when saved. For<br />
numbers outside your area code, type in the 10 digit area code and number (no other typing is<br />
necessary). For Email and Web entries, type these exactly as you want it to appear.<br />
Description: Choose a description if desired from drop-down menu. These options were setup by<br />
the database administrator in the Windows version of <strong>ClientBase</strong>.<br />
Save/Cancel: Click Save to accept new information or Cancel.<br />
As alternative methods of communicating with customers continue to expand (e.g. cell phones,<br />
beepers, additional Emails, etc.), you may find your phone tables growing increasingly lengthy for<br />
customer profiles. You have the ability to maintain an unlimited number of communication entries.<br />
To modify an entry, click Edit next to the communication you wish to alter, make changes, and click<br />
Save. To remove an entry, click Edit next to the communication you wish to remove, and click<br />
Delete.<br />
SPECIAL DATES<br />
These fields are particularly useful to record unique dates for each specific contact. You may want<br />
to enter a date when a contract is to be renewed. To add unlimited special dates click on Add Special<br />
Date, fill in special date details and click Save.<br />
420
An In-depth Look at Other Profiles<br />
This area contains the following fields:<br />
Type: Select special date types from drop-down menu which was set up in the program or freeflow<br />
the information.<br />
Date: Select month from drop-down menu, type day and year.<br />
Comment: Type a comment if desired.<br />
Save/Cancel: Click Save to accept new information or Cancel to abort.<br />
You have the ability to maintain an unlimited number of Special Dates. To modify an entry, click<br />
Edit next to the special date you wish to alter, make changes, and click Save. To remove an entry,<br />
click Edit next to the special date wish to remove, and click Delete.<br />
Note: A change was made within the internal workings of the program in version 2.5 that removed<br />
the Special Date Type "Birthday" from Special Dates under the hood and moved it into a dedicated<br />
field. This change was to keep birthdates at the passenger level where they needed to be and not<br />
at a profile level. Although you will not see any visual changes from this, certain birthday queries<br />
may take extra time to process. This could happen in instances where the dates searched for in the<br />
query cross months or years. Example, if the query is to find all birthdays between December 27,<br />
2011 and January 3, 2012, this query could run slower than it did in previous versions.<br />
Attention Report Writers:<br />
Any reports written that use <strong>ClientBase</strong> data (Crystal Reports for example) that involve birthdates<br />
will need adjustments, as the internal change made will affect your reports.A new passenger table<br />
was created. Birthdate was then removed from the special date table and moved into the new<br />
passenger table. The passenger table contains three BIRTHDATE integer fields. All existing<br />
records were migrated to these fields.<br />
o BIRTHMDYMONTH<br />
o BIRTHMDYDAY<br />
o BIRTHMDYYEAR<br />
Here are some example SQL statements that show how special dates were queried in previous<br />
versions as compared to version 3.7.<br />
SAMPLE 1: PASSENGER Birthdays in the month of June<br />
OLD version:<br />
SELECT P.* FROM SPECIALDATE S JOIN PASSENGER P ON<br />
S.PASSENGER_LINKNO=P.PASSENGERNO WHERE S.MONTHDAY STARTS WITH '06';<br />
NEW version:<br />
SELECT * FROM PASSENGER WHERE BIRTHMDYMONTH=6;<br />
SAMPLE 2: PASSENGER Birthdays between June 1 June 14<br />
OLD version:<br />
SELECT P.* FROM SPECIALDATE S JOIN PASSENGER P ON<br />
S.PASSENGER_LINKNO=P.PASSENGERNO WHERE S.MONTHDAY between '0601' and<br />
'0614';<br />
NEW version:<br />
SELECT * FROM PASSENGER WHERE BIRTHMDYMONTH=6 AND BIRTHMDYDAY BETWEEN<br />
1 AND 14;<br />
421
An In-Depth Look at Other Profiles<br />
SAMPLE 3: PASSENGER Birthdays in 1963<br />
OLD version:<br />
SELECT P.* FROM SPECIALDATE S JOIN PASSENGER P ON<br />
S.PASSENGER_LINKNO=P.PASSENGERNO WHERE S.YEARMONTHDAY starts with '1963';<br />
NEW version:<br />
SELECT * FROM PASSENGER WHERE BIRTHMDYYEAR=1963;<br />
SAMPLE 4: PASSENGER Birthdays in 14-FEB-1963<br />
OLD version:<br />
SELECT P.* FROM SPECIALDATE S JOIN PASSENGER P ON<br />
S.PASSENGER_LINKNO=P.PASSENGERNO WHERE S.YEARMONTHDAY='19630214';<br />
NEW version:<br />
SELECT * FROM PASSENGER WHERE BIRTHMDYYEAR=1963 and BIRTHMDYMONTH=2 and<br />
BIRTHMDYDAY=14;<br />
ADDITIONAL INFO<br />
Additional Info fields provide general information about the profile. To edit fields in this area, click<br />
Edit, make changes, and click Save.<br />
General Information<br />
Profile Name: In an Other Profile, enter the name of company or individual. Any printed reports or<br />
labels can include the Profile name entered in the General Info link.<br />
Last Name: Enter the last name of primary contact in business. Any printed reports or labels can<br />
include the First and Last Name entered in the General Info link.<br />
First Name: Enter the first name of the primary contact in this field.<br />
422
An In-depth Look at Other Profiles<br />
MI: Enter the middle initial of the primary contact in the field.<br />
Courtesy Title: Mr., Mrs., Mr. & Mrs., Ms., Dr. are all examples of courtesy titles. The drop-down<br />
menu allows you to select from a lengthy standardized list. This courtesy title is printed on mailing<br />
labels or on letters/emails using the Document Templates. This field can be customized.<br />
Additional Information<br />
Interface ID: This field does not need to be filled out, as Other Profiles don’t require an Interface ID.<br />
Branch No.: For agencies with multiple branches, this field allows a user to select from a dropdown<br />
menu the branch at which this profile was created, or that you want the profile associated with.<br />
Branches are set up prior to using the program.<br />
Salutation: The name used to greet the contact. For example, if Mr. Henry Wilkenson likes to be<br />
called “Hank,” enter Hank in this field. If Mrs. Emily Anderson likes to be called “Mrs. Anderson,”<br />
enter Mrs. Anderson in this field. Or, if you have a couple and want to include both names when<br />
addressing letters, enter Hank and Emily, or Mr. & Mrs. Anderson.<br />
Profile Status<br />
Create User/Create Date: These fields default to the system date and the user logged in at the<br />
time the profile is created. Both of these fields can be modified.<br />
Profile Status: Indicate whether a customer profile is Inactive from the drop-down menu. By<br />
default all profiles start with an Active status. An Inactive status is included so that you can flag a<br />
customer as inactive without having to delete the profile. When querying the <strong>ClientBase</strong> database,<br />
only profiles marked as Active are included in the search. Use the Advanced Search, however, to<br />
search for Inactive profiles.<br />
Save/Cancel: Click Save to accept new information or Cancel.<br />
Remarks Link<br />
The Remarks link provides a full-page view of unlimited remarks that can be entered, and provides<br />
tremendous flexibility for entering comments in each profile. To add or edit a remark, click Edit,<br />
make changes, and click Save or Cancel. The great thing about remarks is that the first few lines<br />
can be viewed from anywhere in the profile.<br />
423
An In-Depth Look at Other Profiles<br />
Employees Link<br />
The Employees link is designed for detailed information on specific individuals who are key contacts<br />
with an Other profile entity. Add a new employee by clicking on Add. To modify or enhance an<br />
employee, click View in front of the employee name, and then Edit. Click Edit, then Delete to remove<br />
a employee.<br />
Let’s take a look at how to organize information for each employee by going through each field of the<br />
Add/Modify screen:<br />
Employee<br />
Relationship with Profile/Position: By choosing from a drop-down menu, these user-definable<br />
items. Identify the employee as the Owner or Main Contact for future reference.<br />
Last Name: Enter the legal last name of family member/employee.<br />
First Name: Enter the first name of the Employee in this field.<br />
Middle Name: Enter a middle initial.<br />
Courtesy Title: Mr., Mrs., Mr. & Mrs., Ms., Dr. are all examples of courtesy titles. The drop-down<br />
menu allows you to select from a customized list. This courtesy title can printed on mail labels and<br />
letters.<br />
Birth Date: From the drop-down menu, select the month, then enter the day and year if desired.<br />
Passport Number #1 & #2: For up to 2 passports, enter traveler’s passport number.<br />
Expiration: Enter traveler’s passport expiration date in date format listed below; or double-click on<br />
the date from the drop-down calendar.<br />
Country of Origin: Enter the passport Country of Origin from the drop-down menu.<br />
Save/Delete/Cancel: Click Save to accept new information, Delete to remove this passenger<br />
entirely, or Cancel leave area without saving changes.<br />
Remarks: Enter unlimited free-flowing information pertaining to this traveller.<br />
424
An In-depth Look at Other Profiles<br />
Preferred Airlines/Preferred Car Rentals/Preferred Cruise Lines/Preferred Hotels/Preferred<br />
Tours: Passenger Travel Preferences are captured at the vendor level as well as by Travel<br />
Category. In the past when a travel preference was created for a passenger it applied to the travel<br />
category, not a vendor. For example, if a passenger had an air preference of business class but<br />
liked first class for one of his/her preferred airlines, there wasn't a way to capture both. Now the<br />
business class air preference can be captured as the global preference for the travel category as<br />
well as capturing first class as the preference for the specific preferred vendor. Even though<br />
preferences are now captured at the vendor level, it is not mandatory to select preferred<br />
preferences for a vendor. It is also not mandatory to select preferred vendors for a passenger.<br />
To set up/modify preferences, on the Family Member/Employee screen, select a passenger and<br />
click Edit. Scroll down to the desired Travel Category. Each Travel Category shows a "Preferred"<br />
section that lists the vendors, with a "Preference" section underneath it. When a vendor is<br />
highlighted, the Preference section will change accordingly, displaying the preferences for that<br />
vendor.<br />
A General Preference is available to each Travel Category under Preferred. Highlight the General<br />
Preference and enter the global preferences for the category in the Preference section below it.<br />
When a preferred vendor is later added to a Travel Category, the preference settings from General<br />
Preference are defaulted as the preferences for the new vendor. Next, make adjustments to the<br />
new vendor's preferences as needed. A field, Desirability can be used as a rating for a vendor. For<br />
example, United Airlines may be a preferred airline for a corporate account but the employee<br />
traveling for the company may Dislike that airline. By entering the Desirability, if you see that the<br />
employee dislikes United, he/she could be booked on another preferred airline the corporate<br />
account uses. The Desirability field is displayed when adding or viewing a preferred vendor.<br />
Desirability options appear as a drop down to select from. Selections are: Do Not Use; Dislikes; No<br />
Preference; Favorable; or Very Favorable.<br />
All Travel Categories now use the user-defined field Special Options. Under Air Preferences, Meal<br />
Preferences was renamed to Meal Type which links to a Meal Code field that was also added. Air<br />
Craft Type was also added as a preference. For Cruise Preferences, Ship Name and Departure<br />
Port were added as user defined fields and are displayed as preference options. When using<br />
passenger columns for preferences in queries, the default global preferences are displayed in the<br />
query.<br />
Save/Cancel: Click Save to accept new information or Cancel to leave area without saving<br />
425
An In-Depth Look at Other Profiles<br />
changes.<br />
Activities Link<br />
Agents can see the history of contacts made with a specific Other profile entity (if they have been<br />
granted permission) by clicking on the Activities link. This displays a complete history of all contacts<br />
associated with this specific other profile. Included are Notes (record of interaction with Other entity),<br />
Reminders (record of scheduled past and future activities) and Mailers (record detailing mailings<br />
sent to this entity).<br />
To add a new Note, Reminder or Mailer, click on the drop-down menu Create Activity. To modify or<br />
enhance a Note, Reminder or Mailer click Edit next to the item. Click Edit|Delete to remove any<br />
item. Notice the filter buttons located directly above the Activities results screen. This allows for<br />
quick sorting of the results appearing in this link. By default ALL Activities are displayed, but options<br />
for viewing just Mailers, Notes, Reminders, or Open Reminders are available. Also, there is a<br />
Summary View and Detail View of activities in the listing.<br />
For more information on Activities including how to create them, refer to the chapters entitled, An In-<br />
Depth Look at Activities and Using the Activity Manager to Manage Your Activities.<br />
Groups Link<br />
Profiles may be associated with a specific group that has been created by the agency. There is no<br />
limit to how many groups one profile may be associated with. This group table is shared with Trams<br />
Back Office. To add a new group to an other’s profile, click Add Group to select group name from<br />
the drop-down menu. To modify or enhance a group, click Edit next to the group entry. Click Edit<br />
next to the group entry, and then Delete to remove a group name from a profile.<br />
Attachments Link<br />
To enhance the amount and type of information accessible in a <strong>ClientBase</strong> profile, a feature is<br />
included in all profile types allowing you to point to other files available on your local or network drive.<br />
These files are referred to as Attachments.<br />
To access an attachment at the client level, click the Attachment link. To add a new Attachment click<br />
Add Attachment, and Browse for Attachment to identity the File Path of the file. The File Path<br />
includes the drive where the file is located, any directories or sub-directories, and the name of the<br />
file. Choose to compress the file by clicking in the Compression box. Enter a brief description of the<br />
attachment, if desired. Click Save.<br />
426
An In-depth Look at Other Profiles<br />
To view a saved attachment, highlight the attachment, and click Open next to the attachment.<br />
<strong>ClientBase</strong> uses Windows Associations to view the file type, load the appropriate software, and<br />
retrieve the specified file. Every file has an extension (e.g., .doc, .jpg, .bmp, .html, etc.) that must<br />
be associated with a specific Windows software program such as Word, Paint Shop Pro, Internet<br />
Explorer, etc. to be viewed. Although this association is created automatically by Windows when<br />
various software programs are installed, if a workstation does not have a software program<br />
associated with the type of file an attachment is pointing to, then the file cannot be viewed from the<br />
attachment created in <strong>ClientBase</strong>.<br />
Since a copy of the file has been stored within the <strong>ClientBase</strong> database when it is opened at a<br />
workstation, it is loaded temporarily into a temp directory. If any changes are made to the original<br />
file or the temporary file, the attachment in <strong>ClientBase</strong> must be re-directed to the new file, or the old<br />
file will still be displayed. This is done by using Edit and browsing for the updated file. Once this is<br />
done, the copy of the file saved in the <strong>ClientBase</strong> database will be updated.<br />
Click Edit, then Delete, next to the attachment to remove it.<br />
427
An In-Depth Look at Other Profiles<br />
428
Chapter<br />
15<br />
An In-Depth Look at PNR Import<br />
This chapter provides a detailed overview of using the PNR Import<br />
feature in <strong>ClientBase</strong>. PNR Import is currently available for Amadeus,<br />
Apollo/Galileo, Sabre and Worldspan.<br />
Reservations stored within an Amadeus, Apollo/Galileo, Sabre, or Worldspan PNR can be imported<br />
into <strong>ClientBase</strong>, and new reservation records can be created within the reservation tab of the Res<br />
Card. Once the new reservations reside in the Res Card, print out trip proposals, itineraries, or add<br />
additional reservations using Live Connect and generate invoices.<br />
Note for every GDS: For troubleshooting purposes, PNR Import for each GDS can create a copy<br />
of the file being imported and saved locally for review. To automatically create a PNR Import log file,<br />
create the following directory on your workstation: My Documents\Trams\<strong>ClientBase</strong>. Each time<br />
PNR Import is performed the ImportLog.txt file will be overwritten with the current PNR.<br />
PNR Import For Amadeus<br />
The PNR Import for Amadeus takes air, car, hotel and rail segments included in an Amadeus PNR<br />
and imports them into <strong>ClientBase</strong> Res Card reservation records. Amadeus has 3 platforms - APS<br />
(which stands for Amadeus Pro Software), Vista, and ProWeb. The Amadeus tool we use for Merge<br />
to PNR and PNR Import is called Amadeus +Script and is available with both APS and Vista<br />
platforms. (If the agency's APS or Vista platform did not come with this +Script tool activated, then<br />
contact the Amadeus support desk to turn it on. Amadeus has agreed to waive an fees associated<br />
with +Scripts for all Trams customers, so there is no cost, just a phone call to the support desk.)<br />
Since +Scripts is unavailable with ProWeb, PNR Import function (as well as Merge to PNR via API)<br />
DOES NOT work with it.<br />
Setup Instructions<br />
1) For all users, download the following cbbcomps.exe:<br />
ftp.Trams.com/pub/updates/utilities/CBBComps.zip<br />
2) Run on each workstation to install and register the necessary GDS files for this feature to work.<br />
3) Verify your APS or Vista +Script tool is activated.<br />
Steps To Import a PNR from Amadeus<br />
1) Be sure you are currently logged into both Amadeus and <strong>ClientBase</strong>.<br />
2) Create a new Res Card or open an existing Res Card within the appropriate client profile in<br />
<strong>ClientBase</strong>.<br />
3/25/13 429
An In-Depth Look at PNR Import<br />
3) Click on the PNR Import button on the main Res Card menu bar.<br />
4) Select Amadeus from the drop down list in the GDS field.<br />
5) Enter the desired Record Locator or leave the Record Locator field blank to import the current,<br />
active PNR.<br />
6) Click Next.<br />
Multiple Reservations may be included in one PNR, therefore, multiple reservations may be<br />
imported as a result of the PNR import. All segments of an air itinerary will be imported into one<br />
reservation, but additional car and hotel reservations will be imported into separate reservation<br />
records.<br />
Each reservation imported into <strong>ClientBase</strong> must link to an existing Vendor profile within your<br />
<strong>ClientBase</strong> database. To locate the appropriate Vendor profile and automatically link to it, the system<br />
uses the Interface ID within the CRS and matches to an Interface ID within your Vendor profiles.<br />
- If it finds a Vendor profile with the same Interface ID, it imports the Reservation automatically.<br />
- If it does not find the Interface ID, then a prompt appears indicating the Interface ID it could not find.<br />
Use the Select Vendor field to query your Vendor profiles and manually attach the reservation to the<br />
proper Vendor profile. If the Vendor is not in your database then use the Create Vendor and add the<br />
Vendor profile accordingly. Avoid accidentally creating duplicate Vendor profiles by making sure<br />
3/25/13 430
An In-Depth Look at PNR Import<br />
Interface ID's are captured properly within the Vendor profiles you work with frequently.<br />
- If it finds multiple matches on vendor ID, use the Select Vendor field to query.<br />
Special Note: When a PNR is imported from a GDS, the Invoiced Outside of CB is checked by<br />
default and the reservation amount is not included in the uninvoiced balance. This keeps the<br />
reservation from being invoiced twice.<br />
The Amadeus PNR import updates existing reservations. If the same PNR is imported multiple<br />
times, the systems now looks at the rec locator, vendor and confirmation number, and if all match,<br />
then it updates the existing reservation rather than appending it as another new reservation.<br />
PNR Import For Apollo/Galileo<br />
This feature takes air, car, hotel, cruise, tour and rail segments included in an Apollo/Galileo PNR<br />
and imports them into <strong>ClientBase</strong> Res Card reservation records. This feature requires FocalPoint,<br />
FocalPoint Net, Desktop AND must also have ViewPoint 3.0 or higher on each set using the PNR<br />
Import feature. Although ViewPoint does not need to be used to create or retrieve the PNR, it needs<br />
to be running in the background, as it is a View Point tool that we are utilizing that turns the PNR<br />
segments into a file that <strong>ClientBase</strong> can then parse and import into reservation records.<br />
Setup Instructions<br />
For all users, download the following cbbcomps.exe:<br />
ftp.Trams.com/pub/updates/utilities/CBBComps.zip<br />
and register the necessary files, including the Connection ID, for this feature to work.<br />
Steps to Import an Apollo/Galileo PNR<br />
To import a PNR from Apollo/Galileo take the following steps:<br />
1) Be sure you have Viewpoint and <strong>ClientBase</strong> running on your set. (Again, you don't need to use<br />
Viewpoint to create or retrieve your PNR, you can use Focal Point to do your PNR work, you just<br />
need Viewpoint running).<br />
2) Create a new Res Card or open an existing Res Card within the appropriate client profile in<br />
<strong>ClientBase</strong>.<br />
3/25/13 431
An In-Depth Look at PNR Import<br />
3) Click on the PNR Import button on the main Res Card menu bar.<br />
4) Select Apollo/Galileo from the drop down list in the GDS field.<br />
Leave the Record Locator field blank to import the current, active PNR in Viewpoint into <strong>ClientBase</strong>.<br />
(If you are using Focal Point, whatever PNR is active in Focal Point will also automatically be active<br />
in Viewpoint.)<br />
5) Click the Next button.<br />
Multiple Reservations may be included in one PNR, therefore multiple reservations may be imported<br />
as a result of the PNR import. All segments of an air itinerary will be imported into one Reservation,<br />
but additional car and hotel reservations will be imported into separate reservation records.<br />
Each reservation imported into <strong>ClientBase</strong> must link to an existing Vendor profile within your<br />
<strong>ClientBase</strong> database. To locate the appropriate Vendor profile and automatically link to it, the system<br />
uses the Interface ID within the CRS and matches to an Interface ID within your Vendor profiles.<br />
- If it finds a Vendor profile with the same Interface ID, it imports the Reservation automatically.<br />
- If it does not find the Interface ID, then a prompt appears indicating the Interface ID it could not find.<br />
Use the Select Vendor field to query your Vendor profiles and manually attach the reservation to the<br />
proper Vendor profile. If the Vendor is not in your database then use the Create Vendor and add the<br />
Vendor profile accordingly. Avoid accidentally creating duplicate Vendor profiles by making sure<br />
3/25/13 432
An In-Depth Look at PNR Import<br />
Interface ID's are captured properly within the Vendor profiles you work with frequently.<br />
- If it finds multiple matches on vendor ID, use the Select Vendor field to query.<br />
Special Note: When a PNR is imported from a GDS, the Invoiced Outside of CB is checked by<br />
default and the reservation amount is not included in the uninvoiced balance. This keeps the<br />
reservation from being invoiced twice.<br />
The Apollo/Galileo PNR import update existing reservations. If the same PNR is imported multiple<br />
times, the systems now looks at the rec locator, vendor and confirmation number, and if all match,<br />
then it updates the existing reservation rather than appending it as another new reservation.<br />
Trams Back Office Users and the Apollo PNR Import<br />
When importing a PNR from Apollo, if you want to invoice in <strong>ClientBase</strong> rather than invoice in Apollo,<br />
drive the invoice and ticket using the HB:DTD command. This generates a ticket without creating a<br />
MIR (interface record). After importing the PNR into <strong>ClientBase</strong>, generating the invoice from<br />
<strong>ClientBase</strong> sends the air information (and any other items on the invoice) to Trams Back Office<br />
automatically. Uncheck the Invoiced Outside of CB checkbox and invoice in <strong>ClientBase</strong>. Using this<br />
procedure eliminates duplicate invoices in Trams Back Office.<br />
PNR Import For Sabre<br />
This feature takes air, car, hotel, cruise, tour and rail segments included in a Sabre PNR and imports<br />
them into <strong>ClientBase</strong> Res Card reservation records. Sabre workstations must be running Sabre Red<br />
work area.<br />
Setup Instructions<br />
For all users, download the following cbbcomps.exe:<br />
ftp.Trams.com/pub/updates/utilities/CBBComps.zip<br />
and register the necessary files, including the Connection ID, for this feature to work.<br />
Sabre Red Workspace Users: An API is the tool <strong>ClientBase</strong> uses to connect to the Sabre Host. In<br />
order for PNR Import (and Merge to PNR) to work, you must enable the MySabre API within Sabre<br />
Red. Select Tools|Options|Sabre System|Advanced and check Sabre Emulator API:<br />
<strong>ClientBase</strong> <strong>Online</strong> Sabre Red Users: Find <strong>ClientBase</strong> <strong>Online</strong> in Sabre Red.<br />
Steps to Import a Sabre PNR<br />
3/25/13 433
An In-Depth Look at PNR Import<br />
To import a PNR from Sabre take the following steps:<br />
1) Be sure you are currently logged into both Sabre and <strong>ClientBase</strong>.<br />
2) Create a new Res Card or open an existing Res Card within the appropriate client profile in<br />
<strong>ClientBase</strong>.<br />
3) Click on the PNR Import button on the main Res Card menu bar.<br />
4) Select your GDS from the drop-down list in the GDS field.<br />
5) Enter the desired Record Locator or leave the Record Locator field blank to import the current,<br />
active PNR.<br />
6) Select the proper Connect Type. All GDSs except Worldspan should select API. Worldspan<br />
should use the clipboard.<br />
Multiple Reservations may be included in one PNR, therefore multiple reservations may be imported<br />
as a result of the PNR import. All segments of an air itinerary will be imported into one Reservation,<br />
but additional car and hotel reservations will be imported into separate reservation records.<br />
Each reservation imported into <strong>ClientBase</strong> must link to an existing Vendor profile within your<br />
<strong>ClientBase</strong> database. To locate the appropriate Vendor profile and automatically link to it, the system<br />
uses the Interface ID within the CRS and matches to an Interface ID within your Vendor profiles.<br />
- If it finds a Vendor profile with the same Interface ID, it imports the Reservation automatically.<br />
3/25/13 434
An In-Depth Look at PNR Import<br />
- If it does not find the Interface ID, then a prompt appears indicating the Interface ID it could not find.<br />
Use the Select Vendor field to query your Vendor profiles and manually attach the reservation to the<br />
proper Vendor profile. If the Vendor is not in your database then use the Create Vendor and add the<br />
Vendor profile accordingly. Avoid accidentally creating duplicate Vendor profiles by making sure<br />
Interface ID's are captured properly within the Vendor profiles you work with frequently.<br />
- If it finds multiple matches on vendor ID, use the Select Vendor field to query.<br />
Special Note: When a PNR is imported from a GDS, the Invoiced Outside of CB is checked by<br />
default and the reservation amount is not included in the uninvoiced balance. This keeps the<br />
reservation from being invoiced twice.<br />
The Sabre PNR import brings in cruise and tour segments in addition to air, rail, car and hotel<br />
segments. Keep in mind that the PNR import only parses and imports the data contained in cruise<br />
and tour segments, not the accounting lines. If the cruise or tour segment is formatted to include<br />
pricing information then the price is imported, if pricing is formatted as a remark, then the price is<br />
imported to remarks and the pricing fields in the <strong>ClientBase</strong> reservation must be manually entered.<br />
The Sabre PNR import update existing reservations. If the same PNR is imported multiple times,<br />
the systems now looks at the rec locator, vendor and confirmation number, and if all match, then it<br />
updates the existing reservation rather than appending it as another new reservation.<br />
Trams Back Office Users and the Sabre PNR Import<br />
Trams Back Office customers need to make decisions on how they are going to handle what's being<br />
invoiced in Sabre and conversely in <strong>ClientBase</strong>.<br />
Problem: You create a PNR and then import it into <strong>ClientBase</strong> - for example a ticket and service<br />
fee. Next you create an invoice with those items which automatically land in Trams Back Office with<br />
a <strong>ClientBase</strong> generated invoice number. Now you need to drive the ticket and service fee in Sabre<br />
in order to generate the ticket and MCO for the service fee. When you interface to Trams, you now<br />
have 2 invoices in Trams with different invoice numbers (one generated by <strong>ClientBase</strong>, the other by<br />
Sabre). There is no option with Sabre to drive just a ticket without generating an invoice number<br />
and interface record.<br />
Solutions:<br />
Option 1 - Drive the invoice for air and services fees from Sabre. Drive any other bookings from<br />
<strong>ClientBase</strong>.<br />
Example Bookings - Air, Cruise or Tour, Service Fee<br />
1. Once the data has been imported to the Res Card, uncheck the box, Include Summary of All<br />
Reservations, so that only the invoiced items show on the <strong>ClientBase</strong> invoice. If there is a cruise or<br />
tour on the Res Card in conjunction with air and service fee, just invoice the cruise or tour from the<br />
Res Card.<br />
2. Drive the ticket and MCO for the service fee from Sabre.<br />
Results: You have 2 invoices for the customer and 2 invoices in TBO (one from <strong>ClientBase</strong> and<br />
one from Sabre). There is an un-invoiced amount on the Res Card for the air and service fee.<br />
Option 2 - Create a separate POS queue in Sabre. Sabre may charge the agency to set this up as<br />
it is considered an additional "device."<br />
1. The agency imports the PNR to the Res Card.<br />
2. The agency drives the invoice in Sabre (to generate the ticket and MCO) with the command to<br />
send this interface record to an alternate POS queue.<br />
POS Queue #1 - This queue transmits interface records to Trams Back Office that are NOT imported<br />
into the Res Card.<br />
3/25/13 435
An In-Depth Look at PNR Import<br />
POS Queue #2 - This queue holds interface records that were imported into the Res Card - hence<br />
they will never DX transmit this queue. Sabre needs to clean the records out of this queue<br />
periodically.<br />
Results: The agency would have one invoice with all bookings in the Res Card on it to give to the<br />
customer and one invoice in Trams Back Office.<br />
Set Up PNR Import For Worldspan<br />
This feature takes air, car, hotel, cruise, tour and rail segments included in a Worldspan PNR<br />
(Worldspan Go! Res Dedicated or Internet 4.0 or above) and imports them into <strong>ClientBase</strong> Res Card<br />
reservation records. Contact your Worldspan Account Manager to enable a DIR Device, assign you<br />
a unique agent Pool Name, and provide you with a unique agency Connection ID. Worldspan has<br />
waived all fees associated with enabling these features for <strong>ClientBase</strong> customers.<br />
Setup Instructions<br />
1) Contact your Worldspan Account Manager to enable a DIR Device, assign you a unique agency<br />
Pool Name, and Obtain a unique agency Connection ID.<br />
2) Your unique agency Connection ID needs to be added to a registry setting at each workstation<br />
from which you plan to run <strong>ClientBase</strong>.<br />
To set this registry setting from each workstation, download the following cbbcomps.exe<br />
ftp.Trams.com/pub/updates/utilities/CBBComps.zip<br />
and register the necessary files, including the Connection ID, for this feature to work.<br />
3) <strong>ClientBase</strong> needs to pass an Agent Sine, and your Agency Pool Name to Worldspan when PNR<br />
Import is performed. To set this so it defaults automatically, you can enter each Agent Sine and<br />
Agency Pool Name into each User Login record.<br />
To do this, have each User log into <strong>ClientBase</strong> and go to Tools|My Login|PNR Import. Click Add<br />
and set the CRS to Worldspan, entering agent's login Sine into Agent Sine, and Agency Pool Name<br />
into the field Pool Name. Each time this User performs a PNR Import the Agent Sine and Agency<br />
Pool Name default automatically. The SYSDBA can also enter this information into each User Login<br />
record by logging into <strong>ClientBase</strong> as the SYSDBA and going to Tools|Settings|User Logins and<br />
retrieving each Login record and updating accordingly.<br />
Special Note: Worldspan has changed the way agents log into Worldspan. Previously agents used<br />
the format BSI$1234RE/GS and <strong>ClientBase</strong> used this sine in setup under Tools|MyLogin|PNR<br />
Import as 1234RE/GS to work with the PNR Import feature. Worldspan now has agents changing<br />
the format of their login to 8-12 character with at least one character being numeric and they now<br />
have to add a slash and a password. This password changes every 90 days. Agents will need<br />
change their sine in <strong>ClientBase</strong> to the following format 1234RE/GS/Password, inserting their true<br />
password in that entry. Without changing this in <strong>ClientBase</strong>, PNR Import will not work.<br />
For agents who do not want to change the password every 90 days, they can complete Worldspan's<br />
Password Exemption Qualification Request Form and file for exemption.<br />
Steps to Import a Worldspan PNR<br />
To import a PNR from Worldspan take the following steps:<br />
1) Create a new Res Card or open an existing Res Card within the appropriate client profile in<br />
<strong>ClientBase</strong>.<br />
3/25/13 436
An In-Depth Look at PNR Import<br />
2) Click on the PNR Import button on the main Res Card menu bar.<br />
3) Select Worldspan from the drop down list in the GDS field.<br />
4) Enter the desired Record Locator and be sure the Agent Sine default is complete or enter your<br />
agent sine/GS (i.e 9999DS/GS).<br />
5) Click the Next button.<br />
Each reservation imported into <strong>ClientBase</strong> must link to an existing Vendor profile within your<br />
<strong>ClientBase</strong> database. To locate the appropriate Vendor profile and automatically link to it, the<br />
system uses the Interface ID within the CRS and matches to an Interface ID within your Vendor<br />
profiles.<br />
- If it finds a Vendor profile with the same Interface ID, it imports the Reservation automatically.<br />
- If it does not find the Interface ID, then a prompt appears indicating the Interface ID it could not find.<br />
Use the Select Vendor field to query your Vendor profiles and manually attach the reservation to the<br />
proper Vendor profile. If the Vendor is not in your database then use the Create Vendor and add the<br />
Vendor profile accordingly. Avoid accidentally creating duplicate Vendor profiles by making sure<br />
Interface ID's are captured properly within the Vendor profiles you work with frequently.<br />
- If it finds multiple matches on vendor ID, use the Select Vendor field to query.<br />
3/25/13 437
An In-Depth Look at PNR Import<br />
Special Note: When a PNR is imported from a GDS, the Invoiced Outside of CB is checked by<br />
default and the reservation amount is not included in the uninvoiced balance. This keeps the<br />
reservation from being invoiced twice.<br />
3/25/13 438
Chapter<br />
16<br />
Synchronize the Primary<br />
Database with a Trams Hosted<br />
Copy<br />
This section provides an overview of synchronization of primary location’s database<br />
on Trams Hosted Server, and frequently asked questions.<br />
What Is <strong>ClientBase</strong> Synchronization<br />
The <strong>ClientBase</strong> Synchronization utility provides you with the ability to create a copy of your<br />
<strong>ClientBase</strong> database and place it on a Trams Hosted Server so it can be accessed for either CBMS<br />
(<strong>ClientBase</strong> Marketing Services) purposes, or Hosted <strong>ClientBase</strong> Browser (CBB) or <strong>ClientBase</strong><br />
<strong>Online</strong> (CBO) purposes. Changes made to either your primary <strong>ClientBase</strong> database or the sync<br />
copy are then passed back and forth automatically via an on-going synchronization routine.<br />
What is Trams Sync Web Service<br />
The Trams Sync Web Service acts as an intelligent automatic "Post Office" where a copy of your<br />
database file is stored or “hosted”. After a relatively easy initial “Sync Out” setup of your primary<br />
database with timed scheduling (performed by the Trams Implementation team), the Trams Web<br />
Service actually picks up or delivers any updates to your database automatically. After you have<br />
signed up to use this service and obtain a User Name and Password, a Trams Implementer guides<br />
you through the initial setup and scheduled routines.<br />
How It Works<br />
Your entire PRIMARY database and all the information connected to Profiles, Activities, Res Cards<br />
and Invoices can be “Sync’d” out to the Trams Sync Web Service where it is hosted by use of a one<br />
time Initial Sync Out using the <strong>ClientBase</strong> sync utility. An ongoing “sync” routine is then created<br />
using the Windows Task Scheduler that automatically updates both the primary and copy database<br />
with any changes users have made to them.<br />
3/25/13 439
Synchronizing with Trams Hosted Copy<br />
Synchronization Frequently Asked Questions<br />
What Can I Do in the Primary database That I Can’t Do in the Sync Copies<br />
There are certain settings and routines that must be done from the Primary database and have been<br />
disabled within the sync copies for data integrity purposes. Below is a complete listing of what you<br />
can only do from the Primary database:<br />
Update all Agency Settings<br />
Update all Branch Settings in the Utilities Menu (except Invoice/Refund #’s, these must sync out in<br />
the sync copy)<br />
Use the Profile Import to import Marketing Codes (all other aspects of Profile Import can be done on<br />
a <strong>ClientBase</strong> Browser or <strong>ClientBase</strong> <strong>Online</strong> sync database).<br />
Log into Trams Back Office<br />
Note: The only thing a sync'd copy can do in their database is create User Logins, Change<br />
Branch Info including Invoice/Refund #'s (but not formats), and Enter Access Codes.<br />
Where Can I Find Information in My Program Concerning Sync<br />
Program information including version, serial number, and sync items is found under Tools|/About.<br />
Also you can find the last Sync Out/In date and time.<br />
What If I Change the Same Profile in Each Database Between<br />
Synchronizations<br />
Adding new profiles, activities and Res Cards to each database between synchronizations of course<br />
results in the combination of all new records in both databases after synchronization. Adding new<br />
records to the same profile (new Communication entries, Family/Employee entries, Cards, Activities,<br />
Res Cards etc.) in each database between synchronizations also results in the combination of all<br />
new records in that single profile in both databases after synchronization.<br />
But, what if the same record within an existing profile (same Communication entry, Family/Employee<br />
entry, Card, Activity, Res Card etc.) is updated in each database between synchronization<br />
Updating the same existing record within the same profile (the same phone entry, or card entry, or<br />
passenger entry or Activity, etc.) in each database between synchronizations results in only the<br />
update that occurred latest in time after the synchronization is performed. For example, if the family<br />
member record for Christine Anderson is updated with a Courtesy Title at 9:00 a.m. in the primary<br />
database, and the same family member record for Christine Anderson is updated with a Gender at<br />
10:00 a.m. in the sync copy database and synchronization takes place at 11:00 a.m., the result<br />
includes a Gender but no Courtesy Title in Christine Anderson’s family record.<br />
A record is defined as any screen that includes an OK, Cancel or Apply button and all the fields<br />
included in that screen. To avoid the possible loss of data, we recommend you limit each location<br />
to only viewing and adding records to profiles that are not assigned to its branch. Avoid updating<br />
records that are part of a profile that is not assigned to your branch. We also recommend<br />
synchronizing databases on a frequent, regular schedule. Synchronizing databases on a frequent<br />
basis (daily) also minimizes the chances of updating the same record between synchronizations and<br />
possibly losing data.<br />
What Happens If I Delete a Record in One Database and Before<br />
Synchronizing, Change the Record in the Other Database<br />
Deletions win. Regardless of the time stamp on the modifications, once both databases are<br />
3/25/13 440
Synchronizing with Trams Hosted Copy<br />
synchronized the record is deleted. The exception would be in the case of modifying a profile by<br />
adding an invoice and then deleting the profile from the other database between synchronizations.<br />
What Does NOT Synchronize<br />
Workstation Defaults and certain Trams Back Office data including Journal Entries and all General<br />
Ledger information other than the End of Period “To Date” do NOT synchronize.<br />
Do Invoices Generated from the Res Card in the Sync Copy Database<br />
Synchronize to the Primary Database<br />
Yes and visa versa. If you plan to use the <strong>ClientBase</strong> Res Card invoicing feature, some setup needs<br />
to be done within each database before beginning the on-going sync routine. Each database needs<br />
to create a unique starting Invoice number series for each Branch record. This is because the<br />
invoice numbers issued through the <strong>ClientBase</strong> Res Card increment by one each time an invoice is<br />
issued and to avoid duplicate invoice numbers (which go to unresolved and do not get processed<br />
by the synchronization routine), a unique series needs to be established in both the Primary<br />
Database and the Sync Copy Database. This can be done by going to the Utilities menu, selecting<br />
the Branch menu and retrieving each Branch Record you plan to use. Within the General Branch<br />
Info tab, enter a unique Next Sales Invoice No and a unique Next Refund Invoice No. This needs<br />
to be done in both the Primary Database and the Sync Copy database and different starting<br />
numbers should be used in each.<br />
What If I Do an End of Period in My Primary database, and Before I Sync Out<br />
to My Branch Database, Someone in the Branch Office Generates an Invoice<br />
from the Res Card Within That Same Closed Period<br />
The branch database knows the last End of Period Through date and does not allow Users to issue<br />
invoices within that time frame. In this case though, since the End of Period date has not yet<br />
synchronized to the branch, the Res Card allows the User to generate the invoice. After<br />
synchronizing that file out of the branch and upon synchronizing the file into the main office, the<br />
synchronization program detects the invoice within the closed period and stops the synchronization<br />
process; therefore, not allowing that sync file to be synchronized until the End of Period is voided in<br />
the Primary database. Since the branch database does not have a way of voiding the invoice, even<br />
if that is the desired result, you need to void the End of Period in the Primary database, so that you<br />
can Sync In the branch sync file. After syncing in the file, you can then void the Invoice using the<br />
Primary database, or reissue your End of Period if the invoice belongs.<br />
Can I Log into Trams Back Office From Any Database Other Than the Primary<br />
Database<br />
As mentioned above, no. You can only connect to the Primary Database using the Trams Back<br />
Office program, as synchronization was designed for <strong>ClientBase</strong> not Trams Back Office.<br />
Important Note: Although you cannot log into your Sync Copy Database with the Trams Back<br />
Office program (Tramswin.exe), if your agency uses Trams Back Office you do need to keep your<br />
Sync Copy database upgraded to the same version your Primary database is running. Therefore,<br />
anytime you install a Trams Back Office update in your Primary location, you will need to run the<br />
update in your Sync Copy location as well.<br />
How Do I Allocate Inventory Across Sync Primary and Sync Copy Databases<br />
In the past, agencies that have been synchronizing with another location were limited to creating<br />
and pulling from inventory in only the Primary location. The reason for this limitation was because<br />
of the potential to oversell inventory between synchronization processes. To overcome this danger,<br />
<strong>ClientBase</strong> has the ability to allocate available inventory across your various sync databases. Sync<br />
activated databases have an additional entry tab in Inventory Details, called Sync Database<br />
3/25/13 441
Synchronizing with Trams Hosted Copy<br />
Allocation.:<br />
Upon creating new Inventory (or updating existing Inventory) look at the count within the Available<br />
Inventory field. Determine if this inventory should be re-allocated to other sync locations (databases)<br />
to facilitate better sales of this inventory. Click the Sync Database Allocation tab and Re-allocate to<br />
re-allocate any quantity available from your current database to any other Sync Copy database.<br />
The system allocates the inventory to the database the user is connected to. When an agent Pulls<br />
From Inventory, they are only able to pull inventory allocated to the database they are connected to.<br />
As agents use the inventory feature within the Res Card, if they determine that they have a client<br />
interested in inventory that is no longer available, they click the View Inventory Record and the Sync<br />
Database Allocation tab to see if there is available inventory in other locations (databases). If so<br />
they may suggest re-allocated some of that available inventory to locations (databases) that no<br />
longer have any available to them. To re-allocate inventory from one location (database) to another,<br />
you must connect to the database that has the available inventory. You can only re-allocate<br />
inventory from the database you are connecting to and you can only re-allocate inventory of the<br />
database has available inventory records to re-allocate.<br />
***Important Note for agencies syncing to CBB Hosted and CBO: If you are synchronizing to the<br />
Hosted <strong>ClientBase</strong> Browser application or <strong>ClientBase</strong> <strong>Online</strong>, DO NOT allocate inventory to that<br />
database unless you are OK with not being able re-allocate it back out of CBB/CBO!<br />
<strong>ClientBase</strong> Browser and <strong>ClientBase</strong> <strong>Online</strong> do not yet include the Inventory Manager and therefore<br />
does not have the ability to re-allocate its unused available inventory back to other databases. This<br />
means any inventory allocated to CBB Hosted or CBO, will have to be sold via CBB/CBO.<br />
3/25/13 442
<strong>ClientBase</strong> Index<br />
A<br />
About 76<br />
Access America<br />
Live Connect Features 190<br />
Action menu icon 71, 112, 148<br />
Action menu icon (gear) 378<br />
Activities<br />
Introduction 137<br />
Notes 137<br />
Overview of Types 137<br />
Results Screen 150<br />
Activities Folder, Vendor Profile 396<br />
Activities Link 410<br />
Activities Link in Client Profile 101<br />
Activities, Adding New 154<br />
Activities, An In-Depth Look At 137<br />
Activities, In-Depth Look At 137<br />
Activities, Search for 147<br />
Activity Date 150<br />
Activity Detail 150<br />
Activity Manager 70, 71<br />
Completed/Responded Activities 150<br />
Date Fields 148<br />
Introduction 147<br />
Navigation Bar 151<br />
Reset button 150<br />
Using the Activity Manager to Manage Your Activities 147<br />
Working with Query Results 153<br />
Activity Manager Query<br />
Level 2<br />
Reminders/Mailers/Notes 150<br />
Activity Manager Search<br />
From Date 149<br />
Login Name 149<br />
Refresh 149<br />
Activity Manager search<br />
Login Name 149<br />
Select 149<br />
Selection Criteria 149<br />
Activity Type 150<br />
Activity, Simple Search 148<br />
Additional Entries Link 136<br />
ADDITIONAL INFO 94<br />
Additional Information 95<br />
Additional Information in Vendor Profile 391<br />
Additional Name 84<br />
3/25/13 443
<strong>ClientBase</strong> Index<br />
Advanced Activity Searches 149<br />
Advanced Search 80<br />
Advanced Searches 110<br />
Advanced Security Level 31<br />
AFCNET<br />
Create new reservation in Live Connect 183<br />
Importing Reservation Made Outside of <strong>ClientBase</strong> 185<br />
Live Connect Features 183<br />
Retrieve an existing reservation for editing or cancelling 185<br />
Set Up Live Connect 181<br />
AFCNET, Live Connect Intro 181<br />
Agency Remarks link 393<br />
Agency Settings (Global Defaults), setup 42<br />
Agent Profile<br />
Anatomy of an 400<br />
General Info Link 402<br />
Introduction 399<br />
Agent Profile, create new 400<br />
Agent Profiles, An In-depth Look at 399<br />
Agent Remarks in Reservation 164<br />
Agent Remarks, Res Card 158<br />
Agent/Amount/%Rate, on invoice 169<br />
All About Travel<br />
Create New Reservation 186<br />
Import Existing Reservation 188<br />
Intro 185<br />
Retrieve Res for Editing or Cancelling 188<br />
All About Travel features 186<br />
All About Travel, setup 185<br />
All E-mail Jobs 129<br />
Allianz Travel Insurance<br />
Create new reservation in Live Connect 190<br />
Set Up Live Connect 188<br />
Allianz Travel Insurance sign up 188<br />
Allocating Inventory Across Sync’d DB 371, 373<br />
Always Move this Entry in PNR 23<br />
Always Move This Rule 52<br />
Amadeus<br />
Set up PNR Import for Reservation 429<br />
Amadeus +Script 429<br />
Amadeus AgentNet VAX<br />
Create New Reservation in Live Connect 194<br />
Import Existing Reservation Made Outside of <strong>ClientBase</strong> 196<br />
Steps for Editing or Cancelling a Reservation 196<br />
Amadeus AgentNet VAX features 194<br />
Amadeus Agentnet VAX Participating Vendors & Codes 194<br />
3/25/13 444
<strong>ClientBase</strong> Index<br />
Amadeus AgentNet VAX, Live Connect Intro 192<br />
Amadeus AgentNet VAX, Participating Vendors & Vendor<br />
Codes for Dynamic 194<br />
Amadeus AgentNet VAX, setup 193<br />
Amadeus Cruise<br />
Create New Reservation 198<br />
Import Existing Reservation 200<br />
Participating Vendors & Vendor Codes<br />
198<br />
Retrieve Res for Editing or Cancelling 200<br />
Amadeus Cruise Set Up 197<br />
Amadeus Cruise, Intro 196<br />
Amadeus Pro Software 429<br />
Amadeus Users, Merge to PNR 135<br />
Amadeus, setup to use in CB 49<br />
Amadeus, Steps for Setting Up PNR Import For 429<br />
American Express Vacations<br />
Create New AX Express Vacations Reservation 201<br />
Import American Express Vacations Reservation Made Outside<br />
of CB 203<br />
American Express Vacations enrollment info 200<br />
American Express Vacations Features 201<br />
American Express Vacations Set Up 200<br />
An 415<br />
API 134<br />
Apollo<br />
Import an Apollo/Galileo PNR into CB 431<br />
Apollo PNR Import and TBO 433<br />
Apollo/Galileo<br />
Setup PNR Import for Reservation 431<br />
Steps for Setting Up PNR Import For 433<br />
Apollo/Galileo set up to use in CB 50<br />
Apple Vacations<br />
Create New Reservation in Live Connect 205<br />
Import Existing Reservation Made Outside of <strong>ClientBase</strong> 207<br />
Steps for Editing or Cancelling a Reservation 207<br />
Apple Vacations Live Connect features 205<br />
Apple Vacations Live Connect Intro 204<br />
Apple Vacations sign up 204<br />
Apple Vacations, setup 204<br />
applet 134<br />
ARC/BSP type transactions, capture & invoice 164<br />
Attachment Link 426<br />
Attachment Link, Agent Profile 411<br />
Attachments Link in Client Profile 105<br />
Attachments Link, Vendor Profile 397<br />
3/25/13 445
<strong>ClientBase</strong> Index<br />
Authentication Type 37, 124<br />
Auto Europe<br />
Create New Auto Europe Reservation 209<br />
Auto Europe Features 209<br />
Auto Europe Set Up 207<br />
Auto-Case Converter 117<br />
Auto-Case Converter Settings 52<br />
AutoEurope enrollment info 207<br />
B<br />
Base Fare/Tax/Commission 164<br />
BATCH OF REMINDERS 177<br />
Batch Reminder Settings 60<br />
Batched reminders, Launching in ResCard 177<br />
Birthday Statistics 78<br />
Booking Payment 169<br />
Booking Status, Res Card 162<br />
Branch No 95<br />
Branch PNR Entries setup 23<br />
BRANCH SETTINGS 22<br />
BRANCH SETTINGS setup 22<br />
Branch, in Res Card 158<br />
Brendan Vacations<br />
Create new reservation in Live Connect 212<br />
Live Connect Features 212<br />
Set Up Live Connect 211<br />
Brendan Vacations, Obtain Login 210, 229<br />
Browser Items 69, 70<br />
C<br />
Casa Travel<br />
Create new reservation in Live Connect 215<br />
Importing Reservation Made Outside of <strong>ClientBase</strong> 216<br />
Live Connect Features 215<br />
Retrieve an existing reservation for editing or cancelling 217<br />
Set Up Live Connect 214<br />
Casa Travel, Live Connect Intro 214<br />
Case Converter 74, 116<br />
CBO Enabled 30<br />
CCRA<br />
Retrieve an CCRA Existing Reservation for Editing or Cancelling<br />
222<br />
CCRATravel Hotel Booking Portal<br />
Create New CCRA Reservation 220<br />
CCRATravel Hotel Booking Portal enrollment info 219<br />
CCRATravel Hotel Booking Portal Features 220<br />
CCRATravel Hotel Booking Portal Set Up 219<br />
Centrav<br />
3/25/13 446
<strong>ClientBase</strong> Index<br />
Create new reservation in Live Connect 224<br />
Importing Reservation Made Outside of <strong>ClientBase</strong> 225<br />
Live Connect Features Supported by 224<br />
Retrieve an existing reservation for editing or cancelling 226<br />
Set Up Live Connect 222<br />
Centrav, enrollment info 222<br />
Charge As in Reservation 163<br />
Check/CC Number 168<br />
Classic Vacation Live Connect Features 228<br />
Classic Vacations<br />
Import Previously Made Classic Vacations Reservation Details<br />
228<br />
Classic Vacations Live Connect Intro 226<br />
Classic Vacations, setup 226<br />
Client Feedback About Trip, Res Card 159<br />
Client Profile<br />
General Info Link 90<br />
Introduction 83<br />
Marketing Codes Link 97<br />
Remarks Link 96<br />
Types of Client Profiles 83<br />
Client Profile, create 83<br />
Client Profiles<br />
Introduction, An In-depth Look at 83<br />
Client Profiles, an In-depth Look 83<br />
CLIENT SURVEY 78<br />
Client Survey 78<br />
Client Survey Settings 55<br />
<strong>ClientBase</strong><br />
What Can <strong>ClientBase</strong> <strong>Online</strong> Do 18<br />
What is it 17<br />
<strong>ClientBase</strong> <strong>Online</strong><br />
Building and Maintaining Relationships 18<br />
Introduction 17<br />
Training 18<br />
<strong>ClientBase</strong> <strong>Online</strong>, Intro & Set Up 17<br />
<strong>ClientBase</strong>, Getting to Know 69<br />
<strong>ClientBase</strong>, Main Screen 69<br />
Close Profile, Agent 401, 417<br />
Columns 81, 113, 381<br />
Columns, Select 81<br />
Columns, Select for Results Screen 381<br />
Columns, Select Query 113, 151<br />
Columns, Sort by 151<br />
Communication Defaults 35, 75<br />
COMMUNICATION DEFAULTS, set up 47<br />
3/25/13 447
<strong>ClientBase</strong> Index<br />
Completed Fields Statistics 79<br />
Confirmation # in Reservation 163<br />
Constant 41<br />
Contiki<br />
Set Up Live Connect 229<br />
Contiki Vacations<br />
Create new reservation in Live Connect 230<br />
Live Connect Features 230<br />
Contiki Vacations, enrollment info 229<br />
Continental Airlines Vacations 259<br />
Copy a Reservation record from one Res Card to another Res<br />
Card 166<br />
Copy an entire Res Card from one Profile to Another Profile 166<br />
Copy Employee Record to Another Profile 100<br />
Copy Family Member/Employee Record to Another Profile 100<br />
Corporate Profile, create 83<br />
Cosmos<br />
Create New Cosmos Reservation 237<br />
Import Existing Cosmos Reservation Made Outside CB 238<br />
Steps for Editing or Cancelling a Reservation 239<br />
Cosmos enrollment info 235<br />
Cosmos Live Connect Features 237<br />
Cosmos Setup 236<br />
Count 80<br />
Count of queries 111<br />
Count, Query 113<br />
Courtesy Title 94, 391, 406<br />
Create a New Profile 77<br />
Create a Shortcut for CBO on Your Desktop 20<br />
Create Date - From/To 150<br />
Create Date, Res Card 158<br />
Create ResCard/Invoice, steps 160<br />
Creating a new profile 77<br />
Credit Cards Link in Client Profile 102<br />
CRM, Customer Relationship Management 83<br />
CRS Rules<br />
Handling Blank Merge Fields 52<br />
CRS, selecting for PNR entries 23<br />
Cruise Finder 300<br />
CruiseBase Setup 352<br />
CruiseBase Vendors and Vendor Codes 354<br />
Customize Format 170<br />
D<br />
Date 152, 382<br />
Date Fields 89, 99, 141, 148, 150, 424<br />
Date Fields Formats 408<br />
3/25/13 448
<strong>ClientBase</strong> Index<br />
Date Formulas 152, 382<br />
Date Reserved, Res Card 162<br />
DEFAULT FIELD VALUES FOR NEW INVOICES, set up 59<br />
DEFAULT FIELD VALUES FOR NEW PROFILES, set up 44<br />
Default Field Values for Res Cards 55<br />
Default Invoice Format 170<br />
Default Invoice Setting 24<br />
Delete a Profile 112<br />
Delimiter 39<br />
Delta Vacations 259, 260<br />
Deposit Due Date/Final Deposit Due Date 164<br />
Detailed Review of Links, Other Profile 417<br />
Diagnostics 19<br />
Diagnostics, Run and Setup IE for use 19<br />
Display on Selection Screen for PNR rule 52<br />
Display on Selection Screen of Merge to PNR 23<br />
Display Zero Balance when Invoice reservations are not paid in<br />
full<br />
25<br />
Document Templates<br />
Merge To 121<br />
DOCUMENT TEMPLATES, setup/edit 53<br />
Duration in Reservation 163<br />
E<br />
E-mail Account Login and Password 37, 124<br />
E-Mail Settings 36, 75<br />
E-Mail Settings for User Profiles 36, 75<br />
Email, Setting Up 123<br />
E-mails, preparing to send 127<br />
Employees Folder, Vendor Profile 394<br />
Enable SSO<br />
28<br />
eZforex<br />
Create New eZforex Reservation 234<br />
eZforex enrollment info 233<br />
eZforex set up 233<br />
eZforexFeatures 234<br />
F<br />
Family Members Link 407<br />
Family Members/Employees Link 98<br />
Field Groups, PNR rules 51<br />
File Manager 69<br />
File Manager, Meet the 70<br />
File Managers, Meet the 70<br />
Find 71, 153<br />
FocalPoint 431<br />
3/25/13 449
<strong>ClientBase</strong> Index<br />
FocalPoint Net 431<br />
Folders, Other Profile Detailed Review of 417<br />
Forgot My User Name/Password 20<br />
Form of Payment 168, 169<br />
Form of Payment setup for invoices 60<br />
Format Type/Max Length 57<br />
From E-mail Address 36, 124<br />
G<br />
Galileo<br />
Import an Apollo/Galileo PNR 431<br />
Galileo/Apollo<br />
Steps for Setting Up PNR Import 431<br />
Galileo/Apollo, Steps for Setting Up PNR Import 431<br />
GDS Selection Link 136<br />
gear 148<br />
General Info Link, Agent 402<br />
General Info link, Other 418<br />
General Info Link, Vendor Profile 388<br />
General Tab in Branch Settings 22<br />
Generate Invoice 171<br />
Geographic Statistics 78<br />
Global Defaults, setup 42<br />
Global Modify 74, 118<br />
Global Saved Searches 71<br />
Global Saved Searches, Activities 72<br />
Globus<br />
Create New Globus Reservation 237<br />
Import Globus Reservation Made Outside of <strong>ClientBase</strong> 238<br />
Globus and Cosmos Family enrollment info 235<br />
Globus Family Agent Lingo<br />
Import Globus Reservation Made Outside of <strong>ClientBase</strong> 242<br />
Steps for Editing or Cancelling a Reservation 242<br />
Globus Family Agent Lingo (Canada) 239<br />
Create New Globus Family Agent Lingo Reservation 240<br />
Globus Family Agent Lingo (Canada) setup 239<br />
Globus Family Agent Lingo Features 240<br />
Globus Live Connect Features 237<br />
Globus Set Up 236<br />
Go to Advanced Search, Activities 149<br />
Go To Profile 148<br />
Go to Profile, Res Card 158<br />
GOGO Worldwide Vacations<br />
Create new reservation in Live Connect 244<br />
Enroll 242<br />
Live Connect Features 244<br />
Setup Live Connect 243<br />
3/25/13 450
<strong>ClientBase</strong> Index<br />
GROUP LISTS, set up 47<br />
Group, Res Card 158<br />
Groups Link 411, 426<br />
Groups Link in Client Profile 105<br />
Groups Link, Vendor Profile 397<br />
H<br />
Hawaii World 265<br />
Hawaii World Bookings 268<br />
Header and Footer - Invoices or Trip Proposals 63<br />
Header Information, Agent Profile 401, 417<br />
Header Information, Client Profile 88<br />
Header Information, Other Profile 416<br />
Header Information, Vendor Profile 387<br />
Help 76<br />
Hide Reservation Totals (Include Only Invoice Totals) 25, 26,<br />
171<br />
Hide Reservation Vendor Name in invoice 25, 171<br />
Hide Reservation Vendor Name on Trip Proposal 26<br />
Host Codes 62<br />
I<br />
Import Profile 74<br />
Import Profile Data From an ASCII (.txt) File 38<br />
Import Wizard, Profile 39<br />
Include Itinerary Remarks 26<br />
Include Service Provider Graphics 25, 26, 171<br />
Include Summary Of All Reservations 26<br />
Include Summary of All Reservations 24, 170<br />
Insight Vacations<br />
Create new reservation in Live Connect 247<br />
Live Connect Features 247<br />
Set Up Live Connect 246<br />
Insight Vacations, enrollment info 246<br />
Interface ID 95, 391, 423<br />
Interface ID Filter 40<br />
InterfaceID 44<br />
Internet Explorer version 6.0 or greater 19<br />
Introduction, Getting to Know <strong>ClientBase</strong> 69<br />
Introduction, Using the Profile Manager to Manage Your Profiles<br />
109<br />
Inventory 441<br />
Introduction 371<br />
Selling,querying for, searching for 372<br />
Inventory, selling inventory, pulling from 371<br />
Inventory, selling,pulling from inventory 372<br />
Inventory, using in CB 371<br />
Invoice For/Branch/Locator No/Group 168<br />
3/25/13 451
<strong>ClientBase</strong> Index<br />
Invoice Issue Date 168<br />
Invoice Link in Res Card 175<br />
Invoice Remarks 168<br />
INVOICE SETTINGS 24<br />
Invoice Totals 169<br />
Invoice Trip Balance Due Date 168<br />
Invoice, E-mailing an 172<br />
Invoice, generate 167<br />
Invoice, Quick Steps to Create 160<br />
Invoice/ResCard, create a basic 160<br />
Invoice/Trip Proposal Remarks setup 23<br />
Invoiced out of CB+ 163<br />
Issued Through ARC in Res Card 163<br />
iTravelinsured<br />
Create New Reservation in Live Connect 250<br />
Intro 249<br />
iTravelinsured Features 250<br />
iTravelinsured Live Connect, enroll 249<br />
iTravelInsured, setup 249<br />
L<br />
Labels 132<br />
Language 170<br />
Leisure Profile, create 83<br />
Links, Agent Profile Detailed Review of 401<br />
Links, Client Profile Detailed Review of 89<br />
Links, Vendor Profile Detailed Review of 388<br />
Live Connect<br />
An In-depth Look at Live Connect 181<br />
Introduction 181<br />
LIVE CONNECT LOGINS, set up 63<br />
Live Connect Provider 75<br />
Live Connect Providers in Vendor Profile 392<br />
LIVE CONNECT PROVIDERS, setup in CB 63<br />
Live Connect Settings 75<br />
LIVE CONNECT, setup passwords 35<br />
Locator No., Res Card 158<br />
Log Out 76<br />
Login 19<br />
Login Name 142<br />
Login name for user 28<br />
Login Name, Activity 150<br />
Logos, setting up in headers/footers as user level 65<br />
Loyalty Programs Link in Client Profile 103<br />
M<br />
Mailer<br />
Create Date 145<br />
3/25/13 452
<strong>ClientBase</strong> Index<br />
Date of 144<br />
Mailer Entry Screen 144<br />
Mailer, create 77<br />
Mailer, create from Merge to Doc 123<br />
Mailer, creating for Merge to E-Mail 128<br />
Mailers 143<br />
Example 143<br />
Main Screen, <strong>ClientBase</strong> 69<br />
Manulife Global Travel Insurance 252<br />
Create New Manulife Global Travel Insurance Reservation 254<br />
Manulife Global Travel Insurance Features 254<br />
Manulife Global Travel Insurance, set up 252<br />
Map 41<br />
Marketing 78<br />
MARKETING CATEGORIES AND MARKETING CODES 46<br />
MARKETING CATEGORIES AND MARKETING CODES,<br />
set up 46<br />
Marketing Code Statistics Report 78<br />
Marketing Codes Link 97<br />
Marketing Link 97<br />
Marketing Link, Vendor Profile 393<br />
Marketing Source, Res Card 158<br />
Mask Credit Card Number 73<br />
Membership ID Fields 48<br />
Menu Bar in Client Profile 87<br />
Merge 76<br />
MERGE to 76<br />
Merge to Doc 76<br />
Merge to Document 121<br />
Merge to Document Template 121<br />
Merge to E-mail 76, 123<br />
Merge to E-mail Configured for SMTP 126<br />
Merge to E-Mail for a Single profile 127<br />
Merge to E-Mail, Multiple Profiles 126<br />
Merge to File 76, 129<br />
Merge to Label<br />
77<br />
Merge to PNR 133<br />
Merge to PNR Rules, setup 51<br />
MERGE TO PNR SETTINGS 48<br />
MERGE TO PNR SETTINGS, set up 48<br />
Merge to Printer 76<br />
MHRoss.com 256<br />
Create New MH Ross Reservation 257<br />
MHRoss.com Features 257<br />
MHRoss.com set up 256<br />
3/25/13 453
<strong>ClientBase</strong> Index<br />
MLT World Agent Direct<br />
Import Existing MLT Reservation Made Outside of <strong>ClientBase</strong><br />
262<br />
MLT WorldAgent Direct<br />
Create New MLT Reservation 261<br />
MLT WorldAgent Direct Live Connect features 261<br />
MLT WorldAgent Direct, enroll 259<br />
MLT WorldAgent Direct, setup 259<br />
MLT, WorldAgent Direct enrollment 259<br />
Mode 127<br />
More Fields Link 412<br />
More Fields Link in Client Profile 106<br />
My Login 74<br />
N<br />
Navigation Bar 69, 112, 151, 381<br />
Navigation Bar, Meet the 80<br />
No. of Pax in Reservation 163<br />
No. of Pax/No. of Nights/No. of Rooms/No. of Cars/No. of Policies/No.<br />
of Units 163<br />
Not Invoiced - Base/Tax/Comm 169<br />
Note<br />
Create Date 139<br />
Date of 138<br />
Login Name 139<br />
Private 139<br />
Remarks 139<br />
NOTE ICON 77<br />
Note, Data Entry Screen 138<br />
Notes 137<br />
Notes, what is 137<br />
O<br />
OPEN WIZARD 85<br />
Other Profile<br />
Activities Link 426<br />
An In-depth Look at 415<br />
Anatomy of an 416<br />
Employees Link 424<br />
General Info folder 418<br />
Introduction 415<br />
Remarks Link 423<br />
Other Profile Links 417<br />
Other Profile, create new 416<br />
P<br />
Page History 73<br />
Passengers in Reservation 163<br />
Passengers Link, Res Card 160<br />
3/25/13 454
<strong>ClientBase</strong> Index<br />
password login security 20<br />
Personal Saved Searches 71<br />
Personal Saved Searches, Activities 72<br />
Pleasant Holidays<br />
Create New Reservation in Live Connect 266<br />
Enroll 265<br />
Import Existing Reservation Made Outside of <strong>ClientBase</strong> 268<br />
Obtain login info 320, 323<br />
Steps for Editing or Cancelling a Reservation 268<br />
Pleasant Holidays Live Connect features 266<br />
Pleasant Holidays Set Up 265<br />
PNR<br />
Using the Merge to PNR Feature 133<br />
PNR Additional Entries Link 136<br />
PNR Custom Rules 52<br />
PNR Entry into PNR rules 23<br />
PNR Import 36, 75<br />
PNR Import For Sabre 433<br />
PNR Import for Sabre<br />
Steps for Setting Up 433<br />
PNR Import For Worldspan 436<br />
PNR Import for Worldspan<br />
Steps for Setting Up 436<br />
PNR Import, an in-depth look at 429<br />
PNR Import, Apollo 433<br />
PNR Import, Steps for Setting Up for Sabre 433, 436<br />
PNR Rule, setup new 51<br />
PNR Rules<br />
Handling Blank Merge Fields 52<br />
PNR, Merge to 133<br />
Polar <strong>Online</strong><br />
Create New Reservation in Live Connect 270<br />
Enroll 269<br />
Import Existing Reservation Made Outside of <strong>ClientBase</strong> 271<br />
Steps for Editing or Cancelling a Reservation 272<br />
Polar <strong>Online</strong> Live Connect features 270<br />
Polar <strong>Online</strong> Set up 269<br />
Port 36, 124<br />
Preferred Airlines 99, 395, 408, 425<br />
Preferred Car Rentals 99, 395, 408, 425<br />
Preferred Cruise Lines 99, 395, 408, 425<br />
Preferred Hotels 99, 395, 408, 425<br />
Preferred Tours 99, 395, 408, 425<br />
Preferred Vendor 391<br />
Prepared For, Res Card 158<br />
Preview Invoice Before Printing 24, 170, 171<br />
3/25/13 455
<strong>ClientBase</strong> Index<br />
Primary Agent 95<br />
Primary Phone 92, 390, 404, 420<br />
PrimeSport<br />
Create New Reservation in Live Connect 273<br />
Enroll 272<br />
Supports the following Live Connect Features 273<br />
PrimeSport Set Up 272<br />
Print Reservation in Condensed Format 25, 26, 171<br />
Printer, Merge to 131<br />
Priority 143, 150<br />
Private 150<br />
Profile<br />
Merge Doc 121<br />
Merge to PNR 133<br />
Profile Defaults 35, 75<br />
Profile Indicators 89, 388, 401, 417<br />
Profile link in advanced search 380<br />
Profile Manager 70<br />
Using to Manage Your Profiles 109<br />
Profile Statistics 78<br />
Profile Statistics Reports 78<br />
Profile Status 95, 406, 423<br />
Profile Status in Vendor Profile 392<br />
Profile, Anatomy of a Client 86<br />
Profile, Client<br />
Anatomy of a Profile 86<br />
Types of 83<br />
Profile, Search Results Screen 111<br />
Profiles<br />
Merge to E-mail 123<br />
Merge to File 129<br />
Merge to Printer 131<br />
Putting your profiles to work for you 121<br />
Putting Your Profiles to Work for You, Introduction 121<br />
Using the Merge to Doc 121<br />
Profiles (Manager) 70<br />
Profiles, Adding New 115<br />
Profiles, an in-depth look at Client 83<br />
ProWeb 429<br />
Purge Inactive E-mails 129<br />
Q<br />
Query Folder Defaults 74<br />
Query Level 1 79<br />
Query Results Count 113<br />
R<br />
RBC Insurance<br />
3/25/13 456
<strong>ClientBase</strong> Index<br />
Create New RBC Reservation 276<br />
enrollment info 275<br />
Set Up Live Connect in <strong>ClientBase</strong> 275<br />
RBC Insurance Features 276<br />
Record Locator in Res Card/Reservation 163<br />
Referred By 95<br />
Referred by Statistics 78<br />
Regent - Partner Access<br />
Create New Regent - Partner Access Reservation 279<br />
Regent Seven Seas - Partner Access<br />
Steps for Editing or Cancelling a Reservation 281<br />
Regent Seven Seas - Partner Access Features 279<br />
Regent Seven Seas - Partner Access Set Up 278<br />
Region, Res Card 158<br />
Remarks 99, 395, 408, 424<br />
Remarks Link 96<br />
Remarks Link, Agent Profile 407<br />
Remarks Link, Other Profile 423<br />
Reminder<br />
Completed box 153<br />
Create Date 142<br />
Date of 140<br />
Example 139<br />
Login Name 142<br />
Priority 143<br />
Private 143<br />
Remarks 143<br />
Subject 143<br />
Reminder Alarm Settings 55<br />
Reminder Entry Screen 140<br />
Reminder Type 150<br />
Reminder, create 77<br />
Reminders 139<br />
Reminders, Create 139<br />
REPORTS, run 78<br />
Require Unique, Non Blank I/F ID On New Profiles 45<br />
Res Card Activities Link 176<br />
Res Card Folder in Advanced Search 380<br />
RES CARD INSURANCE PROMPTING, set up 58<br />
Res Card Link in Client Profile 103<br />
Res Card Manager 70, 72<br />
Introduction 377<br />
Using the Res Card Manager to Manage Your Res Cards 377<br />
Working with Search Results 383<br />
RES CARD MORE FIELD CATEGORIES, set up 58<br />
Res Card More Fields Categories 57<br />
3/25/13 457
<strong>ClientBase</strong> Index<br />
Res Card Search, Simple 378<br />
RES CARD TAX & COMMISSION DEFAULTS, setup 59<br />
Res Card, Advanced Search 379<br />
RES CARD, create 77<br />
Res Cards<br />
An In-depth Look at Res Cards 155<br />
Attachments Link 178<br />
General Info link 157<br />
Generate an Invoice 167<br />
Introduction 155<br />
Itinerary Report Link 176<br />
Mandatory fields within 159<br />
More Fields Link 179<br />
Service Provider 165<br />
Ways to Create a New Res Card 156<br />
Res Cards Results screen 380<br />
Res Cards, Adding New 383<br />
Reservation Cycle, Res Card 158<br />
Reservation Data Entry into ResCard for Invoice 161<br />
Reservation Itin/Invoice Link 164<br />
Reservation Summary 168<br />
Results Screen in Res Cards 380<br />
Rule, Description of 51<br />
S<br />
Sabre<br />
PNR Import and TBO 435<br />
Setup PNR Import for Reservation 433<br />
Steps to Import a Sabre PNR into CB 433<br />
Sabre Cruises<br />
Create New Reservation in Live Connect 285<br />
Import Existing Reservation Made Outside of <strong>ClientBase</strong> 286<br />
Live Connect Features Supported by 285<br />
Obtain Login info 283<br />
Setting Up Live Connect 283<br />
Steps for Editing or Cancelling a Reservation 287<br />
Sabre PCC 28<br />
Sabre Red Users 50, 135, 433<br />
Sabre Red Users, <strong>ClientBase</strong> <strong>Online</strong> 433<br />
Sabre Vacations<br />
Create New Reservation in Live Connect 294<br />
Import Existing Reservation Made Outside of <strong>ClientBase</strong> 296<br />
Intro & Enroll 292<br />
Live Connect Features Supported by 310<br />
Obtain login info 296<br />
Participating Vendors and Vendor Codes 284, 298, 308<br />
Steps for Editing or Cancelling a Reservation 296<br />
3/25/13 458
<strong>ClientBase</strong> Index<br />
Sabre Vacations - Canada<br />
Additional <strong>ClientBase</strong> Set Up 288<br />
Create New Reservation in Live Connect 291<br />
Enroll, Setup 287<br />
Importing Reservation Made Outside of <strong>ClientBase</strong> 292<br />
Participating Vendors and Vendor Codes 290<br />
Sabre Vacations - Canada, Live Connect Features 290<br />
Sabre Vacations Dynamic Vendors/Codes 294<br />
Sabre Vacations Live Connect features 294<br />
Sabre Vacations Set Up 293<br />
Salutation 95, 391, 423<br />
Save All Invoices To Branch X setup 60<br />
Saved Search Defaults 74<br />
Saved Searches 81<br />
Saving a search in the Activity Manager 151<br />
Saving Queries for Easy Access 113, 151<br />
Saving Searches for Easy Access 381<br />
Saving searches in ResCards 381<br />
Search Filters 69, 79<br />
Search for Profiles 109<br />
Search Res Cards 377<br />
Search Results 69, 81<br />
Working with 153, 383<br />
Search results in Res Card, working with 383<br />
Search Results Screen 81, 111<br />
Search Results, Working with 153<br />
Search Results, Working with in ResCards 383<br />
Search Simple 110<br />
Searches for Easy Access, Saving 151<br />
Secure Connection 37, 124<br />
Security Level 31<br />
Send as one transmission 50<br />
Service Fee as Invoice Total Line Item 25, 171<br />
Service Fee as Total Line Item 26<br />
Service Fee Label in invoices 25, 171<br />
Service Fee Label on Trip Proposals 26<br />
Service Provider<br />
Agent Remarks in reservation 165<br />
Allocated Pricing 165<br />
General Info 165<br />
Itin/Invoice Remarks in reservation 165<br />
Service Provider in reservation 165<br />
Service Provider Profile, create 386<br />
Set Up to Use <strong>ClientBase</strong> <strong>Online</strong> 17, 21<br />
Setting Up Agency Branch Settings 22<br />
Settings 73<br />
3/25/13 459
<strong>ClientBase</strong> Index<br />
Ship To/Bill To Addresses, Res Card 158<br />
Signature CruiseConnection<br />
Create New Reservation 298<br />
Obtain Login info 296<br />
Retrieve an existing reservation to edit/cancel 301<br />
Setting Up Live Connect 297<br />
Signature CruiseConnection Features 298<br />
Signature HotelConnection<br />
Create New Signature HotelConnection Res 302<br />
Import Existing Reservation Made Outside of CB 304<br />
Signature HotelConnection Enrollment info 301<br />
Signature HotelConnection Features 302<br />
Signature HotelConnection Set Up 301<br />
Signature Travel Network CruiseConnection<br />
Create New Reservation in Live Connect 302<br />
Import Existing Reservation Made Outside of <strong>ClientBase</strong> 300<br />
Signature Travel Network CruiseConnection, enroll 305<br />
Simple Search 79<br />
Simple Search Filters 110<br />
SMTP, Using Merge to E-mail Configured for 126<br />
Sort by Columns 81, 113, 151, 381<br />
Source of Booking in Res Card 163<br />
Special Date Statistics 78<br />
Special Dates 93<br />
Special Dates, Agent 404<br />
Special Dates, Other Profiles 420<br />
Squaremouth Travel Insurance<br />
Create New Reservation in Live Connect 306<br />
Setup 305<br />
Squaremouth Travel Insurance Live Connect Features 306<br />
Squaremouth Travel Insurance Live Connect Intro 305<br />
SSL 37, 125<br />
SSL (Secure Sockets Layer) 37, 125<br />
STATISTICS 78<br />
STATISTICS REPORTS 78<br />
Status in Reservation 163<br />
Status, Res Card 158<br />
Steps to Create Invoice 160<br />
Subject 150<br />
Submit to 169<br />
Sync Database Allocation 373, 441<br />
Synchronization<br />
How It Works 439<br />
Synchronization Frequently Asked Questions 440<br />
T<br />
Tandem from Passport <strong>Online</strong><br />
3/25/13 460
<strong>ClientBase</strong> Index<br />
Import Existing Reservation Made Outside of CB 311<br />
Obtain Login info 307<br />
Set Up Live Connect 308<br />
Tax 164<br />
Text Messages, Sending from Any Email Program 129<br />
This Invoice 169<br />
TLS<br />
37, 125<br />
TLS (Transport Layer Security) 37, 125<br />
to 121<br />
To Do (Timeless) 141<br />
To-Do list<br />
Reminders 139<br />
Toolbar 69<br />
Toolbar in Vendor Profile 387, 401, 417<br />
Tools 73<br />
TOOLS ICON 79<br />
Trafalgar<br />
Create new reservation in Live Connect 310, 314<br />
Live Connect Features 314<br />
Set Up Live Connect 313<br />
Trafalgar, enrollment info 313<br />
TRAMS Hosted Copy Synchronization<br />
What Is <strong>ClientBase</strong> Synchronization 439<br />
What is TRAMS Sync Web Service 439<br />
Transat Travel Insurance<br />
Create New Transat Travel Insurance Reservation 317<br />
set up 316<br />
Transat Travel Insurance enrollment info 315<br />
Transat Travel Insurance Features 317<br />
Travel Bound<br />
Create New Travel Bound Reservation 321<br />
Import Reservation Made Outside of <strong>ClientBase</strong> 323, 327<br />
Retrieve an Existing Travel Bound Res to Edit/Cancel 323<br />
Travel Bound Canada<br />
Create New Travel Bound Reservation 325<br />
Retrieve an Existing Travel Bound Res to Edit/Cancel 327<br />
Travel Bound Canada Enrollment info 323<br />
Travel Bound Canada Features 325<br />
Travel Bound Canada Set Up 323<br />
Travel Bound Enrollment info 320<br />
Travel Bound Features 321<br />
Travel Bound Set Up 320<br />
Travel Category Defaults setup 60<br />
Travel Category in Vendor Profile 392<br />
Travel Guard<br />
3/25/13 461
<strong>ClientBase</strong> Index<br />
Create New Travel Guard Reservation 332<br />
Set Up Live Connect in <strong>ClientBase</strong> Plus 331<br />
Travel Guard enrollment info 331<br />
Travel Guard ezTips 334<br />
Travel Guard Features 332<br />
Travel History Folder, Vendor Profile 396<br />
Travel History Link 410<br />
Travel History Link in Client Profile 104<br />
Travel Impressions<br />
Create New Reservation in Live Connect 336<br />
Import Reservation Made Outside of <strong>ClientBase</strong> 338<br />
Steps for Editing or Cancelling a Reservation 204<br />
Travel Impressions enrollment info 334<br />
Travel Impressions Live Connect features 336<br />
Travel Impressions Set Up 335<br />
Travel Insured<br />
Create New Reservation in Live Connect 340<br />
Live Connect features 340<br />
Travel Insured enrollment info 339<br />
Travel Insured Set Up 339<br />
Travel Type 169<br />
Travel Type/Submit To Defaults setup 60<br />
Travel Types 62<br />
Travelex Insurance Services<br />
Create New Reservation 329<br />
Set Up Live Connect 327<br />
Travelex Insurance Services enrollment info 327<br />
Travelex Insurance Services Live Connect Features 329<br />
Travelport<br />
Create New Reservation in Live Connect 346<br />
Participating Vendors and Vendor Codes for Galileo Users 345<br />
Participating Vendors and Vendor Codes for Worldspan 345<br />
Setting Up Live Connect 342<br />
Travelport Cruise and Tour, enroll 342<br />
Travelport Live Connect Features 346<br />
TravelSafe<br />
Create New Reservation in Live Connect 350<br />
Supports the following Live Connect features 350<br />
TravelSafe set up 349<br />
TravelSafe Vacation Insurance 349<br />
TravTech CruiseBase<br />
Create New Reservation in Live Connect 354<br />
Import Existing Reservation Made Outside of <strong>ClientBase</strong> 356<br />
Intro 352<br />
Steps for Editing or Cancelling a Reservation 356<br />
Supports the following Live Connect Features 354<br />
3/25/13 462
<strong>ClientBase</strong> Index<br />
Vendors and Vendor Codes 354<br />
TravTech CruiseBase Setup 352<br />
Trip Balance Due Date setup 60<br />
Trip Name, Res Card 158<br />
TRIP PROPOSAL REMARKS setup 23<br />
Trip Proposal settings 26<br />
Trip Start Date/Trip End Date, Res Card 158<br />
Tripinsurance.com 259<br />
Tripology<br />
Import a Lead 358<br />
Live Connect Features Supported by 358<br />
Set Up Live Connect 357<br />
Tripology enrollment info 356<br />
TSA Requirements, set up required fields for 67<br />
Tvl Cat 104, 411<br />
U<br />
United Vacations 260<br />
Update Rule 40<br />
User Level Logos in Headers/Footers, Set Up 65<br />
User Logins and Permissions, Set Up 27<br />
User Password 30<br />
USER SETTINGS 28<br />
User Settings 74<br />
USER-DEFINED FIELDS 46<br />
Using 371<br />
V<br />
Vacation Access Vacations 296, 307<br />
VacationSelect<br />
Create New Reservation in Live Connect 361<br />
Enroll 359<br />
Import Existing Reservation Made Outside of <strong>ClientBase</strong> 363<br />
Participating Vendors and Vendor Codes 361<br />
Steps for Editing or Cancelling a Reservation 363<br />
VacationSelect Live Connect Features 361<br />
VacationSelect Set Up 359, 361<br />
VacationSelect support the following Live Connect features 361<br />
Value 92, 390, 404, 420<br />
VAX<br />
Steps for Editing or Cancelling a Reservation 367<br />
VAX Vacation Access Vacations<br />
Create New Reservation in Live Connect 365<br />
Participating Dynamic Vendors and Vendor Codes 365<br />
VAX Vacation Access Vacations Set Up 364<br />
VAX VacationAccess Vacations<br />
Enroll 363<br />
Import Existing Reservation Made Outside of <strong>ClientBase</strong> 367<br />
3/25/13 463
<strong>ClientBase</strong> Index<br />
Live Connect features 365<br />
Vendor Commission% 391<br />
Vendor ID 391<br />
Vendor in Res Card 163<br />
Vendor Info 391<br />
Vendor Profile<br />
General Info Link 388<br />
Marketing link 393<br />
Remarks link 393<br />
Vendor Profile Links 388<br />
Vendor profile, create 386<br />
Vendor/Service Provider Profile<br />
An In-depth Look 385<br />
Anatomy of 386<br />
Introduction 385<br />
View 112, 153<br />
ViewPoint 3.0 431<br />
Vista 429<br />
W<br />
Walt Disney<br />
Create New Reservation 369<br />
Walt Disney Parks & Resorts Features 369<br />
Walt Disney Parks and Resorts 367<br />
Walt Disney Parks and Resorts, set up 368<br />
Web ID/Web Password 95<br />
Web Service 439<br />
WIZARD 85<br />
Working with Query Results 153, 383<br />
WorldAgent Direct features 261<br />
WorldAgent Direct, setup 259<br />
Worldspan<br />
Import a Worldspan PNR into CB 436<br />
Setup PNR Import for Reservation 436<br />
Steps for Setting Up PNR Import For 436<br />
Worldspan, Set up to use in CB 50<br />
Worry-Free Vacations 259, 260<br />
3/25/13 464