Download - ADInstruments
Download - ADInstruments
Download - ADInstruments

You also want an ePaper? Increase the reach of your titles
YUMPU automatically turns print PDFs into web optimized ePapers that Google loves.
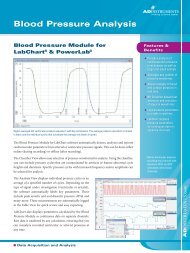
Figure 3–2<br />
The correct length of<br />
wiring to the DIN plug<br />
Wire from<br />
transducer<br />
Transducer ground<br />
(earth) wire<br />
Testing the Transducer<br />
Once the transducer is connected, it can be tested using LabChart or<br />
Scope. Looking at the GP Amp dialog, you can see the output from the<br />
transducer as you change the force or load on it. You may have to<br />
adjust the range of the GP Amp to get a good response. If there<br />
appears to be no response from the transducer, recheck the wiring<br />
against the diagrams for the appropriate transducer and the<br />
manufacturer’s instructions. If everything seems to be in order, the<br />
joints are soldered properly and so on, and there is still no response,<br />
contact your <strong>ADInstruments</strong> representative for help.<br />
Powered Signal Sources<br />
To connect transducers that require some form of power supply to the<br />
GP Amp, first read this section carefully. The requirements of the<br />
transducer should be determined before attempting to connect it up.<br />
To adapt a transducer for use with the GP Amp, you need to:<br />
• set the excitation voltage for the transducer<br />
• wire the transducer to use the eight-pin DIN plug.<br />
You will also need this equipment:<br />
• a soldering iron and resin-cored solder (only resin-cored solder!)<br />
• an eight-pin DIN-style male plug with 45-degree pin spacing (one<br />
is supplied with your GP Amp)<br />
• common E12 resistors: 0.25 or 0.125 Watt, 2% or 1% metal film.<br />
34<br />
GP Amp Owner’s Guide