Instruction Manual
Instruction Manual
Instruction Manual

Create successful ePaper yourself
Turn your PDF publications into a flip-book with our unique Google optimized e-Paper software.
<strong>Instruction</strong><br />
<strong>Manual</strong><br />
Dynoware<br />
Type 2825A1-2<br />
B19.2825Ae-06.02
002-195Ae-06.02 (B19.2825Ae) Page 3
Foreword<br />
This manual is written for the data acquisition, analysis,<br />
and presentation software version V2.3x for Kistler<br />
Dynamometers. We think the Dynoware package will be<br />
easy to learn and use, yet powerful enough for your<br />
requirements.<br />
Information in this document is subject to change without<br />
notice. Kistler reserves the right to change or improve its<br />
products and make changes in the content without<br />
obligation to notify any person or organization of such<br />
changes or improvements.<br />
© 2001, 2002 Kistler Instrumente AG. All rights reserved.<br />
Except as expressly provided herein, no part of this manual<br />
may be reproduced for any purpose without the express<br />
prior written consent of Kistler Instrumente AG.<br />
Kistler Instrumente AG<br />
Postfach<br />
CH-8408 Winterthur<br />
Schweiz<br />
Tel. +41 52-224 11 11<br />
Fax +41 52-224 14 14<br />
info@kistler.com<br />
www.kistler.com<br />
Your competent distributor:<br />
002-195Ae-06.02 (B19.2825Ae) Page 1
Content<br />
Content<br />
1. Introduction...............................................................................................................................5<br />
1.1 Getting Software Help......................................................................................................6<br />
1.2 Customer Support............................................................................................................6<br />
1.3 Service and Assistance......................................................................................................6<br />
1.4 License Agreement...........................................................................................................7<br />
1.5 Warranty .........................................................................................................................7<br />
1.6 Claims .............................................................................................................................8<br />
2. Important Information ...............................................................................................................9<br />
2.1 For your Safety ................................................................................................................9<br />
2.2 Warning ..........................................................................................................................9<br />
2.3 How To Use This <strong>Manual</strong> .................................................................................................9<br />
3. Description of Dynoware .........................................................................................................11<br />
3.1 General..........................................................................................................................11<br />
3.2 System Requirements .....................................................................................................11<br />
4. Installing Software...................................................................................................................13<br />
4.1 Dynoware Software Installation.......................................................................................13<br />
4.2 HASP Key installation .....................................................................................................14<br />
4.3 Data Acquisition Board Installation..................................................................................14<br />
4.3.1 PCIM-DAS1602/16 ...........................................................................................15<br />
4.3.2 PC-CARD-DAS16/16.........................................................................................15<br />
4.4 Data Acquisition Board Software Configuration ...............................................................16<br />
4.4.1 PCIM-DAS1602/16 ...........................................................................................17<br />
4.4.2 PC-CARD-DAS16/16.........................................................................................17<br />
4.5 Set the board number to zero .........................................................................................17<br />
4.6 Executing Dynoware ......................................................................................................18<br />
4.7 Connecting the Cables ...................................................................................................18<br />
4.8 Important Issues Regarding Piezoelectric Force Dynamometers ........................................19<br />
4.9 Charge Amplifiers...........................................................................................................19<br />
5. Quick Start..............................................................................................................................20<br />
6. Reference ................................................................................................................................23<br />
6.1 File... .............................................................................................................................23<br />
6.1.1 Open….............................................................................................................23<br />
6.1.2 Configuration... .................................................................................................24<br />
6.1.2.1 Load… ...............................................................................................24<br />
6.1.2.2 Save…................................................................................................24<br />
6.1.3 Export…............................................................................................................24<br />
6.1.4 Print..................................................................................................................26<br />
6.1.5 Print Preview .....................................................................................................26<br />
6.1.6 Print Setup….....................................................................................................27<br />
6.1.7 Copy to Clipboard .............................................................................................28<br />
6.1.8 Exit ...................................................................................................................28<br />
6.2 Acquisition.....................................................................................................................28<br />
6.2.1 Hardware….......................................................................................................28<br />
Page 2<br />
002-195Ae-06.02 (B19.2825Ae)
Content<br />
6.2.1.1 A/D Board ..........................................................................................29<br />
6.2.1.2 Show Hardware Dialog between acquisition cycles ...............................29<br />
6.2.1.3 Amplifier Selection...............................................................................29<br />
6.2.1.4 Configurations using Amplifier 5017/5019 ...........................................30<br />
6.2.1.4.1 Multichannel Amplifier 5017/5019 .....................................30<br />
6.2.1.4.2 RS-232C Setup ..................................................................31<br />
6.2.1.4.3 Multicomponent Measurement...........................................31<br />
6.2.1.5 Configurations using 5011/5015 amplifiers ..........................................34<br />
6.2.1.5.1 Charge Amplifier Type 5011/5015......................................34<br />
6.2.1.5.2 RS-232C Setup ..................................................................35<br />
6.2.1.6 Configurations using Other amplifiers ..................................................35<br />
6.2.1.6.1 Others...............................................................................35<br />
6.2.1.7 Configurations using Rotating Cutting Dynamometer 5223...................36<br />
6.2.1.7.1 RCD 5223 .........................................................................36<br />
6.2.1.7.2 RS-232C Setup ..................................................................37<br />
6.2.1.7.3 RCD Calculations ...............................................................37<br />
6.2.1.8 Configurations Using Rotating Cutting Dyno 5237 (High Speed RCD)...38<br />
6.2.1.8.1 RCD 5237 .........................................................................38<br />
6.2.1.8.2 RS-232C Setup ..................................................................39<br />
6.2.2 Edit…................................................................................................................39<br />
6.2.2.1 Parameter...........................................................................................39<br />
6.2.2.2 Channels & Trigger..............................................................................40<br />
6.2.2.3 Data Manipulation Online ...................................................................42<br />
6.2.3 Start... ...............................................................................................................43<br />
6.3 View..............................................................................................................................44<br />
6.3.1 New…...............................................................................................................44<br />
6.3.2 Edit…................................................................................................................44<br />
6.3.3 Setup… .............................................................................................................46<br />
6.3.4 Documentation..................................................................................................46<br />
6.3.4.1 Comments ..........................................................................................46<br />
6.3.4.2 File, Date, Time...................................................................................47<br />
6.3.4.3 Edit Labels ..........................................................................................48<br />
6.3.5 Zoom ................................................................................................................48<br />
6.3.5.1 <strong>Manual</strong> Zoom .....................................................................................48<br />
6.3.5.2 Graphical Zoom...................................................................................48<br />
6.3.6 Zoom Out .........................................................................................................49<br />
6.3.7 Cursor ...............................................................................................................49<br />
6.3.8 Horiz. Grid.........................................................................................................50<br />
6.3.9 Vert. Grid ..........................................................................................................50<br />
6.3.10 Toolbar..............................................................................................................50<br />
6.3.11 Status Bar ..........................................................................................................51<br />
6.4 Analysis..........................................................................................................................51<br />
6.4.1 Mean Value.......................................................................................................51<br />
6.4.2 Signal Drift Compensation..................................................................................52<br />
6.4.3 Smoothing on….................................................................................................55<br />
6.4.3.1 Moving Mean .....................................................................................55<br />
6.4.3.2 Moving Median ..................................................................................56<br />
6.4.3.3 Digital Low Pass..................................................................................56<br />
6.4.3.4 Digital High Pass .................................................................................56<br />
6.4.4 Smoothing off....................................................................................................57<br />
6.4.5 Overwrite File Cycle Data...................................................................................57<br />
6.5 Tools..............................................................................................................................58<br />
6.5.1 Voltmeter….......................................................................................................58<br />
6.5.2 Oscilloscope… ...................................................................................................59<br />
6.6 Options..........................................................................................................................60<br />
6.6.1 User Mode ........................................................................................................60<br />
002-195Ae-06.02 (B19.2825Ae) Page 3
Content<br />
6.6.1.1 Supervisor...........................................................................................60<br />
6.6.1.2 Operator ............................................................................................60<br />
6.6.1.3 Change Password ...............................................................................60<br />
6.7 Window.........................................................................................................................61<br />
6.7.1 Cascade.............................................................................................................61<br />
6.7.2 Tile Horizontal ...................................................................................................61<br />
6.7.3 Tile Vertical........................................................................................................61<br />
6.7.4 Arrange Icons ....................................................................................................61<br />
6.7.5 Close All............................................................................................................61<br />
6.7.6 ..........................................................................................61<br />
6.8 Help... ...........................................................................................................................61<br />
6.8.1 Help Topics........................................................................................................61<br />
6.8.2 About Dynoware ...............................................................................................62<br />
7. Appendix.................................................................................................................................63<br />
7.1 Graphs...........................................................................................................................63<br />
7.2 Language Selection ........................................................................................................63<br />
7.3 Shortcut Key Summary...................................................................................................64<br />
7.4 Modifying the Report Logo ............................................................................................64<br />
7.5 Example Files .................................................................................................................65<br />
7.6 Index.............................................................................................................................66<br />
Page 4<br />
002-195Ae-06.02 (B19.2825Ae)
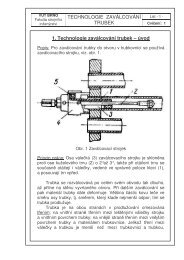
Introduction<br />
1. Introduction<br />
We thank you for choosing a Kistler quality product. Please<br />
take the time to thoroughly read this instruction manual. It<br />
will help you with the installation, maintenance, and use of<br />
the Dynoware system.<br />
Dynoware is an easy-to-use data acquisition and manipulation<br />
program. The typical Windows controls apply to the<br />
graphs and dialog boxes in Dynoware. This section will<br />
give you a quick overview of the capabilities of Dynoware.<br />
The menu bar is your access to all areas of Dynoware. It is<br />
divided into sections covering specific functions such as file<br />
handling, data acquisition configuration, hardware<br />
configuration, data viewing, window control, and<br />
obtaining help. In addition to the menu bar, there is a<br />
toolbar similar to those found in major word processing<br />
and spreadsheet programs. The toolbar consists of icons<br />
that execute a specific function when clicked.<br />
The user has full control over data acquisition. Sampling<br />
rate and length of trials, as well as amplifier range and<br />
trigger options are all easily accessible. The units of data<br />
acquisition can be customized to the desired physical data<br />
being measured.<br />
The graphs are designed to be easy to read, and can be<br />
fully customized. The number of graphs to view is flexible,<br />
along with default parameters so each trial is readily<br />
viewed in a format that is most useful to the user.<br />
If you have questions at any time while in Dynoware,<br />
simply press the F1 key and the Dynoware on-line help<br />
window appears. Help is also available from the menu bar.<br />
Kistler offers a wide range of products for use in measuring<br />
technology:<br />
• Quartz crystal sensors for force, torque, strain,<br />
pressure, acceleration, shock, vibration and acousticemission<br />
• Piezoresistive pressure sensors and transmitters<br />
• Signal conditioners, indicators and calibrators<br />
• Electronic control and monitoring systems as well as<br />
application-specific software for measuring technology<br />
Kistler also develops and produces measuring solutions for<br />
the application fields engines, vehicles, manufacturing,<br />
plastics and biomechanics.<br />
Our product and application brochures will provide you<br />
with an overview of our product range. Detailed data<br />
sheets are available for almost all products.<br />
002-195Ae-06.02 (B19.2825Ae) Page 5
Dynoware Type 2825A1-2<br />
1.1 Getting Software Help<br />
Dynoware software takes advantage of<br />
the HTML on-line help system to offer you<br />
quick assistance at the touch of a button.<br />
You will need Microsoft Internet Explorer<br />
Version 5.01 of newer, or comparable<br />
browser to view the HTML help. To<br />
receive immediate help from wherever you<br />
are in Dynoware, press the F1 key and a<br />
window will pop up with specific advice<br />
about where you currently are in the<br />
software.<br />
Help is also accessible through the menu<br />
bar found at the top of the screen.<br />
If you need additional help beyond what<br />
can be found either on-line or in this<br />
manual, please contact Kistler's extensive<br />
support organization.<br />
Figure 1.1: Help is available by pressing the F1 key or by<br />
selecting the Help from the menu<br />
1.2 Customer Support<br />
The worldwide Kistler service organization is available for<br />
any special questions or problems that you may have after<br />
your careful study of these instructions. Note, refer to<br />
sections 1.3 through 1.6 for general policies on customer<br />
support. Before you call, please be ready to fully explain<br />
your problem. If you are experiencing a problem with<br />
Dynoware software, please try to duplicate the problem<br />
and take a snapshot of the screen by pressing the "print<br />
screen" button. This copies the screen to the clipboard so<br />
that it can be pasted into a word processing program and<br />
printed. You can fax or mail this picture to Kistler, or e-mail<br />
the data file to us via Internet.<br />
Our Internet e-mail address for Dynoware support is:<br />
force@kistler.com<br />
1.3 Service and Assistance<br />
The customer is responsible for proper Dynoware<br />
installation and operation. Dynoware must be installed as<br />
per instructions provided in sections 4 and 5. If modifications<br />
to these instructions are necessary for a particular<br />
purchaser site, Kistler recommends the purchaser contact a<br />
Page 6<br />
002-195Ae-06.02 (B19.2825Ae)
Introduction<br />
Kistler representative for input and advise regarding these<br />
changes.<br />
Installation problems and subsequent system performance<br />
difficulties can be adverted by timely communication.<br />
Often, questions can be answered through email or<br />
telephone conversations. The purchaser is encouraged to<br />
email or call the appropriate Kistler organization in the<br />
event of such questions.<br />
We welcome comments and suggestions for future<br />
features and enhancements. Please email all suggestions to<br />
force@kistler.com<br />
1.4 License Agreement<br />
Please refer to the Software License Agreement packet<br />
containing your Dynoware software and to the license<br />
presented during installation. This packet thoroughly<br />
details the Software License Agreement.<br />
Dynoware is protected by the copyright laws that pertain<br />
to computer software. It is illegal to make copies of the<br />
software or documentation except for backup purposes. It<br />
is illegal to give software or documentation to another<br />
person or institution. The software contains trade secrets<br />
and in order to protect them you may not decompile,<br />
reverse engineer, disassemble, or otherwise reduce the<br />
software to human-perceivable form. You may not modify,<br />
adapt, translate, rent, lease, or create derivative works<br />
based upon this software or documentation.<br />
You may permanently transfer the software to another<br />
user provided you notify Kistler in advance, transfer the<br />
documentation and all disks, and notify the new user of<br />
the terms and conditions of the license agreement.<br />
1.5 Warranty<br />
Kistler warrants Dynoware to be free from defects in<br />
material and workmanship as stated in the software license<br />
agreement. It is warranted only under normal use and<br />
service. The period of warranty is twelve (12) months from<br />
date of shipment.<br />
When returning items under warranty, said equipment<br />
shall be returned to Kistler Instruments prepaid. Full details<br />
relative to the claim or malfunction shall accompany the<br />
shipment. No action will be taken until these details are<br />
received. Please contact Kistler or your Kistler<br />
002-195Ae-06.02 (B19.2825Ae) Page 7
Dynoware Type 2825A1-2<br />
representative for a Return Authorization Number before<br />
returning goods.<br />
Settlement will be made at Kistler’s discretion, either<br />
through repair or replacement of the item in question or<br />
through issuance of full credit. Damage occurring through<br />
misuse or mishandling, will not be covered by this<br />
warranty.<br />
This warranty is in lieu of all warranties expressed or<br />
implied, and of all obligations or liabilities on the part of<br />
Kistler Instruments for damages following the use or<br />
misuse of items supplied. Any unauthorized disassembly or<br />
attempt at repair shall void this warranty.<br />
No agent or representative is authorized to assume for the<br />
Corporation any liability except as set forth within this<br />
warranty document.<br />
1.6 Claims<br />
Claims relating to goods delivered must be made within 14<br />
days of receipt of goods. After fault determination by<br />
Kistler, settlement will be made either by the carrier,<br />
insurer, or Kistler. Means will be through replacement,<br />
repair or credit.<br />
Page 8<br />
002-195Ae-06.02 (B19.2825Ae)
Important Information<br />
2. Important Information<br />
Please practice common sense safety rules at all times.<br />
2.1 For your Safety<br />
Prior to any installation and repair work or cable changes,<br />
you must disconnect all power sources from the instruments.<br />
Observe all local safety regulations concerning the handling<br />
of line-powered electrical and electronic equipment.<br />
When it must be assumed that safe operation is no longer<br />
possible, the computer, charge amplifier, etc. must be<br />
taken out of operation and secured against unintentional<br />
use.<br />
Whenever opening covers or removing parts, except where<br />
this can be done by hand, use caution where parts under<br />
hazardous voltage are exposed.<br />
2.2 Warning<br />
Any breakage of the ground conductor inside or outside<br />
the instruments, or loosening of the ground conductor<br />
connection may render the instrument dangerous.<br />
The power plug must be inserted in to a socket with a<br />
ground connector. The protection must not be nullified by<br />
an extension line lacking a protective ground connector.<br />
When changing the signal conditioner fuses, only the<br />
standard type with the specified amperage rating must be<br />
used. Use of repaired fuses or short-circuiting the fuse<br />
holder is expressly forbidden.<br />
2.3 How To Use This <strong>Manual</strong><br />
Whether you are a novice at computers or a long time<br />
programming expert, you will be pleased to learn how<br />
quickly and easily you will become familiar with the<br />
operation of Dynoware. This manual will take you through<br />
the installation and setup of the Dynoware software, and a<br />
complete reference to all of the features of this software.<br />
002-195Ae-06.02 (B19.2825Ae) Page 9
Dynoware Type 2825A1-2<br />
If you are eager to begin operation of Dynoware we<br />
recommend section 5 of this manual for a quick start<br />
guide. Remember that on-line help is always available by<br />
pressing the F1 key from anywhere in the software.<br />
Page 10<br />
002-195Ae-06.02 (B19.2825Ae)
Description of Dynoware<br />
3. Description of Dynoware<br />
3.1 General<br />
Dynoware is a general-purpose data<br />
acquisition and display software package<br />
suitable for cutting force and<br />
general dynamometer applications. It is<br />
designed to combine the performance<br />
of the proven line of Kistler quartz<br />
dynamometers with modern computer<br />
technology. Dynoware lets you quickly<br />
setup, record, and display reaction forces<br />
and moments.<br />
All components have been included<br />
with the system (i.e., software, cables,<br />
and A/D board). If a computer is included<br />
with your system, the Dynoware<br />
software is already installed on it and<br />
you can skip the software installation<br />
portion of this manual.<br />
Figure 3.1: The Dynowaresplash screen appears for a few seconds when the application starts<br />
The Dynoware system can consist of many components,<br />
each specific to the user’s application. These include:<br />
• Dynamometer<br />
• Charge amplifier<br />
• Measurement Computing Inc. DAS-1602 or<br />
compatible A/D board<br />
• Dynoware software and manual<br />
• All necessary cabling.<br />
A computer can be purchased with the software and A/D<br />
board pre-configured.<br />
3.2 System Requirements<br />
In order to effectively use Dynoware software you will<br />
need to have an IBM-compatible personal computer that<br />
meets or exceeds the following recommendation.<br />
Dynoware may not run properly if these computer<br />
002-195Ae-06.02 (B19.2825Ae) Page 11
Dynoware Type 2825A1-2<br />
specifications are not met. The overall system performance<br />
is dependent on the selection of hardware.<br />
Recommended Computer Specifications:<br />
• IBM PC Pentium II 500 MHz or 100% compatible<br />
computer<br />
• 32 Megabytes RAM minimum, 64 Megabytes<br />
recommended<br />
• Hard Disk Drive with at least 100 Megabytes available<br />
for data storage and software installation<br />
• CD-ROM<br />
• Microsoft Windows 95, 98, NT 4.0, 2000 or ME<br />
• 1 available expansion slot for the data acquisition<br />
board. ISA, PCI, and type II PCMCIA bus versions of<br />
the A/D boards are available<br />
• Microsoft compatible mouse<br />
• A color printer is recommended for creating hard<br />
copies of graphs<br />
Page 12<br />
002-195Ae-06.02 (B19.2825Ae)
Installing Software<br />
4. Installing Software<br />
This chapter will show you how to install the data<br />
acquisition board, the Dynoware software, configure the<br />
data acquisition hardware, as well as hook up the cable<br />
from the A/D board to the signal conditioner.<br />
4.1 Dynoware Software Installation<br />
Dynoware software consists of one CD-ROM media disk<br />
containing an automatic installation procedure. If a computer<br />
was purchased as part of the Dynoware system, then<br />
the software is already installed and the enclosed<br />
Dynoware CD-ROM should be stored in a safe place as a<br />
backup. To install Dynoware perform the following procedure:<br />
1. Insert Dynoware Disk into your CD-ROM drive.<br />
2. (If your CD-ROM is setup to auto play you can skip<br />
this step) From the Start menu, choose Run, In the<br />
dialog box, type “d\:readme” (without the quotes)<br />
substitute your CD-ROM drive letter for “d” above,<br />
Choose OK.<br />
3. The “readme.exe” program presents general information<br />
on installing Dynoware. We recommend reading<br />
this information prior continuation. Select the option under the desired language.<br />
Figure 4.1: Running the setup program<br />
Installation Note:<br />
You may run the setup program directly by entering<br />
"d:\setup" from the Start fi Run windows dialog box.<br />
The main Dynoware installation screen will present you<br />
with links to the three installable components: The<br />
Dynoware main application, the Runtime License driver<br />
installation, and the Data Acquisition board driver<br />
installation.<br />
002-195Ae-06.02 (B19.2825Ae) Page 13
Dynoware Type 2825A1-2<br />
Select Dynoware installation and follow<br />
the instructions to review the license<br />
agreement and to install the main<br />
application.<br />
Figure 4.2: Main Installation screen<br />
After Dynoware is installed, the main<br />
installation dialog box will reappear (it<br />
may take a few seconds). Select<br />
Runtime License driver installation and<br />
follow the instructions to install the<br />
runtime license (HASP key). If you do<br />
not install the Runtime License,<br />
Dynoware will operate in only in a<br />
feature limited demonstration mode.<br />
Next, select the Data acquisition board driver installation to<br />
install the Measurement Computing Inc. drivers for the<br />
data acquisition board. Follow the instructions on screen to<br />
install the driver. At the end you will be prompted to<br />
reboot the computer.<br />
4.2 HASP Key installation<br />
The HASP key is a Runtime License hardware key that<br />
enables Dynoware to operate in full feature mode. The<br />
HASP key should be installed onto the 25 pin D-Sub<br />
parallel port connector of your computer. The readme.exe<br />
notes provide detailed information on installing the HASP<br />
software.<br />
4.3 Data Acquisition Board Installation<br />
The data acquisition board should be installed by someone<br />
who is familiar with installing computer peripherals and<br />
familiar with the insides of a computer. If you are unsure<br />
how to open your personal computer or if your system is<br />
warranted under a service contract, please have a qualified<br />
technician install the board.<br />
Installation Note:<br />
The installation CD-ROM contains board specific<br />
Installation Technical Notes for the various A/D boards<br />
supplied by Kistler. See these technical notes as well as<br />
the information below. The procedure to install and<br />
configure the board is highly dependant on the specific<br />
board purchased with Dynoware.<br />
Page 14<br />
002-195Ae-06.02 (B19.2825Ae)
Installing Software<br />
Warning:<br />
Make sure to disconnect the power source from your<br />
computer before opening it.<br />
Warning:<br />
Protect the system and A/D board from static discharge<br />
by touching the computer chassis to ground yourself<br />
prior to handling the A/D board.<br />
4.3.1 PCIM-DAS1602/16<br />
The following steps are recommended for A/D board<br />
installation:<br />
1. See technical note K20.302-4e PCIM-DAS1602.pdf<br />
contained on the installation CD for detailed<br />
information.<br />
2. With the power off and the power cord unplugged,<br />
remove the computer PC cover to gain access to the<br />
system's expansion slots. Avoid touching any<br />
components inside the PC.<br />
3. Touch the metal computer chassis prior to handling the<br />
A/D board to avoid inducing static shocks.<br />
4. Set the on board switch to BIP (bipolar) (see your<br />
board manual).<br />
5. Set the on board switch to 8 channels (differential).<br />
6. Select an available PCI slot, and remove the back plate<br />
metal covers with a screwdriver.<br />
7. Carefully insert the A/D board into the slot making<br />
sure that it seats correctly into the computer. Replace<br />
the slot cover screw, fastening the edge of the board<br />
to the chassis of the PC.<br />
8. With the A/D board properly installed, replace the<br />
cover of the computer and tighten the screws.<br />
9. Restart the computer. The board will be auto-detected<br />
by the Plug-and-Play operating system. When<br />
prompted for the driver, insert the Dynoware CD-<br />
ROM and locate the CBI95.INF file.<br />
4.3.2 PC-CARD-DAS16/16<br />
The following steps are recommended for A/D board<br />
installation:<br />
1. See technical note K20.302-6e PC-CARD-DAS16.pdf<br />
contained on the installation CD-ROM for detailed<br />
information.<br />
2. With the power on and Windows running, insert the<br />
PC-CARD-DAS16/16 into a PCMCIA type II slot.<br />
3. Windows will recognize this device as a new device<br />
and will prompt you to enter the disk with the<br />
manufacturers drivers. This is the CD-ROM with the<br />
002-195Ae-06.02 (B19.2825Ae) Page 15
Dynoware Type 2825A1-2<br />
Dynoware installation program and containing the file<br />
CBI95.INF. Place the disk in the drive and continue.<br />
4. Windows will load the necessary PC-CARD drivers and<br />
configure the PC-CARD-DAS16/16.<br />
Installation Note:<br />
Any time the PCMCIA or PCI cards are remove and<br />
reinserted, the INSTACAL program will need to be run.<br />
4.4 Data Acquisition Board Software Configuration<br />
The Data acquisition board driver software<br />
needs to be configured using the board<br />
configuration program Instacal (found in the<br />
Measurement Computing program group).<br />
This program will configure the data<br />
acquisition drivers for the board. Locate the<br />
Measurement Computing program group and<br />
select the Instacal icon to start the data<br />
acquisition board configuration program.<br />
Figure 4.3: Instacal board configuration program<br />
Note:<br />
The Instacal board configuration program will automatically<br />
identify and plug-and-play capable data<br />
acquisition boards. <strong>Manual</strong>ly add any non-plug and play<br />
boards.<br />
Instacal will automatically identify any installed<br />
plug and play boards. Any non plug-and-play<br />
board will have to be manually added by<br />
selecting the Install menu option and then<br />
selecting the desired board from the list. Instacal<br />
should be run any time a board is removed from<br />
a computer (even for PCMCIA card boards).<br />
Figure 4.4: Configuration for the PCIM-DAS1602/16<br />
Page 16<br />
002-195Ae-06.02 (B19.2825Ae)
Installing Software<br />
Note:<br />
Dynoware will use the board configured in Instacal as<br />
board zero. By default, the “DEMO-BOARD” is installed<br />
as board zero. Remove the “DEMO-BOARD” and<br />
reconfigure the desired board to be zero. (See section<br />
4.5 below)<br />
Once the board is installed it will need to be configured.<br />
Right click on the board and select Configure… or double<br />
click the board.<br />
4.4.1 PCIM-DAS1602/16<br />
Channels<br />
Input Mode<br />
Clock Speed<br />
See technical note K20.302-4e PCIM-DAS1602.pdf<br />
contained on the installation CD-ROM for detailed<br />
information.<br />
The following parameters should be set:<br />
Select 8 channels, differential mode (note: Instacal setting<br />
must match hardware switch setting).<br />
Bipolar (note: Instacal setting must match hardware switch<br />
setting).<br />
Select 10 MHz (note: Instacal setting must match hardware<br />
switch setting).<br />
4.4.2 PC-CARD-DAS16/16<br />
Channels<br />
Input Mode<br />
Clock Speed<br />
See technical note K20.302-6e PC-CARD-DAS16.pdf<br />
contained on the installation CD-ROM for detailed information.<br />
The following parameters should be set:<br />
Select 8 channel differential mode (note: Instacal automatically<br />
controls hardware setting).<br />
Bipolar (note: Instacal automatically controls hardware<br />
setting).<br />
Select 10 MHz (note: Instacal automatically controls hardware<br />
setting).<br />
4.5 Set the board number to zero<br />
Dynoware operates using the Instacal board configured as<br />
board number zero. By default, “DEMO-BOARD” is<br />
installed as board number zero. Right click the board zero<br />
“DEMO-BOARD” and select either Delete (to remove it<br />
completely) or Change Board# to reconfigure it at a<br />
different board number. Then Right click the desired board<br />
002-195Ae-06.02 (B19.2825Ae) Page 17
Dynoware Type 2825A1-2<br />
and select Change Board# to reconfigure it as Board zero.<br />
Your board is now properly configured to operate with<br />
Dynoware.<br />
The A/D bits, Available channels, Acquisition mode and<br />
Maximum Channels will be automatically set reflecting the<br />
board type selected. The gain can be selected in Dynoware<br />
to your specifications. The gain setting changes the scale<br />
on the board itself, so the lower the scale means the better<br />
the resolution. However, it also means a lower overall<br />
measurement force range, so the user must be careful not<br />
to choose too high of a gain such that saturation occurs<br />
(i.e., be sure the forces to be measured do not exceed the<br />
measuring range of the system. If this occurs, choose a<br />
lower gain such as ±10 V).<br />
4.6 Executing Dynoware<br />
To execute Dynoware, open the newly created Kistler<br />
Group in the Programs extension of the Start Menu and<br />
click on the Dynoware icon.<br />
It is possible to change the program language, see section<br />
7.2.<br />
4.7 Connecting the Cables<br />
There is one (1) 37-pin cable that connects the junction<br />
box or amplifier to the data acquisition board. To properly<br />
connect the cable:<br />
1. Shut down the computer and Turn off the power to<br />
the computer and the amplifier.<br />
2. Connect the 37-pin cable from the A/D board to the<br />
junction box or amplifier.<br />
3. Be sure to tighten any cable-fastening screws by hand<br />
to secure the cable connections and prevent slippage<br />
(do not over tighten).<br />
4. Turn the amplifier and computer on.<br />
If the cables are not long enough, additional cables could<br />
be connected to the original ones to extend their lengths.<br />
Excessively long cables are not recommended because<br />
insulation may not be adequate to prevent interference<br />
and loss of signal.<br />
Page 18<br />
002-195Ae-06.02 (B19.2825Ae)
Installing Software<br />
4.8 Important Issues Regarding Piezoelectric Force Dynamometers<br />
Please take care to follow these rules applying to<br />
installation and handling of dynamometers and<br />
connections:<br />
• Protect the signal conditioner and cable connector<br />
ends from dust and moisture. Close end caps.<br />
• Dynamometer mountings must be level and properly<br />
secured.<br />
• Use caution connecting and removing the cables. Also<br />
take care to not step on the cable connections to avoid<br />
shearing off the cable.<br />
4.9 Charge Amplifiers<br />
Dynoware automatically controls the range selection, filter<br />
selection and operate/reset functions of several types of<br />
Kistler charge amplifiers. Charge amplifiers should be<br />
allowed to warm up sufficiently for most accurate<br />
measurements, with 30 minutes being a minimum. Unplug<br />
the amplifier if it is not to be used for a very long time.<br />
002-195Ae-06.02 (B19.2825Ae) Page 19
Dynoware Type 2825A1-2<br />
5. Quick Start<br />
This section will help familiarize the new user with<br />
Dynoware.<br />
Data cannot be acquired until the hardware is properly<br />
configured. This section is meant as an overview to the<br />
features of Dynoware that will be applied to acquired trials<br />
and graphs once the proper configurations have been<br />
performed. For more information on configuring<br />
Dynoware, refer to section 6.2.<br />
Figure 5.1: Running Dynoware from the Start menu<br />
Start Dynoware by choosing:<br />
Start fi Programs fi Kistler fi DynoWare.<br />
The splash screen appears briefly. The splash screen (Figure<br />
5.2) shows current application version and product type<br />
information.<br />
Figure 5.2: The Dynoware Splash Screen<br />
Page 20<br />
002-195Ae-06.02 (B19.2825Ae)
Quick Start<br />
The File menu allows you to open stored trials, print, save,<br />
export, manage configurations and exit the program. The<br />
print setup can be customized here also. Feel free to open<br />
some of the supplied trials and manipulate them to help<br />
familiarize you with the program’s capabilities.<br />
The Acquisition menu is where hardware is configured and<br />
where acquisition is performed. Choosing Acquisition à<br />
Hardware will bring up the Hardware Dialog Box (Figure<br />
5.3) showing the configuration settings. Choosing<br />
Acquisition à Setup allows the user to configure data<br />
acquisition specific parameters (Figure 5.4). Acquisition à<br />
Start will begin the acquisition process.<br />
Figure 5.3: Hardware Configuration Dialog<br />
Figure 5.4: Acquisition Edit<br />
The View menu allows the user to configure Dynoware<br />
graphic preferences and to edit the trial documentation.<br />
Selecting View à Setup (section 6.3.3) allows configuration<br />
of the default graphs that appear when a file is<br />
opened or a trial is acquired. With View à Edit the content<br />
of an individual graph can be changed (6.2.2).<br />
002-195Ae-06.02 (B19.2825Ae) Page 21
Dynoware Type 2825A1-2<br />
Double clicking on a specific feature of the graph (title,<br />
legend or axis title) provides editing capability.<br />
The view can be changed at any time without adversely<br />
affecting the data in any way. A user may also zoom the<br />
displayed area, enable/disable grid lines, display a moving<br />
cursor, and edit labels and documentation information<br />
from the View menu.<br />
Figure 5.5: View Edit<br />
The Analysis menu gives options for filtering data and<br />
removing signal drift. Refer to the online help system for<br />
detailed information on these topics.<br />
The Tools menu provides two methods for displaying realtime<br />
voltage data: Oscilloscope and Voltmeter. These tools<br />
are designed for simple troubleshooting of the system.<br />
The other menu that appears when a graph is shown is the<br />
Window menu. The Window menu uses standard<br />
Microsoft Windows commands to arrange active windows.<br />
Page 22<br />
002-195Ae-06.02 (B19.2825Ae)
Reference<br />
6. Reference<br />
This section describes the menus used in Dynoware.<br />
6.1 File...<br />
Depending on whether or not a graph is open on the<br />
screen, the File menu will have a different appearance. If<br />
no graph is open, there will only be commands to open,<br />
load/save configurations, export data and exit Dynoware.<br />
6.1.1 Open…<br />
This will bring up a open file open dialog box (Figure 6.1:<br />
File Open) where the desired trial can be selected for<br />
viewing. The default directory is the data directory, though<br />
the dialog box can be easily navigated using standard<br />
Windows techniques to browse other drives, directories,<br />
and network computers. The extension for the trials are<br />
“*.dwd”. Files stored in Dynoware 1.x format will<br />
automatically be converted and loaded.<br />
Figure 6.1: File Open<br />
The Add button will add the selected file (as will double<br />
clicking it in the Name list) to the Open File selection. The<br />
Remove button will clear the Open File selection.<br />
If a valid configuration file exists, the Load Config check<br />
box will be available and the user can choose to load the<br />
configuration options associated with the file (hardware<br />
setup, data acquisition, and view setups). If a configuration<br />
was not stored for the data file, this option will be disabled<br />
and appear grayed out.<br />
002-195Ae-06.02 (B19.2825Ae) Page 23
Dynoware Type 2825A1-2<br />
6.1.2 Configuration...<br />
The Hardware, Data Acquisition and View settings can be<br />
loaded or stored to a file. The default extension for<br />
configuration files is “*.cfg”.<br />
6.1.2.1 Load…<br />
To load the Hardware, Data Acquisition and View settings<br />
from a configuration file select Configuration Load. This<br />
will overwrite the existing Dynoware configuration<br />
settings. A standard Windows file open dialog box (Figure<br />
6.2) will be presented to select the appropriate<br />
configuration file to load. To load a configuration file<br />
automatically when a data file is opened enable the Load<br />
Config option in the File Open dialog box (See section<br />
6.1.1 above).<br />
Figure 6.2: Configuration Load<br />
6.1.2.2 Save…<br />
To store the Hardware, Data Acquisition and View settings<br />
to a configuration file select Configuration Save. A<br />
standard Windows file save dialog box will be presented to<br />
select the appropriate configuration file name to save the<br />
current settings to. The default extension of configuration<br />
files is “*.cfg”. Configuration files can be saved automatically<br />
by checking the Save configuration option in the<br />
Acquisition Edit dialog box (See section 6.2.2)<br />
6.1.3 Export…<br />
Files may be exported to ASCII delimited text files by<br />
selecting File Export (e.g. for further evaluation in<br />
Microsoft EXCEL). The Export Dialog (Figure 6.3) allows for<br />
the selection of the cycles to export, and the channels to<br />
export. The user can also select the data delimiter or enter<br />
a user-defined delimiter.<br />
The Browse button allows the user to use the standard<br />
windows file chooser dialog box to select the destination<br />
Export file name. Another box pops up to display export<br />
Page 24<br />
002-195Ae-06.02 (B19.2825Ae)
Reference<br />
progress. An example of an exported file is shown below.<br />
Use the Select/Unselect All buttons to select or clear<br />
export selection for channels and cycles in the trial.<br />
Note, if the tab delimitation is<br />
selected, the file can be imported<br />
directly by Microsoft Excel using the<br />
default import options of Excel.<br />
Figure 6.3: Export Dialog<br />
Example of an exported file:<br />
File Header Information<br />
File Header Information<br />
File Data<br />
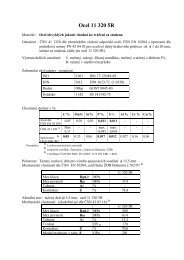
FILE TYPE:<br />
Path: C:\DynoWare_Data\IPL-Tagung\<br />
Filename: 5A-Fraesen_Aussen_2.dwd<br />
Config ID: 5A-Fraesen_Aussen_2.cfg<br />
Setup ID: 0<br />
Manipulated: 0<br />
Filename 1:<br />
Filename 2:<br />
Date: Monday, 12 September , 2000<br />
Time: 13:43:19<br />
Sampling rate [Hz]: 3000<br />
Measuring time [s]: 90<br />
Delay time [s]: 0<br />
Cycle time [s]: 0<br />
Cycles: 1<br />
Samples per channel: 270001<br />
Cycle interval: 0<br />
Channel enabled: 1 1<br />
Cycle No: 1<br />
Time [s] Fz Mz<br />
0 -2.83203 2.44E-03<br />
3.33E-04<br />
-3.11523 -4.88E-03<br />
6.66E-04<br />
-3.11523 -2.44E-03<br />
1.00E-03<br />
-3.11523 -2.44E-03<br />
1.33E-03<br />
-2.83203 -2.44E-03<br />
1.67E-03<br />
-2.54883 -2.44E-03<br />
... ... ...<br />
2.67E-03<br />
-2.54883 -2.44E-03<br />
002-195Ae-06.02 (B19.2825Ae) Page 25
Dynoware Type 2825A1-2<br />
6.1.4 Print...<br />
Shortcut: Ctrl+P<br />
Print brings up the Print dialog box (Figure 6.4:<br />
Print Dialog) using the default print settings. The<br />
user selects the views to be printed by clicking<br />
on the views in the list and highlighting them<br />
yellow. The Document title appears as the<br />
default graph title but the user can change the<br />
text here. Pressing the Select All button will<br />
highlight all open views to be printed. Other<br />
options enable the printing of the Amplifier and<br />
Acquisition configuration at the bottom of the<br />
printout, previewing the printout on screen prior<br />
to making a hardcopy, and printing to a file for<br />
later viewing.<br />
Some printout information will be disabled if the<br />
selected view contains Multiple cycle data.<br />
Figure 6.4: Print Dialog<br />
After selecting OK, the Printer selection dialog<br />
will appear allowing the user to change the<br />
printer and select the number of copies to print.<br />
If the Preview option was checked the print<br />
preview screen will appear (see section 6.1.5).<br />
Figure 6.5: Printer Selection<br />
6.1.5 Print Preview<br />
The Print Preview is identical to the Print function above<br />
except the output appears on the monitor. This allows the<br />
user to see what the printout will look like on the prior to<br />
printing (Figure 6.6: Print Preview Screen) so that any<br />
necessary changes can be made before the print function is<br />
carried out. From this dialog box you can zoom in on the<br />
image for a closer look, create a print file, directly email a<br />
print file and execute the hardcopy Print function.<br />
A print file is a special "*.ll" file that can be viewed with a<br />
special viewer. The special viewer, LLViewer, is available on<br />
the installation CD-ROM in the LLViewer subdirectory or in<br />
Page 26<br />
002-195Ae-06.02 (B19.2825Ae)
Reference<br />
the installation directory - by default C:\Kistler\Dynoware\.<br />
Run the LLView.exe installation program and follow the<br />
onscreen instructions. Files directly emailed will need the<br />
LLViewer to view the email contents.<br />
Figure 6.6: Print Preview Screen<br />
6.1.6 Print Setup…<br />
Print Setup… allows the user to configure the printing<br />
specifications. Standard setup functions are to select the<br />
printer, paper size and tray (if applicable), and the paper<br />
002-195Ae-06.02 (B19.2825Ae) Page 27
Dynoware Type 2825A1-2<br />
orientation. A Properties button allows to further customize<br />
printer settings.<br />
6.1.7 Copy to Clipboard<br />
This will copy the active window contents to the Windows<br />
clipboard. The graph can then be pasted into a word<br />
processing or spreadsheet application as a graphic.<br />
6.1.8 Exit<br />
Exit closes Dynoware. Since changes to the data are<br />
continuously stored in the file, no extra question is<br />
necessary about saving changes.<br />
6.2 Acquisition...<br />
The Acquisition menu is where all data acquisition and<br />
hardware configuration is performed.<br />
6.2.1 Hardware…<br />
Shortcut: Alt+H<br />
Figure 6.7: Hardware configuration<br />
The Hardware dialog box (Figure 6.7: Hardware<br />
configuration) allows the user to customize specific<br />
equipment used in the system. The dialog has several<br />
different tabs dependent upon the specific amplifier<br />
configured in the system. There are five major items that<br />
can be configured: The A/D board, The amplifier, The<br />
amplifier communication interface, The dynamometer, and<br />
Page 28<br />
002-195Ae-06.02 (B19.2825Ae)
Reference<br />
the specific calculations to be performed with<br />
dynamometer data.<br />
6.2.1.1 A/D Board<br />
The A/D board is automatically<br />
selected from the Instacal board<br />
configuration program from<br />
Measurement Computing (see<br />
section 4.4). This tab (Figure 6.8:<br />
A/D Board) shows the configured<br />
A/D Board (board 0 in Instacal) and<br />
allows the user to edit the A/D<br />
board gain selection (A/D Board<br />
Full Scale measurement range in<br />
volts).<br />
Figure 6.8: A/D Board<br />
Board<br />
Full Scale<br />
Description<br />
Information displayed is:<br />
Displays the A/D Board that is configured in the Instacal<br />
program.<br />
The Full Scale input defines the resolution of the A/D<br />
Board: Small Full Scale = more resolution per volt, Note: All<br />
input voltage signals to the board must be smaller than the<br />
defined Full Scale.<br />
Description of the A/D Board manufacturer.<br />
Max. Throughput Displays maximum throughput of the A/D Board.<br />
Resolution<br />
Analog Channels<br />
Digital Channels<br />
Displays resolution of the A/D Board.<br />
Displays the maximum number of the analog channels<br />
available.<br />
Displays the maximum number of the digital channels<br />
available.<br />
6.2.1.2 Show Hardware Dialog between acquisition cycles<br />
If enabled, the hardware dialog will appear prior to<br />
acquiring data for a cycle. The checkbox enables or<br />
disables this option. Only changes to the amplifier settings,<br />
and operate reset state are allowed once placed into the<br />
data acquisition mode. Select the Acquisition à Hardware<br />
option to re-enable this option, or to make extended<br />
changes to the configuration.<br />
6.2.1.3 Amplifier Selection<br />
The user should first choose the amplifier selection (Figure<br />
6.9: Amplifier Selection) from the bottom of the dialog,<br />
Supported amplifiers are the 5017/5019, 5011/5015,<br />
002-195Ae-06.02 (B19.2825Ae) Page 29
Dynoware Type 2825A1-2<br />
Rotating Cutting Dynamometer 5223, High Speed<br />
Rotating Cutting Dynamometer 5237 and Other user<br />
defined amplifiers. This selection will modify the available<br />
tabs for setting other specific hardware settings.<br />
Figure 6.9: Amplifier Selection<br />
6.2.1.4 Configurations using Amplifier 5017/5019<br />
Selecting 5019/5017 in the amplifier selection (see section<br />
6.2.1.3 above) will enable the multichannel 5017/5019<br />
tab, the RS-232C Setup tab, and the Multicomponent<br />
Measurement tab.<br />
6.2.1.4.1 Multichannel Amplifier 5017/5019<br />
Chan<br />
Label<br />
Measuring Range<br />
Unit<br />
Scale<br />
Sensitivity<br />
Filter<br />
Time Constant<br />
Operate<br />
Reset<br />
Send Parameters<br />
Reset/Operate<br />
The multichannel configuration tab allows for customization<br />
of the 5017 or 5019 multichannel charge amplifier.<br />
There are several configurable parameters associated with<br />
this amplifier:<br />
Channel number displays the specific channel number<br />
ranging from 1 up to 8.<br />
Enter a label of each channel. This label will appear on<br />
graphs and reports.<br />
Enter the Measuring Range (Maximum measurable<br />
amount) [M.U.] of each channel (M.U. = Mechanical Unit).<br />
Enter the display units of each channel.<br />
The Scale setting for the amplifier is automatically<br />
determined from the Measuring Range and the full scale<br />
output capability of the amplifier. Scale [M.U./V] =<br />
Measuring Range [M.U.] / 10.0 V<br />
Enter the sensitivity of a sensor (see calibration sheet).<br />
Select the desired Low Pass filter (internal filter in the signal<br />
conditioner) to be used.<br />
Select the desired High Pass filter Time Constant (internal<br />
signal filter in the signal conditioner) to be used.<br />
Transmit the command to place the amplifier into the<br />
operate mode.<br />
Transmit the command to place the amplifier into reset<br />
mode.<br />
Transmit the command to set the appropriate per channel<br />
configuration for Sensitivity, Range, Filter, and Time<br />
constant settings.<br />
Enable the automatic control (via RS-232C interface) of the<br />
Operate/Reset commands during a typical acquisition<br />
cycle. Amplifier will be automatically set to operate at the<br />
start of a cycle, and will return to reset after the acquisition<br />
has completed for any given cycle. In some cases, this<br />
Page 30<br />
002-195Ae-06.02 (B19.2825Ae)
Reference<br />
automatic control of Reset/Operate is not desired and the<br />
selection box should remain unchecked.<br />
6.2.1.4.2 RS-232C Setup<br />
Serial Port<br />
Baudrate<br />
Data Bits<br />
Stop Bit<br />
Parity<br />
Handshaking<br />
The RS-232C configuration should be properly configured<br />
using the RS-232C Setup Tab for the 5017 or 5019 to<br />
function properly.<br />
Selects the COM port used to control the signal<br />
conditioner. This is the port on the pc where the serial<br />
cable is connected.<br />
Selects the data transmission rate used to communicate<br />
with the signal conditioner. This setting must be identical<br />
to the setting in the signal conditioner. Refer to the signal<br />
conditioner manual to determine the proper setting.<br />
Selects the number of data bits used in the data<br />
communication protocol. This setting must be identical to<br />
the setting in the signal conditioner. Refer to the signal<br />
conditioner manual to determine the proper setting.<br />
Selects the number of stop bits in the data transmission<br />
protocol. This setting must be identical to the setting in the<br />
signal conditioner. Refer to the signal conditioner manual<br />
to determine the proper setting.<br />
Selects the parity checking used during communication<br />
with the signal conditioner. This setting must be identical<br />
to the setting in the signal conditioner. Refer to the signal<br />
conditioner manual to determine the proper setting.<br />
Selects the handshaking method used during communication<br />
with the signal conditioner. This setting must be<br />
identical to the setting in the signal conditioner. Refer to<br />
the signal conditioner manual to determine the proper<br />
setting.<br />
Note:<br />
Typically the communication is configured for COM1,<br />
9600 baud, 8 data bits, 1 stop bit, no parity, and<br />
Hardware handshaking.<br />
6.2.1.4.3 Multicomponent Measurement<br />
With the multichannel Amplifier Type 5017 and the<br />
appropriate hardware, additional software calculations can<br />
be performed. These calculations can provide resultant<br />
forces and moments for various types of dynamometers, in<br />
a variety of applications. If a multichannel calculation is<br />
enabled, the user cannot enable/disable channels in the<br />
configuration (Section 6.2.2.2). Select the multicomponent<br />
calculation type from the list presented corresponding to<br />
your specific hardware dynamometer.<br />
002-195Ae-06.02 (B19.2825Ae) Page 31
Dynoware Type 2825A1-2<br />
6.2.1.4.3.1 Mode Off<br />
Multicomponent calculations are disabled.<br />
6.2.1.4.3.2 Type 1<br />
The type 1 dynamometer measures 4 shear components<br />
and 1 vertical component. From the raw components F x<br />
, F y<br />
,<br />
F z<br />
and M z<br />
are calculated. The user must configure the a 1<br />
, a 2<br />
,<br />
b 1<br />
, and b 2<br />
distances.<br />
6.2.1.4.3.3 Type 1a<br />
The type 1a dynamometer measures 4 shear components<br />
and 4 vertical components. From the raw components F x ,<br />
F y , F z and M z are calculated. The user must configure the<br />
a 1 , a 2 , b 1 , and b 2 distances.<br />
Page 32<br />
002-195Ae-06.02 (B19.2825Ae)
Reference<br />
6.2.1.4.3.4 Type 2<br />
The type 2 dynamometer measures 2 shear components<br />
and 4 vertical components. From the raw components F x<br />
,<br />
F y<br />
, F z<br />
and M x<br />
, M y<br />
are calculated. The user must configure<br />
the a and b distances.<br />
6.2.1.4.3.5 Type 3<br />
The type 3 dynamometer measures 4 shear components<br />
and 2 vertical components. From the raw components F x<br />
,<br />
F y<br />
, F z<br />
and M x<br />
, M z<br />
are calculated. The user must configure<br />
the a and b distances.<br />
6.2.1.4.3.6 Type 4<br />
The type 4 dynamometer measures 4 shear components<br />
and 4 vertical components. From the raw components F x<br />
,<br />
F y<br />
, F z<br />
and M x<br />
, M y<br />
, M z<br />
are calculated. The user must<br />
configure the a and b distances.<br />
002-195Ae-06.02 (B19.2825Ae) Page 33
Dynoware Type 2825A1-2<br />
6.2.1.4.3.7 Type 5<br />
The type 5 dynamometer measures 5 shear components<br />
and 3 vertical components. From the raw components F x<br />
,<br />
F y<br />
, F z<br />
and M x<br />
, M y<br />
, M z<br />
are calculated. The user must<br />
configure the a, b and c distances.<br />
Sensor Distances<br />
Dynamometer View<br />
Resultant Window<br />
Enter the appropriate distances between sensors from the<br />
drawing given for the appropriate dynamometer type. All<br />
distances are entered in Millimeters [mm].<br />
This window shows a drawing defining the coordinate<br />
system, and sensor layout for the selected dynamometer.<br />
Use this as a guide when entering sensor distances,<br />
configuring your system, and interpreting data.<br />
The resultant window shows channel allocation for<br />
acquired and calculated channels. This should be used as a<br />
guide when configuring graphs.<br />
6.2.1.5 Configurations using 5011/5015 amplifiers<br />
Selecting 5011/5015 in the amplifier selection (see section<br />
6.2.1.3 above) will enable the Charge Amplifier Type<br />
5011/5015 tab.<br />
6.2.1.5.1 Charge Amplifier Type 5011/5015<br />
The following parameters should be set when using<br />
5011/5015 charge amplifiers in Dynoware:<br />
Communications Selection<br />
The user can select the remote control mode, either via RS-<br />
232C (in which case only channel one can be remotely<br />
controlled) or via IEEE-488 (in which case all channels can<br />
be remotely controlled). If RS-232C is chosen, a RS-232<br />
Setup tab will appear to allow custom configuration of the<br />
communication parameters.<br />
Channel Channel number. Channels range from 1 to 8.<br />
Label<br />
Measuring Range<br />
Unit<br />
Enter a label of each channel. This label will appear on<br />
graphs and reports.<br />
Enter the Measuring Range [M.U.] of each channel (M.U.<br />
= Mechanical Unit).<br />
Enter the display units of each channel.<br />
Page 34<br />
002-195Ae-06.02 (B19.2825Ae)
Reference<br />
Scale<br />
Sensitivity<br />
Filter<br />
Time Constant<br />
IEEE Address<br />
Operate<br />
Reset<br />
Send Parameter<br />
Reset/Operate<br />
The Scale setting for the amplifier is automatically<br />
determined from the Measuring Range and the full scale<br />
output capability of the amplifier. Scale [M.U./V] =<br />
Measuring Range [M.U.] / Amplifier Full Scale Output [V];<br />
(M.U. = Mechanical Unit)<br />
Enter the sensitivity of a sensor (see calibration sheet).<br />
Select the desired Low Pass filter (internal signal filter in the<br />
signal conditioner) to be used.<br />
Select the desired High Pass filter Time Constant (internal<br />
signal filter in the signal conditioner) to be used.<br />
Enter the IEEE-488 address of the selected 5011/5015. The<br />
selected channel address must match the address<br />
configured in the 5011/5015. Please refer to the<br />
5011/5015 users manual for information on configuring<br />
the IEEE-488 address. Each device must have a unique<br />
address. This applies only if IEEE communication mode is<br />
selected.<br />
Transmit the command to place the amplifier into the<br />
operate mode.<br />
Transmit the command to place the amplifier into reset<br />
mode.<br />
Transmit the command to set the appropriate per channel<br />
configuration for Sensitivity, Range, Filter, and Time<br />
constant settings.<br />
Enable the automatic control (via RS-232C or IEEE-488<br />
interface) of the Operate/Reset commands during a typical<br />
acquisition cycle. Amplifier will be automatically set to<br />
operate at the start of a cycle, and will return to reset after<br />
the acquisition has completed for any given cycle. In some<br />
cases, this automatic control of Reset/Operate is not<br />
desired and the selection box should remain unchecked.<br />
6.2.1.5.2 RS-232C Setup<br />
(See section 6.2.1.4.2) – This tab will only appear if RS-<br />
232C interface is selected.<br />
6.2.1.6 Configurations using Other amplifiers<br />
Selecting Others in the amplifier selection (see section<br />
6.2.1.3 above) will enable the Other tab.<br />
6.2.1.6.1 Others<br />
Channel<br />
The other adapter tab allows for generic amplifier<br />
configuration. In this setup no specific equipment is controlled.<br />
The data provided allows Dynoware to convert data<br />
from measured voltages to real mechanical units. The<br />
information configured in this tab is:<br />
Channel number used for configured devices and connections.<br />
002-195Ae-06.02 (B19.2825Ae) Page 35
Dynoware Type 2825A1-2<br />
Label<br />
Measuring Range<br />
Unit<br />
FS<br />
Range 1<br />
Sensitivity<br />
Enter the label for each channel. Labels will appear on<br />
graphs and reports.<br />
Enter the measuring Range of each channel (if not<br />
activated, use double click or F4). You can either enter an<br />
overall measuring range, or an individual range and<br />
sensitivity. Measuring Range [M.U.] = Sensor Range [pC]<br />
divided by Sensitivity [pC/M.U.] (M.U. = Mechanical Unit).<br />
Enter the unit of each channel. The configured units will<br />
appear on graphs and reports<br />
Enter the full scale (FS) of each channel.<br />
Enter the range of the adapter for each channel (activate<br />
with double click or F4).<br />
Enter the sensitivity of a sensor (activate with double click<br />
or F4).<br />
6.2.1.7 Configurations using Rotating Cutting Dynamometer 5223<br />
Selecting RCD 5223 in the amplifier selection (see section<br />
6.2.1.3 above) will enable the RCD 5223 tab, the RS-232C<br />
Setup tab, and the RCD Calculations tab.<br />
6.2.1.7.1 RCD 5223<br />
The rotating cutting dynamometer requires the configuration<br />
of the following parameters:<br />
Channel Channel number. Channels range from 1 to 6.<br />
Label<br />
Measuring Range<br />
Unit<br />
Full Scale Output (FSO)<br />
Sensitivity<br />
Range Selection<br />
Zoom Channel<br />
Operate<br />
Reset<br />
Send Parameters<br />
Assign labels for each channel. These labels appear in<br />
graphs and reports.<br />
The measuring range is automatically assigned based on<br />
the Scale and Sensitivity settings. Measuring Range [M.U.]<br />
= Full Scale Output [mV] divided by Sensitivity [mV/M.U.];<br />
(M.U. = Mechanical Unit).<br />
Assign units to each channel. These labels appear in graphs<br />
and reports.<br />
Assign the full scale setting for the amplifier in [mV].<br />
Enter the sensitivity of a sensor in [mV/M.U].<br />
Select the desired measurement range.<br />
Select the channel to appear as the zoom output channel.<br />
You can select F x<br />
, F z<br />
or M z<br />
.<br />
Transmit the command to place the amplifier into the<br />
operate mode.<br />
Transmit the command to place the amplifier into reset<br />
mode.<br />
Transmit the command to set the appropriate per channel<br />
configuration for Sensitivity and Range settings, and the<br />
zoom channel selection.<br />
Page 36<br />
002-195Ae-06.02 (B19.2825Ae)
Reference<br />
Reset/Operate<br />
Enable the automatic control (via RS-232C interface) of the<br />
Operate/Reset commands during a typical acquisition<br />
cycle. Amplifier will be automatically set to operate at the<br />
start of a cycle, and will return to reset after the acquisition<br />
has completed for any given cycle. In some cases, this<br />
automatic control of Reset/Operate is not desired and the<br />
selection box should remain unchecked.<br />
6.2.1.7.2 RS-232C Setup<br />
(see section 6.2.1.4.2)<br />
6.2.1.7.3 RCD Calculations<br />
With the RCD 5223... additional software calculations can<br />
be performed. These calculations can provide radial and<br />
tangential forces or active force in a variety of applications.<br />
If a RCD calculation is enabled, the user cannot enable/disable<br />
channels in the Channels & Trigger configuration<br />
(see section 6.2.2.2).<br />
6.2.1.7.3.1 Off<br />
RCD Calculations are disabled<br />
6.2.1.7.3.2 Type 1<br />
The type 1 RCD Calculation computes the F a<br />
(active force)<br />
cutting force parameter. The user must configure tool<br />
diameter, D.<br />
6.2.1.7.3.3 Type 2<br />
The type 2 RCD Calculation computes the F r<br />
(Radial Force)<br />
and F t<br />
(tangential force) cutting force parameters. The user<br />
must configure tool diameter, D.<br />
002-195Ae-06.02 (B19.2825Ae) Page 37
Dynoware Type 2825A1-2<br />
Tool Diameter<br />
Tool View<br />
Resultant Window<br />
Enter the tool diameter for the appropriate tool under test.<br />
All distances are entered in millimeters, "mm".<br />
This window shows a drawing defining the coordinate<br />
system, and tool measurement layout for the selected<br />
dynamometer.<br />
The resultant window shows channel allocation for<br />
acquired and calculated channels. This should be used as a<br />
guide when configuring graphs.<br />
6.2.1.8 Configurations Using Rotating Cutting Dyno 5237 (High Speed RCD)<br />
Selecting RCD 5237 in the amplifier selection (see section<br />
6.2.1.3 above) will enable the RCD 5237 tab, and the RS-<br />
232C Setup tab.<br />
6.2.1.8.1 RCD 5237<br />
To configure the 5237 high speed rotating cutting<br />
dynamometer, configure the following:<br />
Channel Channel number. Channels range from 1 to 2.<br />
Label<br />
Measuring Range<br />
Unit<br />
Sensitivities<br />
Range Selection<br />
Operate<br />
Reset<br />
Send Parameters<br />
Reset/Operate<br />
Assign labels for each channel. These labels appear in<br />
graphs and reports.<br />
The measuring range is automatically assigned based on<br />
the Scale and Sensitivity settings. Measuring Range [M.U.]<br />
= Full Scale Output [mV] divided by Sensitivity [mV/M.U.];<br />
(M.U. = Mechanical Unit)<br />
Assign units to each channel. These labels appear in graphs<br />
and reports.<br />
Range I, Range II and Range III – enter the sensitivity of a<br />
sensor in [mV/M.U.] for each of the calibrated ranges.<br />
Select the desired measurement range from the pull-down<br />
choice box.<br />
Transmit the command to place the amplifier into the<br />
operate mode.<br />
Transmit the command to place the amplifier into reset<br />
mode.<br />
Transmit the command to set the appropriate per channel<br />
configuration for the Range settings.<br />
Enable the automatic control (via RS-232C interface) of the<br />
Operate/Reset commands during a typical acquisition<br />
cycle. Amplifier will be automatically set to operate at the<br />
start of a cycle, and will return to reset after the acquisition<br />
has completed for any given cycle. In some cases, this<br />
automatic control of Reset/Operate is not desired and the<br />
selection box should remain unchecked.<br />
Page 38<br />
002-195Ae-06.02 (B19.2825Ae)
Reference<br />
6.2.1.8.2 RS-232C Setup<br />
(see section 6.2.1.4.2)<br />
6.2.2 Edit…<br />
Shortcut: Alt+E<br />
Selecting Acquisition fi Edit (Figure 6.10: Edit Acquisition<br />
Parameters) allows configuration of the data acquisition<br />
process for DynoWare. The parameters tab provides<br />
configuration of the basic sampling and storage criteria.<br />
The Channels and triggers tab provides selection of the<br />
trigger method and the channels available. The Data<br />
Manipulation Online tab allows for user customized data<br />
calculations to be performed on acquired data.<br />
Figure 6.10: Edit Acquisition Parameters<br />
6.2.2.1 Parameter<br />
Measuring Time<br />
Sample Rate<br />
The Parameter tab (Figure 6.10: Edit Acquisition<br />
Parameters) allows for configuration of the following:<br />
Definition of the actual duration of acquisition measured in<br />
seconds.<br />
The Sample rate defines the number of measurements per<br />
second and per channel.<br />
Note:<br />
The higher the sample rate, the better is the resolution of<br />
the measuring signal.<br />
002-195Ae-06.02 (B19.2825Ae) Page 39
Dynoware Type 2825A1-2<br />
Note:<br />
Because of the huge amount of data a high sample rate is<br />
automatically equivalent to slow data processing and a<br />
slow building up of the graphical display. According to<br />
experience a sample rate of 250 Hz could be sufficient for<br />
monitoring purposes. For detailed analysis however 2'000<br />
Hz or higher might be necessary.<br />
Note:<br />
High sampling rates and long acquisition duration can<br />
create large files. Ensure that there is enough disk space<br />
available when using continuous monitoring.<br />
Cycles<br />
Continuous<br />
This defines the number of measuring cycles (machine<br />
cycles) to be acquired.<br />
If checked the number of cycles is unknown. The<br />
acquisition has to be stopped manually.<br />
Trigger Delay Time The delay time between the trigger signal and<br />
measurement start.<br />
Save<br />
Display<br />
Information<br />
Enable saving the acquisition data into a file after each<br />
cycle is acquired.<br />
Enable displaying acquired data on the screen after each<br />
cycle is acquired.<br />
Displays information about the number of Channels used<br />
for the measurement, the number of Samples/Channel,<br />
and the approximate memory storage size needed for one<br />
cycle. This depends on the number of channels, the<br />
sampling time, and the sampling rate.<br />
File the name of the file. The file extension is '*.dwd' .<br />
Browse<br />
Directory<br />
Save configuration<br />
Browse enables visual selection of a directory and a file<br />
name, use the Browse function to find and overwrite an<br />
existing file or to browse for a directory (folder).<br />
Displays the selected directory or folder on a disk where<br />
the file will be stored.<br />
Enable the check to save the configuration when starting<br />
the measurement. Dynoware uses the same file name as<br />
for the data file, but with the extension '*.cfg' for<br />
configuration files. See Section 6.1.2.2 Configuration<br />
Save… for more information about configurations.<br />
6.2.2.2 Channels & Trigger<br />
The Channels and Trigger tab (Figure 6.11: Edit Acquisition<br />
Channels & Trigger) is configured with the following<br />
options in the table and trigger sections:<br />
Page 40<br />
002-195Ae-06.02 (B19.2825Ae)
Reference<br />
On (Enable) Activates/Deactivates a channel if multicomponent<br />
measurement mode is not activated.<br />
Trigger<br />
Channel<br />
Label<br />
Trigger: On enter key<br />
Trigger: Digital<br />
Trigger: Analog<br />
Trigger: Rising/Falling<br />
Trigger: % or Absolute<br />
Threshold<br />
Activate a channel as a 'trigger channel' in case of analog<br />
trigger mode.<br />
Displays the number of the channel.<br />
Enter the label of the channel (e.g. drilling moment).<br />
The measurement is started by pressing the enter key.<br />
The measurement is started by an external trigger signal<br />
(e.g. start machine).<br />
The measurement is started if the defined channel has<br />
reached a certain level.<br />
Start of the Trigger at rising or falling edge.<br />
The analog trigger threshold is defined as a percentage or<br />
an absolute value.<br />
specifies in M.U. (mechanical units) or volts the analog<br />
trigger threshold.<br />
Figure 6.11: Edit Acquisition Channels & Trigger<br />
002-195Ae-06.02 (B19.2825Ae) Page 41
Dynoware Type 2825A1-2<br />
6.2.2.3 Data Manipulation Online<br />
Figure 6.12: Edit Acquisition, Data Manipulation Online<br />
Data for any specified channel can be modified with<br />
standard mathematical functions immediately after the<br />
data is acquired. The source channels and operation to be<br />
performed must be specified as well as the destination of<br />
the calculation.<br />
Warning:<br />
The destination channel data is permanently destroyed.<br />
Use the data manipulation functions with extreme<br />
caution. To create a new data set, enable acquisition of<br />
an additional channel (placeholder).<br />
On (Enable)<br />
Activate the function for the data manipulation.<br />
1. Base First channel for the data manipulation.<br />
2. Base Second channel for the data manipulation. Here you may<br />
also enter constant values. Note: Confirm numerical entries<br />
with RETURN.<br />
Operation<br />
Result<br />
Add<br />
The mathematical operation to be performed. The<br />
following functions are available: Addition, Subtraction,<br />
Multiplication, Division, log a , ln b , exp(e) c , exp(10) d .<br />
Channel to place the result.<br />
Add a new function.<br />
a<br />
b<br />
c<br />
d<br />
base 10 logarithm<br />
natural logarithm<br />
natural exponential<br />
base 10 exponential<br />
Page 42<br />
002-195Ae-06.02 (B19.2825Ae)
Reference<br />
Remove<br />
Remove the selected function.<br />
6.2.3 Start...<br />
Shortcut: Alt+S<br />
To begin the data acquisition process, select the<br />
Acquisition fi Start menu choice. If the specified storage<br />
file already exists (as specified in section 6.2.2.1 Acquisition<br />
Parameter) a prompt will appear (Figure 6.13: Overwrite<br />
File Prompt) to overwrite the existing file.<br />
Warning:<br />
If you choose to overwrite the file, all existing data in<br />
the file will be lost.<br />
Figure 6.13: Overwrite File Prompt<br />
First, if the enabled, the Comments dialog (see Section<br />
6.3.4.1) will appear. Here notes about the given cycle can<br />
be added or changed to document the trial cycle.<br />
Next, if Show Hardware dialog between Acquisition Cycles<br />
is enabled (see Section 6.2.1.2 Show Hardware Dialog<br />
between acquisition cycles), the Hardware configuration<br />
dialog will appear allowing changes to the amplifier<br />
configuration.<br />
Finally, the main data acquisition dialog box (Figure 6.14:<br />
Begin Acquisition Prompt) will appear showing the current<br />
cycle number. If analog or digital triggering is required, the<br />
system will go into the wait for trigger state. If Key<br />
triggering is enabled pressing the Go button or the Enter<br />
key will start acquisition. Once a trigger has occurred, or<br />
Go has been selected, the progress bar will update to<br />
indicate acquisition status.<br />
To abort acquisition (or stop a continuous cycle acquisition),<br />
press the Stop button.<br />
002-195Ae-06.02 (B19.2825Ae) Page 43
Dynoware Type 2825A1-2<br />
Figure 6.14: Begin Acquisition Prompt<br />
Warning:<br />
The data acquisition process may take several seconds to<br />
abort before the next acquisition interval can begin.<br />
6.3 View...<br />
The view menu provides for complete control of the<br />
graphical output of Dynoware. Graph types and data content<br />
can be selected for individual views and for configuration<br />
of a default view set.<br />
6.3.1 New…<br />
With a specific window open, selecting New… will create a<br />
new duplicate window with the identical configuration as<br />
the current active window. This new view can now be<br />
configured individually.<br />
6.3.2 Edit…<br />
Shortcut: Alt+V<br />
The View Edit configuration provides for control of the<br />
current windows graph type and contained items (Figure<br />
6.15: View Edit). The user can also customize the colors of<br />
a specific graph item from this dialog box, and set view<br />
dependence (link to other open views of this file).<br />
Page 44<br />
002-195Ae-06.02 (B19.2825Ae)
Reference<br />
Figure 6.15: View Edit<br />
Selected Cycles and Channels are highlighted in yellow.<br />
Click on an item to highlight (or select) it, click on a<br />
highlighted item to unselect it. There are three types of<br />
graphics: y(t), y(x), and numerical. In order to select or<br />
change the x-axis in a y(x) graph, click on the y-x icon.<br />
The following describes additional items in the View Edit<br />
dialog:<br />
File<br />
Cycle<br />
Channel<br />
Color<br />
vs. Y2<br />
Select all/Unselect all<br />
Select Color<br />
View dependence<br />
Displays the files to be selected.<br />
Selects the cycles to be displayed in the view. If more than<br />
two cycles are selected, they will be superimposed.<br />
Select the channels to be displayed.<br />
Shows the color selection for each channel. Press the Select<br />
Color button to change the color.<br />
Selecting vs. Y2 allows graphing vs. two vertical axis scales.<br />
One scaling will appear on the left of the graph, the<br />
second scale will appear on the right of the graph. The<br />
legend will indicate the corresponding axis that applies to<br />
each line. vs. Y2 applies to time based graphs y(t) only.<br />
Selects/Unselects all cycles or channels to view.<br />
Change the color for each channel.<br />
Links two or more windows. Changing in one window<br />
from one cycle to the next will update the other windows<br />
accordingly.<br />
002-195Ae-06.02 (B19.2825Ae) Page 45
Dynoware Type 2825A1-2<br />
6.3.3 Setup…<br />
Figure 6.16: View Setup<br />
With View fi Setup you can configure the windows and<br />
default graphs that will appear when a file is opened or<br />
when data is acquired. A user can configure several default<br />
windows by repeatedly pressing the Add button and<br />
following the onscreen wizard for creating a new view<br />
window. To remove an existing view, highlight the view in<br />
the Data Views window and select the Remove button.<br />
To find more information about a view, highlight it in the<br />
Data Views window and press the Details button.<br />
6.3.4 Documentation<br />
Shortcut: Alt+D<br />
Each individual cycle can have additional documentation<br />
associated with it. There are two tabs in the documentation<br />
dialog, Comments and File, Date, Time.<br />
6.3.4.1 Comments<br />
The comments tab (Figure 6.17: Documentation) allows<br />
user entered text data to be associated with each cycle.<br />
The changes are updated immediately in the file.<br />
Page 46<br />
002-195Ae-06.02 (B19.2825Ae)
Reference<br />
Figure 6.17: Documentation<br />
Document title<br />
Remarks<br />
Material<br />
Tool<br />
Allows for customization of the graph titles<br />
General text comments can be entered in the remarks<br />
section<br />
In cutting force documentation mode, the user can supply<br />
a material type comment<br />
In cutting force documentation mode, the user can enter<br />
specific information about the cutting tool under test.<br />
Cutting Force Parameters v c<br />
= cutting velocity [m/min]<br />
F = feed [mm/rev]<br />
a p<br />
= depth of cut [mm]<br />
n = speed [rpm]<br />
v f<br />
= feed velocity [m/min]<br />
a e<br />
= cutter engagement [mm]<br />
Documentation Mode<br />
Show Documentation<br />
specify to document specific cutting force parameters, or to<br />
document the file using general comments.<br />
between acquisition cycles enable the automatic display of<br />
the documentation dialog box immediately prior to<br />
acquiring a cycle.<br />
6.3.4.2 File, Date, Time<br />
The File, Date, Time tab documents the temporal and storage data associated with the original<br />
acquisition.<br />
Folder<br />
File<br />
Date<br />
Time<br />
The directory where the file was initially created<br />
The initial name of the file<br />
The original date of the acquisition<br />
The original time of the acquisition<br />
002-195Ae-06.02 (B19.2825Ae) Page 47
Dynoware Type 2825A1-2<br />
6.3.4.3 Edit Labels<br />
The user can edit the channel labels or unit labels of<br />
specific channels at any time using the View fi Edit Labels<br />
selection. The channel label or unit entered for any one<br />
specific channel will be applied to all of the stored cycles<br />
within the file. The changes are updated immediately in the<br />
file.<br />
6.3.5 Zoom<br />
The zoom function provides for changing the x-axis and y-<br />
axis scaling parameters for an active graph. The user can<br />
manually zoom by entering the axis minimum and<br />
maximum values or graphically zoom using the right<br />
mouse button.<br />
6.3.5.1 <strong>Manual</strong> Zoom<br />
By default all graphs are scaled to best fit the minimum and<br />
maximum values of the contained graphs. Selecting View<br />
→ Zoom (Figure 6.18: <strong>Manual</strong> zoom) presents a dialog box<br />
which can be used to set the x-axis minimum and<br />
maximum values and the y-axis minimum and maximum<br />
values. The dialog box will remain active (button Apply) so<br />
that the user can switch to other open windows and<br />
change the zoom settings. New settings will be activated<br />
when the OK or apply buttons are selected. The Zoom Off<br />
button will restore the graph to the original auto scaled<br />
values.<br />
Note:<br />
A zoomed graph will have the word 'zoom' in the upper<br />
left corner of the window.<br />
Figure 6.18: <strong>Manual</strong> zoom<br />
6.3.5.2 Graphical Zoom<br />
It is possible to zoom by clicking the right mouse button<br />
and dragging to create a Window over the desired zoom<br />
area of a graph. When the right mouse button is released,<br />
the graph will be redrawn with the new coordinates.<br />
Page 48<br />
002-195Ae-06.02 (B19.2825Ae)
Reference<br />
6.3.6 Zoom Out<br />
Zoom Out will restore the graph to the original auto scaled<br />
values. Also, by double clicking the right mouse button, the<br />
graph will return to the original coordinate scaling. Zoom<br />
Out is deactivated if the graph is currently not zoomed.<br />
6.3.7 Cursor<br />
For the analysis of data it is helpful to display the x- and y-<br />
coordinates. Pressing the toolbar icon<br />
or selecting View fi Cursor from the menu will enable the<br />
cursor tool. The dashed vertical cursor line can be moved<br />
with the mouse or with the keys.<br />
1.) Move the mouse over the dashed vertical cursor line.<br />
The mouse cursor will change to .<br />
2.) Click the left mouse button and drag the line to a new<br />
position (cursor will change to when dragging)<br />
3.) Release the mouse, the data in the cursor box will be<br />
updated.<br />
Alternatively:<br />
1.) Move the vertical cursor one sample by pressing the left<br />
or right arrow keys:<br />
2.) Move the vertical cursor 5% by pressing the page up or<br />
page down keys.<br />
The cursor window can be moved anywhere on the<br />
desktop by left clicking the mouse on the toolbar, and<br />
dragging to a new location. Dynoware will remember the<br />
last active state and last active location of the toolbar each<br />
time it is started.<br />
When activated, the cursor tool will apply to all time base<br />
graphs y(t) and tables (numerical graphs). Numerical<br />
graphs will have the cursor identified by a highlighted row.<br />
If the graphs have view dependence enabled (Section 6.2.2<br />
View Edit) all graphs based on the same document will<br />
have the cursor adjusted to the same time.<br />
002-195Ae-06.02 (B19.2825Ae) Page 49
Dynoware Type 2825A1-2<br />
Figure 6.19: Cursor Tool<br />
6.3.8 Horiz. Grid<br />
Selecting View fi Horiz. Grid from the main menu, or<br />
selecting the<br />
icon on the toolbar will redraw the active graph with<br />
horizontal grid lines enabled. Selecting the option again will<br />
disable the horizontal grid lines.<br />
6.3.9 Vert. Grid<br />
Selecting View fi Vert. Grid from the main menu, or<br />
selecting the<br />
icon on the toolbar will redraw the active graph with<br />
vertical grid lines enabled. Selecting the option again will<br />
disable the vertical grid lines.<br />
6.3.10 Toolbar<br />
Selecting View fi Toolbar will toggle the visible state of<br />
the system toolbar. The functional descriptions are:<br />
File Open<br />
Hardware<br />
Edit Acquisition<br />
Page 50<br />
002-195Ae-06.02 (B19.2825Ae)
Reference<br />
Cycle Documentation<br />
Setup View<br />
Start Acquisition<br />
New View<br />
Edit View<br />
Cursor<br />
Mean Value (Stats)<br />
Drift Compensation<br />
Horizontal Grids<br />
Vertical Grids<br />
Zoom Out<br />
Voltmeter<br />
Oscilloscope<br />
Cascade Views<br />
Tile Vertical<br />
Tile Horizontal<br />
Help<br />
6.3.11 Status Bar<br />
The status bar can be enabled/disabled from the View fi<br />
Status Bar menu selection. The status bar runs along the<br />
lower edge of the Dynoware screen. It is separated into<br />
two sections. The left side of the status bar offers<br />
information on a topic selected when the mouse is moved<br />
over a menu bar or tool bar item. The right section of the<br />
status bar and shows the status of the Caps Lock key, the<br />
Num lock key, and the Scroll lock key.<br />
Figure 6.20: Status Bar<br />
6.4 Analysis...<br />
6.4.1 Mean Value<br />
By selecting Analysis fi Mean value from the main menu<br />
or by clicking the<br />
icon on the toolbar statistical data can be displayed on an<br />
active y(t) time based graph.<br />
002-195Ae-06.02 (B19.2825Ae) Page 51
Dynoware Type 2825A1-2<br />
Figure 6.21: Mean value<br />
The statistical data will appear on the bottom of the graph<br />
(stats on up to 8 curves can be displayed). Statistical data<br />
will include: Maximum value, Minimum Value and Mean<br />
(average) value between two user identified points.<br />
Figure 6.1: Sample statistical data<br />
A dashed vertical bar will first appear on the graph along<br />
with the cursor. This vertical line will track the mouse<br />
movement to set the starting point for the analysis. Move<br />
to the desired starting position then left click the mouse.<br />
Next, a dashed vertical bar will appear on the graph along<br />
with the cursor. This vertical line will track the mouse<br />
movement to set the ending point for the analysis. Move<br />
to the desired ending position then left click the mouse.<br />
To change either the starting position or ending position<br />
and update the statistical data:<br />
1.) Move the mouse over the dashed vertical cursor line.<br />
The cursor will change to<br />
2.) Click the left mouse button and drag the line to a new<br />
position (cursor will change to when dragging)<br />
3.) Release the mouse, the statistical data will be updated.<br />
The Mean value analysis can be disabled and the graph<br />
restored to normal by reselecting the menu choice, or the<br />
toolbar icon.<br />
6.4.2 Signal Drift Compensation<br />
By selecting Analysis fi Signal Drift Compensation from<br />
the main menu or by clicking the<br />
Page 52<br />
002-195Ae-06.02 (B19.2825Ae)
Reference<br />
icon on the toolbar, data can be adjusted to remove the<br />
effect of long-term thermal drift and offset. This is<br />
accomplished by computing a straight line between a<br />
starting and ending point, then subtracting this line from<br />
the selected portion of the data set. All data sets on the<br />
current time series graph will be compensated.<br />
This function is especially designed for resolving the<br />
problems of drift in piezoelectric measurement systems. In<br />
the Operate mode, the signal drifts away with a constant<br />
slope, however the direction (if negative or positive) is<br />
unpredictable. In short measurements or in measurements<br />
with high forces this drift is usually negligible. After very<br />
long measurements however this drift is clearly visible. The<br />
measurement is started before applying the force and<br />
continues until there is no force applied to the tool<br />
anymore, the drift is visible as the signal that does not fall<br />
back to the zero line.<br />
Note:<br />
The selection of the starting and ending points are<br />
critical to the accuracy of the compensation.<br />
Note:<br />
The words 'Drift Compensation On' will appear in the<br />
upper left corner the graph to identify the data set as<br />
modified.<br />
When selecting drift compensation:<br />
A dashed vertical bar will first appear on the graph along<br />
with the cursor. This vertical line will track the mouse<br />
movement to set the starting point for the compensation.<br />
Move to the desired starting position then left click the<br />
mouse.<br />
Next, a dashed vertical bar will appear on the graph along<br />
with the cursor. This vertical line will track the mouse<br />
movement to set the ending point for the compensation.<br />
Move to the desired ending position then left click the<br />
mouse.<br />
The first vertical line should be placed right before the<br />
rising edge of the force curve - where the signal still lies on<br />
the zero line. The second line has to be placed where there<br />
is no force application anymore, i.e. where the measured<br />
signal should lie again on the zero line.<br />
002-195Ae-06.02 (B19.2825Ae) Page 53
Dynoware Type 2825A1-2<br />
14.00<br />
Operation 1<br />
Ch1 [N]<br />
12.00<br />
10.00<br />
8.00<br />
6.00<br />
4.00<br />
2.00<br />
0<br />
5 10 15 20 25 30<br />
>>><br />
-2.00<br />
Time [s]<br />
Cycle No.: 1<br />
Figure 6.22: Original Signal<br />
14.00<br />
Drift Compensation on<br />
Operation 1<br />
Ch1 [N]<br />
12.00<br />
10.00<br />
8.00<br />
6.00<br />
4.00<br />
2.00<br />
0<br />
5 10 15 20 25 30<br />
>>><br />
-2.00<br />
Time [s]<br />
Cycle No.: 1<br />
Figure 6.23: Drift compensation applied<br />
To change either the starting position or ending position<br />
and update the compensation:<br />
1.) Move the mouse over the dashed vertical cursor line.<br />
The cursor will change to<br />
2.) Click the left mouse button and drag the line to a new<br />
position (cursor will change to when dragging)<br />
3.) Release the mouse, the data set will be updated and the<br />
graph redrawn.<br />
The change is only temporary and can be disabled by<br />
reselecting the menu choice, or the toolbar icon. Select<br />
Overwrite File Cycle Data (see Section 6.4.5) to permanently<br />
apply the changes to the data set.<br />
Page 54<br />
002-195Ae-06.02 (B19.2825Ae)
Reference<br />
6.4.3 Smoothing on…<br />
Smoothing is used to filter a data set or to remove defined<br />
frequency content. The type of filter to use depends upon<br />
the type of modification required. The filtering options are:<br />
Moving Mean, Moving Median, Digital Low Pass, and<br />
Digital High Pass. Each is discussed in the following<br />
paragraphs. Select the channels to apply the filter from the<br />
list presented or press the All Channels button to select all<br />
available channels.<br />
Note:<br />
The words 'Smoothing On' will appear in the upper left<br />
corner of the graph to identify the data set as modified.<br />
6.4.3.1 Moving Mean<br />
A moving mean filter is used to smooth an entire data set<br />
when no particular frequencies are to be filtered out. This<br />
type of filter generates a moving average data set from the<br />
original one, based on a user-specified Window size. The<br />
window size specifies how many values to the left and<br />
right of the current value are averaged. The window size<br />
must be an odd number, because the current value must<br />
fall in the exact center of the window, with an even<br />
number of points to the left and right of it (if you enter an<br />
even number, the calculation is made with the next higher<br />
number). The average of all values in the window is<br />
calculated, and this number is used to replace the current<br />
value. The larger the window size, the more the resulting<br />
data set is smoothed. The Figure below illustrates both the<br />
moving mean and the moving median filters.<br />
Note:<br />
At the beginning and the end when the window size<br />
would exceed the sampled values, the window size is<br />
reduced, starting and ending with a window size of<br />
CEIL(WindowSize/2).<br />
002-195Ae-06.02 (B19.2825Ae) Page 55
Dynoware Type 2825A1-2<br />
Figure 6.24: Moving mean and moving median filters<br />
6.4.3.2 Moving Median<br />
The moving median filter is similar to the moving mean in<br />
that it also uses a moving window. However, this method<br />
sorts the values within the window and replaces the<br />
current value with the median value (i.e., the middle value<br />
in the sorted data window). The moving median type filter<br />
is good for removing sharp spikes in the data.<br />
6.4.3.3 Digital Low Pass<br />
For a low pass filter, the cutoff frequency is the frequency<br />
above which all frequencies are attenuated to some<br />
degree, and below which all frequencies pass unfiltered.<br />
Essentially, all low frequencies are allowed to pass, and all<br />
high frequencies are removed. The specified cutoff<br />
frequency is the −3db (half power) attenuation point of a<br />
13 tap Finite Impulse Response (FIR) filter.<br />
6.4.3.4 Digital High Pass<br />
For a high pass filter, the cutoff frequency is the frequency<br />
below which all frequencies are attenuated to some<br />
degree, and above which all frequencies pass unfiltered.<br />
Essentially, all high frequencies are allowed to pass, and all<br />
low frequencies are removed. The specified cutoff<br />
frequency is the −3db (half power) attenuation point of a<br />
13 tap Finite Impulse Response (FIR) filter.<br />
Smoothed data is not stored permanently and can be<br />
undone by selecting Analysis fi Smoothing Off (Section<br />
6.4.4 Smoothing off) from the main menu. Select<br />
Overwrite File Cycle Data (see Section 6.4.5) to<br />
permanently apply the changes to the data.<br />
Page 56<br />
002-195Ae-06.02 (B19.2825Ae)
Reference<br />
Warning:<br />
Kistler measurement equipment is very sensitive.<br />
Sometimes what appears to be noise can be “real”<br />
measured phenomena. Care should be exercised in<br />
filtering so as not to remove important data.<br />
Below is an example of a "noisy" data set Figure 6.25:<br />
Original data set (no smoothing), on which a Moving<br />
Median filter (Windows Size = 13) has been applied, Figure<br />
6.26: Smoothing on, moving mean (window size = 13).<br />
Figure 6.25: Original data set (no smoothing)<br />
Figure 6.26: Smoothing on, moving mean (window size = 13)<br />
6.4.4 Smoothing off<br />
Selecting Analysis fi Smoothing Off will disable any filters<br />
currently applied to the data set. A check mark on the<br />
menu will indicate if smoothing is currently on or off.<br />
6.4.5 Overwrite File Cycle Data<br />
The operations Smoothing and Signal Drift Compensation<br />
display temporary changes to a data set. These operations<br />
002-195Ae-06.02 (B19.2825Ae) Page 57
Dynoware Type 2825A1-2<br />
do not permanently affect the data stored in a file. To<br />
permanently archive these changes, select Overwrite File<br />
Cycle Data from the Analysis menu.<br />
This operation allows the user to apply several different<br />
functions to a data set. For instance, data can be compensated<br />
for drift; the changes save in the file, and then Mean<br />
value analysis can be done. Normally the drift compensation<br />
and mean value functions are mutually exclusive<br />
(cannot be done at the same time).<br />
Warning:<br />
Overwritten changes cannot be undone and<br />
permanently modifies the data in the file. Be sure to<br />
make a backup of the original file prior to selecting<br />
Overwrite File Cycle Data.<br />
6.5 Tools...<br />
6.5.1 Voltmeter…<br />
The Voltmeter (Figure 6.27: Voltmeter) is a troubleshooting<br />
tool that numerically displays the voltages at the<br />
inputs to the A/D board. Selecting Voltmeter from the Tool<br />
menu starts the meter. Any configured amplifiers are<br />
placed into operate mode automatically at the start of the<br />
voltmeter, and are returned to reset when the tool is<br />
exited. To stop the acquisition press the Stop button, to<br />
restart the acquisition press Run.<br />
Figure 6.27: Voltmeter<br />
Page 58<br />
002-195Ae-06.02 (B19.2825Ae)
Reference<br />
The grid shows the channels configured in the system, their<br />
active state, and the configured label. To enable/disable a<br />
channel use the On column check box.<br />
The voltage data can be selected to appear in Volts [V] or<br />
Millivolts [mV].<br />
The Voltmeter can be run at the same time as the<br />
Oscilloscope function, but other data acquisition functions<br />
are disabled while the Voltmeter is active.<br />
6.5.2 Oscilloscope…<br />
The Oscilloscope (Figure 6.28: Oscilloscope Tool) is a<br />
troubleshooting tool that graphically displays the voltages<br />
at the inputs to the A/D board. Selecting Oscilloscope from<br />
the Tool menu starts the scope. Any configured amplifiers<br />
are placed into operate mode automatically at the start of<br />
the oscilloscope, and are returned to reset when the tool is<br />
exited. To stop the acquisition press the Stop button, to<br />
restart the acquisition press Run.<br />
Figure 6.28: Oscilloscope Tool<br />
The grid shows the channels configured in the system, their<br />
active state, and the configured label. To enable/disable a<br />
channel use the On column check box. The channel color is<br />
displayed in the On column.<br />
The voltage scale, and time scale can be selected from the<br />
Volt/Div. and Sec./Div. Boxes.<br />
002-195Ae-06.02 (B19.2825Ae) Page 59
Dynoware Type 2825A1-2<br />
The Oscilloscope can be run at the same time as the<br />
Voltmeter function, but other data acquisition functions are<br />
disabled while the Oscilloscope is active.<br />
6.6 Options...<br />
6.6.1 User Mode<br />
The User Mode allows the software operation to be<br />
restricted. The default user mode is Supervisor.<br />
6.6.1.1 Supervisor<br />
No operation restrictions are made in the Supervisor mode.<br />
To restrict access to software and device configurations,<br />
select the operator mode. The default password is<br />
"DynoWare" (capital 'D' and 'W', lower case for other<br />
letters!).<br />
6.6.1.2 Operator<br />
No functional settings can be made in this mode (Changes<br />
to devices configurations, etc. can only be made in the<br />
supervisor mode). To switch from User mode to Operator<br />
mode a password is required.<br />
6.6.1.3 Change Password<br />
Figure 6.29: Changing Password<br />
To change the Operator/Supervisor mode password select<br />
the Options fi User Mode fi Change Password menu<br />
choice. You will need to enter the old password, and enter<br />
the new password twice identically for the new password<br />
to be accepted. Passwords are case sensitive. The default<br />
password is "DynoWare" (capital 'D' and 'W', lower case<br />
for other letters!).<br />
Page 60<br />
002-195Ae-06.02 (B19.2825Ae)
Reference<br />
6.7 Window...<br />
When a graph is open, the Window menu appears in the<br />
menu bar. The Window menu is for controlling the position<br />
of the graphs, and is useful when many different graphs<br />
are open on the screen.<br />
6.7.1 Cascade<br />
Arrange all open graphs staggered and overlapping each<br />
other.<br />
6.7.2 Tile Horizontal<br />
Arrange all open graphs to be non-overlapping tiled<br />
horizontally.<br />
6.7.3 Tile Vertical<br />
Arrange all open graphs to be non-overlapping tiled<br />
vertically.<br />
6.7.4 Arrange Icons<br />
Arranges all minimized graphs icons in the lower left corner<br />
of the application.<br />
6.7.5 Close All<br />
Closes all open graphs and files.<br />
6.7.6 <br />
Shows a list of open graphs. Select an item in the list to<br />
active a specific graph.<br />
6.8 Help...<br />
6.8.1 Help Topics<br />
The Dynoware help menu is available by selecting Help<br />
Topics from the Help menu, or by pressing F1 at any time.<br />
Dynoware uses standard HTML help format through the<br />
default-configured browser (see section 1.1 for more information).<br />
002-195Ae-06.02 (B19.2825Ae) Page 61
Dynoware Type 2825A1-2<br />
6.8.2 About Dynoware<br />
The Dynoware about box provides information about the<br />
running version of the application, the build number, and<br />
the product type number. Be prepared to provide this information<br />
when requesting technical support.<br />
Page 62<br />
002-195Ae-06.02 (B19.2825Ae)
Appendix<br />
7. Appendix<br />
7.1 Graphs<br />
Manipulating data using graphs is simple and quick with<br />
Dynoware. When a trial is opened one or more graphs<br />
appear using the default configuration (see Section 6.3.3<br />
Setup…). The graphs can be edited for content, display,<br />
and titles.<br />
Smoothing on<br />
Zoom on<br />
Y1<br />
Drift Compensation on<br />
2800.00<br />
Graph information Area:<br />
Zoom , Smoothing, and Drift<br />
Compensation<br />
Bohren Lehrwerkstatt<br />
Main Title (double click to<br />
edit)<br />
Y2<br />
100.00<br />
Fx [N]: Y2<br />
Fy [N]: Y2<br />
Fz [N]: Y1<br />
80.00<br />
2400.00<br />
2000.00<br />
Zoom selection = right click<br />
and drag<br />
Zoom out = double right click<br />
60.00<br />
Legend, shows<br />
label, units, and<br />
axis<br />
40.00<br />
1600.00<br />
20.00<br />
Second y-Axis<br />
1200.00<br />
800.00<br />
0<br />
-20.00<br />
Cycle move<br />
forward, cycle move<br />
backward buttons.<br />
-40.00<br />
400.00<br />
Graphical data<br />
-60.00<br />
>>><br />
0<br />
-80.00<br />
14 15 16 17 18 19 20 21 22 23 Cycle No.: 1<br />
Figure 7.1: Typical time based y(t) graph<br />
Time [s]<br />
Vertical dashed bars for<br />
drift compensation,<br />
cursor, or mean value<br />
calculations.<br />
Current cycle number<br />
7.2 Language Selection<br />
Each supported language that is installed is available to the<br />
user by pressing Ctrl+Alt+S then selecting the language<br />
002-195Ae-06.02 (B19.2825Ae) Page 63
Dynoware Type 2825A1-2<br />
from the choices presented. The new language is loaded<br />
next time the application is started.<br />
7.3 Shortcut Key Summary<br />
Key<br />
F1<br />
Alt+D<br />
Alt+E<br />
Alt+H<br />
Alt+S<br />
Ctrl+Alt+S<br />
Ctrl+P<br />
Ctrl+L<br />
Ctrl+TAB<br />
Ctrl+SHIFT+TAB<br />
Right Mouse Drag<br />
on graph<br />
Right Mouse<br />
Double Click on<br />
graph<br />
Command<br />
Help<br />
View → Documentation<br />
Acquisition → Edit<br />
Acquisition → Hardware<br />
Acquisition → Start<br />
Select Language<br />
Print Report<br />
Report Layout (not documented)<br />
Cycle through Open Windows (forwards)<br />
Cycle through Open Windows (backwards)<br />
Zoom In on graph<br />
Zoom Out (if previously zoomed in)<br />
7.4 Modifying the Report Logo<br />
If you want to modify the report print-out to have your<br />
companies logo perform the following steps:<br />
1.) Use Notepad to Edit the "DynoWare_20.ini" file.<br />
Open the file C:\Windows\dynoware_20.ini (for<br />
Windows 95 or Windows 98) or C:\Winnt\dynoware_20.ini<br />
(for Windows NT or Windows 2000),<br />
respectively.<br />
2.) Add the logo image file to Dynoware.<br />
In the [dynoware_20] section, add (or edit) the<br />
logo={drive:\path\file} command to add the image<br />
file you to appear on the report. In the example<br />
below, mylogo.bmp will appear on the report.<br />
Figure 7.2: Adding the report logo file<br />
Notes:<br />
The image file extension does not need to be entered.<br />
DynoWare will search for "bmp", "wmf", "pcx", "tif" and<br />
"jpg" image extensions automatically (and supports these<br />
types of images). The recommended image size is 362<br />
(width) by 67 (height) pixels. Images will be scaled to fit<br />
Page 64<br />
002-195Ae-06.02 (B19.2825Ae)
Appendix<br />
and centered in the logo area of the report. The default<br />
logo "prnlogo.bmp" that appears in the DynoWare<br />
directory can be used as an example logo. Copy the file<br />
and edit for the desired logo.<br />
7.5 Example Files<br />
Filename<br />
Bohren LW 13.dwd<br />
Messdat2.dwd<br />
Swept_sine.dwd<br />
Frasen_15000rpm_2.dwd<br />
5A-Fraesen_Aussen_2.dwd<br />
Description<br />
1 channel Swept sine wave for filter experimentation<br />
002-195Ae-06.02 (B19.2825Ae) Page 65
Dynoware Type 2825A1-2<br />
7.6 Index<br />
5<br />
5011 ............................................................34<br />
5015 ............................................................34<br />
5017 ............................................................30<br />
5019 ............................................................30<br />
5223 ............................................................36<br />
5237 ............................................................38<br />
A<br />
About...........................................................62<br />
Acquisition ...................................................28<br />
C<br />
Channels ......................................................40<br />
Charge amplifiers..........................................19<br />
Clipboard, Copy to........................................28<br />
Comments....................................................46<br />
Computer specifications ................................12<br />
Configuration ...............................................24<br />
Connecting the cables...................................18<br />
Cursor ..........................................................49<br />
D<br />
Data acquisition board ..................................14<br />
Data manipulation ........................................42<br />
Digital high pass ...........................................56<br />
Digital low pass.............................................56<br />
Documentation.............................................47<br />
E<br />
e-mail address ................................................6<br />
Exit ..............................................................28<br />
Export….......................................................24<br />
F<br />
File menu .....................................................23<br />
G<br />
Graph...........................................................63<br />
Grid..............................................................50<br />
H<br />
Hardware .....................................................28<br />
HASP key .....................................................14<br />
Help.....................................................5, 6, 10<br />
Help menu ...................................................61<br />
I<br />
Instacal.........................................................16<br />
Installation of A/D board...............................15<br />
Installing.......................................................13<br />
L<br />
Language .....................................................63<br />
License agreement ..........................................7<br />
Logo ............................................................64<br />
M<br />
M.U. ............................................................30<br />
Mean value ..................................................51<br />
Moving mean...............................................55<br />
Moving median ............................................56<br />
Multicomponent measurement......................31<br />
O<br />
Open ...........................................................23<br />
Operator ......................................................60<br />
Oscilloscope .................................................59<br />
Other amplifiers............................................35<br />
Overwrite file cycle data................................57<br />
P<br />
Password......................................................60<br />
PC-CARD-DAS16/16....................................15<br />
PCIM-DAS1602/16 ......................................15<br />
Print preview ................................................26<br />
Print setup ...................................................28<br />
Q<br />
Quick start ...................................................20<br />
S<br />
Shortcut key .................................................64<br />
Page 66<br />
002-195Ae-06.02 (B19.2825Ae)
Appendix<br />
Signal drift compensation ..............................53<br />
Smoothing....................................................55<br />
Software installation......................................13<br />
Start .............................................................43<br />
Status bar .....................................................51<br />
superimposed ...............................................45<br />
Supervisor.....................................................60<br />
T<br />
Toolbar.........................................................50<br />
Tools menu...................................................58<br />
Trigger .........................................................40<br />
U<br />
User mode....................................................60<br />
V<br />
View edit......................................................45<br />
View setup ...................................................46<br />
Voltmeter .....................................................58<br />
W<br />
Warranty....................................................... 7<br />
Window menu..............................................61<br />
Z<br />
Zoom ...........................................................48<br />
002-195Ae-06.02 (B19.2825Ae) Page 67