TM 6.0 Manual in *.PDF format - ThinManager
TM 6.0 Manual in *.PDF format - ThinManager
TM 6.0 Manual in *.PDF format - ThinManager

You also want an ePaper? Increase the reach of your titles
YUMPU automatically turns print PDFs into web optimized ePapers that Google loves.
Automation Control Products<br />
Th<strong>in</strong>Manager <strong>6.0</strong><br />
Help <strong>Manual</strong><br />
By the ACP Technical Staff<br />
May 1, 2012<br />
Atlanta, Georgia, USA
Contents<br />
1 Introduction 11<br />
1.1 Documentation Contents ............................................................................... 11<br />
1.2 ACP Th<strong>in</strong>Manager <strong>6.0</strong> ................................................................................... 12<br />
1.3 What is New <strong>in</strong> Th<strong>in</strong>Manager <strong>6.0</strong> ................................................................. 13<br />
1.4 Evolution of Th<strong>in</strong>Manager Term<strong>in</strong>ology ......................................................... 14<br />
1.4.1 Essential Th<strong>in</strong>Manager Functionality ................................................. 14<br />
1.4.2 The Client/Server Relationship <strong>in</strong> Term<strong>in</strong>al Services ........................ 14<br />
1.4.3 Hardware Configuration Tool ............................................................. 14<br />
1.4.4 Wizards .............................................................................................. 15<br />
1.4.5 Term<strong>in</strong>al Server Groups ..................................................................... 16<br />
1.4.6 Application Groups ............................................................................. 17<br />
1.4.7 Display Servers and Display Clients .................................................. 18<br />
2 System Overview 20<br />
2.1 Quick Start Checklist ...................................................................................... 20<br />
2.2 Required Components ................................................................................... 21<br />
2.2.1 W<strong>in</strong>dows Term<strong>in</strong>al Server Operat<strong>in</strong>g System .................................... 21<br />
2.2.2 Client Communication Protocol ......................................................... 21<br />
2.2.3 Th<strong>in</strong>Manager Adm<strong>in</strong>istrative Software ............................................... 21<br />
2.2.4 Th<strong>in</strong>Manager Ready Th<strong>in</strong> Client Hardware ....................................... 22<br />
2.2.5 Th<strong>in</strong>Manager Compatible Th<strong>in</strong> Client Hardware ............................... 22<br />
2.3 Connection Overview ..................................................................................... 23<br />
2.4 Failover Overview .......................................................................................... 23<br />
2.5 MultiSession Overview ................................................................................... 25<br />
2.6 MultiMonitor Overview ................................................................................... 25<br />
2.7 TermSecure Overview ................................................................................... 26<br />
2.8 PXE Boot Overview ....................................................................................... 26<br />
3 Installation of Th<strong>in</strong>Manager 27<br />
3.1 Standard Th<strong>in</strong>Manager Installation ................................................................ 27<br />
3.1.1 W<strong>in</strong>dows Server 2003 ........................................................................ 27<br />
3.1.2 W<strong>in</strong>dows Server 2008 ........................................................................ 36<br />
3.2 W<strong>in</strong><strong>TM</strong>C Installation ....................................................................................... 36<br />
4 Licens<strong>in</strong>g Th<strong>in</strong>Manager 44<br />
4.1 Th<strong>in</strong>Manager Licens<strong>in</strong>g .................................................................................. 44<br />
4.1.1 Standard Licens<strong>in</strong>g ............................................................................ 44<br />
4.1.2 XLi Licens<strong>in</strong>g ...................................................................................... 45<br />
4.1.3 Master License Advantages............................................................... 45<br />
4.2 License Activation .......................................................................................... 45<br />
4.3 Add<strong>in</strong>g a Master License to Th<strong>in</strong>Manager ..................................................... 59<br />
4.3.1 Delete License ................................................................................... 61<br />
4.3.2 License Details ................................................................................... 61<br />
4.3.3 Install Demo Code ............................................................................. 62<br />
iii Contents
4.3.4 Show Old Licenses ............................................................................ 63<br />
4.4 W<strong>in</strong><strong>TM</strong>C Licenses .......................................................................................... 63<br />
4.5 TermSecure Licenses .................................................................................... 63<br />
4.6 Upgrad<strong>in</strong>g to Th<strong>in</strong>Manager 5 from Older Th<strong>in</strong>Manager versions .................. 64<br />
5 Redundant Th<strong>in</strong>Manager Servers 65<br />
5.1 Redundancy Overview ................................................................................... 65<br />
5.1.1 Redundancy Differences .................................................................... 66<br />
5.2 Creat<strong>in</strong>g a Redundant Pair of Th<strong>in</strong>Manager Servers .................................... 66<br />
5.3 Creat<strong>in</strong>g Mirrored Redundancy ...................................................................... 67<br />
6 Th<strong>in</strong>Manager Interface 68<br />
6.1 Open<strong>in</strong>g Th<strong>in</strong>Manager ................................................................................... 68<br />
6.2 Th<strong>in</strong>Manager Graphic User Interface ............................................................ 69<br />
6.3 Tree Pane ...................................................................................................... 70<br />
6.4 Icons ............................................................................................................... 71<br />
6.4.1 Tree Icons .......................................................................................... 71<br />
6.5 Details Pane ................................................................................................... 79<br />
6.5.1 Th<strong>in</strong>Manager Server Detail Tabs ....................................................... 79<br />
6.5.2 Term<strong>in</strong>al Group Detail Tabs ............................................................... 80<br />
6.5.3 Term<strong>in</strong>al Detail Tabs .......................................................................... 81<br />
6.5.4 Term<strong>in</strong>al Server Detail Tabs .............................................................. 82<br />
6.5.5 Modify<strong>in</strong>g a Term<strong>in</strong>al .......................................................................... 84<br />
6.5.6 Delet<strong>in</strong>g a Term<strong>in</strong>al ............................................................................ 85<br />
6.5.7 Restart<strong>in</strong>g a Term<strong>in</strong>al ......................................................................... 85<br />
6.5.8 Reboot<strong>in</strong>g a Term<strong>in</strong>al ......................................................................... 85<br />
6.5.9 Renam<strong>in</strong>g a Term<strong>in</strong>al ......................................................................... 85<br />
7 Menu Items 87<br />
7.1 Edit ................................................................................................................. 87<br />
7.1.1 Add Term<strong>in</strong>al ...................................................................................... 87<br />
7.1.2 Add Term<strong>in</strong>al Group ........................................................................... 87<br />
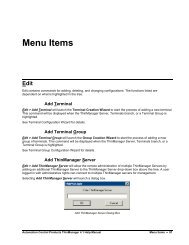
7.1.3 Add Th<strong>in</strong>Manager Server ................................................................... 87<br />
7.1.4 Remove Th<strong>in</strong>Manager Server ............................................................ 89<br />
7.1.5 Delete ................................................................................................. 90<br />
7.1.6 Modify ................................................................................................. 90<br />
7.1.7 Rename.............................................................................................. 90<br />
7.1.8 Lock .................................................................................................... 91<br />
7.1.9 Unlock ................................................................................................ 91<br />
7.1.10 F<strong>in</strong>d .................................................................................................. 91<br />
7.1.11 F<strong>in</strong>d Next .......................................................................................... 92<br />
7.2 Manage .......................................................................................................... 92<br />
7.2.1 Th<strong>in</strong>Manager Server List .................................................................... 92<br />
7.2.2 TermSecure Access Groups .............................................................. 92<br />
7.2.3 Packages ........................................................................................... 94<br />
7.2.4 Web Management .............................................................................. 95<br />
7.2.5 DNS Configuration ............................................................................. 96<br />
7.2.6 PXE Server ........................................................................................ 96<br />
7.2.7 Configure Default Term<strong>in</strong>al ................................................................ 96<br />
7.2.8 Restore Configuration ........................................................................ 97<br />
7.2.9 Backup Configuration ......................................................................... 98<br />
7.2.10 Synchronize Configuration ............................................................... 98<br />
7.2.11 Reconnect ........................................................................................ 99<br />
7.2.12 Disconnect ....................................................................................... 99<br />
iv Contents ACP Th<strong>in</strong>Manager <strong>6.0</strong>
7.3 Install .............................................................................................................. 99<br />
7.3.1 Licenses ............................................................................................. 99<br />
7.3.2 TermCap Database .......................................................................... 100<br />
7.3.3 Firmware Package ........................................................................... 102<br />
7.3.4 Firmware .......................................................................................... 103<br />
7.3.5 Boot Loader ..................................................................................... 104<br />
7.3.6 Cha<strong>in</strong> Loader ................................................................................... 105<br />
7.3.7 Modules............................................................................................ 106<br />
7.3.8 Reports (Installation)........................................................................ 108<br />
7.4 Tools ............................................................................................................ 111<br />
7.4.1 Restart Term<strong>in</strong>als ............................................................................. 111<br />
7.4.2 Reboot Term<strong>in</strong>als ............................................................................. 111<br />
7.4.3 Reboot Term<strong>in</strong>al Server ................................................................... 111<br />
7.4.4 Disable Term<strong>in</strong>als ............................................................................ 112<br />
7.4.5 Enable Term<strong>in</strong>als ............................................................................. 113<br />
7.4.6 Disable Term<strong>in</strong>al Server .................................................................. 113<br />
7.4.7 Enable Term<strong>in</strong>al Server ................................................................... 114<br />
7.4.8 Calibrate Touch Screen ................................................................... 114<br />
7.4.9 Send Message ................................................................................. 115<br />
7.4.10 Clear Event Log ............................................................................. 116<br />
7.5 View ............................................................................................................. 116<br />
7.5.1 Status Bar ........................................................................................ 116<br />
7.5.2 Show Connected Only ..................................................................... 116<br />
7.5.3 Reports (Selection) .......................................................................... 116<br />
7.5.4 Pr<strong>in</strong>t .................................................................................................. 117<br />
7.5.5 Options ............................................................................................. 118<br />
7.6 RemoteView ................................................................................................. 118<br />
7.6.1 Interactive Shadow .......................................................................... 118<br />
7.6.2 Scaled to W<strong>in</strong>dow ............................................................................ 119<br />
7.6.3 Go FullScreen .................................................................................. 119<br />
7.6.4 Connect Options .............................................................................. 119<br />
7.6.5 Send Key ......................................................................................... 120<br />
7.7 Help .............................................................................................................. 120<br />
7.7.1 Help Topics ...................................................................................... 120<br />
7.7.2 About Th<strong>in</strong>Manager… ...................................................................... 120<br />
7.8 Right Click Menus <strong>in</strong> the Tree Pane ............................................................ 121<br />
7.8.1 Right Click on the Th<strong>in</strong>Manager Server Icon ................................... 121<br />
7.8.2 Right Click on the Term<strong>in</strong>als Branch Icon ........................................ 121<br />
7.8.3 Right Click on a Term<strong>in</strong>al Group Icon .............................................. 121<br />
7.8.4 Right Click on a Term<strong>in</strong>al Icon ......................................................... 122<br />
7.8.5 Right Click on the Display Servers Term<strong>in</strong>al Servers Branch Icon .. 122<br />
7.8.6 Right Click on a Term<strong>in</strong>al Server Icon ............................................. 122<br />
7.8.7 Right Click on the Display Servers Cameras Branch Icon .............. 123<br />
7.8.8 Right Click on a Camera Icon .......................................................... 123<br />
7.8.9 Right Click on the VCenter Servers Branch Icon ............................. 123<br />
7.8.10 Right Click on the Display Client Branch Icon ............................... 124<br />
7.8.11 Right Click on a Display Client Member Icon................................. 124<br />
7.8.12 Right Click on the TermSecure Users Branch ............................... 125<br />
7.8.13 Right Click on a TermSecure Users Group Icon ........................... 125<br />
7.8.14 Right Click on a TermSecure Users Icon ....................................... 126<br />
8 Add<strong>in</strong>g Th<strong>in</strong> Client Hardware 127<br />
8.1 The Boot Process ........................................................................................ 127<br />
8.2 IP Address Assignment ................................................................................ 128<br />
8.2.1 DHCP ............................................................................................... 128<br />
ACP Th<strong>in</strong>Manager <strong>6.0</strong><br />
Contents v
8.2.2 Static IP ............................................................................................ 130<br />
8.2.3 Hybrid IP Address<strong>in</strong>g ....................................................................... 131<br />
8.3 Configur<strong>in</strong>g New Hardware .......................................................................... 133<br />
8.4 Create New Term<strong>in</strong>al Mode ......................................................................... 133<br />
8.5 Replace or Create New Term<strong>in</strong>al Mode ...................................................... 133<br />
8.6 Auto-Creation of Term<strong>in</strong>als .......................................................................... 134<br />
8.6.1 Enabl<strong>in</strong>g AutoCreate ........................................................................ 134<br />
8.6.2 Configur<strong>in</strong>g Default Term<strong>in</strong>al ........................................................... 135<br />
9 Configuration Wizards 138<br />
9.1 Introduction to Wizards ................................................................................ 138<br />
9.1.1 List Wizards ..................................................................................... 139<br />
9.1.2 Configuration Wizards ...................................................................... 139<br />
9.2 Th<strong>in</strong>Manager Server List .............................................................................. 141<br />
9.2.2 Automatic Synchronization .............................................................. 143<br />
9.2.3 Def<strong>in</strong><strong>in</strong>g Th<strong>in</strong>Manager Servers for <strong>Manual</strong> Synchronization ........... 147<br />
9.2.4 <strong>Manual</strong> Synchronization ................................................................... 149<br />
9.3 Th<strong>in</strong>Manager Server Configuration Wizard ................................................. 153<br />
9.4 DNS Configuration ....................................................................................... 171<br />
10 Term<strong>in</strong>al Configuration 174<br />
10.1 Term<strong>in</strong>al Configuration Wizard .................................................................... 174<br />
10.1.2 Term<strong>in</strong>als Us<strong>in</strong>g Individual Term<strong>in</strong>al Servers ................................ 184<br />
10.1.3 Term<strong>in</strong>als Us<strong>in</strong>g Display Clients .................................................... 188<br />
10.1.4 Display Client Selection ................................................................. 188<br />
10.1.5 Cont<strong>in</strong>uation of the Term<strong>in</strong>al Configuration ................................... 197<br />
11 PXE Server Configuration 212<br />
11.1 Overview ...................................................................................................... 212<br />
11.2 Th<strong>in</strong> Client Hardware Requirements ............................................................ 212<br />
11.3 Methods of Operation .................................................................................. 212<br />
11.3.1 Th<strong>in</strong>Manager Only Method ............................................................ 212<br />
11.3.2 Th<strong>in</strong>Manager Proxy Method .......................................................... 212<br />
11.3.3 Stand-Alone DHCP Server Method ............................................... 212<br />
11.4 PXE Server Configuration Wizard ............................................................... 213<br />
11.4.1 Enabl<strong>in</strong>g the Th<strong>in</strong>Manager PXE Server ......................................... 213<br />
11.4.2 Network Interface Configuration .................................................... 214<br />
11.4.3 Network Interface Configuration for Synchronized Th<strong>in</strong>Manager<br />
Servers 215<br />
11.4.4 IP Address Range Configuration ................................................... 216<br />
11.4.5 Exclusions ...................................................................................... 218<br />
11.4.6 Reservations .................................................................................. 219<br />
11.5 Term<strong>in</strong>al Group Configuration Wizard ......................................................... 220<br />
11.5.2 Chang<strong>in</strong>g a Term<strong>in</strong>al’s Group ........................................................ 224<br />
11.5.3 Unique Group Configurations ........................................................ 227<br />
12 Display Servers 233<br />
12.1 Term<strong>in</strong>al Services Display Servers .............................................................. 233<br />
12.2 Camera Configuration Wizard ...................................................................... 242<br />
12.2.2 IP Camera Group Configuration .................................................... 246<br />
12.2.3 IP Camera Adm<strong>in</strong>istration .............................................................. 248<br />
13 Display Clients 249<br />
vi Contents ACP Th<strong>in</strong>Manager <strong>6.0</strong>
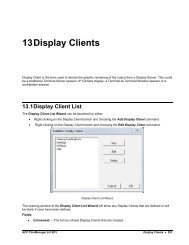
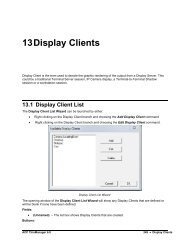
13.1 Display Client List ........................................................................................ 249<br />
13.2 Term<strong>in</strong>al Services Display Clients ............................................................... 252<br />
13.3 Camera Display Clients ............................................................................... 262<br />
13.3.2 Add<strong>in</strong>g a Camera Overlay to a Display Client ............................... 274<br />
13.3.3 Camera Overlays and TermMon ActiveX Control ......................... 277<br />
13.4 Term<strong>in</strong>al Shadow Display Clients ................................................................ 278<br />
14 Failover and Instant Failover 286<br />
14.1 Failover Introduction .................................................................................... 286<br />
14.2 Failover ........................................................................................................ 286<br />
14.2.1 Failover Setup <strong>in</strong> Term<strong>in</strong>al Services Display Clients ..................... 288<br />
14.3 Instant Failover ............................................................................................ 291<br />
14.4 Instant Failover Configuration ...................................................................... 293<br />
14.4.1 Instant Failover Setup <strong>in</strong> Term<strong>in</strong>al Services Display Clients ......... 293<br />
14.4.2 Switch<strong>in</strong>g Between Sessions with Display Clients ........................ 296<br />
14.4.3 Instant Failover Tree Icons ............................................................ 297<br />
15 Modules 299<br />
15.1 Module Overview ......................................................................................... 299<br />
15.1.1 Module List ..................................................................................... 299<br />
15.2 Install<strong>in</strong>g a Module ....................................................................................... 302<br />
15.3 Add<strong>in</strong>g a Module to a Group or Term<strong>in</strong>al ..................................................... 305<br />
15.4 Chang<strong>in</strong>g Module Parameters ..................................................................... 308<br />
15.5 Individual Module Details ............................................................................. 311<br />
15.6 ICA Modules................................................................................................. 311<br />
15.6.1 Citrix ICA UseAlternateAddress Module ........................................ 312<br />
15.6.2 Citrix ICA wfclient.<strong>in</strong>i Extension Module ........................................ 312<br />
15.7 Keyboard Modules ....................................................................................... 312<br />
15.7.1 Key Block Module .......................................................................... 312<br />
15.7.2 Key Block S<strong>in</strong>gle Key Module ........................................................ 313<br />
15.7.3 Keyboard Configuration Module .................................................... 313<br />
15.8 Local Storage Modules ................................................................................ 314<br />
15.8.1 USB Flash Drive Module................................................................ 314<br />
15.8.2 USB Memory Card Reader Module ............................................... 315<br />
15.9 Miscellaneous Modules ................................................................................ 315<br />
15.9.1 Add Serial Port ............................................................................... 315<br />
15.9.2 Firmware Update (Disk On Chip / Compact Flash) Update<br />
Module 315<br />
15.9.3 Local Pr<strong>in</strong>t Module ......................................................................... 317<br />
15.9.4 MultiMonitor Module ....................................................................... 320<br />
15.9.5 Redundant Ethernet Module .......................................................... 320<br />
15.9.6 Second Network Module ................................................................ 320<br />
15.9.7 Term<strong>in</strong>al Shadow Module .............................................................. 321<br />
15.9.8 TermMon ActiveX Configuration Module ....................................... 321<br />
15.9.9 Term<strong>in</strong>al Shadow Module .............................................................. 321<br />
15.9.10 Time Zone Redirection Module .................................................... 322<br />
15.9.11 User Override Module .................................................................. 322<br />
15.10 Mouse Modules ............................................................................................ 323<br />
15.10.1 Mouse Configuration Module ....................................................... 323<br />
15.10.2 PS/2 Mouse Module ..................................................................... 324<br />
15.10.3 Serial Mouse Driver ..................................................................... 324<br />
15.10.4 Share Keyboard and Mouse Modules ......................................... 324<br />
15.11 RDP Modules ............................................................................................... 327<br />
15.11.1 RDP Experience Module.............................................................. 327<br />
ACP Th<strong>in</strong>Manager <strong>6.0</strong><br />
Contents vii
15.11.2 RDP Module for Th<strong>in</strong>Manager v2.4 and Older ............................ 328<br />
15.11.3 RDP Port Module ......................................................................... 328<br />
15.11.4 RDP Serial Port Redirection Module ........................................... 328<br />
15.11.5 RDP Session IP Module .............................................................. 331<br />
15.12 Screen Saver Modules ................................................................................. 332<br />
15.12.1 MultiSession Screen Saver Module ............................................. 332<br />
15.12.2 Screen Saver Module .................................................................. 333<br />
15.13 Sound Modules ............................................................................................ 334<br />
15.14 TermSecure Modules ................................................................................... 336<br />
15.14.1 RF Ideas pcProx Module ............................................................. 336<br />
15.14.2 RF Ideas pcProx USB Module ..................................................... 337<br />
15.14.3 TermMon ActiveX Configuration .................................................. 337<br />
15.14.4 USB Flash Drive Module.............................................................. 338<br />
15.14.5 Wavetrend Tag Reader ................................................................ 338<br />
15.15 Touch Screen Modules ................................................................................ 339<br />
15.15.1 USB Touch Screen Driver Module ............................................... 341<br />
15.16 Video Driver Modules ................................................................................... 342<br />
15.17 Advanced Modules ...................................................................................... 342<br />
15.17.1 ICA Client Version <strong>6.0</strong>/8.0/Citrix Receiver Version 12 ................. 342<br />
15.17.2 Instant Failover Module ................................................................ 343<br />
16 Citrix ICA 345<br />
16.1 Term<strong>in</strong>als Us<strong>in</strong>g Display Clients with ICA .................................................... 345<br />
16.2 Display Client Configuration Wizard ............................................................ 346<br />
16.2.2 Term<strong>in</strong>al Us<strong>in</strong>g Citrix and Individual Term<strong>in</strong>al Servers .................. 348<br />
17 Hotkeys 351<br />
17.1 Term<strong>in</strong>al Configuration Wizard Hotkeys Display Clients ............................. 351<br />
18 Multiple Monitors 361<br />
18.1 Introduction to Multiple Monitors .................................................................. 361<br />
18.2 Share Keyboard and Mouse Modules ......................................................... 361<br />
18.3 MultiMonitor.................................................................................................. 365<br />
19 Virtualization <strong>in</strong> Th<strong>in</strong>Manager 378<br />
19.1 Virtualization Overview ................................................................................ 378<br />
19.2 VCenter Servers .......................................................................................... 378<br />
19.2.2 VCenter Server Right-Click Menus ................................................ 382<br />
19.3 Virtual Term<strong>in</strong>al Servers .............................................................................. 385<br />
19.4 Virtual Workstations ..................................................................................... 388<br />
19.4.1 Workstation Display Clients ........................................................... 388<br />
19.4.2 Term<strong>in</strong>als and Virtual Workstations ............................................... 393<br />
20 Schedul<strong>in</strong>g 399<br />
20.1 Term<strong>in</strong>al Schedule ....................................................................................... 399<br />
20.2 Term<strong>in</strong>al Server Schedule ........................................................................... 402<br />
20.3 Th<strong>in</strong>Manager Server Schedule .................................................................... 405<br />
20.4 TermSecure User Schedule ......................................................................... 410<br />
21 Reports 413<br />
21.1 Reports Overview ........................................................................................ 413<br />
viii Contents ACP Th<strong>in</strong>Manager <strong>6.0</strong>
21.2 Report Template Installation ........................................................................ 413<br />
21.3 Select<strong>in</strong>g Reports ......................................................................................... 415<br />
21.4 Report Tab ................................................................................................... 417<br />
21.5 Pr<strong>in</strong>t Report .................................................................................................. 418<br />
21.6 Schedul<strong>in</strong>g Reports ...................................................................................... 419<br />
21.7 Chang<strong>in</strong>g the Report Logo ........................................................................... 424<br />
22 W<strong>in</strong><strong>TM</strong>C Fat Client 425<br />
22.1 W<strong>in</strong><strong>TM</strong>C Overview ....................................................................................... 425<br />
22.2 Local W<strong>in</strong><strong>TM</strong>C Configuration ....................................................................... 425<br />
22.3 W<strong>in</strong><strong>TM</strong>C Configuration <strong>in</strong> Th<strong>in</strong>Manager ...................................................... 428<br />
22.3.2 MultiMonitor W<strong>in</strong><strong>TM</strong>C .................................................................... 431<br />
22.3.3 W<strong>in</strong><strong>TM</strong>C Modules .......................................................................... 432<br />
22.3.4 W<strong>in</strong><strong>TM</strong>C Licens<strong>in</strong>g ......................................................................... 432<br />
23 Shadow<strong>in</strong>g 433<br />
23.1 Th<strong>in</strong>Manager Shadow .................................................................................. 433<br />
23.1.1 Shadow Access ............................................................................. 434<br />
23.1.2 Configure Shadow<strong>in</strong>g ..................................................................... 435<br />
23.1.3 Shadow Keystrokes ....................................................................... 436<br />
23.1.4 Term<strong>in</strong>al-to-Term<strong>in</strong>al Shadow<strong>in</strong>g ................................................... 436<br />
24 Th<strong>in</strong>Manager Security 443<br />
24.1 Th<strong>in</strong>Manager Security Groups ..................................................................... 443<br />
24.2 Th<strong>in</strong>Manager Server Security ...................................................................... 447<br />
24.2.1 W<strong>in</strong>dows Security .......................................................................... 449<br />
25 TermSecure 450<br />
25.1 TermSecure Overview ................................................................................. 450<br />
25.2 Users Types ................................................................................................. 451<br />
25.2.1 W<strong>in</strong>dows Users .............................................................................. 451<br />
25.2.2 TermSecure Users ......................................................................... 451<br />
25.2.3 Th<strong>in</strong>Manager Security Group Users .............................................. 451<br />
25.3 Deploy<strong>in</strong>g TermSecure ................................................................................ 452<br />
26 Permissions 453<br />
26.1 Creat<strong>in</strong>g Permissions Groups ...................................................................... 453<br />
26.2 Permission Groups for Term<strong>in</strong>als ................................................................ 456<br />
26.3 Permission Groups for Display Clients ........................................................ 458<br />
26.4 Permission Groups for TermSecure Users .................................................. 460<br />
26.5 Shortcut Method of Add<strong>in</strong>g TermSecure Access Groups ............................ 467<br />
26.6 TermSecure User Configuration Wizard ...................................................... 472<br />
26.7 TermSecure Users Group Configuration Wizard ......................................... 487<br />
26.8 Add<strong>in</strong>g a TermSecure User to the TermSecure User Group ....................... 490<br />
26.9 TermSecure Log<strong>in</strong> ....................................................................................... 495<br />
26.9.1 Logg<strong>in</strong>g Out ................................................................................... 497<br />
26.10 TermSecure Menu ....................................................................................... 497<br />
26.11 Card and Badge Configuration for a TermSecure User .............................. 503<br />
26.11.1 Automatic Card/Badge ID Number Entry ..................................... 504<br />
26.11.2 <strong>Manual</strong> Card/Badge ID Number Entry ......................................... 509<br />
27 TermMon ActiveX Control 514<br />
ACP Th<strong>in</strong>Manager <strong>6.0</strong><br />
Contents ix
27.1 Register<strong>in</strong>g the Control ................................................................................ 514<br />
27.2 Us<strong>in</strong>g the Control ......................................................................................... 514<br />
27.2.1 TermMon ActiveX Configuration Module ....................................... 514<br />
27.2.2 Read-Only Properties .................................................................... 514<br />
27.2.3 Read-Write Properties ................................................................... 515<br />
27.2.4 Events ............................................................................................ 515<br />
27.2.5 Methods ......................................................................................... 516<br />
27.2.6 Control Constants .......................................................................... 520<br />
27.3 TermMon ActiveX Demo Application ........................................................... 521<br />
28 Non-Th<strong>in</strong>Manager Components 523<br />
28.1 W<strong>in</strong>dows Server 2003 .................................................................................. 523<br />
28.1.1 Install<strong>in</strong>g Term<strong>in</strong>al Services ........................................................... 523<br />
28.2 Creat<strong>in</strong>g Microsoft User Profiles .................................................................. 526<br />
28.3 Software Installation On W<strong>in</strong>dows 2003 ...................................................... 528<br />
28.3.1 Term<strong>in</strong>al Services Configuration .................................................... 531<br />
28.3.2 Term<strong>in</strong>al Services Connections ..................................................... 531<br />
28.3.3 Term<strong>in</strong>al Services Connections ..................................................... 537<br />
28.3.4 Licens<strong>in</strong>g Mode .............................................................................. 538<br />
28.3.5 Permission Compatibility................................................................ 539<br />
28.3.6 Restrict Each User to a S<strong>in</strong>gle Session ......................................... 540<br />
28.3.7 License Server Discovery Mode .................................................... 540<br />
28.4 W<strong>in</strong>dows 2008 Server .................................................................................. 542<br />
28.4.1 Add<strong>in</strong>g Term<strong>in</strong>al Server Role ......................................................... 542<br />
28.4.2 Add<strong>in</strong>g Applications <strong>in</strong> W<strong>in</strong>dows 2008 ........................................... 547<br />
28.4.3 Create Users .................................................................................. 548<br />
28.4.4 Allow<strong>in</strong>g Application Access .......................................................... 548<br />
28.4.5 Install<strong>in</strong>g Th<strong>in</strong>Manager ................................................................... 552<br />
28.4.6 Allow Inbound Traffic to Firewall .................................................... 553<br />
28.4.7 Local Security Policy – User Access Controls ............................... 561<br />
28.5 Command Prompt ........................................................................................ 562<br />
28.6 Alternative Term<strong>in</strong>al Keystrokes .................................................................. 563<br />
28.7 DHCP Server Setup ..................................................................................... 564<br />
28.8 Group Policy................................................................................................. 566<br />
28.9 Microsoft Licenses ....................................................................................... 567<br />
28.9.1 Microsoft Client Access Licenses (CALs)...................................... 567<br />
28.9.2 Microsoft Term<strong>in</strong>al Server Licenses .............................................. 567<br />
28.9.3 Microsoft Term<strong>in</strong>al Server Licens<strong>in</strong>g Activation ............................. 568<br />
29 Th<strong>in</strong>Manager Troubleshoot<strong>in</strong>g Guide 569<br />
29.1 Section 1 - From Power on to Term<strong>in</strong>al Server Log<strong>in</strong> ................................. 569<br />
29.2 Section 2 - Th<strong>in</strong> Client is Booted, Connected, and Runn<strong>in</strong>g a Session on<br />
the Term<strong>in</strong>al Server .................................................................................................. 572<br />
30 Index 574<br />
x Contents ACP Th<strong>in</strong>Manager <strong>6.0</strong>
1 Introduction<br />
1.1 Documentation Contents<br />
This documentation covers the follow<strong>in</strong>g topics:<br />
What is New <strong>in</strong> Th<strong>in</strong>Manager <strong>6.0</strong><br />
A Quick Start Checklist<br />
Standard Th<strong>in</strong>Manager Installation<br />
Th<strong>in</strong>Manager Licens<strong>in</strong>g<br />
Redundancy<br />
The Th<strong>in</strong>Manager Interface<br />
The Menu items<br />
Add<strong>in</strong>g th<strong>in</strong> client hardware<br />
Configuration Wizards<br />
The Term<strong>in</strong>al Configuration Wizard<br />
The PXE Server Configuration Wizard<br />
Display Servers<br />
Display Clients (formerly Term<strong>in</strong>al Server Groups and Application Groups)<br />
Failover and Instant Failover<br />
Modules<br />
Citrix ICA<br />
Hotkeys<br />
MultiMonitor<br />
Reports<br />
W<strong>in</strong><strong>TM</strong>C<br />
Shadow<strong>in</strong>g<br />
Th<strong>in</strong>Manager Security<br />
TermSecure<br />
TermMon ActiveX Control<br />
A Th<strong>in</strong>Manager Troubleshoot<strong>in</strong>g Guide to aid <strong>in</strong> deployment<br />
ACP Th<strong>in</strong>Manager <strong>6.0</strong><br />
11 Introduction
1.2 ACP Th<strong>in</strong>Manager <strong>6.0</strong><br />
Th<strong>in</strong>Manager is a server-side configuration, management, and hardware enabl<strong>in</strong>g software for Term<strong>in</strong>al<br />
Services based th<strong>in</strong> client systems.<br />
Th<strong>in</strong>Manager is a software program that allows th<strong>in</strong> clients to boot, receive a configuration, and connect<br />
to a term<strong>in</strong>al server. Th<strong>in</strong>Manager provides term<strong>in</strong>al configuration, session management, and session<br />
status monitor<strong>in</strong>g. ACP Th<strong>in</strong>Manager provides quick replacement of term<strong>in</strong>als and an almost seamless<br />
switch from term<strong>in</strong>al server to term<strong>in</strong>al server <strong>in</strong> case of term<strong>in</strong>al server failure.<br />
A th<strong>in</strong> client is a device that connects to a server, logs onto a separate <strong>in</strong>dependent session, and runs its<br />
applications on the server and not locally on the th<strong>in</strong> client. Th<strong>in</strong> Clients first connect to a Th<strong>in</strong>Manager<br />
Server where it receives its configuration. This configuration sends the term<strong>in</strong>al to a term<strong>in</strong>al server where<br />
it logs <strong>in</strong>.<br />
Note: The terms Th<strong>in</strong> Client and Term<strong>in</strong>al are used <strong>in</strong>terchangeably <strong>in</strong> this document.<br />
The keystrokes and mouse movements from the th<strong>in</strong> client are sent to the term<strong>in</strong>al server. The term<strong>in</strong>al<br />
server session determ<strong>in</strong>es the response and sends the screen display back to the term<strong>in</strong>al. This<br />
simplifies ma<strong>in</strong>tenance and management by elim<strong>in</strong>at<strong>in</strong>g the need to <strong>in</strong>stall and configure operat<strong>in</strong>g<br />
systems and applications on the th<strong>in</strong> client. All configuration, management, <strong>in</strong>stallation and applications<br />
are on the server, not the th<strong>in</strong> client.<br />
Note: All trademarks, service marks, and copyrights belong to their respective companies.<br />
Microsoft, W<strong>in</strong>dows, W<strong>in</strong>dows XP, W<strong>in</strong>dows 2000, W<strong>in</strong>dows 2000 Server, W<strong>in</strong>dows 2003, W<strong>in</strong>dows<br />
2003, Server W<strong>in</strong>dows 2008, and W<strong>in</strong>dows 2008 Server are trademarks of the Microsoft Corporation,<br />
Redmond, Wash<strong>in</strong>gton.<br />
Citrix, ICA, and Citrix Device Services are trademarks of Citrix Systems, Fort Lauderdale, Florida.<br />
ESX and vCenter is a trademark of the VMware Company, Palo Alto, California.<br />
ACP, ACP Enabled, AppL<strong>in</strong>k, MultiSession, MultiMonitor, SmartSession, SessionTil<strong>in</strong>g,<br />
TermSecure, Th<strong>in</strong>Manager, Th<strong>in</strong>Manager Ready, and Th<strong>in</strong>Server, are trademarks of Automation<br />
Control Products, Atlanta, Georgia.<br />
12 Introduction ACP Th<strong>in</strong>Manager <strong>6.0</strong>
1.3 What is New <strong>in</strong> Th<strong>in</strong>Manager <strong>6.0</strong><br />
New – Firmware Packages<br />
Th<strong>in</strong>Manager <strong>6.0</strong> <strong>in</strong>troduces the deployment of the firmware and modules as a package. Different<br />
versions of the package can be assigned to <strong>in</strong>dividual modules. This allows legacy hardware to keep a<br />
version that works for it while new hardware can use newer package versions to take advantage of new<br />
features.<br />
See Packages for details.<br />
New – Menu Items<br />
Th<strong>in</strong>Manager <strong>6.0</strong> <strong>in</strong>cludes new menu items to support the use of Firmware Packages. These <strong>in</strong>clude<br />
Manage>Packages, Install>Firmware Packages, Install>Boot Loader, and Install>Cha<strong>in</strong> Loader.<br />
New – Term<strong>in</strong>al Description Field<br />
Th<strong>in</strong>Manager <strong>6.0</strong> adds a Description field to the Term<strong>in</strong>al Configuration so that additional <strong>in</strong>fo can be<br />
assigned to a term<strong>in</strong>al.<br />
See Term<strong>in</strong>al Description for details.<br />
New – USB to VGA MultiMonitor Support<br />
Th<strong>in</strong>Manager <strong>6.0</strong> supports a USB to VGA converter to turn s<strong>in</strong>gle monitor th<strong>in</strong> clients <strong>in</strong>to MultiMonitor<br />
th<strong>in</strong> clients.<br />
See www.th<strong>in</strong>manager.com for details.<br />
New – i<strong>TM</strong>C iPad<br />
Th<strong>in</strong>Manager <strong>6.0</strong> supports the new Th<strong>in</strong>Manager iPad client. This will turn an iPad <strong>in</strong>to a mobile term<strong>in</strong>al<br />
complete with Display Client application deployment, MultiSession, and Failover.<br />
See www.th<strong>in</strong>manager.com for details.<br />
New – Subscription Licens<strong>in</strong>g<br />
Th<strong>in</strong>Manager <strong>6.0</strong> <strong>in</strong>troduces subscription based licens<strong>in</strong>g.<br />
See www.th<strong>in</strong>manager.com for details.<br />
New – Web Th<strong>in</strong>Manager Access<br />
Screentronix provides a secure VPN that allows you to connect to a Th<strong>in</strong>Manager Server from a remote<br />
browser to aid <strong>in</strong> management.<br />
See Web Management for details.<br />
New – Block Mouse Button Functions<br />
The Mouse Configuration Module has the ability to lock down the mouse buttons, scroll buttons, and<br />
scroll wheel.<br />
See Mouse Configuration Module for details.<br />
ACP Th<strong>in</strong>Manager <strong>6.0</strong> Introduction 13
1.4 Evolution of Th<strong>in</strong>Manager Term<strong>in</strong>ology<br />
Th<strong>in</strong>Manager has evolved over the years lead<strong>in</strong>g to changes <strong>in</strong> term<strong>in</strong>ology and function.<br />
1.4.1 Essential Th<strong>in</strong>Manager Functionality<br />
The boot<strong>in</strong>g of a th<strong>in</strong> client is a two-step process:<br />
The th<strong>in</strong> client connects to Th<strong>in</strong>Manager to receive its configuration.<br />
This configuration sends the th<strong>in</strong> client to a term<strong>in</strong>al server to log<strong>in</strong> and run a session.<br />
The Th<strong>in</strong>Manager may be on the same physical computer as the term<strong>in</strong>al server or it may be on a<br />
different computer.<br />
1.4.2 The Client/Server Relationship <strong>in</strong> Term<strong>in</strong>al Services<br />
This is how the client/server relationship works <strong>in</strong> term<strong>in</strong>al services:<br />
The client (fat or th<strong>in</strong>) connects to a term<strong>in</strong>al server, logs on, and starts a session.<br />
The client sends mouse and keystrokes to the term<strong>in</strong>al server for process<strong>in</strong>g.<br />
The term<strong>in</strong>al server processes the <strong>in</strong>put, generates the correspond<strong>in</strong>g graphics, and sends<br />
the graphics calls to the client for display.<br />
The client displays the graphics locally for the user.<br />
1.4.3 Hardware Configuration Tool<br />
Early versions of Th<strong>in</strong>Manager functioned as a tool for configur<strong>in</strong>g the th<strong>in</strong> client hardware.<br />
14 Introduction ACP Th<strong>in</strong>Manager <strong>6.0</strong>
Th<strong>in</strong>Manager 2.3.1 Interface<br />
The status of the term<strong>in</strong>al was limited to <strong>in</strong>dicat<strong>in</strong>g if a term<strong>in</strong>al was on or off by use of green or red colors<br />
on the term<strong>in</strong>al icons.<br />
1.4.4 Wizards<br />
Configuration wizards were added <strong>in</strong> Th<strong>in</strong>Manager 2.4.<br />
Th<strong>in</strong>Manager 2.4 Interface<br />
The tree was expanded to show what term<strong>in</strong>al servers the term<strong>in</strong>als were assigned to. Green and red<br />
lightn<strong>in</strong>g bolts <strong>in</strong>dicated whether a term<strong>in</strong>al had an active connection to the term<strong>in</strong>al server.<br />
ACP Th<strong>in</strong>Manager <strong>6.0</strong> Introduction 15
1.4.5 Term<strong>in</strong>al Server Groups<br />
Th<strong>in</strong>Manager 2.5 <strong>in</strong>troduced Term<strong>in</strong>al Server Groups. These were collections of term<strong>in</strong>al servers that a<br />
term<strong>in</strong>al could connect to and run a session on.<br />
Th<strong>in</strong>Manager 2.5 Interface<br />
The use of Term<strong>in</strong>al Server Groups <strong>in</strong>creased the power of Th<strong>in</strong>Manager through AppL<strong>in</strong>k and<br />
MultiSession.<br />
AppL<strong>in</strong>k is the deployment of specific applications and MultiSession is the ability to run multiple sessions<br />
on a term<strong>in</strong>al at the same time. In the example Term<strong>in</strong>al2 is us<strong>in</strong>g MultiSession to run two AppL<strong>in</strong>k apps<br />
(HMI and Reports).<br />
16 Introduction ACP Th<strong>in</strong>Manager <strong>6.0</strong>
1.4.6 Application Groups<br />
Term<strong>in</strong>al Server Groups were renamed Application Groups <strong>in</strong> Th<strong>in</strong>Manager 3.2.<br />
Th<strong>in</strong>Manager3.2 Interface<br />
Term<strong>in</strong>al Server Groups didn’t describe Term<strong>in</strong>al-to-Term<strong>in</strong>al shadow<strong>in</strong>g accurately because that function<br />
isn’t com<strong>in</strong>g from the term<strong>in</strong>al server but is com<strong>in</strong>g from the shadowed term<strong>in</strong>al.<br />
ACP Th<strong>in</strong>Manager <strong>6.0</strong> Introduction 17
1.4.7 Display Servers and Display Clients<br />
Th<strong>in</strong>Manager 4.0 added IP cameras, an additional source to display on the Th<strong>in</strong>Manager Ready th<strong>in</strong><br />
client lead<strong>in</strong>g to a major change <strong>in</strong> term<strong>in</strong>ology.<br />
Th<strong>in</strong>Manager 4.0 Interface<br />
Important Def<strong>in</strong>itions:<br />
A server is def<strong>in</strong>ed as device, computer, or application that provides applications, files, or data for use by<br />
other computers.<br />
A client is def<strong>in</strong>ed as device, computer, or application that requests data, resources, or services from a<br />
server or software program that shares data with the server.<br />
Display Servers – Th<strong>in</strong>Manager 4 uses Display Servers to denote devices that provide content that can<br />
be displayed on the client. Examples <strong>in</strong>clude the traditional term<strong>in</strong>al server and IP cameras.<br />
Display Clients - Th<strong>in</strong>Manager 4 uses Display Clients to denote the graphic render<strong>in</strong>g of the output from<br />
a Display Server. This could be a traditional Term<strong>in</strong>al Server session, IP Camera display, or a Term<strong>in</strong>alto-Term<strong>in</strong>al<br />
Shadow session.<br />
18 Introduction ACP Th<strong>in</strong>Manager <strong>6.0</strong>
Th<strong>in</strong>Manager 4.1 Interface<br />
Th<strong>in</strong>Manager 4.1 added the Workstation Display Client to allow a workstation desktop to be ported to a<br />
term<strong>in</strong>al. This could be an XP, Vista, or W<strong>in</strong>dows 7 workstation and could be a virtual or physical device.<br />
ACP Th<strong>in</strong>Manager <strong>6.0</strong> Introduction 19
2 System Overview<br />
2.1 Quick Start Checklist<br />
Microsoft<br />
<br />
<br />
<br />
Build a term<strong>in</strong>al server with the Microsoft W<strong>in</strong>dows 2003 or 2008 Server operat<strong>in</strong>g system. Add<br />
the Term<strong>in</strong>al Services/Remote Desktop Services Role. See Non-Th<strong>in</strong>Manager Components.<br />
Create a Microsoft Licens<strong>in</strong>g Server and add a TS/RDS CAL (Term<strong>in</strong>al Server/Remote Desktop<br />
Services Client Access License) for each th<strong>in</strong> client. They also require a normal CAL. See<br />
Microsoft Licenses.<br />
Create a Microsoft user profile for each term<strong>in</strong>al on the term<strong>in</strong>al server. Make sure that the user is<br />
a member of the Remote Desktop Users W<strong>in</strong>dows group. See Creat<strong>in</strong>g Microsoft User Profiles.<br />
Apply appropriate security to each user profile us<strong>in</strong>g the standard Microsoft techniques.<br />
Th<strong>in</strong>Manager<br />
<br />
Install ACP Th<strong>in</strong>Manager software onto a computer to create a Th<strong>in</strong>Manager Server. See<br />
Installation of Th<strong>in</strong>Manager.<br />
Create a Master ACP License and add enough Product Licenses for each th<strong>in</strong> client. Activate and<br />
apply to the <strong>TM</strong>S See Add<strong>in</strong>g a Master License to Th<strong>in</strong>Manager.<br />
Hardware<br />
<br />
<br />
Establish the IP address<strong>in</strong>g scheme for the th<strong>in</strong> clients, Static IP or DHCP. See IP Address<br />
Assignment.<br />
If us<strong>in</strong>g DHCP, configure Option 066 to list the IP address of the Th<strong>in</strong>Manager Server. See<br />
DHCP.<br />
Attach the term<strong>in</strong>als to Th<strong>in</strong>Manager by either:<br />
o Turn<strong>in</strong>g on the term<strong>in</strong>al and select<strong>in</strong>g the "Create New Term<strong>in</strong>al" option when the offl<strong>in</strong>e<br />
term<strong>in</strong>als are listed.<br />
o Pre-creat<strong>in</strong>g the term<strong>in</strong>als <strong>in</strong> Th<strong>in</strong>Manager and select<strong>in</strong>g the proper term<strong>in</strong>al name when<br />
the term<strong>in</strong>al is turned on and offl<strong>in</strong>e term<strong>in</strong>als are listed.<br />
Results<br />
<br />
<br />
Step 1: The clients will connect to the Th<strong>in</strong>Manager Server and download the firmware and<br />
configuration.<br />
Step 2: The configuration will send them to the term<strong>in</strong>al server to log<strong>in</strong> and start a session.<br />
Note: It is a good idea to schedule an automatic backup of your configuration. See Schedul<strong>in</strong>g for details.<br />
ACP Th<strong>in</strong>Manager <strong>6.0</strong><br />
20 System Overview
2.2 Required Components<br />
Th<strong>in</strong> Clients require a number of components to function properly. These <strong>in</strong>clude:<br />
Term<strong>in</strong>al Services from Microsoft (renamed Remote Desktop Services <strong>in</strong> W<strong>in</strong>dows 2008 R2)<br />
Client Communication Protocol, either Microsoft RDP or Citrix ICA<br />
ACP Th<strong>in</strong>Manager software<br />
Th<strong>in</strong>Manager Ready or PXE Compatible Th<strong>in</strong> Client Hardware<br />
Standard TCP/IP network <strong>in</strong>frastructure<br />
2.2.1 W<strong>in</strong>dows Term<strong>in</strong>al Server Operat<strong>in</strong>g System<br />
The first component is the Term<strong>in</strong>al Server. This is a computer with a version of Microsoft's W<strong>in</strong>dows<br />
2003 or 2008 Server that has the Term<strong>in</strong>al Services functionality activated. The operat<strong>in</strong>g system allows<br />
multiple users to log <strong>in</strong>to the server and run <strong>in</strong>dependent, isolated sessions. The operat<strong>in</strong>g system<br />
controls the server, provides security, controls user access, and runs the applications.<br />
The term<strong>in</strong>al servers need a Microsoft Term<strong>in</strong>al Services Licens<strong>in</strong>g Server with Term<strong>in</strong>al<br />
Services/Remote Desktop Services Client Access Licenses (TS/RDS CALs) added.<br />
See Microsoft Licenses for details.<br />
2.2.2 Client Communication Protocol<br />
The second component is the Client Communication Protocol. The Client Communication Protocol is<br />
the protocol used for client-to-server communications <strong>in</strong> the Term<strong>in</strong>al Services Environment. The protocol<br />
handles all video, <strong>in</strong><strong>format</strong>ion, and user <strong>in</strong>put such as keyboard and mouse <strong>in</strong>put. This can be either the<br />
default RDP protocol that is <strong>in</strong>stalled by default with any W<strong>in</strong>dows Term<strong>in</strong>al Server operat<strong>in</strong>g systems or<br />
an ICA protocol available separately from Citrix.<br />
The RDP (Remote Desktop Protocol) is the Client-Communication Protocol that is <strong>in</strong>cluded with<br />
Microsoft Term<strong>in</strong>al Services and can be used by Th<strong>in</strong> Clients to connect to W<strong>in</strong>dows 2000/2003/2008<br />
Term<strong>in</strong>al Servers. The RDP connection to a W<strong>in</strong>dows 2000 Term<strong>in</strong>al Server is limited to a 256-color<br />
depth (8-bit) while the W<strong>in</strong>dows 2003/2008 Server connection can be made at a higher color depth.<br />
The ICA (Independent Computer Architecture) Protocol is available by <strong>in</strong>stall<strong>in</strong>g and licens<strong>in</strong>g a Citrix<br />
component on the Term<strong>in</strong>al Servers.<br />
2.2.3 Th<strong>in</strong>Manager Adm<strong>in</strong>istrative Software<br />
The third component is ACP Th<strong>in</strong>Manager software from Automation Control Products. Th<strong>in</strong>Manager is<br />
used to configure, manage, and control the Th<strong>in</strong>Manager th<strong>in</strong> clients. Although Th<strong>in</strong>Manager is treated as<br />
a s<strong>in</strong>gle entity, it really has two ma<strong>in</strong> components, the Th<strong>in</strong>Manager <strong>in</strong>terface and the Th<strong>in</strong>Server service.<br />
<br />
<br />
Th<strong>in</strong>Server is a service that is the eng<strong>in</strong>e of the program. It starts automatically, runs <strong>in</strong> the<br />
background, and provides essential functions to control the th<strong>in</strong> clients. Th<strong>in</strong>Server is <strong>in</strong>stalled<br />
dur<strong>in</strong>g Th<strong>in</strong>Manager <strong>in</strong>stallation if selected.<br />
Th<strong>in</strong>Manager is the adm<strong>in</strong>istrative software that facilitates the configuration and organization of<br />
the th<strong>in</strong> clients. This is the visible component of the Th<strong>in</strong>Manager software. Th<strong>in</strong>Manager displays<br />
<strong>in</strong><strong>format</strong>ion generated by Th<strong>in</strong>Server. Th<strong>in</strong>Manager can be <strong>in</strong>stalled on any computer on the<br />
network, <strong>in</strong>clud<strong>in</strong>g the term<strong>in</strong>al server.<br />
ACP Th<strong>in</strong>Manager <strong>6.0</strong> System Overview 21
Note: Th<strong>in</strong>Manager Server is used to describe a computer runn<strong>in</strong>g Th<strong>in</strong>Manager and Th<strong>in</strong>Server that<br />
provides control and configuration to Th<strong>in</strong> Clients, even if the computer is a workstation.<br />
One <strong>in</strong>stance of Th<strong>in</strong>Manager can provide client connection to several term<strong>in</strong>al servers. The th<strong>in</strong> clients<br />
would boot from the Th<strong>in</strong>Manager server but could be assigned to any of several term<strong>in</strong>al servers.<br />
2.2.4 Th<strong>in</strong>Manager Ready Th<strong>in</strong> Client Hardware<br />
ACP Th<strong>in</strong>Manager is designed to control and configure ACP Enabled Th<strong>in</strong> clients. These are<br />
Th<strong>in</strong>Manager Ready th<strong>in</strong> clients produced by a variety of manufactur<strong>in</strong>g partners and display<strong>in</strong>g the<br />
Th<strong>in</strong>Manager Ready sticker. These devices have a Th<strong>in</strong>Manager BIOS on board that allow them to<br />
connect to a Th<strong>in</strong>Manager Server and operate as th<strong>in</strong> clients without a hard drive or embedded operat<strong>in</strong>g<br />
system.<br />
Th<strong>in</strong>Manager Ready Logos<br />
Th<strong>in</strong>Manager Enabled th<strong>in</strong> clients should display a Th<strong>in</strong>Manager Ready Logo. The ACP website<br />
(www.th<strong>in</strong>manager.com) has l<strong>in</strong>ks to the ACP Partners.<br />
2.2.5 Th<strong>in</strong>Manager Compatible Th<strong>in</strong> Client Hardware<br />
Th<strong>in</strong>Manager 5.0 <strong>in</strong>troduced a PXE Server (Preboot Execution Environment) to the Th<strong>in</strong>Manager System.<br />
The PXE server has the ability to take generic off-the-shelf devices and have them boot the Th<strong>in</strong>Manager<br />
firmware to become full function<strong>in</strong>g Th<strong>in</strong>Manager th<strong>in</strong> clients. These are called Th<strong>in</strong>Manager Compatible<br />
th<strong>in</strong> clients.<br />
Th<strong>in</strong>Manager Compatible th<strong>in</strong> clients do not have a dist<strong>in</strong>guish<strong>in</strong>g logo. See the list of tested and<br />
compatible th<strong>in</strong> clients at http://www.th<strong>in</strong>manager.com/complist/<strong>in</strong>dex.php.<br />
22 System Overview ACP Th<strong>in</strong>Manager <strong>6.0</strong>
2.3 Connection Overview<br />
When a term<strong>in</strong>al is powered on:<br />
For Th<strong>in</strong>Manager Ready th<strong>in</strong> clients:<br />
An IP address is requested from a DHCP server by default. The DHCP server needs to<br />
have Option 066 set to the Th<strong>in</strong>Manager Server IP address and Option 067 set to<br />
firmware.acp to specify a Th<strong>in</strong>Manager Server IP address. Units with the ACP<br />
BootLoader 5.01 and later can use DHCP and have the Th<strong>in</strong>Manager Server statically<br />
assigned on the unit.<br />
See DHCP Server Setup and Boot Process for details.<br />
Alternately, the term<strong>in</strong>al may be assigned a static IP address and the Th<strong>in</strong>Manager<br />
Server IP address.<br />
For Th<strong>in</strong>Manager Compatible PXE th<strong>in</strong> clients:<br />
PXE clients must use DHCP.<br />
Th<strong>in</strong>Manager Compatible th<strong>in</strong> clients make a DHCP request for an IP address and make<br />
a PXE request for a PXE server and boot file. These can come from a DHCP server or<br />
Th<strong>in</strong>Manager depend<strong>in</strong>g on system configuration.<br />
See PXE Server Configuration Wizard for details.<br />
The term<strong>in</strong>al connects to the Th<strong>in</strong>Manager Server to download its configuration.<br />
The Th<strong>in</strong>Manager configuration will tell the term<strong>in</strong>al which term<strong>in</strong>al server to connect and log<strong>in</strong> to.<br />
The term<strong>in</strong>al will connect to that term<strong>in</strong>al server and display the W<strong>in</strong>dows log<strong>in</strong> dialog box or will<br />
automatically log<strong>in</strong> with help from the Th<strong>in</strong>Manager configuration.<br />
The term<strong>in</strong>al will create a session on the term<strong>in</strong>al server, allow<strong>in</strong>g applications to run.<br />
The Th<strong>in</strong> client can be assigned to a s<strong>in</strong>gle term<strong>in</strong>al server, or it can be assigned to multiple term<strong>in</strong>al<br />
servers <strong>in</strong> case of term<strong>in</strong>al server failure. Display Clients are groups of term<strong>in</strong>al servers that have added<br />
functionality for the th<strong>in</strong> client.<br />
2.4 Failover Overview<br />
Server failures <strong>in</strong> any network or system can disrupt productivity and data management. ACP<br />
Th<strong>in</strong>Manager, version 2.3 and later, has a failover capability built <strong>in</strong>to it that allows term<strong>in</strong>als to connect to<br />
a secondary term<strong>in</strong>al server if the term<strong>in</strong>al server that they are logged <strong>in</strong>to fails. This will lessen the effect<br />
of server failures on the term<strong>in</strong>al server network. The term<strong>in</strong>als can detect the server crash, drop the<br />
connection to it, and connect to a secondary server <strong>in</strong> seconds.<br />
To <strong>in</strong>itiate ACP Th<strong>in</strong>Manager Failover protection, four steps are needed:<br />
<br />
<br />
Multiple Servers: The first step is to have multiple term<strong>in</strong>al servers, with appropriate<br />
applications and licenses <strong>in</strong>stalled.<br />
Term<strong>in</strong>al Server Address<strong>in</strong>g In Th<strong>in</strong>Manager: When configur<strong>in</strong>g the display clients to use<br />
<strong>in</strong>dividual term<strong>in</strong>al servers, list the term<strong>in</strong>al servers, <strong>in</strong> the order of preferred connection, <strong>in</strong><br />
Th<strong>in</strong>Manager. Upon boot, each term<strong>in</strong>al will try to connect to the first server <strong>in</strong> the list (the<br />
primary server). If it is not available, it will try the next on the list (a secondary server) until a<br />
connection is made.<br />
When us<strong>in</strong>g a SmartSession Display Client the term<strong>in</strong>al will connect to the term<strong>in</strong>al server<br />
with the lightest load.<br />
ACP Th<strong>in</strong>Manager <strong>6.0</strong> System Overview 23
Sufficient Memory: The third step is to have sufficient memory capacity on the servers to<br />
accommodate the addition of term<strong>in</strong>als dur<strong>in</strong>g failover. If you do not plan for the extra<br />
capacity, the servers can be taxed with the addition of the new term<strong>in</strong>als.<br />
User Permissions: Each term<strong>in</strong>al server needs the appropriate W<strong>in</strong>dows 2003/2008 user<br />
profiles and permissions. The term<strong>in</strong>als will not log <strong>in</strong>to a secondary session unless it has a<br />
user profile on that server.<br />
ACP Th<strong>in</strong>Manager allows the use of several term<strong>in</strong>al servers, def<strong>in</strong>ed as the primary and as backups. If<br />
the primary term<strong>in</strong>al server fails, the th<strong>in</strong> client will detect the server failure and will <strong>in</strong>itiate a new session<br />
on a backup server. This allows the operator to cont<strong>in</strong>ue their work and m<strong>in</strong>imize the effect of a server<br />
failure.<br />
Failover Configured for Display Clients <strong>in</strong> the Display Client Wizard<br />
Failover when us<strong>in</strong>g Display Clients is configured <strong>in</strong> the Display Client Wizard by add<strong>in</strong>g multiple term<strong>in</strong>al<br />
servers to the Display Client. See Display Client List for details.<br />
Instant Failover is an advanced configuration of failover. The term<strong>in</strong>al will log <strong>in</strong>to two term<strong>in</strong>al servers<br />
and start a session on each one. The primary session will be displayed, with the secondary session<br />
cascaded beh<strong>in</strong>d it. If the primary term<strong>in</strong>al server fails, the term<strong>in</strong>al will switch focus to the already<br />
<strong>in</strong>itiated secondary session and display the secondary session, sav<strong>in</strong>g the time needed to switch term<strong>in</strong>al<br />
servers and load applications.<br />
See Instant Failover for further details.<br />
24 System Overview ACP Th<strong>in</strong>Manager <strong>6.0</strong>
2.5 MultiSession Overview<br />
MultiSession is the ability for a Term<strong>in</strong>al to display several Display Clients at one time. Normally the<br />
Display Clients are cascaded with only one active at a time. Til<strong>in</strong>g allows a thumbnail of each Display<br />
Client to be displayed at the same time.<br />
Display Client Selection Page of Term<strong>in</strong>al Configuration Wizard<br />
MultiSession is <strong>in</strong>itiated by add<strong>in</strong>g multiple Display Clients on the Display Client Selection page of the<br />
Term<strong>in</strong>al Configuration Wizard.<br />
See SessionTil<strong>in</strong>g Options for details.<br />
2.6 MultiMonitor Overview<br />
MultiMonitor is the ability of some th<strong>in</strong> clients to use up to five monitors on the th<strong>in</strong> client. These monitors<br />
can be used to display s<strong>in</strong>gle screen Display Clients or the monitors can be merged to form spanned<br />
w<strong>in</strong>dows of two or more monitors.<br />
The MultiMonitor function can be applied to the W<strong>in</strong><strong>TM</strong>C client runn<strong>in</strong>g on a W<strong>in</strong>dows PC with multiple<br />
monitors.<br />
Note: MultiMonitor requires the usage of Display Clients <strong>in</strong>stead of us<strong>in</strong>g <strong>in</strong>dividual term<strong>in</strong>al servers.<br />
ACP Th<strong>in</strong>Manager <strong>6.0</strong> System Overview 25
See MultiMonitor for more details.<br />
2.7 TermSecure Overview<br />
TermSecure is a new Th<strong>in</strong>Manager feature that allows users to logon to a th<strong>in</strong> client and access userspecific<br />
or term<strong>in</strong>al-specific Display Client. This does not replace the W<strong>in</strong>dows logon but adds an<br />
additional layer of security and control.<br />
Term<strong>in</strong>als and Display Clients can be assigned Access Group permissions. A TermSecure User can use<br />
those term<strong>in</strong>als and Display Clients only if the TermSecure User has been assigned to the same Access<br />
Group Display Clients<br />
TermSecure has two ma<strong>in</strong> attributes:<br />
<br />
SecureAccess: Manages user access to term<strong>in</strong>al servers and sessions through Th<strong>in</strong>Manager<br />
authentication and group permissions.<br />
SmartContext: Allows the movement of the display of a TermSecure User’s term<strong>in</strong>al server<br />
sessions between multiple th<strong>in</strong> clients; <strong>in</strong>itiated by either manual log<strong>in</strong> or the use of an<br />
authentication device. This allows a user to leave one term<strong>in</strong>al, logon to a different term<strong>in</strong>al, and<br />
reconnect to their session, essentially hav<strong>in</strong>g the session follow him from term<strong>in</strong>al to term<strong>in</strong>al.<br />
TermSecure log<strong>in</strong>s can be <strong>in</strong>itiated by a manual log<strong>in</strong> or by the use of an ID device like USB drives or<br />
ProxCards for log<strong>in</strong>.<br />
See TermSecure User Configuration Wizard for details.<br />
Note: TermSecure requires the usage of Display Clients <strong>in</strong>stead of us<strong>in</strong>g <strong>in</strong>dividual term<strong>in</strong>al servers.<br />
2.8 PXE Boot Overview<br />
PXE (Preboot Execution Environment; sometimes pronounced "pixie") is an environment that allows a<br />
computer to boot over a network. Th<strong>in</strong>Manager provides a complete PXE boot environment that does not<br />
require any additional software components. The Th<strong>in</strong>Manager PXE Server conforms to version 2.1 of the<br />
Intel PXE boot specification.<br />
The Th<strong>in</strong> Client computer must be capable of PXE Boot<strong>in</strong>g. Most standard BIOS ROMS <strong>in</strong>clude a PXE<br />
Option ROM. In order to PXE boot, the PXE Option ROM must be enabled <strong>in</strong> the BIOS. The PXE boot<br />
method (boot from network) should be set to first <strong>in</strong> the boot order. Disabl<strong>in</strong>g the other boot devices <strong>in</strong> the<br />
BIOS will ensure that the unit will only boot via PXE.<br />
See PXE Server Configuration for more details.<br />
26 System Overview ACP Th<strong>in</strong>Manager <strong>6.0</strong>
3 Installation of Th<strong>in</strong>Manager<br />
3.1 Standard Th<strong>in</strong>Manager Installation<br />
3.1.1 W<strong>in</strong>dows Server 2003<br />
Note: The <strong>in</strong>stallation of the latest Microsoft .NET Framework may require a restart.<br />
Th<strong>in</strong>Manager can be <strong>in</strong>stalled on a W<strong>in</strong>dows server or a workstation (NT 4.0 SP5 and later). On Microsoft<br />
W<strong>in</strong>dows 2003/ 2008 Servers, software needs to be added <strong>in</strong> the Install Mode through the Control<br />
Panel > Add/Remove Programs. Failure to use the Install Mode can prevent an application from work<strong>in</strong>g<br />
properly.<br />
Select Start > Sett<strong>in</strong>gs > Control Panel > Add/Remove Programs to open the Add/Remove<br />
Programs dialog box.<br />
ACP Th<strong>in</strong>Manager <strong>6.0</strong><br />
27 Installation of Th<strong>in</strong>Manager
Add/Remove Programs<br />
Select the CD or Floppy button on the Add/Remove Programs Properties dialog box to open the<br />
Installation wizard. The wizard will prompt for the <strong>in</strong>sertion of the Th<strong>in</strong>Manager CD. When the CD is<br />
<strong>in</strong>serted, the wizard will ask for the path to the setup program.<br />
28 Installation of Th<strong>in</strong>Manager ACP Th<strong>in</strong>Manager <strong>6.0</strong>
Install CD File System<br />
The Th<strong>in</strong>Manager CD has 4 folders.<br />
Documentation – This folder conta<strong>in</strong>s a copy of this documentation <strong>in</strong> *.pdf <strong>format</strong>.<br />
Term<strong>in</strong>al ActiveX – This folder conta<strong>in</strong>s the Term<strong>in</strong>al Monitor ActiveX and companion<br />
documentation. See TermMon ActiveX Control for details.<br />
Th<strong>in</strong>Manager– This folder conta<strong>in</strong>s the Th<strong>in</strong>Manager setup program.<br />
W<strong>in</strong><strong>TM</strong>C – This folder conta<strong>in</strong>s the W<strong>in</strong><strong>TM</strong>C setup program. See W<strong>in</strong><strong>TM</strong>C Installation for<br />
details.<br />
Browse to the setup.exe file <strong>in</strong> the Th<strong>in</strong>Manager folder to <strong>in</strong>stall Th<strong>in</strong>Manager.<br />
ACP Th<strong>in</strong>Manager <strong>6.0</strong> Installation of Th<strong>in</strong>Manager 29
Run Installation Program W<strong>in</strong>dow<br />
Once the Th<strong>in</strong>Manager setup program is selected, select Next to cont<strong>in</strong>ue the <strong>in</strong>stallation.<br />
30 Installation of Th<strong>in</strong>Manager ACP Th<strong>in</strong>Manager <strong>6.0</strong>
Th<strong>in</strong>Manager Setup Wizard<br />
The Th<strong>in</strong>Manager Setup Wizard will lead the user through the <strong>in</strong>stallation process.<br />
Select Next to cont<strong>in</strong>ue.<br />
ACP Th<strong>in</strong>Manager <strong>6.0</strong> Installation of Th<strong>in</strong>Manager 31
End-User Licens<strong>in</strong>g Agreement<br />
Read the End-User Licens<strong>in</strong>g Agreement (EULA). If you agree to the conditions, select Yes to cont<strong>in</strong>ue.<br />
32 Installation of Th<strong>in</strong>Manager ACP Th<strong>in</strong>Manager <strong>6.0</strong>
Application Selection<br />
The <strong>in</strong>stallation wizard will display the components of the Th<strong>in</strong>Manager <strong>in</strong>stallation. Although<br />
Th<strong>in</strong>Manager appears to be a seamless program, it has two major components and utilities.<br />
Th<strong>in</strong>Manager is the graphic user <strong>in</strong>terface. It is <strong>in</strong>stalled to view and control the program.<br />
<br />
<br />
Th<strong>in</strong>Server is the eng<strong>in</strong>e that drives the program. It is a vital component that needs to be<br />
<strong>in</strong>stalled with Th<strong>in</strong>Manager to allow th<strong>in</strong> clients to boot and be configured. Th<strong>in</strong>Server is the<br />
component that requires licens<strong>in</strong>g. It is separated from Th<strong>in</strong>Manager <strong>in</strong> the <strong>in</strong>stallation to<br />
allow additional <strong>in</strong>stances of Th<strong>in</strong>Manager to be <strong>in</strong>stalled for remote adm<strong>in</strong>istration.<br />
Th<strong>in</strong>Manager Utilities <strong>in</strong>cludes tools like the touch screen calibration program. These<br />
utilities need to be <strong>in</strong>stalled on every term<strong>in</strong>al server that have clients with touch screens<br />
connected to them.<br />
Note: If touch screens are be<strong>in</strong>g used with th<strong>in</strong> clients, the Th<strong>in</strong>Manager Utilities program needs<br />
<strong>in</strong>stalled on every term<strong>in</strong>al server to provide the Calibrate Touch program for connected th<strong>in</strong> clients.<br />
The Browse button will allow the user to change the path to the folder where Th<strong>in</strong>Manager will be<br />
<strong>in</strong>stalled.<br />
Check the desired components and select Next.<br />
ACP Th<strong>in</strong>Manager <strong>6.0</strong> Installation of Th<strong>in</strong>Manager 33
Installation Wizard Completion<br />
When the wizard has f<strong>in</strong>ished select the F<strong>in</strong>ish button.<br />
34 Installation of Th<strong>in</strong>Manager ACP Th<strong>in</strong>Manager <strong>6.0</strong>
After Installation Dialog<br />
After the Th<strong>in</strong>Manager Setup wizard has f<strong>in</strong>ished, one needs to complete the <strong>in</strong>stallation through the<br />
Microsoft dialog boxes.<br />
Select Next to cont<strong>in</strong>ue.<br />
F<strong>in</strong>ish Installation<br />
Select F<strong>in</strong>ish to complete the <strong>in</strong>stallation.<br />
Th<strong>in</strong>Manager now needs licenses <strong>in</strong>stalled. See Licens<strong>in</strong>g Th<strong>in</strong>Manager for details.<br />
ACP Th<strong>in</strong>Manager <strong>6.0</strong> Installation of Th<strong>in</strong>Manager 35
3.1.2 W<strong>in</strong>dows Server 2008<br />
Note: The <strong>in</strong>stallation of the latest Microsoft .NET Framework may require a restart.<br />
It is a common practice to <strong>in</strong>stall Th<strong>in</strong>Manager on a term<strong>in</strong>al server but Th<strong>in</strong>Manager is <strong>in</strong>dependent of<br />
term<strong>in</strong>al services and doesn’t need to be <strong>in</strong>stalled on a term<strong>in</strong>al server.<br />
Applications on term<strong>in</strong>al servers need to be <strong>in</strong>stalled <strong>in</strong> the Install Mode. Open the Control Panel and<br />
click on the Install Application on Term<strong>in</strong>al Server icon to start the <strong>in</strong>stallation wizard.<br />
Figure 1 - Install Application on Term<strong>in</strong>al Server Icon<br />
Once the wizard beg<strong>in</strong>s navigate to the Th<strong>in</strong>Manager setup.exe program and cont<strong>in</strong>ue with the<br />
wizard as described <strong>in</strong> Licens<strong>in</strong>g Th<strong>in</strong>Manager. Th<strong>in</strong>Manager will <strong>in</strong>stall a 32-bit version on 32-bit<br />
operat<strong>in</strong>g systems and a 64-bit version on 64-bit operat<strong>in</strong>g systems.<br />
The Install Mode can also be entered by typ<strong>in</strong>g change user /<strong>in</strong>stall at a command prompt.<br />
You can then run the setup.exe to <strong>in</strong>stall Th<strong>in</strong>Manager.<br />
Type change user /execute when f<strong>in</strong>ished <strong>in</strong>stall<strong>in</strong>g to leave the Install Mode.<br />
See Allow Inbound Traffic to Firewall for details on configur<strong>in</strong>g the 2008 server to allow connections.<br />
3.2 W<strong>in</strong><strong>TM</strong>C Installation<br />
The W<strong>in</strong><strong>TM</strong>C program is a term<strong>in</strong>al client that is <strong>in</strong>stalled on a PC. When the W<strong>in</strong><strong>TM</strong>C client is run it<br />
connects to a Th<strong>in</strong>Manager Server, receives its configuration, and then connects to a term<strong>in</strong>al server and<br />
launches a session. The session is then displayed <strong>in</strong> the W<strong>in</strong><strong>TM</strong>C client as a w<strong>in</strong>dow or as a full screen,<br />
br<strong>in</strong>g<strong>in</strong>g term<strong>in</strong>al server comput<strong>in</strong>g to PCs.<br />
Note: Do not <strong>in</strong>stall W<strong>in</strong><strong>TM</strong>C on a Th<strong>in</strong>Manager Server. The two programs will compete over the 2031<br />
port.<br />
The W<strong>in</strong><strong>TM</strong>C client needs to be <strong>in</strong>stalled on each PC that it is run on.<br />
Note: Although PCs don’t have as strict a requirement as term<strong>in</strong>al servers; it is a good idea to <strong>in</strong>stall the<br />
W<strong>in</strong><strong>TM</strong>C client us<strong>in</strong>g the Add and Remove Programs feature.<br />
The Th<strong>in</strong>Manager Install CD conta<strong>in</strong>s the <strong>in</strong>stallation for the Th<strong>in</strong>Manager program and the W<strong>in</strong><strong>TM</strong>C<br />
client. To <strong>in</strong>stall the W<strong>in</strong><strong>TM</strong>C client on a PC select Start > Sett<strong>in</strong>gs > Control Panel > Add/Remove<br />
Programs to open the Add/Remove Programs dialog box.<br />
36 Installation of Th<strong>in</strong>Manager ACP Th<strong>in</strong>Manager <strong>6.0</strong>
Add/Remove Programs<br />
Select the CD or Floppy button on the Add/Remove Programs Properties dialog box to open the<br />
Installation wizard. The wizard will prompt for the <strong>in</strong>sertion of the Th<strong>in</strong>Manager CD. When the CD is<br />
<strong>in</strong>serted, the wizard will ask for the path to the setup program.<br />
ACP Th<strong>in</strong>Manager <strong>6.0</strong> Installation of Th<strong>in</strong>Manager 37
Install CD File System<br />
The Th<strong>in</strong>Manager CD has 4 folders.<br />
Documentation – This folder conta<strong>in</strong>s a copy of this documentation <strong>in</strong> *.pdf <strong>format</strong>.<br />
Term<strong>in</strong>al ActiveX – This folder conta<strong>in</strong>s the Term<strong>in</strong>al Monitor ActiveX and companion<br />
documentation. See TermMon ActiveX Control for details.<br />
Th<strong>in</strong>Manager– This folder conta<strong>in</strong>s the Th<strong>in</strong>Manager setup program.<br />
W<strong>in</strong><strong>TM</strong>C – This folder conta<strong>in</strong>s the W<strong>in</strong><strong>TM</strong>C setup program.<br />
Browse to the setup.exe file <strong>in</strong> the W<strong>in</strong><strong>TM</strong>C folder to <strong>in</strong>stall the W<strong>in</strong><strong>TM</strong>C client.<br />
38 Installation of Th<strong>in</strong>Manager ACP Th<strong>in</strong>Manager <strong>6.0</strong>
Run Installation Program W<strong>in</strong>dow<br />
Once the W<strong>in</strong><strong>TM</strong>C setup program is selected, click the Next button to cont<strong>in</strong>ue with the <strong>in</strong>stall.<br />
W<strong>in</strong><strong>TM</strong>C Setup Wizard<br />
The W<strong>in</strong><strong>TM</strong>C Setup wizard will launch. Select Next to cont<strong>in</strong>ue.<br />
ACP Th<strong>in</strong>Manager <strong>6.0</strong> Installation of Th<strong>in</strong>Manager 39
License Agreement<br />
Read the End-User License Agreement (EULA). If you agree with the conditions select Yes to cont<strong>in</strong>ue.<br />
Choose Dest<strong>in</strong>ation Location<br />
40 Installation of Th<strong>in</strong>Manager ACP Th<strong>in</strong>Manager <strong>6.0</strong>
The Browse button will allow the user to change the path to the folder where the W<strong>in</strong><strong>TM</strong>C client will be<br />
<strong>in</strong>stalled.<br />
Select Next to cont<strong>in</strong>ue.<br />
Feature Selection<br />
The W<strong>in</strong><strong>TM</strong>C <strong>in</strong>stallation program has two options.<br />
W<strong>in</strong><strong>TM</strong>C - This is the client application that needs to be <strong>in</strong>stalled to use the client.<br />
W<strong>in</strong><strong>TM</strong>C Shadow Service - This optional program allows the PC to be shadowed from with<strong>in</strong><br />
Th<strong>in</strong>Manager by authorized users.<br />
Note: The W<strong>in</strong><strong>TM</strong>C Shadow Service will function even when the W<strong>in</strong><strong>TM</strong>C isn’t active.<br />
Select the Next button to cont<strong>in</strong>ue with the W<strong>in</strong><strong>TM</strong>C <strong>in</strong>stallation.<br />
ACP Th<strong>in</strong>Manager <strong>6.0</strong> Installation of Th<strong>in</strong>Manager 41
W<strong>in</strong><strong>TM</strong>C Installation Completion<br />
When the wizard has f<strong>in</strong>ished select the F<strong>in</strong>ish button.<br />
After Installation Dialog<br />
After the W<strong>in</strong><strong>TM</strong>C setup wizard has f<strong>in</strong>ished, one needs to complete the <strong>in</strong>stallation through the Microsoft<br />
dialog boxes.<br />
Select Next to cont<strong>in</strong>ue.<br />
42 Installation of Th<strong>in</strong>Manager ACP Th<strong>in</strong>Manager <strong>6.0</strong>
F<strong>in</strong>ish Installation<br />
Select F<strong>in</strong>ish to complete the <strong>in</strong>stallation.<br />
ACP Th<strong>in</strong>Manager <strong>6.0</strong> Installation of Th<strong>in</strong>Manager 43
4 Licens<strong>in</strong>g Th<strong>in</strong>Manager<br />
4.1 Th<strong>in</strong>Manager Licens<strong>in</strong>g<br />
Th<strong>in</strong>Manager 5.0 <strong>in</strong>troduced changes <strong>in</strong> licens<strong>in</strong>g.<br />
Master Licenses – Each Th<strong>in</strong>Manager Server or synchronized pair of Th<strong>in</strong>Manager Servers use a s<strong>in</strong>gle<br />
Master License to conta<strong>in</strong> the product licenses. Product license codes of <strong>in</strong>dividual license components<br />
are added to the master license. When the master license is activated the product licenses are <strong>in</strong>cluded<br />
<strong>in</strong> the activation and a s<strong>in</strong>gle master license file is downloaded, conta<strong>in</strong><strong>in</strong>g the functionality of the member<br />
component licenses.<br />
The master license can be for a s<strong>in</strong>gle Th<strong>in</strong>Manager Server or for a Mirrored Redundant pair of<br />
Th<strong>in</strong>Manager Servers, or a fully redundant pair of Th<strong>in</strong>Manager Servers, depend<strong>in</strong>g on the component<br />
licenses. See Redundant Th<strong>in</strong>Manager Servers for details on Stand Alone, Mirrored, and Fully<br />
Redundant systems.<br />
4.1.1 Standard Licens<strong>in</strong>g<br />
Product Licenses – Product licenses are the licenses that are added to the Master License to provide<br />
the needed functions. The Product Licenses are:<br />
<br />
<br />
<br />
Term<strong>in</strong>al Connection License – This is the ma<strong>in</strong> product license that allows a term<strong>in</strong>al to<br />
receive its configuration. It is needed by every term<strong>in</strong>al.<br />
MultiMonitor – This product license, with a Term<strong>in</strong>al Connection License, allows a<br />
specialized th<strong>in</strong> client to use up to five monitors on a s<strong>in</strong>gle th<strong>in</strong> client. See MultiMonitor for<br />
details.<br />
W<strong>in</strong><strong>TM</strong>C - This product license, with a Term<strong>in</strong>al Connection License, allows Th<strong>in</strong>Manager to<br />
manage the RDP connection and term<strong>in</strong>al services experience of a PC. See W<strong>in</strong><strong>TM</strong>C Fat<br />
Clients for details.<br />
TermSecure – This product license enables additional security features for users. It can be<br />
used to grant them special access to hidden applications or allows access to a user’s<br />
application from any term<strong>in</strong>al <strong>in</strong> the system. See TermSecure for details.<br />
TermSecure licens<strong>in</strong>g is per-user licens<strong>in</strong>g. Each <strong>in</strong>stance of Th<strong>in</strong>Manager will <strong>in</strong>stall with<br />
licens<strong>in</strong>g for five users of TermSecure <strong>in</strong>cluded. Additional TermSecure product codes can be<br />
purchased to <strong>in</strong>crease the number of TermSecure users beyond the <strong>in</strong>itial five users.<br />
Components <strong>in</strong>cluded <strong>in</strong> the Th<strong>in</strong>Manager Term<strong>in</strong>al Connection Licenses <strong>in</strong>clude:<br />
MultiSession<br />
SmartSession<br />
Instant Failover<br />
ACP Th<strong>in</strong>Manager <strong>6.0</strong><br />
44 Licens<strong>in</strong>g Th<strong>in</strong>Manager
Redundant Ethernet<br />
Share Keyboard and Mouse<br />
4.1.2 XLi Licens<strong>in</strong>g<br />
XLi Licenses are added to a master license the same way as standard licenses. XLi licenses <strong>in</strong>clude all<br />
features from the standard licenses plus MultiMonitor, W<strong>in</strong><strong>TM</strong>C, Term Secure, and PXE Boot.<br />
4.1.3 Master License Advantages<br />
The use of a Master License means that there is one license for the Th<strong>in</strong>Manager Server. You only need<br />
to activate and transfer one master license if you need to decommission an old Th<strong>in</strong>Manager Server and<br />
build a new one.<br />
New license components get added to the master license and the master license is re-activated and reapplied<br />
to the Th<strong>in</strong>Manager Server.<br />
4.2 License Activation<br />
4.2.1.1 Installation<br />
Install Th<strong>in</strong>Manager on a computer or on two computers if you have redundant or mirrored Term<strong>in</strong>al<br />
Connection product licenses.<br />
See Installation of Th<strong>in</strong>Manager and Redundant Th<strong>in</strong>Manager Servers for details.<br />
4.2.1.2 Synchronization<br />
Synchronize the Th<strong>in</strong>Manager Servers if you are us<strong>in</strong>g redundancy or mirrored redundancy.<br />
See Automatic Synchronization for details.<br />
4.2.1.3 Onl<strong>in</strong>e Activation<br />
Go to www.th<strong>in</strong>manager.com and follow the l<strong>in</strong>ks to the License Activation to activate the license.<br />
ACP Th<strong>in</strong>Manager <strong>6.0</strong> Licens<strong>in</strong>g Th<strong>in</strong>Manager 45
License Activation Site<br />
Log<strong>in</strong> with an exist<strong>in</strong>g account or use the New User l<strong>in</strong>k to create a new account.<br />
4.2.1.4 New Account<br />
An account can be created on the license site by select<strong>in</strong>g the New User l<strong>in</strong>k.<br />
New User Entry<br />
Enter your e-mail address to start the creation process.<br />
46 Licens<strong>in</strong>g Th<strong>in</strong>Manager ACP Th<strong>in</strong>Manager <strong>6.0</strong>
New User In<strong>format</strong>ion Entry<br />
Enter the required <strong>in</strong><strong>format</strong>ion and select the Submit button.<br />
A password will be sent to the e-mail address that allows access to the site.<br />
ACP Th<strong>in</strong>Manager <strong>6.0</strong> Licens<strong>in</strong>g Th<strong>in</strong>Manager 47
Select the Log<strong>in</strong> l<strong>in</strong>k to enter the site.<br />
4.2.1.5 Log<strong>in</strong> to Site<br />
Log<strong>in</strong><br />
Enter the e-mail address used <strong>in</strong> the creation of the account. Enter the password that was sent to that<br />
account to log<strong>in</strong> to the site. Select the Log<strong>in</strong> button.<br />
48 Licens<strong>in</strong>g Th<strong>in</strong>Manager ACP Th<strong>in</strong>Manager <strong>6.0</strong>
License Site Ma<strong>in</strong> Screen<br />
The Th<strong>in</strong>Manager Licens<strong>in</strong>g site has a sidebar with 6 functions:<br />
Logout – This will log you out of the site and end your session.<br />
Manage Account – This allows you to change the details of the account, like address and<br />
phone number. It also has a l<strong>in</strong>k that allows you to change the password to one of your<br />
choos<strong>in</strong>g.<br />
Create Master License – This creates the Master License that acts as a shell or conta<strong>in</strong>er to<br />
hold the <strong>in</strong>dividual license product codes.<br />
Manage Master License – This allows you to add the product license codes of the <strong>in</strong>dividual<br />
license components to the master license.<br />
Activate Master License – This allows the master license to be activated and downloaded<br />
for <strong>in</strong>stallation.<br />
History – This shows the history of actions taken by the user.<br />
4.2.1.6 Creat<strong>in</strong>g a Master License<br />
Select the Create Master License l<strong>in</strong>k to <strong>in</strong>itiate the creation of a master license.<br />
Create Master License<br />
Enter a description of the license for your usage <strong>in</strong> the Server Name/Server Description field.<br />
Select the redundancy level that matches the redundancy level of your Term<strong>in</strong>al Connection product<br />
license and select the Submit button.<br />
ACP Th<strong>in</strong>Manager <strong>6.0</strong> Licens<strong>in</strong>g Th<strong>in</strong>Manager 49
Master License In<strong>format</strong>ion.<br />
The site will create a master license and display the <strong>in</strong><strong>format</strong>ion for you. It is useful to pr<strong>in</strong>t this page for<br />
your records.<br />
4.2.1.7 Manage Master Licenses<br />
Use the Manage Master License l<strong>in</strong>k to add product licenses to the Master License.<br />
View Master License<br />
Select<strong>in</strong>g the Manage Master License l<strong>in</strong>k will display the master licenses.<br />
Download File – This l<strong>in</strong>k will download the master license file once the product codes of the<br />
component licenses are added. The Master License needs to be activated before<br />
download<strong>in</strong>g. If this l<strong>in</strong>k is selected before activation it will prompt for activation.<br />
See Download the Master License for details.<br />
50 Licens<strong>in</strong>g Th<strong>in</strong>Manager ACP Th<strong>in</strong>Manager <strong>6.0</strong>
Add Product License – This l<strong>in</strong>k will allow a product code of a license to be added to the<br />
master license.<br />
See Add Product License for details.<br />
Edit License – This l<strong>in</strong>k allows the descriptions of the master license to be edited.<br />
Master License Number – This l<strong>in</strong>k displays the master license details.<br />
4.2.1.8 Add Product License<br />
The Master License needs the product license codes of the component licenses to be added to the<br />
master license. This is done by select<strong>in</strong>g the Add Product License l<strong>in</strong>k of the Manage Master License<br />
page.<br />
Add Product Code W<strong>in</strong>dow<br />
Enter the product license code (license number) of the component license to the License Number field<br />
and select the Submit button.<br />
Add Product Code Result W<strong>in</strong>dow<br />
ACP Th<strong>in</strong>Manager <strong>6.0</strong> Licens<strong>in</strong>g Th<strong>in</strong>Manager 51
When a product code of a license is successfully added to the master license the web site will show a<br />
confirmation message.<br />
Enter as many product codes as you have licenses to add to the master license.<br />
The master license will need activation and download<strong>in</strong>g after each group of product licenses are added.<br />
4.2.1.9 Redundant Master License with Non-Redundant Product Licenses<br />
If you have non-redundant Term<strong>in</strong>al Connection Licenses you can add them to a mirrored or fully<br />
redundant master license. When you add the product license it will ask which Th<strong>in</strong>Manager Server you<br />
want to apply the license to. Apply half to the Primary and half to the Secondary.<br />
Stand-alone License on a Redundant Th<strong>in</strong>Manager Server<br />
Once the product licenses are assigned to the target server it can be activated and applied.<br />
52 Licens<strong>in</strong>g Th<strong>in</strong>Manager ACP Th<strong>in</strong>Manager <strong>6.0</strong>
Stand-alone License on a Redundant Th<strong>in</strong>Manager Server<br />
Stand-alone Product Licenses applied to the Primary will show “Valid” for the Primary and “Invalid” for the<br />
Secondary, and vice versa.<br />
ACP Th<strong>in</strong>Manager <strong>6.0</strong> Licens<strong>in</strong>g Th<strong>in</strong>Manager 53
4.2.1.10 Activate the Master License<br />
The Master License needs activated and downloaded once the product license codes of the component<br />
licenses have been added to the master license. This is done by select<strong>in</strong>g the Activate Master License<br />
l<strong>in</strong>k of the Manage Master License page.<br />
Activate Master License Page<br />
Select<strong>in</strong>g the Activate Master License l<strong>in</strong>k will display the Activate Master License page with a list of<br />
all the master licenses that are registered to the person logged <strong>in</strong>.<br />
Select the master license from the table or enter the master license number <strong>in</strong>to the Master License<br />
Number field and select the Submit button.<br />
54 Licens<strong>in</strong>g Th<strong>in</strong>Manager ACP Th<strong>in</strong>Manager <strong>6.0</strong>
Activate Master License Page<br />
Activation requires the entry of the Installation ID of the Th<strong>in</strong>Manager Servers that the master license will<br />
be <strong>in</strong>stalled on.<br />
The Installation IDs will need to be added each time the Master License is activated or re-activated.<br />
ACP Th<strong>in</strong>Manager <strong>6.0</strong> Licens<strong>in</strong>g Th<strong>in</strong>Manager 55
Th<strong>in</strong>Manager Licens<strong>in</strong>g W<strong>in</strong>dow with Installation IDs<br />
The Installation IDs are shown on the Licens<strong>in</strong>g w<strong>in</strong>dow that is launched by select<strong>in</strong>g Install > Licenses<br />
from the Th<strong>in</strong>Manager menu.<br />
Enter the required <strong>in</strong>stallation IDs <strong>in</strong>to the Primary Installation ID field (and the Secondary Installation<br />
ID field if needed) on the Activate Master License page of the License Activation web site.<br />
Select the Submit button to f<strong>in</strong>ish the activation.<br />
56 Licens<strong>in</strong>g Th<strong>in</strong>Manager ACP Th<strong>in</strong>Manager <strong>6.0</strong>
4.2.1.11 Download the Master License<br />
Download the master license by select<strong>in</strong>g the Manage Master Licenses l<strong>in</strong>k from the ma<strong>in</strong> menu.<br />
Manage Master Licenses<br />
Select the Download File l<strong>in</strong>k for the master license.<br />
Select the l<strong>in</strong>k on the page to start the download.<br />
Master License Download<br />
ACP Th<strong>in</strong>Manager <strong>6.0</strong> Licens<strong>in</strong>g Th<strong>in</strong>Manager 57
File Download W<strong>in</strong>dow<br />
The download will beg<strong>in</strong> and prompt you to save the file. Do not save it directly <strong>in</strong>to the Th<strong>in</strong>Manager<br />
folder but save it to a folder that is accessible from Th<strong>in</strong>Manager.<br />
58 Licens<strong>in</strong>g Th<strong>in</strong>Manager ACP Th<strong>in</strong>Manager <strong>6.0</strong>
4.3 Add<strong>in</strong>g a Master License to Th<strong>in</strong>Manager<br />
Licenses are added to Th<strong>in</strong>Manager Servers by select<strong>in</strong>g Install>Licenses from the Th<strong>in</strong>Manager Menu.<br />
Licens<strong>in</strong>g W<strong>in</strong>dow – S<strong>in</strong>gle Th<strong>in</strong>Manager Server<br />
S<strong>in</strong>gle, unsynchronized Th<strong>in</strong>Manager Servers will display the Installation ID for the local Th<strong>in</strong>Manager<br />
Server.<br />
ACP Th<strong>in</strong>Manager <strong>6.0</strong> Licens<strong>in</strong>g Th<strong>in</strong>Manager 59
Licens<strong>in</strong>g W<strong>in</strong>dow – S<strong>in</strong>gle Th<strong>in</strong>Manager Server<br />
Synchronized Th<strong>in</strong>Manager Servers will show the Installation IDs for both redundant Th<strong>in</strong>Manager<br />
Servers. See Automatic Synchronization for details.<br />
Select the Install License button to launch a file browse w<strong>in</strong>dow.<br />
File Browser for License Files<br />
Browse to the folder that the master license is saved <strong>in</strong>. Highlight the master license and select the Open<br />
button to <strong>in</strong>stall the license.<br />
60 Licens<strong>in</strong>g Th<strong>in</strong>Manager ACP Th<strong>in</strong>Manager <strong>6.0</strong>
Licens<strong>in</strong>g W<strong>in</strong>dow with Licenses Installed<br />
The master license will be displayed <strong>in</strong> the Master License Number field. The product code of each<br />
component license will be displayed <strong>in</strong> the license w<strong>in</strong>dow.<br />
4.3.1 Delete License<br />
The Delete License button will delete the Master License.<br />
Delete License Prompt<br />
Select<strong>in</strong>g the Delete License button will open a Delete License w<strong>in</strong>dow. Select<strong>in</strong>g Yes will delete the<br />
license while select<strong>in</strong>g No will cancel the deletion and close the w<strong>in</strong>dow.<br />
4.3.2 License Details<br />
The License Details button will open the License Details w<strong>in</strong>dow with <strong>in</strong><strong>format</strong>ion about the Master<br />
License.<br />
ACP Th<strong>in</strong>Manager <strong>6.0</strong> Licens<strong>in</strong>g Th<strong>in</strong>Manager 61
Master License Details<br />
The License Details w<strong>in</strong>dow shows <strong>in</strong><strong>format</strong>ion about the master license, the activator of the license,<br />
and the owner of the license on the Master License, License Activator, and License Owner tabs.<br />
4.3.3 Install Demo Code<br />
The Install Demo Code button will open the Install Demo Code w<strong>in</strong>dow and allow a user to add a demo<br />
code to give Th<strong>in</strong>Manager temporary functionality.<br />
Install Demo Code W<strong>in</strong>dow<br />
A Demo Code gives Th<strong>in</strong>Manager temporary functionality, normally for 30 days.<br />
62 Licens<strong>in</strong>g Th<strong>in</strong>Manager ACP Th<strong>in</strong>Manager <strong>6.0</strong>
4.3.4 Show Old Licenses<br />
The Show Old Licenses button will show Th<strong>in</strong>Manager 3.X licenses <strong>in</strong> a Licenses Not Included <strong>in</strong><br />
Master License w<strong>in</strong>dow.<br />
Not Included <strong>in</strong> Master License W<strong>in</strong>dow<br />
The Not Included <strong>in</strong> Master License w<strong>in</strong>dow shows licenses <strong>in</strong>stalled <strong>in</strong> previous versions on<br />
Th<strong>in</strong>Manager before the upgrade to Th<strong>in</strong>Manager 5.<br />
4.4 W<strong>in</strong><strong>TM</strong>C Licenses<br />
Each W<strong>in</strong><strong>TM</strong>C requires a Term<strong>in</strong>al Connection License and a W<strong>in</strong><strong>TM</strong>C License. The product license code<br />
for the W<strong>in</strong><strong>TM</strong>C is added to the master license like other product license codes as described <strong>in</strong> License<br />
Activation.<br />
4.5 TermSecure Licenses<br />
TermSecure is licensed on a Per-User License. Each Th<strong>in</strong>Manager Server <strong>in</strong>stallation comes with a 5-<br />
user TermSecure license. This allows you to try and use TermSecure with Th<strong>in</strong>Manager before buy<strong>in</strong>g.<br />
Additional user licenses for TermSecure can be purchased and added to the master license as described<br />
<strong>in</strong> License Activation.<br />
ACP Th<strong>in</strong>Manager <strong>6.0</strong> Licens<strong>in</strong>g Th<strong>in</strong>Manager 63
4.6 Upgrad<strong>in</strong>g to Th<strong>in</strong>Manager 5 from Older<br />
Th<strong>in</strong>Manager versions<br />
Start the activation process by go<strong>in</strong>g to https://secure.randombytes.com/<strong>TM</strong>40_License. See Onl<strong>in</strong>e<br />
Activation for details.<br />
Log<strong>in</strong> to the license site. Create an account as needed. See New Account for details.<br />
Select the Create Master License l<strong>in</strong>k to create a new Master License. See Creat<strong>in</strong>g a Master License<br />
for details.<br />
Select the Manage Master License l<strong>in</strong>k to view the master license. Select the Add Product License l<strong>in</strong>k<br />
and add each of your current Product License Numbers to the newly created Master License. See Add<br />
Product License for details.<br />
The Th<strong>in</strong>Manager 3.X Product License Numbers can be found by select<strong>in</strong>g Install > Licenses > Show<br />
Old Licenses <strong>in</strong> Th<strong>in</strong>Manager. See Show Old Licenses for details.<br />
Activate the Master License once all the product codes are added. Select the Activate Master License<br />
l<strong>in</strong>k to activate the master license. See Activate the Master License for details.<br />
Once the Master License is activated it need to be downloaded and <strong>in</strong>stalled <strong>in</strong> Th<strong>in</strong>Manager. See<br />
Activate the Master License; Download the Master License, and Add<strong>in</strong>g a Master License to<br />
Th<strong>in</strong>Manager for details.<br />
64 Licens<strong>in</strong>g Th<strong>in</strong>Manager ACP Th<strong>in</strong>Manager <strong>6.0</strong>
5 Redundant Th<strong>in</strong>Manager<br />
Servers<br />
5.1 Redundancy Overview<br />
ACP uses the term Failover to describe hav<strong>in</strong>g two or more term<strong>in</strong>al servers that the th<strong>in</strong> clients can<br />
connect and run a session from.<br />
ACP uses the term Redundancy to describe hav<strong>in</strong>g two or more Th<strong>in</strong>Manager Servers that the th<strong>in</strong><br />
clients can connect and receive a configuration from.<br />
Th<strong>in</strong>Manager can be <strong>in</strong>stalled <strong>in</strong> three modes:<br />
S<strong>in</strong>gle Th<strong>in</strong>Manager Server<br />
Full Redundancy<br />
Mirrored Redundancy<br />
S<strong>in</strong>gle Th<strong>in</strong>Manager Server – No Redundancy: A system with a s<strong>in</strong>gle Th<strong>in</strong>Manager Server will have<br />
all the term<strong>in</strong>als boot from that computer, receive their configuration, and then connect to the assigned<br />
term<strong>in</strong>al servers. If the Th<strong>in</strong>Manager Server fails the term<strong>in</strong>als will cont<strong>in</strong>ue to function as designed<br />
because they hold their configuration <strong>in</strong> memory. If the term<strong>in</strong>al reboots it will be unable to connect to the<br />
failed Th<strong>in</strong>Manager Server and will not receive their configuration or connect to a term<strong>in</strong>al server until the<br />
Th<strong>in</strong>Manager Server comes back onl<strong>in</strong>e.<br />
Full Redundancy – Two Th<strong>in</strong>Manager Servers: A fully redundant system has two licensed<br />
Th<strong>in</strong>Manager Servers that are synchronized with the same configuration on each. The th<strong>in</strong> clients are<br />
configured to boot from either Th<strong>in</strong>Manager Server to receive their configuration. If the primary<br />
Th<strong>in</strong>Manager Server fails the term<strong>in</strong>als will cont<strong>in</strong>ue to function as designed because they hold their<br />
configuration <strong>in</strong> memory. If the term<strong>in</strong>al reboots it will be unable to connect to the failed primary<br />
Th<strong>in</strong>Manager Server but will switch and boot from the secondary Th<strong>in</strong>Manager Server and will receive the<br />
configuration and connect to a term<strong>in</strong>al server.<br />
Mirrored Redundancy – Two Th<strong>in</strong>Manager Servers: This is a form of redundancy that is controlled with<br />
a mirrored license. You use two synchronized Th<strong>in</strong>Manager Servers that the term<strong>in</strong>als can boot from as <strong>in</strong><br />
a fully redundant system. The difference is that adm<strong>in</strong>istrative functions like shadow<strong>in</strong>g and configuration<br />
changes are limited to the primary Th<strong>in</strong>Manager Server.<br />
Mirrored redundancy is a means to provide a redundant Th<strong>in</strong>Manager Server at a lower cost. It provides a<br />
backup Th<strong>in</strong>Manager Server to keep production runn<strong>in</strong>g until a replacement can be found for the primary<br />
Th<strong>in</strong>Manager Server.<br />
Note: All Enterprise licenses <strong>in</strong>clude Full Redundancy.<br />
ACP Th<strong>in</strong>Manager <strong>6.0</strong><br />
65 Redundant Th<strong>in</strong>Manager Servers
5.1.1 Redundancy Differences<br />
No Redundancy - S<strong>in</strong>gle Th<strong>in</strong>Manager Server<br />
Least expensive.<br />
If the Th<strong>in</strong>Manager Server fails the th<strong>in</strong> clients cont<strong>in</strong>ue to run from their configuration<br />
loaded <strong>in</strong>to RAM.<br />
If the th<strong>in</strong> client reboots the th<strong>in</strong> clients cannot retrieve their configuration until the<br />
Th<strong>in</strong>Manager Server is restored.<br />
The Master License is created with “None” for its redundancy.<br />
Mirrored Redundancy- Two Th<strong>in</strong>Manager Servers<br />
Provides redundancy at a lower cost than full redundancy.<br />
If the Th<strong>in</strong>Manager Server fails the th<strong>in</strong> clients cont<strong>in</strong>ue to run from their configuration<br />
loaded <strong>in</strong>to RAM.<br />
Configuration changes can be made only on the primary Th<strong>in</strong>Manager Server. If it fails<br />
the th<strong>in</strong> clients are able to retrieve their configuration from the backup and run as<br />
configured. Configuration changes must wait until the primary Th<strong>in</strong>Manager is restored.<br />
The Master License is created with “Mirrored Redundancy”. It uses Mirrored Term<strong>in</strong>al<br />
Connection Product Licenses.<br />
Full Redundancy - Two Th<strong>in</strong>Manager Servers<br />
If the Th<strong>in</strong>Manager Server fails the th<strong>in</strong> clients cont<strong>in</strong>ue to run from their configuration<br />
loaded <strong>in</strong>to RAM.<br />
If a Th<strong>in</strong>Manager Server fails, the other Th<strong>in</strong>Manager Server will provide configuration.<br />
The Th<strong>in</strong>Manager configuration can be changed on either Th<strong>in</strong>Manager Server at any<br />
time.<br />
Requires a duplicate set of licenses on the backup Th<strong>in</strong>Manager Server.<br />
The Master License is created with “Full Redundancy”. It uses Redundant Term<strong>in</strong>al<br />
Connection Product Licenses.<br />
5.2 Creat<strong>in</strong>g a Redundant Pair of Th<strong>in</strong>Manager<br />
Servers<br />
To create a redundant pair of Th<strong>in</strong>Manager Servers:<br />
1. Install Th<strong>in</strong>Manager on two computers. See Standard Th<strong>in</strong>Manager Installation.<br />
2. Configure the th<strong>in</strong> clients on the primary Th<strong>in</strong>Manager Server. See Term<strong>in</strong>al<br />
Configuration Wizard.<br />
3. Synchronize the two Th<strong>in</strong>Manager Servers. See Synchronize Configuration.<br />
4. Create a Master License with Full Redundancy and add a Redundant Term<strong>in</strong>al<br />
Connection Product License or add two Term<strong>in</strong>al Connection Product Licenses and apply<br />
one to the Primary Th<strong>in</strong>Manager Server and one to the Secondary Th<strong>in</strong>Manager Server.<br />
See Th<strong>in</strong>Manager Licens<strong>in</strong>g for details.<br />
5. Configure the th<strong>in</strong> clients to boot from two Th<strong>in</strong>Manager Servers us<strong>in</strong>g the DHCP server<br />
or static IP address<strong>in</strong>g. See DHCP Server Setup or Configur<strong>in</strong>g New Hardware.<br />
See Th<strong>in</strong>Manager Licens<strong>in</strong>g for details about Redundant License activation.<br />
66 Redundant Th<strong>in</strong>Manager Servers ACP Th<strong>in</strong>Manager <strong>6.0</strong>
5.3 Creat<strong>in</strong>g Mirrored Redundancy<br />
Mirrored Redundancy provides redundancy at a reduced cost from full redundancy.<br />
To set up Mirrored redundancy:<br />
6. Install Th<strong>in</strong>Manager on two computers. See Standard Th<strong>in</strong>Manager Installation.<br />
7. Synchronize the two Th<strong>in</strong>Manager Server. See <strong>Manual</strong> Synchronization.<br />
8. Create a Master License with Mirrored Redundancy and add a Mirrored Term<strong>in</strong>al<br />
Connection Product License to the Master License. See Th<strong>in</strong>Manager Licens<strong>in</strong>g for<br />
details<br />
9. Configure the th<strong>in</strong> clients on the primary Th<strong>in</strong>Manager Server. The configurations will be<br />
transferred to the secondary Th<strong>in</strong>Manager Server. See Term<strong>in</strong>al Configuration Wizard.<br />
10. Configure the th<strong>in</strong> clients to boot from two Th<strong>in</strong>Manager Server us<strong>in</strong>g the DHCP server or<br />
static IP address<strong>in</strong>g. See DHCP Server Setup or Configur<strong>in</strong>g New Hardware.<br />
Adm<strong>in</strong>istrative functions like chang<strong>in</strong>g configuration or shadow<strong>in</strong>g can be only performed on the primary<br />
Th<strong>in</strong>Manager Server. If the primary fails the th<strong>in</strong> clients will cont<strong>in</strong>ue runn<strong>in</strong>g from their configuration<br />
stored <strong>in</strong> memory. If they reboot they are able to retrieve their configuration from the backup and run as<br />
configured. Configuration changes must wait until the primary Th<strong>in</strong>Manager is restored.<br />
ACP Th<strong>in</strong>Manager <strong>6.0</strong> Redundant Th<strong>in</strong>Manager Servers 67
6 Th<strong>in</strong>Manager Interface<br />
6.1 Open<strong>in</strong>g Th<strong>in</strong>Manager<br />
Th<strong>in</strong>Manager is used for the configuration of Th<strong>in</strong> Clients <strong>in</strong> the ACP th<strong>in</strong> client environment.<br />
Th<strong>in</strong>Manager can be started us<strong>in</strong>g any of the traditional W<strong>in</strong>dows methods, based on the adm<strong>in</strong>istrator's<br />
preference:<br />
Run from the Start Menu, Start > Programs > \Automation Control Products ><br />
Th<strong>in</strong>Manager or Run Start > Programs > \ ACP > Th<strong>in</strong>Manager depend<strong>in</strong>g on the<br />
<strong>in</strong>stallation folder.<br />
Run from the Run l<strong>in</strong>e, Start > Run > C:\Program Files\Automation Control<br />
Products\Th<strong>in</strong>Manager\Th<strong>in</strong>Manager.exe (default path).<br />
Run from a command prompt, C:\Program Files\Automation Control<br />
Products\Th<strong>in</strong>Manager\Th<strong>in</strong>Manager.exe (default path).<br />
Run from a shortcut on the desktop.<br />
Run from a Th<strong>in</strong>Manager icon <strong>in</strong> the system tray, if this option is selected <strong>in</strong> View > Options<br />
from the menu bar.<br />
Run from W<strong>in</strong>dows Explorer.<br />
Note: Th<strong>in</strong>Manager can be run on a term<strong>in</strong>al with full privileges if the user is an adm<strong>in</strong>istrator or a<br />
member of the Th<strong>in</strong>Manager Adm<strong>in</strong>istrator’s group. See Th<strong>in</strong>Manager Server Configuration wizard for<br />
details on Th<strong>in</strong>Manager User Groups.<br />
ACP Th<strong>in</strong>Manager <strong>6.0</strong><br />
68 Th<strong>in</strong>Manager Interface
6.2 Th<strong>in</strong>Manager Graphic User Interface<br />
ACP Th<strong>in</strong>Manager Graphic User Interface<br />
The Th<strong>in</strong>Manager adm<strong>in</strong>istrative <strong>in</strong>terface provides "at-a-glance management". The groups and<br />
term<strong>in</strong>als are displayed <strong>in</strong> the tree pane. The configuration data is displayed <strong>in</strong> the detail panel. Colorcoded<br />
icons <strong>in</strong> the tree pane show the on-l<strong>in</strong>e status of term<strong>in</strong>als.<br />
The sections of the Th<strong>in</strong>Manager <strong>in</strong>terface <strong>in</strong>clude:<br />
A Title Bar with the standard W<strong>in</strong>dows M<strong>in</strong>imize/Maximize/Close shortcut icons.<br />
A Menu Bar with commands.<br />
<br />
<br />
<br />
<br />
A Tree Pane with an expandable/collapsible tree show<strong>in</strong>g the Term<strong>in</strong>als, Display Servers,<br />
Display Clients, TermSecure Users on the Th<strong>in</strong>Manager Server. Term<strong>in</strong>als that are on-l<strong>in</strong>e<br />
have a green monitor icon, while stopped or reboot<strong>in</strong>g term<strong>in</strong>als have a red monitor icon.<br />
A tabbed Details Pane with <strong>in</strong><strong>format</strong>ion about sett<strong>in</strong>gs and configurations. The blue group<br />
icon denotes a property that was obta<strong>in</strong>ed from the group. The details pane is tabbed for<br />
organization. The tabs that are shown depend on the tree item that is highlighted.<br />
A Status Bar that shows advice and tips.<br />
The Communication Indicator shows green when Th<strong>in</strong>Manager is talk<strong>in</strong>g to a<br />
Th<strong>in</strong>Manager Server. Th<strong>in</strong>Manager will wait until this communication is f<strong>in</strong>ished before<br />
process<strong>in</strong>g additional requests.<br />
ACP Th<strong>in</strong>Manager <strong>6.0</strong> Th<strong>in</strong>Manager Interface 69
6.3 Tree Pane<br />
The tree pane shows the members of the ACP Th<strong>in</strong> Client Network <strong>in</strong> an expandable tree.<br />
ACP Th<strong>in</strong>Manager with Tree<br />
The Tree has five branches.<br />
Term<strong>in</strong>als – This lists term<strong>in</strong>al groups and term<strong>in</strong>als. Term<strong>in</strong>al groups can be expanded to show<br />
member term<strong>in</strong>als and term<strong>in</strong>als can be expanded to show assigned display clients.<br />
Display Servers – This lists the display server types that can be used when configur<strong>in</strong>g display<br />
clients.<br />
VCenter Servers - This allows Th<strong>in</strong>Manager to list and manage VMWare VCenter servers.<br />
Display Clients – This lists the display client types that can be added to a term<strong>in</strong>al configuration.<br />
They can be expanded to show the members of each display client type.<br />
TermSecure Users – This lists configured TermSecure Users and any created groups of<br />
TermSecure users.<br />
70 Th<strong>in</strong>Manager Interface ACP Th<strong>in</strong>Manager <strong>6.0</strong>
6.4 Icons<br />
6.4.1 Tree Icons<br />
Several of the menu tools and other features are dependent on what icon is highlighted <strong>in</strong> the tree.<br />
The tree is divided <strong>in</strong>to five branches, Term<strong>in</strong>als, Display Servers, VCenter Servers, Display Clients<br />
and TermSecure Users.<br />
Five Tree Branches<br />
Each of the branches, shown as a blue icon, can be expanded.<br />
ACP Th<strong>in</strong>Manager <strong>6.0</strong> Th<strong>in</strong>Manager Interface 71
Expanded Tree Show<strong>in</strong>g Icon Variety<br />
Term<strong>in</strong>al Groups can be expanded to show the subgroups and term<strong>in</strong>als that are members of the group.<br />
Term<strong>in</strong>als can be expanded to show the display clients assigned to it.<br />
Display Clients can be expanded to show the members that are assigned to it.<br />
TermSecure User Group can be expanded to show the TermSecure Users that are members of the<br />
group.<br />
Each of the branches of the tree can be expanded.<br />
72 Th<strong>in</strong>Manager Interface ACP Th<strong>in</strong>Manager <strong>6.0</strong>
6.4.1.1 Th<strong>in</strong>Manager Server Icons<br />
Th<strong>in</strong>Manager Server Icons<br />
Th<strong>in</strong>Manager can connect to several Th<strong>in</strong>Manager Servers, but only one Th<strong>in</strong>Manager Server tree can be<br />
displayed at a time. The tree shows the local Th<strong>in</strong>Manager Server by default. Other Th<strong>in</strong>Manager Servers<br />
can be added to the Th<strong>in</strong>Manager Server drop-down box by select<strong>in</strong>g Edit > Add Th<strong>in</strong>Manager Server<br />
from the menu bar.<br />
A Green Th<strong>in</strong>Manager Server icon represents a Th<strong>in</strong>Manager Server that has an active communication<br />
l<strong>in</strong>k with the program. These can be collapsed or expanded to show the Group and Term<strong>in</strong>al icons that<br />
nest under the Th<strong>in</strong>Manager Server icons.<br />
A Red Th<strong>in</strong>Manager Server icon represents a Th<strong>in</strong>Manager Server that is not communicat<strong>in</strong>g with the<br />
program. Right click<strong>in</strong>g on a red Th<strong>in</strong>Manager icon and select<strong>in</strong>g Reconnect will re<strong>in</strong>itiate<br />
communications to the Th<strong>in</strong>Manager Server.<br />
6.4.1.2 Term<strong>in</strong>al Icons<br />
The Term<strong>in</strong>als branch can be expanded to show Term<strong>in</strong>al Groups and term<strong>in</strong>als.<br />
Group and Term<strong>in</strong>al Icons<br />
A Group is represented by an icon of two monitors with a blue screen. Subgroups can be nested under<br />
Groups.<br />
A Term<strong>in</strong>al is represented by an icon of a s<strong>in</strong>gle monitor.<br />
<br />
<br />
A Red term<strong>in</strong>al screen <strong>in</strong>dicates that the Term<strong>in</strong>al is off or not communicat<strong>in</strong>g with the<br />
Th<strong>in</strong>Manager Server.<br />
A Purple term<strong>in</strong>al screen <strong>in</strong>dicates that the Term<strong>in</strong>al is load<strong>in</strong>g the firmware dur<strong>in</strong>g the boot<br />
process.<br />
ACP Th<strong>in</strong>Manager <strong>6.0</strong> Th<strong>in</strong>Manager Interface 73
A Yellow term<strong>in</strong>al screen <strong>in</strong>dicates that the Term<strong>in</strong>al has loaded firmware, received its<br />
configuration and is <strong>in</strong> the process of establish<strong>in</strong>g a monitor connection to the Th<strong>in</strong>Manager<br />
Server.<br />
A Green term<strong>in</strong>al screen <strong>in</strong>dicates that the Term<strong>in</strong>al is on and communicat<strong>in</strong>g with the<br />
Th<strong>in</strong>Manager Server.<br />
A Term<strong>in</strong>al with a Head icon <strong>in</strong>dicates that a TermSecure User is logged onto the term<strong>in</strong>al. The<br />
TermSecure User name will be displayed <strong>in</strong> parentheses.<br />
A Term<strong>in</strong>al with a Lock or a locked group icon means that that term<strong>in</strong>al or group is be<strong>in</strong>g<br />
modified and cannot be changed by another user. If the Group or Term<strong>in</strong>al rema<strong>in</strong>s locked after<br />
its configuration wizard is closed, it can be unlocked by us<strong>in</strong>g Edit > Unlock from the menu bar.<br />
A Term<strong>in</strong>al with a Red X <strong>in</strong>dicated that an adm<strong>in</strong>istrator has disabled the term<strong>in</strong>al.<br />
Note: The purple and yellow screen will not be visible before the term<strong>in</strong>al has connected the first time and<br />
is def<strong>in</strong>ed <strong>in</strong> Th<strong>in</strong>Manager.<br />
The purple and yellow screens are only visible dur<strong>in</strong>g a reboot and not after a restart, as a restarted<br />
term<strong>in</strong>al does not reload firmware.<br />
The Term<strong>in</strong>al icon can be expanded to show the assignment of the term<strong>in</strong>al.<br />
Term<strong>in</strong>al Assigned to Individual Term<strong>in</strong>al Servers<br />
A term<strong>in</strong>al that is us<strong>in</strong>g <strong>in</strong>dividual term<strong>in</strong>al servers may expand to show a term<strong>in</strong>al server icon with three<br />
connection states.<br />
A green lightn<strong>in</strong>g bolt <strong>in</strong>dicates an active connection to the term<strong>in</strong>al server.<br />
<br />
<br />
A yellow lightn<strong>in</strong>g bolt <strong>in</strong>dicates an active connection that is cascaded <strong>in</strong> the background while<br />
us<strong>in</strong>g Instant Failover.<br />
A red lightn<strong>in</strong>g bolt <strong>in</strong>dicates an <strong>in</strong>active connection to the term<strong>in</strong>al server.<br />
74 Th<strong>in</strong>Manager Interface ACP Th<strong>in</strong>Manager <strong>6.0</strong>
Term<strong>in</strong>al us<strong>in</strong>g Display Clients<br />
A term<strong>in</strong>al that is us<strong>in</strong>g Display Clients can be expanded to show the status of the Display Clients. The<br />
Display Clients can be expanded to show the status of the Display Client members.<br />
If a Group or Term<strong>in</strong>al is disabled us<strong>in</strong>g the Tools > Disable function, it will be displayed with a red X<br />
over the term<strong>in</strong>al icon. An entire Th<strong>in</strong>Manager Server or an entire Group can be disabled, but the<br />
Th<strong>in</strong>Manager Server icon and the Group icon will not show an X, just the term<strong>in</strong>al icons.<br />
Disabled Term<strong>in</strong>al Icons<br />
A Red term<strong>in</strong>al screen with a Red X <strong>in</strong>dicates that the Term<strong>in</strong>al is disabled and is either turned off or<br />
rebooted and wait<strong>in</strong>g to be enabled.<br />
A Green term<strong>in</strong>al screen with a Red X <strong>in</strong>dicates that the disabl<strong>in</strong>g has been applied to the term<strong>in</strong>al that<br />
is turned on. The term<strong>in</strong>al has a disabl<strong>in</strong>g screen and is wait<strong>in</strong>g for enabl<strong>in</strong>g.<br />
If a Group or Term<strong>in</strong>al is disabled us<strong>in</strong>g the Tools > Disable function, it will be displayed with a red X<br />
over the term<strong>in</strong>al icon. An entire Th<strong>in</strong>Manager Server or an entire Group can be disabled, but the<br />
Th<strong>in</strong>Manager Server icon and the Group icon will not show an X, just the term<strong>in</strong>al icons.<br />
Once a term<strong>in</strong>al is disabled, a disabl<strong>in</strong>g screen will appear on the term<strong>in</strong>al until the term<strong>in</strong>al has been<br />
enabled.<br />
ACP Th<strong>in</strong>Manager <strong>6.0</strong> Th<strong>in</strong>Manager Interface 75
Disabl<strong>in</strong>g Screen<br />
If a term<strong>in</strong>al is active when it is disabled, it will display the Disable Screen with a message <strong>in</strong>dicat<strong>in</strong>g the<br />
disabled status <strong>in</strong> the upper left corner.<br />
Disabled Term<strong>in</strong>al<br />
If a term<strong>in</strong>al is booted when disabled, the boot process will be halted until the term<strong>in</strong>al is enabled.<br />
See Disable Term<strong>in</strong>als for details.<br />
76 Th<strong>in</strong>Manager Interface ACP Th<strong>in</strong>Manager <strong>6.0</strong>
6.4.1.3 Display Servers Branch<br />
The Display Servers section of the tree is where display sources are def<strong>in</strong>ed and configured. These<br />
def<strong>in</strong>itions will be used when def<strong>in</strong><strong>in</strong>g a Display Client. Examples of Display Servers are Term<strong>in</strong>al Servers<br />
and IP Cameras.<br />
Display Servers Tree Branch<br />
6.4.1.4 Term<strong>in</strong>al Server Connection Icons<br />
The Display Servers Term<strong>in</strong>al Servers branch can be expanded to show the Term<strong>in</strong>al Servers that are<br />
configured. The Term<strong>in</strong>al Servers can be expanded to show the member term<strong>in</strong>al servers. The member<br />
term<strong>in</strong>al servers can be expanded to show the term<strong>in</strong>als connected to them. The monitor screen color<br />
and the lightn<strong>in</strong>g bolt color <strong>in</strong>dicate the term<strong>in</strong>al’s status on the Term<strong>in</strong>al Server.<br />
Term<strong>in</strong>al Server Connection Icons<br />
The monitor screen color <strong>in</strong>dicates the Th<strong>in</strong>Manager Server connection status. The lightn<strong>in</strong>g bolt color<br />
<strong>in</strong>dicates the Term<strong>in</strong>al Server connection status.<br />
<br />
<br />
<br />
<br />
<br />
A Red monitor screen <strong>in</strong>dicates that the term<strong>in</strong>al is off or unable to communicate to the<br />
Th<strong>in</strong>Manager Server.<br />
A Green monitor screen <strong>in</strong>dicates that the term<strong>in</strong>al is on and able to communicate to the<br />
Th<strong>in</strong>Manager Server.<br />
A Red lightn<strong>in</strong>g bolt represents a lack of active connection to the term<strong>in</strong>al server.<br />
A Green lightn<strong>in</strong>g bolt represents a connection to the term<strong>in</strong>al server with an active session.<br />
A Yellow lightn<strong>in</strong>g bolt represents a connection to the term<strong>in</strong>al server with a session that is the<br />
backup session <strong>in</strong> Instant Failover mode.<br />
ACP Th<strong>in</strong>Manager <strong>6.0</strong> Th<strong>in</strong>Manager Interface 77
6.4.1.5 VCenter Server Icons<br />
VCenter Server Tree Icons<br />
6.4.1.6 Display Clients Branch<br />
The Display Clients section of the tree is where the usage of a Display Server is def<strong>in</strong>ed. Display Clients<br />
are added to the term<strong>in</strong>al configuration. Examples of Display Clients are Term<strong>in</strong>al Services Display<br />
Clients, IP Camera Display Clients, Term<strong>in</strong>al Shadow Display Clients, and Workstation Display Clients.<br />
Display Client Tree Branch<br />
6.4.1.7 TermSecure User Branch<br />
The TermSecure Users branch can be expanded.<br />
78 Th<strong>in</strong>Manager Interface ACP Th<strong>in</strong>Manager <strong>6.0</strong>
TermSecure User Tree<br />
The TermSecure User branch expands to show TermSecure User Groups.<br />
A Two-headed icon represents a TermSecure User Group. This can be expanded to show member<br />
TermSecure Users.<br />
A S<strong>in</strong>gle-headed icon represents a TermSecure User. This can be expanded to show any Display<br />
Clients that are assigned to the TermSecure User.<br />
A S<strong>in</strong>gle-head with Term<strong>in</strong>al icon represents a TermSecure User that is logged <strong>in</strong> on a term<strong>in</strong>al. The<br />
term<strong>in</strong>al name is shown <strong>in</strong> parentheses. This can be expanded to show any Display Clients that are<br />
assigned to the TermSecure User.<br />
A TermSecure User that is not active or logged <strong>in</strong>to a term<strong>in</strong>al server will show the normal Display Client<br />
icon.<br />
A TermSecure User that is active and logged <strong>in</strong>to a term<strong>in</strong>al will show an icon of the TermSecure User<br />
head with the Display Client<br />
6.5 Details Pane<br />
The Details Pane has tabs to provide additional <strong>in</strong><strong>format</strong>ion. Highlight<strong>in</strong>g different items <strong>in</strong> the tree will<br />
display a different set of tabs and the correspond<strong>in</strong>g set of <strong>in</strong><strong>format</strong>ion.<br />
6.5.1 Th<strong>in</strong>Manager Server Detail Tabs<br />
Highlight<strong>in</strong>g the green Th<strong>in</strong>Manager Server will show:<br />
Configuration - These are the configuration parameters set <strong>in</strong> the Th<strong>in</strong>Manager Server<br />
Configuration Wizard and <strong>in</strong>clude the Event Messag<strong>in</strong>g summary.<br />
Licenses - This displays the <strong>in</strong>stalled licenses, the quantity used and the quantity available.<br />
Th<strong>in</strong>Manager lists all the license files and identifies whether that are valid or <strong>in</strong>valid. This tab<br />
will display licenses for both Th<strong>in</strong>Manager Servers if the pair is auto-synchronized.<br />
Versions - This displays the version numbers of Th<strong>in</strong>Manager, the firmware, and the<br />
TermCap database.<br />
Synchronization – This will show the synchronization status of the Th<strong>in</strong>Manager Server.<br />
See Automatic Synchronization for details.<br />
Event Log - This displays events for the Th<strong>in</strong>Manager Server. The events and duration are<br />
configurable <strong>in</strong> the Th<strong>in</strong>Manager Server Configuration wizard. See Event Selection Page for<br />
details.<br />
Report – This will display the selected report for the Th<strong>in</strong>Manager Server. See Reports for<br />
details.<br />
ACP Th<strong>in</strong>Manager <strong>6.0</strong> Th<strong>in</strong>Manager Interface 79
IP Assignment – This will display the IP address, MAC Address, and Term<strong>in</strong>al name of PXE<br />
boot clients when the Th<strong>in</strong>Manager PXE Server is configured to assign IP addresses to<br />
term<strong>in</strong>als. See PXE Server Configuration Wizard for details.<br />
Th<strong>in</strong>Manager Server Tabs<br />
6.5.2 Term<strong>in</strong>al Group Detail Tabs<br />
Highlight<strong>in</strong>g a Group will show:<br />
Configuration - These are the configuration parameters set <strong>in</strong> the Group Configuration<br />
Wizard and <strong>in</strong>clude Term<strong>in</strong>al Server assignments, video sett<strong>in</strong>gs, and monitor<strong>in</strong>g sett<strong>in</strong>gs.<br />
See Term<strong>in</strong>al Group Configuration Wizard for details.<br />
Modules - This lists the assigned modules and parameters for the Group. See Modules for<br />
details.<br />
Schedule – This will display any events scheduled for the Group. See Term<strong>in</strong>al Schedule for<br />
details.<br />
Properties - This is blank for a Group.<br />
Event Log - This is blank for a Group.<br />
Shadow – This is blank for a Group<br />
Report – This will display the selected report for the group. See Reports for details.<br />
80 Th<strong>in</strong>Manager Interface ACP Th<strong>in</strong>Manager <strong>6.0</strong>
Group Tabs – Modules<br />
6.5.3 Term<strong>in</strong>al Detail Tabs<br />
Highlight<strong>in</strong>g a Term<strong>in</strong>al will show:<br />
Configuration - These are the configuration parameters set <strong>in</strong> the Term<strong>in</strong>al Configuration<br />
Wizard and <strong>in</strong>clude Term<strong>in</strong>al Server assignments, video sett<strong>in</strong>gs, and monitor<strong>in</strong>g sett<strong>in</strong>gs.<br />
See Term<strong>in</strong>al Configuration Wizard for details.<br />
Modules - This lists the assigned modules and parameters for the Term<strong>in</strong>al. See Modules for<br />
details.<br />
Schedule – This will display any events scheduled for the term<strong>in</strong>al. See Term<strong>in</strong>al Schedule<br />
for details.<br />
Properties - This shows the IP address, firmware version, make and model, CPU, memory<br />
usage, Term<strong>in</strong>al Up Time, CPU load, and BootROM version of the Term<strong>in</strong>al.<br />
Event Log - This shows the term<strong>in</strong>al events and term<strong>in</strong>al configuration events for that<br />
term<strong>in</strong>al, if event logg<strong>in</strong>g is enabled <strong>in</strong> the Th<strong>in</strong>Manager Configuration Wizard. See Event<br />
Selection Page for details.<br />
Shadow – This tab shows what the term<strong>in</strong>al is display<strong>in</strong>g on its monitor. Adm<strong>in</strong>istrators can<br />
<strong>in</strong>teract with the session while Th<strong>in</strong>Manager Power Users can view the session but not<br />
control it. See Th<strong>in</strong>Manager Security Groups for details.<br />
Report – This will display the selected report for the term<strong>in</strong>al. See Reports for details.<br />
ACP Th<strong>in</strong>Manager <strong>6.0</strong> Th<strong>in</strong>Manager Interface 81
Term<strong>in</strong>al Tabs – Shadow<br />
6.5.4 Term<strong>in</strong>al Server Detail Tabs<br />
Highlight<strong>in</strong>g the blue Term<strong>in</strong>al Server branch will show:<br />
Status - This shows the status of the communication connection between the local<br />
Th<strong>in</strong>Manager Server and the def<strong>in</strong>ed Term<strong>in</strong>al Servers and Th<strong>in</strong>Manager Servers. This<br />
shows whether the local Th<strong>in</strong>Manager Server is able to retrieve the updated resource<br />
<strong>in</strong><strong>format</strong>ion used <strong>in</strong> determ<strong>in</strong><strong>in</strong>g the SmartSession Server Rank<strong>in</strong>g. See Term<strong>in</strong>al Server<br />
Name Page for details.<br />
Summary - This will report <strong>in</strong><strong>format</strong>ion on the term<strong>in</strong>al servers like available memory, uptime,<br />
CPU utilization, and operat<strong>in</strong>g system.<br />
Event Log - This shows the term<strong>in</strong>al events and term<strong>in</strong>al configuration events for that<br />
term<strong>in</strong>al server, if event logg<strong>in</strong>g is enabled <strong>in</strong> the Th<strong>in</strong>Manager Configuration Wizard. See<br />
Event Selection Page for details.<br />
The Connection Status of the Term<strong>in</strong>al Servers may have different messages:<br />
OK <strong>in</strong>dicates a good connection.<br />
WTSAPI32.dll connection failed occurs when the term<strong>in</strong>al server is off or unreachable.<br />
The RPC Server is unavailable occurs when the term<strong>in</strong>al server is off or unreachable.<br />
No log<strong>in</strong> <strong>in</strong><strong>format</strong>ion supplied <strong>in</strong>dicates that the Term<strong>in</strong>al Server didn’t have a username<br />
and password added <strong>in</strong> the Term<strong>in</strong>al Server List Wizard.<br />
82 Th<strong>in</strong>Manager Interface ACP Th<strong>in</strong>Manager <strong>6.0</strong>
User specified does not have permission to connect <strong>in</strong>dicates that the Term<strong>in</strong>al Server<br />
had an <strong>in</strong>valid username and password added <strong>in</strong> the Term<strong>in</strong>al Server List Wizard.<br />
Term<strong>in</strong>al Servers Tabs – Status<br />
Highlight<strong>in</strong>g an <strong>in</strong>dividual Term<strong>in</strong>al Server will show:<br />
Configuration - This shows the <strong>in</strong>stalled Client Communication Protocols and the<br />
SmartSession sett<strong>in</strong>gs for the Term<strong>in</strong>al Server. See Term<strong>in</strong>al Server Capabilities Page for<br />
details.<br />
Properties – This tab displays the server resource data like total memory, free memory,<br />
uptime, and CPU speed.<br />
Schedule – This will display any events scheduled for the Group. See Term<strong>in</strong>al Server<br />
Schedule for details.<br />
Users - This tab displays <strong>in</strong><strong>format</strong>ion from the Term<strong>in</strong>al Services Manager. It shows users<br />
that are logged <strong>in</strong>to the Term<strong>in</strong>al Server. Right click<strong>in</strong>g on a user will show options that allow<br />
the session to be Reset (logged off), Disconnected, or have a message sent to it.<br />
Sessions - This tab displays <strong>in</strong><strong>format</strong>ion from the Term<strong>in</strong>al Services Manager. It shows users<br />
that are logged <strong>in</strong>to the Term<strong>in</strong>al Server. Right click<strong>in</strong>g on a user will show options that allow<br />
the session to be Reset (logged off), Disconnected, or have a message sent to it.<br />
Processes - This tab displays <strong>in</strong><strong>format</strong>ion from the Term<strong>in</strong>al Services Manager. It shows the<br />
processes runn<strong>in</strong>g on the Term<strong>in</strong>al Server and can have them sorted by Session ID (users)<br />
or Process Name. Right click<strong>in</strong>g on a process will give the option to kill the process.<br />
Graph – This tab will display the CPU usage and memory usage of the term<strong>in</strong>al server as a<br />
graph. This graph can conta<strong>in</strong> one hour of historical data.<br />
ACP Th<strong>in</strong>Manager <strong>6.0</strong> Th<strong>in</strong>Manager Interface 83
Event Log - This shows the term<strong>in</strong>al events and term<strong>in</strong>al configuration events for that<br />
term<strong>in</strong>al, if event logg<strong>in</strong>g is enabled <strong>in</strong> the Th<strong>in</strong>Manager Configuration Wizard. Event<br />
Selection Page for details.<br />
Connect – This tab will open a connection from Th<strong>in</strong>Manager to the term<strong>in</strong>al server. This<br />
session allows adm<strong>in</strong>istrators to manage the term<strong>in</strong>al server from with<strong>in</strong> Th<strong>in</strong>Manager. See<br />
Connect Options for details.<br />
Report – This will display the selected report for the term<strong>in</strong>al server. See Reports for details.<br />
Term<strong>in</strong>al Server Tabs - Users<br />
6.5.5 Modify<strong>in</strong>g a Term<strong>in</strong>al<br />
Modify<strong>in</strong>g a term<strong>in</strong>al allows you to reconfigure the term<strong>in</strong>al or change group sett<strong>in</strong>gs such as touch<br />
screen usage, video resolution, or to assign it to a term<strong>in</strong>al server.<br />
To modify a term<strong>in</strong>al open the Term<strong>in</strong>al Configuration Wizard or the Term<strong>in</strong>al Properties by either:<br />
Highlight<strong>in</strong>g the term<strong>in</strong>al <strong>in</strong> the Th<strong>in</strong>Manager tree pane by click<strong>in</strong>g on the term<strong>in</strong>al name or<br />
icon and select Edit > Modify from the Th<strong>in</strong>Manager menu bar.<br />
Right-click<strong>in</strong>g on the term<strong>in</strong>al icon <strong>in</strong> the Th<strong>in</strong>Manager tree pane and select Modify.<br />
Double-click<strong>in</strong>g on a term<strong>in</strong>al icon <strong>in</strong> the Th<strong>in</strong>Manager tree pane.<br />
This will launch the Term<strong>in</strong>al Configuration Wizard, allow<strong>in</strong>g changes to be made.<br />
Note: The term<strong>in</strong>al will need to be restarted for the changes to take effect.<br />
84 Th<strong>in</strong>Manager Interface ACP Th<strong>in</strong>Manager <strong>6.0</strong>
6.5.6 Delet<strong>in</strong>g a Term<strong>in</strong>al<br />
A term<strong>in</strong>al can be deleted from the Th<strong>in</strong>Manager by:<br />
Highlight<strong>in</strong>g the term<strong>in</strong>al <strong>in</strong> the Th<strong>in</strong>Manager tree pane and select<strong>in</strong>g Edit > Delete from the<br />
Th<strong>in</strong>Manager menu bar<br />
Right-click<strong>in</strong>g a term<strong>in</strong>al icon <strong>in</strong> the tree pane of Th<strong>in</strong>Manager and select<strong>in</strong>g Delete<br />
Term<strong>in</strong>al.<br />
6.5.7 Restart<strong>in</strong>g a Term<strong>in</strong>al<br />
A restart will reload any changes to a term<strong>in</strong>al configuration or firmware without a cycl<strong>in</strong>g of power.<br />
A term<strong>in</strong>al or group can be restarted by:<br />
Select<strong>in</strong>g Tools>Restart Term<strong>in</strong>al from the Th<strong>in</strong>Manager menu bar. This will restart all the<br />
term<strong>in</strong>als on the server if the server is highlighted. If a group is highlighted, all members of<br />
the group will be highlighted. If a term<strong>in</strong>al is highlighted, the term<strong>in</strong>al is restarted.<br />
Right-click<strong>in</strong>g a Th<strong>in</strong>Manager Server icon <strong>in</strong> the tree pane of Th<strong>in</strong>Manager and select<strong>in</strong>g<br />
Restart Term<strong>in</strong>als. This will reboot all the term<strong>in</strong>als <strong>in</strong> the tree.<br />
Right-click<strong>in</strong>g a group icon <strong>in</strong> the tree pane of Th<strong>in</strong>Manager and select<strong>in</strong>g Restart<br />
Term<strong>in</strong>als. This will reboot all the term<strong>in</strong>als <strong>in</strong> the group.<br />
Right- click<strong>in</strong>g a term<strong>in</strong>al icon <strong>in</strong> the tree pane of Th<strong>in</strong>Manager and select<strong>in</strong>g Restart<br />
Term<strong>in</strong>al. This will restart only the highlighted term<strong>in</strong>al.<br />
6.5.8 Reboot<strong>in</strong>g a Term<strong>in</strong>al<br />
A reboot will cycle power to the term<strong>in</strong>al, reload<strong>in</strong>g firmware and configuration.<br />
A term<strong>in</strong>al or group can be rebooted by:<br />
Select<strong>in</strong>g Tools>Reboot Term<strong>in</strong>als from the Th<strong>in</strong>Manager menu bar. This will reboot all the<br />
term<strong>in</strong>als on the server if the server is highlighted. If a group is highlighted, all members of<br />
the group will be highlighted. If a term<strong>in</strong>al is highlighted, the term<strong>in</strong>al is rebooted.<br />
6.5.9 Renam<strong>in</strong>g a Term<strong>in</strong>al<br />
Term<strong>in</strong>als can be renamed by:<br />
Highlight<strong>in</strong>g the Term<strong>in</strong>al and select<strong>in</strong>g Edit > Rename.<br />
Right-click<strong>in</strong>g the Term<strong>in</strong>al and select<strong>in</strong>g Rename.<br />
Note: Renam<strong>in</strong>g a term<strong>in</strong>al can be accomplished the same way that files or directories are renamed <strong>in</strong><br />
W<strong>in</strong>dows Explorer. S<strong>in</strong>gle click twice on the term<strong>in</strong>al name; this will draw a box around the name and<br />
highlight it. Type the new term<strong>in</strong>al name.<br />
ACP Th<strong>in</strong>Manager <strong>6.0</strong> Th<strong>in</strong>Manager Interface 85
Renam<strong>in</strong>g a Term<strong>in</strong>al<br />
The term<strong>in</strong>al name should be less than 15 characters because of limitations on the term<strong>in</strong>al server.<br />
Tip on s<strong>in</strong>gle click<strong>in</strong>g twice: Click once to highlight the name, move the mouse slightly and click aga<strong>in</strong>.<br />
This will prevent W<strong>in</strong>dows from confus<strong>in</strong>g the two s<strong>in</strong>gle clicks with a double click.<br />
86 Th<strong>in</strong>Manager Interface ACP Th<strong>in</strong>Manager <strong>6.0</strong>
7 Menu Items<br />
7.1 Edit<br />
Edit conta<strong>in</strong>s commands for add<strong>in</strong>g, delet<strong>in</strong>g, and chang<strong>in</strong>g configurations. The functions listed are<br />
dependent on what is highlighted <strong>in</strong> the tree.<br />
7.1.1 Add Term<strong>in</strong>al<br />
Edit > Add Term<strong>in</strong>al will launch the Term<strong>in</strong>al Creation Wizard to start the process of add<strong>in</strong>g a new<br />
term<strong>in</strong>al. This command will be displayed when the Th<strong>in</strong>Manager Server, Term<strong>in</strong>als branch, or a Term<strong>in</strong>al<br />
Group is highlighted.<br />
See Term<strong>in</strong>al Configuration Wizard for details.<br />
7.1.2 Add Term<strong>in</strong>al Group<br />
Edit > Add Term<strong>in</strong>al Group will launch the Group Creation Wizard to start the process of add<strong>in</strong>g a new<br />
group of term<strong>in</strong>als. This command will be displayed when the Th<strong>in</strong>Manager Server, Term<strong>in</strong>als branch, or<br />
a Term<strong>in</strong>al Group is highlighted.<br />
See Term<strong>in</strong>al Group Configuration Wizard for details.<br />
7.1.3 Add Th<strong>in</strong>Manager Server<br />
Edit > Add Th<strong>in</strong>Manager Server will allow the remote adm<strong>in</strong>istration of multiple Th<strong>in</strong>Manager Servers by<br />
add<strong>in</strong>g an additional Th<strong>in</strong>Manager Server to the Th<strong>in</strong>Manager Server drop-down box above the tree. A<br />
user logged <strong>in</strong> with adm<strong>in</strong>istrative rights can connect to multiple Th<strong>in</strong>Manager servers for management.<br />
Select<strong>in</strong>g Add Th<strong>in</strong>Manager Server will launch a dialog box.<br />
Add Th<strong>in</strong>Manager Server Dialog Box<br />
ACP Th<strong>in</strong>Manager <strong>6.0</strong><br />
87 Menu Items
Enter computer name or the IP address of a Th<strong>in</strong>Manager server. This adds the Th<strong>in</strong>Manager Server to<br />
the Th<strong>in</strong>Manager Server drop-down box above the tree pane of the local Th<strong>in</strong>Manager so that the<br />
configuration can be displayed <strong>in</strong> the tree when needed.<br />
Note: You should only add Th<strong>in</strong>Manager Servers of the same version to the list.<br />
Th<strong>in</strong>Manager Add<strong>in</strong>g an Additional Th<strong>in</strong>Manager Server<br />
The new Th<strong>in</strong>Manager Server will be added to the Th<strong>in</strong>Manager Server drop-down box. Select<strong>in</strong>g the<br />
new Th<strong>in</strong>Manager Server <strong>in</strong> the drop-down will display the tree for that Th<strong>in</strong>Manager Server.<br />
Members of the Adm<strong>in</strong>istrator group or the Th<strong>in</strong>Manager Adm<strong>in</strong>istrators group have full control of the<br />
remote Th<strong>in</strong>Manager Server and can make changes as needed. Members of the Th<strong>in</strong>Manager Power<br />
Users group can monitor the connection.<br />
See Th<strong>in</strong>Manager Security Groups for more details.<br />
If Th<strong>in</strong>Manager is <strong>in</strong>stalled on a W<strong>in</strong>dows XP Pro workstation, it cannot be added to a Th<strong>in</strong>Manager on a<br />
W<strong>in</strong>dows 2003 unless a security option is changed.<br />
In W<strong>in</strong>dows XP Pro select Start > Control Panel > Adm<strong>in</strong>istrative Tools > Local Security Policy.<br />
88 Menu Items ACP Th<strong>in</strong>Manager <strong>6.0</strong>
W<strong>in</strong>dows XP Pro – Local Security Sett<strong>in</strong>gs<br />
Highlight the Security Options folder <strong>in</strong> the Local Security Sett<strong>in</strong>gs program. Change the Network<br />
access: Shar<strong>in</strong>g and Security model for local accounts from the default Guest Only to Classic to<br />
match the sett<strong>in</strong>g of the W<strong>in</strong>dows 2003 term<strong>in</strong>al server.<br />
7.1.4 Remove Th<strong>in</strong>Manager Server<br />
Edit > Remove Th<strong>in</strong>Manager Server will delete a highlighted Th<strong>in</strong>Manager Server from the tree.<br />
ACP Th<strong>in</strong>Manager <strong>6.0</strong> Menu Items 89
7.1.5 Delete<br />
Edit > Delete will launch a message box that will remove a highlighted Th<strong>in</strong>Manager Server, group or<br />
term<strong>in</strong>al. Delet<strong>in</strong>g a remote Th<strong>in</strong>Manager Server will remove it from the local list.<br />
Delete Group Message Box<br />
Delet<strong>in</strong>g a group will give the option of delet<strong>in</strong>g the group term<strong>in</strong>als or mov<strong>in</strong>g them under the server<br />
without a group.<br />
7.1.6 Modify<br />
The function of Edit > Modify depends on what tree icon is highlighted when Modify is selected.<br />
<br />
<br />
<br />
<br />
<br />
<br />
<br />
Modify will launch the Th<strong>in</strong>Manager Server Configuration Wizard for a highlighted<br />
Th<strong>in</strong>Manager Server. This allows the Th<strong>in</strong>Manager Server to be configured as described <strong>in</strong><br />
the Th<strong>in</strong>Manager Server Configuration Wizard.<br />
Modify will launch the Term<strong>in</strong>al Group Configuration Wizard for a highlighted term<strong>in</strong>al<br />
group. Modifications can be made as described <strong>in</strong> Term<strong>in</strong>al Group Configuration Wizard.<br />
Modify will launch the Term<strong>in</strong>al Configuration Wizard for a highlighted term<strong>in</strong>al.<br />
Modifications can be made as described <strong>in</strong> Term<strong>in</strong>al Configuration Wizard.<br />
Modify will launch the appropriate Display Server Configuration Wizard for a highlighted<br />
Display Server member.<br />
Modify will launch the appropriate VCenter Server Property Wizard for a highlighted<br />
VCenter member.<br />
Modify will launch the appropriate Display Client Configuration Wizard for a highlighted<br />
Display Client member.<br />
Modify will launch the TermSecure Configuration Wizard for a highlighted TermSecure<br />
user or group.<br />
7.1.7 Rename<br />
Edit > Rename will allow a highlighted tree item to have its name changed.<br />
Note: The term<strong>in</strong>al name should be less than 15 characters because of limitations of the term<strong>in</strong>al server.<br />
90 Menu Items ACP Th<strong>in</strong>Manager <strong>6.0</strong>
7.1.8 Lock<br />
When a tree member is opened for modification, the entry <strong>in</strong> the configuration is automatically locked to<br />
prevent two people from mak<strong>in</strong>g changes at one time.<br />
Edit > Lock will manually lock the configuration of a tree member to prevent it from be<strong>in</strong>g changed. A<br />
lock icon will designate the locked state.<br />
Lock Icons<br />
7.1.9 Unlock<br />
Edit > Unlock will manually unlock a tree member that was locked while be<strong>in</strong>g modified. This is used if<br />
the server was shut down while a tree member was locked, prevent<strong>in</strong>g the member from be<strong>in</strong>g unlocked<br />
automatically when the modifications are complete.<br />
Us<strong>in</strong>g the Unlock function will display a warn<strong>in</strong>g to alert the user.<br />
Lock Warn<strong>in</strong>g Message<br />
Unlock<strong>in</strong>g a locked member can cause a loss of configuration data if another user is modify<strong>in</strong>g it.<br />
Note: This tool is to be used only when a tree member rema<strong>in</strong>s locked due to an unexpected server shut<br />
down while a member is be<strong>in</strong>g configured. Us<strong>in</strong>g this tool while another is configur<strong>in</strong>g that term<strong>in</strong>al can<br />
lead to corruption of the database.<br />
7.1.10 F<strong>in</strong>d<br />
Edit > F<strong>in</strong>d launches a F<strong>in</strong>d dialog that searches the tree for the item typed <strong>in</strong>to the F<strong>in</strong>d field.<br />
ACP Th<strong>in</strong>Manager <strong>6.0</strong> Menu Items 91
F<strong>in</strong>d Dialog Box<br />
The F<strong>in</strong>d function has several checkboxes to enhance the search:<br />
Search Names – this, when checked, will search for a name entered <strong>in</strong> the F<strong>in</strong>d field.<br />
Search IP Addresses - this, when checked, will search for an IP address entered <strong>in</strong> the F<strong>in</strong>d<br />
field.<br />
Search Term<strong>in</strong>al Ids - this, when checked, will search for a MAC address/Term<strong>in</strong>al ID entered <strong>in</strong><br />
the F<strong>in</strong>d field.<br />
Search Term<strong>in</strong>al Models – this, when checked, will search for a th<strong>in</strong> client model entered <strong>in</strong> the<br />
F<strong>in</strong>d field.<br />
Exact Match Only - this, when checked, will limit searches to exact matches to the name entered<br />
<strong>in</strong> the F<strong>in</strong>d field.<br />
CTRL+F are the short cut key to launch F<strong>in</strong>d.<br />
7.1.11 F<strong>in</strong>d Next<br />
Edit > F<strong>in</strong>d Next will cont<strong>in</strong>ue search<strong>in</strong>g the tree for the next <strong>in</strong>stance of the text <strong>in</strong> the F<strong>in</strong>d field of the<br />
F<strong>in</strong>d dialog box.<br />
F3 is the shortcut key for this function.<br />
7.2 Manage<br />
7.2.1 Th<strong>in</strong>Manager Server List<br />
Manage > Th<strong>in</strong>Manager Server List will launch the Th<strong>in</strong>Manager List Wizard. See Th<strong>in</strong>Manager<br />
Server List for details.<br />
7.2.2 TermSecure Access Groups<br />
Select<strong>in</strong>g Manage > TermSecure Access Groups will launch the Access Groups w<strong>in</strong>dow to create<br />
Permission Groups for use with TermSecure.<br />
See Permissions for more details.<br />
92 Menu Items ACP Th<strong>in</strong>Manager <strong>6.0</strong>
Access Groups W<strong>in</strong>dow<br />
Select the OK button to accept the changes and close the w<strong>in</strong>dow.<br />
Select the Edit button to change the highlighted Access Group.<br />
Select the Add button to add a new Access Group.<br />
Select the Delete button to remove the highlighted Access Group.<br />
If the Add button is selected, an Access Group Creation w<strong>in</strong>dow will be displayed.<br />
Access Group Creation W<strong>in</strong>dow<br />
Enter a name for the new Access Group and select OK to create the group.<br />
ACP Th<strong>in</strong>Manager <strong>6.0</strong> Menu Items 93
TermSecure Access Groups Added<br />
Def<strong>in</strong>ed Access Groups will be displayed <strong>in</strong> the Access Group w<strong>in</strong>dow. See Permissions for more<br />
details.<br />
7.2.3 Packages<br />
A Package is a version of Firmware and the Modules that belong with it. Install<strong>in</strong>g a package will <strong>in</strong>stall<br />
both firmware and modules.<br />
Manage > Packages will launch the Package Manager.<br />
Package Manager<br />
94 Menu Items ACP Th<strong>in</strong>Manager <strong>6.0</strong>
The Package Manager w<strong>in</strong>dow allows you to set the version of package for a make and model of the<br />
hardware or allows you to <strong>in</strong>dividually configure the package per term<strong>in</strong>al.<br />
Model Specific Default Package:<br />
Manufacturer – This lets you select the Manufacturer of the term<strong>in</strong>als to configure.<br />
Model – This lets you select the specific model of the term<strong>in</strong>als to configure.<br />
<br />
<br />
<br />
<br />
<br />
<br />
Package – This lets you select what package to apply to all the term<strong>in</strong>als of the selected make<br />
and model.<br />
Allow the sett<strong>in</strong>gs of the Package <strong>in</strong> Term<strong>in</strong>al Configuration – The checkbox, when selected,<br />
will allow the <strong>in</strong>dividual selection of the term<strong>in</strong>al’s package <strong>in</strong> the Term<strong>in</strong>al Firmware Package<br />
drop-down on the Term<strong>in</strong>al Hardware page of the Term<strong>in</strong>al Configuration Wizard.<br />
Install Package – This button opens a file browser to select the new package to load. These are<br />
found on the Th<strong>in</strong>Manager web site (http://www.th<strong>in</strong>manager.com/support/downloads.php).<br />
Upgrad<strong>in</strong>g Th<strong>in</strong>Manager will update the packages.<br />
Delete Package – This allows you to remove a package, if desired.<br />
OK – This buttons accepts the changes and closes the w<strong>in</strong>dow.<br />
Cancel – This closes the w<strong>in</strong>dow without mak<strong>in</strong>g the changes.<br />
7.2.3.1 Delete Firmware Packages<br />
Delete Firmware Packages W<strong>in</strong>dow<br />
Select<strong>in</strong>g the Delete Packages button on the Packages Manager w<strong>in</strong>dow will launch the Delete<br />
Firmware Package w<strong>in</strong>dow.<br />
Select the firmware version you wish to remove from the drop-down. Select Delete to delete the file or<br />
select Cancel to return to the Packages Manager w<strong>in</strong>dow.<br />
7.2.4 Web Management<br />
Screentronix (www.screentronix.com) provides a secure VPN that allows you to connect to a<br />
Th<strong>in</strong>Manager Server from a remote browser to aid <strong>in</strong> management. This is done on the Web<br />
Management w<strong>in</strong>dow.<br />
Select Manage > Web Management to launch the Web Management w<strong>in</strong>dow.<br />
ACP Th<strong>in</strong>Manager <strong>6.0</strong> Menu Items 95
Web Management W<strong>in</strong>dow<br />
The Web Management w<strong>in</strong>dow allows toy to register your Th<strong>in</strong>Manager Server with Screentronix to allow<br />
a secure VPN to be created as needed for remote support and management.<br />
Mach<strong>in</strong>e ID – Enter the number for this mach<strong>in</strong>e that was generated on the Screentronix site.<br />
User Name – Enter your Screentronix user name <strong>in</strong> this field.<br />
Password – Enter your Screentronix password <strong>in</strong> this field.<br />
Submit – Select this button to send the <strong>in</strong><strong>format</strong>ion and register this mach<strong>in</strong>e with Screentronix.<br />
Install Demo Code – Use this button to enter a Demo license code. This is available from the f<br />
Done – This closes the w<strong>in</strong>dow.<br />
7.2.5 DNS Configuration<br />
Manage > DNS Configuration will launch the DNS Configuration Wizard. See DNS Configuration for<br />
details.<br />
7.2.6 PXE Server<br />
Manage > PXE Server will launch the PXE Server Configuration Wizard. See PXE Server Configuration<br />
Wizard for details.<br />
7.2.7 Configure Default Term<strong>in</strong>al<br />
Manage > Configure Default Term<strong>in</strong>al will launch the Term<strong>in</strong>al Properties for the “Default” term<strong>in</strong>al. This<br />
default term<strong>in</strong>al is used as a template that term<strong>in</strong>als created dur<strong>in</strong>g Auto-Create are based on. See Auto-<br />
Creation of Term<strong>in</strong>als for details on Auto-Creation of term<strong>in</strong>als.<br />
96 Menu Items ACP Th<strong>in</strong>Manager <strong>6.0</strong>
7.2.8 Restore Configuration<br />
Manage > Restore Configuration will allow a backed up Th<strong>in</strong>Manager configuration to be applied to the<br />
Th<strong>in</strong>Manager Server. Select Restore Configuration to launch the desired Th<strong>in</strong>Manager Configuration file<br />
<strong>in</strong> the browse w<strong>in</strong>dow and select Open. The backup copy will overwrite the exist<strong>in</strong>g configuration.<br />
Restore Th<strong>in</strong>Manager Configuration<br />
ACP Th<strong>in</strong>Manager <strong>6.0</strong> Menu Items 97
7.2.9 Backup Configuration<br />
Manage > Backup Configuration allows the Th<strong>in</strong>Manager Configuration to be saved. Select Backup<br />
Configuration to launch a browse w<strong>in</strong>dow and select the Save button to save a backup copy.<br />
Backup Th<strong>in</strong>Manager Configuration<br />
7.2.10 Synchronize Configuration<br />
Manage > Synchronize Configuration allows the configuration of multiple Th<strong>in</strong>Manager Servers to be<br />
kept identical so that a term<strong>in</strong>al will boot with the same configuration regardless of what Th<strong>in</strong>Manager<br />
Server the term<strong>in</strong>al connects to.<br />
Note: Th<strong>in</strong>Manager has an Automatic Synchronization feature that will keep two Th<strong>in</strong>Manager Servers<br />
synchronized without requir<strong>in</strong>g a manual <strong>in</strong>put. See Th<strong>in</strong>Manager Server List Page for details.<br />
Although Automatic Synchronization is the preferred method of synchronization, <strong>Manual</strong> Synchronization<br />
is useful to synchronize the configurations on the primary and backup Th<strong>in</strong>Manager Servers before<br />
turn<strong>in</strong>g on the Automatic Synchronization.<br />
Select<strong>in</strong>g Synchronize Configuration will launch the Synchronize Th<strong>in</strong>Manager Server<br />
Configurations Wizard. See <strong>Manual</strong> Synchronization for details.<br />
98 Menu Items ACP Th<strong>in</strong>Manager <strong>6.0</strong>
7.2.11 Reconnect<br />
This command will re<strong>in</strong>itiate the connection between the highlighted Th<strong>in</strong>Manager Server and the<br />
Th<strong>in</strong>Server service.<br />
7.2.12 Disconnect<br />
This command will disconnect the connection between the highlighted Th<strong>in</strong>Manager Server and the<br />
Th<strong>in</strong>Server service.<br />
7.3 Install<br />
Install is a new menu item that conta<strong>in</strong>s the commands from Manage that <strong>in</strong>volve <strong>in</strong>stallation.<br />
7.3.1 Licenses<br />
Install > License opens up the Licens<strong>in</strong>g dialog box.<br />
Licens<strong>in</strong>g W<strong>in</strong>dow<br />
The Master License Number field shows the number of the <strong>in</strong>stalled master license. See Creat<strong>in</strong>g a<br />
Master License for details.<br />
The Licens<strong>in</strong>g w<strong>in</strong>dow displays several columns.<br />
<br />
<br />
<br />
License Number – This displays the component product license numbers <strong>in</strong>cluded <strong>in</strong> the<br />
<strong>in</strong>stalled master license. A green monitor <strong>in</strong>dicates a valid license while <strong>in</strong>valid licenses will<br />
display a red “X”.<br />
Description – This lists the product license type.<br />
Location – This lists the Th<strong>in</strong>Manager Server(s) that the component product license applies to.<br />
ACP Th<strong>in</strong>Manager <strong>6.0</strong> Menu Items 99
Redundancy – This <strong>in</strong>dicates whether the license type is fully redundant or mirrored.<br />
Expiration – This displays the license expiration date.<br />
The Installation ID field displays the Installation ID number that is used <strong>in</strong> the license activation process.<br />
Th<strong>in</strong>Manager Servers that are auto-synchronized will display the Install ID of both Th<strong>in</strong>Manager Servers.<br />
Install License – This button launches a file browser that allows a license file to be added.<br />
Delete License – This button allows a highlighted license to be deleted.<br />
Details – This button displays the details of a highlighted license.<br />
Install Demo Code – This button allows a Demo Code to be added to give temporary<br />
functionality.<br />
Show Old Licenses – This lists the previously <strong>in</strong>stalled Th<strong>in</strong>Manager 3.x licenses on the<br />
Th<strong>in</strong>Manager Server.<br />
Done – This button closes the Licens<strong>in</strong>g w<strong>in</strong>dow.<br />
See Th<strong>in</strong>Manager Licens<strong>in</strong>g for details.<br />
7.3.2 TermCap Database<br />
Th<strong>in</strong>Manager has a Term<strong>in</strong>al Capability Database (termcap.db) that provides Th<strong>in</strong>Manager with<br />
the configuration parameters for each th<strong>in</strong> client model. At each term<strong>in</strong>al connection, the TermCap<br />
database is checked and an <strong>in</strong>tegrity check is performed. If the configuration does not match the term<strong>in</strong>al<br />
specifications, Th<strong>in</strong>Manager may reconfigure the term<strong>in</strong>al to acceptable parameters.<br />
Term<strong>in</strong>al Capabilities Integrity Check<br />
The Term<strong>in</strong>al Capability database can be updated with the current release from the Th<strong>in</strong>Manager web<br />
site (www.th<strong>in</strong>manager.com).<br />
To update the Term<strong>in</strong>al Capabilities Database, select Install > TermCap Database.<br />
100 Menu Items ACP Th<strong>in</strong>Manager <strong>6.0</strong>
Install New TermCap Database<br />
An Open dialog box will be launched.<br />
Select the new version of the termcap.db and select the Open button. This will <strong>in</strong>stall the new version.<br />
ACP Th<strong>in</strong>Manager <strong>6.0</strong> Menu Items 101
7.3.3 Firmware Package<br />
Th<strong>in</strong>Manager allows the firmware for the th<strong>in</strong> client to be upgraded with the latest version from the<br />
Th<strong>in</strong>Manager web site (www.th<strong>in</strong>manager.com).<br />
To update the Term<strong>in</strong>al Capabilities Database, select Install > Firmware Package.<br />
An Open dialog box will be launched.<br />
Install Firmware Package<br />
Select the new version of the termpack-##.pkg and select the Open button. This will <strong>in</strong>stall the new<br />
version.<br />
102 Menu Items ACP Th<strong>in</strong>Manager <strong>6.0</strong>
7.3.4 Firmware<br />
Th<strong>in</strong>Manager allows the firmware for the th<strong>in</strong> client to be upgraded with the latest version from the<br />
Th<strong>in</strong>Manager web site (www.th<strong>in</strong>manager.com). Th<strong>in</strong>Manager <strong>6.0</strong> and later have the *.fw file<br />
extension while Th<strong>in</strong>Manager 5.0 and earlier use the firmware.acp <strong>format</strong>.<br />
Select Install > Firmware to launch a file browser.<br />
Install New Firmware<br />
Select the new type of firmware, either the new *.fw <strong>format</strong> or the earlier legacy firmware.acp<br />
<strong>format</strong> <strong>in</strong> the drop-down. Select the file <strong>in</strong> the w<strong>in</strong>dow and select Open. This will <strong>in</strong>stall the new version of<br />
the firmware.<br />
The th<strong>in</strong> clients will download the new version of firmware the next time they are rebooted.<br />
ACP Th<strong>in</strong>Manager <strong>6.0</strong> Menu Items 103
7.3.5 Boot Loader<br />
Th<strong>in</strong>Manager uses a boot loader to <strong>in</strong>itially load the bootstrap on PXE th<strong>in</strong> clients.<br />
To <strong>in</strong>stall the PXE Boot Loader, select Install > PXE Boot Loader.<br />
Install Boot Loader<br />
An Open dialog box will be launched<br />
Select the acpboot.b<strong>in</strong> file and select the Open button. This will <strong>in</strong>stall the file.<br />
104 Menu Items ACP Th<strong>in</strong>Manager <strong>6.0</strong>
7.3.6 Cha<strong>in</strong> Loader<br />
Th<strong>in</strong>Manager uses a cha<strong>in</strong> loader to help the Boot Loader on PXE th<strong>in</strong> clients dur<strong>in</strong>g the boot process.<br />
To <strong>in</strong>stall the Cha<strong>in</strong> Loader, select Install > Cha<strong>in</strong> Loader.<br />
Install Cha<strong>in</strong> Loader<br />
An Open dialog box will be launched<br />
Select the acpboot.b<strong>in</strong> file and select the Open button. This will <strong>in</strong>stall the file.<br />
ACP Th<strong>in</strong>Manager <strong>6.0</strong> Menu Items 105
7.3.7 Modules<br />
Install > Modules open the Modules dialog box. This displays the modules that are available to the ACP<br />
Enabled th<strong>in</strong> clients. See Module Overview for details.<br />
Installed Modules W<strong>in</strong>dows<br />
The Module Type drop-down allows all modules to be displayed or allows the modules to be filtered by<br />
type.<br />
The Package drop-down allows the view<strong>in</strong>g of all the modules, or the modules of a s<strong>in</strong>gle package. S<strong>in</strong>ce<br />
the Package conta<strong>in</strong>s both a version of a firmware and the modules that support it, this dropdown allows<br />
you to filter the modules by version.<br />
The Modules for Server X w<strong>in</strong>dow has three columns.<br />
Description – This lists the modules by name.<br />
<br />
Version – This is the version number of the module. This can be compared aga<strong>in</strong>st the latest<br />
versions from http://www.th<strong>in</strong>manager.com/support/downloads.php.<br />
License Required – This shows what license is required, if any, to use the module.<br />
The Modules for Server X w<strong>in</strong>dow has three buttons.<br />
Install Module – This button launches a file browser that allows a module file to be added or<br />
updated.<br />
Remove Module form All Term<strong>in</strong>als – This button will remove a highlighted module from all<br />
term<strong>in</strong>als. It doesn’t remove the module from the system; it just removes it from the<br />
configurations.<br />
106 Menu Items ACP Th<strong>in</strong>Manager <strong>6.0</strong>
Done – This button closes the Modules w<strong>in</strong>dow.<br />
Select<strong>in</strong>g Install Module… will launch a dialog box that allows modules files to be selected.<br />
Open Module File<br />
A module can be added to the list of available modules by highlight<strong>in</strong>g the desired module file and<br />
select<strong>in</strong>g Open. . The w<strong>in</strong>dow will close when the license is <strong>in</strong>stalled.<br />
Note: The module files should not be saved directly <strong>in</strong>to the Th<strong>in</strong>Manager folder but should be saved to<br />
another folder and be <strong>in</strong>stalled us<strong>in</strong>g Th<strong>in</strong>Manager.<br />
See Module Overview for details<br />
ACP Th<strong>in</strong>Manager <strong>6.0</strong> Menu Items 107
7.3.8 Reports (Installation)<br />
Install > Reports will launch a Reports w<strong>in</strong>dow that allows additional reports to be added to<br />
Th<strong>in</strong>Manager. Each report has two components, an H<strong>TM</strong>L template and a SQL query.<br />
See Reports for <strong>in</strong><strong>format</strong>ion on reports.<br />
Reports W<strong>in</strong>dow –Reports Templates<br />
The Reports widow has radio buttons to display report templates, SQL files, and images, f<strong>in</strong>ished<br />
reports, and assorted files.<br />
Select<strong>in</strong>g the Report Template radio button will display <strong>in</strong>stalled report templates. Th<strong>in</strong>Manager <strong>in</strong>stalls a<br />
variety of templates. New templates can be downloaded from www.th<strong>in</strong>manager.com.<br />
Select<strong>in</strong>g the Install button will launch a file browser to <strong>in</strong>stall new templates. Select<strong>in</strong>g the Delete button<br />
will delete a highlighted report.<br />
108 Menu Items ACP Th<strong>in</strong>Manager <strong>6.0</strong>
Open File W<strong>in</strong>dow<br />
Navigated to the desired template, highlight the file, and select Open. This will <strong>in</strong>stall the template and<br />
close the file browser w<strong>in</strong>dow.<br />
ACP Th<strong>in</strong>Manager <strong>6.0</strong> Menu Items 109
Reports W<strong>in</strong>dow – SQL Files<br />
Select<strong>in</strong>g the SQL Files radio button will display <strong>in</strong>stalled SQL queries. Th<strong>in</strong>Manager <strong>in</strong>stalls a variety of<br />
SQL queries as companions to the report templates. New SQL queries for new reports can be<br />
downloaded from www.th<strong>in</strong>manager.com.<br />
Select<strong>in</strong>g the Install button will launch a file browser to <strong>in</strong>stall new SQL queries. Select<strong>in</strong>g the Delete<br />
button will delete a highlighted SQL query.<br />
Reports W<strong>in</strong>dow – Images, F<strong>in</strong>ished Reports, etc.<br />
110 Menu Items ACP Th<strong>in</strong>Manager <strong>6.0</strong>
Select<strong>in</strong>g the Images, F<strong>in</strong>ished Reports, and etc. radio button will display <strong>in</strong>stalled images and reports.<br />
Select<strong>in</strong>g the Install button will launch a file browser to <strong>in</strong>stall new images. Select<strong>in</strong>g the Delete button<br />
will delete a highlighted image, report, or file. This is a handy way do delete older copies of backed up<br />
reports and configurations that were saved us<strong>in</strong>g the Scheduler. See System Schedule for details.<br />
Select<strong>in</strong>g the OK button will close the Reports w<strong>in</strong>dow.<br />
7.4 Tools<br />
Tools conta<strong>in</strong> commands that affect the term<strong>in</strong>als.<br />
7.4.1 Restart Term<strong>in</strong>als<br />
Tools > Restart Term<strong>in</strong>als will perform an <strong>in</strong>telligent restart of a term<strong>in</strong>al. It will load any changes to the<br />
configuration, modules, firmware, and reconnect them to the term<strong>in</strong>al server without cycl<strong>in</strong>g power to the<br />
term<strong>in</strong>al, unless it is needed to reload the firmware.<br />
Note: Restart<strong>in</strong>g a term<strong>in</strong>al does not close the session on the term<strong>in</strong>al server nor does it unlock a frozen<br />
session. It reloads changes <strong>in</strong>dependent of the session on the term<strong>in</strong>al server. It will reconnect to the<br />
same session without chang<strong>in</strong>g the session.<br />
<br />
<br />
<br />
Highlight a term<strong>in</strong>al <strong>in</strong> the Th<strong>in</strong>Manager tree pane and select this command to restart a<br />
term<strong>in</strong>al.<br />
Highlight a group <strong>in</strong> the Th<strong>in</strong>Manager tree pane and select this command to restart all the<br />
term<strong>in</strong>als of the group.<br />
Highlight a Th<strong>in</strong>Manager Server <strong>in</strong> the Th<strong>in</strong>Manager tree pane and select this command to<br />
restart all the term<strong>in</strong>als on the Th<strong>in</strong>Manager Server.<br />
7.4.2 Reboot Term<strong>in</strong>als<br />
Tools > Reboot Term<strong>in</strong>als will cycle the power to the term<strong>in</strong>al, reload<strong>in</strong>g the firmware and configuration,<br />
and reconnect it to the term<strong>in</strong>al server. The function of this command has been largely replaced by the<br />
Restart Term<strong>in</strong>al command.<br />
Note: Reboot<strong>in</strong>g a term<strong>in</strong>al does not close the session on the term<strong>in</strong>al server nor does it unlock a frozen<br />
session. It reboots and reloads the firmware and configuration <strong>in</strong>dependent of the session on the term<strong>in</strong>al<br />
server. It will reconnect to the same session without chang<strong>in</strong>g the session.<br />
<br />
<br />
<br />
Highlight a term<strong>in</strong>al <strong>in</strong> the Th<strong>in</strong>Manager tree pane and select this command to reboot a<br />
term<strong>in</strong>al.<br />
Highlight a group <strong>in</strong> the Th<strong>in</strong>Manager tree pane and select this command to reboot all the<br />
term<strong>in</strong>als of the group.<br />
Highlight a Th<strong>in</strong>Manager Server <strong>in</strong> the Th<strong>in</strong>Manager tree pane and select this command to<br />
reboot all the term<strong>in</strong>als on the Th<strong>in</strong>Manager Server.<br />
7.4.3 Reboot Term<strong>in</strong>al Server<br />
Tools > Reboot Term<strong>in</strong>al Server will send a command to restart the highlighted term<strong>in</strong>al server.<br />
<br />
Highlight a term<strong>in</strong>al server <strong>in</strong> the Th<strong>in</strong>Manager tree pane and select this command to restart<br />
a term<strong>in</strong>al server.<br />
ACP Th<strong>in</strong>Manager <strong>6.0</strong> Menu Items 111
Caution: Reboot Term<strong>in</strong>al Server will restart the term<strong>in</strong>al server and log off all sessions without giv<strong>in</strong>g<br />
users a chance to save their data. Use wisely.<br />
7.4.4 Disable Term<strong>in</strong>als<br />
The Disable Term<strong>in</strong>al command will disable any highlighted Group or Term<strong>in</strong>al by display<strong>in</strong>g a lockout<br />
screen. The term<strong>in</strong>al will wait until it is enabled with the Tools > Enable Term<strong>in</strong>al function to be<br />
functional aga<strong>in</strong>. This allows term<strong>in</strong>als to be locked down for security reasons, or to prevent the term<strong>in</strong>als<br />
from access<strong>in</strong>g the term<strong>in</strong>al servers.<br />
Highlight<strong>in</strong>g a Term<strong>in</strong>al Server, or Group <strong>in</strong> the Th<strong>in</strong>Manager tree and select<strong>in</strong>g Tools > Disable<br />
Term<strong>in</strong>al will disable every term<strong>in</strong>al assigned to it.<br />
Disabled Term<strong>in</strong>al Icons<br />
If a Group or Term<strong>in</strong>al is disabled us<strong>in</strong>g the Tools > Disable function, it will be displayed with a red X<br />
over the term<strong>in</strong>al icon. An entire Th<strong>in</strong>Manager Server or an entire Group can be disabled, but only the<br />
term<strong>in</strong>al icons will show the X, not the Th<strong>in</strong>Manager Server icon or the Group icons.<br />
Once a term<strong>in</strong>al is disabled, a disabl<strong>in</strong>g screen will appear on the term<strong>in</strong>al until the term<strong>in</strong>al has been<br />
enabled.<br />
Disabled Term<strong>in</strong>al Screen – Logged On<br />
A logged on term<strong>in</strong>al will display a screen <strong>in</strong>dicat<strong>in</strong>g that the term<strong>in</strong>al is disabled.<br />
112 Menu Items ACP Th<strong>in</strong>Manager <strong>6.0</strong>
Disabled Boot Screen<br />
Term<strong>in</strong>als that are booted while disabled will halt on a blue screen <strong>in</strong>dicat<strong>in</strong>g that the term<strong>in</strong>al is disabled.<br />
7.4.5 Enable Term<strong>in</strong>als<br />
The Enable Term<strong>in</strong>al command will remove the disabl<strong>in</strong>g from a highlighted Group or term<strong>in</strong>al and allow<br />
it to cont<strong>in</strong>ue function<strong>in</strong>g or resume the boot process.<br />
7.4.6 Disable Term<strong>in</strong>al Server<br />
The Disable Term<strong>in</strong>al Server command will disable all connections from the selected term<strong>in</strong>al server to<br />
all th<strong>in</strong> clients logged onto that server. The sessions will be disconnected but not reset.<br />
Disabled Term<strong>in</strong>al Server<br />
This is useful <strong>in</strong> updat<strong>in</strong>g term<strong>in</strong>al servers. Clients can be disconnected and have their sessions logged<br />
off, allow<strong>in</strong>g the server can be updated. Once it is updated <strong>in</strong> can be enabled to allow client to connect to<br />
it aga<strong>in</strong>.<br />
ACP Th<strong>in</strong>Manager <strong>6.0</strong> Menu Items 113
7.4.7 Enable Term<strong>in</strong>al Server<br />
The Enable Term<strong>in</strong>al Server command will enable a disabled term<strong>in</strong>al server to allow connections from<br />
th<strong>in</strong> clients.<br />
7.4.8 Calibrate Touch Screen<br />
Th<strong>in</strong>Manager has a touch screen configuration utility that can calibrate a th<strong>in</strong> client touch screen. The<br />
utility can be started three ways:<br />
On the th<strong>in</strong> client, select Start > Program Files > Automation Control Products ><br />
Calibrate Touch Screen (or Start > Program Files > ACP > CalTouchScreen). This is<br />
useful because it allows the operator to calibrate the touch screen without adm<strong>in</strong>istrative<br />
support.<br />
<br />
<br />
<br />
On the Th<strong>in</strong>Manager Server, highlight the desired term<strong>in</strong>al <strong>in</strong> Th<strong>in</strong>Manager and select Tools<br />
> Calibrate Touch Screen from the menu bar. This will launch the calibration on the selected<br />
term<strong>in</strong>al.<br />
The Calibration Touch Down Time (seconds) sett<strong>in</strong>g on the touch screen module will allow<br />
the calibration to be triggered by hold<strong>in</strong>g a f<strong>in</strong>ger on the touch screen for the amount of time<br />
set <strong>in</strong> the parameter. See Touch Screen Modules for details.<br />
The TermMon ActiveX can be configured to launch the calibration program. See TermMon<br />
ActiveX Control for details.<br />
Touch Screen Calibration Screen<br />
A new touch screen calibration program was released with Th<strong>in</strong>Manager 2.6 and is <strong>in</strong>cluded <strong>in</strong> the 2.6<br />
and later touch screen modules. When the calibration is run, a “+” appears <strong>in</strong> the lower left. Touch the<br />
center of the + and then touch the center of the other four +s as they appear. This provides touch<br />
screen mapp<strong>in</strong>g for the term<strong>in</strong>al.<br />
Note: The touch screen module must first be added through the Module page <strong>in</strong> the Term<strong>in</strong>al<br />
Configuration wizard.<br />
114 Menu Items ACP Th<strong>in</strong>Manager <strong>6.0</strong>
To launch the calibration program from the Start menu from with<strong>in</strong> the session requires that the<br />
Th<strong>in</strong>Manager Utilities be <strong>in</strong>stalled on each term<strong>in</strong>al server. See Standard Th<strong>in</strong>Manager Installation <strong>in</strong><br />
W<strong>in</strong>dows for details.<br />
7.4.9 Send Message<br />
Send Message will send a message to a highlighted term<strong>in</strong>al.<br />
Send Message W<strong>in</strong>dow<br />
Enter the message <strong>in</strong>to the Message text box. The Message Title can be changed, if desired.<br />
Select the OK button to send or the Cancel button to cancel.<br />
Send Message W<strong>in</strong>dow<br />
When a message is sent, an ACP splash screen will be displayed with the message until the message is<br />
acknowledged.<br />
ACP Th<strong>in</strong>Manager <strong>6.0</strong> Menu Items 115
7.4.10 Clear Event Log<br />
Select<strong>in</strong>g Clear Event Log will clear the event log. The event log is configured the Th<strong>in</strong>Manager Server<br />
Configuration Wizard that is launched by double-click<strong>in</strong>g on the Th<strong>in</strong>Manager <strong>in</strong> the tree or highlight<strong>in</strong>g<br />
the Th<strong>in</strong>Manager and select<strong>in</strong>g Edit > Modify from the menu.<br />
7.5 View<br />
7.5.1 Status Bar<br />
The Status Bar shows advice and comments on the bottom of the Th<strong>in</strong>Manager w<strong>in</strong>dow. When the<br />
Status Bar command is checked, the Status Bar text is visible. When the Status Bar command is<br />
unchecked, the Status Bar text is <strong>in</strong>visible.<br />
7.5.2 Show Connected Only<br />
View > Show Connected Only, if checked, will simplify the tree by remov<strong>in</strong>g unconnected term<strong>in</strong>als,<br />
term<strong>in</strong>al servers and term<strong>in</strong>al server groups.<br />
7.5.3 Reports (Selection)<br />
View > Reports will open the Select Reports w<strong>in</strong>dow.<br />
Select Reports W<strong>in</strong>dow<br />
The Select Reports w<strong>in</strong>dow allows the selection of the default report that will display when the Report tab<br />
is selected for a Th<strong>in</strong>Manager Server, term<strong>in</strong>al, term<strong>in</strong>al server, or TermSecure user.<br />
The default reports can be changed by select<strong>in</strong>g a different report <strong>in</strong> the drop-down boxes.<br />
See Reports for details.<br />
116 Menu Items ACP Th<strong>in</strong>Manager <strong>6.0</strong>
7.5.4 Pr<strong>in</strong>t<br />
View > Pr<strong>in</strong>t will pr<strong>in</strong>t the highlighted tab of the Details pane.<br />
Pr<strong>in</strong>t Reports<br />
A Pr<strong>in</strong>t dialog box will appear to allow the selection of the pr<strong>in</strong>ter and the desired number of copies.<br />
ACP Th<strong>in</strong>Manager <strong>6.0</strong> Menu Items 117
7.5.5 Options<br />
Select<strong>in</strong>g Options will launch the Options dialog box.<br />
Options<br />
The Display “Create New Term<strong>in</strong>al” dialog for unknown term<strong>in</strong>als check box, if selected, will launch<br />
the Term<strong>in</strong>al Configuration Wizard on the Th<strong>in</strong>Manager Server when a new term<strong>in</strong>al is added.<br />
The Display “Create New User” dialog for unknown users check box, if selected, will launch the<br />
TermSecure User Configuration Wizard on the Th<strong>in</strong>Manager Server when an unknown ID device (USB<br />
key or ID card) is read by a term<strong>in</strong>al.<br />
Note: Check<strong>in</strong>g the Display “Create New User” dialog for unknown users check box is useful for<br />
assign<strong>in</strong>g ID cards to TermSecure Users. See Card and Badge Configuration for a TermSecure User for<br />
details.<br />
The M<strong>in</strong>imize to the System Tray checkbox will send the Th<strong>in</strong>Manager icon <strong>in</strong> the system tray when<br />
Th<strong>in</strong>Manager is m<strong>in</strong>imized.<br />
Warn if license will expire with<strong>in</strong> __ day(s) will set the warn<strong>in</strong>g period before license expiration. This is<br />
useful for time-limited demonstration and Trialware licenses.<br />
7.6 RemoteView<br />
7.6.1 Interactive Shadow<br />
Interactive Shadow, if checked, allows Adm<strong>in</strong>istrators and members of the Th<strong>in</strong>Manager Security<br />
Groups that have <strong>in</strong>teractive shadow permissions to <strong>in</strong>teract and control a shadowed term<strong>in</strong>al session. If<br />
this value is unchecked the sessions will be viewable, but observers cannot take control of the session.<br />
118 Menu Items ACP Th<strong>in</strong>Manager <strong>6.0</strong>
7.6.2 Scaled to W<strong>in</strong>dow<br />
Scaled to W<strong>in</strong>dows, if checked, will scale the shadowed term<strong>in</strong>al session to fit the Details pane of<br />
Th<strong>in</strong>Manager. If this value is unchecked the session will be viewed regular-sized, requir<strong>in</strong>g the use of<br />
scroll bars to view portions of the screen.<br />
7.6.3 Go FullScreen<br />
This allows the connection from the Connect tab on Th<strong>in</strong>Manager to the term<strong>in</strong>al server to be displayed<br />
full screen <strong>in</strong>stead of <strong>in</strong> a w<strong>in</strong>dow <strong>in</strong> Th<strong>in</strong>Manager.<br />
This session can be switched to full-screen by select<strong>in</strong>g RemoteView > Go FullScreen <strong>in</strong> the menu. This<br />
changes the appearance from runn<strong>in</strong>g from with<strong>in</strong> a w<strong>in</strong>dow to runn<strong>in</strong>g as a desktop.<br />
The full screen session will have a tool tab at the top of the screen with controls that allow the w<strong>in</strong>dow to<br />
be switched back to the w<strong>in</strong>dow or to close the connection.<br />
Remote Session Tool Bar<br />
The standard M<strong>in</strong>imize, Maximize, and Close icons on the Remote Session Tool Bar allow control over<br />
the session.<br />
The hot keys of CTL+ALT+BREAK will allow you to switch to full screen mode or to exit full screen mode.<br />
7.6.4 Connect Options<br />
Select<strong>in</strong>g RemoteView > Connect Options will launch the Term<strong>in</strong>al Server Connect Options w<strong>in</strong>dow that<br />
allows the term<strong>in</strong>al server Remote View connection to be configured.<br />
The Video Sett<strong>in</strong>gs <strong>in</strong>clude:<br />
Term<strong>in</strong>al Server Connect Options<br />
ACP Th<strong>in</strong>Manager <strong>6.0</strong> Menu Items 119
Video Mode – This allows the connection to be displayed at a specific resolution or as full<br />
screen.<br />
Width – This allows the connection to be displayed at a specific width if the Video Mode is<br />
set to Custom.<br />
Height – This allows the connection to be displayed at a specific height if the Video Mode is<br />
set to Custom.<br />
Color Depth - This allows the connection to be displayed at a specific color depth. W<strong>in</strong>dows<br />
2003 is required for high-color.<br />
The Access Options <strong>in</strong>clude:<br />
<br />
<br />
<br />
Allow Auto-Log<strong>in</strong> – This allows the connection to log<strong>in</strong> without prompt<strong>in</strong>g when checked. It<br />
will use the log<strong>in</strong> <strong>in</strong><strong>format</strong>ion that is entered on the Term<strong>in</strong>al Server Name page of the<br />
Term<strong>in</strong>al Server Wizard.<br />
Allow Access to Local Drives – This allows the user to access the hard drive on the remote<br />
computer from the remote connection.<br />
Connect To Console – This allows the Th<strong>in</strong>Manager user to capture the console session for<br />
display through Th<strong>in</strong>Manager <strong>in</strong>stead of start<strong>in</strong>g a new session on the term<strong>in</strong>al server.<br />
7.6.5 Send Key<br />
Send Key allows the send<strong>in</strong>g of key commands to the shadowed session that are normally saved for the<br />
local mach<strong>in</strong>e and don’t function <strong>in</strong> shadow<strong>in</strong>g. These <strong>in</strong>clude:<br />
CTLL+ALT+DEL<br />
CTL+ESC<br />
ALT+Tab<br />
ALT+Shift+Tab<br />
ALT+ESC<br />
ALT+Space.<br />
Select RemoteView > Send Key and the desired key comb<strong>in</strong>ation to send the key command to the<br />
shadowed session.<br />
Note: The Key Block module will block this command if it is used on the term<strong>in</strong>al. See Key Block Module<br />
for details.<br />
7.7 Help<br />
7.7.1 Help Topics<br />
Select<strong>in</strong>g Help Topics will launch the Th<strong>in</strong>Manager Help file. This file can also be launched by select<strong>in</strong>g<br />
F1 while us<strong>in</strong>g Th<strong>in</strong>Manager.<br />
7.7.2 About Th<strong>in</strong>Manager…<br />
Select<strong>in</strong>g About Th<strong>in</strong>Manager will display a dialog box with Th<strong>in</strong>Manager version <strong>in</strong><strong>format</strong>ion, copyright<br />
<strong>in</strong><strong>format</strong>ion, and contact <strong>in</strong><strong>format</strong>ion for Th<strong>in</strong>Manager.<br />
120 Menu Items ACP Th<strong>in</strong>Manager <strong>6.0</strong>
7.8 Right Click Menus <strong>in</strong> the Tree Pane<br />
7.8.1 Right Click on the Th<strong>in</strong>Manager Server Icon<br />
<br />
<br />
Reconnect - This causes the Th<strong>in</strong>Server service to try to reconnect to the highlighted<br />
Th<strong>in</strong>Manager Server.<br />
Modify - This launches the Th<strong>in</strong>Manager Server Configuration Wizard to configure the<br />
highlighted Th<strong>in</strong>Manager Server.<br />
Remove - This removes the highlighted Th<strong>in</strong>Manager Server from the tree. It does not<br />
remove any configuration or un<strong>in</strong>stall the program.<br />
See Add Th<strong>in</strong>Manager Server for details.<br />
7.8.2 Right Click on the Term<strong>in</strong>als Branch Icon<br />
<br />
<br />
<br />
Add Term<strong>in</strong>al - This launches the Term<strong>in</strong>al Configuration Wizard to create a term<strong>in</strong>al.<br />
Add Group - This launches the Term<strong>in</strong>al Group Configuration Wizard to create a group.<br />
Restart Term<strong>in</strong>als - This sends a signal to all the term<strong>in</strong>als to reload any changes to its<br />
configuration, modules, or firmware. It will only do a full reboot if needed.<br />
7.8.3 Right Click on a Term<strong>in</strong>al Group Icon<br />
<br />
<br />
<br />
<br />
<br />
<br />
Add Term<strong>in</strong>al - This launches the Term<strong>in</strong>al Configuration Wizard to create a term<strong>in</strong>al <strong>in</strong><br />
the group.<br />
Add Group - This launches the Term<strong>in</strong>al Group Configuration Wizard to create a group.<br />
Restart Term<strong>in</strong>als - This sends a signal to all the term<strong>in</strong>als under the highlighted icon to<br />
reload any changes to its configuration, modules, or firmware. It will only do a full reboot if<br />
needed.<br />
Modify - This launches the Term<strong>in</strong>al Group Configuration Wizard to configure the<br />
highlighted group.<br />
Rename - This allows the Group to be renamed.<br />
Delete - This removes the Group from the Th<strong>in</strong>Manager configuration. Member term<strong>in</strong>als can<br />
be deleted with the group, or moved out of the group, depend<strong>in</strong>g on the choice <strong>in</strong> the<br />
confirmation w<strong>in</strong>dow.<br />
ACP Th<strong>in</strong>Manager <strong>6.0</strong> Menu Items 121
Delete Group confirmation W<strong>in</strong>dow<br />
Select<strong>in</strong>g Yes will delete the Group and all member term<strong>in</strong>als.<br />
Select<strong>in</strong>g No will delete only the group. The member term<strong>in</strong>als will be moved out of the group and reta<strong>in</strong><br />
their configuration as <strong>in</strong>dividuals.<br />
Select<strong>in</strong>g Cancel will stop the process and allow the group to rema<strong>in</strong> as it is.<br />
7.8.4 Right Click on a Term<strong>in</strong>al Icon<br />
<br />
<br />
<br />
<br />
<br />
Modify - This launches the Term<strong>in</strong>al Configuration Wizard to configure the highlighted<br />
term<strong>in</strong>al.<br />
Rename - This allows the term<strong>in</strong>al to be renamed.<br />
Delete - This removes the term<strong>in</strong>al from the Th<strong>in</strong>Manager configuration.<br />
Go to TermSecure User - This changes the focus of the tree to the TermSecure User that is<br />
logged <strong>in</strong>to the term<strong>in</strong>al.<br />
Restart Term<strong>in</strong>al - This sends a signal to the term<strong>in</strong>al to reload any changes to the<br />
configuration, modules, or firmware. It will only do a full reboot if needed.<br />
7.8.5 Right Click on the Display Servers Term<strong>in</strong>al Servers Branch<br />
Icon<br />
<br />
<br />
Add Term<strong>in</strong>al Server - This launches the Term<strong>in</strong>al Server Wizard to create and configure a<br />
new term<strong>in</strong>al server.<br />
Add Virtual Term<strong>in</strong>al Server - This launches the Term<strong>in</strong>al Server Wizard and allows you to<br />
import a virtual term<strong>in</strong>al server from a configured VCenter Server.<br />
Edit Term<strong>in</strong>al Server - This launches the Term<strong>in</strong>al Server List Wizard to allow the<br />
configuration of an exist<strong>in</strong>g term<strong>in</strong>al server.<br />
See Term<strong>in</strong>al Services Display Servers for details<br />
7.8.6 Right Click on a Term<strong>in</strong>al Server Icon<br />
<br />
<br />
<br />
Modify - This launches the Term<strong>in</strong>al Server Configuration Wizard to allow changes to the<br />
configuration of the highlighted term<strong>in</strong>al server.<br />
Rename - This allows the term<strong>in</strong>al server to be renamed.<br />
Delete - This removes the term<strong>in</strong>al server from the Th<strong>in</strong>Manager configuration.<br />
122 Menu Items ACP Th<strong>in</strong>Manager <strong>6.0</strong>
Term<strong>in</strong>al Server Deletion Confirmation<br />
Th<strong>in</strong>Manager will prompt for confirmation before deletion.<br />
Term<strong>in</strong>al Server Deletion Error<br />
A term<strong>in</strong>al server cannot be deleted from a configuration if it still has term<strong>in</strong>als assigned to it.<br />
Restart Term<strong>in</strong>als - This sends a signal to the term<strong>in</strong>al to reload any changes to all term<strong>in</strong>als<br />
connected to the term<strong>in</strong>al server. It will only do a full reboot if needed.<br />
7.8.7 Right Click on the Display Servers Cameras Branch Icon<br />
<br />
<br />
Add Camera - This launches the Camera Server Wizard to def<strong>in</strong>e an IP camera as a<br />
display server.<br />
Add Camera Group - This launches the Camera Server Wizard and allows you apply group<br />
sett<strong>in</strong>gs to member cameras to speed the configuration process.<br />
7.8.8 Right Click on a Camera Icon<br />
<br />
<br />
<br />
Modify - This launches the Camera Server Configuration Wizard to allow changes to the<br />
configuration of the highlighted camera.<br />
Rename - This allows the camera to be renamed.<br />
Delete - This removes the camera from the Th<strong>in</strong>Manager configuration.<br />
7.8.9 Right Click on the VCenter Servers Branch Icon<br />
The branches of the VCenter Server tree have various right-click menus:<br />
VCenter Servers:<br />
o Add vCenter Server – Launches the VCenter Server Property Wizard to allow a<br />
VCenter Server to be def<strong>in</strong>ed.<br />
ACP Th<strong>in</strong>Manager <strong>6.0</strong> Menu Items 123
Def<strong>in</strong>ed VCenter Servers:<br />
o Remove – Removes the def<strong>in</strong>ed VCenter Server.<br />
Imported Datacenter:<br />
o Rename – Allows you to rename the datacenter.<br />
o Delete – Allows you to delete the datacenter.<br />
Virtual Mach<strong>in</strong>e:<br />
o Power Operations:<br />
• Power On – Turns on a stopped or suspended virtual mach<strong>in</strong>e.<br />
• Power Off – Turns off a stopped or suspended virtual mach<strong>in</strong>e.<br />
• Suspend – Suspends a runn<strong>in</strong>g virtual mach<strong>in</strong>e and stores the state.<br />
• Reset – Cycles power to the virtual mach<strong>in</strong>e to restart the virtual mach<strong>in</strong>e.<br />
o Snapshot:<br />
• Take Snapshot – Captures and stores the state of the virtual mach<strong>in</strong>e.<br />
• Revert to Current Snapshot – Reapplies the stored state of a previously saved<br />
virtual mach<strong>in</strong>e.<br />
• Snapshot Manager – Launches the Snapshot management tool.<br />
o Rename – Allows the virtual mach<strong>in</strong>e to be renamed.<br />
o Remove from Inventory – Removes the virtual mach<strong>in</strong>e from the tree without delet<strong>in</strong>g<br />
the files.<br />
o Delete – Removes the virtual mach<strong>in</strong>e from the tree AND deletes the file system.<br />
7.8.10 Right Click on the Display Client Branch Icon<br />
<br />
Add Display Client- This launches the Display Client Wizard to create and configure a new<br />
Display Client.<br />
Edit Display Client- This launches the Display Client List to allow the configuration of an<br />
exist<strong>in</strong>g Display Client.<br />
See Display Client List for details.<br />
7.8.11 Right Click on a Display Client Member Icon<br />
<br />
<br />
<br />
Modify - This launches the Display Client Configuration Wizard to allow changes to the<br />
configuration of the highlighted Display Client.<br />
Rename - This allows the Display Client to be renamed.<br />
Delete - This removes the Display Client from the Th<strong>in</strong>Manager configuration.<br />
124 Menu Items ACP Th<strong>in</strong>Manager <strong>6.0</strong>
Term<strong>in</strong>al Services Display Client Deletion Confirmation<br />
Th<strong>in</strong>Manager will prompt for confirmation before deletion.<br />
Display Client Deletion Error<br />
A Display Client cannot be deleted from a configuration if it still has term<strong>in</strong>als assigned to it.<br />
7.8.12 Right Click on the TermSecure Users Branch<br />
<br />
<br />
Add TermSecure User – This launches the TermSecure User Configuration Wizard to<br />
allow a TermSecure User to be def<strong>in</strong>ed.<br />
Add TermSecure User Group – This launches the TermSecure User Group<br />
Configuration Wizard to allow a TermSecure User Group to be def<strong>in</strong>ed.<br />
7.8.13 Right Click on a TermSecure Users Group Icon<br />
<br />
<br />
<br />
<br />
<br />
Add TermSecure User – This launches the TermSecure User Configuration Wizard to<br />
allow a TermSecure User to be def<strong>in</strong>ed.<br />
Add TermSecure User Group – This launches the TermSecure User Group<br />
Configuration Wizard to allow a TermSecure User Group to be def<strong>in</strong>ed.<br />
Modify - This launches the TermSecure User Group Configuration Wizard to allow<br />
changes to the configuration of the highlighted TermSecure User Group.<br />
Rename - This allows the TermSecure User Group to be renamed.<br />
Delete - This will remove the TermSecure User Group from the Th<strong>in</strong>Manager configuration.<br />
Members can be deleted with the group or moved out of the group, depend<strong>in</strong>g on the choice<br />
<strong>in</strong> the confirmation w<strong>in</strong>dow.<br />
ACP Th<strong>in</strong>Manager <strong>6.0</strong> Menu Items 125
Delete Group Confirmation W<strong>in</strong>dow<br />
Select<strong>in</strong>g Yes will delete the Group and all members.<br />
Select<strong>in</strong>g No will delete only the group. The members will be moved out of the group and reta<strong>in</strong> their<br />
configuration as <strong>in</strong>dividuals.<br />
Select<strong>in</strong>g Cancel will stop the process and allow the group to rema<strong>in</strong> as it is.<br />
7.8.14 Right Click on a TermSecure Users Icon<br />
<br />
<br />
<br />
<br />
<br />
Modify - This launches the TermSecure User Configuration Wizard to allow changes to<br />
the configuration of the highlighted TermSecure User.<br />
Rename - This allows the TermSecure User to be renamed.<br />
Delete - This removes the TermSecure User from the Th<strong>in</strong>Manager configuration.<br />
Logoff User – This logs the TermSecure User out the term<strong>in</strong>al that it is currently logged <strong>in</strong>to.<br />
Go to Term<strong>in</strong>al - This changes the focus of the tree to the term<strong>in</strong>al that the TermSecure<br />
User is logged <strong>in</strong>to.<br />
126 Menu Items ACP Th<strong>in</strong>Manager <strong>6.0</strong>
8 Add<strong>in</strong>g Th<strong>in</strong> Client Hardware<br />
8.1 The Boot Process<br />
There are two methods that an ACP Enabled th<strong>in</strong> client can use to boot. The standard method is to<br />
connect to a Th<strong>in</strong>Manager Server and download the firmware and its configuration across the network.<br />
This allows for an easy update of the firmware and ensures that all the term<strong>in</strong>als share the same<br />
firmware. Embedded Th<strong>in</strong>Manager Ready th<strong>in</strong> clients have the firmware embedded <strong>in</strong> them on a compact<br />
flash or disk-on-chip and boot locally then connect to a Th<strong>in</strong>Manager Server to download its configuration.<br />
See Firmware Update (Disk On Chip / Compact Flash) Update Module for details.<br />
A Th<strong>in</strong>Manager Ready th<strong>in</strong> client goes through a number of steps from the <strong>in</strong>itial power on to the<br />
complete connection to a term<strong>in</strong>al server. Understand<strong>in</strong>g this process will aid <strong>in</strong> term<strong>in</strong>al configuration<br />
and troubleshoot<strong>in</strong>g.<br />
The steps are:<br />
POST: Once a Th<strong>in</strong>Manager Ready th<strong>in</strong> client is turned on it beg<strong>in</strong>s the Power On Self-Test to exam<strong>in</strong>e<br />
the hardware and to test the memory.<br />
IP Address Assignment: The term<strong>in</strong>al needs an IP address to connect to the network. By default, it<br />
receives an IP Address from a DHCP server, but this can be changed to use an assigned static IP. See<br />
IP Address Assignment for details.<br />
Th<strong>in</strong>Manager Server Connection: After receiv<strong>in</strong>g an IP address the term<strong>in</strong>al will connect to the<br />
Th<strong>in</strong>Manager Server. This is the Boot Server Host as def<strong>in</strong>ed <strong>in</strong> the DHCP scope Option 066 or the<br />
Primary Th<strong>in</strong>Manager Server def<strong>in</strong>ed <strong>in</strong> the static IP address configuration.<br />
Firmware Load<strong>in</strong>g: Next the term<strong>in</strong>al will download the firmware from the Th<strong>in</strong>Manager Server.<br />
Term<strong>in</strong>al Configuration Download: Established term<strong>in</strong>als will receive their configuration and proceed.<br />
New term<strong>in</strong>als will need to be def<strong>in</strong>ed on the Th<strong>in</strong>Manager Server, either through the Term<strong>in</strong>al<br />
Configuration Wizard or the Create New Term<strong>in</strong>al method.<br />
ACP Th<strong>in</strong>Manager Logo Screen: After the term<strong>in</strong>al receives its configuration, it will display an ACP<br />
splash screen with the Th<strong>in</strong>Manager logo.<br />
Client Communication Connection: Next the term<strong>in</strong>al will launch its Client Communication protocol.<br />
Term<strong>in</strong>al Server Connection: The th<strong>in</strong> client will connect to the term<strong>in</strong>al server(s) that it is assigned to <strong>in</strong><br />
its configuration.<br />
W<strong>in</strong>dows Log<strong>in</strong>: Next the term<strong>in</strong>al will display the W<strong>in</strong>dows Log<strong>in</strong> dialog box, prompt<strong>in</strong>g for a valid<br />
username and password. If these have been entered <strong>in</strong>to the username and password fields on the<br />
Term<strong>in</strong>al Configuration Wizard of Th<strong>in</strong>Manager, the term<strong>in</strong>al will log<strong>in</strong> automatically and display the<br />
W<strong>in</strong>dows desktop or a def<strong>in</strong>ed <strong>in</strong>itial program.<br />
ACP Th<strong>in</strong>Manager <strong>6.0</strong><br />
127 Add<strong>in</strong>g Th<strong>in</strong> Client Hardware
Note: W<strong>in</strong>dows 2000 prevents auto-log<strong>in</strong> with RDP by default. To allow auto-log<strong>in</strong> see RDP-tcp Log<strong>in</strong><br />
Sett<strong>in</strong>gs for details.<br />
W<strong>in</strong>dows Session: The term<strong>in</strong>al logs onto a session on term<strong>in</strong>al server. The term<strong>in</strong>al will pass mouse<br />
clicks and keystrokes to the session on the term<strong>in</strong>al server. The term<strong>in</strong>al server will process the data and<br />
send the graphics back to the term<strong>in</strong>al for display, giv<strong>in</strong>g a full W<strong>in</strong>dows experience to the user.<br />
8.2 IP Address Assignment<br />
Th<strong>in</strong>Manager Ready th<strong>in</strong> clients are set by default to automatically receive an IP address from a DHCP<br />
server. Most Th<strong>in</strong>Manager Ready th<strong>in</strong> clients may use a manually assigned Static IP address <strong>in</strong>stead.<br />
Note: The Th<strong>in</strong>Adapter and Th<strong>in</strong>Adapter Plus require DHCP.<br />
8.2.1 DHCP<br />
Th<strong>in</strong>Manager Ready th<strong>in</strong> clients are set to use DHCP (Dynamic Host Configuration Protocol) by default.<br />
The DHCP Server needs two options configured for Th<strong>in</strong>Manager Ready th<strong>in</strong> clients.<br />
DHCP Options<br />
Option 066 - Boot Server Host Name must be set to the IP address of the Th<strong>in</strong>Manager Server. If<br />
redundant Th<strong>in</strong>Manager Servers are be<strong>in</strong>g used, the IP addresses of multiple Th<strong>in</strong>Manager Servers can<br />
be entered, separated with a space.<br />
Option 067 - Bootfile Name must be set to firmware.acp.<br />
128 Add<strong>in</strong>g Th<strong>in</strong> Client Hardware ACP Th<strong>in</strong>Manager <strong>6.0</strong>
Details are at DHCP Server Setup for details.<br />
Th<strong>in</strong>Manager Ready th<strong>in</strong> clients use DHCP (Dynamic Host Configuration Protocol) by default. If they have<br />
been set to use a static IP they can be reset to DHCP from static IP by press<strong>in</strong>g any key when prompted<br />
dur<strong>in</strong>g the boot sequence to open the IP Configuration Menu.<br />
IP Configuration Menu - DHCP<br />
Press the A key to allow a change to DHCP and enter D key to set the configuration to DHCP. Press the<br />
Enter key to return to ma<strong>in</strong> menu.<br />
Press the S key to save the configuration and cont<strong>in</strong>ue with the boot process.<br />
Boot Process - Firmware Download<br />
The term<strong>in</strong>al will connect to the Th<strong>in</strong>Manager Server and download the firmware.<br />
The download bar will be purple if the term<strong>in</strong>al is us<strong>in</strong>g Multicast dur<strong>in</strong>g the download. See MultiCast<br />
Configuration Page for details.<br />
ACP Th<strong>in</strong>Manager <strong>6.0</strong> Add<strong>in</strong>g Th<strong>in</strong> Client Hardware 129
8.2.2 Static IP<br />
Most models of Th<strong>in</strong>Manager Ready th<strong>in</strong> clients allow the usage of static IPs. These are set by<br />
<strong>in</strong>terrupt<strong>in</strong>g the boot process to launch the IP Configuration Menu and add<strong>in</strong>g the static IPs.<br />
Boot Process - Press Any Key Prompt<br />
To set the term<strong>in</strong>al to use a static IP, press any key at the appropriate moment of the boot sequence.<br />
IP Configuration Menu – Static IP<br />
Press the A to allow the client IP to change from DHCP.<br />
Type <strong>in</strong> the static IP address for the client, <strong>in</strong>clud<strong>in</strong>g the separat<strong>in</strong>g periods and press the Enter key.<br />
130 Add<strong>in</strong>g Th<strong>in</strong> Client Hardware ACP Th<strong>in</strong>Manager <strong>6.0</strong>
IP Configuration Menu - Options<br />
Once the Term<strong>in</strong>al has a static IP assigned, the IP Configuration Menu will be shown to allow the sett<strong>in</strong>g<br />
of other values.<br />
(A) Term<strong>in</strong>al IP Address - This should be a unique address for the term<strong>in</strong>al.<br />
<br />
<br />
<br />
<br />
<br />
<br />
<br />
(B) Primary Th<strong>in</strong>Manager Server IP Address - This should be the unique address for your<br />
ma<strong>in</strong> Th<strong>in</strong>Manager Server.<br />
(C) Secondary Th<strong>in</strong>Manager Server IP Address - The Secondary Th<strong>in</strong>Manager field allows<br />
the term<strong>in</strong>al to use two Th<strong>in</strong>Manager Servers. If the term<strong>in</strong>al cannot connect to the Primary<br />
Th<strong>in</strong>Manager Server, it will connect to the Secondary Th<strong>in</strong>Manager Server to receive its<br />
configuration. If you are not us<strong>in</strong>g a Secondary Th<strong>in</strong>Manager Server, set the IP address to<br />
0.0.0.0.<br />
(D) Router IP Address - Fill <strong>in</strong> the IP address of the router or gateway if one is be<strong>in</strong>g used. If<br />
not this should be set to 0.0.0.0.<br />
(E) Subnet Mask - Set this to your subnet mask. 255.255.255.0. is a standard sett<strong>in</strong>g.<br />
(F) Password Status - Allows a password to be set to prevent unauthorized people from<br />
chang<strong>in</strong>g the configuration.<br />
(H) Help - Will launch a Help to expla<strong>in</strong> the IP Configuration Menu.<br />
(Q) Abort Changes and Exit - This will cancel any sett<strong>in</strong>g changes and let the term<strong>in</strong>al<br />
cont<strong>in</strong>ue to boot with the old sett<strong>in</strong>gs.<br />
(S) Save Changes and Exit - This will apply any changes and allow the term<strong>in</strong>al to cont<strong>in</strong>ue<br />
to boot with the new sett<strong>in</strong>gs.<br />
Type the letter of the desired sett<strong>in</strong>g and type the IP address, with periods. Press the Enter key on the<br />
keyboard to accept each change.<br />
Once configured the term<strong>in</strong>al will connect to the Th<strong>in</strong>Manager Server and download the firmware and<br />
configuration.<br />
8.2.3 Hybrid IP Address<strong>in</strong>g<br />
Th<strong>in</strong>Manager Ready th<strong>in</strong> clients that have BootROM version 5.01 or later have the ability to use DHCP for<br />
the client IP address and have the Th<strong>in</strong>Manager Server IP addresses entered as static IPs to save hav<strong>in</strong>g<br />
to configure the DHCP server with Option 066.<br />
ACP Th<strong>in</strong>Manager <strong>6.0</strong> Add<strong>in</strong>g Th<strong>in</strong> Client Hardware 131
Select<strong>in</strong>g any key when prompted dur<strong>in</strong>g bootup opens the IP Configuration Menu.<br />
Boot Loader v5.01 Default Values<br />
Typ<strong>in</strong>g the B key will allow the configuration of a static IP for the Th<strong>in</strong>Manager Server. Type the numbers<br />
and periods for the address.<br />
DHCP with Static Th<strong>in</strong>Manager Server<br />
Once a Th<strong>in</strong>Manager Server is assigned, typ<strong>in</strong>g C will allow a redundant secondary Th<strong>in</strong>Manager Server<br />
to be assigned.<br />
Type S to save the changes and allow the connection to the Th<strong>in</strong>Manager Server. The term<strong>in</strong>al will now<br />
boot us<strong>in</strong>g DHCP.<br />
Note: The Escape key will let you exit the entry field and return to the IP Configuration Menu.<br />
132 Add<strong>in</strong>g Th<strong>in</strong> Client Hardware ACP Th<strong>in</strong>Manager <strong>6.0</strong>
8.3 Configur<strong>in</strong>g New Hardware<br />
The configuration of term<strong>in</strong>als is done <strong>in</strong> Th<strong>in</strong>Manager on the Th<strong>in</strong>Manager Server and not on each<br />
<strong>in</strong>dividual term<strong>in</strong>al. When a new, undef<strong>in</strong>ed Th<strong>in</strong>Manager Ready Th<strong>in</strong> Client is first connected to a<br />
Th<strong>in</strong>Manager Server one of three th<strong>in</strong>gs will happen:<br />
<br />
<br />
<br />
If the Th<strong>in</strong>Manager Server has no term<strong>in</strong>als that are configured and offl<strong>in</strong>e, then the term<strong>in</strong>al<br />
will go <strong>in</strong>to the Create New Term<strong>in</strong>al Mode and launch the Term<strong>in</strong>al Configuration Wizard<br />
on the Th<strong>in</strong>Manager Server. Once the term<strong>in</strong>al is configured on the Th<strong>in</strong>Manager Server it<br />
will automatically download its configuration upon boot up.<br />
If the Th<strong>in</strong>Manager Server has term<strong>in</strong>als that are created and offl<strong>in</strong>e, the term<strong>in</strong>al will go <strong>in</strong>to<br />
Replace or Create Mode and list the offl<strong>in</strong>e term<strong>in</strong>als that are available for selection. Once a<br />
configuration is selected, the term<strong>in</strong>al will take that identity. Dur<strong>in</strong>g any follow<strong>in</strong>g boot up the<br />
term<strong>in</strong>al will automatically download its configuration.<br />
A third scenario is to use the Auto-Create Term<strong>in</strong>al Mode to create an array of term<strong>in</strong>als.<br />
8.4 Create New Term<strong>in</strong>al Mode<br />
Turn<strong>in</strong>g on a term<strong>in</strong>al for the first time will <strong>in</strong>itiate the Create New Term<strong>in</strong>al mode if:<br />
No term<strong>in</strong>als are def<strong>in</strong>ed <strong>in</strong> Th<strong>in</strong>Manager, or<br />
All the def<strong>in</strong>ed term<strong>in</strong>als are currently connected, or<br />
All the def<strong>in</strong>ed term<strong>in</strong>als that are turned off have the Allow This Term<strong>in</strong>al To Be Replaced If<br />
Off L<strong>in</strong>e check box unselected.<br />
Create New Term<strong>in</strong>al Mode Screen<br />
When a term<strong>in</strong>al enters the Create New Term<strong>in</strong>al Mode, the term<strong>in</strong>al will launch the Term<strong>in</strong>al<br />
Configuration Wizard on the Th<strong>in</strong>Manager Server. The term<strong>in</strong>al will display a screen <strong>in</strong>dicat<strong>in</strong>g that it will<br />
wait until the configuration is f<strong>in</strong>ished before progress<strong>in</strong>g further.<br />
8.5 Replace or Create New Term<strong>in</strong>al Mode<br />
Turn<strong>in</strong>g on a term<strong>in</strong>al for the first time will <strong>in</strong>itiate the Replace or Create New Term<strong>in</strong>al Mode if one or<br />
more of the def<strong>in</strong>ed term<strong>in</strong>als are offl<strong>in</strong>e and they have the Allow This Term<strong>in</strong>al To Be Replaced If Off<br />
L<strong>in</strong>e check box selected.<br />
ACP Th<strong>in</strong>Manager <strong>6.0</strong> Add<strong>in</strong>g Th<strong>in</strong> Client Hardware 133
Replace or Create Mode<br />
The screen will display all the offl<strong>in</strong>e term<strong>in</strong>als that the term<strong>in</strong>al can replace. Highlight the desired term<strong>in</strong>al<br />
name us<strong>in</strong>g the keyboard and press the Enter button. The term<strong>in</strong>al will retrieve the selected configuration<br />
and assume its identity.<br />
8.6 Auto-Creation of Term<strong>in</strong>als<br />
Auto-Create allows new term<strong>in</strong>als to be created and configured <strong>in</strong> an array, us<strong>in</strong>g the Default Term<strong>in</strong>al<br />
as a template.<br />
Turn<strong>in</strong>g on a term<strong>in</strong>al for the first time will <strong>in</strong>itiate the Replace or Auto-Create Term<strong>in</strong>al mode if:<br />
And<br />
And<br />
<br />
<br />
<br />
The Auto-Create mode is enabled by the selection of the Enable AutoCreate check box on<br />
the Unknown Term<strong>in</strong>al page of the Th<strong>in</strong>Manager Server Configuration Wizard.<br />
The Th<strong>in</strong>Manager Server Configuration Wizard is launched by select<strong>in</strong>g Manage ><br />
Sett<strong>in</strong>gs from the Th<strong>in</strong>Manager menu.<br />
The Default term<strong>in</strong>al is configured as a template for the new term<strong>in</strong>als.<br />
This is done by select<strong>in</strong>g Manage > Configure Default Term<strong>in</strong>al on the Th<strong>in</strong>Manager menu.<br />
The user selects Auto-Create from the Replace or Action Menu as the term<strong>in</strong>al boots and<br />
connects. The user can do a replacement <strong>in</strong>stead of Auto-Create.<br />
8.6.1 Enabl<strong>in</strong>g AutoCreate<br />
Open the Th<strong>in</strong>Manager Server Configuration Wizard by right click<strong>in</strong>g on the Th<strong>in</strong>Manager Server <strong>in</strong> the<br />
tree and select<strong>in</strong>g Modify, or select Manage > Sett<strong>in</strong>gs from the menu.<br />
The term<strong>in</strong>al will be given the name of the Auto-Create Mask and a number, start<strong>in</strong>g with “0”. The Auto-<br />
Create Mask is configured on the Unknown Term<strong>in</strong>als page of the Th<strong>in</strong>Manager Server Configuration<br />
Wizard.<br />
134 Add<strong>in</strong>g Th<strong>in</strong> Client Hardware ACP Th<strong>in</strong>Manager <strong>6.0</strong>
Unknown Term<strong>in</strong>als<br />
Check the Enable AutoCreate checkbox and enter an AutoCreate Mask name. This allows new<br />
term<strong>in</strong>als to be added to the system and configured without additional <strong>in</strong>put from the server.<br />
8.6.2 Configur<strong>in</strong>g Default Term<strong>in</strong>al<br />
The Default Term<strong>in</strong>al is created by select<strong>in</strong>g Manage > Configure Default Term<strong>in</strong>al. This will launch the<br />
Term<strong>in</strong>al Configuration Wizard for a term<strong>in</strong>al pre-named “Default”.<br />
ACP Th<strong>in</strong>Manager <strong>6.0</strong> Add<strong>in</strong>g Th<strong>in</strong> Client Hardware 135
Default Term<strong>in</strong>al Configuration<br />
Configure the term<strong>in</strong>al with the desired sett<strong>in</strong>gs. The Default term<strong>in</strong>al can be added to a Group by<br />
select<strong>in</strong>g the Change Group button.<br />
Once the wizard is f<strong>in</strong>ished, the Default term<strong>in</strong>al will be displayed <strong>in</strong> the Th<strong>in</strong>Manager Server tree.<br />
136 Add<strong>in</strong>g Th<strong>in</strong> Client Hardware ACP Th<strong>in</strong>Manager <strong>6.0</strong>
Th<strong>in</strong>Manager Tree with Default Term<strong>in</strong>al<br />
Once the Enable AutoCreate check box on the Server Properties w<strong>in</strong>dow is checked and the Default<br />
Term<strong>in</strong>al is created and configured, any new term<strong>in</strong>al connected to the Th<strong>in</strong>Manager Server will have<br />
AutoCreate Term<strong>in</strong>al as an option.<br />
Replace or Action Menu<br />
The user needs to scroll to AutoCreate Term<strong>in</strong>al and press the Enter key to automatically create and<br />
configure the term<strong>in</strong>al.<br />
The new term<strong>in</strong>al will be given the AutoCreate Mask and a number, start<strong>in</strong>g at 0, for its name. This name<br />
will also be entered <strong>in</strong> the Username field of the Log In In<strong>format</strong>ion page of the Term<strong>in</strong>al<br />
Configuration Wizard.<br />
ACP Th<strong>in</strong>Manager <strong>6.0</strong> Add<strong>in</strong>g Th<strong>in</strong> Client Hardware 137
9 Configuration Wizards<br />
9.1 Introduction to Wizards<br />
ACP Th<strong>in</strong>Manager uses wizards for configuration. Wizards take two forms.<br />
List Wizards associate Term<strong>in</strong>al Servers and Th<strong>in</strong>Manager Servers with their IP addresses<br />
or assign server functions to groups of Term<strong>in</strong>al Servers.<br />
Configuration Wizards set the parameters and options for <strong>in</strong>dividual term<strong>in</strong>als, groups of<br />
term<strong>in</strong>als, Display Servers, Display Clients, TermSecure Users, and TermSecure Server<br />
Groups. This is where the term<strong>in</strong>als and TermSecure Users have their sett<strong>in</strong>gs def<strong>in</strong>ed.<br />
This help will list the wizards <strong>in</strong> the follow<strong>in</strong>g order:<br />
Th<strong>in</strong>Manager Server List<br />
Th<strong>in</strong>Manager Server Configuration Wizard<br />
DNS Configuration<br />
PXE Server Configuration Wizard<br />
Term<strong>in</strong>al Configuration Wizard<br />
Term<strong>in</strong>al Group Configuration Wizard<br />
Display Server Configuration Wizards<br />
Term<strong>in</strong>al Services Display Servers<br />
Camera Configuration Wizard<br />
VCenter Server Configuration Wizard<br />
Display Client Configuration Wizards<br />
Term<strong>in</strong>al Services Display Clients<br />
Camera Display Clients<br />
Term<strong>in</strong>al Shadow Display Clients<br />
TermSecure Configuration<br />
TermSecure User Configuration Wizard<br />
TermSecure Users Group Configuration Wizard<br />
ACP Th<strong>in</strong>Manager <strong>6.0</strong><br />
138 Configuration Wizards
9.1.1 List Wizards<br />
The List Wizards are:<br />
Term<strong>in</strong>al Server List – Used to show def<strong>in</strong>ed Term<strong>in</strong>al Servers, or Term<strong>in</strong>al Services Display Servers.<br />
The Term<strong>in</strong>al Server Configuration Wizard can be launched from here. Launched by:<br />
Expand<strong>in</strong>g the Display Server branch, right click<strong>in</strong>g on the Term<strong>in</strong>al Servers icon, and<br />
select<strong>in</strong>g Edit Term<strong>in</strong>al Server List.<br />
See Term<strong>in</strong>al Services Display Servers for details.<br />
Display Client List – Used to show def<strong>in</strong>ed Display Clients. The Display Client Configuration Wizard<br />
can be launched from here. Launched by:<br />
Right click<strong>in</strong>g on the Display Client icon, and select<strong>in</strong>g Edit Display Client List.<br />
See Display Client List for details<br />
Th<strong>in</strong>Manager Server List – Used to def<strong>in</strong>e Th<strong>in</strong>Manager Servers and setup Automatic Synchronization.<br />
Launch by:<br />
Select<strong>in</strong>g Manage > Th<strong>in</strong>Manager Server List.<br />
See Th<strong>in</strong>Manager Server List for details.<br />
9.1.2 Configuration Wizards<br />
The Configuration Wizards are:<br />
Doma<strong>in</strong> Name Server Wizard – Used to configure DNS, if needed. Launched by:<br />
Select<strong>in</strong>g Manage > DNS Configuration.<br />
See DNS Configuration for details.<br />
PXE Server Configuration Wizard – Used to configure Th<strong>in</strong>Manager for use with PXE th<strong>in</strong> clients.<br />
Launched by:<br />
Select<strong>in</strong>g Manage > PXE Server.<br />
See PXE Server Configuration Wizard for details.<br />
Th<strong>in</strong>Manager Server Configuration Wizard – Used to configure global Th<strong>in</strong>Manager properties like<br />
schedul<strong>in</strong>g, e-mail notification, and user access. Launched by:<br />
Double click<strong>in</strong>g on the Th<strong>in</strong>Man icon.<br />
Right click<strong>in</strong>g on the Th<strong>in</strong>Man icon and select<strong>in</strong>g Modify.<br />
Highlight<strong>in</strong>g the Th<strong>in</strong>Man icon and select<strong>in</strong>g Edit > Modify.<br />
See Th<strong>in</strong>Manager Server Configuration Wizard for details<br />
Term<strong>in</strong>al Configuration Wizard – Used to configure Term<strong>in</strong>als, both th<strong>in</strong> clients and PCs with W<strong>in</strong><strong>TM</strong>C<br />
<strong>in</strong>stalled. Launched by:<br />
Select<strong>in</strong>g Edit > Add Term<strong>in</strong>al <strong>in</strong> the menu.<br />
Right click<strong>in</strong>g on the Term<strong>in</strong>als branch icon and select<strong>in</strong>g Add Term<strong>in</strong>al.<br />
Double click<strong>in</strong>g on an exist<strong>in</strong>g term<strong>in</strong>al icon.<br />
See Term<strong>in</strong>al Configuration Wizard for details.<br />
ACP Th<strong>in</strong>Manager <strong>6.0</strong> Configuration Wizards 139
Term<strong>in</strong>al Group Configuration Wizard – Used to configure groups of Term<strong>in</strong>als, both th<strong>in</strong> clients and<br />
PCs with W<strong>in</strong><strong>TM</strong>C <strong>in</strong>stalled. Launched by:<br />
Select<strong>in</strong>g Edit > Add Term<strong>in</strong>al Group <strong>in</strong> the menu.<br />
Right click<strong>in</strong>g on the Term<strong>in</strong>als branch icon and select<strong>in</strong>g Add Group.<br />
Double click<strong>in</strong>g on an exist<strong>in</strong>g term<strong>in</strong>al group icon.<br />
See Term<strong>in</strong>al Group Configuration Wizard for details.<br />
Term<strong>in</strong>al Server Wizard – Used to def<strong>in</strong>e and configure Term<strong>in</strong>al Servers. Launch by:<br />
Expand the Display Server branch, right click on the Term<strong>in</strong>al Servers icon and select Add<br />
Term<strong>in</strong>al Server<br />
Double click<strong>in</strong>g on an exist<strong>in</strong>g Term<strong>in</strong>al Server icon.<br />
Camera Configuration Wizard - – Used to def<strong>in</strong>e and configure IP cameras as Display Servers. Launch<br />
by:<br />
Expand the Display Server branch, right click on the Cameras icon and select Add Camera.<br />
Double click<strong>in</strong>g on an exist<strong>in</strong>g Cameras icon.<br />
See Camera Configuration Wizard for details<br />
VCenter Server Wizard - Used to create and configure VCenter Servers. These are virtual mach<strong>in</strong>es<br />
managed by VMWare’s vCenter Server. Launch by:<br />
Highlight<strong>in</strong>g the VCenter Server branch, right click<strong>in</strong>g, and select<strong>in</strong>g Add VCenter Server.<br />
Display Client Wizards - Used to create and configure Display Clients. These <strong>in</strong>clude the Term<strong>in</strong>al<br />
Services, Camera, Term<strong>in</strong>al Shadow, and Workstation Display Clients. Launch by:<br />
Highlight<strong>in</strong>g the Display Clients branch, right click<strong>in</strong>g, and select<strong>in</strong>g Add Display Client.<br />
Expand<strong>in</strong>g the Display Clients branch, highlight<strong>in</strong>g Term<strong>in</strong>al Services, right click<strong>in</strong>g, and<br />
select<strong>in</strong>g Add Display Client.<br />
Expand<strong>in</strong>g the Display Clients branch, highlight<strong>in</strong>g Camera, right click<strong>in</strong>g, and select<strong>in</strong>g<br />
Add Display Client.<br />
Expand<strong>in</strong>g the Display Clients branch, highlight<strong>in</strong>g Workstation, right click<strong>in</strong>g, and select<strong>in</strong>g<br />
Add Display Client.<br />
Expand<strong>in</strong>g the Display Clients branch, highlight<strong>in</strong>g Term<strong>in</strong>al Shadow, right click<strong>in</strong>g, and<br />
select<strong>in</strong>g Add Display Client.<br />
Double click<strong>in</strong>g on an exist<strong>in</strong>g Display Client icon.<br />
See Display Client Configuration Wizard for details<br />
TermSecure User Configuration Wizard – Used to def<strong>in</strong>e and configure TermSecure Users. Launch by:<br />
Highlight<strong>in</strong>g the TermSecure User branch, right click<strong>in</strong>g, and select<strong>in</strong>g Add TermSecure<br />
User.<br />
Double click<strong>in</strong>g on an exist<strong>in</strong>g TermSecure User icon.<br />
See TermSecure User Configuration Wizard for details.<br />
TermSecure User Group Configuration Wizard – Used to def<strong>in</strong>e and configure TermSecure User<br />
Groups. Launch by:<br />
Highlight<strong>in</strong>g the TermSecure User branch, right click<strong>in</strong>g, and select<strong>in</strong>g Add TermSecure<br />
User Group.<br />
Double click<strong>in</strong>g on an exist<strong>in</strong>g TermSecure User Group icon.<br />
See TermSecure Users Group Configuration Wizard for details.<br />
140 Configuration Wizards ACP Th<strong>in</strong>Manager <strong>6.0</strong>
9.2 Th<strong>in</strong>Manager Server List<br />
Select<strong>in</strong>g Manage > Th<strong>in</strong>Manager Server List will launch the Th<strong>in</strong>Manager Server List Wizard to allow<br />
the def<strong>in</strong>ition of Th<strong>in</strong>Manager Servers. The def<strong>in</strong>ition of Th<strong>in</strong>Manager Servers allows the connection to<br />
remote Th<strong>in</strong>Manager Servers and allows the synchronization of Th<strong>in</strong>Manager Server configurations.<br />
Multiple Th<strong>in</strong>Manager Servers should be synchronized so that a term<strong>in</strong>al will receive the same<br />
configuration regardless of the Th<strong>in</strong>Manager Server that it boots from.<br />
Automatic Synchronization will connect all of the configuration databases on the Th<strong>in</strong>Manager Servers<br />
<strong>in</strong> this list and keep them synchronized so that a change on one is a change on all. See Auto-<br />
Synchronization Selection Page for details.<br />
<strong>Manual</strong> Synchronization requires a user to synchronize the configurations after each configuration<br />
change. See Synchronize Configuration for details.<br />
Th<strong>in</strong>Manager Server List Wizard - Introduction<br />
Importance of Page: This displays <strong>in</strong>troductory <strong>in</strong><strong>format</strong>ion<br />
Select Next to cont<strong>in</strong>ue, F<strong>in</strong>ish to save and close, or Cancel to close without sav<strong>in</strong>g.<br />
ACP Th<strong>in</strong>Manager <strong>6.0</strong><br />
141 Configuration Wizards
9.2.1.1 Auto-Synchronization Selection Page<br />
Auto-synchronization Selection<br />
Importance of Page: Enables Auto-synchronization.<br />
Sett<strong>in</strong>gs:<br />
Automatic Synchronization – Check this to <strong>in</strong>itiate auto-synchronization.<br />
Why Change from Default Sett<strong>in</strong>gs: Auto-synchronization is required for Mirrored licenses and<br />
Redundant Licenses. It also makes sure that redundant Th<strong>in</strong>Manager Servers have the same<br />
configuration.<br />
Select Next to cont<strong>in</strong>ue, F<strong>in</strong>ish to save and close, or Cancel to close without sav<strong>in</strong>g.<br />
142 Configuration Wizards ACP Th<strong>in</strong>Manager <strong>6.0</strong>
9.2.2 Automatic Synchronization<br />
Multiple Th<strong>in</strong>Manager Servers should be synchronized so that a term<strong>in</strong>al will receive the same<br />
configuration regardless of the Th<strong>in</strong>Manager Server that it boots from.<br />
Automatic synchronization is required for Mirrored licenses, Redundant licenses, and Enterprise Server<br />
licenses<br />
Auto-synchronization Selection<br />
Select the Automatic Synchronization checkbox and select the Next button to configure Autosynchronization.<br />
ACP Th<strong>in</strong>Manager <strong>6.0</strong> Configuration Wizards 143
9.2.2.1 Automatic Synchronization Configuration<br />
Auto-synchronization Configuration<br />
Importance of Page: Def<strong>in</strong>es and displays the Primary and Secondary Th<strong>in</strong>Manager Servers. This<br />
allows a term<strong>in</strong>al to boot from a backup if the primary fails.<br />
Fields:<br />
<br />
<br />
<br />
Name (Primary Th<strong>in</strong>Manager Server) – This field is for the NetBIOS name of the Primary<br />
Th<strong>in</strong>Manager Server. Use its real name and not a shortcut or nickname. The name is entered by<br />
us<strong>in</strong>g the Edit button.<br />
IP Address (Primary Th<strong>in</strong>Manager Server) – This field is for the IP address of the Primary<br />
Th<strong>in</strong>Manager Server. It is entered by us<strong>in</strong>g the Edit button.<br />
Name (Secondary Th<strong>in</strong>Manager Server) – This field is for the NetBIOS name of the Secondary<br />
Th<strong>in</strong>Manager Server. . Use its real name and not a shortcut or nickname. The name is entered by<br />
us<strong>in</strong>g the Edit button.<br />
IP Address (Secondary Th<strong>in</strong>Manager Server) – This field is for the IP address of the<br />
Secondary Th<strong>in</strong>Manager Server. It is entered by us<strong>in</strong>g the Edit button.<br />
Buttons:<br />
<br />
Edit (Primary Th<strong>in</strong>Manager Server) – This button launched the Enter the Primary<br />
Th<strong>in</strong>Manager Server In<strong>format</strong>ion W<strong>in</strong>dow that is used to def<strong>in</strong>e the primary Th<strong>in</strong>Manager<br />
Server.<br />
144 Configuration Wizards ACP Th<strong>in</strong>Manager <strong>6.0</strong>
Edit (Secondary Th<strong>in</strong>Manager Server) – This button launched the Enter the Secondary<br />
Th<strong>in</strong>Manager Server In<strong>format</strong>ion W<strong>in</strong>dow that is used to def<strong>in</strong>e the backup Th<strong>in</strong>Manager Server.<br />
Why Change from Default Sett<strong>in</strong>gs: The Name and IP address of both Th<strong>in</strong>Manager Servers need to<br />
be def<strong>in</strong>ed for auto-synchronization to work.<br />
9.2.2.2 Def<strong>in</strong><strong>in</strong>g the Th<strong>in</strong>Manager Servers<br />
Select each Edit button on the Auto-synchronization Configuration page to launch the Enter<br />
Th<strong>in</strong>Manager Server In<strong>format</strong>ion W<strong>in</strong>dow for each Th<strong>in</strong>Manager Server.<br />
Enter Th<strong>in</strong>Manager Server In<strong>format</strong>ion W<strong>in</strong>dow<br />
Enter the name of the Th<strong>in</strong>Manager Server <strong>in</strong> the Th<strong>in</strong>Manager Server field.<br />
Enter the IP address of the Th<strong>in</strong>Manager Server. The Discover button will enter the IP address for you.<br />
Select the OK button to accept the sett<strong>in</strong>gs or the Cancel button to close without sav<strong>in</strong>g.<br />
ACP Th<strong>in</strong>Manager <strong>6.0</strong> Configuration Wizards 145
Auto-synchronization Configuration<br />
When complete, the Auto-synchronization Configuration w<strong>in</strong>dow will show the Primary and Secondary<br />
Th<strong>in</strong>Manager Servers. This will automatically synchronize their configuration so that a term<strong>in</strong>al will receive<br />
the same configuration regardless of the Th<strong>in</strong>Manager Server that it boots from.<br />
Additionally, the status lights for the term<strong>in</strong>als will be displayed <strong>in</strong> the trees of both Th<strong>in</strong>Manager Servers.<br />
Select F<strong>in</strong>ish to save and close, or Cancel to close without sav<strong>in</strong>g.<br />
146 Configuration Wizards ACP Th<strong>in</strong>Manager <strong>6.0</strong>
9.2.3 Def<strong>in</strong><strong>in</strong>g Th<strong>in</strong>Manager Servers for <strong>Manual</strong> Synchronization<br />
9.2.3.1 Th<strong>in</strong>Manager Server List Page<br />
Th<strong>in</strong>Manager Server List - Blank<br />
Importance of Page: This page allows Th<strong>in</strong>Manager Servers to be def<strong>in</strong>ed.<br />
The Th<strong>in</strong>Manager Server List is the collection of Th<strong>in</strong>Manager Servers on the network. These <strong>in</strong>clude<br />
Th<strong>in</strong>Manager Servers that the term<strong>in</strong>al will communicate with to keep the connection status lights <strong>in</strong> the<br />
Th<strong>in</strong>Manager tree updated. It also allows access to remote Th<strong>in</strong>Manager Servers that allow network wide<br />
monitor<strong>in</strong>g, control, and management.<br />
Fields:<br />
List Box (Unlabeled) – The list box will display a list of def<strong>in</strong>ed Th<strong>in</strong>Manager Servers and their<br />
IP addresses.<br />
Buttons:<br />
Remove Server – This button will clear a highlighted Th<strong>in</strong>Manager Server from the list.<br />
Add Server – This button will launch a w<strong>in</strong>dow that allows the entry of a Th<strong>in</strong>Manager Server<br />
name and IP address.<br />
Edit Server – This button will launch a w<strong>in</strong>dow that allows the change of a highlighted<br />
Th<strong>in</strong>Manager Server name and IP address.<br />
ACP Th<strong>in</strong>Manager <strong>6.0</strong> Configuration Wizards 147
Arrows – These buttons adjust the order of the Th<strong>in</strong>Manager Servers. The computer on top is<br />
considered the Primary Th<strong>in</strong>Manager Server.<br />
Why Change from Default Sett<strong>in</strong>gs: The Th<strong>in</strong>Manager Servers need to be def<strong>in</strong>ed and listed <strong>in</strong> the<br />
w<strong>in</strong>dow to be available for manual synchronization and remote access.<br />
Select the Add Server button on the Th<strong>in</strong>Manager Server List Page to launch the Enter the new<br />
Th<strong>in</strong>Manager Server Def<strong>in</strong>ition W<strong>in</strong>dow.<br />
Th<strong>in</strong>Manager Server Def<strong>in</strong>ition<br />
Enter the name of the Th<strong>in</strong>Manager Server <strong>in</strong> the Th<strong>in</strong>Manager Server field.<br />
Enter the IP address of the Th<strong>in</strong>Manager Server <strong>in</strong> the Th<strong>in</strong>Manager Server IP field. The Discover button<br />
will enter the IP address for you.<br />
Select the OK button to accept the sett<strong>in</strong>gs or the Cancel button to close without sav<strong>in</strong>g.<br />
Repeat until all Th<strong>in</strong>Manager Servers are def<strong>in</strong>ed.<br />
148 Configuration Wizards ACP Th<strong>in</strong>Manager <strong>6.0</strong>
Th<strong>in</strong>Manager Server List - Filled<br />
When all of the desired Th<strong>in</strong>Manager Servers are added to the list, select F<strong>in</strong>ish to close the<br />
Th<strong>in</strong>Manager Server List wizard.<br />
9.2.4 <strong>Manual</strong> Synchronization<br />
Redundant Th<strong>in</strong>Manager Servers should be synchronized so that the same configuration is available to<br />
th<strong>in</strong> clients regardless of where they boot. Auto-synchronization is the preferred method (see Automatic<br />
Synchronization Configuration) but the Th<strong>in</strong>Manager Servers can be manually synchronized.<br />
Select Manage > Synchronize Configurations from the menu to <strong>in</strong>itiate the manual synchronization.<br />
This will launch the Synchronize Th<strong>in</strong>Manager Server Configurations wizard.<br />
ACP Th<strong>in</strong>Manager <strong>6.0</strong> Configuration Wizards 149
Synchronize Th<strong>in</strong>Manager Server Configuration Wizard<br />
Highlight the primary Th<strong>in</strong>Manager Server as the Configuration Source Th<strong>in</strong>Manager Server and the<br />
secondary Th<strong>in</strong>Manager Server as the Configuration Dest<strong>in</strong>ation. Select Next to proceed. Although<br />
many Th<strong>in</strong>Manager Servers can be def<strong>in</strong>ed <strong>in</strong> the Th<strong>in</strong>Manager Server List it is normal to have just a<br />
primary and a backup Th<strong>in</strong>Manager Server.<br />
150 Configuration Wizards ACP Th<strong>in</strong>Manager <strong>6.0</strong>
Synchronization Differences<br />
The Th<strong>in</strong>Manager Synchronization Wizard will list the files be<strong>in</strong>g updated, <strong>in</strong>clud<strong>in</strong>g the firmware,<br />
TermCap database, modules, and the configuration. It synchronizes everyth<strong>in</strong>g but the licenses.<br />
Note: The Synchronization tool does not compare and contrast then make changes back and forth.<br />
Synchronization will take the files and configuration from the source Th<strong>in</strong>Manager Server and overwrite<br />
the correspond<strong>in</strong>g files on the dest<strong>in</strong>ation Th<strong>in</strong>Manager Server.<br />
Select Next to cont<strong>in</strong>ue.<br />
ACP Th<strong>in</strong>Manager <strong>6.0</strong> Configuration Wizards 151
Th<strong>in</strong>Manager Server Synchronization Confirmation<br />
The Th<strong>in</strong>Manager Server Configuration Wizard will prompt for a confirmation of the synchronization<br />
before proceed<strong>in</strong>g. Select F<strong>in</strong>ish to f<strong>in</strong>alize the synchronization.<br />
Synchronization Complete W<strong>in</strong>dow<br />
A message will display the f<strong>in</strong>al results of the synchronization.<br />
152 Configuration Wizards ACP Th<strong>in</strong>Manager <strong>6.0</strong>
9.3 Th<strong>in</strong>Manager Server Configuration Wizard<br />
The Th<strong>in</strong>Manager Server Configuration wizard allows the configuration of global Th<strong>in</strong>Manager sett<strong>in</strong>gs. It<br />
can be launched by:<br />
Select<strong>in</strong>g Edit > Modify while the Th<strong>in</strong>Man icon is highlighted <strong>in</strong> the Th<strong>in</strong>Manager tree, or<br />
Double-click<strong>in</strong>g on the Th<strong>in</strong>Manager icon <strong>in</strong> the tree, or<br />
Right click<strong>in</strong>g the Th<strong>in</strong>Man icon and select<strong>in</strong>g Modify.<br />
Th<strong>in</strong>Manager Server Configuration Wizard<br />
Importance of Page: This displays <strong>in</strong>troductory <strong>in</strong><strong>format</strong>ion<br />
Select Next to Configure the Th<strong>in</strong>Manager Server sett<strong>in</strong>gs.<br />
ACP Th<strong>in</strong>Manager <strong>6.0</strong><br />
153 Configuration Wizards
9.3.1.1 Unknown Term<strong>in</strong>als Page<br />
Unknown Term<strong>in</strong>als<br />
Importance of Page: Controls creation and replacement of term<strong>in</strong>als through use of passwords and<br />
auto-creation.<br />
Sett<strong>in</strong>gs:<br />
<br />
<br />
<br />
Allow unknown term<strong>in</strong>als to connect - This checkbox, if selected, lets new term<strong>in</strong>als be added<br />
to the Th<strong>in</strong>Manager Server. Replacements and new term<strong>in</strong>als are prevented if this box is unselected.<br />
Require password on unknown term<strong>in</strong>als - This checkbox, if selected, allows use of a<br />
password so that only authorized personnel can add term<strong>in</strong>als to the Th<strong>in</strong>Manager Server. If<br />
checked, the password fields become active and allow the addition of a password.<br />
Enable AutoCreate - This checkbox, if selected, allows the auto-creation of an array of term<strong>in</strong>als<br />
as described <strong>in</strong> Auto-Creation of Term<strong>in</strong>als.<br />
AutoCreate Mask - This field is the base name used <strong>in</strong> the array of term<strong>in</strong>als when us<strong>in</strong>g Auto-<br />
Creation of Term<strong>in</strong>als.<br />
Why Change from Default Sett<strong>in</strong>gs: requir<strong>in</strong>g a password can control who adds term<strong>in</strong>als. Us<strong>in</strong>g autocreation<br />
can be helpful is some large deployments.<br />
Select Next to cont<strong>in</strong>ue, F<strong>in</strong>ish to save and close, or Cancel to close without sav<strong>in</strong>g.<br />
154 Configuration Wizards ACP Th<strong>in</strong>Manager <strong>6.0</strong>
9.3.1.2 Term<strong>in</strong>al Replacement Page<br />
Term<strong>in</strong>al Replacement<br />
Importance of Page: Sets the global sett<strong>in</strong>g for enabl<strong>in</strong>g replacement of offl<strong>in</strong>e term<strong>in</strong>als.<br />
Note: Term<strong>in</strong>als that are on cannot be replaced until they are turned off.<br />
Sett<strong>in</strong>gs:<br />
Enable Replacement – This checkbox gives global permission for term<strong>in</strong>als to be replaced.<br />
Un-select<strong>in</strong>g this will prevent all term<strong>in</strong>als from show<strong>in</strong>g up <strong>in</strong> the replacement list when a new<br />
term<strong>in</strong>al is added, mak<strong>in</strong>g Create New Term<strong>in</strong>al the only option. This feature is also available for<br />
the Group and term<strong>in</strong>al level on the first page of the correspond<strong>in</strong>g wizard. However, if this<br />
checkbox is unselected <strong>in</strong> the Th<strong>in</strong>Manager Server Configuration Wizard, check<strong>in</strong>g it <strong>in</strong> a<br />
Term<strong>in</strong>al Configuration Wizard will have no effect.<br />
Why Change from Default Sett<strong>in</strong>gs: Un-select<strong>in</strong>g this will prevent all term<strong>in</strong>als from show<strong>in</strong>g up <strong>in</strong> the<br />
replacement list when a new term<strong>in</strong>al is added, mak<strong>in</strong>g Create New Term<strong>in</strong>al the only option.<br />
Select Next to cont<strong>in</strong>ue, F<strong>in</strong>ish to save and close, or Cancel to close without sav<strong>in</strong>g.<br />
ACP Th<strong>in</strong>Manager <strong>6.0</strong> Configuration Wizards 155
9.3.1.3 Historical Logg<strong>in</strong>g Page<br />
Historical Logg<strong>in</strong>g<br />
Importance of Page: Sets the duration that logs are ma<strong>in</strong>ta<strong>in</strong>ed.<br />
Sett<strong>in</strong>gs:<br />
Ma<strong>in</strong>ta<strong>in</strong> Historical Log for X days - This field determ<strong>in</strong>es the length of time that the term<strong>in</strong>al<br />
server CPU and memory data from the Term<strong>in</strong>al Server Graph tab is stored. See Details Pane<br />
for an example of the graph.<br />
Ma<strong>in</strong>ta<strong>in</strong> Event Log for X days - This field determ<strong>in</strong>es how long the event log is kept.<br />
Choose events to log - These checkboxes determ<strong>in</strong>e what events are stored <strong>in</strong> the log.<br />
Term<strong>in</strong>al Server Events - This checkbox, when selected, records events of the term<strong>in</strong>al<br />
servers.<br />
Term<strong>in</strong>al Events - This checkbox, when selected, records events of the term<strong>in</strong>al.<br />
Term<strong>in</strong>al Configuration Changes - This checkbox, when selected, records changes to<br />
the term<strong>in</strong>al configuration.<br />
User Configuration Changes - This checkbox, when selected, records changes to the<br />
TermSecure User configuration.<br />
156 Configuration Wizards ACP Th<strong>in</strong>Manager <strong>6.0</strong>
Buttons:<br />
Clear History - This button will erase the Historical log.<br />
Clear Event Log - This button will erase the Event log.<br />
Why Change from Default Sett<strong>in</strong>gs: You can add Term<strong>in</strong>al Server events and TermSecure User events<br />
that aren’t collected by default. You can change the duration of the logs.<br />
Select<strong>in</strong>g the Event Log tab will show the events for the highlighted tree icon.<br />
Event Log Tab<br />
Details of an event can be obta<strong>in</strong>ed by double-click<strong>in</strong>g on an event.<br />
ACP Th<strong>in</strong>Manager <strong>6.0</strong> Configuration Wizards 157
Event Detail<br />
The Event Details w<strong>in</strong>dow shows details of the selected event. Select either the OK or Cancel button to<br />
close.<br />
Select Next to cont<strong>in</strong>ue, F<strong>in</strong>ish to save and close, or Cancel to close without sav<strong>in</strong>g.<br />
158 Configuration Wizards ACP Th<strong>in</strong>Manager <strong>6.0</strong>
9.3.1.4 System Schedule<br />
System Schedule<br />
Importance of Page: Allows schedules to be setup for Th<strong>in</strong>Manager and the Th<strong>in</strong>Manager system.<br />
Buttons:<br />
Edit Schedule – This button launched the Event Schedule w<strong>in</strong>dow.<br />
See Schedul<strong>in</strong>g for details.<br />
Why Change from Default Sett<strong>in</strong>gs: Automat<strong>in</strong>g backups, reports, and actions with the Scheduler<br />
saves time.<br />
Select Next to cont<strong>in</strong>ue, F<strong>in</strong>ish to save and close, or Cancel to close without sav<strong>in</strong>g.<br />
ACP Th<strong>in</strong>Manager <strong>6.0</strong> Configuration Wizards 159
9.3.1.5 Th<strong>in</strong>Manager Security Groups<br />
Access to Th<strong>in</strong>Manager can be assigned to W<strong>in</strong>dows User Groups on the Th<strong>in</strong>Manager Security<br />
Groups page.<br />
Th<strong>in</strong>Manager Security Groups<br />
Importance of Page: Normally adm<strong>in</strong>istrators are the only people who have access to Th<strong>in</strong>Manager<br />
functions. This page allows access to be granted to people so they can perform specific jobs without<br />
be<strong>in</strong>g elevated to the adm<strong>in</strong>istrator role.<br />
Sett<strong>in</strong>gs:<br />
W<strong>in</strong>dows User Group – This dropdown shows the group that is be<strong>in</strong>g configured.<br />
Fields:<br />
<br />
<br />
Available – This list box shows the Th<strong>in</strong>Manager functions that are available to the W<strong>in</strong>dows<br />
group displayed <strong>in</strong> the W<strong>in</strong>dows User Group box. These functions can be added to the Allowed<br />
list by double click<strong>in</strong>g.<br />
Allowed – This list box shows the Th<strong>in</strong>Manager functions that are granted to the W<strong>in</strong>dows group<br />
displayed <strong>in</strong> the W<strong>in</strong>dows User Group box. These functions can be removed from the Allowed<br />
list by double click<strong>in</strong>g.<br />
160 Configuration Wizards ACP Th<strong>in</strong>Manager <strong>6.0</strong>
Buttons:<br />
Delete Group – This button will remove the highlighted group <strong>in</strong> the W<strong>in</strong>dows User Group box.<br />
Add Group – This button launched the New W<strong>in</strong>dow Group w<strong>in</strong>dow where a new W<strong>in</strong>dows©<br />
group can be added to the configuration. See Add W<strong>in</strong>dows Group for details.<br />
Why Change from Default Sett<strong>in</strong>gs: Creat<strong>in</strong>g a W<strong>in</strong>dows Group and grant<strong>in</strong>g access to Th<strong>in</strong>Manager<br />
functions allows people to use Th<strong>in</strong>Manager without be<strong>in</strong>g an adm<strong>in</strong>istrator.<br />
Th<strong>in</strong>Manager allows different levels of access and functionality based on standard W<strong>in</strong>dows groups. By<br />
default only members of the W<strong>in</strong>dows Adm<strong>in</strong>istrator group has the ability to connect to Th<strong>in</strong>Manager and<br />
use the application. The Th<strong>in</strong>Manager Security Groups allows other W<strong>in</strong>dows groups to be granted<br />
privileges <strong>in</strong> Th<strong>in</strong>Manager.<br />
Th<strong>in</strong>Manager comes with privileges pre-def<strong>in</strong>ed for six groups. Each of these groups (except<br />
Adm<strong>in</strong>istrators) needs to be created on the doma<strong>in</strong> controller or <strong>in</strong> the Local Users and Groups on the<br />
Computer Management console and members added before they can be used.<br />
<br />
<br />
<br />
<br />
<br />
Adm<strong>in</strong>istrators - The Microsoft def<strong>in</strong>ed Adm<strong>in</strong>istrator group is given all privileges by default <strong>in</strong><br />
Th<strong>in</strong>Manager. This may be denied by unselect<strong>in</strong>g the various allowed W<strong>in</strong>dows User Group<br />
Permissions.<br />
Th<strong>in</strong>Manager Adm<strong>in</strong>istrators have full permission to do anyth<strong>in</strong>g with<strong>in</strong> Th<strong>in</strong>Manager <strong>in</strong>clud<strong>in</strong>g<br />
the power to logoff sessions, kill processes, send messages, restart term<strong>in</strong>als, calibrate touch<br />
screens, change term<strong>in</strong>al configurations, update firmware, update the TermCap, and restore<br />
configurations. Adm<strong>in</strong>istrators and members of Th<strong>in</strong>Manager Adm<strong>in</strong>istrators can shadow<br />
term<strong>in</strong>als and <strong>in</strong>teractively control the term<strong>in</strong>al session. These privileges may not be removed<br />
and will be grayed out.<br />
Th<strong>in</strong>Manager Interactive Shadow Users - Members of this group may shadow a term<strong>in</strong>al<br />
<strong>in</strong>teractively.<br />
Th<strong>in</strong>Manager Power Users can logoff sessions, kill processes, send messages, restart<br />
term<strong>in</strong>als, and calibrate touch screens. They cannot change term<strong>in</strong>al configurations, update<br />
firmware, update the TermCap, and restore configurations. Th<strong>in</strong>Manager Power Users can<br />
shadow term<strong>in</strong>als from with<strong>in</strong> Th<strong>in</strong>Manager but cannot <strong>in</strong>teract with the session.<br />
Th<strong>in</strong>Manager Shadow Users - Members of this group may shadow a term<strong>in</strong>al but not<br />
<strong>in</strong>teractively.<br />
Th<strong>in</strong>Manager Users can view only. They cannot logoff sessions, kill processes, send messages,<br />
restart term<strong>in</strong>als, or calibrate touch screens. Th<strong>in</strong>Manager Users cannot shadow a term<strong>in</strong>al.<br />
Select<strong>in</strong>g the Add Group button to launch the New W<strong>in</strong>dows Group w<strong>in</strong>dow will allow the configuration<br />
of additional W<strong>in</strong>dows User Groups.<br />
9.3.1.6 Add W<strong>in</strong>dows Group<br />
New W<strong>in</strong>dow User Group W<strong>in</strong>dow<br />
ACP Th<strong>in</strong>Manager <strong>6.0</strong> Configuration Wizards 161
Add<strong>in</strong>g a W<strong>in</strong>dows Group name <strong>in</strong> the Enter W<strong>in</strong>dows User Group Name field of the New W<strong>in</strong>dow<br />
Group w<strong>in</strong>dow and select<strong>in</strong>g the OK button will add the W<strong>in</strong>dows User Group to the drop-down list.<br />
Note: This doesn’t create the user group on any servers. This just adds the name of an exist<strong>in</strong>g group to<br />
the list that Th<strong>in</strong>Manager is ma<strong>in</strong>ta<strong>in</strong><strong>in</strong>g.<br />
Th<strong>in</strong>Manager Security Groups Page<br />
Select the group from the W<strong>in</strong>dows Users Group drop-down. Choose the permissions you want to grant<br />
to the group by double click<strong>in</strong>g on the function <strong>in</strong> the Available W<strong>in</strong>dows User Group Permissions list.<br />
Members of the W<strong>in</strong>dows User Group will have the selected permissions the next time they log<strong>in</strong>.<br />
Although Th<strong>in</strong>Manager has W<strong>in</strong>dows User Groups pre-configured with privileges, these groups have not<br />
been created on the term<strong>in</strong>al servers.<br />
To create a W<strong>in</strong>dows User Group, open the Computer Management Console by select<strong>in</strong>g Start ><br />
Sett<strong>in</strong>gs > Control Panel > Adm<strong>in</strong>istrative Tools > Computer Management.<br />
162 Configuration Wizards ACP Th<strong>in</strong>Manager <strong>6.0</strong>
Created Th<strong>in</strong>Manager Security Groups<br />
Highlight Groups <strong>in</strong> the tree and select Action > New Group to launch the New Group w<strong>in</strong>dow.<br />
Microsoft New Group W<strong>in</strong>dows<br />
Enter the group name <strong>in</strong> the Group name field.<br />
Add Users to the W<strong>in</strong>dows User Group by select<strong>in</strong>g the Add button.<br />
Select the Create button to f<strong>in</strong>ish the W<strong>in</strong>dows User Group creation. Members of the W<strong>in</strong>dows User<br />
Group will have the selected permissions the next time they log<strong>in</strong>.<br />
ACP Th<strong>in</strong>Manager <strong>6.0</strong> Configuration Wizards 163
Note: The Th<strong>in</strong>Server service may need to be stop and restarted to load the new Th<strong>in</strong>Manager Security<br />
Group sett<strong>in</strong>gs.<br />
Select Next to cont<strong>in</strong>ue the Th<strong>in</strong>Manager Server Configuration Wizard, F<strong>in</strong>ish to save and close, or<br />
Cancel to close without sav<strong>in</strong>g.<br />
9.3.1.7 Event Selection Page<br />
Event Selection<br />
Importance of Page: Th<strong>in</strong>Manager has event notification. E-mails or W<strong>in</strong>dows messages can be sent by<br />
Th<strong>in</strong>Manager to identify changes <strong>in</strong> the setup, configuration or status.<br />
Sett<strong>in</strong>gs:<br />
<br />
<br />
Email – Check<strong>in</strong>g the E-mail checkbox will send an e-mail message when that event occurs. The<br />
e-mail needs to be set up on the next page of the wizard.<br />
W<strong>in</strong>dows Messages – Check<strong>in</strong>g the W<strong>in</strong>dows Message checkbox will send a message to a<br />
term<strong>in</strong>al when that event occurs. The term<strong>in</strong>al needs to be def<strong>in</strong>ed on the next page of the<br />
wizard.<br />
Why Change from Default Sett<strong>in</strong>gs: In<strong>format</strong>ion about these events can be useful. The event needs<br />
checked to add the notification.<br />
The Th<strong>in</strong>Manager Server Stop/Start, Term<strong>in</strong>al Server Monitor Connection, and Term<strong>in</strong>al Monitor<br />
Connection events may <strong>in</strong>dicate the failure of the Th<strong>in</strong>Manager Server, Term<strong>in</strong>al Server, or term<strong>in</strong>al.<br />
Shar<strong>in</strong>g <strong>in</strong><strong>format</strong>ion on configuration changes, firmware, TermCap, or license <strong>in</strong>stallation can be useful<br />
164 Configuration Wizards ACP Th<strong>in</strong>Manager <strong>6.0</strong>
when management is shared among a group. Send<strong>in</strong>g an e-mail to all group members keeps them<br />
<strong>in</strong>formed of all changes.<br />
Select Next to cont<strong>in</strong>ue, F<strong>in</strong>ish to save and close, or Cancel to close without sav<strong>in</strong>g.<br />
9.3.1.8 E-Mail or W<strong>in</strong>dows Message Recipients Page<br />
Email or W<strong>in</strong>dows Messag<strong>in</strong>g Recipients<br />
Importance of Page: This page def<strong>in</strong>es what users are notified of event changes from the Event<br />
Selection page.<br />
Fields:<br />
<br />
<br />
<br />
<br />
SMTP Server - Enter the SMTP (Simple Mail Transfer Protocol) server to be used by the<br />
Th<strong>in</strong>Manager Server <strong>in</strong> the field.<br />
E-Mail Return Addresses - Enter the return e-mail address to be used by the Th<strong>in</strong>Manager<br />
Server <strong>in</strong> the field<br />
E-Mail Addresses - Th<strong>in</strong>Manager will send an e-mail message to the addresses <strong>in</strong> this text box<br />
when an event selected on the Event Select page occurs.<br />
Term<strong>in</strong>als - Th<strong>in</strong>Manager will send a message to the term<strong>in</strong>als <strong>in</strong> this text box when an event<br />
selected on the Event Select page occurs.<br />
ACP Th<strong>in</strong>Manager <strong>6.0</strong> Configuration Wizards 165
Buttons:<br />
Add (E-Mail Addresses) - Select this button to add e-mail addresses through the Enter the E-<br />
mail address w<strong>in</strong>dow.<br />
Delete (E-Mail Addresses) - Select this button to delete a highlighted e-mail address from the E-<br />
mail Addresses list.<br />
Add (Term<strong>in</strong>als) - Select this button to add a term<strong>in</strong>al through the Select Term<strong>in</strong>al(s) w<strong>in</strong>dow.<br />
Delete (Term<strong>in</strong>als) - Select this button to delete a highlighted term<strong>in</strong>al from the Term<strong>in</strong>als list.<br />
Add (E-Mail Addresses) - Select this button to add e-mail addresses through the Enter the E-mail<br />
address w<strong>in</strong>dow.<br />
Enter the E-mail Address W<strong>in</strong>dow<br />
Enter the desired e-mail address <strong>in</strong> the entry form and select OK. Select the Cancel button to close the<br />
w<strong>in</strong>dow without mak<strong>in</strong>g changes.<br />
Add (Term<strong>in</strong>als) - Select this button to add a term<strong>in</strong>al through the Select Term<strong>in</strong>al(s) w<strong>in</strong>dow.<br />
Term<strong>in</strong>al Selection W<strong>in</strong>dow<br />
166 Configuration Wizards ACP Th<strong>in</strong>Manager <strong>6.0</strong>
The Select Term<strong>in</strong>al(s) w<strong>in</strong>dows will list the term<strong>in</strong>als configured on the Th<strong>in</strong>Manager Server. Highlight<br />
the desired term<strong>in</strong>al and select the OK button.<br />
Why Change from Default Sett<strong>in</strong>gs: You need to add recipients for event notification to work.<br />
Select Next to cont<strong>in</strong>ue, F<strong>in</strong>ish to save and close, or Cancel to close without sav<strong>in</strong>g.<br />
9.3.1.9 Multicast Configuration Page<br />
Multicast Configuration Page<br />
Importance of Page: Allows multicast to be configured for Th<strong>in</strong>Manager Servers.<br />
Fields:<br />
Maximum Packet Size – This allows the firmware download packet size to be changed, if<br />
needed.<br />
Sett<strong>in</strong>gs:<br />
Enable Multicast - This checkbox, if selected, enables Multicast.<br />
Enable Smart Multicast - This checkbox, if selected, enables Smart Multicast.<br />
Buttons:<br />
Advanced - This button, if selected, displays the advanced sett<strong>in</strong>gs.<br />
Set to Defaults - This button, if selected, sets the advanced sett<strong>in</strong>gs back to the defaults.<br />
ACP Th<strong>in</strong>Manager <strong>6.0</strong> Configuration Wizards 167
Why Change from Default Sett<strong>in</strong>gs: You may need to change the sett<strong>in</strong>gs if there is a conflict with<br />
another multicast server on the network.<br />
Multicast provides the ability for an unlimited number of term<strong>in</strong>als to boot simultaneously from the same<br />
data stream. This feature reduces the amount of network traffic and reduces the amount of load on the<br />
Th<strong>in</strong>Manager Server when multiple term<strong>in</strong>als are boot<strong>in</strong>g concurrently. This function is especially useful<br />
for low bandwidth connections and highly utilized networks.<br />
Smart Multicast allows the term<strong>in</strong>al firmware to be sent directly to the term<strong>in</strong>al while a s<strong>in</strong>gle term<strong>in</strong>al is<br />
boot<strong>in</strong>g. If additional term<strong>in</strong>als request the term<strong>in</strong>al firmware dur<strong>in</strong>g this time, the firmware will be<br />
multicast so that all term<strong>in</strong>als can receive the firmware from a s<strong>in</strong>gle data stream. If Smart Multicast is<br />
disabled, the firmware will always be sent as a multicast transmission.<br />
Multicast is only available on term<strong>in</strong>als with ACP Boot Loader Version 5.0 and later. No local term<strong>in</strong>al<br />
configuration is needed to use Multicast.<br />
Unicast – Th<strong>in</strong>Manager has error check<strong>in</strong>g that will switch a term<strong>in</strong>al’s firmware download to unicast if<br />
the multicast download fails.<br />
The th<strong>in</strong> client will cont<strong>in</strong>ue to try to use multicast at each boot but will use unicast if multicast keeps<br />
fail<strong>in</strong>g.<br />
Advanced Sett<strong>in</strong>gs – Select<strong>in</strong>g the Advanced button will reveal advanced sett<strong>in</strong>gs for multicast.<br />
Advanced Multicast Options<br />
Importance of Page: This allows chang<strong>in</strong>g the multicast sett<strong>in</strong>gs if there is a conflict with another<br />
multicast server on the network.<br />
168 Configuration Wizards ACP Th<strong>in</strong>Manager <strong>6.0</strong>
Sett<strong>in</strong>gs:<br />
Multicast Sett<strong>in</strong>gs<br />
o Address – This is the IP address that will be used for Multicast transmissions.<br />
o Port – This is the dest<strong>in</strong>ation port that will be used for Multicast transmissions.<br />
o Time-to-Live (TTL) – This is the maximum number of router hops for Multicast packets.<br />
Sett<strong>in</strong>g this value to 255 allows for unlimited hops.<br />
IGMP Sett<strong>in</strong>gs (Internet Group Management Protocol)<br />
o Version – This sets the IGMP version for use with multicast capable routers.<br />
o Time-to-Live (TTL) – This sets the time-to-live value for IGMP packets.<br />
Buttons:<br />
Advanced - This button displays the advanced sett<strong>in</strong>gs.<br />
Set to Defaults - This button sets the advanced sett<strong>in</strong>gs back to the defaults.<br />
Why Change from Default Sett<strong>in</strong>gs: Change these if a conflict develops.<br />
Select Next to cont<strong>in</strong>ue, F<strong>in</strong>ish to save and close, or Cancel to close without sav<strong>in</strong>g.<br />
ACP Th<strong>in</strong>Manager <strong>6.0</strong> Configuration Wizards 169
9.3.1.10 Shadow Configuration Page<br />
Th<strong>in</strong>Manager allows the port used for shadow<strong>in</strong>g to be configured.<br />
Shadow Configuration Port<br />
Importance of Page: This allows the port that is used for shadow<strong>in</strong>g to be changed.<br />
Sett<strong>in</strong>gs:<br />
Shadow Port – Th<strong>in</strong>Manager uses port 5900 as the default port for shadow<strong>in</strong>g. Enter<strong>in</strong>g a<br />
different port number <strong>in</strong>to the Shadow Port field will change the port used if it is <strong>in</strong> conflict with<br />
another processes use of the port.<br />
Why Change from Default Sett<strong>in</strong>gs: Th<strong>in</strong>Manager uses the save port as VNC. If VNC is <strong>in</strong>stalled on a<br />
W<strong>in</strong><strong>TM</strong>C PC then there could be a conflict between shadow<strong>in</strong>g services. If this happens the port can be<br />
changed <strong>in</strong> Th<strong>in</strong>Manager.<br />
Select F<strong>in</strong>ish to accept changes or select Cancel to close without mak<strong>in</strong>g changes.<br />
170 Configuration Wizards ACP Th<strong>in</strong>Manager <strong>6.0</strong>
9.4 DNS Configuration<br />
Select<strong>in</strong>g Manage > DNS Configuration will launch the Doma<strong>in</strong> Name Server Wizard to allow the<br />
def<strong>in</strong>ition of Doma<strong>in</strong> Name Servers.<br />
Doma<strong>in</strong> Name Service Wizard - Introduction<br />
Importance of Page: This allows you to use a DNS server to identify term<strong>in</strong>al servers <strong>in</strong>stead of rely<strong>in</strong>g<br />
on IP addresses.<br />
Sett<strong>in</strong>gs:<br />
<br />
System without a DNS server - This is selected if you are not us<strong>in</strong>g a DNS server for computer<br />
identification. No configuration is needed. Select the F<strong>in</strong>ish button to close the wizard.<br />
System us<strong>in</strong>g a DNS server - This is selected if you are not us<strong>in</strong>g a DNS server for computer<br />
identification. Select the Next button to launch the Doma<strong>in</strong> Name Service Configuration<br />
screen.<br />
Why Change from Default Sett<strong>in</strong>gs: Us<strong>in</strong>g a DNS server allows you to po<strong>in</strong>t to a server by name<br />
<strong>in</strong>stead of IP address as the DNS server will handle name resolution.<br />
Select Next to cont<strong>in</strong>ue, F<strong>in</strong>ish to save and close, or Cancel to close without sav<strong>in</strong>g.<br />
ACP Th<strong>in</strong>Manager <strong>6.0</strong><br />
171 Configuration Wizards
9.4.1.1 Doma<strong>in</strong> Name Server Configuration Page<br />
Doma<strong>in</strong> Name Server Configuration<br />
Importance of Page: This is the page where the DNS server is def<strong>in</strong>ed <strong>in</strong> Th<strong>in</strong>Manager.<br />
Fields:<br />
DNS Servers – The DNS Servers that Th<strong>in</strong>Manager and the term<strong>in</strong>als will use need to be listed<br />
<strong>in</strong> this list box. They are added with the Add DNS Server button. See DNS Server Entry W<strong>in</strong>dow<br />
for details.<br />
Doma<strong>in</strong> - This is a field for the DNS doma<strong>in</strong> name.<br />
Search Doma<strong>in</strong> - This field will be added as a prefix to any DNS searches.<br />
Buttons:<br />
The Add DNS Server - This button will launch the DNS Server dialog box that allows a DNS<br />
Server to be added to the list.<br />
Remove DNS Server - This button will remove a highlighted DNS server from the list.<br />
Arrows (Up/Down) - The arrow keys will change the order of DNS servers used. Highlight a<br />
DNS server <strong>in</strong> the list and select the appropriate arrow.<br />
Read DNS Sett<strong>in</strong>g from this computer - This button will transfer the DNS sett<strong>in</strong>gs from the<br />
current computer <strong>in</strong>to Th<strong>in</strong>Manager<br />
Why Change from Default Sett<strong>in</strong>gs: The default is blank. You need to add values for this to work.<br />
172 Configuration Wizards ACP Th<strong>in</strong>Manager <strong>6.0</strong>
Select F<strong>in</strong>ish to save and close, or Cancel to close without sav<strong>in</strong>g.<br />
9.4.1.2 DNS Server Entry W<strong>in</strong>dow<br />
Doma<strong>in</strong> Name Server Configuration - Add DNS Server<br />
Select<strong>in</strong>g the Add DNS Server button will launch a DNS Server dialog box that allows the IP address of<br />
the DNS server to be entered.<br />
Add the IP address of the DNS server <strong>in</strong>to the DNS Server dialog and select OK. Additional IP addresses<br />
can be listed by select<strong>in</strong>g the Add DNS Server button aga<strong>in</strong>.<br />
Select the F<strong>in</strong>ish button when the DNS configuration is done.<br />
ACP Th<strong>in</strong>Manager <strong>6.0</strong> Configuration Wizards 173
10 Term<strong>in</strong>al Configuration<br />
10.1 Term<strong>in</strong>al Configuration Wizard<br />
The Term<strong>in</strong>al Configuration Wizard is used to configure term<strong>in</strong>als for use with Th<strong>in</strong>Manager.<br />
If a term<strong>in</strong>al is a member of a term<strong>in</strong>al group that has a group sett<strong>in</strong>g <strong>in</strong> use then the term<strong>in</strong>al will have<br />
that sett<strong>in</strong>g grayed out and deactivated. The sett<strong>in</strong>g will need to be changed at the group level <strong>in</strong> the<br />
Group Configuration Wizard and not the Term<strong>in</strong>al Configuration Wizard.<br />
Launch the Term<strong>in</strong>al Creation Wizard by:<br />
Select<strong>in</strong>g the Th<strong>in</strong>Manager Server <strong>in</strong> the Th<strong>in</strong>Manager tree and select<strong>in</strong>g Edit > Add Term<strong>in</strong>al<br />
from the menu bar, or<br />
Select<strong>in</strong>g the Term<strong>in</strong>als branch <strong>in</strong> the Th<strong>in</strong>Manager tree, right-click<strong>in</strong>g on the Term<strong>in</strong>als icon, and<br />
select<strong>in</strong>g the Add Term<strong>in</strong>al option, or<br />
Select<strong>in</strong>g a Group <strong>in</strong> the Th<strong>in</strong>Manager tree, right-click<strong>in</strong>g on the Group icon, and select<strong>in</strong>g the<br />
Add Term<strong>in</strong>al option. This puts the term<strong>in</strong>al <strong>in</strong> that group.<br />
ACP Th<strong>in</strong>Manager <strong>6.0</strong><br />
174 Term<strong>in</strong>al Configuration
10.1.1.1 Term<strong>in</strong>al Name Page<br />
Term<strong>in</strong>al Configuration Wizard - Term<strong>in</strong>al Name<br />
Importance of Page: Names the term<strong>in</strong>al and allows it to be added to a group.<br />
Sett<strong>in</strong>gs:<br />
Term<strong>in</strong>al Name – Required field for unique term<strong>in</strong>al name. Keep it under 15 characters.<br />
Term<strong>in</strong>al Group –Adds the term<strong>in</strong>al to a group of term<strong>in</strong>als by us<strong>in</strong>g the Change Group button.<br />
Copy Sett<strong>in</strong>gs – Allows the term<strong>in</strong>al to be created quickly by copy<strong>in</strong>g configuration from an<br />
exist<strong>in</strong>g term<strong>in</strong>al.<br />
Buttons:<br />
Description – This launches the Term<strong>in</strong>al Description W<strong>in</strong>dow to allow the entry of additional<br />
data.<br />
See Term<strong>in</strong>al Description for details.<br />
Change Group – Launches tree to select group for the term<strong>in</strong>al to jo<strong>in</strong>. See Chang<strong>in</strong>g a<br />
Term<strong>in</strong>al’s Group for details.<br />
Copy From – Launches tree that allows an exist<strong>in</strong>g term<strong>in</strong>al configuration to be applied to the<br />
new term<strong>in</strong>al. Only active when checkbox is selected.<br />
Permissions – Applies TermSecure permissions to the term<strong>in</strong>al. See Permissions for details.<br />
ACP Th<strong>in</strong>Manager <strong>6.0</strong> Term<strong>in</strong>al Configuration 175
Why Change from Default Sett<strong>in</strong>gs:<br />
Term<strong>in</strong>al needs a unique name. It can have sett<strong>in</strong>g from another term<strong>in</strong>al applied to speed configuration.<br />
Add<strong>in</strong>g to a group will speed configuration and management.<br />
10.1.1.2 Term<strong>in</strong>al Description<br />
The Description button launches the Term<strong>in</strong>al Description w<strong>in</strong>dow.<br />
Term<strong>in</strong>al Description W<strong>in</strong>dow<br />
The Term<strong>in</strong>al Description allows you to add additional <strong>in</strong><strong>format</strong>ion about the term<strong>in</strong>al <strong>in</strong> the Term<strong>in</strong>al<br />
Description field.<br />
Term<strong>in</strong>al Description <strong>in</strong> Configuration Tab<br />
Data entered <strong>in</strong> the Term<strong>in</strong>al Description field will be displayed on the term<strong>in</strong>al’s Configuration tab.<br />
10.1.1.3 Jo<strong>in</strong><strong>in</strong>g a Group<br />
The Change Group button launches the Select Group w<strong>in</strong>dow to allow the term<strong>in</strong>al to jo<strong>in</strong> a group of<br />
term<strong>in</strong>als.<br />
176 Term<strong>in</strong>al Configuration ACP Th<strong>in</strong>Manager <strong>6.0</strong>
Select Group W<strong>in</strong>dow<br />
Expand the Term<strong>in</strong>als tree to show the created groups. Highlight the desired group and select OK to jo<strong>in</strong>.<br />
This will close the w<strong>in</strong>dow.<br />
To remove a term<strong>in</strong>al from a group highlight Term<strong>in</strong>als and select the OK button.<br />
Cancel will close without changes.<br />
10.1.1.4 Copy Sett<strong>in</strong>gs<br />
Term<strong>in</strong>al configuration can be sped up by copy<strong>in</strong>g the sett<strong>in</strong>gs from an established term<strong>in</strong>al.<br />
Select the Copy Sett<strong>in</strong>gs from another Term<strong>in</strong>al checkbox and then select the Copy From button: This<br />
will launch the Select Term<strong>in</strong>al w<strong>in</strong>dow that allows the term<strong>in</strong>al to copy sett<strong>in</strong>gs from another term<strong>in</strong>al.<br />
ACP Th<strong>in</strong>Manager <strong>6.0</strong> Term<strong>in</strong>al Configuration 177
Select Term<strong>in</strong>al W<strong>in</strong>dow<br />
The Select Term<strong>in</strong>al w<strong>in</strong>dow will show a tree of the configured Term<strong>in</strong>al Groups and term<strong>in</strong>als. Highlight<br />
the term<strong>in</strong>al that you wish to copy and select the OK button to load the sett<strong>in</strong>gs and return to the Term<strong>in</strong>al<br />
Configuration Wizard.<br />
The Cancel button will close the Select Term<strong>in</strong>al w<strong>in</strong>dow without mak<strong>in</strong>g changes.<br />
178 Term<strong>in</strong>al Configuration ACP Th<strong>in</strong>Manager <strong>6.0</strong>
10.1.1.5 Term<strong>in</strong>al Hardware Page<br />
Term<strong>in</strong>al Configuration Wizard - Hardware Configuration<br />
Importance of Page: Def<strong>in</strong>es the hardware used for the term<strong>in</strong>al.<br />
Sett<strong>in</strong>gs:<br />
Make/OEM: This dropdown allows the make of the hardware to be selected.<br />
Model: This dropdown allows the model of the hardware to be selected.<br />
OEM Model: This displays the actual model used once the term<strong>in</strong>al connects to Th<strong>in</strong>Manager.<br />
Video Chipset: This displays the video chipset used once the term<strong>in</strong>al connects to<br />
Th<strong>in</strong>Manager.<br />
Touch Type: This displays the touch screen controller used if the th<strong>in</strong> client has an <strong>in</strong>tegrated<br />
touch screen.<br />
Term<strong>in</strong>al ID – This displays the MAC address of a connected term<strong>in</strong>al. We use it to identify the<br />
th<strong>in</strong> client. On W<strong>in</strong><strong>TM</strong>C c clients this will be the term<strong>in</strong>al name.<br />
Term<strong>in</strong>al Firmware Package – This dropdown allows the firmware package that the term<strong>in</strong>al will<br />
use to be changed. This must be allowed on the Package Manager Page (Manage >Packages).<br />
See Packages for details.<br />
Buttons:<br />
ACP Th<strong>in</strong>Manager <strong>6.0</strong> Term<strong>in</strong>al Configuration 179
Clear: This will remove the Term<strong>in</strong>al ID identifier from the configuration of an <strong>in</strong>active term<strong>in</strong>al.<br />
The MAC address of a term<strong>in</strong>al is used for the Term<strong>in</strong>al ID. Clear<strong>in</strong>g the Term<strong>in</strong>al ID will free<br />
hardware that has already been tied to a configuration and allow the term<strong>in</strong>al to be tied to a<br />
different configuration, without delet<strong>in</strong>g its orig<strong>in</strong>al configuration. It will also allow the make and<br />
model of the hardware to be changed.<br />
Edit: Select<strong>in</strong>g this button will launch the Edit Term<strong>in</strong>al ID w<strong>in</strong>dow that allows you to manually<br />
change the MAC address of the configuration. This allows you do a replacement of an old<br />
term<strong>in</strong>al by enter<strong>in</strong>g the MAC address of the replacement. Enter<strong>in</strong>g the new MAC address allows<br />
the new term<strong>in</strong>al to boot and retrieve its configuration without select<strong>in</strong>g the term<strong>in</strong>al from the list.<br />
Edit Term<strong>in</strong>al ID W<strong>in</strong>dow<br />
Why Change from Default Sett<strong>in</strong>gs: Us<strong>in</strong>g the correct make & model of the hardware dur<strong>in</strong>g<br />
configuration allows the wizard to display only sett<strong>in</strong>gs that are appropriate for that specific model, mak<strong>in</strong>g<br />
configuration more accurate.<br />
If you add a different model than you used <strong>in</strong> configuration then Th<strong>in</strong>Manager will adjust the configuration<br />
to match the new hardware. This is down with help from the TermCap database. See TermCap Database<br />
for details.<br />
A W<strong>in</strong><strong>TM</strong>C connection needs to be configured as Generic/Personal Computer. See W<strong>in</strong><strong>TM</strong>C Overview<br />
for details.<br />
Note: The default Make and OEM Model is set to the oldest unit, the ACP DC-30-100 because all<br />
follow<strong>in</strong>g units exceed its capabilities. If you configure your units as a DC-30-100 you will want to adjust<br />
the video sett<strong>in</strong>g once the actual hardware is attached, as the DC-30-100 video is limited to 800x600,<br />
256-color resolution.<br />
Select Next to cont<strong>in</strong>ue, F<strong>in</strong>ish to save and close, or Cancel to close without sav<strong>in</strong>g.<br />
180 Term<strong>in</strong>al Configuration ACP Th<strong>in</strong>Manager <strong>6.0</strong>
10.1.1.6 Term<strong>in</strong>al Options<br />
Term<strong>in</strong>al Options Page<br />
Importance of Page: Provides configuration of a few term<strong>in</strong>al functions.<br />
Sett<strong>in</strong>gs:<br />
Allow replacement at term<strong>in</strong>al if offl<strong>in</strong>e – This allows the term<strong>in</strong>al to show up <strong>in</strong> the<br />
replacement list dur<strong>in</strong>g a new term<strong>in</strong>al connection<br />
Set Schedule – This will allow the Schedule button to become active. See Schedul<strong>in</strong>g for details.<br />
Enable Term<strong>in</strong>al Effects - This allows the desktops <strong>in</strong> MultiSession to slide smoothly <strong>in</strong>to the<br />
desktop <strong>in</strong>stead of appear<strong>in</strong>g <strong>in</strong>stantaneously.<br />
Show term<strong>in</strong>al status messages, - This allows the term<strong>in</strong>al to display status messages <strong>in</strong> the<br />
upper left corner of the screen.<br />
Allow term<strong>in</strong>al to be shadowed – This dropdown sets the Shadow<strong>in</strong>g sett<strong>in</strong>g allow<strong>in</strong>g the<br />
configuration of Shadow<strong>in</strong>g Options.<br />
Allow Interactive Shadow – This allows users with Shadow<strong>in</strong>g permission to <strong>in</strong>teractively<br />
shadow the term<strong>in</strong>al. See Interactive Shadow for details.<br />
Buttons:<br />
Schedule – This launches the Event Schedule w<strong>in</strong>dow for the term<strong>in</strong>al. See Schedul<strong>in</strong>g for details.<br />
ACP Th<strong>in</strong>Manager <strong>6.0</strong> Term<strong>in</strong>al Configuration 181
Why Change from Default Sett<strong>in</strong>gs:<br />
Allow replacement at term<strong>in</strong>al if offl<strong>in</strong>e – This prevents an offl<strong>in</strong>e term<strong>in</strong>al from be<strong>in</strong>g selected<br />
when add<strong>in</strong>g a new term<strong>in</strong>al. Turn<strong>in</strong>g this off prevents a critical configuration from be<strong>in</strong>g<br />
transferred.<br />
If this is turned off then an adm<strong>in</strong>istrator will need to turn it back on if this term<strong>in</strong>al needs<br />
replaced.<br />
Show term<strong>in</strong>al status messages -Suppress<strong>in</strong>g <strong>in</strong>cidental messages like Display Client<br />
switch<strong>in</strong>g and TermSecure log<strong>in</strong>s can keep an operator from worry<strong>in</strong>g about non-essential<br />
messages.<br />
Allow term<strong>in</strong>al to be shadowed - Chang<strong>in</strong>g the sett<strong>in</strong>g controls connection sett<strong>in</strong>gs:<br />
o No – This will prevent the term<strong>in</strong>al from be<strong>in</strong>g shadowed by anyone.<br />
o Ask – This will ask the user to allow shadow<strong>in</strong>g. The user will need to say Yes on a<br />
message w<strong>in</strong>dow before the shadow<strong>in</strong>g is allowed.<br />
o Warn - Will display a message w<strong>in</strong>dow alert<strong>in</strong>g the term<strong>in</strong>al that it is to be shadowed, but<br />
doesn’t require user <strong>in</strong>put before the shadow<strong>in</strong>g is allowed.<br />
o Yes – Will allow shadow<strong>in</strong>g to occur without warn<strong>in</strong>g or user <strong>in</strong>put.<br />
Allow Interactive Shadow – Unselect<strong>in</strong>g will prevent the observer from controll<strong>in</strong>g the session. This<br />
“Look but don’t touch” mode prevents an observer from click<strong>in</strong>g the wrong buttons.<br />
Select Next to cont<strong>in</strong>ue, F<strong>in</strong>ish to save and close, or Cancel to close without sav<strong>in</strong>g.<br />
182 Term<strong>in</strong>al Configuration ACP Th<strong>in</strong>Manager <strong>6.0</strong>
10.1.1.7 Term<strong>in</strong>al Mode Selection Page<br />
Term<strong>in</strong>al Server Specification<br />
Importance of Page: This page has the sett<strong>in</strong>gs that allow the use of Display Clients, TermSecure, and<br />
MultiMonitor.<br />
Sett<strong>in</strong>gs:<br />
Use Display Clients - This sett<strong>in</strong>g is required to use most features and functions like<br />
SmartSession load balanc<strong>in</strong>g, MultiSession, and Term<strong>in</strong>al-to-Term<strong>in</strong>al shadow<strong>in</strong>g.<br />
If Use Display Clients is selected, two other sett<strong>in</strong>gs may become available:<br />
<br />
Enable TermSecure – This checkbox enables TermSecure on the term<strong>in</strong>al. This checkbox will<br />
only be displayed if the Th<strong>in</strong>Manager Server has a TermSecure license <strong>in</strong>stalled. See<br />
TermSecure for details on this function.<br />
The Enable MultiMonitor checkbox will be displayed if the hardware selected on the Term<strong>in</strong>al<br />
Hardware page is a MultiMonitor-capable th<strong>in</strong> client. Select<strong>in</strong>g this will allow the term<strong>in</strong>al to be<br />
configured for MultiMonitor. See MultiMonitor for details.<br />
Why Change from Default Sett<strong>in</strong>gs:<br />
We recommend us<strong>in</strong>g Display Clients because that expands the features and functions available.<br />
Select Next to cont<strong>in</strong>ue, F<strong>in</strong>ish to save and close, or Cancel to close without sav<strong>in</strong>g.<br />
ACP Th<strong>in</strong>Manager <strong>6.0</strong> Term<strong>in</strong>al Configuration 183
10.1.2 Term<strong>in</strong>als Us<strong>in</strong>g Individual Term<strong>in</strong>al Servers<br />
Term<strong>in</strong>als may connect to a series of <strong>in</strong>dividual term<strong>in</strong>al servers by not select<strong>in</strong>g the Use Display Clients<br />
on the Term<strong>in</strong>al Mode Selection page. Although this is not the recommended method this is covered<br />
here.<br />
Term<strong>in</strong>al Configuration Wizard - Term<strong>in</strong>al Server Specification<br />
Importance of Page: Used to select the legacy <strong>in</strong>dividual term<strong>in</strong>al server method.<br />
Note: We strongly recommend us<strong>in</strong>g Display Clients because that expands the features and functions<br />
available.<br />
Sett<strong>in</strong>gs:<br />
Not Select<strong>in</strong>g Use Display Clients is a legacy sett<strong>in</strong>g from earlier versions of Th<strong>in</strong>Manager.<br />
Us<strong>in</strong>g this sett<strong>in</strong>g will limit the features available.<br />
Select<strong>in</strong>g this enables use of the <strong>in</strong>dividual term<strong>in</strong>al server method.<br />
Select Next to cont<strong>in</strong>ue, F<strong>in</strong>ish to save and close, or Cancel to close without sav<strong>in</strong>g.<br />
The Term<strong>in</strong>al Connection Type page is displayed next to allow the selection of the desired Client<br />
Communication Protocol.<br />
184 Term<strong>in</strong>al Configuration ACP Th<strong>in</strong>Manager <strong>6.0</strong>
Term<strong>in</strong>al Configuration Wizard - Connection Type<br />
Importance of Page: Selects the client/server communication protocol.<br />
Sett<strong>in</strong>gs:<br />
Citrix ICA – This allows the use of the Citrix© ICA protocol <strong>in</strong> client to server communications.<br />
Citrix Device Services – This is a legacy version of the ICA protocol used on W<strong>in</strong>dows NT and<br />
W<strong>in</strong>dows 2000 term<strong>in</strong>al servers.<br />
Remote Desktop Protocol (RDP) – This is the default protocol from Microsoft©. It is<br />
automatically <strong>in</strong>stalled on Microsoft© term<strong>in</strong>al servers.<br />
Why Change from Default Sett<strong>in</strong>gs: This is where the term<strong>in</strong>al is configured to use the Citrix© ICA<br />
protocol if the Citrix© ICA protocol is go<strong>in</strong>g to be used <strong>in</strong>stead of the default RDP.<br />
Select Next to cont<strong>in</strong>ue, F<strong>in</strong>ish to save and close, or Cancel to close without sav<strong>in</strong>g.<br />
Select<strong>in</strong>g the Citrix ICA sett<strong>in</strong>g will change the path of the Term<strong>in</strong>al Configuration Wizard to display<br />
additional configuration pages. See Citrix for details.<br />
ACP Th<strong>in</strong>Manager <strong>6.0</strong> Term<strong>in</strong>al Configuration 185
Term<strong>in</strong>al Server Selection<br />
Importance of Page: This allows the selection of the term<strong>in</strong>al servers that the term<strong>in</strong>al will use. Add<strong>in</strong>g<br />
multiple term<strong>in</strong>al servers to the Selected Term<strong>in</strong>al Server list will establish failover.<br />
List Box:<br />
<br />
Available Term<strong>in</strong>al Servers – This is the list of the term<strong>in</strong>als configured <strong>in</strong> the Term<strong>in</strong>al Server<br />
Configuration Wizard and available to the term<strong>in</strong>al.<br />
If the Available Term<strong>in</strong>al Server list box is empty the Term<strong>in</strong>al Server Configuration Wizard can<br />
be launched with the Edit Server List button to def<strong>in</strong>e the term<strong>in</strong>al servers.<br />
Selected Term<strong>in</strong>al Servers – This is the list of term<strong>in</strong>al servers that the term<strong>in</strong>al will connect to,<br />
<strong>in</strong> the order that they will connect. Move the term<strong>in</strong>al servers to this list with the left and right<br />
arrow or by double click<strong>in</strong>g on the name.<br />
List<strong>in</strong>g two or more term<strong>in</strong>al servers configures Failover. The term<strong>in</strong>al will connect to the first <strong>in</strong><br />
the list. If it fails than the term<strong>in</strong>al will try the next <strong>in</strong> the list.<br />
Buttons:<br />
<br />
Arrows – The left and right arrows move the term<strong>in</strong>al servers between list boxes. The up and<br />
down arrow change the order that the term<strong>in</strong>al servers are used. The top term<strong>in</strong>al server is<br />
considered the primary term<strong>in</strong>al server.<br />
186 Term<strong>in</strong>al Configuration ACP Th<strong>in</strong>Manager <strong>6.0</strong>
Edit Server List – This launches the Term<strong>in</strong>al Server Configuration Wizard that allows<br />
term<strong>in</strong>al servers to be def<strong>in</strong>ed with<strong>in</strong> Th<strong>in</strong>Manager. Select<strong>in</strong>g Manage > Term<strong>in</strong>al Server List<br />
from the Th<strong>in</strong>Manager menu will also launch the Term<strong>in</strong>al Server Configuration Wizard.<br />
Override – This is not used with <strong>in</strong>dividual term<strong>in</strong>al servers.<br />
Sett<strong>in</strong>gs:<br />
Enforce Primary Term<strong>in</strong>al Server Connection – This will cause a term<strong>in</strong>al that failed over to a<br />
backup term<strong>in</strong>al server to return to the primary term<strong>in</strong>al server whenever that server becomes<br />
available.<br />
Why Change from Default Sett<strong>in</strong>gs: It is critical to list the term<strong>in</strong>al servers that the term<strong>in</strong>al will use. The<br />
wizard will not advance without a term<strong>in</strong>al server selected.<br />
If the Available Term<strong>in</strong>al Servers column is empty, the Term<strong>in</strong>al Server List Wizard needs to be run to<br />
def<strong>in</strong>e the term<strong>in</strong>al servers. Select the Edit Server List to launch the Term<strong>in</strong>al Server Configuration<br />
Wizard and def<strong>in</strong>e the term<strong>in</strong>al servers.<br />
Term<strong>in</strong>al Configuration Wizard - Term<strong>in</strong>al Server Selection<br />
This is an example of a term<strong>in</strong>al with the term<strong>in</strong>al servers selected.<br />
Select Next to cont<strong>in</strong>ue, F<strong>in</strong>ish to save and close, or Cancel to close without sav<strong>in</strong>g.<br />
ACP Th<strong>in</strong>Manager <strong>6.0</strong> Term<strong>in</strong>al Configuration 187
10.1.3 Term<strong>in</strong>als Us<strong>in</strong>g Display Clients<br />
Term<strong>in</strong>als may be configured to use Display Clients by select<strong>in</strong>g the Use Display Clients on the<br />
Term<strong>in</strong>al Mode Selection page.<br />
Term<strong>in</strong>al Configuration Wizard - Term<strong>in</strong>al Server Specification<br />
If the Use Display Clients is selected, two other sett<strong>in</strong>gs may become available:<br />
Enable TermSecure, when checked, will enable TermSecure functionality. This checkbox will<br />
only be displayed if the Th<strong>in</strong>Manager Server has a TermSecure license <strong>in</strong>stalled. See<br />
TermSecure for details on this function.<br />
The Enable MultiMonitor checkbox will be displayed if the hardware selected on the Term<strong>in</strong>al<br />
Hardware page is a MultiMonitor-capable th<strong>in</strong> client. Select<strong>in</strong>g this will allow the term<strong>in</strong>al to be<br />
configured for MultiMonitor. See MultiMonitor for details.<br />
Select Next to cont<strong>in</strong>ue configuration.<br />
10.1.4 Display Client Selection<br />
The Display Client Selection page is displayed next to allow the selection of the desired Display Clients.<br />
188 Term<strong>in</strong>al Configuration ACP Th<strong>in</strong>Manager <strong>6.0</strong>
Term<strong>in</strong>al Configuration Wizard – Display Client Selection<br />
Importance of Page: This allows the selection of the Display Clients that the term<strong>in</strong>al will use. Add<strong>in</strong>g<br />
multiple Display Clients to the Selected Display Clients list will establish MultiSession.<br />
List Box:<br />
<br />
Available Display Clients – This is the list of the Display Clients configured <strong>in</strong> the Display Client<br />
Configuration Wizard and available to the term<strong>in</strong>al.<br />
If the Available Display Client list box is empty the Display Client Configuration Wizard can be<br />
launched with the Edit Display Clients button to def<strong>in</strong>e the Display Clients.<br />
Selected Display Clients– This is the list of the Display Clients that the term<strong>in</strong>al will connect to,<br />
<strong>in</strong> the order that they will connect. Move the Display Clients to this list with the left and right arrow<br />
or by double click<strong>in</strong>g on the name.<br />
List<strong>in</strong>g two or more the Display Clients configures MultiSession. The term<strong>in</strong>al will display the first<br />
<strong>in</strong> the list and cascade the others.<br />
Buttons:<br />
<br />
<br />
Arrows – The left and right arrows move the Display Clients between list boxes. The up and<br />
down arrow change the order that the Display Clients are used. The top Display Clients is<br />
displayed on top at startup.<br />
Edit Display Clients – This launches the Display Client Configuration Wizard that allows<br />
Display Clients to be def<strong>in</strong>ed with<strong>in</strong> Th<strong>in</strong>Manager.<br />
ACP Th<strong>in</strong>Manager <strong>6.0</strong> Term<strong>in</strong>al Configuration 189
Override – This allows a highlighted Display Client to use a different log<strong>in</strong> or screen resolution<br />
than the term<strong>in</strong>al.<br />
See Display Client Override for details.<br />
Why Change from Default Sett<strong>in</strong>gs: It is critical to list the Display Clients that the term<strong>in</strong>al will use. The<br />
wizard will not advance without a Display Client selected.<br />
If the Available Display Clients column is empty, the Display Clients List Wizard needs to be run to<br />
configure Display Clients. Select the Edit Display Clients button to launch the Display Client List<br />
Wizard as shown <strong>in</strong> Display Client List.<br />
Term<strong>in</strong>al Configuration Wizard – Display Client Selection<br />
This is an example of a term<strong>in</strong>al with the Display Clients selected.<br />
10.1.4.1 Display Client Override<br />
Th<strong>in</strong>Manager has an Override button that will allow any Display Client to be configured to log<strong>in</strong> with a<br />
different user account than the term<strong>in</strong>al. The Override button becomes active when two or more Display<br />
Client are added to the Selected Display Client column.<br />
190 Term<strong>in</strong>al Configuration ACP Th<strong>in</strong>Manager <strong>6.0</strong>
Override Sett<strong>in</strong>gs W<strong>in</strong>dow<br />
Importance of Page: Allows a Display Client to use a different log<strong>in</strong> or screen resolution than the<br />
term<strong>in</strong>al.<br />
Sett<strong>in</strong>gs:<br />
<br />
<br />
Override - Log<strong>in</strong> Sett<strong>in</strong>gs– This needs checked to use this sett<strong>in</strong>g.<br />
Us<strong>in</strong>g this override with a blank username and password will force the user to manually log<strong>in</strong>.<br />
o Username – Field for the username of the W<strong>in</strong>dows© user account you want to use.<br />
o Password – Field for the password for the username.<br />
o Verify Password – Field to confirm the password.<br />
Override - Doma<strong>in</strong>– This needs checked to use this sett<strong>in</strong>g.<br />
o Doma<strong>in</strong> – Field for the doma<strong>in</strong> of the user account.<br />
Override - Video Sett<strong>in</strong>gs– This needs checked to use this sett<strong>in</strong>g.<br />
o Resolution – Dropdown for the video resolution to use for the Display Client.<br />
o Color Depth – Dropdown for the color depth to use for the Display Client.<br />
Buttons:<br />
OK – Accepts changes and closes w<strong>in</strong>dow.<br />
Cancel – Closes w<strong>in</strong>dow without changes.<br />
Why Change from Default Sett<strong>in</strong>gs: The defaults are blank and will not override anyth<strong>in</strong>g until changed.<br />
Select Next to cont<strong>in</strong>ue, F<strong>in</strong>ish to save and close, or Cancel to close without sav<strong>in</strong>g.<br />
ACP Th<strong>in</strong>Manager <strong>6.0</strong> Term<strong>in</strong>al Configuration 191
10.1.4.2 Virtual Workstations<br />
If you choose a Workstation Display Client you will need to associate it to an available workstation. This is<br />
done on the Complete the Workstation Display Client Configuration page.<br />
Complete the Workstation Display Client Configuration Page<br />
Importance of Page: Allows a workstation to be associated with a Workstation Display Client so that the<br />
term<strong>in</strong>al can display a workstation.<br />
Buttons:<br />
Add Workstation – Accepts changes and closes w<strong>in</strong>dow.<br />
Add Virtual Workstation – Closes w<strong>in</strong>dow without changes.<br />
Remove – This removes a highlighted workstation.<br />
Edit – This allows a highlighted workstation to be changed.<br />
Arrows –The up and down arrow change the order that multiple workstations are used.<br />
Why Change from Default Sett<strong>in</strong>gs: The default is blank and will not deploy a workstation until a<br />
workstation is added.<br />
Select<strong>in</strong>g the Add Workstation button will launch the Add Workstation w<strong>in</strong>dow.<br />
192 Term<strong>in</strong>al Configuration ACP Th<strong>in</strong>Manager <strong>6.0</strong>
Add Workstation W<strong>in</strong>dow<br />
Enter the Workstation name and IP address <strong>in</strong> the Workstation Display Name and Workstation IP<br />
Address fields.<br />
Select<strong>in</strong>g the Add Virtual Workstation button will launch the Add Virtual Workstation w<strong>in</strong>dow.<br />
Add Workstation W<strong>in</strong>dow<br />
The Add Virtual Workstation w<strong>in</strong>dow will show the configured VCenter Servers. Expand the tree and<br />
select the desired virtual workstation. Select the Add button to apply that virtual workstation.<br />
Error Message<br />
ACP Th<strong>in</strong>Manager <strong>6.0</strong> Term<strong>in</strong>al Configuration 193
Each virtual mach<strong>in</strong>e can only be used once s<strong>in</strong>ce workstations have a one-to-one relationship with the<br />
access<strong>in</strong>g term<strong>in</strong>al. If you try to apply a workstation twice you will receive and error message.<br />
Complete the Workstation Display Client Configuration Page<br />
Once a workstation has been applied for that display client it will be listed <strong>in</strong> the Selected Workstations<br />
textbox.<br />
Select Next to cont<strong>in</strong>ue, F<strong>in</strong>ish to save and close, or Cancel to close without sav<strong>in</strong>g.<br />
194 Term<strong>in</strong>al Configuration ACP Th<strong>in</strong>Manager <strong>6.0</strong>
10.1.4.3 Term<strong>in</strong>al Interface Options<br />
Term<strong>in</strong>al Interface Options Page<br />
Importance of Page: This page conta<strong>in</strong>s the sett<strong>in</strong>g that allows navigation between sessions when us<strong>in</strong>g<br />
MultiSession.<br />
Sett<strong>in</strong>gs:<br />
<br />
<br />
Show Group Selector on Term<strong>in</strong>al - This checkbox, if selected, will display an on-screen dropdown<br />
menu that can be activated by mouse.<br />
Enable Til<strong>in</strong>g – This checkbox, when selected, allows the Display Clients to be tiled on the<br />
monitor to provide an overview of all the sessions at once. See SessionTil<strong>in</strong>g Options for details.<br />
Screen Edge Group Selection - This checkbox, if selected, will activate a feature that will switch<br />
w<strong>in</strong>dows if the mouse is moved off screen.<br />
Buttons:<br />
Selector Options – This button launches the Group Selector Options w<strong>in</strong>dow that has the sett<strong>in</strong>gs for<br />
switch<strong>in</strong>g between sessions when us<strong>in</strong>g MultiSession. See Term<strong>in</strong>al Interface Options Hotkeys for<br />
details.<br />
Til<strong>in</strong>g Options– This button launches the Tile Options w<strong>in</strong>dow that has the sett<strong>in</strong>gs for til<strong>in</strong>g sessions<br />
when us<strong>in</strong>g MultiSession. See Term<strong>in</strong>al Interface Options Hotkeys for details.<br />
ACP Th<strong>in</strong>Manager <strong>6.0</strong> Term<strong>in</strong>al Configuration 195
Ma<strong>in</strong> Menu Options – This allows configuration of the TermSecure Ma<strong>in</strong> Menu. See TermSecure Menu<br />
for details.<br />
Why Change from Default Sett<strong>in</strong>gs: These sett<strong>in</strong>gs allow you to control how MultiSession is displayed<br />
and navigated.<br />
Select Next to cont<strong>in</strong>ue, F<strong>in</strong>ish to save and close, or Cancel to close without sav<strong>in</strong>g.<br />
10.1.4.4 Hotkey Configuration Page<br />
Hotkey Configuration Page<br />
Importance of Page: Used to configure hotkeys to make it easier to access sessions and functions.<br />
Sett<strong>in</strong>gs:<br />
Enable Instant Failover Hotkeys - This checkbox, if selected, allows the hot key switch<strong>in</strong>g<br />
between the two active sessions of a Term<strong>in</strong>al Services Display Client that is us<strong>in</strong>g Instant<br />
Failover.<br />
Enable Group Hotkeys - This checkbox, if selected, allows the hot key switch<strong>in</strong>g between<br />
different sessions of a term<strong>in</strong>al us<strong>in</strong>g MultiSession.<br />
Enable Til<strong>in</strong>g Hotkey – This checkbox, if selected, allows SessionTil<strong>in</strong>g to be activated by a<br />
hotkey comb<strong>in</strong>ation.<br />
196 Term<strong>in</strong>al Configuration ACP Th<strong>in</strong>Manager <strong>6.0</strong>
Enable Ma<strong>in</strong> Menu Hotkey – This checkbox, if selected, allows the TermSecure Ma<strong>in</strong> Menu to<br />
be activated by a hotkey comb<strong>in</strong>ation.<br />
Buttons:<br />
<br />
<br />
<br />
Change Hotkeys (Enable Instant Failover Hotkeys) – This button launches the Select<br />
Hotkeys w<strong>in</strong>dow that has the sett<strong>in</strong>gs for hotkeys when us<strong>in</strong>g Instant Failover. See Hotkey<br />
Configuration for details.<br />
Change Hotkeys (Enable Group Hotkeys) – This button launches the Select Hotkeys w<strong>in</strong>dow<br />
that has the sett<strong>in</strong>gs for hotkeys when us<strong>in</strong>g MultiSession. See Hotkey Configuration for details.<br />
Change Hotkeys (Enable Til<strong>in</strong>g Hotkeys) – This button launches the Select Hotkeys w<strong>in</strong>dow<br />
that has the sett<strong>in</strong>gs for hotkeys when us<strong>in</strong>g Til<strong>in</strong>g. See Hotkey Configuration for details.<br />
Change Hotkeys (Enable Ma<strong>in</strong> Menu Hotkeys) – This button launches the Select Hotkeys<br />
w<strong>in</strong>dow that has the sett<strong>in</strong>gs for hotkeys when us<strong>in</strong>g TermSecure. See Hotkey Configuration for<br />
details.<br />
Why Change from Default Sett<strong>in</strong>gs: These sett<strong>in</strong>gs allow you to control sessions with hotkeys.<br />
Select Next to cont<strong>in</strong>ue, F<strong>in</strong>ish to save and close, or Cancel to close without sav<strong>in</strong>g.<br />
10.1.5 Cont<strong>in</strong>uation of the Term<strong>in</strong>al Configuration<br />
The configuration paths (Independent Term<strong>in</strong>al Servers vs. Display Clients, ICA vs. Device Services and<br />
RDP) unite at the Log<strong>in</strong> Configuration. However, the Log In In<strong>format</strong>ion page varies depend<strong>in</strong>g on it the<br />
term<strong>in</strong>al is us<strong>in</strong>g <strong>in</strong>dividual Term<strong>in</strong>al Servers or Display Clients.<br />
ACP Th<strong>in</strong>Manager <strong>6.0</strong> Term<strong>in</strong>al Configuration 197
10.1.5.1 Log<strong>in</strong> for Display Client Users<br />
Log<strong>in</strong> In<strong>format</strong>ion - Use Display Clients<br />
Importance of Page: This page allows a term<strong>in</strong>al to automatically log<strong>in</strong> without user action.<br />
Sett<strong>in</strong>gs:<br />
Username – Enter a valid W<strong>in</strong>dows user account.<br />
Password – Enter the password.<br />
Verify Password – Re-enter the password for confirmation.<br />
Doma<strong>in</strong> - Enter the doma<strong>in</strong>, if Doma<strong>in</strong> accounts are be<strong>in</strong>g used.<br />
Path - Enter the path to the desired application <strong>in</strong> the field. This will be the only program to run<br />
and the desktop, icons, and start menu will be hidden.<br />
Command L<strong>in</strong>e Options – This field provides a space for command l<strong>in</strong>e options and switches.<br />
This field may not be required.<br />
Initial Folder - This field is provided <strong>in</strong> case you need to specify the work<strong>in</strong>g directory for the<br />
program when us<strong>in</strong>g a relative path for the <strong>in</strong>itial program. This field may not be required.<br />
Buttons:<br />
198 Term<strong>in</strong>al Configuration ACP Th<strong>in</strong>Manager <strong>6.0</strong>
Verify - The Verify button will contact the doma<strong>in</strong> controller to validate the accuracy of the<br />
doma<strong>in</strong> user account.<br />
Select the Verify button to check the user.<br />
Validate Users W<strong>in</strong>dow<br />
A Validate Users w<strong>in</strong>dow will be displayed with the status of the user. If the user account is a valid<br />
doma<strong>in</strong> account, the results will show valid. If the results show <strong>in</strong>valid, try another account.<br />
Why Change from Default Sett<strong>in</strong>gs: Us<strong>in</strong>g the auto-log<strong>in</strong> feature allows a term<strong>in</strong>al to connect and load<br />
sessions without requir<strong>in</strong>g user <strong>in</strong>put. It also hides the log<strong>in</strong> account so the user doesn’t know the account<br />
and can’t use it for unauthorized access to the network.<br />
Select Next to cont<strong>in</strong>ue, F<strong>in</strong>ish to save and close, or Cancel to close without sav<strong>in</strong>g.<br />
ACP Th<strong>in</strong>Manager <strong>6.0</strong> Term<strong>in</strong>al Configuration 199
10.1.5.2 Video Resolution Page<br />
Term<strong>in</strong>al Configuration Wizard - Video Configuration<br />
Importance of Page: This page sets the video resolution that the term<strong>in</strong>al will use.<br />
Sett<strong>in</strong>gs:<br />
Resolution – Select the desired screen size. The list will conta<strong>in</strong> the sizes available for the<br />
hardware that was chosen on the Term<strong>in</strong>al Hardware page.<br />
W<strong>in</strong><strong>TM</strong>C configurations show a Full Screen option.<br />
Color Depth – Select the desired color depth. The list will conta<strong>in</strong> the values available for the<br />
hardware that was chosen on the Term<strong>in</strong>al Hardware page.<br />
Refresh Rate – Select the desired refresh rate for the monitor. The list will conta<strong>in</strong> the values<br />
available for the hardware that was chosen on the Term<strong>in</strong>al Hardware page.<br />
Why Change from Default Sett<strong>in</strong>gs: The monitor that is used may have a different resolution than the<br />
default value. A W<strong>in</strong>dows© 2003 or 2008 term<strong>in</strong>al server can display 16K colors but a W<strong>in</strong>dows© 2000<br />
term<strong>in</strong>al servers can only display 256 colors.<br />
A term<strong>in</strong>al that is us<strong>in</strong>g MultiMonitor can have the screen resolution of each monitor set. See MultiMonitor<br />
for more details.<br />
200 Term<strong>in</strong>al Configuration ACP Th<strong>in</strong>Manager <strong>6.0</strong>
MultiMonitor Video Sett<strong>in</strong>gs<br />
Importance of Page: Configures the video resolution of each monitor for a MultiMonitor term<strong>in</strong>al.<br />
Sett<strong>in</strong>gs:<br />
Number of Monitors – These radio buttons allow you to def<strong>in</strong>e how many monitors the term<strong>in</strong>al<br />
will use.<br />
Color Depth – Select the desired color depth. The color depth will be used for all monitors.<br />
Resolution – Select the desired screen size for each monitor used.<br />
Color Depth – Select the desired color depth for each monitor used.<br />
Refresh Rate – Select the desired refresh rate for each monitor used.<br />
Buttons:<br />
Why Change from Default Sett<strong>in</strong>gs: MultiMonitor allows you to use different sized monitors <strong>in</strong>stead of<br />
requir<strong>in</strong>g that all are the same. This page allows you to adjust the sett<strong>in</strong>gs to match your configuration.<br />
Select Next to cont<strong>in</strong>ue, F<strong>in</strong>ish to save and close, or Cancel to close without sav<strong>in</strong>g.<br />
ACP Th<strong>in</strong>Manager <strong>6.0</strong> Term<strong>in</strong>al Configuration 201
10.1.5.3 W<strong>in</strong><strong>TM</strong>C Sett<strong>in</strong>gs Page<br />
A term<strong>in</strong>al that is set for use as a W<strong>in</strong><strong>TM</strong>C PC client by us<strong>in</strong>g Generic/PersonalComputer <strong>in</strong> the Make<br />
and Model field of on the Term<strong>in</strong>al Hardware page will display a page for W<strong>in</strong><strong>TM</strong>C sett<strong>in</strong>gs. It is not<br />
shown for normal term<strong>in</strong>als.<br />
W<strong>in</strong><strong>TM</strong>C Sett<strong>in</strong>gs<br />
Importance of Page: Used to configure the W<strong>in</strong><strong>TM</strong>C client that converts a PC <strong>in</strong>to a term<strong>in</strong>al services<br />
client that is controlled and managed through Th<strong>in</strong>Manager.<br />
Sett<strong>in</strong>gs:<br />
Redirect Local Resources:<br />
o<br />
o<br />
o<br />
o<br />
Redirect Serial Ports – Enable this sett<strong>in</strong>g to make local serial ports available <strong>in</strong> a<br />
session. Serial Port redirection does not work when you connect to a term<strong>in</strong>al server<br />
runn<strong>in</strong>g W<strong>in</strong>dows 2000 or earlier.<br />
Redirect Drives – Enable this sett<strong>in</strong>g to make local drives available <strong>in</strong> a session. Drive<br />
redirection does not work when you connect to a term<strong>in</strong>al server runn<strong>in</strong>g W<strong>in</strong>dows 2000<br />
or earlier.<br />
Redirect Pr<strong>in</strong>ters – Enable this sett<strong>in</strong>g to make your local pr<strong>in</strong>ter available <strong>in</strong> a session.<br />
Redirect Sound –Enable this sett<strong>in</strong>g to allow audio played <strong>in</strong> your session to play locally.<br />
Sound redirection does not work when you connect to a term<strong>in</strong>al server runn<strong>in</strong>g W<strong>in</strong>dows<br />
2000 or earlier.<br />
202 Term<strong>in</strong>al Configuration ACP Th<strong>in</strong>Manager <strong>6.0</strong>
o<br />
Redirect Smart Cards – Enable this sett<strong>in</strong>g to make your smart card available <strong>in</strong> a<br />
session. Smart card redirection does not work when you connect to a term<strong>in</strong>al server<br />
runn<strong>in</strong>g W<strong>in</strong>dows 2000 or earlier.<br />
Client Control Sett<strong>in</strong>gs:<br />
o Allow client to be closed – Enable this sett<strong>in</strong>g if you want your user to be able to close<br />
the client.<br />
o Allow client to be sized – Enable this sett<strong>in</strong>g if you want your user to be able to resize<br />
the client.<br />
o Always ma<strong>in</strong>ta<strong>in</strong> monitor connection – Enable this sett<strong>in</strong>g to keep the monitor<strong>in</strong>g<br />
connection active when W<strong>in</strong><strong>TM</strong>C is closed to allow shadow<strong>in</strong>g. Unselect<strong>in</strong>g this checkbox<br />
will release the W<strong>in</strong><strong>TM</strong>C license when the W<strong>in</strong><strong>TM</strong>C program is closed but will deny<br />
shadow access.<br />
o Show groups <strong>in</strong> separate w<strong>in</strong>dows – This checkbox, if selected, will display multiple<br />
Display Clients as separate w<strong>in</strong>dows rather than <strong>in</strong> one w<strong>in</strong>dow shell.<br />
Experience Sett<strong>in</strong>gs:<br />
o Show Desktop Background – Enable this sett<strong>in</strong>g if you want your user to be able to<br />
select a W<strong>in</strong>dows Desktop Background. If not set, the background will be a solid color.<br />
o Show w<strong>in</strong>dow contents while dragg<strong>in</strong>g – Enable this sett<strong>in</strong>g if you want the w<strong>in</strong>dow<br />
contents of a w<strong>in</strong>dow to be shown while the w<strong>in</strong>dow is be<strong>in</strong>g dragged.<br />
o Show menu/w<strong>in</strong>dow animations – Enable this sett<strong>in</strong>g if you want menu/w<strong>in</strong>dow<br />
animations to be enabled on the client.<br />
o Show Themes – Enable this sett<strong>in</strong>g if you want your user to be able to select a W<strong>in</strong>dows<br />
Theme.<br />
Note: These functions may be denied by user policies or term<strong>in</strong>al server configuration. Check the<br />
Microsoft© Local Policy, Group Policy, and Term<strong>in</strong>al Services Configuration. See Non-Th<strong>in</strong>Manager<br />
Components for details.<br />
Why Change from Default Sett<strong>in</strong>gs: The Redirect Local Resources sett<strong>in</strong>gs allow the user to access<br />
the resources on the PC.<br />
The Client Control Sett<strong>in</strong>gs can be set to prevent the W<strong>in</strong><strong>TM</strong>C from be<strong>in</strong>g closed. If you want to convert<br />
a floor PC to a dedicated term<strong>in</strong>al you can <strong>in</strong>stall W<strong>in</strong><strong>TM</strong>C on the PC and have it launch automatically by<br />
plac<strong>in</strong>g it <strong>in</strong> the Startup folder (C:\Documents and Sett<strong>in</strong>gs\%username%\Start Menu\Programs\Startup).<br />
The user can’t close W<strong>in</strong><strong>TM</strong>C if the Allow client to be closed and the Allow client to be sized sett<strong>in</strong>gs<br />
are unchecked.<br />
The Experience Sett<strong>in</strong>gs give a PC-like desktop experience but use more resources.<br />
Select Next to cont<strong>in</strong>ue, F<strong>in</strong>ish to save and close, or Cancel to close without sav<strong>in</strong>g.<br />
ACP Th<strong>in</strong>Manager <strong>6.0</strong> Term<strong>in</strong>al Configuration 203
10.1.5.4 Term<strong>in</strong>al Module Selection Page<br />
Term<strong>in</strong>al Configuration Wizard - Module Selection<br />
Importance of Page: This page attaches modules to a term<strong>in</strong>al so that it can use touch screens, sound,<br />
USB drives, etc.<br />
Sett<strong>in</strong>gs:<br />
Installed Modules – This list box displays the modules that are added to the term<strong>in</strong>al. Modules<br />
added to a group will show a group icon.<br />
Buttons:<br />
Move Up & Move Down – These buttons changes the order that the modules load dur<strong>in</strong>g boot<br />
up by rearrang<strong>in</strong>g the module list. They are rarely used.<br />
<br />
<br />
Add… – This opens the Attach Module to Term<strong>in</strong>al w<strong>in</strong>dow to allow a module to be added to<br />
the term<strong>in</strong>al.<br />
Configure… – Open the Modules Properties w<strong>in</strong>dow by highlight<strong>in</strong>g the module <strong>in</strong> the Module<br />
list box and click<strong>in</strong>g the Configure button.<br />
Remove – Remove a module by highlight<strong>in</strong>g it <strong>in</strong> the Module list box and click<strong>in</strong>g the Remove<br />
button.<br />
Why Change from Default Sett<strong>in</strong>gs: Certa<strong>in</strong> features and functions are activated by use of modules.<br />
204 Term<strong>in</strong>al Configuration ACP Th<strong>in</strong>Manager <strong>6.0</strong>
Select Next to cont<strong>in</strong>ue, F<strong>in</strong>ish to save and close, or Cancel to close without sav<strong>in</strong>g.<br />
10.1.5.5 Attach<strong>in</strong>g a Module<br />
A Module is a component of the firmware that is not needed for the basic functionality but may be desired<br />
for advanced functionality. These features <strong>in</strong>clude Touch Screen drivers, serial mouse drivers, High<br />
Speed Serial drivers, Shared Keyboard and Mouse, USB Memory Card Reader, and Instant Failover. See<br />
Module Overview for details.<br />
To attach a Module to a Term<strong>in</strong>al, select the Add… button to launch the Attach Module to Term<strong>in</strong>al<br />
w<strong>in</strong>dow.<br />
Attach Module to Term<strong>in</strong>al<br />
The Attach Module to Term<strong>in</strong>al w<strong>in</strong>dow will show the modules that are available to the term<strong>in</strong>al. The<br />
Module Type drop-down box sorts the modules by categories to make the modules easier to f<strong>in</strong>d.<br />
Highlight the desired module and select the OK button to add the module to the configuration.<br />
ACP Th<strong>in</strong>Manager <strong>6.0</strong> Term<strong>in</strong>al Configuration 205
Term<strong>in</strong>al Configuration Wizard - Module Selection<br />
Term<strong>in</strong>als that are members of a Group may show icons to represent the properties of added modules.<br />
<br />
<br />
The Group icon represents modules assigned to a parent Group.<br />
No icon <strong>in</strong>dicates that the module was added to that particular Group or Term<strong>in</strong>al and not a<br />
parent Group.<br />
206 Term<strong>in</strong>al Configuration ACP Th<strong>in</strong>Manager <strong>6.0</strong>
Module Configuration<br />
Highlight<strong>in</strong>g a module and select<strong>in</strong>g the Configure button will open the Module Properties w<strong>in</strong>dow and<br />
allow changes to the module configuration.<br />
ACP Th<strong>in</strong>Manager <strong>6.0</strong> Term<strong>in</strong>al Configuration 207
Module Properties<br />
On the Modules Properties w<strong>in</strong>dow, select the parameter to change, select the new value <strong>in</strong> the dropdown<br />
list, and click the Set button. This will change the sett<strong>in</strong>g.<br />
The Set to Default button will restore the module to the default sett<strong>in</strong>gs.<br />
Select the Done button to close the Module Properties w<strong>in</strong>dow and to return to the Term<strong>in</strong>al<br />
Configuration Wizard.<br />
Select Next to cont<strong>in</strong>ue, F<strong>in</strong>ish to save and close, or Cancel to close without sav<strong>in</strong>g.<br />
10.1.5.6 Th<strong>in</strong>Manager Server Monitor List Page<br />
This page is not displayed when Auto-synchronization is used. See Auto-synchronization.<br />
208 Term<strong>in</strong>al Configuration ACP Th<strong>in</strong>Manager <strong>6.0</strong>
Term<strong>in</strong>al Configuration Wizard - Th<strong>in</strong>Manager Server Monitor List<br />
Importance of Page: If you are us<strong>in</strong>g two Th<strong>in</strong>Manager Servers without automatic synchronization them<br />
the term<strong>in</strong>al will normally only send its connection status (green light) to the Th<strong>in</strong>Manager Server that it<br />
booted from. This page allows you to list multiple Th<strong>in</strong>Manager Servers so that the term<strong>in</strong>al will send its<br />
status <strong>in</strong><strong>format</strong>ion to all the Th<strong>in</strong>Manager Servers<br />
Sett<strong>in</strong>gs:<br />
<br />
Available Th<strong>in</strong>Manager Servers – This is the list of def<strong>in</strong>ed Th<strong>in</strong>Manager Servers. Select<strong>in</strong>g<br />
the Edit Server List button will launch the Th<strong>in</strong>Manager Server List Wizard to add new<br />
Th<strong>in</strong>Manager Servers.<br />
Selected Th<strong>in</strong>Manager Server – This is the list of Th<strong>in</strong>Manager Servers that the term<strong>in</strong>al will<br />
send its connection status to. Move Th<strong>in</strong>Manager Servers from the Available list to Selected list<br />
by double click<strong>in</strong>g or us<strong>in</strong>g the arrow buttons while highlighted.<br />
Buttons:<br />
<br />
<br />
Arrows – These buttons move highlighted Th<strong>in</strong>Manager Servers from one list to the other or<br />
rearrange the order listed.<br />
Edit Server List – This launches the Th<strong>in</strong>Manager Server List Wizard that allows the def<strong>in</strong><strong>in</strong>g of<br />
Th<strong>in</strong>Manager Servers.<br />
ACP Th<strong>in</strong>Manager <strong>6.0</strong> Term<strong>in</strong>al Configuration 209
Why Change from Default Sett<strong>in</strong>gs: Add<strong>in</strong>g Th<strong>in</strong>Manager Servers to the Selected Th<strong>in</strong>Manager<br />
Server allows control, configuration, shadow<strong>in</strong>g, and reboot<strong>in</strong>g of a term<strong>in</strong>al from a backup Th<strong>in</strong>Manager<br />
Server if the primary Th<strong>in</strong>Manager Server fails.<br />
Select Next to cont<strong>in</strong>ue, F<strong>in</strong>ish to save and close, or Cancel to close without sav<strong>in</strong>g.<br />
10.1.5.7 Monitor<strong>in</strong>g Configuration Page<br />
Term<strong>in</strong>al Configuration Wizard - Monitor<strong>in</strong>g Configuration<br />
Importance of Page: This page sets the speed that failover is detected and <strong>in</strong>itiated. A th<strong>in</strong> client creates<br />
a socket connection to the term<strong>in</strong>al server. If the socket is disconnected the term<strong>in</strong>al will try to reconnect<br />
and failover based on these sett<strong>in</strong>gs.<br />
Sett<strong>in</strong>gs:<br />
Monitor Interval<br />
<br />
o<br />
o<br />
Monitor Interval (Fast/Medium/Slow) – These sett<strong>in</strong>gs have a set rate for the frequency<br />
that the term<strong>in</strong>al server status is checked.<br />
Monitor Interval (Custom) – This sett<strong>in</strong>g allows the adm<strong>in</strong>istrator to change the sett<strong>in</strong>gs<br />
from the defaults.<br />
Monitor Interval – This is the period of time the term<strong>in</strong>al will wait after los<strong>in</strong>g the socket<br />
connection before it tries to reconnect.<br />
210 Term<strong>in</strong>al Configuration ACP Th<strong>in</strong>Manager <strong>6.0</strong>
Field:<br />
<br />
Monitor Timeout – This is the period of time the term<strong>in</strong>al will wait between tries.<br />
Monitor Retry - This is the number of times the term<strong>in</strong>al will try to reestablish a connection<br />
before fail<strong>in</strong>g over.<br />
Primary Up Delay Multiplier - This is a constant used to generate the Primary Up Delay time.<br />
Primary Up Delay - This is a delay added (usually set to 30 or 60 seconds) to allow a Term<strong>in</strong>al<br />
Server to get fully booted before the term<strong>in</strong>al will try to log<strong>in</strong>. This time period is equal to the<br />
Monitor<strong>in</strong>g Interval times the Primary Up Delay Multiplier.<br />
This prevents a term<strong>in</strong>al us<strong>in</strong>g Enforce Primary from switch<strong>in</strong>g back to its primary term<strong>in</strong>al server<br />
before it is ready.<br />
Why Change from Default Sett<strong>in</strong>gs: Faster rates will cause a quicker failover but will check on term<strong>in</strong>al<br />
server status more often, caus<strong>in</strong>g more network traffic. Slow<strong>in</strong>g down the rate will cause less traffic but<br />
will slow the failover speed a little.<br />
Select F<strong>in</strong>ish to save and close, or Cancel to close without sav<strong>in</strong>g.<br />
ACP Th<strong>in</strong>Manager <strong>6.0</strong> Term<strong>in</strong>al Configuration 211
11 PXE Server Configuration<br />
11.1 Overview<br />
PXE (Preboot Execution Environment; sometimes pronounced "pixie") is an environment that allows a<br />
computer to boot over a network. Th<strong>in</strong>Manager provides a complete PXE boot environment that does not<br />
require any additional software components. The Th<strong>in</strong>Manager PXE Server conforms to version 2.1 of the<br />
Intel PXE boot specification.<br />
11.2 Th<strong>in</strong> Client Hardware Requirements<br />
The Th<strong>in</strong> Client computer must be capable of PXE Boot<strong>in</strong>g. Most standard BIOS ROMS <strong>in</strong>clude a PXE<br />
Option ROM. In order to PXE boot, the PXE Option ROM must be enabled <strong>in</strong> the BIOS. The PXE boot<br />
method (boot from network) should be set to first <strong>in</strong> the boot order. Disabl<strong>in</strong>g the other boot devices <strong>in</strong> the<br />
BIOS will ensure that the unit will only boot via PXE.<br />
11.3 Methods of Operation<br />
11.3.1 Th<strong>in</strong>Manager Only Method<br />
Us<strong>in</strong>g this method, the Th<strong>in</strong> Client will acquire an IP address and PXE boot options from the Th<strong>in</strong>Manager<br />
PXE Server. No standard DHCP Server is required. You must have the Th<strong>in</strong>Manager PXE Server<br />
enabled and the desired network <strong>in</strong>terfaces enabled. Select the “Not us<strong>in</strong>g standard DHCP Server” server<br />
mode.<br />
11.3.2 Th<strong>in</strong>Manager Proxy Method<br />
Us<strong>in</strong>g this method, the Th<strong>in</strong> Client will acquire an IP address from a standard DHCP server. There is no<br />
need to set any PXE related boot options <strong>in</strong> the DHCP server configuration. These options will be sent to<br />
the Th<strong>in</strong> Client by the Th<strong>in</strong>Manager PXE Server. You must have the Th<strong>in</strong>Manager PXE Server enabled <strong>in</strong><br />
Th<strong>in</strong>Manager and you must select the “Us<strong>in</strong>g standard DHCP server with Boot Options” server mode.<br />
11.3.3 Stand-Alone DHCP Server Method<br />
Us<strong>in</strong>g this method, the Th<strong>in</strong> Client will acquire an IP address from a standard DHCP server <strong>in</strong>clud<strong>in</strong>g the<br />
specified PXE boot options. This method is required if your DHCP server is <strong>in</strong>stalled on the same<br />
mach<strong>in</strong>e as Th<strong>in</strong>Manager. You must set Option 66 (Boot Server Host Name) to the IP address of your<br />
Th<strong>in</strong>Manager Server and Option 67 (Boot File Name) to “acpboot.b<strong>in</strong>”. You must have the<br />
Th<strong>in</strong>Manager PXE Server enabled and you must select the “Us<strong>in</strong>g standard DHCP server” server mode.<br />
ACP Th<strong>in</strong>Manager <strong>6.0</strong><br />
212 PXE Server Configuration
See Network Interface Configuration for details.<br />
11.4 PXE Server Configuration Wizard<br />
11.4.1 Enabl<strong>in</strong>g the Th<strong>in</strong>Manager PXE Server<br />
Open the Th<strong>in</strong>Manager PXE Server Configuration Wizard by select<strong>in</strong>g Manage > PXE Server from the<br />
menu.<br />
PXE Server Configuration<br />
Enable PXE Server must be selected to boot PXE th<strong>in</strong> clients from Th<strong>in</strong>Manager.<br />
ACP Th<strong>in</strong>Manager <strong>6.0</strong> PXE Server Configuration 213
11.4.2 Network Interface Configuration<br />
Network Interface Configuration<br />
Select a network <strong>in</strong>terface from the drop down list to configure from the Select Interface to Configure<br />
dropdown. This allows each network adapter to be configured <strong>in</strong>dividually. The primary IP Address<br />
reflects the current IP address for the selected adapter.<br />
PXE Server Mode<br />
<br />
<br />
<br />
Select Us<strong>in</strong>g Standard DHCP server if you want to have a standard DHCP server assign IP<br />
addresses to th<strong>in</strong> clients on the same network as the selected network adapter. The PXE Boot<br />
options will be provided by Th<strong>in</strong>Manager automatically. This selection will require no changes to<br />
your DHCP server configuration.<br />
Select Standard DHCP server with Boot Options if you want a standard DHCP server to assign<br />
IP addresses and PXE boot options to th<strong>in</strong> clients on the same network as the selected network<br />
adapter. Set Option 66 (Boot Server Host Name) to the IP address of your Th<strong>in</strong>Manager Server<br />
and Option 67 (Boot File Name) to “acpboot.b<strong>in</strong>”. The PXE boot options will not be<br />
provided by Th<strong>in</strong>Manager. You must use this mode if your DHCP server is <strong>in</strong>stalled on your<br />
Th<strong>in</strong>Manager Server.<br />
Select Not us<strong>in</strong>g standard DHCP server if you want Th<strong>in</strong>Manager to assign IP addresses to th<strong>in</strong><br />
clients without the need for a DHCP server. Us<strong>in</strong>g this mode requires that you set up IP address<br />
ranges. Use this mode if you want to use static IP assignments (reservations). Th<strong>in</strong>Manager will<br />
not assign IP addresses to non-PXE boot<strong>in</strong>g devices.<br />
214 PXE Server Configuration ACP Th<strong>in</strong>Manager <strong>6.0</strong>
Allow New PXE clients allows unknown PXE th<strong>in</strong> clients to connect to Th<strong>in</strong>Manager through the<br />
selected network <strong>in</strong>terface. Uncheck this option if you only want known clients to connect.<br />
Note: Uncheck this sett<strong>in</strong>g if you are plann<strong>in</strong>g to have more than one non-synchronized Th<strong>in</strong>Manager<br />
Server on your network. You will need to temporarily enable this option to add a new th<strong>in</strong> client. For<br />
proper operation, you can only have this option enabled on one Th<strong>in</strong>Manager Server at a time.<br />
11.4.3 Network Interface Configuration for Synchronized<br />
Th<strong>in</strong>Manager Servers<br />
Network Interface Configuration for Synchronized Th<strong>in</strong>Manager Servers<br />
The Network Interface Configuration page will display a network <strong>in</strong>terface dropdown for each<br />
Th<strong>in</strong>Manager Server if you are us<strong>in</strong>g auto-synchronization.<br />
Select a network <strong>in</strong>terface from the Select Interface to Configure to configure the primary Th<strong>in</strong>Manager<br />
and select a network <strong>in</strong>terface from the Synchronization Interface to configure the secondary<br />
Th<strong>in</strong>Manager dropdown. This allows a network adapter on each Th<strong>in</strong>Manager Server to be configured<br />
<strong>in</strong>dividually.<br />
ACP Th<strong>in</strong>Manager <strong>6.0</strong> PXE Server Configuration 215
11.4.4 IP Address Range Configuration<br />
The IP Address Range Configuration page displays the current ranges of IP Address be<strong>in</strong>g used by<br />
Th<strong>in</strong>Manager to assign to th<strong>in</strong> clients. It also gives the ability to edit the IP ranges.<br />
Note: This section of the PXE Server Wizard is only used when the Not us<strong>in</strong>g standard DHCP server<br />
option is selected <strong>in</strong> the Network Interface Configuration.<br />
IP Address Range Configuration<br />
Select the Add button to launch the IP Address Range w<strong>in</strong>dow to add a range of IP addresses for the<br />
PXE Server.<br />
216 PXE Server Configuration ACP Th<strong>in</strong>Manager <strong>6.0</strong>
11.4.4.1 Add<strong>in</strong>g or Edit<strong>in</strong>g an IP Address Range<br />
IP Address Range<br />
The IP Address Range w<strong>in</strong>dow has fields for the IP addresses to be assigned.<br />
Fields:<br />
Start<strong>in</strong>g IP Address: This is first IP address you want the PXE Server to pass out.<br />
End<strong>in</strong>g IP Address: This is last IP address you want the PXE Server to pass out.<br />
Subnet Mask: This is the subnet mask of the network.<br />
Router IP Address: This is the IP address of your router, if needed. Leave as 0.0.0.0 if not<br />
needed.<br />
Buttons:<br />
Exclusions launches the Exclusion w<strong>in</strong>dow to exclude a specific IP addresses from the<br />
available range.<br />
Reservations launched the Reservation w<strong>in</strong>dow that allows reserve a specific IP address to be<br />
assigned to a th<strong>in</strong> client based on the th<strong>in</strong> client MAC address.<br />
Advanced launches the Advanced IP Range Sett<strong>in</strong>gs w<strong>in</strong>dow that allows DHCP options to be<br />
added.<br />
Clear IP Assignments will clear the sett<strong>in</strong>g from the IP Address Range w<strong>in</strong>dow.<br />
ACP Th<strong>in</strong>Manager <strong>6.0</strong> PXE Server Configuration 217
11.4.5 Exclusions<br />
Exclusion W<strong>in</strong>dow<br />
Select<strong>in</strong>g the Add button will launch the Exclusion Range w<strong>in</strong>dow that allows you to remove one or more<br />
IP addresses from the range of IP addresses passed out by the PXE server.<br />
Exclusion Range W<strong>in</strong>dow<br />
Enter the first and last IP addresses of the range you want to exclude <strong>in</strong> the Exclusion Start IP Address<br />
and the Exclusion End IP Address. If you have a s<strong>in</strong>gle IP address you want to exclude then enter it <strong>in</strong><br />
both the Exclusion Start IP Address and the Exclusion End IP Address fields.<br />
218 PXE Server Configuration ACP Th<strong>in</strong>Manager <strong>6.0</strong>
11.4.6 Reservations<br />
Reservation W<strong>in</strong>dow<br />
Reservations allow you to associate a specific IP address to a specific th<strong>in</strong> client by associat<strong>in</strong>g the IP<br />
address with the MAC address of the th<strong>in</strong> client.<br />
Select the Add button to add a reservation.<br />
Reservation W<strong>in</strong>dow<br />
Hardware Address is the primary MAC address of the th<strong>in</strong> client.<br />
Secondary Hardware Address is the MAC address of the second network <strong>in</strong>terface of the th<strong>in</strong> client (if<br />
present).<br />
IP Address sets the IP address to be reserved for the desired th<strong>in</strong> client. This will be the address<br />
assigned to the th<strong>in</strong> client when connected through either the primary or the secondary th<strong>in</strong> client network<br />
<strong>in</strong>terface.<br />
ACP Th<strong>in</strong>Manager <strong>6.0</strong> PXE Server Configuration 219
11.5 Term<strong>in</strong>al Group Configuration Wizard<br />
Us<strong>in</strong>g Term<strong>in</strong>al Groups allows a configuration to be def<strong>in</strong>ed for a group of term<strong>in</strong>als. Term<strong>in</strong>als added to<br />
a group will <strong>in</strong>herit the group properties to speed the configuration process. Us<strong>in</strong>g Groups can also aid <strong>in</strong><br />
management because many tasks can be done on the group level <strong>in</strong>stead of repeat<strong>in</strong>g them for multiple<br />
term<strong>in</strong>als.<br />
Groups can be nested with<strong>in</strong> groups, provid<strong>in</strong>g deeper levels of organization.<br />
<br />
<br />
All Group Sett<strong>in</strong>gs use a forced <strong>in</strong>heritance because of the use of nested Groups. Once a sett<strong>in</strong>g<br />
has been selected as a group property, every term<strong>in</strong>al group and term<strong>in</strong>al beneath it will use that<br />
sett<strong>in</strong>g.<br />
Group Sett<strong>in</strong>gs will be designated on the Configuration and Modules tabs with the Group icon of<br />
two blue monitors.<br />
11.5.1.1 Group Sett<strong>in</strong>gs Checkbox<br />
The Term<strong>in</strong>al Group Configuration Wizard establishes the term<strong>in</strong>al sett<strong>in</strong>gs for a group of term<strong>in</strong>als, while<br />
the Term<strong>in</strong>al Configuration Wizard establishes the term<strong>in</strong>al sett<strong>in</strong>gs for the <strong>in</strong>dividual term<strong>in</strong>al. The<br />
Term<strong>in</strong>al Configuration Wizard and the Group Configuration Wizard use the same forms so they are very<br />
similar, with a few different sett<strong>in</strong>gs.<br />
Note: This Help document will only show the differences between the Group Configuration Wizard and<br />
the Term<strong>in</strong>al Configuration Wizard. See Term<strong>in</strong>al Configuration Wizard for configuration details.<br />
The Group wizard will have Group Sett<strong>in</strong>g checkboxes for each sett<strong>in</strong>g. Select<strong>in</strong>g this checkbox will<br />
force that sett<strong>in</strong>g to be <strong>in</strong>herited by nested sub-groups and member term<strong>in</strong>als. The Group Sett<strong>in</strong>gs of any<br />
sub-group or term<strong>in</strong>al will be grayed out to prevent changes if the group sett<strong>in</strong>g is selected on the parent.<br />
Changes need to be made at the Group level.<br />
ACP Th<strong>in</strong>Manager <strong>6.0</strong><br />
220 PXE Server Configuration
Group Sett<strong>in</strong>g Example<br />
This example shows variations <strong>in</strong> the use of four Group Sett<strong>in</strong>gs on the Term<strong>in</strong>al Group Options page<br />
of a nested group.<br />
Note: The Group Configuration Wizard shows “Term<strong>in</strong>al Configuration Wizard” <strong>in</strong> the title because it<br />
uses the same framework as the Term<strong>in</strong>al Configuration Wizard.<br />
Term<strong>in</strong>al Replacement (1) and Term<strong>in</strong>al Schedule (2) were configured <strong>in</strong> the parent group and cannot<br />
be changed <strong>in</strong> this child group. Term<strong>in</strong>al Replacement (1) was set as checked, while Term<strong>in</strong>al<br />
Schedule (2) was set as unchecked.<br />
The Term<strong>in</strong>al Effects (3) Group Sett<strong>in</strong>g is selected for this Group. It will be grayed out <strong>in</strong> child groups<br />
and member term<strong>in</strong>als.<br />
The Shadow<strong>in</strong>g (4) Group Sett<strong>in</strong>g is unselected, mak<strong>in</strong>g it available to be set for child groups and<br />
member term<strong>in</strong>als.<br />
ACP Th<strong>in</strong>Manager <strong>6.0</strong> PXE Server Configuration 221
11.5.1.2 Group Name Page<br />
The Group Configuration Wizard can be launched by select<strong>in</strong>g Edit > Add Term<strong>in</strong>al Group or by or<br />
right click<strong>in</strong>g on the Term<strong>in</strong>als branch <strong>in</strong> the tree and select<strong>in</strong>g Add Group.<br />
Group Configuration Wizard – Term<strong>in</strong>al Group Name<br />
Importance of Page: This page allows the Group to be named.<br />
Fields:<br />
Group Name – This is the name given to the group. Keep it under 15 characters.<br />
Term<strong>in</strong>al Group – This is the name of a parent group if this group is a sub-group.<br />
Buttons:<br />
Change Group – This launches a w<strong>in</strong>dow that allows the group to be added as a sub-group to<br />
another group.<br />
Permissions – This allows the Term<strong>in</strong>al Group to be assigned Access Groups for security. This<br />
is a function of TermSecure. See Permissions for details.<br />
Checkbox:<br />
Group Sett<strong>in</strong>g – This will make the Permission a group sett<strong>in</strong>g that is <strong>in</strong>herited by all members.<br />
222 PXE Server Configuration ACP Th<strong>in</strong>Manager <strong>6.0</strong>
Why Change from Default Sett<strong>in</strong>gs: A group needs a name at creation. The group can be added to<br />
another group us<strong>in</strong>g the Change Group button.<br />
Duplicate Name Warn<strong>in</strong>g<br />
If an exist<strong>in</strong>g name is selected, a Duplicate Name Warn<strong>in</strong>g popup will be displayed when the Next<br />
button is selected.<br />
Term<strong>in</strong>al Groups can be added to other Term<strong>in</strong>al Groups, creat<strong>in</strong>g a multi-level hierarchy. This is done<br />
with the Change Group button that launches the Select Group w<strong>in</strong>dow.<br />
Select Term<strong>in</strong>al Group W<strong>in</strong>dow<br />
The Select Group w<strong>in</strong>dow will show a tree display<strong>in</strong>g the group hierarchy. Highlight the Term<strong>in</strong>al Group<br />
that you want to jo<strong>in</strong> and select the OK button to jo<strong>in</strong> or select the Cancel button to quit without jo<strong>in</strong><strong>in</strong>g.<br />
ACP Th<strong>in</strong>Manager <strong>6.0</strong> PXE Server Configuration 223
Term<strong>in</strong>al Group Configuration Wizard – Term<strong>in</strong>al Group Name Page<br />
The parent Term<strong>in</strong>al Group you jo<strong>in</strong>ed will be displayed <strong>in</strong> the Group field.<br />
Select the Next button to cont<strong>in</strong>ue or select the Cancel button to close the configuration wizard without<br />
sav<strong>in</strong>g.<br />
11.5.2 Chang<strong>in</strong>g a Term<strong>in</strong>al’s Group<br />
A term<strong>in</strong>al is added to a group from the Term<strong>in</strong>al Name page of the Term<strong>in</strong>al Configuration Wizard.<br />
Open the Term<strong>in</strong>al Configuration Wizard by either:<br />
Highlight<strong>in</strong>g the term<strong>in</strong>al <strong>in</strong> the Th<strong>in</strong>Manager tree pane by click<strong>in</strong>g on the term<strong>in</strong>al name or icon<br />
and select Edi t >Modify from the Th<strong>in</strong>Manager menu bar.<br />
Right click<strong>in</strong>g on the term<strong>in</strong>al icon <strong>in</strong> the Th<strong>in</strong>Manager tree pane and select Modify.<br />
Double click<strong>in</strong>g on a term<strong>in</strong>al icon <strong>in</strong> the Th<strong>in</strong>Manager tree pane.<br />
This will launch the Term<strong>in</strong>al Configuration Wizard.<br />
224 PXE Server Configuration ACP Th<strong>in</strong>Manager <strong>6.0</strong>
Term<strong>in</strong>al Configuration Wizard - Term<strong>in</strong>al Name Page<br />
The first page of the wizard, Term<strong>in</strong>al Name, has a Change Group button. Select the Change Group<br />
button to launch the Select Term<strong>in</strong>al Group w<strong>in</strong>dow.<br />
ACP Th<strong>in</strong>Manager <strong>6.0</strong> PXE Server Configuration 225
Select Group W<strong>in</strong>dow<br />
The Select Term<strong>in</strong>al Group w<strong>in</strong>dow has a tree of the Term<strong>in</strong>al Groups. Highlight the desired Term<strong>in</strong>al<br />
Group and select the OK button. Select<strong>in</strong>g Term<strong>in</strong>als will remove the term<strong>in</strong>al from group membership.<br />
The Cancel button will close the Select Group w<strong>in</strong>dow without mak<strong>in</strong>g changes.<br />
226 PXE Server Configuration ACP Th<strong>in</strong>Manager <strong>6.0</strong>
Term<strong>in</strong>al Group Display<br />
Once a group is selected for the term<strong>in</strong>al the group will be displayed <strong>in</strong> the Term<strong>in</strong>al Group field.<br />
Note: The term<strong>in</strong>al will need to be restarted for the changes to take effect.<br />
11.5.3 Unique Group Configurations<br />
Several pages of the Group Configuration Wizard are different than the Term<strong>in</strong>al Configuration<br />
Wizard. These <strong>in</strong>clude the Log In In<strong>format</strong>ion page, the Group Video Resolution, and Module pages.<br />
ACP Th<strong>in</strong>Manager <strong>6.0</strong> PXE Server Configuration 227
11.5.3.1 Group Log<strong>in</strong> In<strong>format</strong>ion Page<br />
Log In In<strong>format</strong>ion - Use Application Groups<br />
The Log In In<strong>format</strong>ion page is different <strong>in</strong> the Group Configuration Wizard than the Term<strong>in</strong>al<br />
Configuration Wizard.<br />
It is recommended that each term<strong>in</strong>al log<strong>in</strong> to a Term<strong>in</strong>al Server with a unique profile. For this reason, the<br />
Group Username, Password, and Doma<strong>in</strong> are <strong>in</strong>active <strong>in</strong> the Term<strong>in</strong>al Group Configuration. These need<br />
to be set <strong>in</strong>dividually dur<strong>in</strong>g the Term<strong>in</strong>al Configuration.<br />
228 PXE Server Configuration ACP Th<strong>in</strong>Manager <strong>6.0</strong>
11.5.3.2 Group Video Resolution Page<br />
Group Configuration Wizard - Video Configuration<br />
The Group Video Resolution page has a drop-down box that allows the video resolution to be set for all<br />
members of the Group.<br />
The W<strong>in</strong>dows 2000 term<strong>in</strong>al connection uses a 256-color depth. The 64K-color depth is available by<br />
us<strong>in</strong>g RDP connected to a W<strong>in</strong>dows 2003 or 2008 Term<strong>in</strong>al Server.<br />
The Group Sett<strong>in</strong>g checkbox will lock the sett<strong>in</strong>gs for the group and all member term<strong>in</strong>als.<br />
Note: It is not recommended to set the Video Resolution as a Group Sett<strong>in</strong>g because of the variety of<br />
monitor sizes and the ease at which they are changed. These sett<strong>in</strong>gs are better set as an <strong>in</strong>dividual<br />
term<strong>in</strong>al sett<strong>in</strong>g to provide the flexibility to switch monitors.<br />
ACP Th<strong>in</strong>Manager <strong>6.0</strong> PXE Server Configuration 229
11.5.3.3 Group Module Selection Page<br />
Term<strong>in</strong>al Configuration Wizard - Module Selection<br />
A Module is a component of the firmware that is not needed for the basic functionality but may be desired<br />
for advanced functionality. These features <strong>in</strong>clude Touch Screen drivers, serial mouse drivers, High<br />
Speed Serial drivers, Shared Keyboard and Mouse, USB Memory Card Reader, and Instant Failover. See<br />
Module Overview for details.<br />
The Add button will allow Modules to be added to the Group.<br />
The Installed Modules box will show the Module names and the Packages (firmware version) they are<br />
valid with.<br />
See Modules for Details.<br />
230 PXE Server Configuration ACP Th<strong>in</strong>Manager <strong>6.0</strong>
11.5.3.4 Group Modules on Term<strong>in</strong>als<br />
Term<strong>in</strong>als that are members of a Group may show icons to represent the properties of added modules.<br />
Term<strong>in</strong>al Module Selection Page<br />
<br />
The Group icon represents modules assigned to a parent Group.<br />
<br />
The Group icon with yellow plus sign represents properties that are changed on the<br />
term<strong>in</strong>al from the Group sett<strong>in</strong>gs. This is limited to touch screen calibration.<br />
<br />
<br />
The Group icon with the No circle represents a module that isn’t supported by the<br />
firmware package used by the term<strong>in</strong>al.<br />
No icon <strong>in</strong>dicates that the module was added to that particular Group or Term<strong>in</strong>al and not a<br />
parent Group.<br />
If you add a module to a group it will display the group icon and any configuration will need to be made at<br />
the group level.<br />
ACP Th<strong>in</strong>Manager <strong>6.0</strong> PXE Server Configuration 231
The rest of the Group Configuration Wizard pages follow the Term<strong>in</strong>al Configuration Wizard pages.<br />
232 PXE Server Configuration ACP Th<strong>in</strong>Manager <strong>6.0</strong>
12 Display Servers<br />
Display Servers are devices that provide content that can be displayed on the client. Examples <strong>in</strong>clude<br />
the traditional term<strong>in</strong>al server and IP cameras.<br />
The Term<strong>in</strong>al Server List Wizard allows configuration of Term<strong>in</strong>al Services Display Servers. The Camera<br />
Configuration Wizard allows configuration of Camera Display Servers<br />
12.1 Term<strong>in</strong>al Services Display Servers<br />
The Term<strong>in</strong>al Server List Wizard can be launched by:<br />
Right click<strong>in</strong>g on the Display Servers Term<strong>in</strong>al Servers branch and choos<strong>in</strong>g the Add Term<strong>in</strong>al<br />
Server command<br />
Right click<strong>in</strong>g on the Display Servers Term<strong>in</strong>al Servers branch and choos<strong>in</strong>g the Edit Term<strong>in</strong>al<br />
Server command.<br />
Term<strong>in</strong>al Server List Wizard<br />
Importance of Page: This allows you to def<strong>in</strong>e the term<strong>in</strong>al servers that will be used with<strong>in</strong> Th<strong>in</strong>Manager.<br />
ACP Th<strong>in</strong>Manager <strong>6.0</strong><br />
233 Display Servers
Fields:<br />
{Unnamed) – The list box will conta<strong>in</strong> the names and IP addresses of def<strong>in</strong>ed term<strong>in</strong>al servers.<br />
Buttons:<br />
Edit Server – This will open the properties for a highlighted term<strong>in</strong>al server <strong>in</strong> the list.<br />
Add Server - This will launch the Term<strong>in</strong>al Server Configuration Wizard to allow a new term<strong>in</strong>al<br />
server to be def<strong>in</strong>ed.. See<br />
Remove Server – This will remove a highlighted term<strong>in</strong>al server from the list.<br />
F<strong>in</strong>d Servers - This will launch the Available Term<strong>in</strong>al Servers w<strong>in</strong>dow for automated term<strong>in</strong>al<br />
server addition.<br />
Cancel - This will close the wizard without action.<br />
OK – This will close the wizard after accept<strong>in</strong>g changes.<br />
Why Change from Default Sett<strong>in</strong>gs: The term<strong>in</strong>als require term<strong>in</strong>al servers to connect and run sessions<br />
on.<br />
12.1.1.1 Available Term<strong>in</strong>al Servers Search<br />
Available Term<strong>in</strong>al Server W<strong>in</strong>dow<br />
The Available Term<strong>in</strong>al Servers w<strong>in</strong>dow will display any Microsoft© term<strong>in</strong>al servers that are a member<br />
of the same doma<strong>in</strong> or workgroup as Th<strong>in</strong>Manager. Select the F<strong>in</strong>d button to display the member servers.<br />
234 Display Servers ACP Th<strong>in</strong>Manager <strong>6.0</strong>
Available Term<strong>in</strong>al Server W<strong>in</strong>dow<br />
The Doma<strong>in</strong> or WorkGroup to Search field will allow Th<strong>in</strong>Manager to search a different doma<strong>in</strong> or<br />
workgroup. Enter the doma<strong>in</strong> of workgroup to search and select the F<strong>in</strong>d button to display the member<br />
servers.<br />
Once the term<strong>in</strong>al servers are listed, highlight one and select the OK button to add it to the Term<strong>in</strong>al<br />
Server Configuration Wizard. This will launch the Introduction page of the Term<strong>in</strong>al Server Wizard.<br />
ACP Th<strong>in</strong>Manager <strong>6.0</strong> Display Servers 235
12.1.1.2 Term<strong>in</strong>al Server Wizard Introduction Page<br />
Term<strong>in</strong>al Server List Wizard Introduction<br />
Importance of Page: This displays <strong>in</strong>troductory <strong>in</strong><strong>format</strong>ion.<br />
Select Next to cont<strong>in</strong>ue or Cancel to close without sav<strong>in</strong>g.<br />
236 Display Servers ACP Th<strong>in</strong>Manager <strong>6.0</strong>
12.1.1.3 Term<strong>in</strong>al Server Name Page<br />
Term<strong>in</strong>al Server List Wizard – Term<strong>in</strong>al Server Name<br />
Importance of Page: This page def<strong>in</strong>es the term<strong>in</strong>al server and allows the addition of an adm<strong>in</strong>istrative<br />
user account for <strong>in</strong>creased management.<br />
Fields:<br />
Term<strong>in</strong>al Server Name - Enter the computer name as found <strong>in</strong> the Microsoft© System Properties<br />
(NetBIOS name). The name will already be entered if the F<strong>in</strong>d function on the Available<br />
Term<strong>in</strong>al Servers w<strong>in</strong>dow was used.<br />
Term<strong>in</strong>al Server IP – Entered the IP address of the term<strong>in</strong>al server.<br />
Log<strong>in</strong> In<strong>format</strong>ion – Enter a W<strong>in</strong>dows user account with adm<strong>in</strong>istrative rights for the term<strong>in</strong>al server if<br />
you wish to display data from the term<strong>in</strong>al server with<strong>in</strong> Th<strong>in</strong>Manager. This is required to populate the<br />
User, Sessions, and Process tabs of the details pane. See Details Pane for details.<br />
Doma<strong>in</strong> - Enter the doma<strong>in</strong> for the computer, if it is a member of a doma<strong>in</strong>.<br />
User Name – Enter the user name of the adm<strong>in</strong>istrative account here.<br />
Password - Enter the password for the adm<strong>in</strong>istrative account used <strong>in</strong> the User Name field.<br />
Verify Password – Re-enter the password for the adm<strong>in</strong>istrative account used <strong>in</strong> the user name<br />
field. Passwords that do not match will be <strong>in</strong>dicated by a warn<strong>in</strong>g message on the page.<br />
Buttons:<br />
ACP Th<strong>in</strong>Manager <strong>6.0</strong> Display Servers 237
Discover – The Discover button will automatically fill <strong>in</strong> the IP address for a term<strong>in</strong>al server listed<br />
<strong>in</strong> the Term<strong>in</strong>al Server Name field.<br />
Schedule – The Schedule button will launch the Event Schedule for the term<strong>in</strong>al server. This<br />
allows the schedul<strong>in</strong>g of repeated functions like reboot<strong>in</strong>g and disabl<strong>in</strong>g.<br />
See Schedul<strong>in</strong>g for details.<br />
Why Change from Default Sett<strong>in</strong>gs: Th<strong>in</strong>Manager uses a connection to the term<strong>in</strong>al server to pull the<br />
process, user, and session <strong>in</strong><strong>format</strong>ion for the detail pane tabs and to determ<strong>in</strong>e the load for<br />
SmartSession load balanc<strong>in</strong>g. Enter<strong>in</strong>g a username and password <strong>in</strong> the User Name and Password<br />
fields allows Th<strong>in</strong>Server to connect to the server for this data.<br />
Select Next to cont<strong>in</strong>ue, F<strong>in</strong>ish to save and close, or Cancel to close without sav<strong>in</strong>g.<br />
12.1.1.4 Term<strong>in</strong>al Server Capabilities Page<br />
Term<strong>in</strong>al Server Capabilities<br />
Importance of Page: This allows a term<strong>in</strong>al server to be used for SmartSession. It also def<strong>in</strong>es what<br />
communication protocols the server can use.<br />
Sett<strong>in</strong>gs:<br />
<br />
Supported Connections – This is a list of client/server communication protocols that the<br />
term<strong>in</strong>al server can use.<br />
o<br />
Citrix ICA – Check this checkbox if a Citrix server-side program is <strong>in</strong>stalled on the<br />
term<strong>in</strong>al server to provide the ICA protocol.<br />
238 Display Servers ACP Th<strong>in</strong>Manager <strong>6.0</strong>
o<br />
o<br />
Citrix Device Services - Check this checkbox if Citrix Device Services is <strong>in</strong>stalled and<br />
licensed on the term<strong>in</strong>al server. Citrix Device Services is a legacy deployment of the ICA<br />
client but is no longer supported by Citrix. Th<strong>in</strong> clients can still connect to term<strong>in</strong>al servers<br />
with Device Services, but no new Device Services term<strong>in</strong>al servers can be licensed.<br />
Microsoft Remote Desktop Protocol - RDP is <strong>in</strong>stalled by default on W<strong>in</strong>dows<br />
Term<strong>in</strong>al Servers. Uncheck the Microsoft Remote Desktop Protocol checkbox if you<br />
don’t want to access to the term<strong>in</strong>al server with the protocol.<br />
Available for Smart Session Server – This checkbox makes the term<strong>in</strong>al server available<br />
for Application Groups that use SmartSession to provide load balanc<strong>in</strong>g. See Display Client<br />
SmartSession Sett<strong>in</strong>gs Page for more details.<br />
Why Change from Default Sett<strong>in</strong>gs: Add SmartSession if you want to use SmartSession. Add Citrix ICA<br />
if that is be<strong>in</strong>g used.<br />
Note: Configur<strong>in</strong>g a term<strong>in</strong>al server to use SmartSession uses a SmartSession license.<br />
Select Next to cont<strong>in</strong>ue, F<strong>in</strong>ish to save and close, or Cancel to close without sav<strong>in</strong>g.<br />
12.1.1.5 Data Gather<strong>in</strong>g Page<br />
Data Gather<strong>in</strong>g<br />
ACP Th<strong>in</strong>Manager <strong>6.0</strong> Display Servers 239
Importance of Page: This page sets the frequency that Th<strong>in</strong>Manager polls the term<strong>in</strong>al servers for user,<br />
session, and process <strong>in</strong><strong>format</strong>ion.<br />
Sett<strong>in</strong>gs:<br />
<br />
Data Gather<strong>in</strong>g Intervals (Fast/Medium/Slow) - These sett<strong>in</strong>gs set the rate of the frequency<br />
that Th<strong>in</strong>Manager polls the term<strong>in</strong>al server for data.<br />
Data Gather<strong>in</strong>g Intervals (Custom) - This sett<strong>in</strong>g allows the poll<strong>in</strong>g speeds to be set.<br />
o Smart Session Data Update Interval is the amount of time between the retrieval of<br />
SmartSession data, CPU usage, memory usage, and session count, from the term<strong>in</strong>al<br />
server. This sett<strong>in</strong>g affects the update speed of the Server Rank<strong>in</strong>gs used <strong>in</strong><br />
SmartSession load balanc<strong>in</strong>g.<br />
o Process Update Interval is the amount of time between the retrieval of the process<br />
<strong>in</strong><strong>format</strong>ion on the term<strong>in</strong>al server. This sett<strong>in</strong>g affects the speed of the update of the<br />
process <strong>in</strong><strong>format</strong>ion on the Processes tab for the term<strong>in</strong>al server.<br />
o Session Update Interval is the amount of time between the retrieval of session data<br />
from the term<strong>in</strong>al server. This sett<strong>in</strong>g affects the speed of the update of the user<br />
<strong>in</strong><strong>format</strong>ion for the sessions on the Users and Sessions tabs for the term<strong>in</strong>al server.<br />
Why Change from Default Sett<strong>in</strong>gs: Faster rates will lead to quicker updates but will add more network<br />
traffic. Slow<strong>in</strong>g down the rate will cause less traffic but will slow the update rate a little.<br />
Select Next to cont<strong>in</strong>ue, F<strong>in</strong>ish to save and close, or Cancel to close without sav<strong>in</strong>g.<br />
If this term<strong>in</strong>al server is used as a SmartSession server, the Next button will go to a SmartSession<br />
Configuration page. If this term<strong>in</strong>al server is not configured as a SmartSession server, the Next button will<br />
be grayed out and the F<strong>in</strong>ish button will close the wizard.<br />
240 Display Servers ACP Th<strong>in</strong>Manager <strong>6.0</strong>
12.1.1.6 SmartSession Configuration Page<br />
Term<strong>in</strong>al Server List Wizard - SmartSession Configuration<br />
Importance of Page: This allows SmartSession data to be tweaked.<br />
Th<strong>in</strong>Manager uses the CPU utilization, Memory utilization, and number of sessions on the term<strong>in</strong>al<br />
server to def<strong>in</strong>e the SmartSession term<strong>in</strong>al server’s available resources. Th<strong>in</strong>Manager uses these<br />
resource values to rank the load of the SmartSession servers. Th<strong>in</strong>Manager supplies this load data to the<br />
term<strong>in</strong>als to allow the term<strong>in</strong>als to connect to the term<strong>in</strong>al server with the lightest load and greatest<br />
available resources.<br />
The SmartSession Configuration page allows the configuration of the three parameters that<br />
Th<strong>in</strong>Manager uses to determ<strong>in</strong>e availability for SmartSession. Th<strong>in</strong>Manager will scale the range between<br />
the M<strong>in</strong>imum field and Maximum field as 100%.<br />
Sett<strong>in</strong>gs - The three values used <strong>in</strong> SmartSession are:<br />
CPU Utilization – The percentage of CPU usage on the term<strong>in</strong>al server.<br />
Memory Utilization - The percentage of CPU usage on the term<strong>in</strong>al server.<br />
Sessions – The number of sessions on a term<strong>in</strong>al server.<br />
Fields:<br />
M<strong>in</strong>imum – the value that Th<strong>in</strong>Manager will use as the start<strong>in</strong>g po<strong>in</strong>t of the load. A value below<br />
the M<strong>in</strong>imum is considered to be unused.<br />
ACP Th<strong>in</strong>Manager <strong>6.0</strong> Display Servers 241
Maximum – the value that Th<strong>in</strong>Manager will consider the parameter as reach<strong>in</strong>g 100% utilized<br />
and is unavailable.<br />
Why Change from Default Sett<strong>in</strong>gs: Chang<strong>in</strong>g the M<strong>in</strong>imum and Maximum values will change the range<br />
used to calculate SmartSession loads and can <strong>in</strong>fluence SmartSession behavior.<br />
Select F<strong>in</strong>ish to save and close or Cancel to close without sav<strong>in</strong>g.<br />
12.2 Camera Configuration Wizard<br />
The Camera Configuration Wizard allows an IP Camera to be configured as a Display Server with<strong>in</strong><br />
Th<strong>in</strong>Manager.<br />
Launch the Camera Configuration Wizard by right click<strong>in</strong>g on Cameras <strong>in</strong> the Display Servers branch<br />
and select<strong>in</strong>g Add Camera.<br />
12.2.1.1 Camera Name Page<br />
Camera Configuration Wizard<br />
Importance of Page: This page names and addresses the IP Camera.<br />
Fields and Sett<strong>in</strong>gs:<br />
242 Display Servers ACP Th<strong>in</strong>Manager <strong>6.0</strong>
Camera Name and Group<br />
o Camera Name – Enter a name for the camera.<br />
o Change Group – This button allows the camera to be added to a Camera Group.<br />
Camera Model<br />
o Make – Use the drop-down to select a manufacturer.<br />
o Model – Use the drop-down to select a model.<br />
Camera Network Setup<br />
o IP Address – Enter the IP address of the IP camera.<br />
o Port – Enter the port used.<br />
Why Change from Default Sett<strong>in</strong>gs: Each camera needs to be def<strong>in</strong>ed.<br />
The first page of the camera configuration wizard requires that a camera name be entered. Select the<br />
make and model of the camera you are configur<strong>in</strong>g and the IP address and Port that has been previously<br />
assigned to the camera. The IP address and port are set by us<strong>in</strong>g the camera manufacturers<br />
configuration software or through the use of the camera’s web browser <strong>in</strong>terface.<br />
12.2.1.2 Camera Authentication Page<br />
Camera Authentication<br />
ACP Th<strong>in</strong>Manager <strong>6.0</strong> Display Servers 243
Importance of Page: This page provides authentication, if needed.<br />
Fields:<br />
Username – Enter a username, if needed.<br />
Password – Enter a password, if needed<br />
Verify Password – Re-enter the password for accuracy.<br />
Why Change from Default Sett<strong>in</strong>gs: If your camera requires authentication enter it on this page. If the<br />
camera has been configured to allow anonymous connections, leave the <strong>in</strong><strong>format</strong>ion blank.<br />
The term<strong>in</strong>al uses the authentication <strong>in</strong><strong>format</strong>ion when connect<strong>in</strong>g to the camera. Authentication<br />
<strong>in</strong><strong>format</strong>ion is setup <strong>in</strong> the camera by us<strong>in</strong>g the camera manufacturers configuration software or through<br />
the use of the camera’s web browser <strong>in</strong>terface.<br />
12.2.1.3 Camera Model Options<br />
Camera Model Options<br />
Importance of Page: This page allows additional camera configuration.<br />
Fields:<br />
Include Camera Options – This checkbox shows addition options when checked.<br />
244 Display Servers ACP Th<strong>in</strong>Manager <strong>6.0</strong>
Options – The options shown vary by make and model of the camera hardware. Please see<br />
camera documentation for their help.<br />
Why Change from Default Sett<strong>in</strong>gs: The camera can be controlled <strong>in</strong> f<strong>in</strong>er deta<br />
Some cameras support additional configuration options. These options can be configured on this page. If<br />
you wish to use the default options then leave the Include Camera Options unchecked. The newly<br />
created camera will appear <strong>in</strong> the Th<strong>in</strong>Manager tree as follows.<br />
Camera Tree View<br />
ACP Th<strong>in</strong>Manager <strong>6.0</strong> Display Servers 245
12.2.2 IP Camera Group Configuration<br />
The camera group configuration wizard can be launched by right click<strong>in</strong>g on the Cameras branch of the<br />
Th<strong>in</strong>Manager tree and select<strong>in</strong>g the Add Camera Group option.<br />
Add Camera Group Wizard<br />
Enter the Camera Group Name and select F<strong>in</strong>ish. The Camera group will be shown <strong>in</strong> the Th<strong>in</strong>Manager<br />
tree as follows.<br />
246 Display Servers ACP Th<strong>in</strong>Manager <strong>6.0</strong>
Camera Group Tree View<br />
ACP Th<strong>in</strong>Manager <strong>6.0</strong> Display Servers 247
12.2.3 IP Camera Adm<strong>in</strong>istration<br />
Once a camera is configured <strong>in</strong> Th<strong>in</strong>Manager, the Connect tab can be used to connect to the camera<br />
and perform camera adm<strong>in</strong>istration from Th<strong>in</strong>Manager.<br />
Camera Connect Tab<br />
Camera log <strong>in</strong> <strong>in</strong><strong>format</strong>ion may be requested when us<strong>in</strong>g the connect tab. The authentication <strong>in</strong><strong>format</strong>ion<br />
entered dur<strong>in</strong>g the camera configuration is not used when us<strong>in</strong>g the connect tab.<br />
248 Display Servers ACP Th<strong>in</strong>Manager <strong>6.0</strong>
13 Display Clients<br />
Display Client is the term used to denote the graphic render<strong>in</strong>g of the output from a Display Server. This<br />
could be a traditional Term<strong>in</strong>al Server session, IP Camera display, a Term<strong>in</strong>al-to-Term<strong>in</strong>al Shadow<br />
session or a workstation session.<br />
13.1 Display Client List<br />
The Display Client List Wizard can be launched by either:<br />
Right click<strong>in</strong>g on the Display Client branch and choos<strong>in</strong>g the Add Display Client command<br />
Right click<strong>in</strong>g on the Display Client branch and choos<strong>in</strong>g the Edit Display Client command.<br />
Display Client List Wizard<br />
The open<strong>in</strong>g w<strong>in</strong>dow of the Display Client List Wizard will show any Display Clients that are def<strong>in</strong>ed or<br />
will be blank if none have been def<strong>in</strong>ed.<br />
Fields:<br />
(Unnamed) – The list box shows Display Clients that are created.<br />
Buttons:<br />
ACP Th<strong>in</strong>Manager <strong>6.0</strong><br />
249 Display Clients
Add Group – This will launch the Display Client Wizard to create a new Display Client.<br />
Edit Group – This will open the properties for a highlighted Display Client.<br />
Delete Group – This will remove a highlighted Display Client from the list.<br />
Cancel – This will close the wizard without action.<br />
OK - This will close the wizard after accept<strong>in</strong>g changes.<br />
13.1.1.1 Display Client Name Page<br />
Display Client Name Page<br />
Importance of Page: This page starts the configuration wizard, sets the name, and the type of Display<br />
Client.<br />
Fields:<br />
Group Name – This field is used to name the Display Client.<br />
Sett<strong>in</strong>gs:<br />
Type of Display Client drop-down box selects the function of the Display Client.<br />
o<br />
Term<strong>in</strong>al Services – This creates a Display Client that allows a term<strong>in</strong>al to connect to a<br />
term<strong>in</strong>al server, log<strong>in</strong>, and run a session.<br />
250 Display Clients ACP Th<strong>in</strong>Manager <strong>6.0</strong>
o<br />
o<br />
o<br />
Term<strong>in</strong>al Shadow – creates a Display Client that allows a term<strong>in</strong>al to be shadowed by<br />
another term<strong>in</strong>al.<br />
Camera – creates a Display Client that allows the use of IP Cameras.<br />
Workstation – creates a template for workstation deployment. The Workstation Display<br />
Client gets assigned to a specific workstation when it is applied to a term<strong>in</strong>al. See Virtual<br />
Workstations for details.<br />
Buttons:<br />
Permissions - The button will launch the Permissions w<strong>in</strong>dow that allows Permissions to be set<br />
for TermSecure. This is discussed <strong>in</strong> Permissions.<br />
Why Change from Default Sett<strong>in</strong>gs: The group needs a name and a type assigned to it.<br />
This section covers Term<strong>in</strong>al Services Display Clients. Once the Type of Display Client is set to<br />
Term<strong>in</strong>al Services select Next to configure the group options.<br />
ACP Th<strong>in</strong>Manager <strong>6.0</strong> Display Clients 251
13.2 Term<strong>in</strong>al Services Display Clients<br />
The Term<strong>in</strong>al Services Display Clients of Th<strong>in</strong>Manager have the same function as the Term<strong>in</strong>al Server<br />
Groups from pre-3.2 versions of Th<strong>in</strong>Manager and the Application Groups of Th<strong>in</strong>Manager 3.2 and 3.3.<br />
They allow a term<strong>in</strong>al to connect to a term<strong>in</strong>al server, log<strong>in</strong>, and run a session. The specific term<strong>in</strong>al<br />
server that the term<strong>in</strong>al connects to is based on the Display Client configuration and options.<br />
13.2.1.1 Display Client Options Page<br />
Display Client Options<br />
Importance of Page: This page allows the configuration of Display Client parameters<br />
Checkbox:<br />
Allow group to be tiled – If checked, this allows the Display Client to be tiled <strong>in</strong> SessionTil<strong>in</strong>g.<br />
See SessionTil<strong>in</strong>g Options for details.<br />
Allow Group to be moved (MultiMonitor) – If checked, this allows a Display Client to be moved<br />
from one MultiMonitor screen to another. See MultiMonitor for details.<br />
252 Display Clients ACP Th<strong>in</strong>Manager <strong>6.0</strong>
Include IP Camera Overlays –This will allow IP Camera overlays to be added to this Display<br />
Client.<br />
Always ma<strong>in</strong>ta<strong>in</strong> a connection – This keeps a session active, reconnect<strong>in</strong>g and restart<strong>in</strong>g if it is<br />
closed. If unchecked, the user can close a session and another session won’t start automatically.<br />
Connect at boot-up – If checked, the term<strong>in</strong>al will start a session for this Display Client at boot<br />
up. If unchecked, a user action is required to start the session.<br />
Disconnect <strong>in</strong> background – If checked, a Display Client be<strong>in</strong>g used <strong>in</strong> a MultiSession<br />
configuration will disconnect once it is moved <strong>in</strong>to the background. This could be done to require<br />
fewer resources.<br />
Why Change from Default Sett<strong>in</strong>gs: The Always ma<strong>in</strong>ta<strong>in</strong> a connection and Connect at boot up<br />
checkboxes, if unselected, will lower the demand on the term<strong>in</strong>al servers by allow<strong>in</strong>g sessions to be<br />
closed until needed.<br />
Select Next to cont<strong>in</strong>ue, F<strong>in</strong>ish to save and close, or Cancel to close without sav<strong>in</strong>g.<br />
13.2.1.2 Term<strong>in</strong>al Services Display Client Type Page<br />
Term<strong>in</strong>al Services Display Client Type<br />
Importance of Page: Each Term<strong>in</strong>al Services Display Client can use a s<strong>in</strong>gle protocol to connect to the<br />
term<strong>in</strong>al servers.<br />
ACP Th<strong>in</strong>Manager <strong>6.0</strong> Display Clients 253
Sett<strong>in</strong>gs:<br />
Citrix ICA – This allows the use of the Citrix© ICA protocol <strong>in</strong> client to server communications.<br />
Citrix Device Services – This is a legacy version of the ICA protocol used on W<strong>in</strong>dows NT and<br />
W<strong>in</strong>dows 2000 term<strong>in</strong>al servers.<br />
Remote Desktop Protocol (RDP) – This is the default protocol from Microsoft©. It is<br />
automatically <strong>in</strong>stalled on Microsoft© term<strong>in</strong>al servers.<br />
Why Change from Default Sett<strong>in</strong>gs: Change to the Citrix© ICA protocol if the Citrix© ICA protocol is<br />
go<strong>in</strong>g to be used <strong>in</strong>stead of the default RDP.<br />
Select Next to cont<strong>in</strong>ue, F<strong>in</strong>ish to save and close, or Cancel to close without sav<strong>in</strong>g.<br />
13.2.1.3 Term<strong>in</strong>al Services Display Client Options Page<br />
Term<strong>in</strong>al Services Display Client Options<br />
Importance of Page: This page sets the roles of the Display Client.<br />
Checkbox:<br />
SmartSession Group – - This adds SmartSession to the Display Client, which provides load<br />
balanc<strong>in</strong>g between member term<strong>in</strong>al servers.<br />
SmartSession uses CPU availability, memory, and the number of sessions on the member<br />
254 Display Clients ACP Th<strong>in</strong>Manager <strong>6.0</strong>
term<strong>in</strong>al servers to determ<strong>in</strong>e the load on the servers. Th<strong>in</strong> clients connect to the term<strong>in</strong>al server<br />
<strong>in</strong> the Display Client with the most available resources. See SmartSession Option for details.<br />
Application L<strong>in</strong>k Group (AppL<strong>in</strong>k) – - AppL<strong>in</strong>k, provides the Initial Program function to th<strong>in</strong><br />
clients that connect to members of the Display Client. The Initial Program function launches a<br />
program <strong>in</strong>stead of the desktop. Clos<strong>in</strong>g the program will end the connection and force a<br />
reconnection to a session runn<strong>in</strong>g the application. See AppL<strong>in</strong>k Option for details.<br />
Enforce Primary - This allows a th<strong>in</strong> client to connect to its orig<strong>in</strong>al term<strong>in</strong>al server if that term<strong>in</strong>al<br />
server has failed and recovered. This is not available if SmartSession is selected.<br />
Instant Failover (requires license) - This provides Instant Failover where the term<strong>in</strong>al will<br />
connect to two term<strong>in</strong>al servers <strong>in</strong> the Display Client. The term<strong>in</strong>al will have an active session on<br />
two term<strong>in</strong>al servers but will only display one session. If the first term<strong>in</strong>al server fails, the session<br />
of the second term<strong>in</strong>al server session is immediately displayed, elim<strong>in</strong>at<strong>in</strong>g any downtime due to<br />
term<strong>in</strong>al server failure.<br />
Allow Auto-Log<strong>in</strong> - If checked, the term<strong>in</strong>al will use the log<strong>in</strong> <strong>in</strong><strong>format</strong>ion supplied <strong>in</strong> the term<strong>in</strong>al<br />
configuration to automatically logon to the term<strong>in</strong>al server. If unchecked, the user will be required<br />
to manually log<strong>in</strong> to the term<strong>in</strong>al server.<br />
Why Change from Default Sett<strong>in</strong>gs: Display Client features like SmartSession and Instant Failover are<br />
added on this page. You can force users to manually log<strong>in</strong> to a session by deselect<strong>in</strong>g the Allow Auto-<br />
Log<strong>in</strong> checkbox.<br />
Note: Enforce Primary is not available with SmartSession.<br />
13.2.1.4 SmartSession Option<br />
SmartSession is a load balanc<strong>in</strong>g strategy that allows term<strong>in</strong>als to connect to the member of a Term<strong>in</strong>al<br />
Services Display Client that has the most available resources. Th<strong>in</strong>Manager monitors the CPU load,<br />
memory availability, and number of sessions on the term<strong>in</strong>al servers and ranks them by availability.<br />
When a th<strong>in</strong> client connects to a member of a Term<strong>in</strong>al Services Display Client with SmartSession, the<br />
term<strong>in</strong>al connects to the term<strong>in</strong>al server with the lightest load.<br />
SmartSession<br />
Each member term<strong>in</strong>al server needs SmartSession configured <strong>in</strong> the Term<strong>in</strong>al Server Display Server<br />
Wizard. See Term<strong>in</strong>al Server Capabilities Page for details.<br />
ACP Th<strong>in</strong>Manager <strong>6.0</strong> Display Clients 255
Once Th<strong>in</strong>Manager has polled the term<strong>in</strong>al servers and established the availability of their resources,<br />
Th<strong>in</strong>Manager passes the Server Rank<strong>in</strong>g to the th<strong>in</strong> clients for its connection <strong>in</strong>structions.<br />
Th<strong>in</strong>Manager Interface – Server Rank Tab<br />
The Server Rank<strong>in</strong>gs are displayed on the Server Rank tab when a Term<strong>in</strong>al Services Display Client is<br />
highlighted <strong>in</strong> the Th<strong>in</strong>Manager tree. In the example above a th<strong>in</strong> client would connect to Green22<br />
because it has the lowest load.<br />
13.2.1.5 AppL<strong>in</strong>k Option<br />
AppL<strong>in</strong>k provides the Initial Program functionality to a Term<strong>in</strong>al Services Display Client. If AppL<strong>in</strong>k is<br />
enabled, the path to an Initial Program is entered <strong>in</strong>to the AppL<strong>in</strong>k Page of Term<strong>in</strong>al Services Display<br />
Client Wizard. This program will be the only program to run <strong>in</strong> that session.<br />
Note: If the AppL<strong>in</strong>k option is not used then the term<strong>in</strong>al services session will display a desktop.<br />
Note: If a Term<strong>in</strong>al Services Display Client conta<strong>in</strong>s several term<strong>in</strong>al servers, the path must be valid on all<br />
term<strong>in</strong>al servers. If different term<strong>in</strong>al servers have different paths to the desired program, write a batch file<br />
to open the program.<br />
256 Display Clients ACP Th<strong>in</strong>Manager <strong>6.0</strong>
13.2.1.6 Instant Failover Option<br />
Term<strong>in</strong>al Services Display Clients can provide Instant Failover without us<strong>in</strong>g the Instant Failover<br />
Module. With Instant Failover a term<strong>in</strong>al will connect to a session on two term<strong>in</strong>al servers. Both sessions<br />
are active but only one is displayed. If the first term<strong>in</strong>al server fails, the second session is immediately<br />
displayed, elim<strong>in</strong>at<strong>in</strong>g any downtime due to term<strong>in</strong>al server failure.<br />
Note: AppL<strong>in</strong>k and Auto-Log<strong>in</strong> is normally used with Instant Failover to provide <strong>in</strong>stant access to an<br />
application.<br />
Instant Failover is configured by select<strong>in</strong>g the Instant Failover checkbox on the Term<strong>in</strong>al Services<br />
Display Client Options page of the Term<strong>in</strong>al Services Display Client Wizard,<br />
Instant Failover works with the term<strong>in</strong>al servers of a Display Client, not between different Display Clients.<br />
Note: Do not use the Instant Failover Module when us<strong>in</strong>g Instant Failover <strong>in</strong> Display Client.<br />
In a standard Term<strong>in</strong>al Services Display Client, the term<strong>in</strong>al will use the first listed term<strong>in</strong>al server as<br />
the primary server and will use the second listed term<strong>in</strong>al server as the secondary server.<br />
If us<strong>in</strong>g SmartSession, the primary session will be on the server with the lightest load and the backup<br />
session will be on the term<strong>in</strong>al server with the second lightest load.<br />
ACP Th<strong>in</strong>Manager <strong>6.0</strong> Display Clients 257
13.2.1.7 Display Client Members Page<br />
Display Client Members<br />
Importance of Page: This allows the selection of the term<strong>in</strong>al servers that will be members of the Display<br />
Client. Add<strong>in</strong>g multiple term<strong>in</strong>al servers to the Selected Term<strong>in</strong>al Server list will establish failover.<br />
List Box:<br />
<br />
Available Term<strong>in</strong>al Servers – This is the list of the term<strong>in</strong>als configured <strong>in</strong> the Term<strong>in</strong>al Server<br />
Configuration Wizard and available to the term<strong>in</strong>al.<br />
If the Available Term<strong>in</strong>al Server list box is empty the Term<strong>in</strong>al Server Configuration Wizard can<br />
be launched with the Edit Server List button to def<strong>in</strong>e the term<strong>in</strong>al servers.<br />
Selected Term<strong>in</strong>al Servers – This is the list of term<strong>in</strong>al servers that the Display Client will use.<br />
Move the term<strong>in</strong>al servers to this list with the left and right arrow or by double click<strong>in</strong>g on the<br />
name.<br />
List<strong>in</strong>g two or more term<strong>in</strong>al servers configures Failover.<br />
The term<strong>in</strong>al will connect to the term<strong>in</strong>al servers <strong>in</strong> the order listed unless SmartSession is used.<br />
The term<strong>in</strong>al will connect to the term<strong>in</strong>al server with the lightest load if SmartSession is be<strong>in</strong>g<br />
used.<br />
Buttons:<br />
258 Display Clients ACP Th<strong>in</strong>Manager <strong>6.0</strong>
Arrows – The left and right arrows move the term<strong>in</strong>al servers between list boxes. The up and<br />
down arrow change the order that the term<strong>in</strong>al servers are used. The top term<strong>in</strong>al server is<br />
considered the primary term<strong>in</strong>al server.<br />
Edit Server List – This launches the Term<strong>in</strong>al Server Configuration Wizard that allows<br />
term<strong>in</strong>al servers to be def<strong>in</strong>ed with<strong>in</strong> Th<strong>in</strong>Manager. Select<strong>in</strong>g Manage > Term<strong>in</strong>al Server List<br />
from the Th<strong>in</strong>Manager menu will also launch the Term<strong>in</strong>al Server Configuration Wizard.<br />
Why Change from Default Sett<strong>in</strong>gs: It is critical to list the term<strong>in</strong>al servers that the Display Client will<br />
use. The wizard will not advance without a term<strong>in</strong>al server selected.<br />
If the Available Term<strong>in</strong>al Servers column is empty, the Term<strong>in</strong>al Server List Wizard needs to be run to<br />
def<strong>in</strong>e the term<strong>in</strong>al servers. Select the Edit Server List to launch the Term<strong>in</strong>al Server Configuration<br />
Wizard and def<strong>in</strong>e the term<strong>in</strong>al servers.<br />
If the Display Client is us<strong>in</strong>g the SmartSession option, the Next button will launch the SmartSession<br />
Sett<strong>in</strong>gs page.<br />
If the Display Client is not SmartSession Group the F<strong>in</strong>ish button will complete the Display Client<br />
configuration.<br />
13.2.1.8 Display Client SmartSession Sett<strong>in</strong>gs Page<br />
Smart Session Sett<strong>in</strong>gs<br />
ACP Th<strong>in</strong>Manager <strong>6.0</strong> Display Clients 259
Importance of Page: This allows tweak<strong>in</strong>g of SmartSession values by adjust<strong>in</strong>g the weights of the<br />
SmartSession sett<strong>in</strong>gs.<br />
Th<strong>in</strong>Manager multiplies the CPU utilization, Memory utilization, and number of sessions on the term<strong>in</strong>al<br />
server by the Weight shown to def<strong>in</strong>e the SmartSession term<strong>in</strong>al server’s available resources.<br />
The higher the Weight, relative to the others, the greater the importance that parameter has <strong>in</strong><br />
determ<strong>in</strong><strong>in</strong>g the load for SmartSession.<br />
The SmartSession load = (CPU weight * CPU Utilization %) + (Memory weight * Memory Utilization %) +<br />
(Session weight * Session Utilization %)<br />
Sett<strong>in</strong>gs:<br />
CPU Utilization Weight – This is the CPU multiplier.<br />
Memory Utilization Weight – This is the Memory multiplier.<br />
Session Weight – This is the Session multiplier.<br />
Queu<strong>in</strong>g controls the rate that term<strong>in</strong>als connect to the term<strong>in</strong>al servers <strong>in</strong> the Display Client to allow<br />
processor <strong>in</strong>tensive applications to load one at a time <strong>in</strong>stead of many sessions form<strong>in</strong>g at once, br<strong>in</strong>g<strong>in</strong>g<br />
the server to a halt. As term<strong>in</strong>als that use SmartSession Queu<strong>in</strong>g boot, they request their term<strong>in</strong>al server<br />
from Th<strong>in</strong>Manager. Th<strong>in</strong>Manager will send the first term<strong>in</strong>al to the term<strong>in</strong>al server with the lightest load<br />
and will put the other term<strong>in</strong>als <strong>in</strong> a queue for the <strong>in</strong>terval def<strong>in</strong>ed <strong>in</strong> the M<strong>in</strong> _ Sec field. This allows the<br />
term<strong>in</strong>al server load to stabilize and allows Th<strong>in</strong>Manager to re-sample the loads and send the term<strong>in</strong>al to<br />
the term<strong>in</strong>al server with the lowest current load.<br />
Fields:<br />
<br />
M<strong>in</strong> _ Sec – This is the amount of seconds that a term<strong>in</strong>al will wait <strong>in</strong> the queue before be<strong>in</strong>g sent<br />
to a term<strong>in</strong>al server that has another term<strong>in</strong>al connect<strong>in</strong>g. The term<strong>in</strong>al may wait longer than this<br />
value to connect if the CPU of the term<strong>in</strong>al server exceeds the Maximum CPU Utilization<br />
def<strong>in</strong>ed on the SmartSession Configuration page of the Term<strong>in</strong>al Server Configuration<br />
wizard. See SmartSession Configuration Page for details.<br />
Max _ Sec – This is the maximum amount of seconds that a term<strong>in</strong>al will wait <strong>in</strong> the queue before<br />
be<strong>in</strong>g sent to the term<strong>in</strong>al server to log<strong>in</strong>, regardless of the load.<br />
Checkbox:<br />
Inf<strong>in</strong>ite - If the Inf<strong>in</strong>ite checkbox is selected, Th<strong>in</strong>Manager will wait until the CPU utilization of the<br />
term<strong>in</strong>al server has rega<strong>in</strong>ed an acceptable range before send<strong>in</strong>g other term<strong>in</strong>als to it to log<strong>in</strong>.<br />
Why Change from Default Sett<strong>in</strong>gs: The values can be tweaked to alter performance, if needed.<br />
Note: The Weighs are relative. Increas<strong>in</strong>g all three Weights from “1” to “10” doesn’t change the relative<br />
values.<br />
If the Display Client uses the AppL<strong>in</strong>k option, an AppL<strong>in</strong>k page will be displayed by select<strong>in</strong>g the Next<br />
button.<br />
260 Display Clients ACP Th<strong>in</strong>Manager <strong>6.0</strong>
13.2.1.9 Display Client L<strong>in</strong>ked Application Page<br />
AppL<strong>in</strong>k Path<br />
Importance of Page: This page configures the Display Client as an AppL<strong>in</strong>k group where it will launch a<br />
s<strong>in</strong>gle application <strong>in</strong> the session. If this application is closed the term<strong>in</strong>al will reconnect and re-launch the<br />
application.<br />
Fields:<br />
Program Path and Filename - Enter the path to the desired application <strong>in</strong> the field.<br />
Note: Quotation marks may be needed when there is a space <strong>in</strong> the path.<br />
<br />
Command L<strong>in</strong>e Options – This field provides a space for command l<strong>in</strong>e options and switches.<br />
This field may not be required.<br />
Start <strong>in</strong> the follow<strong>in</strong>g folder - This field is provided <strong>in</strong> case you need to specify the work<strong>in</strong>g<br />
directory for the program when us<strong>in</strong>g a relative path for the <strong>in</strong>itial program. This field may not be<br />
required.<br />
Buttons:<br />
<br />
Browse – The Browse button will allow you to select the executable file us<strong>in</strong>g a file browser.<br />
Make sure the path is correct on all term<strong>in</strong>al servers.<br />
ACP Th<strong>in</strong>Manager <strong>6.0</strong> Display Clients 261
Note: If a Term<strong>in</strong>al Services Display Client conta<strong>in</strong>s several term<strong>in</strong>al servers, the path must be valid on all<br />
term<strong>in</strong>al servers. If different term<strong>in</strong>al servers have different paths to the desired program, write a batch file<br />
to open the program.<br />
Why Change from Default Sett<strong>in</strong>gs: This allows you to control a user’s access. If the Display Client<br />
uses AppL<strong>in</strong>k the user will not get a desktop or icons but will be limited to the application specified.<br />
Clos<strong>in</strong>g it will re-launch the program, assur<strong>in</strong>g that it is always runn<strong>in</strong>g.<br />
Select<strong>in</strong>g the F<strong>in</strong>ish button will close the Display Client List wizard and display the created term<strong>in</strong>al<br />
server groups.<br />
13.3 Camera Display Clients<br />
The Camera Display Client configuration wizard can be launched by right click<strong>in</strong>g on the Camera branch<br />
of the Th<strong>in</strong>Manager tree and select<strong>in</strong>g the Add Display Client option.<br />
Camera Display Client Wizard – Name<br />
Importance of Page: Allows nam<strong>in</strong>g and selection of Display Client type.<br />
Fields:<br />
Client Name – Name for Display Client.<br />
262 Display Clients ACP Th<strong>in</strong>Manager <strong>6.0</strong>
Type of Display Client – Drop-down to select type of Display Client.<br />
Button:<br />
Permissions – Sets TermSecure permissions. See Permissions for details.<br />
Why Change from Default Sett<strong>in</strong>gs: The display client needs a name.<br />
Enter the name of the Display Client and any TermSecure permissions on this page.<br />
Camera Display Client Options<br />
Importance of Page: Sets Display Client options.<br />
Checkbox:<br />
Allow Display Client to be tiled – Allows til<strong>in</strong>g of the client.<br />
Allow Display Client to be moved (MultiMonitor) – Allows the Display Client to be opened <strong>in</strong><br />
any MultiMonitor w<strong>in</strong>dow.<br />
Why Change from Default Sett<strong>in</strong>gs: Provides additional options.<br />
Select if this Display Client can be tiled and if when us<strong>in</strong>g MultiMonitor it can be moved to a different<br />
screen.<br />
ACP Th<strong>in</strong>Manager <strong>6.0</strong> Display Clients 263
13.3.1.1 Overlay Layout Page<br />
Camera Display Client Overlay Layout<br />
Importance of Page: Sets camera layout<br />
Sett<strong>in</strong>gs:<br />
Choose Camera Overlay – Allows you to set the layout of the displays. You may have a s<strong>in</strong>gle<br />
overlay or multiple overlays on the Display Client.<br />
Display Size – Sets the size (resolution) of the display to be shown.<br />
Buttons:<br />
Add Overlay – Adds an overlay to the Display Client.<br />
Remove Overlay – Removes a highlighted overlay from the Display Client.<br />
Why Change from Default Sett<strong>in</strong>gs: You need at least one overlay <strong>in</strong> the Display Client.<br />
This page determ<strong>in</strong>es the layout of the camera overlays. You can def<strong>in</strong>e your own custom layout or<br />
choose from predef<strong>in</strong>ed layouts. The Display Size selection should be set to the resolution of the<br />
term<strong>in</strong>al screen to which the Display Client will be added. The picture on this page represents the overlay<br />
layout.<br />
264 Display Clients ACP Th<strong>in</strong>Manager <strong>6.0</strong>
Camera Display Client Layout Selection<br />
Use the layout drop down to select the desired layout.<br />
ACP Th<strong>in</strong>Manager <strong>6.0</strong> Display Clients 265
Camera Display Client 2x2 Layout Selection<br />
Once a layout has been selected, it will be represented graphically. Select Next to configure the overlays.<br />
266 Display Clients ACP Th<strong>in</strong>Manager <strong>6.0</strong>
13.3.1.2 Overlay Cameras Page<br />
Camera Display Client Overlay def<strong>in</strong>ition<br />
Importance of Page: Configures the overlays.<br />
Fields:<br />
Overlay Name – Name for the overlay (filled <strong>in</strong> by default).<br />
Sett<strong>in</strong>gs:<br />
Left – Sets the left side of the overlay <strong>in</strong> pixels.<br />
Top – Sets the top of the overlay <strong>in</strong> pixels.<br />
Width – Sets the overlay width <strong>in</strong> pixels.<br />
Height – Sets the overlay height <strong>in</strong> pixels.<br />
Buttons:<br />
Add – Adds a camera to the overlay.<br />
Delete – Removes a highlighted camera from the overlay.<br />
Set Initial Camera – Sets the <strong>in</strong>itial camera from a series of cameras.<br />
Overlay Options – Launches the Overlay Options page.<br />
ACP Th<strong>in</strong>Manager <strong>6.0</strong> Display Clients 267
Checkbox:<br />
All Cameras Available – This makes all cameras available if checked. If unchecked the Add<br />
button allows specific cameras to be added.<br />
Why Change from Default Sett<strong>in</strong>gs: Each Camera Display Client needs overlays.<br />
Each overlay will be given a default name. The grey region of the screen representation is the overlay<br />
which is currently be<strong>in</strong>g configured. If the All Cameras Available checkbox is checked, all of the<br />
cameras will be available to be selected by the user at the term<strong>in</strong>al.<br />
Set Initial Camera Dialog<br />
Select<strong>in</strong>g the Set Initial Camera button allows the camera the overlay will start on at boot up to be<br />
selected.<br />
268 Display Clients ACP Th<strong>in</strong>Manager <strong>6.0</strong>
Overlay Camera Selection<br />
If the All Cameras Available checkbox is unchecked, cameras must be added manually. Use the Add<br />
button to add cameras to the list. Add<strong>in</strong>g more than one camera allows the user to select from these<br />
cameras at the term<strong>in</strong>al and allows the cycl<strong>in</strong>g between the listed cameras.<br />
ACP Th<strong>in</strong>Manager <strong>6.0</strong> Display Clients 269
Camera Selection<br />
Overlay Options<br />
Click<strong>in</strong>g the Overlay Options button will allow the sett<strong>in</strong>g of additional overlay options.<br />
General Options:<br />
270 Display Clients ACP Th<strong>in</strong>Manager <strong>6.0</strong>
Enable Overlay – This option allows the overlay to be started <strong>in</strong> a disabled non-visible state. The<br />
TermMon ActiveX Control can be used by an application to enable the overlay.<br />
Interactive – This option allows the user on the term<strong>in</strong>al to <strong>in</strong>teract with the overlay. If the user<br />
clicks <strong>in</strong> the overlay area, he can perform functions such as switch<strong>in</strong>g cameras and mak<strong>in</strong>g the<br />
overlay full screen.<br />
Scale – This option will scale camera frames to be to the size of the overlay w<strong>in</strong>dow. Aspect ratio<br />
will be ma<strong>in</strong>ta<strong>in</strong>ed.<br />
Crop – This option will crop the camera frame if it is larger than the camera overlay. This option<br />
when comb<strong>in</strong>ed with the Scale option will always fill the entire overlay area.<br />
Show Complete Camera Name – Us<strong>in</strong>g this option allows the entire path of the camera to be<br />
displayed. The path <strong>in</strong>cludes any groups of which the camera is a member.<br />
Border Size – This sett<strong>in</strong>g determ<strong>in</strong>es the size of the overlay outside border.<br />
Title Options:<br />
Title Position – This is the position of the camera name with<strong>in</strong> the overlay.<br />
Title Size – This is the size of the camera name when displayed with<strong>in</strong> the overlay. Set this to<br />
Don’t’ Show Title if you do not want the camera name displayed.<br />
Cycl<strong>in</strong>g Options:<br />
Enable Cycl<strong>in</strong>g – Check this sett<strong>in</strong>g to cycle between the cameras assigned to the overly.<br />
Cycle Time – This is the time <strong>in</strong> seconds that the overlay will display each camera before<br />
switch<strong>in</strong>g to the next camera.<br />
Camera Display Client Tree View<br />
ACP Th<strong>in</strong>Manager <strong>6.0</strong> Display Clients 271
Once a Camera Display Client has been configured it will be reflected <strong>in</strong> the Th<strong>in</strong>Manager tree under<br />
Display Clients->Camera.<br />
Term<strong>in</strong>al Configuration Display Client Selection<br />
Dur<strong>in</strong>g the term<strong>in</strong>al configuration, select the desired Display Clients for the term<strong>in</strong>al. Multiple Display<br />
Clients can be added to the configuration for a MultiSession configuration.<br />
272 Display Clients ACP Th<strong>in</strong>Manager <strong>6.0</strong>
Camera Display Client Term<strong>in</strong>al Tree View<br />
When the term<strong>in</strong>al is runn<strong>in</strong>g, the Camera Display Client status will be reflected <strong>in</strong> the Th<strong>in</strong>Manager<br />
term<strong>in</strong>al tree view. The status of each Camera Overlay and Camera will be displayed. A green lightn<strong>in</strong>g<br />
bolt on the Display Client icon represents that Display Client is <strong>in</strong> the foreground. A yellow lightn<strong>in</strong>g bolt<br />
on the Display Client icon represents that the Display Client is <strong>in</strong> the background. A green lightn<strong>in</strong>g bolt<br />
on the overlay icon represents an active overlay. A green lightn<strong>in</strong>g bolt on the camera icon represents an<br />
active connection to the camera.<br />
ACP Th<strong>in</strong>Manager <strong>6.0</strong> Display Clients 273
13.3.2 Add<strong>in</strong>g a Camera Overlay to a Display Client<br />
Term<strong>in</strong>al Configuration Display Client Options<br />
Dur<strong>in</strong>g the term<strong>in</strong>al configuration check the Include IP Camera Overlays option to add camera overlays<br />
to a Display Client.<br />
274 Display Clients ACP Th<strong>in</strong>Manager <strong>6.0</strong>
Term<strong>in</strong>al Configuration Overlay Layout<br />
Camera Overlays can be configured before complet<strong>in</strong>g the Term<strong>in</strong>al Configuration wizard,<br />
Term<strong>in</strong>al Configuration Add Camera Overlay<br />
Click<strong>in</strong>g the Add Overlay button will allow the creation of the overlay. Enter the name position and size of<br />
the desired overlay.<br />
ACP Th<strong>in</strong>Manager <strong>6.0</strong> Display Clients 275
Camera Overlay Layout<br />
Once an overlay has been added, it will be represented as a white outl<strong>in</strong>ed square on the layout page.<br />
Select<strong>in</strong>g the Next button will allow the completion of the configuration camera overlays<br />
276 Display Clients ACP Th<strong>in</strong>Manager <strong>6.0</strong>
Overlay Camera Selection<br />
The camera overlay configuration can be completed as described <strong>in</strong> the IP Camera Display Server<br />
Configuration Wizard section.<br />
13.3.3 Camera Overlays and TermMon ActiveX Control<br />
Camera Overlays can be controlled by an application by us<strong>in</strong>g the TermMon ActiveX Control. The Control<br />
can be used to perform operations such as switch<strong>in</strong>g cameras and chang<strong>in</strong>g the overlay size and<br />
position. See TermMon ActiveX for details.<br />
ACP Th<strong>in</strong>Manager <strong>6.0</strong> Display Clients 277
13.4 Term<strong>in</strong>al Shadow Display Clients<br />
Term<strong>in</strong>al Shadow Display Clients allow a term<strong>in</strong>al to shadow another term<strong>in</strong>al. The Shadow Display Client<br />
can conta<strong>in</strong> a specific term<strong>in</strong>al or several term<strong>in</strong>als.<br />
13.4.1.1 Group Name Page<br />
Term<strong>in</strong>al Shadow Display Client - Group Name Page<br />
Importance of Page: This page starts the configuration wizard, sets the name, and the type of Display<br />
Client.<br />
Fields:<br />
Group Name – This field is used to name the Display Client.<br />
Sett<strong>in</strong>gs:<br />
Type of Display Client drop-down box selects the function of the Display Client.<br />
o<br />
Term<strong>in</strong>al Services – This creates a Display Client that allows a term<strong>in</strong>al to connect to a<br />
term<strong>in</strong>al server, log<strong>in</strong>, and run a session.<br />
278 Display Clients ACP Th<strong>in</strong>Manager <strong>6.0</strong>
o Term<strong>in</strong>al Shadow – creates a Display Client that allows a term<strong>in</strong>al to be shadowed by<br />
another term<strong>in</strong>al.<br />
Buttons:<br />
Permissions - The button will launch the Permissions w<strong>in</strong>dow that allows Permissions to be set<br />
for TermSecure. This is discussed <strong>in</strong> Permissions.<br />
Why Change from Default Sett<strong>in</strong>gs: The group needs a name and a type assigned to it.<br />
This section covers Term<strong>in</strong>al Shadow Display Clients. Configure the Display Client by select<strong>in</strong>g<br />
Term<strong>in</strong>al Shadow from the Type of Display Client drop-down after nam<strong>in</strong>g the group.<br />
Select the Next button to cont<strong>in</strong>ue.<br />
Term<strong>in</strong>al Shadow Display Client –Display Client Options<br />
Importance of Page: This page allows the configuration of Display Client parameters<br />
Checkbox:<br />
Allow group to be tiled – If checked, this allows the Display Client to be tiled <strong>in</strong> SessionTil<strong>in</strong>g.<br />
See SessionTil<strong>in</strong>g Options for details.<br />
Allow Group to be moved (MultiMonitor) – If checked, this allows a Display Client to be moved<br />
from one MultiMonitor screen to another. See MultiMonitor for details.<br />
ACP Th<strong>in</strong>Manager <strong>6.0</strong> Display Clients 279
Include IP Camera Overlays –This will allow IP Camera overlays to be added to this Display<br />
Client.<br />
Always ma<strong>in</strong>ta<strong>in</strong> a connection – This keeps a session active, reconnect<strong>in</strong>g and restart<strong>in</strong>g if it is<br />
closed. If unchecked, the user can close a session and another session won’t start automatically.<br />
Connect at boot-up – If checked, the term<strong>in</strong>al will start a session for this Display Client at boot<br />
up. If unchecked, a user action is required to start the session.<br />
Disconnect <strong>in</strong> background – If checked, a Display Client be<strong>in</strong>g used <strong>in</strong> a MultiSession<br />
configuration will disconnect once it is moved <strong>in</strong>to the background. This could be done to require<br />
fewer resources.<br />
Why Change from Default Sett<strong>in</strong>gs: The Always ma<strong>in</strong>ta<strong>in</strong> a session for this group and Start a<br />
session at boot-up for this group checkboxes, if unselected, will lower the demand on the term<strong>in</strong>al<br />
servers by allow<strong>in</strong>g sessions to be closed until needed.<br />
Select Next to cont<strong>in</strong>ue, F<strong>in</strong>ish to save and close, or Cancel to close without sav<strong>in</strong>g.<br />
13.4.1.2 Term<strong>in</strong>al Shadow Display Client Page<br />
The Term<strong>in</strong>al Shadow Display Client page allows the selection of the term<strong>in</strong>al or term<strong>in</strong>als to be<br />
shadowed.<br />
Term<strong>in</strong>al Shadow Display Client – All Term<strong>in</strong>als Available<br />
280 Display Clients ACP Th<strong>in</strong>Manager <strong>6.0</strong>
Importance of Page: This page selects what term<strong>in</strong>als are available to be shadowed us<strong>in</strong>g Term<strong>in</strong>al-to-<br />
Term<strong>in</strong>al Shadow<strong>in</strong>g.<br />
Checkbox:<br />
All Term<strong>in</strong>als Available – This checkbox allows all term<strong>in</strong>als to be shadowed. Unselect it to limit<br />
Term<strong>in</strong>al-to-Term<strong>in</strong>al Shadow<strong>in</strong>g to specific term<strong>in</strong>als.<br />
Interactive Shadow – This checkbox allows <strong>in</strong>teractive shadow<strong>in</strong>g of the term<strong>in</strong>als.<br />
Fields:<br />
Term<strong>in</strong>al to Shadow – This list box shows the term<strong>in</strong>als available to shadow.<br />
Buttons:<br />
Add – This button adds term<strong>in</strong>als to the Term<strong>in</strong>al to Shadow list box when All Term<strong>in</strong>als<br />
Available is unselected.<br />
Delete – This button deletes a highlighted term<strong>in</strong>al from the Term<strong>in</strong>al to Shadow list box when<br />
All Term<strong>in</strong>als Available is unselected.<br />
Why Change from Default Sett<strong>in</strong>gs: The default sett<strong>in</strong>g grants permission to shadow all of the<br />
term<strong>in</strong>als. Unselect<strong>in</strong>g the All Term<strong>in</strong>als Available checkbox allows specific term<strong>in</strong>als to be added.<br />
Additionally, multiple shadow groups can be created, each with a specific term<strong>in</strong>al or group of term<strong>in</strong>als.<br />
By default the Shadow Group is configured to allow all term<strong>in</strong>als to be shadowed. Unselect<strong>in</strong>g the All<br />
Term<strong>in</strong>als Available checkbox will allow the designation of specific term<strong>in</strong>als.<br />
ACP Th<strong>in</strong>Manager <strong>6.0</strong> Display Clients 281
Term<strong>in</strong>al Shadow Display Client –Select Term<strong>in</strong>als<br />
Select the Add button to launch the term<strong>in</strong>al selection w<strong>in</strong>dow.<br />
282 Display Clients ACP Th<strong>in</strong>Manager <strong>6.0</strong>
Select Term<strong>in</strong>al or Group W<strong>in</strong>dow<br />
Select a term<strong>in</strong>al for shadow<strong>in</strong>g by highlight<strong>in</strong>g it <strong>in</strong> the Select Term<strong>in</strong>al or Group w<strong>in</strong>dow and select<strong>in</strong>g<br />
the OK button. The w<strong>in</strong>dow will close after each selection.<br />
To add multiple term<strong>in</strong>als repeat the process by select<strong>in</strong>g the Add button on the Term<strong>in</strong>al Shadow<br />
Display Client page.<br />
ACP Th<strong>in</strong>Manager <strong>6.0</strong> Display Clients 283
Term<strong>in</strong>al Shadow Display Client – Selected Term<strong>in</strong>als<br />
The Term<strong>in</strong>als to Shadow textbox will display the term<strong>in</strong>als added to the list.<br />
Term<strong>in</strong>al Selector<br />
284 Display Clients ACP Th<strong>in</strong>Manager <strong>6.0</strong>
When a term<strong>in</strong>al launches a Shadow Display Client that has multiple members a Select Term<strong>in</strong>al to<br />
Shadow w<strong>in</strong>dow will be displayed to allow the selection of the term<strong>in</strong>al to shadow. Highlight the desired<br />
term<strong>in</strong>al and select the OK button.<br />
13.4.1.3 Display Client List W<strong>in</strong>dow<br />
Available Display Clients<br />
After a Display Client is configured the Display Client List will show configured Display Clients.<br />
Additional groups can be configured by select<strong>in</strong>g the New Group button.<br />
The Display Client List wizard can be closed by select<strong>in</strong>g OK.<br />
ACP Th<strong>in</strong>Manager <strong>6.0</strong> Display Clients 285
14 Failover and Instant Failover<br />
14.1 Failover Introduction<br />
ACP uses specific terms to cover different topics that are concerned with keep<strong>in</strong>g data viable dur<strong>in</strong>g<br />
computer failure.<br />
Replacement: If a term<strong>in</strong>al fails or is destroyed, the session stays active on the term<strong>in</strong>al server while the<br />
th<strong>in</strong> client is replaced. This is covered <strong>in</strong> Add<strong>in</strong>g Th<strong>in</strong> Client Hardware.<br />
Failover: Failover is the ability to switch between multiple term<strong>in</strong>al servers if a term<strong>in</strong>al server fails. This<br />
is built <strong>in</strong> to every Th<strong>in</strong>Manager System and th<strong>in</strong> client. This is covered <strong>in</strong> Failover.<br />
Instant Failover: Instant Failover is the ability of th<strong>in</strong> clients to connect and log<strong>in</strong> to two term<strong>in</strong>al servers<br />
simultaneously. This allows applications to be pre-loaded so that a failure to one term<strong>in</strong>al server causes<br />
m<strong>in</strong>imal impact because the term<strong>in</strong>al will quickly switch to an exist<strong>in</strong>g session. This is covered <strong>in</strong> Instant<br />
Failover.<br />
Redundancy: Redundancy refers to multiple Th<strong>in</strong>Manager Servers. Th<strong>in</strong> clients are not dependent on<br />
Th<strong>in</strong>Manager after boot<strong>in</strong>g and will cont<strong>in</strong>ue to run if the Th<strong>in</strong>Manager Server fails. However, rebooted<br />
term<strong>in</strong>al will wait until the Th<strong>in</strong>Manager Server is restored until it boots and receives its configuration. For<br />
this reason many people use a backup, or Redundant Th<strong>in</strong>Manager Server. This is covered <strong>in</strong><br />
Redundancy Overview.<br />
14.2 Failover<br />
Th<strong>in</strong>Manager gives every th<strong>in</strong> client has the ability to switch between multiple term<strong>in</strong>al servers if a<br />
term<strong>in</strong>al server fails. Each th<strong>in</strong> client has a socket connection to its term<strong>in</strong>al servers. If the socket breaks<br />
the th<strong>in</strong> client will try to reconnect to the primary Term<strong>in</strong>al Server. If the term<strong>in</strong>al server fails to respond to<br />
the term<strong>in</strong>al, it will drop the broken connection and connect to a backup term<strong>in</strong>al server, allow<strong>in</strong>g it to<br />
cont<strong>in</strong>ue to function.<br />
Failover requires:<br />
Two or more term<strong>in</strong>al servers<br />
Identical Microsoft user accounts on each, or doma<strong>in</strong> permissions on both<br />
Identical applications on each, with the same path, to make life easier<br />
ACP Th<strong>in</strong>Manager <strong>6.0</strong><br />
286 Failover and Instant Failover
Failover Step 1 – Session on Primary Term<strong>in</strong>al Server<br />
The th<strong>in</strong> client is configured to use two or more term<strong>in</strong>al servers.<br />
Failover Step 2 – Primary Term<strong>in</strong>al Server Failure<br />
If the connection between the th<strong>in</strong> client and term<strong>in</strong>al server fails the th<strong>in</strong> client will retry the connection.<br />
ACP Th<strong>in</strong>Manager <strong>6.0</strong> Failover and Instant Failover 287
Failover Step 3 – Th<strong>in</strong> Client Automatically Switches to Secondary Term<strong>in</strong>al Server<br />
If the th<strong>in</strong> client cannot connect to the primary term<strong>in</strong>al server it will automatically switch to the next<br />
term<strong>in</strong>al server <strong>in</strong> the list, and start a new session.<br />
Failover Step 4 – Th<strong>in</strong> client has Session Runn<strong>in</strong>g on Secondary Term<strong>in</strong>al Server<br />
Once connected it will log<strong>in</strong> and launch the AppL<strong>in</strong>k application. Any runtime data will rema<strong>in</strong> constant<br />
s<strong>in</strong>ce both servers are draw<strong>in</strong>g the same runtime data from the production floor.<br />
Note: This does not synchronize the hard drives. Failover gives you the ability to cont<strong>in</strong>ue to run the th<strong>in</strong><br />
client by connect<strong>in</strong>g to a backup. Data pulled from an outside source like a PLC or file server would be<br />
the same on either term<strong>in</strong>al server.<br />
14.2.1 Failover Setup <strong>in</strong> Term<strong>in</strong>al Services Display Clients<br />
Failover is configured <strong>in</strong> the Display Client Configuration Wizard. Term<strong>in</strong>al Services Display Clients allow<br />
a term<strong>in</strong>al to run a session from a list of term<strong>in</strong>al servers. The Display Client will have Failover capability if<br />
two or more term<strong>in</strong>al servers added to it.<br />
Launch the Display Client Wizard by right click<strong>in</strong>g on the Display Clients branch <strong>in</strong> the tree. Alternatively,<br />
you can right click on an exist<strong>in</strong>g Term<strong>in</strong>al Services Display client <strong>in</strong> the tree and select Modify.<br />
288 Failover and Instant Failover ACP Th<strong>in</strong>Manager <strong>6.0</strong>
Display Client List<br />
Select the Add button to add a new Display Client, or highlight an exist<strong>in</strong>g Term<strong>in</strong>al Services Display<br />
Client and select the Edit button to edit an exist<strong>in</strong>g Display Client.<br />
Display Client Wizard – Display Client Members<br />
Member term<strong>in</strong>al servers are added on the Display Clients Members page. Add<strong>in</strong>g two or more term<strong>in</strong>al<br />
servers to the Selected Term<strong>in</strong>al Servers field will enable failover. The term<strong>in</strong>al will connect to the<br />
term<strong>in</strong>al servers <strong>in</strong> the order given, unless the Display Client is us<strong>in</strong>g SmartSession.<br />
ACP Th<strong>in</strong>Manager <strong>6.0</strong> Failover and Instant Failover 289
Term<strong>in</strong>al Services Display Client Options<br />
SmartSession uses the CPU usage, Memory usage, and the number of sessions on a term<strong>in</strong>al server to<br />
determ<strong>in</strong>e its load. Term<strong>in</strong>als us<strong>in</strong>g Term<strong>in</strong>al Services Display Clients with SmartSession will start a<br />
session on the server with the lightest load, <strong>in</strong>stead of the order listed.<br />
Select<strong>in</strong>g the SmartSession checkbox on the Display Client Options page of the Display Client<br />
Wizard configures SmartSession. When SmartSession is used the Enforce Primary checkbox is no<br />
longer relevant.<br />
290 Failover and Instant Failover ACP Th<strong>in</strong>Manager <strong>6.0</strong>
14.3 Instant Failover<br />
Every Th<strong>in</strong>Manager th<strong>in</strong> client can be configured to use basic failover. Detect<strong>in</strong>g that the primary server is<br />
down and connect<strong>in</strong>g to a backup server is usually achieved <strong>in</strong>10 to 20 seconds, depend<strong>in</strong>g on the<br />
monitor<strong>in</strong>g configuration. Some applications will need additional time to launch and <strong>in</strong>itialize the<br />
programs. Instant Failover was developed for people who need the session to switch to another term<strong>in</strong>al<br />
server and start runn<strong>in</strong>g immediately, without any delays for start<strong>in</strong>g the applications.<br />
When us<strong>in</strong>g Instant Failover, the th<strong>in</strong> client starts sessions on two servers at once. The sessions are<br />
cascaded on the th<strong>in</strong> client, with the primary session on top. If the primary term<strong>in</strong>al server fails, the<br />
preexist<strong>in</strong>g secondary session is switched to the forefront.<br />
Note: Use a Username, Password, and Initial Program to allow the th<strong>in</strong> client to log<strong>in</strong> automatically and<br />
start a program so that the background session is immediately ready and not need<strong>in</strong>g a log<strong>in</strong> and<br />
program launch.<br />
Instant Failover Step 1 – Session on Two Term<strong>in</strong>al Servers<br />
Instant Failover configures the th<strong>in</strong> client to make connections to two term<strong>in</strong>al servers for each AppL<strong>in</strong>k<br />
Display Client. These will be cascaded so only the primary session is shown. There is an optional hot key<br />
toggle available to allow toggl<strong>in</strong>g between sessions. See Hotkey Configuration for details.<br />
This allows the th<strong>in</strong> client to connect and <strong>in</strong>itialize a session on a backup server so you don’t have to wait<br />
for the session to load.<br />
ACP Th<strong>in</strong>Manager <strong>6.0</strong> Failover and Instant Failover 291
Instant Failover Step 2 – Primary Term<strong>in</strong>al Server Failure<br />
The th<strong>in</strong> client has a socket connection to each term<strong>in</strong>al server so it will quickly detect a term<strong>in</strong>al server<br />
failure.<br />
Instant Failover Step 3 – Switch<strong>in</strong>g to Backup Session on Secondary Term<strong>in</strong>al Server<br />
As soon as the th<strong>in</strong> client detects the failure of the primary term<strong>in</strong>al server the th<strong>in</strong> client will switch to the<br />
backup session and pull it to the foreground. S<strong>in</strong>ce the session is already <strong>in</strong>itialized you don’t have to wait<br />
for your control system to load.<br />
292 Failover and Instant Failover ACP Th<strong>in</strong>Manager <strong>6.0</strong>
Instant Failover Step 4 – Session on Secondary Term<strong>in</strong>al Server<br />
Instant Failover allows the th<strong>in</strong> client to use two active sessions to prevent downtime.<br />
Note: Instant Failover is free from Th<strong>in</strong>Manager but usually requires two application licenses s<strong>in</strong>ce you<br />
have two active sessions. Please see your application vendors for details on their licens<strong>in</strong>g policies.<br />
If three or more term<strong>in</strong>al servers are <strong>in</strong> the Selected Term<strong>in</strong>al Server list, the th<strong>in</strong> client will connect to a<br />
new backup to ensure that it has an active backup.<br />
If the Enforce Primary feature is used, the th<strong>in</strong> client will switch back to the primary once it is back<br />
onl<strong>in</strong>e.<br />
14.4 Instant Failover Configuration<br />
Instant Failover is configured as part of Term<strong>in</strong>al Services Display Clients Wizard.<br />
14.4.1 Instant Failover Setup <strong>in</strong> Term<strong>in</strong>al Services Display Clients<br />
Term<strong>in</strong>al Services Display Clients allow a term<strong>in</strong>al to run a session from a list of term<strong>in</strong>al servers. The<br />
Display Client will have Instant Failover capability if two or more term<strong>in</strong>al servers added to it and the<br />
Instant Failover option is selected. This is configured <strong>in</strong> the Term<strong>in</strong>al Services Display Client Wizard.<br />
Launch the Display Client Wizard by right click<strong>in</strong>g on the Display Clients branch <strong>in</strong> the tree. Alternatively,<br />
you can right click on an exist<strong>in</strong>g Term<strong>in</strong>al Services Display client <strong>in</strong> the tree and select Modify.<br />
ACP Th<strong>in</strong>Manager <strong>6.0</strong> Failover and Instant Failover 293
Display Client List<br />
Select the Add button to add a new Display Client, or highlight an exist<strong>in</strong>g Term<strong>in</strong>al Services Display<br />
Client and select the Edit button to edit an exist<strong>in</strong>g Display Client.<br />
294 Failover and Instant Failover ACP Th<strong>in</strong>Manager <strong>6.0</strong>
Display Client Wizard – Term<strong>in</strong>al Services and Workstations Options Page<br />
Select the Instant Failover check box on the Display Client Options page to enable <strong>in</strong>stant failover for<br />
the Display Client.<br />
Note: Do not use the Instant Failover Module when us<strong>in</strong>g Instant Failover with<strong>in</strong> a Display Client<br />
The Term<strong>in</strong>al Services Options page allows the configuration of other parameters <strong>in</strong> addition to the<br />
Instant Failover such as SmartSession and AppL<strong>in</strong>k. See Term<strong>in</strong>al Services Display Client Options for<br />
details.<br />
Each Term<strong>in</strong>al Services Display Client needs two or more term<strong>in</strong>al servers to get Instant Failover to<br />
function. This is done on the Display Clients Members page of the Display Client Wizard.<br />
Display Client Wizard – Display Client Members Page<br />
Select two or more term<strong>in</strong>al servers from the Available Term<strong>in</strong>al Servers list and move them to the<br />
Selected Term<strong>in</strong>al Servers list by highlight<strong>in</strong>g and double click<strong>in</strong>g, or by us<strong>in</strong>g the Arrow button.<br />
The th<strong>in</strong> client will start sessions on the top two term<strong>in</strong>al servers <strong>in</strong> the Select Term<strong>in</strong>al Server list, with<br />
the top term<strong>in</strong>al server as the primary and the second term<strong>in</strong>al server as the backup, unless<br />
SmartSession was chosen on the Group Options page.<br />
If more than two term<strong>in</strong>al servers are selected, the th<strong>in</strong> client will connect to the other term<strong>in</strong>al servers if<br />
one of the other term<strong>in</strong>al servers fails.<br />
ACP Th<strong>in</strong>Manager <strong>6.0</strong> Failover and Instant Failover 295
14.4.2 Switch<strong>in</strong>g Between Sessions with Display Clients<br />
Instant Failover can be configured to allow a user to toggle between the two <strong>in</strong>stant failover sessions<br />
when the th<strong>in</strong> client is us<strong>in</strong>g Display Clients by us<strong>in</strong>g a hotkey. To configure the hotkey run the Term<strong>in</strong>al<br />
Configuration Wizard for the term<strong>in</strong>al or term<strong>in</strong>al group that is us<strong>in</strong>g a Term<strong>in</strong>al Services Display Client<br />
with Instant Failover and proceed to the Hotkey Configuration page.<br />
Term<strong>in</strong>al Configuration Wizard – Hotkey Configuration Page<br />
When a th<strong>in</strong> client is us<strong>in</strong>g Term<strong>in</strong>al Services Display Clients, select<strong>in</strong>g the Enable Instant Failover<br />
Hotkeys check box will allow the user to switch between <strong>in</strong>stant failover sessions us<strong>in</strong>g the default CTL +<br />
F9 hot key.<br />
The default hotkey can be changed by select<strong>in</strong>g the upper Change Hotkeys button and launch<strong>in</strong>g the<br />
Select Hotkeys w<strong>in</strong>dows.<br />
Note: The hotkey will not work properly if Enforce Primary is selected as a Display Client option on the<br />
Term<strong>in</strong>al Services Options page. As soon as you try to switch to the backup the th<strong>in</strong> client will switch you<br />
back to the Primary Term<strong>in</strong>al Server. It is recommended that you uncheck the Enforce Primary option if<br />
you plan on us<strong>in</strong>g the Instant Failover hotkey.<br />
296 Failover and Instant Failover ACP Th<strong>in</strong>Manager <strong>6.0</strong>
Select Hotkeys W<strong>in</strong>dows<br />
The hot keys needed to switch between <strong>in</strong>stant failover sessions can be changed on the Select Hotkeys<br />
w<strong>in</strong>dow. Select the Control Key or Alt Key radio button and a function key from the drop down box and<br />
select the OK button to accept the changes.<br />
14.4.3 Instant Failover Tree Icons<br />
Under each Term<strong>in</strong>al are icons represent<strong>in</strong>g the Term<strong>in</strong>al Servers that they connect to. The lightn<strong>in</strong>g bolt<br />
color <strong>in</strong>dicated the connection status.<br />
Term<strong>in</strong>al Server Connection Icons<br />
A Red lightn<strong>in</strong>g bolt represents a lack of connection to the term<strong>in</strong>al server.<br />
A Green lightn<strong>in</strong>g bolt represents a connection to the term<strong>in</strong>al server with an active session.<br />
A Yellow lightn<strong>in</strong>g bolt represents a connection to the term<strong>in</strong>al server with an active session that is the<br />
backup <strong>in</strong> Instant Failover mode.<br />
ACP Th<strong>in</strong>Manager <strong>6.0</strong> Failover and Instant Failover 297
Instant Failover<br />
If a term<strong>in</strong>al that is configured for Instant Failover is expanded <strong>in</strong> the Th<strong>in</strong>Manager tree, the Primary<br />
Term<strong>in</strong>al Server should have a green lightn<strong>in</strong>g bolt, while the Secondary Term<strong>in</strong>al Server should have a<br />
yellow lightn<strong>in</strong>g bolt.<br />
In this example the primary session is on Green22 and it shows a green lightn<strong>in</strong>g bolt icon. Blue21 is the<br />
secondary session and has a yellow lightn<strong>in</strong>g bolt icon. Peach23 is the third server <strong>in</strong> the list and has a<br />
red lightn<strong>in</strong>g bolt icon. This means that it doesn’t have an active session but is available if server 1 or<br />
server 2 go offl<strong>in</strong>e.<br />
298 Failover and Instant Failover ACP Th<strong>in</strong>Manager <strong>6.0</strong>
15 Modules<br />
15.1 Module Overview<br />
Modules are software components that can be loaded to <strong>in</strong>crease or modify the functionality of the<br />
term<strong>in</strong>al. Modules <strong>in</strong>clude touch screen drivers, sound drivers, and special device drivers. Modules are<br />
<strong>in</strong>cluded with Th<strong>in</strong>Manager and are registered automatically dur<strong>in</strong>g Th<strong>in</strong>Manager <strong>in</strong>stallation. Updates to<br />
modules (primarily touch screens) are posted on the Th<strong>in</strong>Manager website for download and <strong>in</strong>stallation.<br />
Note: “Install<strong>in</strong>g a module” refers to the registration of the module with the Th<strong>in</strong>Manager Server, while<br />
“Add<strong>in</strong>g a module” refers to attach<strong>in</strong>g the module to a particular group or term<strong>in</strong>al.<br />
This section <strong>in</strong>cludes:<br />
A list of available Modules.<br />
Instructions on <strong>in</strong>stall<strong>in</strong>g and add<strong>in</strong>g Modules.<br />
Details on specific modules.<br />
Note: Certa<strong>in</strong> modules, like the video modules, do not need to be added to specific term<strong>in</strong>als but will be<br />
downloaded automatically <strong>in</strong> Th<strong>in</strong>Manager. These modules do have to be <strong>in</strong>stalled <strong>in</strong> Th<strong>in</strong>Manager to be<br />
available for the download to happen.<br />
These modules may need to be added to the term<strong>in</strong>al <strong>in</strong> older versions of Th<strong>in</strong>Manager that are us<strong>in</strong>g<br />
new firmware.<br />
15.1.1 Module List<br />
Th<strong>in</strong>Manager divides the modules <strong>in</strong>to a number of categories or types to make navigation of the module<br />
list easier. Although details on the specific modules will follow, the types and modules <strong>in</strong>clude:<br />
Note: Certa<strong>in</strong> modules are used <strong>in</strong> limited, specific cases and are considered advanced modules. These<br />
are marked with a (*). See Advanced Modules for details.<br />
ICA - See ICA Modules<br />
Citrix ICA UseAlternateAddress Module<br />
Citrix ICA wfclient.<strong>in</strong>i Extension Module<br />
Citrix Receiver Version 12 (Package 6 only)<br />
ICA Client Version <strong>6.0</strong> (*)<br />
ICA Client Version 8.0 (*)<br />
Keyboard – See Keyboard Modules<br />
ACP Th<strong>in</strong>Manager <strong>6.0</strong><br />
299 Modules
Key Block Module<br />
Key Block S<strong>in</strong>gle Key Module<br />
Keyboard Configuration Module<br />
Share Keyboard and Mouse Master Module<br />
Share Keyboard and Mouse Slave Module<br />
Local Storage - See Local Storage Modules<br />
USB Flash Drive Module<br />
USB Memory Card Reader Module (Package 5 only)<br />
Miscellaneous - See Miscellaneous Modules<br />
Add Serial Port<br />
Firmware Update Module (formerly the Disk On Chip / Compact Flash Update Module)<br />
Instant Failover Module (*) (Package 5 only)<br />
Local Pr<strong>in</strong>ter Module<br />
MultiMonitor Module (Package 5 only)<br />
MultiMonitor2 Module (Package 5 only)<br />
Redundant Ethernet Module<br />
Second Network Module<br />
Serial to TCP Module<br />
<strong>TM</strong>Term DLL Configuration Module<br />
Term<strong>in</strong>al Shadow Module<br />
TermMon ActiveX Configuration<br />
Time Zone Redirection Module<br />
User Override Module<br />
Mouse - See Mouse Modules<br />
Mouse Configuration<br />
PS/2 Mouse Configuration (Package 5 only)<br />
Serial Mouse Driver<br />
Share Keyboard and Mouse Master Module<br />
Share Keyboard and Mouse Slave Module<br />
RDP - See RDP Modules<br />
RDP Experience Module<br />
RDP Module for Th<strong>in</strong>Manager v2.4 and Older (Package 5 only)<br />
RDP Port Module<br />
RDP Serial Port Redirection Module<br />
RDP Session IP Module<br />
Screen Saver - See Screen Saver Modules<br />
300 Modules ACP Th<strong>in</strong>Manager <strong>6.0</strong>
MultiSession Screen Saver Module<br />
Screen Saver Module<br />
Sound - See Sound Modules<br />
AMD cs553x Sound Driver<br />
Intel 8x0 Sound Driver<br />
Intel HDA Sound Driver<br />
Universal Sound Driver<br />
VIA 82xx Sound Driver<br />
TermSecure - See TermSecure Modules<br />
RF Ideas pcProx Module<br />
RF Ideas pcProx USB Module<br />
TermMon ActiveX Configuration Module<br />
USB Flash Drive Module<br />
Wavetrend Tag Reader Module (Package 5 only)<br />
Touch Screen - See Touch Screen Modules<br />
Arista ARP-16XXXAP-ACP Touch Screen Driver<br />
CarrollTouch Touch Screen Driver<br />
Contec Touch Screen Driver (Package 5 only)<br />
DMC TSC Series Touch Screen Driver<br />
DMC Touch Screen Driver (Package 5 only)<br />
Dynapro Touch Screen Driver<br />
eGalax Touch Screen Driver<br />
Elographics Touch Screen Driver<br />
Gunze AHL Touch Screen Driver<br />
Hampshire TSHARC Touch Screen Driver<br />
MicroTouch Touch Screen Driver<br />
Panjit TouchSet Touch Screen Driver<br />
PenMount Touch Screen Driver<br />
Ronics Touch Screen Driver (Package 5 only)<br />
Touch Control Touch Screen Driver<br />
Touch International IR Touch Screen Driver (Package 5 only)<br />
USB Touch Screen Driver<br />
Xycom 33XX Touch Screen Driver (Package 5 only)<br />
Zytronic Touch Screen Driver<br />
Video Driver - See Video Driver Modules.<br />
Custom Video Mode Module<br />
ACP Th<strong>in</strong>Manager <strong>6.0</strong> Modules 301
Video2 Driver - See Video Driver Modules.<br />
Custom Video Mode Module<br />
(*) Denotes an advanced module See Advanced Modules for details.<br />
15.2 Install<strong>in</strong>g a Module<br />
Note: Modules will generally be <strong>in</strong>stalled by the firmware package. This section describes the process to<br />
add or update a s<strong>in</strong>gle module.<br />
Install<strong>in</strong>g a Module adds a new module to Th<strong>in</strong>Manager so that it is available to Term<strong>in</strong>al Groups and<br />
Term<strong>in</strong>als. To <strong>in</strong>stall a module, open the Modules w<strong>in</strong>dow by select<strong>in</strong>g Install > Modules from the<br />
Th<strong>in</strong>Manager menu bar to launch the Modules w<strong>in</strong>dow.<br />
Modules W<strong>in</strong>dow<br />
The Module w<strong>in</strong>dow shows all of the modules <strong>in</strong>stalled on the Th<strong>in</strong>Manager Server.<br />
302 Modules ACP Th<strong>in</strong>Manager <strong>6.0</strong>
Sorted Modules<br />
The <strong>in</strong>stalled modules can be sorted by us<strong>in</strong>g the Module Type and Package dropdown lists.<br />
To <strong>in</strong>stall additional modules select the Install Module button. This will launch a file browser w<strong>in</strong>dow.<br />
ACP Th<strong>in</strong>Manager <strong>6.0</strong> Modules 303
Module File Browser W<strong>in</strong>dow<br />
Browse to the new module, usually downloaded from the Th<strong>in</strong>Manager web site (www.th<strong>in</strong>manager.com).<br />
Highlight the new module, and select the Open button. This will add the new module to the list of<br />
modules.<br />
Select<strong>in</strong>g the Remove Module from All Term<strong>in</strong>als button will remove the highlighted module from all<br />
term<strong>in</strong>als. It does not un<strong>in</strong>stall the module from the Th<strong>in</strong>Manager Server; it just removes its use by all<br />
groups and term<strong>in</strong>als.<br />
Select the Done button to close the Modules w<strong>in</strong>dow.<br />
304 Modules ACP Th<strong>in</strong>Manager <strong>6.0</strong>
15.3 Add<strong>in</strong>g a Module to a Group or Term<strong>in</strong>al<br />
Modules are added to term<strong>in</strong>als or groups of term<strong>in</strong>als on the Module Selection page of the Term<strong>in</strong>al<br />
Configuration Wizard or the Term<strong>in</strong>al Group Configuration Wizard.<br />
Term<strong>in</strong>al Configuration Wizard - Module Selection<br />
To add a Module to a Term<strong>in</strong>al, select the Add… button to launch the Attach Module to Term<strong>in</strong>al<br />
w<strong>in</strong>dow.<br />
ACP Th<strong>in</strong>Manager <strong>6.0</strong> Modules 305
Attach Module to Term<strong>in</strong>al<br />
The Attach Module to Term<strong>in</strong>al w<strong>in</strong>dow will show the modules that are available to the term<strong>in</strong>al. The<br />
Module Type drop-down box sorts the modules by categories to make the modules easier to f<strong>in</strong>d.<br />
Highlight the desired module and select the OK button to add the module to the configuration.<br />
306 Modules ACP Th<strong>in</strong>Manager <strong>6.0</strong>
Term<strong>in</strong>al Configuration Wizard - Module Selection<br />
Term<strong>in</strong>als that are members of a Group may show icons to represent the properties of added modules.<br />
<br />
group level.<br />
The Group icon represents modules assigned at the<br />
<br />
<br />
The Group icon with a red slash through it <strong>in</strong>dicated that<br />
the module set at the group level that will not function with the selected package.<br />
No icon <strong>in</strong>dicates that the module was added to that<br />
particular Group or Term<strong>in</strong>al and not a parent Group.<br />
Note: Any module with a red slash through it will prevent the term<strong>in</strong>al from start<strong>in</strong>g a session.<br />
ACP Th<strong>in</strong>Manager <strong>6.0</strong> Modules 307
15.4 Chang<strong>in</strong>g Module Parameters<br />
Many modules have parameters that can be changed. With the new <strong>in</strong>heritance rules from Th<strong>in</strong>Manager<br />
3.0 module parameters can’t be changed for modules that are <strong>in</strong>herited from a parent group. Changes<br />
must be made at the level that the module was added.<br />
Module Configuration<br />
Highlight<strong>in</strong>g a module on the Module Selection page and select<strong>in</strong>g the Configure button will open the<br />
Module Properties w<strong>in</strong>dow and allow changes to the module configuration.<br />
308 Modules ACP Th<strong>in</strong>Manager <strong>6.0</strong>
Module Properties<br />
On the Modules Properties w<strong>in</strong>dow, select the parameter to change, select the new value <strong>in</strong> the dropdown<br />
list, and click the Set button. This will change the sett<strong>in</strong>g.<br />
The Set to Default button will restore the module to the default sett<strong>in</strong>gs.<br />
Note: The Set button must be selected to apply the change.<br />
Select the Done button to close the Module Properties w<strong>in</strong>dow and to return to the Group or Term<strong>in</strong>al<br />
Configuration Wizard.<br />
ACP Th<strong>in</strong>Manager <strong>6.0</strong> Modules 309
Module Icons <strong>in</strong> Th<strong>in</strong>Manager<br />
The status of the modules is displayed on the Modules tab of the Details pane of Th<strong>in</strong>Manager.<br />
310 Modules ACP Th<strong>in</strong>Manager <strong>6.0</strong>
15.4.1.1 Module Load<strong>in</strong>g Order<br />
Highlight<strong>in</strong>g a module and select<strong>in</strong>g the Move Up or Move Down button can change the order that the<br />
modules load.<br />
Module Load<strong>in</strong>g Order<br />
The load<strong>in</strong>g order of modules rarely needs to be adjusted.<br />
15.5 Individual Module Details<br />
Th<strong>in</strong>Manager divides the modules <strong>in</strong>to a number of categories or types to make navigation of the module<br />
list easier. The types and modules <strong>in</strong>clude ICA, Local Storage, Miscellaneous, Mouse, RDP, Screen<br />
Saver, Sound, TermSecure, Touch Screen, and Video.<br />
15.6 ICA Modules<br />
The ICA Modules are advanced modules for advanced users of the ICA client communication protocol.<br />
ACP Th<strong>in</strong>Manager <strong>6.0</strong> Modules 311
15.6.1 Citrix ICA UseAlternateAddress Module<br />
The Citrix ICA UseAlternateAddress Module is used by advance Citrix users to specify connections to<br />
Citrix Servers.<br />
Configuration <strong>in</strong>cludes Use Alternate Address, Browser Protocol, and HttpBrowser Addresses.<br />
15.6.2 Citrix ICA wfclient.<strong>in</strong>i Extension Module<br />
The Citrix ICA wfclient.<strong>in</strong>i Extension Module is used by advanced Citrix users. This module allows up<br />
to 8 str<strong>in</strong>gs of text to be added to the wfclient.exe for pass<strong>in</strong>g Citrix parameters.<br />
15.7 Keyboard Modules<br />
The Keyboard Modules are modules used to control or alter keyboard behavior.<br />
15.7.1 Key Block Module<br />
The Key Block module traps certa<strong>in</strong> keystrokes and prevents them from be<strong>in</strong>g sent to the term<strong>in</strong>al server<br />
for process<strong>in</strong>g.<br />
Key Block Module<br />
The key comb<strong>in</strong>ations to be blocked can be configured by <strong>in</strong> the Module Properties. To launch this,<br />
highlight the module on the Module Selection page and select the Configure button. A Module<br />
Properties dialog box will be displayed. Select the parameter to change <strong>in</strong> the Module Properties<br />
w<strong>in</strong>dow, select the Value <strong>in</strong> the dropdown box and click the Set button.<br />
The key comb<strong>in</strong>ations that have a value of YES will be blocked from reach<strong>in</strong>g the term<strong>in</strong>al server.<br />
312 Modules ACP Th<strong>in</strong>Manager <strong>6.0</strong>
15.7.2 Key Block S<strong>in</strong>gle Key Module<br />
The Key Block S<strong>in</strong>gle Key module traps specific <strong>in</strong>dividual keystrokes and prevents them from be<strong>in</strong>g sent<br />
to the term<strong>in</strong>al server for process<strong>in</strong>g.<br />
15.7.3 Keyboard Configuration Module<br />
The Keyboard Configuration Module allows key sett<strong>in</strong>gs on a keyboard attached to a th<strong>in</strong> client to be set.<br />
Keyboard Configuration Module Parameters<br />
The Keyboard Configuration parameters <strong>in</strong>clude:<br />
Num Lock State – This allows the Number Lock to be set to On at startup, Off at startup, always<br />
On, or always Off.<br />
Cap Lock State – This allows the Caps Lock to be set to On at startup, Off at startup, always<br />
On, or always Off.<br />
Scroll Lock State – This allows the Scroll Lock to be set to On at startup, Off at startup, always<br />
On, or always Off.<br />
Repeat Delay (ms) – This parameter sets the amount of time that a key needs to be held down<br />
before it starts repeat<strong>in</strong>g the keystroke. If this parameter is set to Disable a key will only send one<br />
keystroke even if the key is held down.<br />
Repeat Rate (char/sec) – This parameter sets the number of characters per second that a held<br />
down key will send.<br />
Disable Repeat for Enter Key – This parameter, when set to Yes, will prevent the Enter key<br />
from repeat<strong>in</strong>g if it is held down.<br />
Keyboard Layout – This parameter allows the th<strong>in</strong> client to use keyboards other than the default<br />
English (United States) keyboard map.<br />
ACP Th<strong>in</strong>Manager <strong>6.0</strong> Modules 313
15.8 Local Storage Modules<br />
The Local Storage modules allow the use of USB ports on th<strong>in</strong> clients. The USB ports are not active by<br />
default for security.<br />
15.8.1 USB Flash Drive Module<br />
The USB Flash Drive Module allows USB flash drives to connect to a term<strong>in</strong>al. The parameters <strong>in</strong>clude:<br />
USB Flash Drive Module Properties<br />
The USB Flash Drive Module has several parameters.<br />
Drive Access Rights <strong>in</strong> Session - ReadWrite allows the user to read and write to the flash<br />
drive. ReadOnly allows the user to read data but not write data, and None sets the flash drive to<br />
access only the unique serial number to make it usable as a TermSecure ID device.<br />
Use with TermSecure - This needs to be set to YES to allow the device to be a TermSecure<br />
identifier. A NO sett<strong>in</strong>g, <strong>in</strong> conjunction with a ReadWrite Access Rights sett<strong>in</strong>g, will allow the<br />
device to be used as a remote storage drive<br />
Allow <strong>Manual</strong> Log<strong>in</strong> - This value, when set to Yes, will allow a TermSecure user to log <strong>in</strong>to a<br />
term<strong>in</strong>al without a TermSecure ID device. If set to No, TermSecure users must use a TermSecure<br />
ID device to log <strong>in</strong>.<br />
Prompt for Password - This value, when set to Yes, will require a TermSecure User to enter<br />
their password for access, even if the password is configured <strong>in</strong> Th<strong>in</strong>Manager.<br />
314 Modules ACP Th<strong>in</strong>Manager <strong>6.0</strong>
15.8.2 USB Memory Card Reader Module<br />
The USB Memory Card Reader Module allows USB card readers to connect to a term<strong>in</strong>al. The<br />
parameters <strong>in</strong>clude:<br />
Number of Slots <strong>in</strong> Reader - This value sets the number of slots that the card reader uses.<br />
<br />
Read Only Access - This value, when set to Yes, will limit the user to read<strong>in</strong>g the card. This<br />
value, when set to No, will allow the user to read and write to the card.<br />
15.9 Miscellaneous Modules<br />
These are modules that don’t fit <strong>in</strong> other categories.<br />
15.9.1 Add Serial Port<br />
The Add Serial Port Module is only used to configure the serial ports of daughter boards that add<br />
additional serial ports to term<strong>in</strong>als. Add a module for each additional serial port. Each module will let the<br />
user configure one additional port.<br />
Port Number - This value is to be set to the port number of the new port.<br />
Port Address - This value is to be set to the port address of the new port.<br />
IRQ - This value is to be set to the IRQ of the new port.<br />
UART- This value is set to the chipset type for the new port.<br />
15.9.2 Firmware Update (Disk On Chip / Compact Flash) Update<br />
Module<br />
The Firmware Update is the new name for the Disk On Chip/Compact Flash Update module <strong>in</strong><br />
Th<strong>in</strong>Manager 3.1.<br />
ACP enables some models of term<strong>in</strong>als to store the firmware with Disk On Chip or Compact Flash<br />
storage so that the unit doesn’t have to download the entire firmware at boot but can boot locally and<br />
download just the configuration to save bandwidth. This is most commonly used with units that will<br />
connect over low bandwidth networks, like wireless networks or WANs. These units can use the Firmware<br />
Update module to download and flash new firmware when the firmware is updated <strong>in</strong> Th<strong>in</strong>Manager.<br />
The ability to update stored firmware term<strong>in</strong>als elim<strong>in</strong>ates the need to send the term<strong>in</strong>al back to the<br />
manufacturer to update the firmware.<br />
Note: The firmware download can vary, depend<strong>in</strong>g on the bandwidth of the connection and the size of the<br />
firmware update.<br />
It is recommended that updates be done over a wired LAN <strong>in</strong>stead of over a wireless connection, when<br />
possible.<br />
The Firmware Update module has two configurable parameters.<br />
Confirm at Term<strong>in</strong>al - This sett<strong>in</strong>g, if set to Yes, will prompt the operator to choose between<br />
immediately updat<strong>in</strong>g firmware or wait<strong>in</strong>g until the next boot up. If Confirm at Term<strong>in</strong>al is set to No,<br />
the firmware download will take place immediately.<br />
Force Update - Normally a stored firmware term<strong>in</strong>al with the Firmware Update module will check<br />
firmware version numbers at boot and only download a new firmware if the versions are different.<br />
This sett<strong>in</strong>g, if set to Yes, will force the term<strong>in</strong>al to always download the firmware for re-flash<strong>in</strong>g.<br />
ACP Th<strong>in</strong>Manager <strong>6.0</strong> Modules 315
Note: The module will download firmware when it detects a different firmware. S<strong>in</strong>ce this will only happen<br />
at the first reboot after updat<strong>in</strong>g the Th<strong>in</strong>Manager firmware, it is safe to leave this module added to<br />
term<strong>in</strong>als permanently when Force Update is set to No. It does not need to be added and removed each<br />
time the firmware is updated. However, s<strong>in</strong>ce it will update when the firmware is different, it will try to<br />
update the firmware if you boot it from a Th<strong>in</strong>Manager server with older firmware.<br />
15.9.2.1 Firmware Update Program<br />
Once the new firmware has downloaded, an update program will run on the term<strong>in</strong>al to rewrite the new<br />
firmware to the storage. The program will display a warn<strong>in</strong>g stat<strong>in</strong>g that the term<strong>in</strong>al must not be reset or<br />
powered off dur<strong>in</strong>g the process, usually around 30 seconds. Ignor<strong>in</strong>g the warn<strong>in</strong>g can corrupt the stored<br />
firmware, so it is important to leave the term<strong>in</strong>al alone for that period of time.<br />
Note: Heed the warn<strong>in</strong>g. The term<strong>in</strong>al must not be reset or powered off dur<strong>in</strong>g the brief period that the<br />
update program is writ<strong>in</strong>g the firmware to the firmware storage device.<br />
It is recommended that updates be done over a wired LAN <strong>in</strong>stead of over a wireless connection, when<br />
possible.<br />
15.9.2.2 Stored Firmware Term<strong>in</strong>al Configuration<br />
A stored firmware term<strong>in</strong>al loads the firmware locally before connect<strong>in</strong>g to the Th<strong>in</strong>Manager server. The<br />
stored firmware term<strong>in</strong>als have a setup program that allows configuration of the connection. Enter the<br />
program by select<strong>in</strong>g any key when Select any key to configure is displayed dur<strong>in</strong>g the boot process. A<br />
setup screen will be displayed.<br />
Th<strong>in</strong> Client Configuration Editor – Default Values<br />
The IP Address<strong>in</strong>g method is set to DHCP by default.<br />
316 Modules ACP Th<strong>in</strong>Manager <strong>6.0</strong>
Th<strong>in</strong> Client Configuration Editor – Chang<strong>in</strong>g Values<br />
To change a value, navigate with arrow keys to the desired property. Press<strong>in</strong>g the Enter key will allow the<br />
<strong>in</strong>put and acceptance of new values.<br />
Th<strong>in</strong> Client Configuration Editor – Static IP Addresses<br />
The changes may be saved or discarded before the boot process is resumed.<br />
15.9.3 Local Pr<strong>in</strong>t Module<br />
The Local Pr<strong>in</strong>t Module simplifies pr<strong>in</strong>t<strong>in</strong>g through the parallel port on th<strong>in</strong> clients.<br />
There are three steps:<br />
1. Install the pr<strong>in</strong>t driver on the term<strong>in</strong>al servers that the client will connect to.<br />
2. Add the Local Pr<strong>in</strong>t Module to the th<strong>in</strong> client as described <strong>in</strong> Add<strong>in</strong>g a Module to a Group or<br />
Term<strong>in</strong>al.<br />
3. Configure the Pr<strong>in</strong>t Driver Name parameter <strong>in</strong> the module to conta<strong>in</strong> the pr<strong>in</strong>t driver’s name.<br />
ACP Th<strong>in</strong>Manager <strong>6.0</strong> Modules 317
Local Pr<strong>in</strong>t Module Properties<br />
Pr<strong>in</strong>ter Driver Name - The Local Pr<strong>in</strong>t module works when the name of the pr<strong>in</strong>t driver is<br />
entered <strong>in</strong> the Value field for the Pr<strong>in</strong>ter Driver Name. The Pr<strong>in</strong>t Driver name is provided by<br />
the properties page for the pr<strong>in</strong>ter.<br />
The Pr<strong>in</strong>ter Property page for a pr<strong>in</strong>ter can be launched by select<strong>in</strong>g Start > Sett<strong>in</strong>gs > Pr<strong>in</strong>ters and<br />
select<strong>in</strong>g the appropriate pr<strong>in</strong>ter. This will launch the Pr<strong>in</strong>ter Queue w<strong>in</strong>dow.<br />
Pr<strong>in</strong>ter Queue w<strong>in</strong>dow<br />
Select Pr<strong>in</strong>ter > Properties to launch the Pr<strong>in</strong>ter Properties page.<br />
318 Modules ACP Th<strong>in</strong>Manager <strong>6.0</strong>
Advanced Pr<strong>in</strong>ter Properties<br />
The Pr<strong>in</strong>ter Property page shows the Pr<strong>in</strong>t Driver name on the Advanced tab. This is the name that<br />
needs to be entered <strong>in</strong>to the Local Pr<strong>in</strong>t Module.<br />
Note: When pr<strong>in</strong>t<strong>in</strong>g from the client, the pr<strong>in</strong>ter will be displayed as Pr<strong>in</strong>ter/username/session number.<br />
ACP Th<strong>in</strong>Manager <strong>6.0</strong> Modules 319
15.9.4 MultiMonitor Module<br />
MultiMonitor<br />
The MultiMonitor Module was <strong>in</strong>troduced to allow MultiMonitor capable th<strong>in</strong> clients to be configured for<br />
use with MultiMonitor before MultiMonitor was <strong>in</strong>tegrated <strong>in</strong>to Th<strong>in</strong>Manager 3.1.<br />
Note: This module provides primitive functionality compared to the <strong>in</strong>tegrated sett<strong>in</strong>gs of Th<strong>in</strong>Manager<br />
3.1+ and is no longer used.<br />
See MultiMonitor for details.<br />
15.9.5 Redundant Ethernet Module<br />
Some th<strong>in</strong> clients have two network ports. The Redundant Ethernet module allows the th<strong>in</strong> client to use<br />
both ports with a s<strong>in</strong>gle IP address and a s<strong>in</strong>gle MAC address.<br />
The th<strong>in</strong> client will use the primary (LAN1) port under normal conditions. If this port, cable, or switch fails,<br />
the Redundant Ethernet module will allow the th<strong>in</strong> client to activate and switch to the backup (LAN2) port<br />
<strong>in</strong> a seamless fashion.<br />
15.9.6 Second Network Module<br />
Some th<strong>in</strong> clients have two network ports. The Second Network module allows the th<strong>in</strong> client to use both<br />
ports on different networks.<br />
320 Modules ACP Th<strong>in</strong>Manager <strong>6.0</strong>
Second Network Module<br />
<br />
<br />
<br />
<br />
IP Method – This allows the second port to use DHCP or a static IP.<br />
IP Address (Static Only) – This allows the second port to be assigned a static IP address.<br />
NetMask (Static Only) – This allows the second port to be assigned a subnet mask.<br />
Router (Static Only) - This allows the second port to be assigned a router.<br />
15.9.7 Term<strong>in</strong>al Shadow Module<br />
This module needs to be <strong>in</strong>stalled <strong>in</strong> Th<strong>in</strong>Manager but is not applied to a term<strong>in</strong>al. A term<strong>in</strong>al will<br />
automatically download this module if it is needed.<br />
15.9.8 TermMon ActiveX Configuration Module<br />
This configures the TermMon ActiveX control that collects term<strong>in</strong>al <strong>in</strong><strong>format</strong>ion and can perform term<strong>in</strong>al<br />
functions. It is listed as both a Miscellaneous Module and a TermSecure Module but is described <strong>in</strong> the<br />
TermSecure section.<br />
See TermMon ActiveX Control for details.<br />
15.9.9 Term<strong>in</strong>al Shadow Module<br />
The Term<strong>in</strong>al Shadow module enables the Term<strong>in</strong>al-to-Term<strong>in</strong>al shadow<strong>in</strong>g feature that was added <strong>in</strong><br />
Th<strong>in</strong>Manager 3.2. This module isn’t added to a term<strong>in</strong>al but is automatically downloaded to term<strong>in</strong>als<br />
us<strong>in</strong>g term<strong>in</strong>al-to-term<strong>in</strong>al shadow<strong>in</strong>g. This term<strong>in</strong>al needs to be available on Th<strong>in</strong>Manager and is<br />
<strong>in</strong>stalled automatically to Th<strong>in</strong>Manager when Th<strong>in</strong>Manager 3.2+ is <strong>in</strong>stalled or Th<strong>in</strong>Manager is updated to<br />
v3.2+.<br />
ACP Th<strong>in</strong>Manager <strong>6.0</strong> Modules 321
15.9.10 Time Zone Redirection Module<br />
The Time Zone Redirection Module allows a term<strong>in</strong>al to display local time when it is connected to a<br />
term<strong>in</strong>al server <strong>in</strong> another time zone.<br />
Time Zone Module Properties<br />
Time Zone - This parameter can be highlighted to activate the Value drop-down that conta<strong>in</strong>s<br />
time zones. Select the Set button to accept the changes.<br />
W<strong>in</strong>dows term<strong>in</strong>al servers need to have time zone redirection allowed <strong>in</strong> the Group Policy Console.<br />
The Allow Time Zone Redirection policy is found under Local Computer Policy\Computer<br />
Configuration\Adm<strong>in</strong>istrative Templates\W<strong>in</strong>dows Components\Term<strong>in</strong>al Services\Client\Server<br />
data redirection folder for Server 2003 or Local Computer Policy\Computer<br />
Configuration\Adm<strong>in</strong>istrative Templates\W<strong>in</strong>dows Components\Term<strong>in</strong>al Services\Term<strong>in</strong>al<br />
Server\Device and Resource Redirection for Server 2008 of the Group Policy.<br />
Please see Microsoft documentation for <strong>in</strong><strong>format</strong>ion on Group Policy.<br />
15.9.11 User Override Module<br />
The User Override Module is a temporary module that allowed users of Th<strong>in</strong>Manager 3.1 to use the User<br />
Override function <strong>in</strong> Display Clients It is no longer needed <strong>in</strong> Th<strong>in</strong>Manager 3.2+.<br />
See Display Client Override for the current method of User Override.<br />
322 Modules ACP Th<strong>in</strong>Manager <strong>6.0</strong>
15.10 Mouse Modules<br />
15.10.1 Mouse Configuration Module<br />
The Mouse Configuration Module allows USB or PS/2 mice to be configured and allows the use of two<br />
mice. Configuration of mouse sett<strong>in</strong>gs <strong>in</strong>clude:<br />
<br />
<br />
<br />
<br />
Primary Mouse Type -This sett<strong>in</strong>g allows both a PS/2 mouse and USB mouse to be used on<br />
a term<strong>in</strong>al. This sett<strong>in</strong>g will def<strong>in</strong>e which mouse is considered the primary mouse.<br />
Mouse Protocol - This value allows the selection of different protocols used by the mouse.<br />
Scroll Mouse - The value, when set to Yes, allows a scroll mouse to function on a term<strong>in</strong>al.<br />
Acceleration Multiplier - This value allows the mouse movement to be slowed down or sped<br />
up.<br />
Acceleration Threshold (pixels) - This value is the number of pixels a mouse must move<br />
before the acceleration multiplier takes effect.<br />
Left Button – This will disable the left mouse button when set to Disabled.<br />
Right Button – This will disable the right mouse button when set to Disabled.<br />
Scroll Button – This will disable the scroll button when set to Disabled.<br />
Scroll Wheel – This will disable the scroll wheel when set to Disabled.<br />
These parameters can be changed by highlight<strong>in</strong>g the parameter and choos<strong>in</strong>g a new value <strong>in</strong> the Value<br />
dropdown box. Use the Set button to accept the new parameter value.<br />
Mouse Configuration Module<br />
Th<strong>in</strong>Manager supports USB mice. The Mouse Configuration Module allows configuration of USB mice.<br />
ACP Th<strong>in</strong>Manager <strong>6.0</strong> Modules 323
A th<strong>in</strong> client can have both a USB and a PS/2 mouse <strong>in</strong>stalled. This module allows the selection of the<br />
primary mouse when us<strong>in</strong>g two mice.<br />
15.10.2 PS/2 Mouse Module<br />
The PS/2 Mouse Module is the forerunner of the Mouse Configuration Module. It allows the chang<strong>in</strong>g of<br />
PS/2 sett<strong>in</strong>gs like mouse type, acceleration and threshold. All of these features are now available <strong>in</strong> the<br />
Mouse Configuration Module.<br />
Mouse Type -This value allows the selection of PS/2 or USB mouse type.<br />
Scroll Mouse - The value, when set to Yes, allows a scroll mouse to function on a term<strong>in</strong>al.<br />
Acceleration Multiplier - This value allows the mouse movement to be slowed down or sped up.<br />
Acceleration Threshold (pixels) - This value is the number of pixels a mouse must move before<br />
the acceleration multiplier takes effect.<br />
15.10.3 Serial Mouse Driver<br />
The Serial Mouse Driver allows a serial mouse to be used with th<strong>in</strong> clients.<br />
Serial Mouse Module<br />
Mouse Type - This value def<strong>in</strong>es what type of mouse is used.<br />
Serial Port – Set this value to the serial port number used for the mouse.<br />
15.10.4 Share Keyboard and Mouse Modules<br />
The Share Keyboard and Mouse module allows several th<strong>in</strong> clients to be controlled with a s<strong>in</strong>gle<br />
keyboard and mouse without the need of a KVM switch (Keyboard/Video/Mouse).<br />
324 Modules ACP Th<strong>in</strong>Manager <strong>6.0</strong>
The Share Keyboard and Mouse has a Master module that is added to the controll<strong>in</strong>g term<strong>in</strong>al, and a<br />
Slave module that is added to the dependent term<strong>in</strong>als.<br />
Shared Keyboard and Mouse Layout<br />
The Share Keyboard and Mouse can be used by plac<strong>in</strong>g several monitors connected to th<strong>in</strong> clients, sideby-side<br />
or top-to-bottom. The Share Keyboard and Mouse Master module is loaded on the center th<strong>in</strong><br />
client. This module is configured by add<strong>in</strong>g the IP addresses of the secondary slave th<strong>in</strong> clients. The<br />
other term<strong>in</strong>als receive the Share Keyboard and Mouse Slave module. Once the Share Keyboard<br />
and Mouse Master Module is added to a term<strong>in</strong>al, it can be configured by highlight<strong>in</strong>g it <strong>in</strong> the Installed<br />
Module w<strong>in</strong>dow and select<strong>in</strong>g the Configure button.<br />
Share Keyboard and Mouse Master Module Properties<br />
Left Term<strong>in</strong>al IP Address - Enter the correct IP address for the Slave term<strong>in</strong>al on the left of the<br />
master term<strong>in</strong>al, if used, and select the Set button.<br />
Right Term<strong>in</strong>al IP Address - Enter the correct IP address for the Slave term<strong>in</strong>al on the right of<br />
the master term<strong>in</strong>al, if used, and select the Set button.<br />
Top Term<strong>in</strong>al IP Address - Enter the correct IP address for the Slave term<strong>in</strong>al on the top of the<br />
master term<strong>in</strong>al, if used, and select the Set button.<br />
ACP Th<strong>in</strong>Manager <strong>6.0</strong> Modules 325
Bottom Term<strong>in</strong>al IP Address - Enter the correct IP address for the Slave term<strong>in</strong>al on the bottom<br />
of the master term<strong>in</strong>al, if used, and select the Set button.<br />
Allow Interactive Shadow of Master - Normally a term<strong>in</strong>al with the master module loaded is<br />
blocked from <strong>in</strong>teractive shadow. If you want to allow <strong>in</strong>teractive shadow<strong>in</strong>g on the master,<br />
highlight the Allow Interactive Shadow of Master parameter, select Yes from the Value dropdown,<br />
and select the Set button.<br />
The Share Keyboard and Mouse Slave module is loaded on the secondary th<strong>in</strong> clients us<strong>in</strong>g the same<br />
methods as other modules are loaded.<br />
Share Keyboard and Mouse Slave Module Properties<br />
Master IP Address - This sett<strong>in</strong>g allows the slave module to be configured to connect to a<br />
specified master by enter<strong>in</strong>g the IP address of the master term<strong>in</strong>al and select<strong>in</strong>g the Set<br />
button.<br />
Select the Done button when f<strong>in</strong>ished.<br />
Once the ACP Enabled th<strong>in</strong> clients are booted, the mouse on the master th<strong>in</strong> client can be moved<br />
seamlessly <strong>in</strong>to the other desktops. The keyboard will be active <strong>in</strong> whatever screen the mouse po<strong>in</strong>ter is<br />
on.<br />
This allows an operator to have control of several displays with only one keyboard and mouse. The<br />
mouse movement is seamless, allow<strong>in</strong>g access to displays without switch<strong>in</strong>g.<br />
Note: A Master Share Keyboard and Mouse session cannot be <strong>in</strong>teractively shadowed <strong>in</strong> Th<strong>in</strong>Manager<br />
unless it is configured to allow it.<br />
The keyboards and mice for the slave th<strong>in</strong> clients can be left attached but stowed away until a multi-user<br />
configuration is needed.<br />
326 Modules ACP Th<strong>in</strong>Manager <strong>6.0</strong>
The Share Keyboard and Mouse Master module is licensed for each master th<strong>in</strong> client. The Share<br />
Keyboard and Mouse Slave module is free. Each master module can have 1 to 4 slave units. Future<br />
releases will expand the number of slaves that the master can control.<br />
15.11 RDP Modules<br />
15.11.1 RDP Experience Module<br />
The RDP Experience Module allows a session connected to a W<strong>in</strong>dows 2003 term<strong>in</strong>al server with RDP to<br />
add features to the session.<br />
RDP Experience Module Parameters<br />
The RDP Experience Module parameters are:<br />
Allow Desktop Background - This sett<strong>in</strong>g, if set to Yes, will allow a term<strong>in</strong>al to show a desktop<br />
background.<br />
Show W<strong>in</strong>dow Contents While Dragg<strong>in</strong>g - This sett<strong>in</strong>g, if set to Yes, will allow a term<strong>in</strong>al to<br />
show w<strong>in</strong>dow contents while dragg<strong>in</strong>g.<br />
Allow Menu and W<strong>in</strong>dow Animation - This sett<strong>in</strong>g, if set to Yes, will allow a term<strong>in</strong>al to show<br />
w<strong>in</strong>dow and menu animations.<br />
Allow Themes - This sett<strong>in</strong>g, if set to Yes, will allow a term<strong>in</strong>al to show a desktop Theme.<br />
In order to use these features, they must be enabled by us<strong>in</strong>g the W<strong>in</strong>dows Group Policy Editor. See<br />
Microsoft documentation for details.<br />
ACP Th<strong>in</strong>Manager <strong>6.0</strong> Modules 327
15.11.2 RDP Module for Th<strong>in</strong>Manager v2.4 and Older<br />
The RDP Module for Th<strong>in</strong>Manager v2.4 and Older module is used to allow older versions of<br />
Th<strong>in</strong>Manager to use RDP.<br />
Th<strong>in</strong>Manager didn’t support RDP until the v2.4.1 release. Users with older versions of Th<strong>in</strong>Manager can<br />
use the RDP client communication protocol with older versions of Th<strong>in</strong>Manager by add<strong>in</strong>g the RDP<br />
Module for Th<strong>in</strong>Manager v2.4 and Older to the term<strong>in</strong>al and <strong>in</strong>stall<strong>in</strong>g a Th<strong>in</strong>Manager firmware that is<br />
v02.05.00 or later.<br />
15.11.3 RDP Port Module<br />
The RDP Port Module allows that port that RDP communicates to the term<strong>in</strong>al server to be changed from<br />
the default 3389 to another port.<br />
RDP Port Module Parameters<br />
The RDP Port Module allows the port that RDP uses to be changed from the default 3389.<br />
RDP Server Port Number (decimal) - Enter the new port number for RDP <strong>in</strong> this value.<br />
15.11.4 RDP Serial Port Redirection Module<br />
The serial ports on a th<strong>in</strong> client can be remapped by add<strong>in</strong>g the RDP Serial Port Redirection module to<br />
the th<strong>in</strong> client without additional configuration. Once the th<strong>in</strong> client is booted, the COM1 <strong>in</strong> the session will<br />
refer to the COM1 on the term<strong>in</strong>al, while the COM2 <strong>in</strong> the session will refer to the COM2 on the term<strong>in</strong>al.<br />
This function requires W<strong>in</strong>dows 2003 to work.<br />
Additionally the COM Port Mapp<strong>in</strong>g needs to be allowed. This is done on the Term<strong>in</strong>al Services<br />
Configuration Console. To open the Term<strong>in</strong>al Services Configuration Console <strong>in</strong> W<strong>in</strong>dows 2003 select<br />
Start > Adm<strong>in</strong>istrative Tools > Term<strong>in</strong>al Services Configuration.<br />
328 Modules ACP Th<strong>in</strong>Manager <strong>6.0</strong>
Term<strong>in</strong>al Services Configuration Console<br />
Launch the RDP-tcp Properties page by highlight<strong>in</strong>g the Connections folder <strong>in</strong> the tree pane and<br />
double-click<strong>in</strong>g the RDP-tcp <strong>in</strong> the right pane. This will launch the RDP-tcp Properties page.<br />
ACP Th<strong>in</strong>Manager <strong>6.0</strong> Modules 329
COM Port Mapp<strong>in</strong>g Allowed<br />
The Com port mapp<strong>in</strong>g checkbox must be unselected to allow the RDP Serial Port module to function<br />
on the W<strong>in</strong>dows 2003 term<strong>in</strong>al server.<br />
330 Modules ACP Th<strong>in</strong>Manager <strong>6.0</strong>
15.11.5 RDP Session IP Module<br />
The RDP Session IP Module allows a term<strong>in</strong>al to use an alias IP address for a specific Display Client<br />
session.<br />
RDP Session IP Module<br />
The RDP Session IP module has three sett<strong>in</strong>gs:<br />
Group Name – This specifies the Display Client to use.<br />
Session IP Address – This is the IP address to use as the alias.<br />
Session IP Address for Instant Failover – This is the IP address to use for a backup session it<br />
the Display Client is configured to use Instant Failover.<br />
ACP Th<strong>in</strong>Manager <strong>6.0</strong> Modules 331
15.12 Screen Saver Modules<br />
15.12.1 MultiSession Screen Saver Module<br />
The MultiSession Screen Saver Module is a screen saver for use on term<strong>in</strong>als configured with<br />
MultiSession. See MultiSession Overview for details.<br />
MultiSession Screen Saver Module Parameters<br />
The MultiSession Screen Saver Module has two modes. It can be set to cycle through the MultiSession<br />
w<strong>in</strong>dows when the term<strong>in</strong>al is <strong>in</strong>active, or it can be set to return to the ma<strong>in</strong> MultiSession screen when the<br />
term<strong>in</strong>al is <strong>in</strong>active.<br />
The parameters are:<br />
Mode - The Cyclic mode will switch between all active sessions on the term<strong>in</strong>al. The<br />
GotoFirstGroup mode will switch the term<strong>in</strong>al to the ma<strong>in</strong> session when it is <strong>in</strong>active.<br />
Start Delay Time <strong>in</strong> secs - This is the number of seconds of <strong>in</strong>activity that the term<strong>in</strong>al will allow<br />
before start<strong>in</strong>g the screen saver.<br />
Switch Interval <strong>in</strong> secs (Cyclic only) - This is the number of seconds that the term<strong>in</strong>al will<br />
display each session when us<strong>in</strong>g the Cyclic mode.<br />
332 Modules ACP Th<strong>in</strong>Manager <strong>6.0</strong>
15.12.2 Screen Saver Module<br />
Screen Saver Module is a module that loads a screen saver on the client. The screen saver will run<br />
when the term<strong>in</strong>al is idle to protect the monitor. S<strong>in</strong>ce the screen saver runs on the client, it saves CPU<br />
resources on the term<strong>in</strong>al server.<br />
Screen Saver on Th<strong>in</strong> Client<br />
ACP Th<strong>in</strong>Manager <strong>6.0</strong> Modules 333
Screen Saver Module Parameters<br />
The Screen Saver Module configuration <strong>in</strong>cludes:<br />
Screen Saver - the graphic that is displayed when the screen saver is active.<br />
Wait Time <strong>in</strong> M<strong>in</strong>utes - the length of time that the term<strong>in</strong>al needs to be idle before the screen<br />
saver starts.<br />
Use Disable Time Period - the screen saver can be set to be disabled or unavailable dur<strong>in</strong>g a<br />
time block. This could be used to prevent the screen saver from runn<strong>in</strong>g dur<strong>in</strong>g normal bus<strong>in</strong>ess<br />
hours.<br />
Disable Start Time (0-23) - This sets the start of the disabled time block. 0 is Midnight<br />
and 23 is 11:00 p.m.<br />
Disable End Time (0-23) - This sets the end of the disabled time block. 0 is Midnight and<br />
23 is 11:00 p.m.<br />
Force Off when Start Hour is Reached - If set to Yes, this will turn the screen saver off<br />
when the Disable End Time is reached.<br />
15.13 Sound Modules<br />
The use of sound from a th<strong>in</strong> client requires four th<strong>in</strong>gs:<br />
Hardware with a L<strong>in</strong>e Out/Speaker plug<br />
Amplified speaker(s)<br />
The Universal Sound Driver Module<br />
334 Modules ACP Th<strong>in</strong>Manager <strong>6.0</strong>
Either W<strong>in</strong>dows RDP Session or Citrix server-side software.<br />
Plug the speaker(s) <strong>in</strong>to the L<strong>in</strong>e Out plug on the term<strong>in</strong>al, add the module, and connect to the term<strong>in</strong>al<br />
server.<br />
Th<strong>in</strong>Manager 4.1 simplifies sound by provid<strong>in</strong>g a Universal Sound Driver Module. This module can be<br />
added to any th<strong>in</strong> client that has an audio jack to enable sound.<br />
Note: Some th<strong>in</strong> clients, like the Advantech PCM-5820, may require that a sound harness be plugged<br />
<strong>in</strong>to the motherboard.<br />
Universal Sound Driver Parameters<br />
These Sound modules have several sett<strong>in</strong>gs:<br />
Audio Bandwidth (ICA Only) - This parameter can be set to Low, Medium, or High bandwidth<br />
when us<strong>in</strong>g Citrix ICA.<br />
Sound <strong>in</strong> Session - This sett<strong>in</strong>g, when set to Enabled, will allow sound generated with<strong>in</strong> the<br />
session to be played through the term<strong>in</strong>al. When this is set to Disabled the session sounds will be<br />
turned off but system sounds will still be generated dur<strong>in</strong>g TermSecure log<strong>in</strong> for audio feedback<br />
dur<strong>in</strong>g the log<strong>in</strong> process.<br />
Term<strong>in</strong>al Sound Effects - This sett<strong>in</strong>g, when set to Enabled, will allow term<strong>in</strong>al sound effects<br />
like TermSecure log<strong>in</strong> sounds on the term<strong>in</strong>al.<br />
ACP Th<strong>in</strong>Manager <strong>6.0</strong> Modules 335
15.14 TermSecure Modules<br />
15.14.1 RF Ideas pcProx Module<br />
Note: Th<strong>in</strong>Manager supports the RFIdeas pcProx Enroll Series 81 readers (Serial: RDR-xx81AKx).<br />
The RF Ideas pcProx Module uses a serial device that allows a term<strong>in</strong>al to use RF Ideas pcProx cards<br />
as TermSecure ID cards<br />
RF Ideas pcProx Module Parameters<br />
. The parameters are:<br />
Port - This selects the port that the RF Ideas pcProx card reader is <strong>in</strong>stalled.<br />
Number of Data Bits – Different cards use different numbers of data bits <strong>in</strong> their <strong>format</strong>. This<br />
sets the number of data bits to match that used by the card as an identifier. The choices are 26, 37,<br />
or Raw.<br />
Use Facility Code - This value, when set to Yes, will require the addition of the card’s Facility<br />
Code to the Card / Badge ID number.<br />
Allow <strong>Manual</strong> Log<strong>in</strong> - This, when set to Yes, will allow a TermSecure user to log <strong>in</strong>to a term<strong>in</strong>al<br />
without a TermSecure ID device. If set to No, TermSecure users must use a TermSecure ID device to<br />
log <strong>in</strong>.<br />
Prompt for Password - This, when set to Yes, will require a TermSecure to enter their password<br />
for access, even if the password is configured <strong>in</strong> Th<strong>in</strong>Manager.<br />
336 Modules ACP Th<strong>in</strong>Manager <strong>6.0</strong>
Zero Pad Facility Code and ID – This will add a zero to the number str<strong>in</strong>g. This is rarely needed.<br />
See Card and Badge Configuration for a TermSecure User for details.<br />
15.14.2 RF Ideas pcProx USB Module<br />
Note: Th<strong>in</strong>Manager supports the RFIdeas pcProx Enroll Series 81 readers (USB: RDR-xx81AKU).<br />
The RF Ideas pcProx USB Module uses a USB device that allows a term<strong>in</strong>al to use RF Ideas pcProx<br />
cards as TermSecure ID cards<br />
RF Ideas pcProx USB Module Parameters<br />
. The parameters are:<br />
Mode – This allows the device to be used <strong>in</strong> TermSecure Mode or Wedge mode. The Wedge<br />
mode sends data straight to the session as a keyboard wedge.<br />
Allow <strong>Manual</strong> TermSecure Log<strong>in</strong> - This, when set to Yes, will allow a TermSecure user to log<br />
<strong>in</strong>to a term<strong>in</strong>al without a TermSecure ID device. If set to No, TermSecure users must use a<br />
TermSecure ID device to log <strong>in</strong>.<br />
Prompt for TermSecure Password - This, when set to Yes, will require a TermSecure to enter<br />
their password for access, even if the password is configured <strong>in</strong> Th<strong>in</strong>Manager.<br />
See Card and Badge Configuration for a TermSecure User for details.<br />
15.14.3 TermMon ActiveX Configuration<br />
This configures the TermMon ActiveX control that collects term<strong>in</strong>al <strong>in</strong><strong>format</strong>ion and can perform term<strong>in</strong>al<br />
functions.<br />
ACP Th<strong>in</strong>Manager <strong>6.0</strong> Modules 337
TermMon ActiveX Module Parameters<br />
Normally the TermMon ActiveX, when registered on a term<strong>in</strong>al server, allows a term<strong>in</strong>al server session to<br />
communicate with its term<strong>in</strong>al and act upon it without the need of the TermMon ActiveX module. The<br />
TermMon ActiveX module can be added to the term<strong>in</strong>al configuration to either deny the default term<strong>in</strong>al<br />
server to term<strong>in</strong>al access or to allow access to other sessions and PCs.<br />
Allow ActiveX Connections - This value, when set to Yes, will allow the ActiveX control to<br />
function. Sett<strong>in</strong>g this value to No will prevent any ActiveX communication to the term<strong>in</strong>al, <strong>in</strong>clud<strong>in</strong>g<br />
the default term<strong>in</strong>al server to term<strong>in</strong>al access.<br />
Only Allow Connections from Session - This value, when set to Yes, will allow other term<strong>in</strong>al<br />
server sessions and PCs to communicate to the term<strong>in</strong>al with the ActiveX functions. If set to No, the<br />
only communication allowed is between the term<strong>in</strong>al and a session on the term<strong>in</strong>al server belong<strong>in</strong>g<br />
to the term<strong>in</strong>al, provid<strong>in</strong>g that the Allow ActiveX Connections is set to Yes.<br />
See TermMon ActiveX Control for details.<br />
15.14.4 USB Flash Drive Module<br />
The USB Flash Drive Module can be used to allow USB flash drives to be used as TermSecure ID<br />
devices. It is also listed under Local Storage modules.<br />
See USB Flash Drive Module <strong>in</strong> the Local Storage Modules for details.<br />
15.14.5 Wavetrend Tag Reader<br />
The Wavetrend Tag Reader Module allows a term<strong>in</strong>al to use Wavetrend RFID cards as TermSecure ID<br />
cards. This allows a user to log<strong>in</strong> through TermSecure when they approach the term<strong>in</strong>al and logs them<br />
out when they leave the area. The distance required to log<strong>in</strong> and log out are configurable <strong>in</strong> the module.<br />
338 Modules ACP Th<strong>in</strong>Manager <strong>6.0</strong>
Wavetrend Tag Reader Module Parameters<br />
The parameters are:<br />
Port - The WaveTrend Tag Reader Module connects to a th<strong>in</strong> client through the serial port. The Port<br />
sett<strong>in</strong>g specifies which COM Port the reader is attached to.<br />
Use Vendor Code - This, if set to YES, <strong>in</strong>cludes the vendor code as part of the identifier number.<br />
Allow <strong>Manual</strong> Log<strong>in</strong> - If set to YES, this allows a TermSecure User to use the hotkey to <strong>in</strong>itiate log<strong>in</strong>s, or<br />
the device. If set to NO, it will force a TermSecure User to use a device to log<strong>in</strong>.<br />
Prompt for Password - NO allows the device to log<strong>in</strong> without a password. YES forces every TermSecure<br />
User to enter a password after us<strong>in</strong>g the device.<br />
Entry Signal Strength - The signal strength required to register the card as <strong>in</strong> range.<br />
Exit Signal Strength - The signal strength required to register the card as out of range.<br />
Entry Sensitivity - The number of reads above the Entry Signal Strength reads that are required to<br />
register as “Entered”.<br />
Exit Sensitivity - The number of reads below the Exit Signal Strength that are required to register as<br />
“Exited”.<br />
15.15 Touch Screen Modules<br />
Arista ARP-16XXXAP-ACP Touch Screen Driver<br />
CarrollTouch Touch Screen Driver<br />
Contec Touch Screen Driver<br />
DMC TSC Series Touch Screen Driver<br />
ACP Th<strong>in</strong>Manager <strong>6.0</strong> Modules 339
DMC Touch Screen Driver<br />
Dynapro Touch Screen Driver<br />
Elographics Touch Screen Driver<br />
Gunze AHL Touch Screen Driver<br />
Hampshire TSHARC Touch Screen Driver<br />
MicroTouch Touch Screen Driver<br />
Panjit TouchSet Touch Screen Driver<br />
PenMount Touch Screen Driver<br />
Ronics Touch Screen Driver<br />
Touch Control Touch Screen Driver<br />
Touch International IR Touch Screen Driver<br />
USB Touch Screen Driver<br />
Xycom 33XX Touch Screen Driver<br />
Touch Screen Parameters<br />
Some, but not all, touch screen modules have parameters that can be modified. These may <strong>in</strong>clude:<br />
Connection<br />
Connection Type – Sets whether the touch screen uses Serial or USB to connect.<br />
Port or Port (Serial Only) – Sets the COM port that a serial touch screen is connected to.<br />
Baud Rate - Sets the speed used for communication between the term<strong>in</strong>al and the touch screen<br />
on some serial touch screens.<br />
340 Modules ACP Th<strong>in</strong>Manager <strong>6.0</strong>
Monitor Number – Used to specify which monitor <strong>in</strong> a MultiMonitor scheme will use for the touch<br />
screen. MultiMonitor th<strong>in</strong> clients with multiple touch screens will need a module loaded for each touch<br />
screen used.<br />
Controller Type - Sets the model of touch screen controller on some touch screens.<br />
Calibration<br />
Number of Calibration Po<strong>in</strong>ts – This sets the number of calibration po<strong>in</strong>ts that the calibration<br />
program uses dur<strong>in</strong>g the calibration process.<br />
Calibration Marg<strong>in</strong> Percentage – This sets the distance from the edge of the screen that the<br />
calibration po<strong>in</strong>ts are displayed.<br />
Calibration Hotkey – This allows a function key to be set as a hotkey so that the calibration can<br />
be launched from a keyboard.<br />
Calibration Hotkey Modifier– This sett<strong>in</strong>g adds CTL or ALT to the hotkey to launch the<br />
calibration from the keyboard, if desired.<br />
Calibration Touch Down Time (seconds) – This sett<strong>in</strong>g, when enabled, will launch the<br />
calibration program when the screen is touched and held for the assigned number of seconds. This<br />
cannot be used with the Right Click Hold Time.<br />
Calibration (entered automatically) – This is set automatically by mach<strong>in</strong>e. These are the<br />
values set dur<strong>in</strong>g the calibration process.<br />
Orientation (entered automatically) - This is set automatically by mach<strong>in</strong>e. Used at the direction<br />
of Tech Support <strong>in</strong> error correction.<br />
Swap XY Coord<strong>in</strong>ates – If X and Y are reversed, this sett<strong>in</strong>g will correct the orientation.<br />
Touch Sett<strong>in</strong>gs<br />
Double Touch Area (pixels) – This sets the size of the area that a second touch will register as<br />
a double touch.<br />
Double Touch Time (milliseconds) - The amount of time between touches that qualifies as a<br />
double touch.<br />
Touch De-Bounce Timeout - a time <strong>in</strong>terval used to prevent a s<strong>in</strong>gle touch from be<strong>in</strong>g registered<br />
as multiple touches.<br />
Right Click<br />
Right Click Hold Time (milliseconds) - This sett<strong>in</strong>g, when enabled, will treat a touch that is held<br />
for the assigned number of seconds as a Right Click of the mouse. This cannot be used with the<br />
Calibration Touch Down Time.<br />
Right Click Area (pixels) - This sets the size of the area that a second touch will register as a<br />
right click.<br />
15.15.1 USB Touch Screen Driver Module<br />
The USB Touch Screen Driver Module is designed to be used by any touch screen that uses a USB<br />
connection to the th<strong>in</strong> client.<br />
ACP Th<strong>in</strong>Manager <strong>6.0</strong> Modules 341
15.16 Video Driver Modules<br />
The method of download<strong>in</strong>g video drivers was changed <strong>in</strong> Th<strong>in</strong>Manager 3.0. In previous versions all of<br />
the video drivers were conta<strong>in</strong>ed <strong>in</strong> the firmware and were downloaded at boot. In v3.0 the video was split<br />
out of the firmware and each th<strong>in</strong> client will only download the video driver that it needs.<br />
One does not need to add the video module to the term<strong>in</strong>al but only needs to have the video module<br />
<strong>in</strong>stalled <strong>in</strong> Th<strong>in</strong>Manager to make it available. As each term<strong>in</strong>al connects to Th<strong>in</strong>Manager it will download<br />
the correct module.<br />
These modules are normally <strong>in</strong>stalled with Th<strong>in</strong>Manager. See Install<strong>in</strong>g a Module to see how to update or<br />
add new modules.<br />
Note: Users with Th<strong>in</strong>Manager 2.6 and earlier may need to add the <strong>in</strong>dividual video module to the<br />
term<strong>in</strong>al if us<strong>in</strong>g certa<strong>in</strong> models of th<strong>in</strong> clients. This doesn’t apply to Th<strong>in</strong>Manager 3.0 and later.<br />
See http://www.th<strong>in</strong>manager.com/support/downloads.shtml for details.<br />
15.17 Advanced Modules<br />
Advanced Modules are modules that are rarely used because they address a limited specific issue and<br />
are not needed <strong>in</strong> normal configurations. These <strong>in</strong>clude the Core Video Modules, Legacy Video Module,<br />
ICA Client Modules, and Instant Failover Module.<br />
These modules are hidden unless the Show Advanced Module checkbox is selected on the Attach<br />
Modules to Term<strong>in</strong>als w<strong>in</strong>dow.<br />
Advanced Module -Instant Failover<br />
15.17.1 ICA Client Version <strong>6.0</strong>/8.0/Citrix Receiver Version 12<br />
The ICA Client Module Client Version 8.0 is a module is not added to term<strong>in</strong>als but needs to be<br />
<strong>in</strong>stalled <strong>in</strong> Th<strong>in</strong>Manager for term<strong>in</strong>als us<strong>in</strong>g the ICA protocol. If a term<strong>in</strong>al is configured to use the ICA<br />
client communication protocol on the Term<strong>in</strong>al Server Specification page of the Term<strong>in</strong>al<br />
Configuration Wizard, the term<strong>in</strong>al will automatically download the v8.0 module to enable ICA<br />
functionality.<br />
342 Modules ACP Th<strong>in</strong>Manager <strong>6.0</strong>
If a user wants to use the <strong>6.0</strong> version of the ICA protocol they will need to add the ICA Client Module<br />
Client Version <strong>6.0</strong> to the term<strong>in</strong>al.<br />
15.17.2 Instant Failover Module<br />
The Instant Failover Module is to be used only with term<strong>in</strong>al configurations that use the legacy<br />
“Individual Term<strong>in</strong>al Servers” method <strong>in</strong>stead of the preferred Display Clients method.<br />
S<strong>in</strong>ce the use of Display Clients is a preferred method of gett<strong>in</strong>g term<strong>in</strong>al services sessions over us<strong>in</strong>g the<br />
legacy “Individual Term<strong>in</strong>al Servers” the module is hidden from view unless the Show Advanced Modules<br />
checkbox is selected.<br />
Instant Failover allows a term<strong>in</strong>al to connect to a session on two term<strong>in</strong>al servers. Both sessions are<br />
active but only one is displayed. If the first term<strong>in</strong>al server fails, the second session is immediately<br />
displayed, elim<strong>in</strong>at<strong>in</strong>g any downtime due to term<strong>in</strong>al server failure. See Instant Failover for details.<br />
Note: The Instant Failover Module is only used with term<strong>in</strong>als us<strong>in</strong>g Individual Term<strong>in</strong>al Servers. (See<br />
Term<strong>in</strong>al Server Specification Page).<br />
Term<strong>in</strong>als us<strong>in</strong>g Display Clients use a checkbox to enable Instant Failover. (See Instant Failover with<br />
Term<strong>in</strong>al Services Display Clients).<br />
Do not use this module while us<strong>in</strong>g Display Clients.<br />
The Instant Failover function requires an Instant Failover license for each term<strong>in</strong>al that uses it.<br />
15.17.2.1 Instant Failover Configuration When Us<strong>in</strong>g Individual Term<strong>in</strong>al<br />
Servers<br />
The th<strong>in</strong> client cascades both sessions, with the primary <strong>in</strong> front. You cannot see the secondary session<br />
as it is hidden <strong>in</strong> back. There is an option that allows one to switch between sessions with a hot key.<br />
Instant Failover Module Properties<br />
ACP Th<strong>in</strong>Manager <strong>6.0</strong> Modules 343
Hot Key Session Switch<strong>in</strong>g - If this parameter is set to Enabled, the hot key comb<strong>in</strong>ation will<br />
allow the toggl<strong>in</strong>g between sessions.<br />
Hotkey Comb<strong>in</strong>ation is CTRL+ - The value of the hot key is defaulted to CTRL+F9 but can be<br />
assigned to any function key.<br />
15.17.2.2 Advanced Video Modules<br />
The Core Video Module, Core Video2 Module, and Legacy Video Module do not need to be added to a<br />
term<strong>in</strong>al but need to be <strong>in</strong>stalled <strong>in</strong> Th<strong>in</strong>Manager. The term<strong>in</strong>al will download it if needed. These modules<br />
are <strong>in</strong>stalled dur<strong>in</strong>g Th<strong>in</strong>Manager <strong>in</strong>stallation so should not be a concern.<br />
344 Modules ACP Th<strong>in</strong>Manager <strong>6.0</strong>
16 Citrix ICA<br />
ACP Th<strong>in</strong>Manager supports two client/server communication protocols, the Microsoft© RDP and the Citrix<br />
ICA. Term<strong>in</strong>als and Display Clients can be configured to use one or the other with a simple radio button.<br />
16.1 Term<strong>in</strong>als Us<strong>in</strong>g Display Clients with ICA<br />
If a term<strong>in</strong>al is us<strong>in</strong>g the display clients to receive applications then Term<strong>in</strong>al Services Display Clients can<br />
be configured to use the ICA protocol. These display clients will show up <strong>in</strong> the Available Display Clients<br />
list on the Display Client Selection Page.<br />
ACP Th<strong>in</strong>Manager <strong>6.0</strong><br />
345 Citrix ICA
Term<strong>in</strong>al Us<strong>in</strong>g Display Clients and ICA Display Clients<br />
Select the desired Display Clients from the Available Display Clients list and move them to the Selected<br />
Display Clients list. The term<strong>in</strong>al will use the Display Clients selected, both RDP and ICA.<br />
16.2 Display Client Configuration Wizard<br />
A Display Client can be configured to use the ICA protocol on the Term<strong>in</strong>al Services Display Client<br />
Type page of the Display Client Configuration Wizard.<br />
Term<strong>in</strong>al Services Display Client Type Page<br />
Importance of Page: Configures the Display Client to use the Citrix ICA Protocol<br />
Sett<strong>in</strong>gs:<br />
Citrix ICA Servers – This allows the Display Client to use the Citrix ICA as its protocol.<br />
Citrix Device Services Servers – This allows the Display Client to use archaic Device Services<br />
Servers.<br />
Remote Desktop Protocol Servers – This uses the default Microsoft © RDP as its protocol.<br />
Why Change from Default Sett<strong>in</strong>gs: You need to select the Citrix ICA Servers to use the ICA protocol.<br />
Select Next to cont<strong>in</strong>ue.<br />
346 Citrix ICA ACP Th<strong>in</strong>Manager <strong>6.0</strong>
16.2.1.1 Citrix ICA Page<br />
Citrix ICA Page<br />
Importance of Page: Configures the Citrix Sett<strong>in</strong>gs<br />
Sett<strong>in</strong>gs:<br />
Encryption Level – This drop-down sets the Citrix encryption level.<br />
Fields:<br />
ICA Browser Address – Enter<strong>in</strong>g the ICA browser address aids <strong>in</strong> connection across routers,<br />
subnets, and doma<strong>in</strong>s.<br />
Enter the name of a Published Application - This field allows the desired published application<br />
to be designated when the Use a Citrix Published Application checkbox is selected.<br />
Checkbox:<br />
Use a Citrix Published Application – This checkbox, if selected, will allow usage of Citrix<br />
Published Applications to deploy programs to the th<strong>in</strong> client.<br />
Why Change from Default Sett<strong>in</strong>gs: Check the Use a Citrix Published Application checkbox and<br />
enter the published application <strong>in</strong> the Enter the name of a Published Application field to use an ICA<br />
published app.<br />
This f<strong>in</strong>ishes the wizard, gray<strong>in</strong>g out the Next button and activat<strong>in</strong>g the F<strong>in</strong>ish button.<br />
ACP Th<strong>in</strong>Manager <strong>6.0</strong> Citrix ICA 347
Note: Published Application should have a cont<strong>in</strong>uous name and not conta<strong>in</strong> spaces.<br />
If the Display Client is us<strong>in</strong>g a Citrix Published Application the wizard will f<strong>in</strong>ish with this page.<br />
If the Display Client is not us<strong>in</strong>g Citrix Published Application the wizard will cont<strong>in</strong>ue to allow the selection<br />
of Term<strong>in</strong>al Servers that are configured to use the ICA protocol. See the Term<strong>in</strong>al Server Capabilities<br />
Page for details.<br />
16.2.2 Term<strong>in</strong>al Us<strong>in</strong>g Citrix and Individual Term<strong>in</strong>al Servers<br />
The Term<strong>in</strong>al Connection Type page of the Term<strong>in</strong>al Configuration Wizard allows the selection of the<br />
desired Client Communication Protocol on term<strong>in</strong>als is us<strong>in</strong>g the legacy “Individual Term<strong>in</strong>al Servers”<br />
<strong>in</strong>stead of the preferred Display Client method.<br />
Term<strong>in</strong>al Configuration Wizard - Connection Type<br />
Select the Citrix ICA radio button to use the ICA protocol.<br />
Once the Citrix ICA protocol is selected the wizard will display the Citrix ICA Configuration page.<br />
348 Citrix ICA ACP Th<strong>in</strong>Manager <strong>6.0</strong>
16.2.2.1 Citrix ICA Configuration Page<br />
Term<strong>in</strong>al Configuration Wizard - Citrix ICA Configuration<br />
Importance of Page: Sets the ICA encryption Level and enables use of Published Applications.<br />
Fields:<br />
Encryption - The Encryption drop-down box sets the level of Citrix encryption.<br />
Buttons:<br />
Are you us<strong>in</strong>g Published Applications – This allows the usage of Citrix Published Applications<br />
for deploy<strong>in</strong>g programs.<br />
Why Change from Default Sett<strong>in</strong>gs: Citrix ICA has a feature called Published Applications. If you are<br />
us<strong>in</strong>g Published Applications, select the Yes radio button, then select the Next button to cont<strong>in</strong>ue to the<br />
Citrix Published Application dialog.<br />
If you are not us<strong>in</strong>g Published Applications, select the No radio button, then select the Next button to<br />
cont<strong>in</strong>ue to the Term<strong>in</strong>al Server Selection page.<br />
ACP Th<strong>in</strong>Manager <strong>6.0</strong> Citrix ICA 349
16.2.2.2 Citrix Published Applications Page<br />
Term<strong>in</strong>al Configuration Wizard - Citrix Published Applications<br />
Importance of Page: Def<strong>in</strong>es what Citrix published application to have the term<strong>in</strong>al<br />
Fields:<br />
Published Application Name – Enter the name of the desired published app you wish to run.<br />
ICA Browser – Enter the ICA master browser name, if needed.<br />
Why Change from Default Sett<strong>in</strong>gs: Allows use of a published application.<br />
Enter the name of the desired Published Applications <strong>in</strong> the Published Applications Name field. Do not<br />
use spaces <strong>in</strong> the name when creat<strong>in</strong>g a Published Application for Term<strong>in</strong>al Services.<br />
Citrix uses ICA Browsers as part of the system. Because the ICA client may have problems detect<strong>in</strong>g an<br />
ICA browser across a router or switch, an ICA Browser field is provided for enter<strong>in</strong>g the name of an ICA<br />
browser.<br />
Select the F<strong>in</strong>ish button to create the Term<strong>in</strong>al, or select the Next button to rejo<strong>in</strong> the ma<strong>in</strong> configuration<br />
path to configure more options.<br />
Term<strong>in</strong>als us<strong>in</strong>g the Select Individual Term<strong>in</strong>al Servers will be shown the Term<strong>in</strong>al Server Selection<br />
page where the desired term<strong>in</strong>al servers can be selected.<br />
350 Citrix ICA ACP Th<strong>in</strong>Manager <strong>6.0</strong>
17 Hotkeys<br />
Th<strong>in</strong>Manager provides hotkeys for switch<strong>in</strong>g between Display Clients, <strong>in</strong>itiat<strong>in</strong>g SessionTil<strong>in</strong>g, and other<br />
functions.<br />
17.1 Term<strong>in</strong>al Configuration Wizard Hotkeys Display<br />
Clients<br />
The Term<strong>in</strong>al Configuration Wizard has several hotkeys that can be configured<br />
ACP Th<strong>in</strong>Manager <strong>6.0</strong><br />
351 Hotkeys
17.1.1.1 Term<strong>in</strong>al Interface Options Hotkeys<br />
Term<strong>in</strong>al Interface Options Page<br />
A term<strong>in</strong>al us<strong>in</strong>g multiple Display Clients will need to have a method to switch between sessions. This is<br />
configured on the Term<strong>in</strong>al Interface Options page.<br />
Group Selector Options allow on-screen switch<strong>in</strong>g of sessions.<br />
<br />
<br />
<br />
Show Group Selector on Term<strong>in</strong>al - This checkbox, if selected, will display an on-screen dropdown<br />
menu that can be activated by mouse.<br />
Enable Til<strong>in</strong>g – This checkbox, when selected, allows the Display Clients to be tiled on the<br />
monitor to provide an overview of all the sessions at once. See SessionTil<strong>in</strong>g Options for details.<br />
Screen Edge Group Selection - This checkbox, if selected, will activate a feature that will switch<br />
w<strong>in</strong>dows if the mouse is moved off screen.<br />
The Selector Options button will launch the Group Selector Options w<strong>in</strong>dow that allows configuration<br />
of the on-screen Group Selector bar.<br />
352 Hotkeys ACP Th<strong>in</strong>Manager <strong>6.0</strong>
Group Selector Options W<strong>in</strong>dow<br />
The Group Selector Options w<strong>in</strong>dow has several sett<strong>in</strong>gs.<br />
The Auto-hide Group Selector checkbox will hide the Group Selector until the mouse is moved<br />
to that space.<br />
The Tile on Group Selector activation checkbox, when selected, will tile the Display Clients<br />
when the auto-hid selector is chosen. This allows the user to select from the available sessions.<br />
The Group Selector Menu Size drop-down box allows the sett<strong>in</strong>g of the size of the Group<br />
Selector font.<br />
Select the OK button to accept changes or the Cancel button to close.<br />
17.1.1.2 SessionTil<strong>in</strong>g Options<br />
Select<strong>in</strong>g the Enable Til<strong>in</strong>g checkbox on the Term<strong>in</strong>al Interface Options page of the Term<strong>in</strong>al<br />
Configuration wizard will allow the sessions to be tiled for selection.<br />
Tiled Sessions on a Term<strong>in</strong>al<br />
Once the sessions are tiled the session selection can be made by:<br />
Us<strong>in</strong>g the Group Selector, if selected on the Term<strong>in</strong>al Interface Options page.<br />
ACP Th<strong>in</strong>Manager <strong>6.0</strong> Hotkeys 353
Click<strong>in</strong>g on the desired session if the Tile Interactive checkbox is unselected on the Tile<br />
Options page.<br />
Right click<strong>in</strong>g on the desired session if the Tile on right click (mouse or touchscreen)<br />
checkbox is unselected on the Tile Options page.<br />
The Til<strong>in</strong>g Options button will launch the Group Selector Options w<strong>in</strong>dow that allows configuration of<br />
the on-screen Group Selector bar.<br />
Tile Options<br />
The Tile Options w<strong>in</strong>dow has several sett<strong>in</strong>gs.<br />
Show Grid – This checkbox, when selected, will show the tiled sessions <strong>in</strong> a grid with each grid<br />
labeled with the session name as while the session is load<strong>in</strong>g.<br />
Tile Inactivity Time – This field sets the length of time that the term<strong>in</strong>al screen will stay focused<br />
on a selected session before revert<strong>in</strong>g back to a tiled state due to <strong>in</strong>activity.<br />
Tile Display Clients at startup – This checkbox, when selected, will show the sessions tiled<br />
when the term<strong>in</strong>al first connects to its sessions.<br />
Include Ma<strong>in</strong> Menu as tile – This checkbox, when selected, will <strong>in</strong>clude a session display<strong>in</strong>g the<br />
TermSecure Ma<strong>in</strong> Menu.<br />
Tile on Right click (mouse or touchscreen) - This checkbox, when selected, will <strong>in</strong>itiate til<strong>in</strong>g<br />
when a session is right clicked.<br />
Tile Interactive – This checkbox, when selected, will allow a user to click <strong>in</strong>to a tiled session and<br />
control it <strong>in</strong>teractively without switch<strong>in</strong>g focus to a s<strong>in</strong>gle session. To focus on a s<strong>in</strong>gle session<br />
use the Group Selector Dropdown or the til<strong>in</strong>g hotkey (CTL + T), if enabled.<br />
Select the OK button to accept changes or the Cancel button to close.<br />
354 Hotkeys ACP Th<strong>in</strong>Manager <strong>6.0</strong>
17.1.1.3 Hotkey Configuration<br />
Hotkey Configuration Page<br />
Term<strong>in</strong>al Hotkeys on the Hotkey Configuration page allows the selection of keyboard comb<strong>in</strong>ations<br />
that allow switch<strong>in</strong>g between sessions.<br />
<br />
<br />
<br />
Enable Instant Failover Hotkeys - This checkbox, if selected, allows the hot key switch<strong>in</strong>g<br />
between the two active sessions of a Display Client that is us<strong>in</strong>g Instant Failover.<br />
Enable Group Hotkeys - This checkbox, if selected, allows the hot key switch<strong>in</strong>g between<br />
different sessions of a term<strong>in</strong>al us<strong>in</strong>g MultiSession.<br />
Enable Til<strong>in</strong>g Hotkey – This checkbox, if selected, allows SessionTil<strong>in</strong>g to be activated by a<br />
hotkey comb<strong>in</strong>ation.<br />
Select<strong>in</strong>g the Change Hotkeys button when Enable Instant Failover Hotkeys is selected will allow the<br />
hotkeys to be changed from the default.<br />
ACP Th<strong>in</strong>Manager <strong>6.0</strong> Hotkeys 355
Select Instant Failover Hotkeys<br />
The default hotkey for Instant Failover switch<strong>in</strong>g is set to Control+F9. This can be changed by select<strong>in</strong>g<br />
the Alt Key radio button or us<strong>in</strong>g the drop-down to select another function key.<br />
Select<strong>in</strong>g the Change Hotkeys button when Enable Group Hotkeys is selected will allow the<br />
MultiSession switch<strong>in</strong>g hotkeys to be changed from the default.<br />
Select MultiSession Switch<strong>in</strong>g Hotkeys<br />
The default hotkey for MultiSession switch<strong>in</strong>g is set to Control+Page Up and Control+Page Down. This<br />
can be changed by select<strong>in</strong>g the Alt Key radio button or us<strong>in</strong>g the drop-down to select another hot key.<br />
Select<strong>in</strong>g the Change Hotkeys button when Enable Til<strong>in</strong>g Hotkeys is selected will allow the hotkeys to<br />
be changed from the default.<br />
356 Hotkeys ACP Th<strong>in</strong>Manager <strong>6.0</strong>
Select SessionTil<strong>in</strong>g Hotkeys<br />
The default hotkey for SessionTil<strong>in</strong>g activation is set to Control+t. This can be changed by select<strong>in</strong>g the<br />
Alt Key radio button or us<strong>in</strong>g the drop-down to select another hot key.<br />
Select the OK button to cont<strong>in</strong>ue or the Cancel button to close without accept<strong>in</strong>g changes.<br />
ACP Th<strong>in</strong>Manager <strong>6.0</strong> Hotkeys 357
17.1.1.4 TermSecure Hotkeys<br />
When the Enable TermSecure checkbox is checked on the Term<strong>in</strong>al Server Specification page<br />
additional TermSecure functionality is enabled to access to the ma<strong>in</strong> menu for logg<strong>in</strong>g <strong>in</strong>to TermSecure.<br />
Term<strong>in</strong>al Interface Options – TermSecure Enabled<br />
The Term<strong>in</strong>al Interface Options page will display the Show Ma<strong>in</strong> Menu on Group Selector checkbox.<br />
The Ma<strong>in</strong> Menu Options button will launch a w<strong>in</strong>dow for Ma<strong>in</strong> Menu sett<strong>in</strong>gs.<br />
Ma<strong>in</strong> Menu Options<br />
358 Hotkeys ACP Th<strong>in</strong>Manager <strong>6.0</strong>
The Ma<strong>in</strong> Menu Options w<strong>in</strong>dow has several sett<strong>in</strong>gs.<br />
Allow reboot/restart – This checkbox, if selected, will add a Reboot and a Restart button on the<br />
ma<strong>in</strong> TermSecure log<strong>in</strong> w<strong>in</strong>dow.<br />
The Show Ma<strong>in</strong> Menu on Group Selector, when selected, will add the ma<strong>in</strong> TermSecure menu<br />
as an option on the Group Selector dropdown.<br />
Show Virtual Keyboard – This checkbox, if selected, will prompt the display of a virtual keyboard<br />
for TermSecure log<strong>in</strong>s. This is helpful for th<strong>in</strong> clients with touch screens.<br />
Select OK to save sett<strong>in</strong>g or Cancel to close without sav<strong>in</strong>g.<br />
The Hotkey Configuration page has an additional TermSecure sett<strong>in</strong>g when the Enable TermSecure<br />
checkbox is checked on the Term<strong>in</strong>al Server Specification page.<br />
Hotkey Configuration – TermSecure Enabled<br />
The Enable Ma<strong>in</strong> Menu Hotkey checkbox, when selected, will allow the TermSecure Ma<strong>in</strong> Menu to be<br />
launched with a hotkey comb<strong>in</strong>ation. The Change Hotkey button allows the default CTL+m comb<strong>in</strong>ation<br />
to be changed.<br />
ACP Th<strong>in</strong>Manager <strong>6.0</strong> Hotkeys 359
Select HotKeys W<strong>in</strong>dow for Ma<strong>in</strong> Menu<br />
The default hotkey for the Ma<strong>in</strong> Menu is set to Control+m. This can be changed by select<strong>in</strong>g the Alt Key<br />
radio button or us<strong>in</strong>g the drop-down to select another hot key.<br />
Select the OK button to cont<strong>in</strong>ue or the Cancel button to close without accept<strong>in</strong>g changes.<br />
TermSecure is covered more thoroughly at TermSecure User Configuration Wizard.<br />
360 Hotkeys ACP Th<strong>in</strong>Manager <strong>6.0</strong>
18 Multiple Monitors<br />
18.1 Introduction to Multiple Monitors<br />
ACP Th<strong>in</strong>Manager has two methods of provid<strong>in</strong>g multiple monitors <strong>in</strong> a th<strong>in</strong> client system - the Share<br />
Keyboard and Mouse method and the MultiMonitor method.<br />
The Share Keyboard and Mouse module allows several th<strong>in</strong> clients, each with a s<strong>in</strong>gle video port, to be<br />
controlled with a s<strong>in</strong>gle keyboard and mouse without the need of a KVM switch (Keyboard/Video/Mouse).<br />
The Share Keyboard and Mouse system ties several desktops together with a common mouse and<br />
keyboard so that the user has <strong>in</strong>creased real estate under their control. Because each screen is still an<br />
<strong>in</strong>dependent desktop, programs don't need to be rewritten <strong>in</strong> a new resolution for a larger desktop.<br />
Instead, one would run the normal sized application on each of the desktops, allow<strong>in</strong>g the operator to<br />
view different w<strong>in</strong>dows on different monitors.<br />
See Share Keyboard and Mouse Modules for details on deployment.<br />
The MultiMonitor method uses specific th<strong>in</strong> clients that have multiple video ports built <strong>in</strong>to the hardware.<br />
Each MultiMonitor th<strong>in</strong> client can have from two to five monitors attached. These monitors can be<br />
configured to merge <strong>in</strong>to an expanded desktop (called “spanned” by ACP) or can display <strong>in</strong>dividual<br />
desktops (called “screened” by ACP), or comb<strong>in</strong>ations of “spanned” and “screened” sessions.<br />
W<strong>in</strong><strong>TM</strong>C now supports MultiMonitor if the PC has W<strong>in</strong>dows runn<strong>in</strong>g on multiple video cards.<br />
See MultiMonitor for details on deployment.<br />
18.2 Share Keyboard and Mouse Modules<br />
The Share Keyboard and Mouse module allows several th<strong>in</strong> clients to be controlled with a s<strong>in</strong>gle<br />
keyboard and mouse without the need of a KVM switch (Keyboard/Video/Mouse).<br />
The Share Keyboard and Mouse has a Master module that is added to the controll<strong>in</strong>g term<strong>in</strong>al, and a<br />
Slave module that is added to the dependent term<strong>in</strong>als.<br />
ACP Th<strong>in</strong>Manager <strong>6.0</strong><br />
361 Multiple Monitors
Shared Keyboard and Mouse Layout<br />
The Share Keyboard and Mouse can be used by plac<strong>in</strong>g several monitors connected to th<strong>in</strong> clients, sideby-side<br />
or top-to-bottom. The Share Keyboard and Mouse Master module is loaded on the center th<strong>in</strong><br />
client. This module is configured by add<strong>in</strong>g the IP addresses of the secondary slave th<strong>in</strong> clients. The<br />
other term<strong>in</strong>als receive the Share Keyboard and Mouse Slave module.<br />
Share Keyboard and Mouse Master Module<br />
Once the Share Keyboard and Mouse Master Module is added to a term<strong>in</strong>al, it can be configured by<br />
highlight<strong>in</strong>g it <strong>in</strong> the Installed Module w<strong>in</strong>dow and select<strong>in</strong>g the Configure button.<br />
362 Multiple Monitors ACP Th<strong>in</strong>Manager <strong>6.0</strong>
Share Keyboard and Mouse Master Module Properties<br />
Left Term<strong>in</strong>al IP Address - Enter the correct IP address for the Slave term<strong>in</strong>al on the left of the<br />
master term<strong>in</strong>al, if used, and select the Set button.<br />
Right Term<strong>in</strong>al IP Address - Enter the correct IP address for the Slave term<strong>in</strong>al on the right of<br />
the master term<strong>in</strong>al, if used, and select the Set button.<br />
Top Term<strong>in</strong>al IP Address - Enter the correct IP address for the Slave term<strong>in</strong>al on the top of the<br />
master term<strong>in</strong>al, if used, and select the Set button.<br />
Bottom Term<strong>in</strong>al IP Address - Enter the correct IP address for the Slave term<strong>in</strong>al on the bottom<br />
of the master term<strong>in</strong>al, if used, and select the Set button.<br />
Allow Interactive Shadow of Master - Normally a term<strong>in</strong>al with the master module loaded is<br />
blocked from <strong>in</strong>teractive shadow. If you want to allow <strong>in</strong>teractive shadow<strong>in</strong>g on the master, highlight<br />
the Allow Interactive Shadow of Master parameter, select Yes from the Value drop-down, and<br />
select the Set button.<br />
The Share Keyboard and Mouse Slave module is loaded on the secondary th<strong>in</strong> clients us<strong>in</strong>g the same<br />
methods as other modules are loaded.<br />
ACP Th<strong>in</strong>Manager <strong>6.0</strong> Multiple Monitors 363
Share Keyboard and Mouse Slave Module Properties<br />
Master IP Address - This sett<strong>in</strong>g allows the slave module to be configured to connect to a<br />
specified master by enter<strong>in</strong>g the IP address of the master term<strong>in</strong>al, and select<strong>in</strong>g the Set button.<br />
Select the Done button when f<strong>in</strong>ished.<br />
Once the ACP Enabled th<strong>in</strong> clients are booted, the mouse on the master th<strong>in</strong> client can be moved<br />
seamlessly <strong>in</strong>to the other desktops. The keyboard will be active <strong>in</strong> whatever screen the mouse po<strong>in</strong>ter is<br />
on.<br />
This allows an operator to have control of several displays with only one keyboard and mouse. The<br />
mouse movement is seamless, allow<strong>in</strong>g access to displays without switch<strong>in</strong>g.<br />
Note: A Master Share Keyboard and Mouse session cannot be <strong>in</strong>teractively shadowed <strong>in</strong> Th<strong>in</strong>Manager<br />
unless it is configured to allow it.<br />
The keyboards and mice for the slave th<strong>in</strong> clients can be left attached, but stowed away until a multi-user<br />
configuration is needed.<br />
The Share Keyboard and Mouse Master module is licensed for each master th<strong>in</strong> client. The Share<br />
Keyboard and Mouse Slave module is free. Each master module can have 1 to 4 slave units.<br />
364 Multiple Monitors ACP Th<strong>in</strong>Manager <strong>6.0</strong>
18.3 MultiMonitor<br />
MultiMonitor is configured <strong>in</strong> the Term<strong>in</strong>al Configuration Wizard or the Group Configuration Wizard.<br />
18.3.1.1 MultiMonitor Hardware Specification<br />
MultiMonitor – Term<strong>in</strong>al Hardware<br />
MultiMonitor configuration is <strong>in</strong>itiated <strong>in</strong> the Term<strong>in</strong>al Configuration Wizard when a MultiMonitor-capable<br />
th<strong>in</strong> client is selected on the Term<strong>in</strong>al Hardware page.<br />
Select the Next button to cont<strong>in</strong>ue.<br />
ACP Th<strong>in</strong>Manager <strong>6.0</strong> Multiple Monitors 365
MultiMonitor – Enable MultiMonitor<br />
MultiMonitor requires the use of Display Clients. Once the Use Display Clients checkbox is selected on<br />
the Term<strong>in</strong>al Server Specification page the Enable MultiMonitor checkbox becomes visible.<br />
Select the Use Display Clients and the Enable MultiMonitor checkboxes, and then select the Next<br />
button.<br />
Note: W<strong>in</strong><strong>TM</strong>C now supports MultiMonitor if the PC has W<strong>in</strong>dows runn<strong>in</strong>g on multiple video cards.<br />
Select<strong>in</strong>g the Enable MultiMonitor checkbox will allow you to configure a W<strong>in</strong><strong>TM</strong>C client for MultiMonitor<br />
use.<br />
Select the Next button to cont<strong>in</strong>ue.<br />
366 Multiple Monitors ACP Th<strong>in</strong>Manager <strong>6.0</strong>
18.3.1.2 MultiMonitor Monitor Configuration<br />
MultiMonitor – Video Sett<strong>in</strong>gs<br />
The MultiMonitor Video Sett<strong>in</strong>g allows the user to choose how many monitors will be connected to the<br />
MultiMonitor th<strong>in</strong> client us<strong>in</strong>g the Number of Monitors radio button.<br />
The Color Depth dropdown allows the color depth to be set for all the monitors.<br />
The Resolution and Refresh Rate can be set for each monitor us<strong>in</strong>g the dropdowns.<br />
ACP Th<strong>in</strong>Manager <strong>6.0</strong> Multiple Monitors 367
MultiMonitor – Video Sett<strong>in</strong>gs<br />
The monitors do not need to use the same resolutions but can be <strong>in</strong>dividually configured.<br />
Select the Next button to cont<strong>in</strong>ue.<br />
368 Multiple Monitors ACP Th<strong>in</strong>Manager <strong>6.0</strong>
18.3.1.3 MultiMonitor Monitor Layout Page<br />
MultiMonitor – Monitor Layout<br />
The Monitor Layout page allows the configuration of the MultiMonitors.<br />
The Choose your monitor layout dropdown will display the various physical arrangements that the<br />
monitors can be placed <strong>in</strong>. Select the layout that matches your layout.<br />
Sample Monitor Layouts<br />
The Ma<strong>in</strong> Monitor radio button determ<strong>in</strong>es which screen is considered the ma<strong>in</strong> monitor. This monitor will<br />
display the TermSecure log<strong>in</strong> w<strong>in</strong>dow, Ma<strong>in</strong> Menu, and Th<strong>in</strong>Manager messages.<br />
The Choose your screen layout dropdown with allow the assignment of sessions to the monitors. The<br />
monitors can be comb<strong>in</strong>ed <strong>in</strong>to a “Spanned” session that conta<strong>in</strong>s two or more monitors or they can be<br />
configured to hold an <strong>in</strong>dividual session per monitor, called “Screened”, or a comb<strong>in</strong>ation of the two.<br />
ACP Th<strong>in</strong>Manager <strong>6.0</strong> Multiple Monitors 369
Samples of Four-Monitor Configurations<br />
Note: The desktop of a spanned session is limited to 4096x2048. The selection of monitor resolution on<br />
the MultiMonitor Video Sett<strong>in</strong>gs page can affect the number of monitors that you can add to a spanned<br />
session.<br />
The TermSecure Initial Screen radio button determ<strong>in</strong>es which screen is considered the ma<strong>in</strong> monitor for<br />
TermSecure. This monitor will display the TermSecure Ma<strong>in</strong> Menu w<strong>in</strong>dow and messages.<br />
Select the Next button to cont<strong>in</strong>ue.<br />
370 Multiple Monitors ACP Th<strong>in</strong>Manager <strong>6.0</strong>
18.3.1.4 MultiMonitor Display Client Selection Page<br />
MultiMonitor – Display Client Selection<br />
The Display Client Selection page allows Display Clients to be assigned to each screen.<br />
ACP Th<strong>in</strong>Manager <strong>6.0</strong> Multiple Monitors 371
MultiMonitor – Display Client Selection<br />
Highlight the desired group and select the arrow to move it to the desired screen.<br />
The number of available screens is based on the comb<strong>in</strong>ation of screened and spanned sessions<br />
selected on the Monitor Layout page. Each screen can have more than one Display Client.<br />
The Override button allows you to assign a different user account or video resolution to a Display Client.<br />
Highlight a Display Client and select the Override button to launch the Override Sett<strong>in</strong>g w<strong>in</strong>dow.<br />
372 Multiple Monitors ACP Th<strong>in</strong>Manager <strong>6.0</strong>
Override Sett<strong>in</strong>g W<strong>in</strong>dow<br />
The override function is important when you want to run several copies of the same application on the<br />
MultiMonitor term<strong>in</strong>al because Microsoft limits each user to a s<strong>in</strong>gle <strong>in</strong>stance of an application by default.<br />
Without the override function you will get a s<strong>in</strong>gle application that bounces from w<strong>in</strong>dow to w<strong>in</strong>dow.<br />
Check the Override checkbox of the sett<strong>in</strong>g you desire to override and fill <strong>in</strong> the appropriate fields.<br />
Select OK to accept the changes and select Cancel to cancel the changes.<br />
Select the Next button to cont<strong>in</strong>ue.<br />
ACP Th<strong>in</strong>Manager <strong>6.0</strong> Multiple Monitors 373
18.3.1.5 MultiMonitor Selection Configuration<br />
MultiMonitor - Screen Options<br />
Term<strong>in</strong>als us<strong>in</strong>g MultiSession can be configured to allow sessions to be moved from monitor to monitor<br />
for user preference. This is configured by select<strong>in</strong>g the Allow groups to move to/from screen checkbox.<br />
If left unselected the sessions will stay <strong>in</strong> the assigned monitor.<br />
The Screen Options sett<strong>in</strong>gs are:<br />
<br />
<br />
<br />
Allow groups to move to/from screen – This checkbox, if selected, will allow a session<br />
from a MultiSession group to be moved to or from the monitor to suit a user’s preference.<br />
Ma<strong>in</strong> Monitor – This drop-down sets what monitor <strong>in</strong> a spanned set will display the Display<br />
Client Selector menu.<br />
Selector Options – This button launches the Group Selector Options w<strong>in</strong>dow to allow<br />
configuration of the Display Client selector.<br />
374 Multiple Monitors ACP Th<strong>in</strong>Manager <strong>6.0</strong>
Group Selector Options W<strong>in</strong>dow<br />
The Group Selector Options allows configuration of the Display Client selection when us<strong>in</strong>g MultiSession.<br />
Show Group Selector – This checkbox, if selected, will display the Display Client Selector to<br />
allow the user to switch between MultiSession groups.<br />
Enable Til<strong>in</strong>g – This checkbox, if selected, allows multiple sessions to be tiled to allow a<br />
visual selection.<br />
The Selector Options button launches the Group Selector Options w<strong>in</strong>dow.<br />
Group Selector Options W<strong>in</strong>dow<br />
The Group Selector Options W<strong>in</strong>dow has three sett<strong>in</strong>gs.<br />
Auto-hide Group Selector – This checkbox, if selected, will hide the drop-down Display Client<br />
selector unless the mouse is hover<strong>in</strong>g over the top center of the screen. This checkbox, if<br />
unselected, will show the drop-down Display Client selector at the top center of the screen.<br />
Tile on Group Selector activation – This checkbox, if selected, will tile the sessions when an<br />
auto-hid group selector is activated.<br />
Group Selector Menu Size – This drop-down sets the size of the text <strong>in</strong> the group selector.<br />
The Til<strong>in</strong>g Options button launches the Tile Options w<strong>in</strong>dow.<br />
Tile Options W<strong>in</strong>dow<br />
The Tile Options W<strong>in</strong>dow has five sett<strong>in</strong>gs.<br />
Show Grid – This checkbox, when selected, will separate tiled sessions with black l<strong>in</strong>es.<br />
ACP Th<strong>in</strong>Manager <strong>6.0</strong> Multiple Monitors 375
Tile Inactivity Time – This is the amount of time <strong>in</strong> seconds that will elapse before an <strong>in</strong>active<br />
session will revert to a tiled mode.<br />
Tile Display clients at startup – This checkbox, when selected, will tile the display clients when<br />
the term<strong>in</strong>al first connects.<br />
Include Ma<strong>in</strong> Menu as tile – This checkbox, when selected, will display the TermSecure Ma<strong>in</strong><br />
Menu as a tiled group.<br />
Tile on Right click (mouse or touch screen) - This checkbox, when selected, will allow a right<br />
click <strong>in</strong> a session to activate til<strong>in</strong>g. Hold<strong>in</strong>g a f<strong>in</strong>ger on a touch screen will trigger til<strong>in</strong>g if the Right<br />
Click Hold Time (milliseconds) is used <strong>in</strong> the touch screen module.<br />
Tile Interactive – This checkbox, if selected, will allow a user to select a tiled session and<br />
<strong>in</strong>teract with it without un-til<strong>in</strong>g the sessions.<br />
376 Multiple Monitors ACP Th<strong>in</strong>Manager <strong>6.0</strong>
18.3.1.6 Allow Group to Move Configuration<br />
Each Display Client that is to be allowed to move needs to have this property configured <strong>in</strong> the Display<br />
Client Wizard. Open the Display Client Wizard for the desired Display Client and navigate to the<br />
Display Client Options page.<br />
Display Client Wizard – Display Client Options<br />
To configure a Display Client to be moved from one MultiMonitor screen to another, select the Allow<br />
Group to be moved (MultiMonitor) checkbox and select the F<strong>in</strong>ish button to accept the change.<br />
See Display Client List for details on the Display Client Wizard.<br />
ACP Th<strong>in</strong>Manager <strong>6.0</strong> Multiple Monitors 377
19 Virtualization <strong>in</strong> Th<strong>in</strong>Manager<br />
19.1 Virtualization Overview<br />
A virtual mach<strong>in</strong>e is an isolated and <strong>in</strong>dependent <strong>in</strong>stall of an operat<strong>in</strong>g system with<strong>in</strong> a host operat<strong>in</strong>g<br />
system. It allows one computer to run several virtual computers on one physical device. Virtualization, the<br />
use of virtual mach<strong>in</strong>es, allows the quick deployment and repetition of computers, often by duplicat<strong>in</strong>g a<br />
folder with a few files.<br />
Th<strong>in</strong>Manager 4.1 <strong>in</strong>cludes virtualization tools to help manage virtual servers and virtual workstations <strong>in</strong> a<br />
th<strong>in</strong> client system.<br />
19.2 VCenter Servers<br />
VCenter is a virtual mach<strong>in</strong>e management tool from VMWare. It allows IT adm<strong>in</strong>istrators to control and<br />
manage multiple ESX servers and their virtual mach<strong>in</strong>es <strong>in</strong> a s<strong>in</strong>gle console.<br />
Th<strong>in</strong>Manager can connect to a VCenter Server and allow the control and management of the virtual<br />
mach<strong>in</strong>es.<br />
ACP Th<strong>in</strong>Manager <strong>6.0</strong><br />
378 Virtualization <strong>in</strong> Th<strong>in</strong>Manager
VCenter Servers Branch <strong>in</strong> the Th<strong>in</strong>Manager Tree<br />
The Th<strong>in</strong>Manager tree has a VCenter Servers branch.<br />
Right-click on the VCenter Servers branch to add a VCenter Server. It will launch a VCenter Server<br />
Property Wizard.<br />
ACP Th<strong>in</strong>Manager <strong>6.0</strong> Virtualization <strong>in</strong> Th<strong>in</strong>Manager 379
19.2.1.1 Virtual Mach<strong>in</strong>e Host Name<br />
Virtual Mach<strong>in</strong>e Host Name Page<br />
Importance of Page: Virtual Mach<strong>in</strong>e Host Name Page allows a VCenter Server to be def<strong>in</strong>ed for use<br />
with<strong>in</strong> Th<strong>in</strong>Manager.<br />
Sett<strong>in</strong>gs:<br />
VCenter Server Name – Enter the name of the VCenter Server you wish to connect to.<br />
VCenter IP Address – Enter the IP address of the VCenter Server.<br />
User Name – Enter an adm<strong>in</strong>istrative account on the VCenter Server to allow a connection.<br />
Password – Enter the password of the adm<strong>in</strong>istrative account.<br />
Verify Password – Re-enter the password of the adm<strong>in</strong>istrative account for verification.<br />
Buttons:<br />
Discover – This button will fill <strong>in</strong> the IP address of the listed VCenter Server.<br />
Why Change from Default Sett<strong>in</strong>gs:<br />
Th<strong>in</strong>Manager won’t connect to a VCenter Server unless you tell it to.<br />
Select F<strong>in</strong>ish to complete the configuration.<br />
380 Virtualization <strong>in</strong> Th<strong>in</strong>Manager ACP Th<strong>in</strong>Manager <strong>6.0</strong>
Connect<strong>in</strong>g to VCenter Server<br />
Once the VCenter Server is def<strong>in</strong>ed and the VCenter Server Property Wizard is closed, Th<strong>in</strong>Manager<br />
will connect to the VCenter Server.<br />
ACP Th<strong>in</strong>Manager <strong>6.0</strong> Virtualization <strong>in</strong> Th<strong>in</strong>Manager 381
Connected VCenter Server<br />
Once the VCenter Server has connected the VCenter Servers branch can be expanded to see the virtual<br />
mach<strong>in</strong>e <strong>in</strong><strong>format</strong>ion imported from the VCenter Server.<br />
VCenter Server Tree Icons<br />
The tree will show the def<strong>in</strong>ed VCenter Servers, datacenters <strong>in</strong> the VCenter Server, and virtual mach<strong>in</strong>es.<br />
The virtual mach<strong>in</strong>e icons show the state they are <strong>in</strong>; stopped, suspended, or runn<strong>in</strong>g.<br />
19.2.2 VCenter Server Right-Click Menus<br />
The branches of the VCenter Server tree have various right-click menus:<br />
VCenter Servers:<br />
o Add vCenter Server – Launches the VCenter Server Property Wizard to allow a<br />
VCenter Server to be def<strong>in</strong>ed.<br />
Def<strong>in</strong>ed VCenter Servers:<br />
o Remove – Removes the def<strong>in</strong>ed VCenter Server from Th<strong>in</strong>Manager.<br />
Datacenter:<br />
o Rename – Allows you to rename the datacenter.<br />
o Delete – Allows you to delete the datacenter.<br />
Virtual Mach<strong>in</strong>e:<br />
o Power Operations:<br />
• Power On – Turns on a stopped or suspended virtual mach<strong>in</strong>e.<br />
• Power Off – Turns off a stopped or suspended virtual mach<strong>in</strong>e.<br />
• Suspend – Suspends a runn<strong>in</strong>g virtual mach<strong>in</strong>e and stores the state.<br />
• Reset – Cycles power to the virtual mach<strong>in</strong>e to restart the virtual mach<strong>in</strong>e.<br />
o Snapshot:<br />
• Take Snapshot – Captures and stores the state of the virtual mach<strong>in</strong>e.<br />
• Revert to Current Snapshot – Reapplies the stored state of a previously saved<br />
virtual mach<strong>in</strong>e.<br />
382 Virtualization <strong>in</strong> Th<strong>in</strong>Manager ACP Th<strong>in</strong>Manager <strong>6.0</strong>
o<br />
o<br />
o<br />
• Snapshot Manager – Launches the Snapshot management tool.<br />
Rename – Allows the virtual mach<strong>in</strong>e to be renamed.<br />
Remove from Inventory – Removes the virtual mach<strong>in</strong>e from the tree without delet<strong>in</strong>g<br />
the files.<br />
Delete – Removes the virtual mach<strong>in</strong>e from the tree AND deletes the file system.<br />
19.2.2.1 Snapshots<br />
Snapshots save the state of the virtual mach<strong>in</strong>e <strong>in</strong> a file. Snapshots allow you to preserve a work<strong>in</strong>g<br />
status before apply<strong>in</strong>g new applications, programs or updates. If the changes fail or are undesired, then<br />
the snapshot can be restored allow<strong>in</strong>g the virtual mach<strong>in</strong>e to return to the pre-change state.<br />
Right-click<strong>in</strong>g on the virtual mach<strong>in</strong>e and select<strong>in</strong>g Snapshot>Take Snapshot will launch the Create<br />
Snapshot w<strong>in</strong>dow.<br />
Create Snapshot W<strong>in</strong>dow<br />
The Create Snapshot w<strong>in</strong>dow allows you to name the snapshot and enter a description.<br />
Select OK to save the snapshot or Cancel to close without sav<strong>in</strong>g.<br />
Multiple snapshots of a virtual mach<strong>in</strong>e can be taken.<br />
Right-click<strong>in</strong>g on the virtual mach<strong>in</strong>e and select<strong>in</strong>g Snapshot>Revert to Current Snapshot will apply the<br />
last snapshot taken.<br />
Right-click<strong>in</strong>g on the virtual mach<strong>in</strong>e and select<strong>in</strong>g Snapshot>Snapshot Manager will launch the<br />
Snapshot Manager w<strong>in</strong>dow.<br />
ACP Th<strong>in</strong>Manager <strong>6.0</strong> Virtualization <strong>in</strong> Th<strong>in</strong>Manager 383
Snapshot Manager<br />
The Snapshot Manager w<strong>in</strong>dow shows all saved snapshots for the selected virtual mach<strong>in</strong>e. The<br />
Snapshot Manager w<strong>in</strong>dow shows the name, description, and creation date of a highlighted snapshot.<br />
Buttons:<br />
Revert To – This applies the selected saved snapshot.<br />
Delete – This deletes a highlighted snapshot.<br />
Delete All – This deletes all saved snapshots.<br />
Edit – Opens the Create Snapshot w<strong>in</strong>dow to allow changes to the name and description.<br />
OK – Closes the Snapshot Manager.<br />
A dialog box will require confirmation before changes are made.<br />
Revert to Snapshot Warn<strong>in</strong>g<br />
384 Virtualization <strong>in</strong> Th<strong>in</strong>Manager ACP Th<strong>in</strong>Manager <strong>6.0</strong>
19.3 Virtual Term<strong>in</strong>al Servers<br />
Virtual term<strong>in</strong>al servers can be added to Th<strong>in</strong>Manager us<strong>in</strong>g two methods, Add Term<strong>in</strong>al Server and<br />
Add Virtual Term<strong>in</strong>al Server.<br />
Add Term<strong>in</strong>al Server – You can def<strong>in</strong>e a virtual term<strong>in</strong>al server as a regular term<strong>in</strong>al server <strong>in</strong> the<br />
Term<strong>in</strong>al Server Wizard.<br />
Right-click on the Term<strong>in</strong>al Server branch and select Add Term<strong>in</strong>al Server to launch the Term<strong>in</strong>al Server<br />
Wizard. Add the virtual term<strong>in</strong>al server as you would a regular term<strong>in</strong>al server. This doesn’t give you any<br />
special configuration or tools.<br />
Add Virtual Term<strong>in</strong>al Server – You can def<strong>in</strong>e a virtual term<strong>in</strong>al server as a virtual term<strong>in</strong>al server <strong>in</strong> the<br />
Term<strong>in</strong>al Server Wizard.<br />
Right-click on the Term<strong>in</strong>al Server branch and select Add Virtual Term<strong>in</strong>al Server to launch the<br />
Term<strong>in</strong>al Server Wizard.<br />
VCenter Server Virtual Mach<strong>in</strong>e Selection List<br />
The second page of the Term<strong>in</strong>al Server Wizard will display a Virtual Mach<strong>in</strong>e Selection Page.<br />
Highlight the desired virtual mach<strong>in</strong>e and select the Next button.<br />
ACP Th<strong>in</strong>Manager <strong>6.0</strong> Virtualization <strong>in</strong> Th<strong>in</strong>Manager 385
Term<strong>in</strong>al Server Name Page<br />
The Term<strong>in</strong>al Server Wizard will cont<strong>in</strong>ue with the virtual term<strong>in</strong>al server fill<strong>in</strong>g <strong>in</strong> the fields.<br />
These fields, and the schedule button, are the same as on the normal Term<strong>in</strong>al Server Wizard. See<br />
Term<strong>in</strong>al Services Display Servers for details.<br />
Select Next to cont<strong>in</strong>ue configur<strong>in</strong>g the virtual term<strong>in</strong>al server, select F<strong>in</strong>ish to save the configuration and<br />
close the wizard, or select Cancel to close the wizard without sav<strong>in</strong>g the changes.<br />
386 Virtualization <strong>in</strong> Th<strong>in</strong>Manager ACP Th<strong>in</strong>Manager <strong>6.0</strong>
Virtual Term<strong>in</strong>al Servers <strong>in</strong> the Th<strong>in</strong>Manager Tree<br />
Term<strong>in</strong>al Server Tree Icons<br />
Virtual Term<strong>in</strong>al Servers will show a different icon than a standard term<strong>in</strong>al server.<br />
A virtual term<strong>in</strong>al server that is def<strong>in</strong>ed as a standard term<strong>in</strong>al server will show the standard term<strong>in</strong>al<br />
server icon.<br />
ACP Th<strong>in</strong>Manager <strong>6.0</strong> Virtualization <strong>in</strong> Th<strong>in</strong>Manager 387
Selected Term<strong>in</strong>al Servers <strong>in</strong> a Display Client<br />
Virtual and standard term<strong>in</strong>al servers are treated identically when choos<strong>in</strong>g display clients.<br />
19.4 Virtual Workstations<br />
W<strong>in</strong>dows workstations, XP Pro, Vista Bus<strong>in</strong>ess, or W<strong>in</strong>dows 7 Pro, can be virtualized for deployment as a<br />
desktop. Th<strong>in</strong>Manager can deploy these virtual desktops to th<strong>in</strong> clients to limit the upkeep and<br />
management of the operator’s workstation.<br />
19.4.1 Workstation Display Clients<br />
First a Workstation Display Client needs to be created. This will act as a template for the workstation<br />
deployment. Later when the Workstation Display Client is added to a term<strong>in</strong>al you will need to assign<br />
which virtual workstation.<br />
Launch the Workstation Display Client Wizard by right-click<strong>in</strong>g on the Display Client branch of the<br />
Th<strong>in</strong>Manager tree or by right-click<strong>in</strong>g on the Workstation Display Client branch of the Th<strong>in</strong>Manager tree.<br />
388 Virtualization <strong>in</strong> Th<strong>in</strong>Manager ACP Th<strong>in</strong>Manager <strong>6.0</strong>
Client Name Page of Display Client Wizard<br />
Enter a name for the Workstation Display Client. Select Workstation from the Type of Display Client<br />
drop-down if you launched the wizard from the Display Client branch.<br />
Select Next to cont<strong>in</strong>ue with the wizard.<br />
ACP Th<strong>in</strong>Manager <strong>6.0</strong> Virtualization <strong>in</strong> Th<strong>in</strong>Manager 389
Display Client Option Page of Display Client Wizard<br />
The Workstation Display Client adds Virtual Workstation Options to the Display Client Options page<br />
of the Display Client Wizard. The Client Options and Display Client Connection Options are the same<br />
as other Display Clients. See Term<strong>in</strong>al Services Display Clients for details.<br />
Virtual Workstation Options:<br />
<br />
Start Virtual Mach<strong>in</strong>e if necessary: This checkbox, if selected, will automatically start a<br />
suspended or stopped virtual mach<strong>in</strong>e when it connects.<br />
Suspend Virtual Mach<strong>in</strong>e when not needed: This checkbox, if selected, will suspend the virtual<br />
mach<strong>in</strong>e when the term<strong>in</strong>al is powered off.<br />
Select Next to cont<strong>in</strong>ue with the wizard.<br />
390 Virtualization <strong>in</strong> Th<strong>in</strong>Manager ACP Th<strong>in</strong>Manager <strong>6.0</strong>
Term<strong>in</strong>al Services Display Client Options Page of Display Client Wizard<br />
The Display Client presents the Display Client Wizard similar to the Term<strong>in</strong>al Services Display Client<br />
Wizard, with the exception of omitt<strong>in</strong>g the addition of term<strong>in</strong>al servers. S<strong>in</strong>ce workstations have a one-toone<br />
relationship to the term<strong>in</strong>als the workstations are assigned when the term<strong>in</strong>al is configured.<br />
Select F<strong>in</strong>ish to accept the changes and close the wizard.<br />
ACP Th<strong>in</strong>Manager <strong>6.0</strong> Virtualization <strong>in</strong> Th<strong>in</strong>Manager 391
Display Client Icons<br />
When the Workstation Display Client is created it will be added to the tree with the Workstation Display<br />
Client icon.<br />
392 Virtualization <strong>in</strong> Th<strong>in</strong>Manager ACP Th<strong>in</strong>Manager <strong>6.0</strong>
19.4.2 Term<strong>in</strong>als and Virtual Workstations<br />
Workstations can only deploy their session once to a remote user so the workstation is assigned to its<br />
remote connection when the Workstation Display Client is applied to a term<strong>in</strong>al.<br />
Open the Term<strong>in</strong>al Configuration Wizard for the term<strong>in</strong>al that you want to assign a workstation to.<br />
Display Client Selection of the Term<strong>in</strong>al Configuration Wizard<br />
The Workstation Display Clients will show up <strong>in</strong> the Available Display Clients list on the Display Client<br />
Selection page of the Term<strong>in</strong>al Configuration Wizard. Move the desired Workstation Display Client to the<br />
Selected Display Client list for deployment.<br />
Workstation Display Clients have their own icon.<br />
Workstation Display Client Icon<br />
ACP Th<strong>in</strong>Manager <strong>6.0</strong> Virtualization <strong>in</strong> Th<strong>in</strong>Manager 393
Select Next to cont<strong>in</strong>ue the wizard.<br />
Complete the Workstation Display Client Configuration Page<br />
The next page of the wizard is the Complete the Workstation Display Client Configuration Page.<br />
Importance of Page: Each deployment of a Workstation Display Client needs to be tied to an available<br />
workstation.<br />
Buttons:<br />
Add Workstation – This button will launch a w<strong>in</strong>dow that allows a workstation to be designated<br />
for use by this term<strong>in</strong>al.<br />
Add Virtual Workstation – This button will launch a w<strong>in</strong>dow that allows a virtual workstation to<br />
be designated for use by this term<strong>in</strong>al.<br />
Remove – This button remove a highlighted workstation from the Selected Workstation list.<br />
Edit – This button will re-open the w<strong>in</strong>dow that allowed a workstation to be added to the Selected<br />
Workstation list.<br />
Arrows – This button will change the load<strong>in</strong>g order of the assigned workstations.<br />
Fields:<br />
Selected Workstations – This textbox will display the workstations assigned to the term<strong>in</strong>al.<br />
Why Change from Default Sett<strong>in</strong>gs:<br />
394 Virtualization <strong>in</strong> Th<strong>in</strong>Manager ACP Th<strong>in</strong>Manager <strong>6.0</strong>
Th<strong>in</strong>Manager won’t connect to workstation unless you tell it to.<br />
Add Workstation W<strong>in</strong>dow<br />
Select<strong>in</strong>g the Add Workstation button on the Complete the Workstation Display Client Configuration<br />
Page will launch the Add Workstation w<strong>in</strong>dow.<br />
Enter the name and address of the workstation <strong>in</strong> the appropriate fields.<br />
Select Add to accept the configuration or select Cancel to close the w<strong>in</strong>dow.<br />
ACP Th<strong>in</strong>Manager <strong>6.0</strong> Virtualization <strong>in</strong> Th<strong>in</strong>Manager 395
Add Virtual Workstation W<strong>in</strong>dow<br />
Select<strong>in</strong>g the Add Virtual Workstation button on the Complete the Workstation Display Client<br />
Configuration Page will launch the Add Virtual Workstation w<strong>in</strong>dow.<br />
The VCenter Server tree will be displayed <strong>in</strong> the Available Virtual Workstation pane. Highlight the desired<br />
virtual workstation and select the Add button to apply the virtual workstation to the term<strong>in</strong>al.<br />
Select Cancel to close the w<strong>in</strong>dow without accept<strong>in</strong>g the configuration.<br />
396 Virtualization <strong>in</strong> Th<strong>in</strong>Manager ACP Th<strong>in</strong>Manager <strong>6.0</strong>
Complete the Workstation Display Client Configuration Page<br />
Once a workstation or virtual workstation is assigned to the term<strong>in</strong>al it will be displayed <strong>in</strong> the Selected<br />
Workstations w<strong>in</strong>dow.<br />
ACP Th<strong>in</strong>Manager <strong>6.0</strong> Virtualization <strong>in</strong> Th<strong>in</strong>Manager 397
Workstation <strong>in</strong> Th<strong>in</strong>Manager Tree<br />
The Th<strong>in</strong>Manager tree will display the workstation icons for the term<strong>in</strong>al once the term<strong>in</strong>al is restarted to<br />
apply the configuration changes.<br />
398 Virtualization <strong>in</strong> Th<strong>in</strong>Manager ACP Th<strong>in</strong>Manager <strong>6.0</strong>
20 Schedul<strong>in</strong>g<br />
Th<strong>in</strong>Manager allows tasks to be automated with the Schedule function. This applies to Term<strong>in</strong>als,<br />
Term<strong>in</strong>al Groups, Term<strong>in</strong>al Servers, TermSecure Users, and the Th<strong>in</strong>Manager Server.<br />
20.1 Term<strong>in</strong>al Schedule<br />
Select<strong>in</strong>g the Schedule button on the Term<strong>in</strong>al Options page will launch the Event Schedule w<strong>in</strong>dow<br />
and allow a schedule to be created for term<strong>in</strong>al events.<br />
ACP Th<strong>in</strong>Manager <strong>6.0</strong><br />
399 Schedul<strong>in</strong>g
Term<strong>in</strong>al Configuration Wizard - Term<strong>in</strong>al Options Page<br />
Check the Set Schedule checkbox and select the Schedule button to launch the Event Schedule<br />
w<strong>in</strong>dow.<br />
Note: The Schedule for Term<strong>in</strong>al Groups is the same as for <strong>in</strong>dividual term<strong>in</strong>als. It has an advantage of<br />
apply<strong>in</strong>g the scheduled events to a whole group of term<strong>in</strong>als <strong>in</strong>stead of requir<strong>in</strong>g a configuration for each<br />
event on each term<strong>in</strong>al.<br />
Event Schedule<br />
The Event Schedule will list events for the term<strong>in</strong>al or group. It has four buttons:<br />
The Add button will launch a Schedule w<strong>in</strong>dow to allow an event to be configured.<br />
The Edit button will allow a highlighted event to be changed.<br />
The Delete button will remove a highlighted event.<br />
The OK button will accept changes and close the Event Schedule w<strong>in</strong>dow.<br />
Events can be added by select<strong>in</strong>g the Add button to launch the Schedule w<strong>in</strong>dow.<br />
400 Schedul<strong>in</strong>g ACP Th<strong>in</strong>Manager <strong>6.0</strong>
Schedule W<strong>in</strong>dow<br />
The Schedule w<strong>in</strong>dow has several configuration sett<strong>in</strong>gs.<br />
Event Type is a drop-down box that allows event selection:<br />
Disable Term<strong>in</strong>al - This will prevent a term<strong>in</strong>al from be<strong>in</strong>g used, although its term<strong>in</strong>al server<br />
sessions will still be runn<strong>in</strong>g on the term<strong>in</strong>al servers.<br />
Enable Term<strong>in</strong>al - This will allow a disabled term<strong>in</strong>al to become active aga<strong>in</strong>.<br />
Reboot Term<strong>in</strong>al - This will cycle power on the term<strong>in</strong>al and reload its configuration.<br />
Reset Term<strong>in</strong>al Sessions - This will logoff the sessions that the term<strong>in</strong>al has open on term<strong>in</strong>al<br />
servers.<br />
The Repeat Interval radio buttons allow the event <strong>in</strong> the Event Type drop-down to be run Once Only,<br />
Weekly/Daily, Monthly, or Yearly.<br />
Select<strong>in</strong>g Once Only will show a Select Date field for the event.<br />
Select<strong>in</strong>g Weekly/Daily will show a Weekly Schedule list for the event to run. The Every Day<br />
button will select all the days <strong>in</strong> the list.<br />
Select<strong>in</strong>g Monthly will show a Select Day of Month field for the event.<br />
Select<strong>in</strong>g Yearly will show a Select Date field for the event.<br />
The Time field allows the selection of the time that the event should occur.<br />
Select the OK button to close the Schedule w<strong>in</strong>dow.<br />
ACP Th<strong>in</strong>Manager <strong>6.0</strong> Schedul<strong>in</strong>g 401
Select Add to add another event to the Event Schedule or select OK to close the Event Schedule<br />
w<strong>in</strong>dow and return to the term<strong>in</strong>al configuration.<br />
20.2 Term<strong>in</strong>al Server Schedule<br />
The Term<strong>in</strong>al Server Name page of the Term<strong>in</strong>al Server Wizard has a Schedule button to configure a<br />
schedule for term<strong>in</strong>al server events.<br />
Term<strong>in</strong>al Server Wizard – Term<strong>in</strong>al Server Name Page<br />
Select the Schedule button on the Term<strong>in</strong>al Server Name page of the Term<strong>in</strong>al Server Wizard to launch<br />
the Event Schedule w<strong>in</strong>dow.<br />
402 Schedul<strong>in</strong>g ACP Th<strong>in</strong>Manager <strong>6.0</strong>
Event Schedule<br />
The Event Schedule will list events for the term<strong>in</strong>al or group. It has four buttons.<br />
The Add button will launch a Schedule w<strong>in</strong>dow to allow an event to be configured.<br />
The Edit button will allow a highlighted event to be changed.<br />
The Delete button will remove a highlighted event.<br />
The OK button will accept changes and close the Event Schedule w<strong>in</strong>dow.<br />
Events can be added by select<strong>in</strong>g the Add button to launch the Schedule w<strong>in</strong>dow.<br />
ACP Th<strong>in</strong>Manager <strong>6.0</strong> Schedul<strong>in</strong>g 403
Schedule W<strong>in</strong>dow<br />
The Schedule w<strong>in</strong>dow has several configuration sett<strong>in</strong>gs.<br />
Event Type is a drop-down box that allows event selection:<br />
Disable Term<strong>in</strong>al Server - This will disconnect all the th<strong>in</strong> clients connected to the term<strong>in</strong>al<br />
server. The sessions will rema<strong>in</strong> idle on the term<strong>in</strong>al server unless they are set to disconnect <strong>in</strong><br />
the Term<strong>in</strong>al Services Configuration console. See Disable Term<strong>in</strong>al Server for details.<br />
Enable Term<strong>in</strong>al Server - This will allow a disabled term<strong>in</strong>al server to accept th<strong>in</strong> client<br />
connections aga<strong>in</strong>.<br />
Reboot Term<strong>in</strong>al Server - This will cycle power on the term<strong>in</strong>al server and restart it.<br />
The Repeat Interval radio buttons allow the event <strong>in</strong> the Event Type drop-down to be run Once Only,<br />
Weekly/Daily, Monthly, or Yearly.<br />
Select<strong>in</strong>g Once Only will show a Select Date field for the event.<br />
Select<strong>in</strong>g Weekly/Daily will show a Weekly Schedule list for the event to run. The Every Day<br />
button will select all the days <strong>in</strong> the list.<br />
Select<strong>in</strong>g Monthly will show a Select Day of Month field for the event.<br />
Select<strong>in</strong>g Yearly will show a Select Date field for the event.<br />
The Time field allows the selection of the time that the event should occur.<br />
Select the OK button to close the Schedule w<strong>in</strong>dow.<br />
Select Add to add another event to the Event Schedule or select OK to close the Event Schedule<br />
w<strong>in</strong>dow and return to the term<strong>in</strong>al server configuration.<br />
404 Schedul<strong>in</strong>g ACP Th<strong>in</strong>Manager <strong>6.0</strong>
20.3 Th<strong>in</strong>Manager Server Schedule<br />
The Th<strong>in</strong>Manager Server Configuration Wizard has a System Schedule page that allows the<br />
Scheduler to be launched. This allows tasks to be scheduled for the Th<strong>in</strong>Manager Server.<br />
20.3.1.1 System Schedule<br />
System Schedule<br />
Select the Edit Schedule button to launch the Event Schedule w<strong>in</strong>dow.<br />
ACP Th<strong>in</strong>Manager <strong>6.0</strong> Schedul<strong>in</strong>g 405
Event Schedule W<strong>in</strong>dow<br />
The Event Schedule w<strong>in</strong>dow allows events to be scheduled by select<strong>in</strong>g the Add button when system is<br />
displayed <strong>in</strong> the Select Event Category drop-down box.<br />
406 Schedul<strong>in</strong>g ACP Th<strong>in</strong>Manager <strong>6.0</strong>
Schedule for Weekly Event<br />
The Schedule dialog allows events to be scheduled for the Th<strong>in</strong>Manager. The two ma<strong>in</strong> events are Run<br />
Report and Backup Configuration Database.<br />
Select the desired event <strong>in</strong> the Event Type drop-down.<br />
If Run Report is chosen, select the desired report <strong>in</strong> the Report Template File drop-down.<br />
If Backup Configuration Database is chosen the backup file will be automatically chosen if the Auto<br />
Generate Filename checkbox is selected. To use a different filename, uncheck the Auto Generate<br />
Filename checkbox and enter the desired name <strong>in</strong> the Report Output Filename. A Browse button will<br />
appear to allow selection of the file.<br />
The Repeat Interval radio buttons control the frequency of the event. The time selection varies with the<br />
Repeat Interval chosen.<br />
ACP Th<strong>in</strong>Manager <strong>6.0</strong> Schedul<strong>in</strong>g 407
Schedule for Monthly Event<br />
Select the appropriate time for the event and select OK to accept the configuration and Cancel to cancel<br />
the changes.<br />
While the Event Schedule w<strong>in</strong>dow is open, other scheduled events can be viewed by select<strong>in</strong>g the event<br />
type <strong>in</strong> the Select Events Category drop-down. The event categories are system (Th<strong>in</strong>Manager Server),<br />
term<strong>in</strong>al (Term<strong>in</strong>als), term<strong>in</strong>alserver (Term<strong>in</strong>al Servers) and user (TermSecure Users).<br />
408 Schedul<strong>in</strong>g ACP Th<strong>in</strong>Manager <strong>6.0</strong>
Events Schedule<br />
New events cannot be added for the non-system categories, but exist<strong>in</strong>g events can be changed by<br />
highlight<strong>in</strong>g an event and select<strong>in</strong>g the Edit button. Events can be deleted by select<strong>in</strong>g the Delete button.<br />
The OK button accepts the changes and closes the w<strong>in</strong>dow.<br />
ACP Th<strong>in</strong>Manager <strong>6.0</strong> Schedul<strong>in</strong>g 409
20.4 TermSecure User Schedule<br />
TermSecure Users and TermSecure User Groups have a schedule on the User Options page of the<br />
TermSecure User Configuration Wizard.<br />
TermSecure User Term<strong>in</strong>al Configuration Wizard – User Options Page<br />
Check the Set Schedule checkbox and select the Schedule button to launch the Event Schedule<br />
w<strong>in</strong>dow.<br />
Note: The Schedule for TermSecure User Groups is the same as for <strong>in</strong>dividual TermSecure Users. It has<br />
an advantage of apply<strong>in</strong>g the scheduled events to a whole group of users <strong>in</strong>stead of requir<strong>in</strong>g a<br />
configuration for each event on each user.<br />
410 Schedul<strong>in</strong>g ACP Th<strong>in</strong>Manager <strong>6.0</strong>
Event Schedule<br />
The Event Schedule will list events for the TermSecure User or TermSecure User group. It has four<br />
buttons:<br />
The Add button will launch a Schedule w<strong>in</strong>dow to allow an event to be configured.<br />
The Edit button will allow a highlighted event to be changed.<br />
The Delete button will remove a highlighted event.<br />
The OK button will accept changes and close the Event Schedule w<strong>in</strong>dow.<br />
Events can be added by select<strong>in</strong>g the Add button to launch the Schedule w<strong>in</strong>dow.<br />
ACP Th<strong>in</strong>Manager <strong>6.0</strong> Schedul<strong>in</strong>g 411
Schedule W<strong>in</strong>dow<br />
The Schedule w<strong>in</strong>dow has several configuration sett<strong>in</strong>gs.<br />
Event Type is a drop-down box that allows event selection:<br />
Disable User - This will prevent a user from logg<strong>in</strong>g <strong>in</strong> through TermSecure or will disconnect<br />
and exist<strong>in</strong>g session.<br />
Enable User - This will allow a user to become active aga<strong>in</strong>.<br />
The Repeat Interval radio buttons allow the event <strong>in</strong> the Event Type drop-down to be run Once Only,<br />
Weekly/Daily, Monthly, or Yearly.<br />
Select<strong>in</strong>g Once Only will show a Select Date field for the event.<br />
Select<strong>in</strong>g Weekly/Daily will show a Weekly Schedule list for the event to run. The Every Day<br />
button will select all the days <strong>in</strong> the list.<br />
Select<strong>in</strong>g Monthly will show a Select Day of Month field for the event.<br />
Select<strong>in</strong>g Yearly will show a Select Date field for the event.<br />
The Time field allows the selection of the time that the event should occur.<br />
Select the OK button to close the Schedule w<strong>in</strong>dow.<br />
Select Add to add another event to the Event Schedule or select OK to close the Event Schedule<br />
w<strong>in</strong>dow and return to the term<strong>in</strong>al configuration.<br />
412 Schedul<strong>in</strong>g ACP Th<strong>in</strong>Manager <strong>6.0</strong>
21 Reports<br />
21.1 Reports Overview<br />
Th<strong>in</strong>Manager has the ability to run reports to show and collect data on the Th<strong>in</strong>Manager system. These<br />
reports can show the event log, configurations, uptimes, and other data.<br />
A Reports tab on the Details pane will show a report for a highlighted Th<strong>in</strong>Manager Server, term<strong>in</strong>al,<br />
term<strong>in</strong>al group, term<strong>in</strong>al server, TermSecure user, or TermSecure user group.<br />
Reports can be scheduled to be run and saved as *.html files for storage or further analysis.<br />
21.2 Report Template Installation<br />
Th<strong>in</strong>Manager will <strong>in</strong>stall a number of reports <strong>in</strong>to the Th<strong>in</strong>Manager folder (C:\Program<br />
Files\Automation Control Products\Th<strong>in</strong>Manager\Report Templates)<br />
dur<strong>in</strong>g <strong>in</strong>stallation.<br />
Additional report templates can be downloaded from http://www.th<strong>in</strong>manager.com/support/downloads.php<br />
as they become available.<br />
New reports are <strong>in</strong>stalled by select<strong>in</strong>g Install > Reports from the Th<strong>in</strong>Manager menu. This launches the<br />
Reports w<strong>in</strong>dow.<br />
ACP Th<strong>in</strong>Manager <strong>6.0</strong><br />
413 Reports
Reports W<strong>in</strong>dow<br />
Select the Install button to launch a file browser.<br />
Report Templates – If this radio button is selected the file browser will browse for *.html<br />
files.<br />
SQL Files – If this radio button is selected the file browser will browse for *.sql files.<br />
<br />
Images, F<strong>in</strong>ished Reports, etc. – If this radio button is selected the file browser will browse<br />
for assorted files.<br />
414 Reports ACP Th<strong>in</strong>Manager <strong>6.0</strong>
File Browser<br />
Each report has a *.html component and a *.sql component. Select the Report Templates radio<br />
button, browse to the new *.html file and select Open to <strong>in</strong>stall. Select the SQL Files radio button,<br />
browse to the new *.sql file and select Open to <strong>in</strong>stall. Once these two components are added the<br />
report will be available.<br />
21.3 Select<strong>in</strong>g Reports<br />
The reports are displayed on a Report tab <strong>in</strong> Th<strong>in</strong>Manager. To select which report will be displayed on<br />
the Report tab select View > Reports from the Th<strong>in</strong>Manager menu to launch the Select Reports w<strong>in</strong>dow.<br />
ACP Th<strong>in</strong>Manager <strong>6.0</strong> Reports 415
Select Reports W<strong>in</strong>dow<br />
The Select Reports w<strong>in</strong>dow has four fields that determ<strong>in</strong>e which report is displayed on the report tab.<br />
System Report – This selects the report to display on the report tab when the Th<strong>in</strong>Manager<br />
Server is highlighted.<br />
Term<strong>in</strong>al Report – This selects the report to display on the report tab when a term<strong>in</strong>al or<br />
term<strong>in</strong>al group is highlighted.<br />
Term<strong>in</strong>al Server Report – This select the report to display on the report tab when a term<strong>in</strong>al<br />
server is highlighted.<br />
TermSecure User Report – This selects the report to display on the report tab when a<br />
TermSecure User or TermSecure User Group is highlighted.<br />
Use the drop-down list to select the desired report.<br />
416 Reports ACP Th<strong>in</strong>Manager <strong>6.0</strong>
21.4 Report Tab<br />
The reports selected <strong>in</strong> the Select Reports w<strong>in</strong>dow will be displayed on the Report tab <strong>in</strong> Th<strong>in</strong>Manager.<br />
Report Tab<br />
Highlight the desired Th<strong>in</strong>Manager Server, term<strong>in</strong>al, term<strong>in</strong>al group, term<strong>in</strong>al server, TermSecure user, or<br />
TermSecure group, and then select the Report tab to display the report.<br />
ACP Th<strong>in</strong>Manager <strong>6.0</strong> Reports 417
21.5 Pr<strong>in</strong>t Report<br />
A Report can be pr<strong>in</strong>ted by select<strong>in</strong>g the Report tab then select<strong>in</strong>g View > Pr<strong>in</strong>t from the Th<strong>in</strong>Manager<br />
menu. A Pr<strong>in</strong>t w<strong>in</strong>dow will be displayed to allow the selection of the pr<strong>in</strong>ter.<br />
Pr<strong>in</strong>t W<strong>in</strong>dow<br />
Highlight the desired pr<strong>in</strong>ter and select the Pr<strong>in</strong>t button to pr<strong>in</strong>t the report.<br />
418 Reports ACP Th<strong>in</strong>Manager <strong>6.0</strong>
21.6 Schedul<strong>in</strong>g Reports<br />
Reports can be scheduled to be run once at a specified time or to be run regularly at a specific time. The<br />
reports are saved as *.html files for storage or further analysis.<br />
To schedule report generation open the Th<strong>in</strong>Manager Server Configuration Wizard by highlight<strong>in</strong>g the<br />
Th<strong>in</strong>Manager Server and select<strong>in</strong>g File > Modify.<br />
Th<strong>in</strong>Manager Server Configuration Wizard – System Schedule<br />
Navigate to the System Schedule page and select the Edit Schedule button to launch the Event<br />
Schedule w<strong>in</strong>dow.<br />
ACP Th<strong>in</strong>Manager <strong>6.0</strong> Reports 419
Event Schedule W<strong>in</strong>dow<br />
Select the Add button to open the Schedule w<strong>in</strong>dow.<br />
420 Reports ACP Th<strong>in</strong>Manager <strong>6.0</strong>
Schedule W<strong>in</strong>dow<br />
The Schedule w<strong>in</strong>dow allows system events to be configured.<br />
Event Type – This drop-down allows the event to be chosen. There are two types:<br />
Backup Configuration Database – This allows a schedul<strong>in</strong>g of automatic configuration<br />
backups.<br />
Run Report – This allows a report to be run and saved as a *.html file on a regular<br />
basis.<br />
Report Template File - This drop-down allows the selection of the report to run.<br />
Report Output File – This applies the nam<strong>in</strong>g convention to the saved reports.<br />
Auto Generate Filename – This checkbox, if selected, will save the file to the<br />
Th<strong>in</strong>Manager folder with the report name and a time stamp as its title.<br />
If the Auto Generate Filename is unselected, the field allows entry of the desired<br />
filename. The filename needs to end <strong>in</strong> .html.<br />
There are a few switches that allow the file name to be modified with a timestamp for<br />
identification purposes. If you do not use a timestamp, the file will be overwritten each<br />
time the report is run.<br />
%c – Adds date and time<br />
ACP Th<strong>in</strong>Manager <strong>6.0</strong> Reports 421
%h – adds hour (0-24)<br />
%M – adds m<strong>in</strong>ute (0-59)<br />
%x – adds date<br />
%X – adds time<br />
Repeat Interval – These radio buttons allow the frequency of the report generation to be set.<br />
Time – The fields to set the time of the report generation changes to match the Report<br />
Interval selected by the radio button. The Time field may allow dates, days, hours, or<br />
<strong>in</strong>tervals to be set for the report.<br />
Once the report is configured, select OK to accept the report schedule.<br />
Event Schedule<br />
The scheduled report will be displayed <strong>in</strong> the Event Schedule w<strong>in</strong>dow.<br />
Select Add to add another report schedule.<br />
Select Edit to edit the schedule of a highlighted report.<br />
Select Delete to delete the schedule of a highlighted report.<br />
Select OK to accept the schedules and close the w<strong>in</strong>dow.<br />
When a report is run the files are saved for view<strong>in</strong>g.<br />
422 Reports ACP Th<strong>in</strong>Manager <strong>6.0</strong>
Saved Reports<br />
Once the report has run it can be opened <strong>in</strong> a web browser.<br />
Report Shown <strong>in</strong> Internet Explorer<br />
ACP Th<strong>in</strong>Manager <strong>6.0</strong> Reports 423
Once the report is generated the data can be saved or re<strong>format</strong>ted as desired us<strong>in</strong>g standard H<strong>TM</strong>L<br />
tools.<br />
21.7 Chang<strong>in</strong>g the Report Logo<br />
Each report template has a Th<strong>in</strong>Manager <strong>TM</strong>3 logo as part of the report header. This can be changed to<br />
your company logo.<br />
1. Create a copy of the desired logo <strong>in</strong> *.jpg <strong>format</strong> with a<br />
size of 150x50 pixels. A white background is helpful if the<br />
logo is irregularly shaped.<br />
2. Name the file logo150x50.jpg.<br />
3. Copy the logo150x50.jpg <strong>in</strong>to the Th<strong>in</strong>Manager folder<br />
(C:\Program Files\Automation Control<br />
Products\Th<strong>in</strong>Manager\Reports by default).<br />
4. Open the report to see the change.<br />
The new logo will be displayed on all reports.<br />
424 Reports ACP Th<strong>in</strong>Manager <strong>6.0</strong>
22 W<strong>in</strong><strong>TM</strong>C Fat Client<br />
22.1 W<strong>in</strong><strong>TM</strong>C Overview<br />
W<strong>in</strong><strong>TM</strong>C is a Th<strong>in</strong>Manager Client for PCs runn<strong>in</strong>g W<strong>in</strong>dows NT/2000/XP/Vista/W<strong>in</strong>dows 7 operat<strong>in</strong>g<br />
systems. W<strong>in</strong><strong>TM</strong>C provides similar functionality to that of a Term<strong>in</strong>al. The W<strong>in</strong><strong>TM</strong>C client can use failover,<br />
Instant Failover, SmartSession, MultiSession, and AppL<strong>in</strong>k, among others. Once the W<strong>in</strong><strong>TM</strong>C client is<br />
<strong>in</strong>stalled the client can be managed remotely through Th<strong>in</strong>Manager <strong>in</strong>stead of locally.<br />
Note: W<strong>in</strong><strong>TM</strong>C should not be <strong>in</strong>stalled on a computer that is runn<strong>in</strong>g Th<strong>in</strong>Manager. A port conflict will<br />
prevent either from runn<strong>in</strong>g properly. W<strong>in</strong><strong>TM</strong>C is meant for PCs and not servers.<br />
W<strong>in</strong><strong>TM</strong>C must use Display clients.<br />
W<strong>in</strong><strong>TM</strong>C supports MultiMonitor if the PC has W<strong>in</strong>dows runn<strong>in</strong>g on multiple video cards.<br />
W<strong>in</strong><strong>TM</strong>C does not support Til<strong>in</strong>g.<br />
See W<strong>in</strong><strong>TM</strong>C Installation for details on <strong>in</strong>stallation.<br />
22.2 Local W<strong>in</strong><strong>TM</strong>C Configuration<br />
When W<strong>in</strong><strong>TM</strong>C starts, a Configure button will be displayed on the splash screen.<br />
ACP Th<strong>in</strong>Manager <strong>6.0</strong><br />
425 W<strong>in</strong><strong>TM</strong>C Fat Client
W<strong>in</strong><strong>TM</strong>C Splash Screen<br />
Click on the Configure button to specify the Th<strong>in</strong>Manager Server(s) to use.<br />
W<strong>in</strong><strong>TM</strong>C Th<strong>in</strong>Manager Server List Configuration<br />
The Th<strong>in</strong>Manager Server List allows the W<strong>in</strong><strong>TM</strong>C to be po<strong>in</strong>ted to one or more Th<strong>in</strong>Manager Servers to retrieve its<br />
configuration.<br />
Enter the IP address or name of your Th<strong>in</strong>Manager Servers <strong>in</strong> the Enter new Th<strong>in</strong>Manager Server<br />
Name or IP Address field and click the Add button to add them to the Current Th<strong>in</strong>Manager Servers list.<br />
The W<strong>in</strong><strong>TM</strong>C will try to connect to the Th<strong>in</strong>Manager Servers <strong>in</strong> the order listed, so the order can be<br />
changed with the Move Up and Move Down buttons.<br />
426 W<strong>in</strong><strong>TM</strong>C Fat Client ACP Th<strong>in</strong>Manager <strong>6.0</strong>
Unneeded Th<strong>in</strong>Manager Servers can be removed with the Delete button.<br />
This configuration menu can be password protected by select<strong>in</strong>g the Set Password button. Once the<br />
password is set, when W<strong>in</strong><strong>TM</strong>C is started and the Configure button is clicked, a password will be required<br />
to change the configuration.<br />
No Th<strong>in</strong>Manager Server Specified<br />
If the OK button is selected without enter<strong>in</strong>g a Th<strong>in</strong>Manager Server, an error w<strong>in</strong>dow will rem<strong>in</strong>d you to enter a<br />
Th<strong>in</strong>Manager Server address.<br />
Once the local configuration is set, W<strong>in</strong><strong>TM</strong>C will connect to a Th<strong>in</strong>Manager Server and attempt to retrieve<br />
its configuration.<br />
Term<strong>in</strong>al Replacement Dialog<br />
If the W<strong>in</strong><strong>TM</strong>C PC has not been def<strong>in</strong>ed, the user will be prompted with a dialog box to allow for the<br />
creat<strong>in</strong>g a new configuration or replac<strong>in</strong>g an exist<strong>in</strong>g term<strong>in</strong>al configuration on the Th<strong>in</strong>Manager Server.<br />
This functionality is similar to that of the create/replacement menu on a Th<strong>in</strong> Client. See Replace or<br />
Create New Mode for details on that method.<br />
Once the W<strong>in</strong><strong>TM</strong>C has been assigned a configuration you will not need to make a selection aga<strong>in</strong>.<br />
If you want to run W<strong>in</strong><strong>TM</strong>C without the configure button, you can run it from a command l<strong>in</strong>e with the<br />
Th<strong>in</strong>Manager Servers separated by semi-colons (i.e. W<strong>in</strong><strong>TM</strong>C <strong>TM</strong>S1; <strong>TM</strong>S2; <strong>TM</strong>S3). This will<br />
elim<strong>in</strong>ate the configure button when W<strong>in</strong><strong>TM</strong>C is started.<br />
ACP Th<strong>in</strong>Manager <strong>6.0</strong> W<strong>in</strong><strong>TM</strong>C Fat Client 427
22.3 W<strong>in</strong><strong>TM</strong>C Configuration <strong>in</strong> Th<strong>in</strong>Manager<br />
If you want to pre-create a W<strong>in</strong><strong>TM</strong>C client <strong>in</strong> Th<strong>in</strong>Manager us<strong>in</strong>g the Term<strong>in</strong>al Configuration Wizard,<br />
select GENERIC for the Make/OEM and PersonalComputer for the Model on the Term<strong>in</strong>al Hardware<br />
page of the Term<strong>in</strong>al Configuration Wizard.<br />
The Term<strong>in</strong>al ID will fill <strong>in</strong> with the name of the PC.<br />
W<strong>in</strong><strong>TM</strong>C Sett<strong>in</strong>gs <strong>in</strong> Term<strong>in</strong>al Hardware<br />
The Term<strong>in</strong>al Configuration Wizard for a W<strong>in</strong><strong>TM</strong>C client is the same as for a th<strong>in</strong> client with a few<br />
exceptions. These <strong>in</strong>clude:<br />
428 W<strong>in</strong><strong>TM</strong>C Fat Client ACP Th<strong>in</strong>Manager <strong>6.0</strong>
22.3.1.1 W<strong>in</strong><strong>TM</strong>C Video Mode Page<br />
Video Resolution for W<strong>in</strong><strong>TM</strong>C<br />
The Video Mode for W<strong>in</strong><strong>TM</strong>C <strong>in</strong>cludes a sett<strong>in</strong>g for FullScreen.<br />
ACP Th<strong>in</strong>Manager <strong>6.0</strong> W<strong>in</strong><strong>TM</strong>C Fat Client 429
22.3.1.2 W<strong>in</strong><strong>TM</strong>C Sett<strong>in</strong>gs Page<br />
W<strong>in</strong><strong>TM</strong>C Sett<strong>in</strong>gs<br />
The Term<strong>in</strong>al Configuration Wizard <strong>in</strong>cludes a W<strong>in</strong><strong>TM</strong>C Sett<strong>in</strong>gs page.<br />
W<strong>in</strong><strong>TM</strong>C clients can also be configured on the W<strong>in</strong><strong>TM</strong>C Sett<strong>in</strong>gs page. These only apply to connections<br />
made by the W<strong>in</strong><strong>TM</strong>C fat client.<br />
The sett<strong>in</strong>gs <strong>in</strong>clude:<br />
Redirect Local Resources:<br />
Redirect Serial Ports - This checkbox, if selected, will make local serial ports available <strong>in</strong> a<br />
session. Serial Port redirection does not work when you connect to a term<strong>in</strong>al server runn<strong>in</strong>g<br />
W<strong>in</strong>dows 2000 or earlier.<br />
Redirect Drives - This checkbox, if selected, will make local drives available <strong>in</strong> a session.<br />
Drive redirection does not work when you connect to a term<strong>in</strong>al server runn<strong>in</strong>g W<strong>in</strong>dows<br />
2000 or earlier.<br />
Redirect Pr<strong>in</strong>ters - This checkbox, if selected, will make your local pr<strong>in</strong>ter available <strong>in</strong> a<br />
session.<br />
Redirect Sound - This checkbox, if selected, will allow audio played <strong>in</strong> your session to play<br />
locally. Sound redirection does not work when you connect to a term<strong>in</strong>al server runn<strong>in</strong>g<br />
W<strong>in</strong>dows 2000 or earlier.<br />
430 W<strong>in</strong><strong>TM</strong>C Fat Client ACP Th<strong>in</strong>Manager <strong>6.0</strong>
Redirect Smart Cards - This checkbox, if selected, will make your smart card available <strong>in</strong> a<br />
session. Smart card redirection does not work when you connect to a term<strong>in</strong>al server runn<strong>in</strong>g<br />
W<strong>in</strong>dows 2000 or earlier.<br />
Client Control Sett<strong>in</strong>gs:<br />
<br />
<br />
<br />
Allow Client to be closed - This checkbox, if selected, will enable your user to close the<br />
client (W<strong>in</strong><strong>TM</strong>C program).<br />
Allow client to be sized - This checkbox, if selected, will enable your user to resize the<br />
client.<br />
Always ma<strong>in</strong>ta<strong>in</strong> monitor connection – Enable this sett<strong>in</strong>g to keep the monitor<strong>in</strong>g<br />
connection active when W<strong>in</strong><strong>TM</strong>C is closed to allow shadow<strong>in</strong>g. Unselect<strong>in</strong>g this checkbox will<br />
release the W<strong>in</strong><strong>TM</strong>C license when the W<strong>in</strong><strong>TM</strong>C program is closed but will deny shadow<br />
access.<br />
Show groups <strong>in</strong> separate w<strong>in</strong>dows – This checkbox, if selected, will display multiple<br />
Display Clients as separate w<strong>in</strong>dows rather than <strong>in</strong> one w<strong>in</strong>dow shell.<br />
Experience Sett<strong>in</strong>gs:<br />
<br />
<br />
<br />
<br />
Show Desktop Background - This checkbox, if selected, will enable your user to select a<br />
W<strong>in</strong>dows Desktop Background. If not selected, the background will be a solid color.<br />
Show w<strong>in</strong>dow contents while dragg<strong>in</strong>g - This checkbox, if selected, will show the w<strong>in</strong>dow<br />
contents to be shown while the w<strong>in</strong>dow is be<strong>in</strong>g dragged.<br />
Show menu/w<strong>in</strong>dow animations - This checkbox, if selected, will enable menu/w<strong>in</strong>dow<br />
animations on the client.<br />
Show Themes - This checkbox, if selected, will enable your user to select a W<strong>in</strong>dows<br />
Theme.<br />
Note: These functions may be denied by user policies or term<strong>in</strong>al server configuration. Check the<br />
Microsoft Local Policy, Group Policy, and Term<strong>in</strong>al Services Configuration. See Non-Th<strong>in</strong>Manager<br />
Components for details.<br />
22.3.2 MultiMonitor W<strong>in</strong><strong>TM</strong>C<br />
Th<strong>in</strong>Manager now supports MultiMonitor for W<strong>in</strong><strong>TM</strong>C if the PC has W<strong>in</strong>dows runn<strong>in</strong>g on multiple video<br />
cards.<br />
Select<strong>in</strong>g the Enable MultiMonitor checkbox will allow you to configure a W<strong>in</strong><strong>TM</strong>C client for MultiMonitor<br />
use.<br />
ACP Th<strong>in</strong>Manager <strong>6.0</strong> W<strong>in</strong><strong>TM</strong>C Fat Client 431
MultiMonitor – Enable MultiMonitor<br />
MultiMonitor requires the use of Display Clients. Once the Use Display Clients checkbox is selected on<br />
the Term<strong>in</strong>al Mode Selection page the Enable MultiMonitor checkbox becomes visible.<br />
Select the Use Display Clients and the Enable MultiMonitor checkboxes, and then select the Next<br />
button.<br />
The Term<strong>in</strong>al Configuration Wizard will display the MultiMonitor Video Sett<strong>in</strong>gs page, Monitor Layout<br />
page, and Display Client Selection page like it does for th<strong>in</strong> clients. See MultiMonitor for details.<br />
22.3.3 W<strong>in</strong><strong>TM</strong>C Modules<br />
W<strong>in</strong><strong>TM</strong>C clients cannot use the Th<strong>in</strong>Manager modules because they are runn<strong>in</strong>g W<strong>in</strong>dows locally. One<br />
must <strong>in</strong>stall touch drivers, sound drivers, pr<strong>in</strong>ters, and etc. through the local W<strong>in</strong>dows operat<strong>in</strong>g system<br />
<strong>in</strong>stead of rely<strong>in</strong>g on Th<strong>in</strong>Manager modules.<br />
22.3.4 W<strong>in</strong><strong>TM</strong>C Licens<strong>in</strong>g<br />
A PC runn<strong>in</strong>g as a W<strong>in</strong><strong>TM</strong>C term<strong>in</strong>al requires a W<strong>in</strong><strong>TM</strong>C license <strong>in</strong> addition to the Term<strong>in</strong>al Connection<br />
license.<br />
W<strong>in</strong><strong>TM</strong>C licenses are sold without redundancy and <strong>in</strong>herit the redundancy of the Term<strong>in</strong>al Connection<br />
licenses <strong>in</strong> the Master License. See Licens<strong>in</strong>g Th<strong>in</strong>Manager for details.<br />
432 W<strong>in</strong><strong>TM</strong>C Fat Client ACP Th<strong>in</strong>Manager <strong>6.0</strong>
23 Shadow<strong>in</strong>g<br />
Shadow<strong>in</strong>g is a popular management tool that allows an authorized user to view what is runn<strong>in</strong>g on a<br />
remote client. There are two methods:<br />
Th<strong>in</strong>Manager Shadow<br />
Term<strong>in</strong>al-to-Term<strong>in</strong>al Shadow<br />
23.1 Th<strong>in</strong>Manager Shadow<br />
Shadow<strong>in</strong>g of a term<strong>in</strong>al can be <strong>in</strong>itiated from with<strong>in</strong> Th<strong>in</strong>Manager by us<strong>in</strong>g the Shadow tab <strong>in</strong> the Detail<br />
pane of Th<strong>in</strong>Manager. To shadow, highlight the desired term<strong>in</strong>al <strong>in</strong> the Th<strong>in</strong>Manager tree and select<br />
the Shadow tab.<br />
ACP Th<strong>in</strong>Manager <strong>6.0</strong><br />
433 Shadow<strong>in</strong>g
Shadow – Shadow Scaled to W<strong>in</strong>dow<br />
The shadowed term<strong>in</strong>al can be viewed full-sized or scaled to fit <strong>in</strong> the Details pane. Select RemoteView ><br />
Shadow scaled to W<strong>in</strong>dow to scale the session and unselect the option to view it life sized.<br />
23.1.1 Shadow Access<br />
Access to the shadow function is controlled by membership <strong>in</strong> Th<strong>in</strong>Manager User Groups. By default only<br />
adm<strong>in</strong>istrators are allowed to shadow.<br />
Shadow<strong>in</strong>g privileges can be established through the use of Th<strong>in</strong>Manager Security Groups. The<br />
Th<strong>in</strong>Manager Adm<strong>in</strong>istrators and Adm<strong>in</strong>istrators can shadow term<strong>in</strong>als and <strong>in</strong>teractively<br />
control the term<strong>in</strong>al session.<br />
Th<strong>in</strong>Manager Power Users can shadow term<strong>in</strong>als from with<strong>in</strong> Th<strong>in</strong>Manager but cannot <strong>in</strong>teract<br />
with the session. They are <strong>in</strong> View-only mode.<br />
Th<strong>in</strong>Manager Interactive Shadow Users can shadow term<strong>in</strong>als from with<strong>in</strong> Th<strong>in</strong>Manager and<br />
can <strong>in</strong>teract with the session.<br />
Th<strong>in</strong>Manager Shadow Users can shadow term<strong>in</strong>als from with<strong>in</strong> Th<strong>in</strong>Manager but cannot <strong>in</strong>teract<br />
with the session. They are <strong>in</strong> View-only mode.<br />
Th<strong>in</strong>Manager Users cannot shadow a term<strong>in</strong>al.<br />
. See Th<strong>in</strong>Manager Security Groups for details.<br />
434 Shadow<strong>in</strong>g ACP Th<strong>in</strong>Manager <strong>6.0</strong>
RemoteView > Interactive Shadow on the menu bar prevents the <strong>in</strong>teraction with the shadowed session<br />
if unselected.<br />
RemoteView > Scaled to W<strong>in</strong>dow on the menu bar, if selected, will display the entire session <strong>in</strong> the<br />
Shadow tab. If unselected, it will display the session at normal size with scroll bars, if needed.<br />
23.1.2 Configure Shadow<strong>in</strong>g<br />
Shadow<strong>in</strong>g can be configured on the Term<strong>in</strong>al Options page of the Term<strong>in</strong>al Configuration Wizard or<br />
Term<strong>in</strong>al Group Configuration Wizard.<br />
Term<strong>in</strong>al Configuration Wizard - Shadow Configuration<br />
The Allow term<strong>in</strong>al to be shadowed drop-down box allows the configuration of Shadow<strong>in</strong>g Options.<br />
No - Prevents members of the Group from be<strong>in</strong>g shadowed.<br />
Ask - Will display a message w<strong>in</strong>dow that will prompt for a positive response before the<br />
shadow<strong>in</strong>g is allowed.<br />
Warn - Will display a message w<strong>in</strong>dow alert<strong>in</strong>g the term<strong>in</strong>al that it is to be shadowed, but<br />
doesn’t require a positive response before the shadow<strong>in</strong>g is allowed.<br />
Yes - Allows shadow<strong>in</strong>g to occur without warn<strong>in</strong>g or recipient <strong>in</strong>put.<br />
ACP Th<strong>in</strong>Manager <strong>6.0</strong> Shadow<strong>in</strong>g 435
Allow Interactive Shadow will allow members with Interactive Shadow privileges to shadow the term<strong>in</strong>al.<br />
The Interactive Shadow privileges are configured <strong>in</strong> the Th<strong>in</strong>Manager Server Configuration Wizard. See<br />
Th<strong>in</strong>Manager Server Configuration Wizard or Th<strong>in</strong>Manager Security Groups for details.<br />
Shadow<strong>in</strong>g is <strong>in</strong>itiated from the Shadow tab on the Details pane of the Th<strong>in</strong>Manager program.<br />
Unselect<strong>in</strong>g the Allow Interactive Shadow checkbox will prevent shadow<strong>in</strong>g from with<strong>in</strong> Th<strong>in</strong>Manager.<br />
23.1.3 Shadow Keystrokes<br />
Because the CTL+ALT+DEL and the CTL+ESC keystrokes can’t be sent to the local mach<strong>in</strong>e to the<br />
shadowed th<strong>in</strong> client, there is a menu item to send these commands. Select RemoteView > Send Key ><br />
Send Ctl+Alt+Del or RemoteView > Send Key > Send Ctl+Esc to send these commands.<br />
Note: The Key Block Module will block these commands from be<strong>in</strong>g sent to a shadowed session.<br />
Chang<strong>in</strong>g the tab or select<strong>in</strong>g another tree icon will break the shadow connection.<br />
23.1.4 Term<strong>in</strong>al-to-Term<strong>in</strong>al Shadow<strong>in</strong>g<br />
Term<strong>in</strong>al-to-Term<strong>in</strong>al shadow<strong>in</strong>g is made possible with Term<strong>in</strong>al Shadow display clients. A Term<strong>in</strong>al<br />
Shadow display client allows a term<strong>in</strong>al to shadow another term<strong>in</strong>al without needed to run the<br />
Th<strong>in</strong>Manager <strong>in</strong>terface or to be logged <strong>in</strong> as an adm<strong>in</strong>istrator. This Shadow Group can conta<strong>in</strong> a specific<br />
term<strong>in</strong>al or several term<strong>in</strong>als.<br />
See Term<strong>in</strong>al Shadow Display Clients for details on configur<strong>in</strong>g Term<strong>in</strong>al Shadow display clients.<br />
436 Shadow<strong>in</strong>g ACP Th<strong>in</strong>Manager <strong>6.0</strong>
23.1.4.1 Term<strong>in</strong>al Shadow Display Client<br />
Term<strong>in</strong>al Shadow Display Client - Group Name Page<br />
Configure the Term<strong>in</strong>al Shadow Display Client by select<strong>in</strong>g Term<strong>in</strong>al Shadow from the Type of Display<br />
Client drop-down after nam<strong>in</strong>g the group.<br />
Select the Next button to cont<strong>in</strong>ue.<br />
ACP Th<strong>in</strong>Manager <strong>6.0</strong> Shadow<strong>in</strong>g 437
23.1.4.2 Term<strong>in</strong>al Shadow Configuration<br />
The Term<strong>in</strong>al Shadow Display Client page allows the selection of the term<strong>in</strong>al or term<strong>in</strong>als to be<br />
shadowed.<br />
Term<strong>in</strong>al Shadow Display Client – All Term<strong>in</strong>als Available<br />
By default the Shadow Group is configured to allow all term<strong>in</strong>als to be shadowed.<br />
Unselect<strong>in</strong>g the All Term<strong>in</strong>als Available checkbox will allow the designation of specific term<strong>in</strong>als.<br />
438 Shadow<strong>in</strong>g ACP Th<strong>in</strong>Manager <strong>6.0</strong>
Term<strong>in</strong>al Shadow Display Client –Select Term<strong>in</strong>als<br />
Select the Add button to launch the term<strong>in</strong>al selection w<strong>in</strong>dow.<br />
ACP Th<strong>in</strong>Manager <strong>6.0</strong> Shadow<strong>in</strong>g 439
Select Term<strong>in</strong>al or Group W<strong>in</strong>dow<br />
Select a term<strong>in</strong>al for shadow<strong>in</strong>g by highlight<strong>in</strong>g it <strong>in</strong> the Select Term<strong>in</strong>al or Group w<strong>in</strong>dow and select<strong>in</strong>g<br />
the OK button. The w<strong>in</strong>dow will close after each selection.<br />
To add multiple term<strong>in</strong>als repeat the process by select<strong>in</strong>g the Add button on the Term<strong>in</strong>al Shadow<br />
Display Client page.<br />
440 Shadow<strong>in</strong>g ACP Th<strong>in</strong>Manager <strong>6.0</strong>
Term<strong>in</strong>al Shadow Display Client – Selected Term<strong>in</strong>als<br />
The Term<strong>in</strong>als to Shadow textbox will display the term<strong>in</strong>als added to the list.<br />
23.1.4.3 Shadow Selection Screen<br />
When a term<strong>in</strong>al launches a Shadow Display Client that has multiple members a Select Term<strong>in</strong>al to<br />
Shadow w<strong>in</strong>dow will be displayed to allow the selection of the term<strong>in</strong>al to shadow.<br />
ACP Th<strong>in</strong>Manager <strong>6.0</strong> Shadow<strong>in</strong>g 441
Term<strong>in</strong>al Selector<br />
Highlight the desired term<strong>in</strong>al and select the OK button.<br />
442 Shadow<strong>in</strong>g ACP Th<strong>in</strong>Manager <strong>6.0</strong>
24 Th<strong>in</strong>Manager Security<br />
24.1 Th<strong>in</strong>Manager Security Groups<br />
Access to Th<strong>in</strong>Manager can be assigned to W<strong>in</strong>dows User Groups on the Th<strong>in</strong>Manager Security<br />
Groups page.<br />
Th<strong>in</strong>Manager Security Groups<br />
Th<strong>in</strong>Manager allows different levels of access and functionality based on standard W<strong>in</strong>dows groups.<br />
ACP Th<strong>in</strong>Manager <strong>6.0</strong> Th<strong>in</strong>Manager Security 443
Standard W<strong>in</strong>dows Groups can be created <strong>in</strong> the Computer Management console and given different<br />
privileges <strong>in</strong> Th<strong>in</strong>Manager.<br />
Th<strong>in</strong>Manager comes with privileges pre-def<strong>in</strong>ed for six groups:<br />
<br />
<br />
<br />
<br />
<br />
Adm<strong>in</strong>istrators - The Microsoft def<strong>in</strong>ed Adm<strong>in</strong>istrator group is given all privileges by default <strong>in</strong><br />
Th<strong>in</strong>Manager. This may be denied by unselect<strong>in</strong>g the various W<strong>in</strong>dows User Group<br />
Permissions.<br />
Th<strong>in</strong>Manager Adm<strong>in</strong>istrators have full permission to do anyth<strong>in</strong>g with<strong>in</strong> Th<strong>in</strong>Manager <strong>in</strong>clud<strong>in</strong>g<br />
the power to logoff sessions, kill processes, send messages, restart term<strong>in</strong>als, calibrate touch<br />
screens, change term<strong>in</strong>al configurations, update firmware, update the TermCap, and restore<br />
configurations. Adm<strong>in</strong>istrators and members of Th<strong>in</strong>Manager Adm<strong>in</strong>istrators can shadow<br />
term<strong>in</strong>als and <strong>in</strong>teractively control the term<strong>in</strong>al session. These privileges may not be removed<br />
and will be grayed out.<br />
Th<strong>in</strong>Manager Interactive Shadow Users - Members of this group may shadow a term<strong>in</strong>al<br />
<strong>in</strong>teractively.<br />
Th<strong>in</strong>Manager Power Users can logoff sessions, kill processes, send messages, restart<br />
term<strong>in</strong>als, and calibrate touch screens. They cannot change term<strong>in</strong>al configurations, update<br />
firmware, update the TermCap, and restore configurations. Th<strong>in</strong>Manager Power Users can<br />
shadow term<strong>in</strong>als from with<strong>in</strong> Th<strong>in</strong>Manager but cannot <strong>in</strong>teract with the session.<br />
Th<strong>in</strong>Manager Shadow Users - Members of this group may shadow a term<strong>in</strong>al but not<br />
<strong>in</strong>teractively.<br />
Th<strong>in</strong>Manager Users can view only. They cannot logoff sessions, kill processes, send messages,<br />
restart term<strong>in</strong>als, or calibrate touch screens. Th<strong>in</strong>Manager Users cannot shadow a term<strong>in</strong>al.<br />
Additional W<strong>in</strong>dows User Groups can be configured by select<strong>in</strong>g the Add Group button to launch the<br />
New W<strong>in</strong>dows Group w<strong>in</strong>dow.<br />
New W<strong>in</strong>dow User Group W<strong>in</strong>dow<br />
Add<strong>in</strong>g a W<strong>in</strong>dows Group name <strong>in</strong> the field of the New W<strong>in</strong>dow Group w<strong>in</strong>dow and select<strong>in</strong>g the OK<br />
button will add the W<strong>in</strong>dows User Group to the drop-down list.<br />
Note: This doesn’t create the user group on any servers. This just adds the name of an exist<strong>in</strong>g group to<br />
the list that Th<strong>in</strong>Manager is ma<strong>in</strong>ta<strong>in</strong><strong>in</strong>g.<br />
444 Th<strong>in</strong>Manager Security ACP Th<strong>in</strong>Manager <strong>6.0</strong>
New Th<strong>in</strong>Manager Security Group<br />
Select the group from the W<strong>in</strong>dows Users Group drop-down. Choose the permissions you want to grant<br />
to the group by double click<strong>in</strong>g on the function <strong>in</strong> the Available W<strong>in</strong>dows User Group Permissions list.<br />
Members of the W<strong>in</strong>dows User Group will have the selected permissions the next time they log<strong>in</strong>.<br />
Although Th<strong>in</strong>Manager has W<strong>in</strong>dows User Groups pre-configured with privileges, these groups have not<br />
been created on the term<strong>in</strong>al servers.<br />
To create a W<strong>in</strong>dows User Group, open the Computer Management Console by select<strong>in</strong>g Start ><br />
Sett<strong>in</strong>gs > Control Panel > Adm<strong>in</strong>istrative Tools > Computer Management.<br />
ACP Th<strong>in</strong>Manager <strong>6.0</strong> Th<strong>in</strong>Manager Security 445
Created Th<strong>in</strong>Manager Security Groups<br />
Highlight Groups <strong>in</strong> the tree and select Action > New Group.<br />
Name the group and select the Create button.<br />
Add Users to the W<strong>in</strong>dows User Group.<br />
Members of the W<strong>in</strong>dows User Group will have the selected permissions the next time they log<strong>in</strong>.<br />
If groups are not created, members of the standard W<strong>in</strong>dows Adm<strong>in</strong>istrator group have full privileges <strong>in</strong><br />
Th<strong>in</strong>Manager while members of the standard W<strong>in</strong>dows User group will be denied access.<br />
Note: The th<strong>in</strong>server service will need to be stopped and restarted and the users will need to re-log<strong>in</strong> for<br />
the changes to take effect.<br />
446 Th<strong>in</strong>Manager Security ACP Th<strong>in</strong>Manager <strong>6.0</strong>
24.2 Th<strong>in</strong>Manager Server Security<br />
Th<strong>in</strong>Manager has a number of security sett<strong>in</strong>gs for the Th<strong>in</strong>Manager Server. Open the Th<strong>in</strong>Manager<br />
Server Configuration Wizard by right click<strong>in</strong>g on the Th<strong>in</strong>Manager Server <strong>in</strong> the tree and select<strong>in</strong>g<br />
Modify, or highlight the Th<strong>in</strong>Manager Server and select Edit > Modify from the menu.<br />
Th<strong>in</strong>Manager Server Configuration Wizard<br />
The second page of the wizard has two sett<strong>in</strong>gs related to security:<br />
Allow unknown term<strong>in</strong>als to connect - This, when unchecked, will prevent any new term<strong>in</strong>als<br />
connect<strong>in</strong>g to the system.<br />
Require passwords on unknown term<strong>in</strong>als - This checkbox, if checked, allows new term<strong>in</strong>als<br />
to be added, but only if the <strong>in</strong>staller has the password.<br />
Note: The use of this password sett<strong>in</strong>g <strong>in</strong> Th<strong>in</strong>Manager is an effective way to limit hardware addition to<br />
authorized users. DO NOT use the password sett<strong>in</strong>g <strong>in</strong> the BIOS of the hardware. Forgett<strong>in</strong>g the BIOS<br />
password can make the unit <strong>in</strong>operable.<br />
ACP Th<strong>in</strong>Manager <strong>6.0</strong> Th<strong>in</strong>Manager Security 447
Term<strong>in</strong>al Replacement<br />
On the Term<strong>in</strong>al Replacement page of the Th<strong>in</strong>Manager Server Configuration Wizard is the Enable<br />
replacement checkbox. This allows failed term<strong>in</strong>als to be replaced. If this is unchecked, term<strong>in</strong>als can still<br />
be added, but only by us<strong>in</strong>g the Create New Term<strong>in</strong>al process.<br />
This is a global sett<strong>in</strong>g that affects all term<strong>in</strong>als connected to this Th<strong>in</strong>Manager Server. The Enable<br />
replacement checkbox is also found on the Term<strong>in</strong>al Configuration Wizard of each term<strong>in</strong>al and the<br />
Term<strong>in</strong>al Group Configuration Wizard of each Term<strong>in</strong>al Group so that the sett<strong>in</strong>g can be applied to<br />
<strong>in</strong>dividual term<strong>in</strong>als and Term<strong>in</strong>al Groups.<br />
448 Th<strong>in</strong>Manager Security ACP Th<strong>in</strong>Manager <strong>6.0</strong>
24.2.1 W<strong>in</strong>dows Security<br />
The ACP Th<strong>in</strong>Manager system delivers a W<strong>in</strong>dows 2000/2003/2008 desktop to each th<strong>in</strong> client by<br />
default. Each th<strong>in</strong> client has full access to the server resources, as if it is the server. However, just<br />
because the th<strong>in</strong> client has the ability to have full access to the server resources doesn’t mean that the<br />
user should be granted full access to the server. To prevent unauthorized changes to the server, it is<br />
recommended that each user profile have security policies applied through the System Policy Editor to<br />
limit access to the needed functions. W<strong>in</strong>dows 2000/2003/2008 Security procedures are discussed <strong>in</strong> the<br />
W<strong>in</strong>dows on-l<strong>in</strong>e help and <strong>in</strong> many books and articles.<br />
Adm<strong>in</strong>istrators usually require that each user log<strong>in</strong> to a term<strong>in</strong>al with their personal account and have the<br />
Microsoft policy determ<strong>in</strong>e the user’s access rights.<br />
Note: Task Manager has a feature that allows the launch<strong>in</strong>g of applications. If us<strong>in</strong>g an Initial Application,<br />
access to Task Manager should be denied <strong>in</strong> the security policy or with the Key Block Module to prevent<br />
a user from launch<strong>in</strong>g unauthorized programs.<br />
ACP Th<strong>in</strong>Manager <strong>6.0</strong> Th<strong>in</strong>Manager Security 449
25 TermSecure<br />
25.1 TermSecure Overview<br />
TermSecure is a Th<strong>in</strong>Manager feature that allows users to logon to a th<strong>in</strong> client and access user-specific<br />
or term<strong>in</strong>al-specific Display Clients. This does not replace the W<strong>in</strong>dows logon, but adds an additional<br />
layer of security and control.<br />
TermSecure has two ma<strong>in</strong> strategies:<br />
<br />
SecureAccess or Term<strong>in</strong>al-specific Applications: You can assign a display client to a<br />
term<strong>in</strong>al and keep it hidden from operators with Permissions. A user with the proper<br />
TermSecure credentials will be able to reveal and access the hidden application.<br />
<br />
An example would be a recipe program that would allow a supervisor to <strong>in</strong>itiate a product<br />
change. This belongs to the station on the floor but you want to prevent users from <strong>in</strong>itiat<strong>in</strong>g<br />
the change.<br />
SmartContext or User-specific Applications: You can assign Display Clients to a<br />
TermSecure user and they can get access to it from any term<strong>in</strong>al <strong>in</strong> the plant. This can be<br />
<strong>in</strong>itiated by either manual log<strong>in</strong> or the use of an authentication device.<br />
This allows a user to leave one term<strong>in</strong>al, logon to a different term<strong>in</strong>al, and reconnect to their<br />
session, essentially hav<strong>in</strong>g the session follow him from term<strong>in</strong>al to term<strong>in</strong>al.<br />
An example would assign a session with reports to a quality control worker who could log<strong>in</strong><br />
anywhere and retrieve their reports.<br />
SecureAccess or Term<strong>in</strong>al-specific Applications are controlled with Permissions.<br />
SmartContext or User-specific Applications are controlled by add<strong>in</strong>g the Display Client to the<br />
TermSecure User configuration.<br />
Note: TermSecure requires the usage of Display Clients <strong>in</strong>stead of us<strong>in</strong>g <strong>in</strong>dividual term<strong>in</strong>al servers.<br />
Five licenses of TermSecure are <strong>in</strong>cluded with each Master License activation. Additional TermSecure<br />
licenses can be purchased to add to the Master License.<br />
ACP Th<strong>in</strong>Manager <strong>6.0</strong><br />
450 TermSecure
25.2 Users Types<br />
There are three types of users <strong>in</strong> a Th<strong>in</strong>Manager system. W<strong>in</strong>dows Users and TermSecure Users are<br />
important to TermSecure.<br />
25.2.1 W<strong>in</strong>dows Users<br />
W<strong>in</strong>dows Users are the Microsoft accounts created <strong>in</strong> W<strong>in</strong>dows that allow access to the W<strong>in</strong>dows<br />
term<strong>in</strong>al servers. These are configured with<strong>in</strong> W<strong>in</strong>dows and authenticated by W<strong>in</strong>dows. They can be<br />
given vary<strong>in</strong>g levels of access and power us<strong>in</strong>g W<strong>in</strong>dows User Groups and Group Policies.<br />
25.2.2 TermSecure Users<br />
TermSecure Users are users who can go to a th<strong>in</strong> client and receive access to specific Display Clients<br />
due to their membership <strong>in</strong> a TermSecure Access Group. The log<strong>in</strong> and authentication is done by<br />
Th<strong>in</strong>Manager a level above the W<strong>in</strong>dows log<strong>in</strong>.<br />
TermSecure grants and limits access to term<strong>in</strong>als and Display Clients but a W<strong>in</strong>dows User log<strong>in</strong> is still<br />
required to actually logon to the term<strong>in</strong>al server.<br />
25.2.3 Th<strong>in</strong>Manager Security Group Users<br />
Th<strong>in</strong>Manager Security Group Users are W<strong>in</strong>dows User Group members who have been configured <strong>in</strong><br />
the Th<strong>in</strong>Manager Server Configuration Wizard to have vary<strong>in</strong>g levels of access and control with<strong>in</strong> the<br />
Th<strong>in</strong>Manager program.<br />
These groups are configured on the Th<strong>in</strong>Manager Security Groups page of the Th<strong>in</strong>Manager Server<br />
Configuration wizard. See Th<strong>in</strong>Manager Security Groups for details.<br />
ACP Th<strong>in</strong>Manager <strong>6.0</strong> TermSecure 451
25.3 Deploy<strong>in</strong>g TermSecure<br />
TermSecure may require a number of steps to configure and deploy TermSecure:<br />
1. TermSecure Access Groups can to be created to use Permissions (optional).<br />
See Creat<strong>in</strong>g Permissions Groups for details.<br />
2. Term<strong>in</strong>als can be assigned TermSecure Access Groups to limit access to specific users<br />
(optional).<br />
See Permission Groups for Term<strong>in</strong>als for details.<br />
3. Display Clients can be assigned TermSecure Access Groups to limit access to specific users<br />
(optional).<br />
See Permission Groups for Display Clients for details.<br />
4. TermSecure Users need to be created.<br />
5. TermSecure Users can be assigned to TermSecure Access Groups (optional).<br />
See TermSecure User Configuration Wizard for details.<br />
6. A Log<strong>in</strong> strategy needs to be put <strong>in</strong> place. The TermSecure User can use the Term<strong>in</strong>al Log<strong>in</strong>,<br />
their TermSecure log<strong>in</strong>, or a W<strong>in</strong>dows log<strong>in</strong> to access the term<strong>in</strong>al servers.<br />
See W<strong>in</strong>dows Log<strong>in</strong> In<strong>format</strong>ion for details.<br />
7. USB drives and ProxCards, if used, need to have the identification number entered <strong>in</strong> their<br />
configuration (optional).<br />
See Card/Badge In<strong>format</strong>ion for details.<br />
8. The TermSecure User can then log<strong>in</strong> to a th<strong>in</strong> client us<strong>in</strong>g TermSecure<br />
TermSecure prompts the TermSecure User to log<strong>in</strong> to the term<strong>in</strong>al servers us<strong>in</strong>g a W<strong>in</strong>dows User<br />
account, or it will pass the pre-configured W<strong>in</strong>dows User account <strong>in</strong><strong>format</strong>ion to the term<strong>in</strong>al<br />
server for auto-log<strong>in</strong>, based on the log<strong>in</strong> strategy selected.<br />
9. The TermSecure User is granted access to all Display Clients that share the same TermSecure<br />
Access as the TermSecure User, and is denied access to Display Clients that they don’t share a<br />
TermSecure Access Group membership.<br />
452 TermSecure ACP Th<strong>in</strong>Manager <strong>6.0</strong>
26 Permissions<br />
Permissions restrict access to applications unless a person has been given a TermSecure log<strong>in</strong> and the<br />
match<strong>in</strong>g permission set.<br />
26.1 Creat<strong>in</strong>g Permissions Groups<br />
Permissions grant or limit access through the TermSecure Access Groups. Select the Permissions<br />
button <strong>in</strong> the Term<strong>in</strong>al Configuration Wizard, the Term<strong>in</strong>al Group Configuration Wizard, the Display<br />
Client Wizard, the TermSecure User Wizard, or the TermSecure Users Group Wizard to set these up.<br />
<br />
<br />
<br />
<br />
Term<strong>in</strong>al Permissions is the list of named permission groups whose members may<br />
access a term<strong>in</strong>al. The Unrestricted group does not require a membership to<br />
access.<br />
Term<strong>in</strong>al Group Permissions is the list of named permission groups whose<br />
members may access a term<strong>in</strong>al belong<strong>in</strong>g to the Term<strong>in</strong>al group. The Unrestricted<br />
group does not require membership to access.<br />
Display Client Permissions is a list of named permission groups whose members<br />
may access and view a Display Client. The Unrestricted group does not require a<br />
log<strong>in</strong>.<br />
TermSecure User Permissions is a list of named permission groups to which a<br />
TermSecure User belongs.<br />
TermSecure User Group Permissions is a list of named permission groups to<br />
which members of a TermSecure User Group belong.<br />
A TermSecure User can use a term<strong>in</strong>al when they share membership <strong>in</strong> a TermSecure<br />
Access Group.<br />
A TermSecure User can use a Display Client when they share membership <strong>in</strong> a TermSecure<br />
Access Group.<br />
ACP Th<strong>in</strong>Manager <strong>6.0</strong> Permissions 453
26.1.1.1 Creat<strong>in</strong>g a TermSecure Access Group<br />
Select<strong>in</strong>g Manage > TermSecure Access Groups from the Th<strong>in</strong>Manager menu will launch the Access<br />
Groups w<strong>in</strong>dow.<br />
Access Groups W<strong>in</strong>dow with Default Groups<br />
Select the Add button to add an Access Group. The Add button launches an Access Group w<strong>in</strong>dow.<br />
Permission Group Creation W<strong>in</strong>dow<br />
Enter a name for the new TermSecure Access Group and select OK to create the group.<br />
454 Permissions ACP Th<strong>in</strong>Manager <strong>6.0</strong>
Additional TermSecure Access Groups Created<br />
The created Access Groups will be displayed <strong>in</strong> the Access Group w<strong>in</strong>dow. These TermSecure Access<br />
Groups, like Microsoft User Groups, do not have sett<strong>in</strong>gs and parameters, but <strong>in</strong>stead get their<br />
usefulness by add<strong>in</strong>g members to them or apply<strong>in</strong>g restrictions to them.<br />
ACP Th<strong>in</strong>Manager <strong>6.0</strong> Permissions 455
26.2 Permission Groups for Term<strong>in</strong>als<br />
TermSecure Access Groups are assigned to a term<strong>in</strong>al with the Permissions button on the first page of<br />
the Term<strong>in</strong>al Configuration Wizard.<br />
Note: Remov<strong>in</strong>g the Unrestricted group from a term<strong>in</strong>al and replac<strong>in</strong>g it with a TermSecure Access group<br />
will render the term<strong>in</strong>al functionless until a member of the group logs <strong>in</strong>.<br />
Open the Term<strong>in</strong>al Configuration Wizard for an exist<strong>in</strong>g term<strong>in</strong>al by double click<strong>in</strong>g on it <strong>in</strong> the tree. Start<br />
the Term<strong>in</strong>al Configuration Wizard for a new term<strong>in</strong>al by select<strong>in</strong>g Edit > Add Term<strong>in</strong>al.<br />
Term<strong>in</strong>al Configuration Wizard<br />
Select the Permissions button on the first page of the Term<strong>in</strong>al Configuration Wizard to launch the<br />
Permissions w<strong>in</strong>dow to apply the TermSecure Access Groups to the term<strong>in</strong>al.<br />
456 Permissions ACP Th<strong>in</strong>Manager <strong>6.0</strong>
Permissions W<strong>in</strong>dow<br />
By default, the term<strong>in</strong>al uses the Unrestricted access group, allow<strong>in</strong>g anyone access to the Display<br />
Clients that are assigned to the term<strong>in</strong>al.<br />
If Additional Permission Groups are configured, they will be displayed <strong>in</strong> the Available list. Access can be<br />
granted or denied by mov<strong>in</strong>g the Access Groups <strong>in</strong>to or out of the Member Of list by double click<strong>in</strong>g or<br />
highlight<strong>in</strong>g the desired group and select<strong>in</strong>g an arrow.<br />
Object Permissions<br />
If the term<strong>in</strong>al has the Unrestricted access group removed from Member Of list and is replaced by other<br />
Access Groups, TermSecure will deny access to the term<strong>in</strong>al except for members of the selected access<br />
groups.<br />
Note: Remov<strong>in</strong>g the Unrestricted group from a term<strong>in</strong>al and add<strong>in</strong>g a different group will render the<br />
term<strong>in</strong>al functionless until a member of the group logs <strong>in</strong>.<br />
Select OK to close the Permissions w<strong>in</strong>dow.<br />
ACP Th<strong>in</strong>Manager <strong>6.0</strong> Permissions 457
26.3 Permission Groups for Display Clients<br />
TermSecure Access Groups are assigned to a Display Client with the Permissions button on the first<br />
page of the Display Client Wizard.<br />
Open the Display Client Wizard for an exist<strong>in</strong>g Display Client by double click<strong>in</strong>g on it <strong>in</strong> the tree. Start the<br />
Display Client Configuration Wizard for a new Display Client by right click<strong>in</strong>g on the Display Client branch<br />
icon and select<strong>in</strong>g Add Display Client.<br />
Display Client Configuration Wizard<br />
Select the Permissions button on the first page of the Display Client Configuration Wizard to launch the<br />
Permissions w<strong>in</strong>dow to apply the TermSecure Access Group to the Display Client.<br />
458 Permissions ACP Th<strong>in</strong>Manager <strong>6.0</strong>
Permissions<br />
By default, the Display Client uses the Unrestricted access group, allow<strong>in</strong>g anyone access to the<br />
Term<strong>in</strong>al Server.<br />
If Additional Permission Groups are configured, they will be displayed <strong>in</strong> the Available list. Access can be<br />
granted or denied by mov<strong>in</strong>g the Access Groups <strong>in</strong>to or out of the Member Of list by double click<strong>in</strong>g or<br />
highlight<strong>in</strong>g the desired group and select<strong>in</strong>g an arrow.<br />
Permissions Changed<br />
If the Display Client has the Unrestricted access group removed from Member Of list and is replaced by<br />
other Access Groups, TermSecure will deny access to the term<strong>in</strong>al except for members of the selected<br />
access groups.<br />
Note: Remov<strong>in</strong>g the Unrestricted group from a term<strong>in</strong>al and add<strong>in</strong>g a different group will hide the Display<br />
Client until a member of the group logs <strong>in</strong>.<br />
Select OK to close the Permissions w<strong>in</strong>dow.<br />
ACP Th<strong>in</strong>Manager <strong>6.0</strong> Permissions 459
26.4 Permission Groups for TermSecure Users<br />
TermSecure Access Group permissions can be applied to TermSecure Users. This is useful for<br />
SecureAccess or Term<strong>in</strong>al-specific Applications.<br />
Create a TermSecure User to apply the permissions by right click<strong>in</strong>g on the TermSecure User branch of<br />
the Th<strong>in</strong>Manager tree and select<strong>in</strong>g Add TermSecure User.<br />
TermSecure Access Groups are configured on the first page of the wizard by select<strong>in</strong>g the Permissions<br />
button.<br />
26.4.1.1 TermSecure User In<strong>format</strong>ion<br />
TermSecure User In<strong>format</strong>ion<br />
Select<strong>in</strong>g the Permissions button will open the Permissions w<strong>in</strong>dow that allows the assignment of a<br />
TermSecure Access Groups.<br />
460 Permissions ACP Th<strong>in</strong>Manager <strong>6.0</strong>
Permissions<br />
The Permissions w<strong>in</strong>dow for TermSecure Users does not show the Unrestricted or the All Users<br />
groups, just the created groups. Access can be granted or denied by mov<strong>in</strong>g the Access Groups <strong>in</strong>to or<br />
out of the Member Of list by double click<strong>in</strong>g or highlight<strong>in</strong>g the desired group and select<strong>in</strong>g an arrow.<br />
Select OK to close the Permissions w<strong>in</strong>dow.<br />
Select Next to cont<strong>in</strong>ue with the TermSecure User Configuration Wizard.<br />
ACP Th<strong>in</strong>Manager <strong>6.0</strong> Permissions 461
26.4.1.2 Card / Badge In<strong>format</strong>ion<br />
The second page of the TermSecure User Configuration Wizard is the Card/Badge In<strong>format</strong>ion page.<br />
Card / Badge In<strong>format</strong>ion Page<br />
The Card / Badge In<strong>format</strong>ion Page enables the use of Identification devices such as USB flash drives,<br />
HID ProxCards, and WaveTrend Radio Frequency IDs (RFIDs) as log<strong>in</strong> devices. This will be covered<br />
later. See Card and Badge Configuration for a TermSecure User for details<br />
Note: Term<strong>in</strong>als us<strong>in</strong>g the USB flash drives, HID ProxCards, and WaveTrend RFIDs, as log<strong>in</strong> devices will<br />
need the appropriate module added. See TermSecure Modules for details.<br />
Select the Next button to cont<strong>in</strong>ue with the configuration.<br />
462 Permissions ACP Th<strong>in</strong>Manager <strong>6.0</strong>
26.4.1.3 Display Client Selection<br />
The next page of the TermSecure User Configuration Wizard is the Display Client Selection page.<br />
Display Client Selection<br />
The Display Client Selection page allows Display Clients to be assigned to the TermSecure User.<br />
Add User specific Display Clients - This sett<strong>in</strong>g, if set to No, will allow the TermSecure User to access<br />
the display client hidden on a term<strong>in</strong>al with the TermSecure Access Group permissions. This is used with<br />
SecureAccess or Term<strong>in</strong>al-specific Applications.<br />
This sett<strong>in</strong>g, if set to Yes, will allow the selection of Display Clients for the TermSecure User that will be<br />
added to the term<strong>in</strong>al when the TermSecure User logs <strong>in</strong> top the term<strong>in</strong>al. This is used with SmartContext<br />
or User-specific Applications.<br />
Select the Next button to cont<strong>in</strong>ue with the configuration.<br />
ACP Th<strong>in</strong>Manager <strong>6.0</strong> Permissions 463
26.4.1.4 Term<strong>in</strong>al Interface Options<br />
The next page of the TermSecure User Configuration Wizard is the Term<strong>in</strong>al Interface Options page.<br />
Term<strong>in</strong>al Interface Options<br />
The Term<strong>in</strong>al Interface Options page sets the menus and hotkeys for the TermSecure User so a<br />
term<strong>in</strong>al us<strong>in</strong>g MultiSession will need to have a method to switch between sessions.<br />
See Term<strong>in</strong>al Interface Options for details.<br />
464 Permissions ACP Th<strong>in</strong>Manager <strong>6.0</strong>
26.4.1.5 Term<strong>in</strong>al Hotkey Options<br />
The next page of the TermSecure User Configuration Wizard is the Term<strong>in</strong>al Hotkey Options page.<br />
Term<strong>in</strong>al Hotkey Options<br />
Term<strong>in</strong>al Hotkeys on the Hotkey Configuration page allows the selection of keyboard comb<strong>in</strong>ations<br />
that allow switch<strong>in</strong>g between sessions.<br />
See Term<strong>in</strong>al Hotkeys for details.<br />
ACP Th<strong>in</strong>Manager <strong>6.0</strong> Permissions 465
26.4.1.6 User Options<br />
The f<strong>in</strong>al page of the TermSecure User Configuration Wizard is the User Options page.<br />
See User Options for details.<br />
Select F<strong>in</strong>ish to f<strong>in</strong>ish the configuration.<br />
User Options<br />
466 Permissions ACP Th<strong>in</strong>Manager <strong>6.0</strong>
26.5 Shortcut Method of Add<strong>in</strong>g TermSecure Access<br />
Groups<br />
Members can be added to TermSecure Access Groups quickly through the TermSecure Access Group<br />
Wizard.<br />
Open the TermSecure Access Group Wizard by select<strong>in</strong>g Manage > TermSecure Access Groups from<br />
the Th<strong>in</strong>Manager menu. This will launch the Access Groups w<strong>in</strong>dow.<br />
Access Groups W<strong>in</strong>dow<br />
Highlight the desired TermSecure Access Group and select the Edit button.<br />
ACP Th<strong>in</strong>Manager <strong>6.0</strong> Permissions 467
Access Group W<strong>in</strong>dow<br />
Select the Edit Members button to launch the Access Group Members w<strong>in</strong>dow.<br />
Access Group Members W<strong>in</strong>dow<br />
Select the Term<strong>in</strong>als, Display Clients, or TermSecure Users radio button to configure that category<br />
and select the Add button.<br />
468 Permissions ACP Th<strong>in</strong>Manager <strong>6.0</strong>
Select Term<strong>in</strong>al W<strong>in</strong>dow<br />
A Select Term<strong>in</strong>al w<strong>in</strong>dow will be displayed with a tree of the configured term<strong>in</strong>als and term<strong>in</strong>al groups.<br />
Select the desired term<strong>in</strong>als and term<strong>in</strong>al groups and select OK for each addition.<br />
Access Group Members<br />
ACP Th<strong>in</strong>Manager <strong>6.0</strong> Permissions 469
The Access Group Members w<strong>in</strong>dow will show the members of the TermSecure Access Group. These<br />
can be removed by highlight<strong>in</strong>g and select<strong>in</strong>g the Remove button.<br />
Display Clients and TermSecure Users can be added by the same process of add<strong>in</strong>g by select<strong>in</strong>g the<br />
appropriate radio button.<br />
Display Client Selection<br />
Member Display Clients<br />
Members can be removed by highlight<strong>in</strong>g them and select<strong>in</strong>g the Remove button.<br />
470 Permissions ACP Th<strong>in</strong>Manager <strong>6.0</strong>
ACP Th<strong>in</strong>Manager <strong>6.0</strong> Permissions 471
26.6 TermSecure User Configuration Wizard<br />
A TermSecure User can be configured with a user name, password, and user-specific Display Clients.<br />
When the user logs <strong>in</strong>to a term<strong>in</strong>al with that identity, TermSecure will allow the user access to the<br />
personalized Display Clients for that user <strong>in</strong> addition to the Display Clients already assigned to the<br />
term<strong>in</strong>al.<br />
Note: The TermSecure Users branch of the Th<strong>in</strong>Manager tree will not be visible unless a Master License<br />
is <strong>in</strong>stalled on the Th<strong>in</strong>Manager Server.<br />
The TermSecure User Configuration Wizard is launched by right click<strong>in</strong>g on the TermSecure Users<br />
branch of the Th<strong>in</strong>Manager tree and select Add TermSecure User.<br />
26.6.1.1 TermSecure User In<strong>format</strong>ion<br />
The first page of the TermSecure User Configuration Wizard is the TermSecure User In<strong>format</strong>ion<br />
page.<br />
Th<strong>in</strong>Manager User In<strong>format</strong>ion<br />
472 Permissions ACP Th<strong>in</strong>Manager <strong>6.0</strong>
The TermSecure User In<strong>format</strong>ion has fields for the user name and password that will be used by the<br />
TermSecure User to log <strong>in</strong>to Th<strong>in</strong>Manager security to access TermSecure functions.<br />
The TermSecure User In<strong>format</strong>ion is for account <strong>in</strong><strong>format</strong>ion:<br />
<br />
<br />
<br />
<br />
User Name - Enter the user name that the user will use to log <strong>in</strong>to the TermSecure system.<br />
Although this can be the same as the W<strong>in</strong>dows user name, the TermSecure user name is<br />
<strong>in</strong>dependent of the Microsoft W<strong>in</strong>dows log<strong>in</strong>. This TermSecure user name can be tied to a<br />
W<strong>in</strong>dows log<strong>in</strong> later <strong>in</strong> the wizard on the W<strong>in</strong>dows Log<strong>in</strong> Page.<br />
Password - Enter the password for the TermSecure User <strong>in</strong> this field.<br />
Verify Password - Re- enter the password for the Th<strong>in</strong>Manager User <strong>in</strong> this field.<br />
The Password Options button launches the Password Ma<strong>in</strong>tenance Options w<strong>in</strong>dow that<br />
regulates rules for the Th<strong>in</strong>Manager User password.<br />
Password Ma<strong>in</strong>tenance Options<br />
Password Complexity Requirements:<br />
M<strong>in</strong>imum Password Length - Sets the amount of characters that the password must conta<strong>in</strong> to<br />
be valid.<br />
Must conta<strong>in</strong> numbers - This checkbox, if checked, will require that the password conta<strong>in</strong> at<br />
least one number <strong>in</strong> it.<br />
Must conta<strong>in</strong> symbols - This checkbox, if checked, will require that the password conta<strong>in</strong> at<br />
least one symbol <strong>in</strong> it.<br />
Must conta<strong>in</strong> capital letters - This checkbox, if checked, will require that the password conta<strong>in</strong><br />
at least one capital letter <strong>in</strong> it.<br />
Password Ma<strong>in</strong>tenance:<br />
Allow User to change password - This checkbox, if checked, will allow the user to change the<br />
password at the TermSecure menu.<br />
Force User to change password at next log<strong>in</strong> - This checkbox, if checked, will require the user<br />
to change the password at the TermSecure menu when they log<strong>in</strong> the next time.<br />
ACP Th<strong>in</strong>Manager <strong>6.0</strong> Permissions 473
Force User to change password periodically - This checkbox, if checked, will require the user<br />
to change the password at the TermSecure menu on the schedule set by the User must change<br />
password every X days field.<br />
User must change password every X days - This field sets the time period between the<br />
scheduled password changes caused by the Force User to change password periodically<br />
checkbox.<br />
The OK button closes the w<strong>in</strong>dow with any changes. The Cancel button closes the w<strong>in</strong>dow without<br />
changes.<br />
Group:<br />
<br />
The Change Group button opens the Choose User Group w<strong>in</strong>dow that allows a User to be<br />
placed <strong>in</strong> an exist<strong>in</strong>g TermSecure Users Group.<br />
Choose User Group<br />
If TermSecure User Groups have been created, the Choose User Group w<strong>in</strong>dow will display the<br />
TermSecure User Group branch of the Th<strong>in</strong>Manager tree.<br />
<br />
<br />
To add the TermSecure User to a TermSecure Users Group, highlight the desired TermSecure<br />
Users Group and select the OK button.<br />
To change the TermSecure User to a different TermSecure Users Group, highlight the desired<br />
TermSecure Users Group and select the OK button.<br />
To remove the TermSecure User from all TermSecure Users Groups, highlight the top-level<br />
Users branch and select the OK button.<br />
The OK button closes the w<strong>in</strong>dow with any changes. The Cancel button closes the w<strong>in</strong>dow without<br />
changes.<br />
Copy Sett<strong>in</strong>gs:<br />
474 Permissions ACP Th<strong>in</strong>Manager <strong>6.0</strong>
The Copy Sett<strong>in</strong>gs from another User checkbox, if selected, activates the Copy From button<br />
that allows the configuration of an exist<strong>in</strong>g TermSecure User to be applied to the current<br />
TermSecure User.<br />
The Copy From button opens the Select User w<strong>in</strong>dow that allows the selection of the desired<br />
TermSecure User configuration.<br />
Select User W<strong>in</strong>dow<br />
The Select User w<strong>in</strong>dow will show a tree with the exist<strong>in</strong>g TermSecure User Groups and the TermSecure<br />
Users.<br />
Highlight the TermSecure User whose configuration you want to copy and select the OK button. The OK<br />
button closes the w<strong>in</strong>dow with any changes. The Cancel button closes the w<strong>in</strong>dow without changes.<br />
ACP Th<strong>in</strong>Manager <strong>6.0</strong> Permissions 475
26.6.1.2 Card / Badge In<strong>format</strong>ion<br />
The next page of the TermSecure User Configuration Wizard is the Card/Badge In<strong>format</strong>ion page.<br />
Card / Badge In<strong>format</strong>ion Page<br />
The Card / Badge In<strong>format</strong>ion Page enables the use of Identification devices such as USB flash drives,<br />
HID ProxCards, and WaveTrend Radio Frequency IDs (RFIDs) as log<strong>in</strong> devices. This will be covered<br />
later. See Card and Badge Configuration for a TermSecure User for details<br />
Note: Term<strong>in</strong>als us<strong>in</strong>g the USB flash drives, HID ProxCards, and WaveTrend RFIDs, as log<strong>in</strong> devices will<br />
need the appropriate module added. See TermSecure Modules for details.<br />
Select the Next button to cont<strong>in</strong>ue with the configuration.<br />
476 Permissions ACP Th<strong>in</strong>Manager <strong>6.0</strong>
26.6.1.3 Display Client Selection<br />
The next page of the TermSecure User Configuration Wizard is the Display Client Selection page.<br />
Display Client Selection<br />
The Display Client Selection page allows Display Clients to be assigned to the TermSecure User. When<br />
the TermSecure User logs onto a term<strong>in</strong>al, these Display Clients will be available on the term<strong>in</strong>al for him.<br />
Add User specific Display Clients - This sett<strong>in</strong>g, if set to Yes, will allow the selection of Display Clients<br />
for the TermSecure User that will be added to the term<strong>in</strong>al when the TermSecure User logs <strong>in</strong> top the<br />
term<strong>in</strong>al. This provides the user-specific Display Clients.<br />
This sett<strong>in</strong>g, if set to No, will rely on Permissions to grant access to term<strong>in</strong>al-specific Display Clients.<br />
Select the Next button to cont<strong>in</strong>ue with the configuration.<br />
ACP Th<strong>in</strong>Manager <strong>6.0</strong> Permissions 477
26.6.1.4 Display Client Specification<br />
The next page of the TermSecure User Configuration Wizard is the Display Client Specification<br />
page.<br />
Display Client Specification Page<br />
The Display Client Specification page allows Display Clients to be assigned to the TermSecure User if<br />
the Add User specific Display Clients radio button is set to Yes.<br />
Move a Display Client you want the TermSecure User to use <strong>in</strong>to the Selected Display Clients list by<br />
double-click<strong>in</strong>g on it <strong>in</strong> the Available Display Clients list or by highlight<strong>in</strong>g it and click<strong>in</strong>g the Right<br />
Arrow button.<br />
To add a new Display Client, select the Edit Display Clients button to launch the Display Client Wizard.<br />
See Display Client List for details.<br />
Select the Next button to cont<strong>in</strong>ue with the configuration.<br />
478 Permissions ACP Th<strong>in</strong>Manager <strong>6.0</strong>
26.6.1.5 W<strong>in</strong>dows Log<strong>in</strong> In<strong>format</strong>ion<br />
The next page of the TermSecure User Configuration Wizard is the W<strong>in</strong>dows Log In In<strong>format</strong>ion<br />
page.<br />
W<strong>in</strong>dows Log<strong>in</strong> In<strong>format</strong>ion<br />
The W<strong>in</strong>dows Log In In<strong>format</strong>ion page allows the configuration of how the TermSecure User will log on<br />
to the W<strong>in</strong>dows term<strong>in</strong>al servers.<br />
There are several W<strong>in</strong>dows log<strong>in</strong> options for the TermSecure User.<br />
1. The TermSecure User can use the term<strong>in</strong>al’s username and password to auto-log on to the<br />
term<strong>in</strong>al server. To do this, check the Use Term<strong>in</strong>al Configuration Log<strong>in</strong> In<strong>format</strong>ion checkbox<br />
2. The TermSecure User can use the TermSecure User username and password to auto-log on to<br />
the term<strong>in</strong>al server. To do this, check the Same as TermSecure User username/password<br />
checkbox. The TermSecure User username and password must match a W<strong>in</strong>dows User<br />
username and password to get authenticated by W<strong>in</strong>dows.<br />
3. The TermSecure User can use a separate username and password to auto-log on to the term<strong>in</strong>al<br />
server. To do this, use the fields for the Username, Password, and Doma<strong>in</strong> that are provided.<br />
4. The TermSecure User can be required to manually log onto the term<strong>in</strong>al servers. To do this,<br />
leave the checkboxes unchecked and the Username, Password, and Doma<strong>in</strong> empty.<br />
ACP Th<strong>in</strong>Manager <strong>6.0</strong> Permissions 479
Select the Next button to cont<strong>in</strong>ue with the configuration.<br />
26.6.1.6 Term<strong>in</strong>al Interface Options<br />
The next page of the TermSecure User Configuration Wizard is the Term<strong>in</strong>al Interface Options page.<br />
Term<strong>in</strong>al Interface Options<br />
The Term<strong>in</strong>al Interface Options page sets the menus and hotkeys for the TermSecure User so a<br />
term<strong>in</strong>al us<strong>in</strong>g MultiSession will need to have a method to switch between sessions.<br />
Group Selector Options allow on-screen switch<strong>in</strong>g of sessions.<br />
Use Term<strong>in</strong>al Sett<strong>in</strong>gs - This checkbox, when selected, will let the TermSecure User <strong>in</strong>herit the<br />
properties that were configured for use with the term<strong>in</strong>al.<br />
<br />
<br />
<br />
<br />
<br />
Show Group Selector on Term<strong>in</strong>al - This checkbox, if selected, will display an on-screen dropdown<br />
menu that can be activated by mouse.<br />
Enable Til<strong>in</strong>g - This checkbox, if selected, allows the sessions to be tiled so that the user can<br />
make a visual selection of the desired selection.<br />
Screen Edge Group Selection - This checkbox, if selected, will activate a feature that will switch<br />
w<strong>in</strong>dows if the mouse is moved off screen.<br />
Selector Options - This button, if selected, will launch the Group Selector Options w<strong>in</strong>dow.<br />
Til<strong>in</strong>g Options - This button, if selected, will launch the Tile Options w<strong>in</strong>dow.<br />
480 Permissions ACP Th<strong>in</strong>Manager <strong>6.0</strong>
Group Selector Options W<strong>in</strong>dow<br />
The Group Selector Options w<strong>in</strong>dow has several sett<strong>in</strong>gs.<br />
The Auto-hide Group Selector checkbox will hide the Group Selector until the mouse is moved<br />
to that space.<br />
The Tile on Group Selector checkbox, when selected, will tile the Display Clients when the autohid<br />
selector is chosen. This allows the user to select from the available sessions.<br />
Select the OK button to accept changes or the Cancel button to close.<br />
The Til<strong>in</strong>g Options button will launch the Group Selector Options w<strong>in</strong>dow that allows configuration of<br />
the on-screen Group Selector bar.<br />
Tile Options<br />
The Tile Options w<strong>in</strong>dow has several sett<strong>in</strong>gs.<br />
Show Grid – This checkbox, when selected, will show the tiled sessions <strong>in</strong> a grid with each grid<br />
labeled with the session name as while the session is load<strong>in</strong>g.<br />
Tile Inactivity Time – This field sets the length of time that the term<strong>in</strong>al screen will stay focused<br />
on a selected session before revert<strong>in</strong>g back to a tiled state due to <strong>in</strong>activity.<br />
Tile Display Clients at startup – This checkbox, when selected, will show the sessions tiled<br />
when the term<strong>in</strong>al first connects to its sessions.<br />
Include Ma<strong>in</strong> Menu as tile – This checkbox, when selected, will <strong>in</strong>clude a session display<strong>in</strong>g the<br />
TermSecure Ma<strong>in</strong> Menu.<br />
Tile on Right click (mouse or touchscreen) - This checkbox, when selected, will <strong>in</strong>itiate til<strong>in</strong>g<br />
when a session is right clicked.<br />
Tile Interactive – This checkbox, when selected, will allow a user to click <strong>in</strong>to a tiled session and<br />
control it <strong>in</strong>teractively without switch<strong>in</strong>g focus to a s<strong>in</strong>gle session. To focus on a s<strong>in</strong>gle session<br />
use the Group Selector Dropdown or the til<strong>in</strong>g hotkey (CTL + T), if enabled.<br />
Select the OK button to accept changes or the Cancel button to close.<br />
The Ma<strong>in</strong> Menu Options button will launch the Ma<strong>in</strong> Menu Options w<strong>in</strong>dow that allows configuration of<br />
the TermSecure Ma<strong>in</strong> Menu.<br />
ACP Th<strong>in</strong>Manager <strong>6.0</strong> Permissions 481
Ma<strong>in</strong> Menu Options W<strong>in</strong>dow<br />
The Allow Reboot/Restart checkbox, if selected, will add a Reboot and Restart button to the ma<strong>in</strong> menu.<br />
26.6.1.7 Term<strong>in</strong>al Hotkey Options<br />
The next page of the TermSecure User Configuration Wizard is the Term<strong>in</strong>al Hotkey Options page.<br />
Term<strong>in</strong>al Hotkey Options<br />
Term<strong>in</strong>al Hotkeys on the Hotkey Configuration page allows the selection of keyboard comb<strong>in</strong>ations<br />
that allow switch<strong>in</strong>g between sessions.<br />
Use Term<strong>in</strong>al Sett<strong>in</strong>gs - This checkbox, when selected, will let the TermSecure User <strong>in</strong>herit the<br />
properties that were configured for use with the term<strong>in</strong>al.<br />
482 Permissions ACP Th<strong>in</strong>Manager <strong>6.0</strong>
Enable Instant Failover Hotkeys - This checkbox, if selected, allows the hot key switch<strong>in</strong>g<br />
between the two active sessions of a Display Client that is us<strong>in</strong>g Instant Failover.<br />
Enable Group Hotkeys - This checkbox, if selected, allows the hot key switch<strong>in</strong>g between<br />
different sessions of a term<strong>in</strong>al us<strong>in</strong>g MultiSession.<br />
Enable Til<strong>in</strong>g Hotkey – This checkbox, if selected, allows SessionTil<strong>in</strong>g to be activated by a<br />
hotkey comb<strong>in</strong>ation.<br />
Select<strong>in</strong>g the Change Hotkeys button when Enable Instant Failover Hotkeys is selected will allow the<br />
hotkeys to be changed from the default.<br />
Select Instant Failover Hotkeys<br />
The default hotkey for Instant Failover switch<strong>in</strong>g is set to Control+F9. This can be changed by select<strong>in</strong>g<br />
the Alt Key radio button or us<strong>in</strong>g the drop-down to select another function key.<br />
Select<strong>in</strong>g the Change Hotkeys button when Enable Group Hotkeys is selected will allow the<br />
MultiSession switch<strong>in</strong>g hotkeys to be changed from the default.<br />
ACP Th<strong>in</strong>Manager <strong>6.0</strong> Permissions 483
Select MultiSession Switch<strong>in</strong>g Hotkeys<br />
The default hotkey for MultiSession switch<strong>in</strong>g is set to Control+Page Up and Control+Page Down. This<br />
can be changed by select<strong>in</strong>g the Alt Key radio button or us<strong>in</strong>g the drop-down to select another hot key.<br />
Select<strong>in</strong>g the Change Hotkeys button when Enable Til<strong>in</strong>g Hotkeys is selected will allow the hotkeys to<br />
be changed from the default.<br />
Select SessionTil<strong>in</strong>g Hotkeys<br />
The default hotkey for SessionTil<strong>in</strong>g activation is set to Control+t. This can be changed by select<strong>in</strong>g the<br />
Alt Key radio button or us<strong>in</strong>g the drop-down to select another hot key.<br />
Select the OK button to cont<strong>in</strong>ue or the Cancel button to close without accept<strong>in</strong>g changes.<br />
484 Permissions ACP Th<strong>in</strong>Manager <strong>6.0</strong>
26.6.1.8 User Options<br />
The f<strong>in</strong>al page of the TermSecure User Configuration Wizard is the User Options page.<br />
User Options<br />
Log In / Log Out Options<br />
Inactivity Timeout - TermSecure will log a TermSecure Users off the term<strong>in</strong>al after this much<br />
<strong>in</strong>active time has passed.<br />
Reset Sessions at Logout - This checkbox, if selected, will logoff a session when the<br />
TermSecure User logs off.<br />
Activate User Group at Log In - This checkbox, if selected, will display the TermSecure User’s<br />
first Display Client when the user logs <strong>in</strong> to the term<strong>in</strong>al.<br />
User Schedule<br />
Set Schedule -<br />
Select<strong>in</strong>g the Schedule button on the User Options page will launch the Event Schedule w<strong>in</strong>dow and<br />
allow a schedule to be created for term<strong>in</strong>al events.<br />
See Term<strong>in</strong>al Schedule for details.<br />
Term<strong>in</strong>al Effects<br />
ACP Th<strong>in</strong>Manager <strong>6.0</strong> Permissions 485
Enable Term<strong>in</strong>al Effects - This allows the use of Term<strong>in</strong>al Effects. This currently <strong>in</strong>cludes slid<strong>in</strong>g<br />
W<strong>in</strong>dows and message rollups.<br />
Shadow<strong>in</strong>g<br />
<br />
Allow term<strong>in</strong>al to be shadowed - This drop-down box allows the configuration of Shadow<strong>in</strong>g<br />
Options.<br />
o No - Prevents the TermSecure Users from be<strong>in</strong>g shadowed.<br />
o<br />
o<br />
o<br />
Ask - Will display a message w<strong>in</strong>dow that will prompt for a positive response before the<br />
shadow<strong>in</strong>g is allowed.<br />
Warn - Will display a message w<strong>in</strong>dow alert<strong>in</strong>g the term<strong>in</strong>al that it is to be shadowed, but<br />
doesn’t require a positive response before the shadow<strong>in</strong>g is allowed.<br />
Yes - Allows shadow<strong>in</strong>g to occur without warn<strong>in</strong>g or recipient <strong>in</strong>put.<br />
Allow Interactive Shadow - This checkbox, if selected, will allow members with Interactive<br />
Shadow privileges to shadow this TermSecure User.<br />
Shadow<strong>in</strong>g is <strong>in</strong>itiated from the Shadow tab on the Details pane of the Th<strong>in</strong>Manager program.<br />
Unselect<strong>in</strong>g this will prevent shadow<strong>in</strong>g from with<strong>in</strong> Th<strong>in</strong>Manager.<br />
Select F<strong>in</strong>ish to f<strong>in</strong>ish the configuration.<br />
486 Permissions ACP Th<strong>in</strong>Manager <strong>6.0</strong>
26.7 TermSecure Users Group Configuration Wizard<br />
TermSecure Users can be organized <strong>in</strong>to TermSecure User Groups, just as Term<strong>in</strong>als can be organized<br />
<strong>in</strong>to Term<strong>in</strong>al Groups. Each sett<strong>in</strong>g of the TermSecure Group has a Group Sett<strong>in</strong>g checkbox. If this box is<br />
selected then that sett<strong>in</strong>g will be applied to each member of the TermSecure Group.<br />
The TermSecure Users Group Configuration Wizard can be launched by right click<strong>in</strong>g on the<br />
TermSecure Users branch of the tree and select<strong>in</strong>g Add TermSecure User Group.<br />
26.7.1.1 TermSecure User Group In<strong>format</strong>ion<br />
The first page of the TermSecure Group Configuration Wizard is the TermSecure User Group<br />
In<strong>format</strong>ion page.<br />
Th<strong>in</strong>Manager User Group In<strong>format</strong>ion<br />
The TermSecure User Group In<strong>format</strong>ion has fields for the group name and membership.<br />
User Name - This field names the TermSecure User Group.<br />
Group Sett<strong>in</strong>g - This checkbox, if selected, applies this configuration to all members of the group.<br />
ACP Th<strong>in</strong>Manager <strong>6.0</strong> Permissions 487
The rest of the TermSecure Group Configuration cont<strong>in</strong>ues as the TermSecure User Configuration, with<br />
the addition of the Group Sett<strong>in</strong>g checkboxes.<br />
TermSecure Group Configuration Wizard<br />
Group Sett<strong>in</strong>gs that are selected will be grayed out for members of the group. Group Sett<strong>in</strong>gs that<br />
aren’t selected will be available for configuration on the <strong>in</strong>dividual TermSecure User configuration page.<br />
488 Permissions ACP Th<strong>in</strong>Manager <strong>6.0</strong>
Select F<strong>in</strong>ish to complete the configuration.<br />
TermSecure Group Member<br />
ACP Th<strong>in</strong>Manager <strong>6.0</strong> Permissions 489
26.8 Add<strong>in</strong>g a TermSecure User to the TermSecure<br />
User Group<br />
To add a TermSecure User to a TermSecure User Group, create a new TermSecure User by right<br />
click<strong>in</strong>g on the TermSecure Users branch <strong>in</strong> the Th<strong>in</strong>Manager tree and select the Add TermSecure<br />
User option or double click on an exist<strong>in</strong>g user to launch the wizard.<br />
TermSecure User In<strong>format</strong>ion Page<br />
Select the Change Group button. This will launch the Choose User Group w<strong>in</strong>dow.<br />
490 Permissions ACP Th<strong>in</strong>Manager <strong>6.0</strong>
Choose User Group W<strong>in</strong>dow<br />
Highlight your TermSecure Users Group and select OK. This will accept the changes and close the<br />
w<strong>in</strong>dow.<br />
ACP Th<strong>in</strong>Manager <strong>6.0</strong> Permissions 491
TermSecure User In<strong>format</strong>ion Page<br />
The TermSecure User Group will now be displayed <strong>in</strong> the Group field.<br />
Select Next to cont<strong>in</strong>ue.<br />
492 Permissions ACP Th<strong>in</strong>Manager <strong>6.0</strong>
Card/Badge In<strong>format</strong>ion<br />
The Card/Badge In<strong>format</strong>ion options are available because these are <strong>in</strong>dividual sett<strong>in</strong>gs, not group<br />
sett<strong>in</strong>gs.<br />
Select Next to cont<strong>in</strong>ue.<br />
ACP Th<strong>in</strong>Manager <strong>6.0</strong> Permissions 493
Display Client Specification<br />
Each of the sett<strong>in</strong>gs that have the Group Sett<strong>in</strong>g checkbox selected <strong>in</strong> the TermSecure User Group<br />
wizard will be grayed out because the Group Sett<strong>in</strong>g enforces the configuration of each chosen<br />
parameter.<br />
Select the F<strong>in</strong>ish button to accept the configuration.<br />
494 Permissions ACP Th<strong>in</strong>Manager <strong>6.0</strong>
26.9 TermSecure Log<strong>in</strong><br />
To log <strong>in</strong> a TermSecure User on a term<strong>in</strong>al, go to a term<strong>in</strong>al that has the Enable TermSecure checkbox<br />
selected on the Term<strong>in</strong>al Server Specification page.<br />
Type the default CTL+m or other designated hotkey at the keyboard or select from group selector<br />
The Ma<strong>in</strong> Menu will be displayed on the term<strong>in</strong>al.<br />
The About button to see details about the term<strong>in</strong>al.<br />
TermSecure Ma<strong>in</strong> Menu<br />
Select OK to close the About w<strong>in</strong>dow.<br />
Select the Log In button to log<strong>in</strong>.<br />
About Menu<br />
TermSecure Log On Screen<br />
Enter your TermSecure User user name <strong>in</strong> the Enter User Name field.<br />
Select OK.<br />
ACP Th<strong>in</strong>Manager <strong>6.0</strong> Permissions 495
Password Screen<br />
Enter the password <strong>in</strong> the field.<br />
Select the OK button. If the user name and password are correct, Th<strong>in</strong>Manager will allow the log<strong>in</strong>.<br />
Th<strong>in</strong>Manager With TermSecure Log On<br />
Once a TermSecure User is logged <strong>in</strong>to a term<strong>in</strong>al, Th<strong>in</strong>Manager will display the TermSecure User’s<br />
name after the term<strong>in</strong>al name <strong>in</strong> the tree.<br />
Th<strong>in</strong>Manager will add the name of the term<strong>in</strong>al after the TermSecure User name <strong>in</strong> the tree.<br />
Right-click<strong>in</strong>g on a term<strong>in</strong>al and select<strong>in</strong>g Go to TermSecure User will move the focus to the<br />
TermSecure user that is logged <strong>in</strong>to the term<strong>in</strong>al.<br />
Right-click<strong>in</strong>g on a TermSecure user and select<strong>in</strong>g Go to Term<strong>in</strong>al will move the focus to the term<strong>in</strong>al<br />
that the TermSecure user is logged <strong>in</strong>to.<br />
496 Permissions ACP Th<strong>in</strong>Manager <strong>6.0</strong>
26.9.1 Logg<strong>in</strong>g Out<br />
The TermSecure User can be logged out by:<br />
Open<strong>in</strong>g the TermSecure Ma<strong>in</strong> Menu (type CTL+m) on the term<strong>in</strong>al and select<strong>in</strong>g the Log Off<br />
button.<br />
Right click<strong>in</strong>g on the TermSecure User <strong>in</strong> the Th<strong>in</strong>Manager tree and select<strong>in</strong>g Logoff User.<br />
Restart<strong>in</strong>g or Reboot<strong>in</strong>g the term<strong>in</strong>al that has a TermSecure User logged <strong>in</strong>.<br />
Ma<strong>in</strong> Menu<br />
The Switch User button will log off the TermSecure User and open the Log<strong>in</strong> screen for another<br />
TermSecure User. The Log Off button will log of the TermSecure User and return to the term<strong>in</strong>al’s<br />
display.<br />
26.10 TermSecure Menu<br />
The TermSecure Menu that is displayed on a term<strong>in</strong>al that allows TermSecure Users to manually log on<br />
to a term<strong>in</strong>al is configurable for use with TermSecure. This menu is generated from the term<strong>in</strong>al and not<br />
the term<strong>in</strong>al server session.<br />
Basic TermSecure Menu<br />
The TermSecure Menu can be configured by a number of sett<strong>in</strong>gs <strong>in</strong> the Term<strong>in</strong>al Configuration Wizard<br />
and TermSecure User Wizard.<br />
The Ma<strong>in</strong> Menu is activated on the Term<strong>in</strong>al Interface Options page of the Term<strong>in</strong>al Configuration<br />
Wizard and/or TermSecure User Configuration Wizard.<br />
26.10.1.1 Ma<strong>in</strong> Menu Configuration - Term<strong>in</strong>al Configuration Wizard<br />
Open the Term<strong>in</strong>al Configuration Wizard by double click<strong>in</strong>g on the desired term<strong>in</strong>al <strong>in</strong> the Th<strong>in</strong>Manager<br />
tree. Term<strong>in</strong>als us<strong>in</strong>g Display Clients will display the Term<strong>in</strong>al Interface Options page. This page will<br />
display Ma<strong>in</strong> Menu options when TermSecure is enabled for the term<strong>in</strong>al.<br />
ACP Th<strong>in</strong>Manager <strong>6.0</strong> Permissions 497
Term<strong>in</strong>al Interface Options Page<br />
A term<strong>in</strong>al us<strong>in</strong>g MultiSession will need to have a method to switch between sessions. This is configured<br />
on the Term<strong>in</strong>al Interface Options page. For term<strong>in</strong>als us<strong>in</strong>g TermSecure, additional Ma<strong>in</strong> Menu options<br />
are available, as shown. See Term<strong>in</strong>al Interface Options for a term<strong>in</strong>al for a comparison.<br />
Group Selector Options allow on-screen switch<strong>in</strong>g of sessions.<br />
<br />
Show Selector on Term<strong>in</strong>al - This checkbox, if selected, will display an on-screen drop-down<br />
menu that can be activated by mouse.<br />
On-Screen Group Selector<br />
<br />
Screen Edge Display Client Selection - This checkbox, if selected, will activate a feature that<br />
will switch w<strong>in</strong>dows if the mouse is moved off screen.<br />
498 Permissions ACP Th<strong>in</strong>Manager <strong>6.0</strong>
Selector Options button will launch the Group Selector Options w<strong>in</strong>dow that allows<br />
configuration of the on-screen Group Selector.<br />
Group Selector Options W<strong>in</strong>dow<br />
The Auto-hide Group Selector checkbox, if selected, will hide the Group Selector until the<br />
mouse is move to that space.<br />
The Tile on Group Selector activation checkbox, when selected, will tile the Display Clients<br />
when the auto-hid selector is chosen. This allows the user to select from the available sessions.<br />
The Group Selector Menu Size drop-down box allows the sett<strong>in</strong>g of the size of the Group<br />
Selector font.<br />
Ma<strong>in</strong> Menu Options allow on-screen switch<strong>in</strong>g of sessions.<br />
The Ma<strong>in</strong> Menu Options button will launch a w<strong>in</strong>dow for Ma<strong>in</strong> Menu sett<strong>in</strong>gs.<br />
Ma<strong>in</strong> Menu Options<br />
The Ma<strong>in</strong> Menu Options w<strong>in</strong>dow has several sett<strong>in</strong>gs.<br />
Allow reboot/restart – This checkbox, if selected, will add a Reboot and a Restart button on the<br />
ma<strong>in</strong> TermSecure log<strong>in</strong> w<strong>in</strong>dow.<br />
Show Ma<strong>in</strong> Menu on Group Selector - This checkbox, if selected, will display the TermSecure<br />
Ma<strong>in</strong> Menu as an option on the Group Selector drop-down.<br />
Show Virtual Keyboard – This checkbox, if selected, will prompt the display of a virtual keyboard<br />
for TermSecure log<strong>in</strong>s. This is helpful for th<strong>in</strong> clients with touch screens.<br />
The Allow reboot/restart checkbox, if selected, will add a Shut Down button to the TermSecure Ma<strong>in</strong><br />
Menu. The Shut Down button leads to a menu with a Restart and Reboot button.<br />
ACP Th<strong>in</strong>Manager <strong>6.0</strong> Permissions 499
Ma<strong>in</strong> Menu with Shut Down Button<br />
Once the user logs out, a Shut Down button will appear on the Ma<strong>in</strong> Menu. Select<strong>in</strong>g the Shut Down<br />
button will launch the Shut Down Menu.<br />
Shut Down Menu<br />
The Shut Down w<strong>in</strong>dow has two buttons.<br />
Restart, when selected, will log off the TermSecure User, reload the configuration and load any changes.<br />
<br />
Reboot, when selected, will log off the TermSecure User, power off the term<strong>in</strong>al and reload firmware and<br />
configuration.<br />
Term<strong>in</strong>al Virtual Keyboard<br />
If the Show Virtual Keyboard checkbox is selected a virtual keyboard will be displayed on the term<strong>in</strong>al.<br />
This is helpful for touch screen users.<br />
Select OK to save sett<strong>in</strong>g or Cancel to close without sav<strong>in</strong>g.<br />
500 Permissions ACP Th<strong>in</strong>Manager <strong>6.0</strong>
26.10.1.2 Ma<strong>in</strong> Menu Hotkey - Term<strong>in</strong>al Configuration Wizard<br />
The Hotkey Configuration page has an additional TermSecure sett<strong>in</strong>g when the Enable TermSecure<br />
checkbox is checked on the Term<strong>in</strong>al Server Specification page.<br />
Hotkey Configuration – TermSecure Enabled<br />
The Enable Ma<strong>in</strong> Menu Hotkey checkbox, when selected, will allow the TermSecure Ma<strong>in</strong> Menu to be<br />
launched with a hotkey comb<strong>in</strong>ation. The Change Hotkey button allows the default CTL+m comb<strong>in</strong>ation<br />
to be changed.<br />
ACP Th<strong>in</strong>Manager <strong>6.0</strong> Permissions 501
Select HotKeys W<strong>in</strong>dow for Ma<strong>in</strong> Menu<br />
The default hotkey for the Ma<strong>in</strong> Menu is set to Control+m. This can be changed by select<strong>in</strong>g the Alt Key<br />
radio button or us<strong>in</strong>g the drop-down to select another hot key.<br />
Select the OK button to cont<strong>in</strong>ue or the Cancel button to close without accept<strong>in</strong>g changes.<br />
Ma<strong>in</strong> Menu<br />
The Ma<strong>in</strong> Menu can be launched with the Ctrl+ m hotkey if the Enable Ma<strong>in</strong> Menu Hotkey checkbox is<br />
selected.<br />
502 Permissions ACP Th<strong>in</strong>Manager <strong>6.0</strong>
26.11 Card and Badge Configuration for a<br />
TermSecure User<br />
TermSecure allows the use of USB drives and RFID cards as log<strong>in</strong> devices at term<strong>in</strong>als. This is<br />
configured on the Card/Badge In<strong>format</strong>ion page of the TermSecure User Configuration Wizard. The<br />
TermSecure Users Configuration Wizard can be launched by double click<strong>in</strong>g on a TermSecure User <strong>in</strong><br />
the Th<strong>in</strong>Manager tree or by right click<strong>in</strong>g on the TermSecure Users branch of the tree and select<strong>in</strong>g Add<br />
TermSecure User.<br />
Card / Badge In<strong>format</strong>ion Page<br />
<br />
<br />
<br />
This user will use a card, badge, or other device to log <strong>in</strong> - This checkbox, if selected,<br />
enables the use of a USB device, card or badge to log<strong>in</strong> to a term<strong>in</strong>al.<br />
Enter Card/Badge ID number - This field is for the unique identification number of the ID<br />
device. This can be filled manually or automatically. See Automatic Card/Badge ID Number<br />
Entry and <strong>Manual</strong> Card/Badge ID Number Entry for <strong>in</strong>structions on the methods.<br />
Always Prompt for Password - This checkbox, if selected, will require a password <strong>in</strong><br />
addition to the ID device to log<strong>in</strong> to a term<strong>in</strong>al as a TermSecure User.<br />
ACP Th<strong>in</strong>Manager <strong>6.0</strong> Permissions 503
26.11.1 Automatic Card/Badge ID Number Entry<br />
Th<strong>in</strong>Manager can be configured to automatically add the Card/Badge ID number. There are a few<br />
conditions that need met to allow this to happen.<br />
<br />
<br />
<br />
<br />
The Display “Create New User” dialog for unknown users check box on the Options<br />
page must be selected.<br />
The term<strong>in</strong>al must use Display Clients.<br />
The term<strong>in</strong>al needs the Enable TermSecure checkbox on the Term<strong>in</strong>al Specification page<br />
of the Term<strong>in</strong>al Configuration Wizard.<br />
The USB Drive module, RF Ideas pcProx Module, or Wavetrend Tag Reader Module<br />
need added to the term<strong>in</strong>al. The USB Drive module needs the Use with TermSecure<br />
parameter set to Yes.<br />
The user needs to scan the card or <strong>in</strong>sert the USB drive to start the TermSecure<br />
Configuration Wizard.<br />
Automatic Card/Badge use starts with the enabl<strong>in</strong>g of the Create New User dialog box. This is configured<br />
on the Options w<strong>in</strong>dow that is opened by select<strong>in</strong>g View > Options.<br />
Options W<strong>in</strong>dow<br />
The Display “Create New User” dialog for unknown users check box, if selected, will launch the<br />
TermSecure User Configuration Wizard on the Th<strong>in</strong>Manager Server when an unknown ID device (USB<br />
key or ID card) is read by a term<strong>in</strong>al. Once this checkbox is selected, scann<strong>in</strong>g a new ID card or <strong>in</strong>sert<strong>in</strong>g<br />
an undef<strong>in</strong>ed USB key will launch the TermSecure User Configuration Wizard with the Enter<br />
Card/Badge ID number automatically filled <strong>in</strong>.<br />
504 Permissions ACP Th<strong>in</strong>Manager <strong>6.0</strong>
TermSecure User Configuration – TermSecure User Replacement<br />
When a new card is scanned or a new USB key is <strong>in</strong>serted <strong>in</strong>to a USB slot on the term<strong>in</strong>al the<br />
TermSecure User Configuration is launched with an option to assign the card to an exist<strong>in</strong>g user.<br />
Select<strong>in</strong>g Next will open the TermSecure User Configuration Wizard and allow a new TermSecure user to<br />
be configured.<br />
Select<strong>in</strong>g Assign Card Number to Exist<strong>in</strong>g User will launch the Select TermSecure User to replace<br />
w<strong>in</strong>dow to assign the card/badge number to an exist<strong>in</strong>g TermSecure User account.<br />
ACP Th<strong>in</strong>Manager <strong>6.0</strong> Permissions 505
Select TermSecure User To Replace W<strong>in</strong>dow<br />
Highlight the desired TermSecure user and select OK. The wizard will display the TermSecure User<br />
In<strong>format</strong>ion page with the selected user entered.<br />
506 Permissions ACP Th<strong>in</strong>Manager <strong>6.0</strong>
TermSecure User In<strong>format</strong>ion Page<br />
If a TermSecure user was selected for the badge, the user will be displayed <strong>in</strong> the User Name field of the<br />
TermSecure User In<strong>format</strong>ion page.<br />
Select<strong>in</strong>g Next will cont<strong>in</strong>ue with the configuration and show the Card/Badge In<strong>format</strong>ion page.<br />
ACP Th<strong>in</strong>Manager <strong>6.0</strong> Permissions 507
Card/Badge In<strong>format</strong>ion Page<br />
The card, badge, or USB drive number will be entered <strong>in</strong> the Enter Card/Badge ID number field.<br />
Select Back to change the configuration, select Next to cont<strong>in</strong>ue, select F<strong>in</strong>ish to accept the changes, or<br />
select Cancel to cancel changes.<br />
508 Permissions ACP Th<strong>in</strong>Manager <strong>6.0</strong>
26.11.2 <strong>Manual</strong> Card/Badge ID Number Entry<br />
Although the easiest method for assign<strong>in</strong>g a card or badge is automatic as described <strong>in</strong> the Automatic<br />
Card/Badge ID Number Entry section, Th<strong>in</strong>Manager can be configured for manual entry<br />
If the Display “Create New User” dialog for unknown users check box on the Options w<strong>in</strong>dow is<br />
unselected, the Enter Card/Badge ID number field will need to be entered manually. The Card/Badge ID<br />
number is accessible <strong>in</strong> the event log. To configure a term<strong>in</strong>al to allow a device one needs to:<br />
Turn the Event Log on<br />
Have the appropriate hardware on the term<strong>in</strong>al, either a USB port or a ProxCard reader.<br />
Add the appropriate module.<br />
Use the device once to have the device’s identifier entered to the event log.<br />
<br />
<br />
Open the TermSecure User Configuration Wizard and enter the ID number to tie the<br />
TermSecure User to the device.<br />
Log<strong>in</strong> with the ID device.<br />
ACP Th<strong>in</strong>Manager <strong>6.0</strong> Permissions 509
26.11.2.1 Event Log<br />
The Event Log is configured <strong>in</strong> the Th<strong>in</strong>Manager Server Configuration Wizard.<br />
Open the Th<strong>in</strong>Manager Server Configuration Wizard by double click<strong>in</strong>g on the Th<strong>in</strong>Manager Server<br />
icon <strong>in</strong> the tree, or highlight<strong>in</strong>g it and select<strong>in</strong>g Edit > Modify from the menu.<br />
Navigate to the Historical Logg<strong>in</strong>g page.<br />
Historical Logg<strong>in</strong>g Page<br />
All events may be selected to be logged, but the Term<strong>in</strong>al Events checkbox is critical to the TermSecure<br />
Device detection. Select the Term<strong>in</strong>al Events checkbox and select the F<strong>in</strong>ish button.<br />
26.11.2.2 USB Device Module<br />
When us<strong>in</strong>g the USB drive as a TermSecure identifier, the USB Flash Drive Module needs added to the<br />
term<strong>in</strong>al.<br />
See USB Flash Drive Module for details.<br />
26.11.2.3 ProxCard Reader Module<br />
A ProxCard Reader works much the same as the USB device, but uses a different module, the RF Ideas<br />
pcProx Module.<br />
See RF Ideas pcProx Module for details.<br />
510 Permissions ACP Th<strong>in</strong>Manager <strong>6.0</strong>
26.11.2.4 WaveTrend Tag Reader Module<br />
A WaveTrend Tag Reader works much the same as the USB device, but uses a different module, the<br />
WaveTrend Tag Reader Module.<br />
See Wavetrend Tag Reader for details.<br />
26.11.2.5 Device Identifier Number<br />
Next the ID device needs to be scanned or <strong>in</strong>serted to help f<strong>in</strong>d the ID number.<br />
Insert the USB device or scan the ProxCard on the term<strong>in</strong>al.<br />
A TermSecure message should be displayed.<br />
TermSecure Message<br />
The ID device will not work so the term<strong>in</strong>al will send a message with the ID device’s identifier number.<br />
Record this number.<br />
This number is also entered <strong>in</strong> the event log if the Term<strong>in</strong>al Events were selected <strong>in</strong> the Th<strong>in</strong>Manager<br />
Server Configuration Wizard.<br />
Open Th<strong>in</strong>Manager.<br />
Highlight the term<strong>in</strong>al <strong>in</strong> the tree and select the Event Log tab.<br />
The ID for the device is entered <strong>in</strong> the log.<br />
Th<strong>in</strong>Manager Event Log<br />
ACP Th<strong>in</strong>Manager <strong>6.0</strong> Permissions 511
Next the ID number needs to be associated with the TermSecure User.<br />
Open the TermSecure User Configuration Wizard for the user you want to have use that ID<br />
device.<br />
Navigate to the Card / Badge In<strong>format</strong>ion page.<br />
Card / Badge In<strong>format</strong>ion Page<br />
Select the This user will use a card, badge, or other device to log <strong>in</strong> checkbox.<br />
Enter the ID Identifier from the earlier steps <strong>in</strong>to the Enter Card/Badge ID number field.<br />
Select the Always Prompt for Password, if desired.<br />
Now the Term<strong>in</strong>al is configured, the ID device is identified, and the TermSecure User is configured to use<br />
the device.<br />
Insert the USB device <strong>in</strong>to the USB port on the th<strong>in</strong> client or scan the ProxCard on the card<br />
scanner.<br />
The USB device will log the TermSecure User <strong>in</strong>to the term<strong>in</strong>al server.<br />
Open Th<strong>in</strong>Manager.<br />
Highlight the Th<strong>in</strong>Manager Server and select the Event Log tab.<br />
512 Permissions ACP Th<strong>in</strong>Manager <strong>6.0</strong>
Event Log<br />
The Event Log will show the results of the successful log<strong>in</strong>. The term<strong>in</strong>al will have the TermSecure User<br />
added to its icon <strong>in</strong> the tree, while the TermSecure User icon will show the name of the term<strong>in</strong>al that it is<br />
logged <strong>in</strong>to.<br />
ACP Th<strong>in</strong>Manager <strong>6.0</strong> Permissions 513
27 TermMon ActiveX Control<br />
The TermMon ActiveX Control can be used to collect <strong>in</strong><strong>format</strong>ion about a term<strong>in</strong>al and perform term<strong>in</strong>al<br />
functions. For the purposes of this document Control will refer to the TermMon ActiveX Control.<br />
This section is not meant as a tutorial on ActiveX controls but is a datasheet on the properties and<br />
functions of the TermMon ActiveX control.<br />
27.1 Register<strong>in</strong>g the Control<br />
The TermMon ActiveX Control can be found on the Th<strong>in</strong>Manager CD as termmon.ocx.<br />
The Control must be registered before it can be used. Copy the file termmon.ocx to the computer<br />
where you want to use it. Register the OCX by execut<strong>in</strong>g regsvr32 .<br />
27.2 Us<strong>in</strong>g the Control<br />
27.2.1 TermMon ActiveX Configuration Module<br />
If runn<strong>in</strong>g the Control <strong>in</strong> the term<strong>in</strong>al’s term<strong>in</strong>al services session, no special configuration of the term<strong>in</strong>al<br />
<strong>in</strong> Th<strong>in</strong>Manager is required. The TermMon ActiveX Control Configuration Module is not required.<br />
If the Control is not run <strong>in</strong> the term<strong>in</strong>al’s term<strong>in</strong>al services session, the TermMon ActiveX Control<br />
Configuration Module must be added to the term<strong>in</strong>al configuration <strong>in</strong> Th<strong>in</strong>Manager. In the module<br />
configuration, Allow ActiveX Connections must be set to YES and Only Allow Connections from<br />
Session must be set to NO.<br />
The TermMon ActiveX Control Configuration Module can be used to prevent a connection from an<br />
application runn<strong>in</strong>g <strong>in</strong> the term<strong>in</strong>al’s term<strong>in</strong>al services session. This is accomplished by add<strong>in</strong>g the<br />
TermMon ActiveX Control Configuration Module to the term<strong>in</strong>al <strong>in</strong> Th<strong>in</strong>Manager and sett<strong>in</strong>g the Allow<br />
ActiveX Connections option to NO.<br />
27.2.2 Read-Only Properties<br />
The follow<strong>in</strong>g properties are read only str<strong>in</strong>gs. An event will be generated any time one of these<br />
properties changes. The Enable method must be <strong>in</strong>voked prior to read<strong>in</strong>g these properties.<br />
Term<strong>in</strong>alName - This is the name of the term<strong>in</strong>al.<br />
Term<strong>in</strong>alModel - This is the term<strong>in</strong>al model number.<br />
Term<strong>in</strong>alIP - This is the term<strong>in</strong>al IP address.<br />
Term<strong>in</strong>alMAC - This is the term<strong>in</strong>al MAC Address.<br />
Term<strong>in</strong>alBootLoaderVersion - This is the term<strong>in</strong>al network boot loader version.<br />
Term<strong>in</strong>alFirmwareVersion - This is the firmware version that the term<strong>in</strong>al is runn<strong>in</strong>g.<br />
<br />
Term<strong>in</strong>alW<strong>in</strong>dowsUsername - This is the W<strong>in</strong>dows Username that is specified <strong>in</strong> the term<strong>in</strong>al’s<br />
Th<strong>in</strong>Manager configuration.<br />
ACP Th<strong>in</strong>Manager <strong>6.0</strong><br />
514 TermMon ActiveX Control
TermSecureUsername - This is the TermSecure username of the TermSecure user currently<br />
logged onto the term<strong>in</strong>al. If no TermSecure user is logged on, this value will be blank.<br />
TermSecureW<strong>in</strong>dowsUsername - This is the W<strong>in</strong>dows Username associated with a<br />
TermSecure user. This is the W<strong>in</strong>dows Username for all TermSecure user sessions. If no<br />
TermSecure user is logged on, this value will be blank.<br />
Term<strong>in</strong>alServerGroupList - This is a comma-separated list of Display Clients currently runn<strong>in</strong>g<br />
on the term<strong>in</strong>al.<br />
ConnectionState - This is the Control’s connection state with the term<strong>in</strong>al.<br />
CurrentTerm<strong>in</strong>alServerGroup - This is the Display Client that is currently be<strong>in</strong>g displayed on the<br />
term<strong>in</strong>al.<br />
CurrentW<strong>in</strong>dowsUsername - This is the W<strong>in</strong>dows Username of the session where the Control<br />
has been executed. This property is not available when the RunInSession property is set to<br />
False.<br />
Term<strong>in</strong>alServerName - This is the name of the Term<strong>in</strong>al Server where the Control is runn<strong>in</strong>g.<br />
This property is not available when the RunInSession property is set to False.<br />
27.2.3 Read-Write Properties<br />
These properties can be set by the application.<br />
RunInSession - When the RunInSession property is set to True, the Control will be runn<strong>in</strong>g <strong>in</strong> the<br />
term<strong>in</strong>al’s term<strong>in</strong>al services session. The term<strong>in</strong>al IP address will be determ<strong>in</strong>ed automatically by<br />
the control.<br />
OverrideIP - If the RunInSession property is set to False, the OverrideIP property specifies the IP<br />
Address of the term<strong>in</strong>al that the Control will connect to.<br />
Note: To use the OverrideIP property, the TermMon ActiveX Control Configuration Module must be<br />
added to the term<strong>in</strong>al configuration <strong>in</strong> Th<strong>in</strong>Manager. In the module configuration, Allow ActiveX<br />
Connections must be set to YES, and Only Allow Connections from Session must be set to NO.<br />
<br />
WatchdogTime – This is the number of seconds before the watchdog will reset the term<strong>in</strong>al<br />
session. Once this property is set to a non-zero value, the property must be updated before the<br />
watchdog time reaches zero. To disable the watchdog, set this property to zero. The watchdog is<br />
disabled by default.<br />
Note: The Enable Method does not need to be called for watchdog operation. Watchdog operation is<br />
<strong>in</strong>dependent of the Enable and Disable Methods.<br />
<br />
ActiveScreen – For MultiMonitor configurations, this is the active screen number. A value of zero<br />
(default) will set the active screen to the screen the mouse po<strong>in</strong>ter is on when a method or<br />
command is executed. A non-zero value will set the Active Screen to the screen number<br />
specified. All methods and commands will be executed on the specified screen.<br />
27.2.4 Events<br />
When a property value changes, an event will be generated by the Control. When an Event occurs the<br />
event code can be used to determ<strong>in</strong>e the property that changed. The Enable method must be <strong>in</strong>voked <strong>in</strong><br />
order to receive events (except for WatchdogTime). The event code is provided by the Control as follows:<br />
TermMonEvent.Term<strong>in</strong>alName<br />
TermMonEvent.Term<strong>in</strong>alModel<br />
ACP Th<strong>in</strong>Manager <strong>6.0</strong> TermMon ActiveX Control 515
TermMonEvent.Term<strong>in</strong>alIP<br />
TermMonEvent.Term<strong>in</strong>alMAC<br />
TermMonEvent.Term<strong>in</strong>alBootLoaderVersion<br />
TermMonEvent.Term<strong>in</strong>alFirmwareVersion<br />
TermMonEvent.Term<strong>in</strong>alW<strong>in</strong>dowsUsername<br />
TermMonEvent.TermSecureUsername<br />
TermMonEvent.TermSecureW<strong>in</strong>dowsUsername<br />
TermMonEvent.Term<strong>in</strong>alServerGroupList<br />
TermMonEvent.ConnectionState<br />
TermMonEvent.CurrentTerm<strong>in</strong>alServerGroup<br />
TermMonEvent.CurrentW<strong>in</strong>dowsUsername<br />
TermMonEvent.Term<strong>in</strong>alServerName<br />
TermMonEvent.WatchdogTime<br />
<br />
<br />
<br />
27.2.5 Methods<br />
Enable - Invok<strong>in</strong>g this method will enable the Control. The Control will attempt to connect to the<br />
term<strong>in</strong>al and generate events to update the Control Properties. The Control will ma<strong>in</strong>ta<strong>in</strong> a<br />
connection to the term<strong>in</strong>al as long as it is enabled.<br />
Disable - Invok<strong>in</strong>g this method will cause the Control to break the connection with the term<strong>in</strong>al.<br />
Events will be generated to clear the Control Properties.<br />
Command - The Command method can be used to send term<strong>in</strong>al action commands. The<br />
Command method requires one parameter which is the term<strong>in</strong>al command to be performed. The<br />
Enable method must be <strong>in</strong>voked before these commands can be executed (except for noted<br />
exceptions). The supported commands are:<br />
o Reboot - This command will <strong>in</strong>itiate a term<strong>in</strong>al reboot.<br />
o Restart - This command will <strong>in</strong>itiate a term<strong>in</strong>al restart.<br />
o Calibrate - This command will <strong>in</strong>itiate a touch screen calibration.<br />
o GotoMa<strong>in</strong>Menu - This command will cause the Ma<strong>in</strong> Menu to be displayed.<br />
o SwitchToNextGroup - This command will switch to the next Display Client.<br />
o SwitchToPrevGroup - This command will switch to the previous Display Client.<br />
o SwitchInstFailover - This command will switch the <strong>in</strong>stant failover group.<br />
o<br />
o<br />
o<br />
o<br />
ChangeTermSecureUser - This command will disconnect any current TermSecure user<br />
sessions and then display the TermSecure Log On menu.<br />
LogOffAndChangeTermSecureUser - This command will log off any current<br />
TermSecure user sessions and then display the TermSecure Log On menu.<br />
LogOffTermSecureUser - This command will log off any current TermSecure user<br />
sessions and will return to a Display Client which is assigned to the term<strong>in</strong>al. If no Display<br />
Clients have been configured on the term<strong>in</strong>al, the TermSecure Log On menu will be<br />
displayed.<br />
DisconnectTermSecureUser - This command will disconnect any current TermSecure<br />
user sessions and will return to a Display Client which is assigned to the term<strong>in</strong>al. If no<br />
516 TermMon ActiveX Control ACP Th<strong>in</strong>Manager <strong>6.0</strong>
o<br />
o<br />
o<br />
o<br />
Display Clients have been configured on the term<strong>in</strong>al, the TermSecure Log On menu will<br />
be displayed.<br />
DisconnectSession - This command will disconnect the Term<strong>in</strong>al Services Session<br />
runn<strong>in</strong>g on the term<strong>in</strong>al. This command does not require that the Enable Method be<br />
<strong>in</strong>voked prior to execution.<br />
LogOffSession - This command will log off the Term<strong>in</strong>al Services Session runn<strong>in</strong>g on<br />
the term<strong>in</strong>al. This command does not require that the Enable Method be <strong>in</strong>voked prior to<br />
execution.<br />
TileStart - This command will tile the Display Clients on the current Screen.<br />
TileEnd - This command will un-tile the Display Clients on the current Screen.<br />
The Command Method constants are provided by the Control as follows:<br />
o TermMonCommand.Reboot<br />
o TermMonCommand.Restart<br />
o TermMonCommand.Calibrate<br />
o TermMonCommand.GotoMa<strong>in</strong>Menu<br />
o TermMonCommand.SwitchToNextGroup<br />
o TermMonCommand.SwitchToPrevGroup<br />
o TermMonCommand.SwitchInstFailover<br />
o TermMonCommand.ChangeTermSecureUser<br />
o TermMonCommand.LogOffAndChangeTermSecureUser<br />
o TermMonCommand.LogOffTermSecureUser<br />
o TermMonCommand.DisconnectTermSecureUser<br />
o TermMonCommand.DisconnectSession<br />
o TermMonCommand.LogOffSession<br />
o TermMonCommand.TileStart<br />
o TermMonCommand.TileEnd<br />
<br />
<br />
ChangeTerm<strong>in</strong>alServerGroup - This method can be used to change the Display Client currently<br />
displayed on the term<strong>in</strong>al. This method requires one parameter which is the name of the Display<br />
Client that the term<strong>in</strong>al should switch to.<br />
TermSecureCheckAccess - This method can be used to query the access rights of a<br />
TermSecure user. This method requires two parameters. The first parameter is the name of the<br />
user. The second parameter is the name of the Access Group. This method returns the result of<br />
the query as follows:<br />
o TermMonConst.Timeout - The request timed out.<br />
o TermMonConst.Busy - The Control is busy with another request.<br />
o<br />
o<br />
TermMonConst.InvalidMember - The user is not a member of the specified<br />
TermSecure Access Group.<br />
TermMonConst.ValidMember - The user is a member of the specified TermSecure<br />
Access Group.<br />
ACP Th<strong>in</strong>Manager <strong>6.0</strong> TermMon ActiveX Control 517
o<br />
o<br />
TermMonConst.UserNotFound - The TermSecure Username was not found.<br />
TermMonConst.GroupNotFound - The Access Group Name was not found.<br />
GetGroupScreen - This method can be used to determ<strong>in</strong>e which screen the specified Display<br />
Client is currently on for MultiMonitor configurations. This method requires one parameter which<br />
is the name of the Display Client.<br />
TermSecureLogonUser - This method can be used to Log On a specified TermSecure user.<br />
This method requires two parameters. The first parameter is the name of the TermSecure user.<br />
The second parameter is the password of the TermSecure user. The password will be encrypted<br />
before be<strong>in</strong>g sent to the term<strong>in</strong>al. This method returns a result as follows:<br />
o TermMonConst.Success - The TermSecure user was successfully logged on.<br />
o TermMonConst.Timeout - The request timed out.<br />
o TermMonConst.Busy - The Control is busy with another request.<br />
o TermMonConst.UserNotFound - The TermSecure username was not found.<br />
o TermMonConst.BadPassword - The TermSecure password was <strong>in</strong>valid.<br />
o<br />
o<br />
o<br />
o<br />
TermMonConst.NoPermission - The TermSecure user does not have permission to<br />
use the term<strong>in</strong>al.<br />
TermMonConst.PasswordChangeReq - The TermSecure user is required to change<br />
his password.<br />
TermMonConst.NoW<strong>in</strong>dowsUsername - This TermSecure user does not have a<br />
W<strong>in</strong>dows Username specified <strong>in</strong> the TermSecure user configuration. This is only required<br />
for Term<strong>in</strong>al Services Display Clients assigned to the TermSecure User.<br />
TermMonConst.NoW<strong>in</strong>dowsPassword - This TermSecure user does not have a<br />
W<strong>in</strong>dows Password specified <strong>in</strong> the TermSecure user configuration. This is only required<br />
for Term<strong>in</strong>al Services Display Clients assigned to the TermSecure User.<br />
CameraOverlayEnable - This method is used to enable a camera overlay. This method requires<br />
two parameters. The first parameter is the name of the Display Client the overlay is on. The<br />
second parameter is the name of the overlay.<br />
CameraOverlayDisable - This method is used to disable a camera overlay. This method requires<br />
two parameters. The first parameter is the name of the Display Client the overlay is on. The<br />
second parameter is the name of the overlay.<br />
CameraOverlayCycleStart - This method is used to start camera cycl<strong>in</strong>g for a camera overlay.<br />
This method requires two parameters. The first parameter is the name of the Display Client the<br />
overlay is on. The second parameter is the name of the overlay.<br />
CameraOverlayCycleStop - This method is used to stop camera cycl<strong>in</strong>g for a camera overlay.<br />
This method requires two parameters. The first parameter is the name of the Display Client the<br />
overlay is on. The second parameter is the name of the overlay.<br />
CameraOverlaySwitchNext - This method is used to switch to the next camera <strong>in</strong> a camera<br />
overlay list. This method requires two parameters. The first parameter is the name of the Display<br />
Client the overlay is on. The second parameter is the name of the overlay.<br />
CameraOverlaySwitchPrev - This method is used to switch to the previous camera <strong>in</strong> a camera<br />
overlay list. This method requires two parameters. The first parameter is the name of the Display<br />
Client the overlay is on. The second parameter is the name of the overlay.<br />
CameraOverlayFullscreenEnter - This method is used to make the current camera <strong>in</strong> a camera<br />
overlay enter full screen. This method requires two parameters. The first parameter is the name<br />
of the Display Client the overlay is on. The second parameter is the name of the overlay.<br />
518 TermMon ActiveX Control ACP Th<strong>in</strong>Manager <strong>6.0</strong>
CameraOverlayFullscreenExit - This method is used to make the current camera <strong>in</strong> a camera<br />
overlay exit full screen. This method requires two parameters. The first parameter is the name of<br />
the Display Client the overlay is on. The second parameter is the name of the overlay.<br />
CameraOverlaySwitchByName - This method is used to change cameras <strong>in</strong> a camera overlay.<br />
This method requires three parameters. The first parameter is the name of the Display Client the<br />
overlay is on. The second parameter is the name of the overlay. The third parameter is the name<br />
of the camera. The camera name must <strong>in</strong>clude the full path if the camera is <strong>in</strong> a camera group.<br />
CameraOverlayMove - This method is used to change the position of a camera overlay. This<br />
method requires four parameters. The first parameter is the name of the Display Client the<br />
overlay is on. The second parameter is the name of the overlay. The third parameter is the x<br />
location. The forth parameter is the y position.<br />
CameraOverlayResize - This method is used to change the size of a camera overlay. This<br />
method requires four parameters. The first parameter is the name of the Display Client the<br />
overlay is on. The second parameter is the name of the overlay. The third parameter is the width.<br />
The forth parameter is the height.<br />
CameraOverlayResizeMove - This method is used to change the size and position of a camera<br />
overlay. This method requires six parameters. The first parameter is the name of the Display<br />
Client the overlay is on. The second parameter is the name of the overlay. The third parameter is<br />
the x position. The forth parameter is the y position. The fifth parameter is the width. The sixth<br />
parameter is the height.<br />
ACP Th<strong>in</strong>Manager <strong>6.0</strong> TermMon ActiveX Control 519
27.2.6 Control Constants<br />
Constant values provided by the Control are as follows:<br />
TermMonEvent<br />
Term<strong>in</strong>alName 1<br />
Term<strong>in</strong>alModel 2<br />
Term<strong>in</strong>alIP 3<br />
Term<strong>in</strong>alMAC 4<br />
Term<strong>in</strong>alBootLoaderVersion 5<br />
Term<strong>in</strong>alFirmwareVersion 6<br />
Term<strong>in</strong>alW<strong>in</strong>dowsUsername 7<br />
TermSecureUsername 8<br />
TermSecureW<strong>in</strong>dowsUsername 9<br />
Term<strong>in</strong>alServerGroupList 10<br />
ConnectionState 11<br />
CurrentTerm<strong>in</strong>alServerGroup 12<br />
CurrentW<strong>in</strong>dowsUsername 13<br />
Term<strong>in</strong>alServerName 14<br />
WatchdogTime 15<br />
TermMonCommand<br />
Reboot 100<br />
Restart 101<br />
Calibrate 102<br />
GotoMa<strong>in</strong>Menu 103<br />
SwitchToNextGroup 104<br />
SwitchToPrevGroup 105<br />
SwitchInstFailover 106<br />
ChangeTermSecureUser 107<br />
LogOffAndChangeTermSecureUser 108<br />
LogOffTermSecureUser 109<br />
DisconnectTermSecureUser 110<br />
DisconnectSession 111<br />
LogOffSession 112<br />
TileStart 113<br />
TileEnd 114<br />
520 TermMon ActiveX Control ACP Th<strong>in</strong>Manager <strong>6.0</strong>
TermMonConst<br />
Success 0<br />
Fail 1<br />
Disconnected 2<br />
Connected 3<br />
Timeout 4<br />
Busy 5<br />
Updat<strong>in</strong>g 6<br />
RequestFailed 7<br />
InvalidMember 8<br />
ValidMember 9<br />
UserNotFound 10<br />
GroupNotFound 11<br />
BadPassword 12<br />
NoPermission 13<br />
PasswordChangeReq 14<br />
NoW<strong>in</strong>dowsUsername 15<br />
NoW<strong>in</strong>dowsPassword 16<br />
27.3 TermMon ActiveX Demo Application<br />
The TermMon ActiveX Demo Application can be used to demonstrate the features of the Control. The<br />
demo application is found on the Th<strong>in</strong>Manager CD <strong>in</strong> the Term<strong>in</strong>al ActiveX folder as TermMon.exe.<br />
To start the application <strong>in</strong> graphical mode, run TermMon.exe <strong>in</strong> a term<strong>in</strong>al’s term<strong>in</strong>al services session.<br />
This will allow the Control functionality to be demonstrated.<br />
The demo application can also be run non-graphically us<strong>in</strong>g command l<strong>in</strong>e options. The <strong>format</strong> is as<br />
follows:<br />
TermMon -c -f -d -a<br />
<br />
The follow<strong>in</strong>g commands are term<strong>in</strong>al action commands:<br />
Reboot<br />
Restart<br />
Calibrate<br />
GotoMa<strong>in</strong>Menu<br />
SwitchToNextGroup<br />
SwitchToPrevGroup<br />
ACP Th<strong>in</strong>Manager <strong>6.0</strong> TermMon ActiveX Control 521
SwitchInstFailover<br />
ChangeTermSecureUser<br />
LogOffAndChangeTermSecureUser<br />
LogOffTermSecureUser<br />
DisconnectTermSecureUser<br />
ChangeTerm<strong>in</strong>alServerGroup -d <br />
The follow<strong>in</strong>g commands return the result <strong>in</strong> the output filename.<br />
Term<strong>in</strong>alName -f <br />
Term<strong>in</strong>alModel -f <br />
Term<strong>in</strong>alIP -f <br />
Term<strong>in</strong>alMAC -f <br />
522 TermMon ActiveX Control ACP Th<strong>in</strong>Manager <strong>6.0</strong>
28 Non-Th<strong>in</strong>Manager<br />
Components<br />
Microsoft Term<strong>in</strong>al Servers play an important role <strong>in</strong> the Th<strong>in</strong>Manager system. It is recommended that you<br />
become familiar with the documentation provided by Microsoft about their server. The follow<strong>in</strong>g<br />
<strong>in</strong><strong>format</strong>ion is provided as an aid to understand<strong>in</strong>g term<strong>in</strong>al services and is not a substitute for Microsoft<br />
documentation.<br />
Microsoft Term<strong>in</strong>al Services requires a license, either a TS CAL (Term<strong>in</strong>al Services Client Access<br />
License) on a 2003 Server or a RDS CAL (Remote Desktop Services Client Access License) on a 2008<br />
Server.<br />
This section covers:<br />
Server 2003<br />
Server 2008<br />
DHCP (Dynamic Host Configuration Protocol) Servers<br />
Term<strong>in</strong>al Services Licens<strong>in</strong>g<br />
28.1 W<strong>in</strong>dows Server 2003<br />
28.1.1 Install<strong>in</strong>g Term<strong>in</strong>al Services<br />
A W<strong>in</strong>dows 2003 Server can be made a term<strong>in</strong>al server by <strong>in</strong>stall<strong>in</strong>g the Term<strong>in</strong>al Services role. This can<br />
be done with either the Manage Your Server or through the Add/Remove Programs > Add/Remove<br />
W<strong>in</strong>dows Components.<br />
ACP Th<strong>in</strong>Manager <strong>6.0</strong><br />
523 Non-Th<strong>in</strong>Manager Components
Manager Your Server<br />
Select the Add or remove a role l<strong>in</strong>k on the Manager Your Server splash screen to <strong>in</strong>stall the Term<strong>in</strong>al<br />
Services role and/or the Term<strong>in</strong>al Services License Server role.<br />
524 Non-Th<strong>in</strong>Manager Components ACP Th<strong>in</strong>Manager <strong>6.0</strong>
W<strong>in</strong>dows Component Wizard<br />
Term<strong>in</strong>al Services can be <strong>in</strong>stalled by select<strong>in</strong>g the Term<strong>in</strong>al Server checkbox <strong>in</strong> the W<strong>in</strong>dows<br />
Component Wizard.<br />
The W<strong>in</strong>dows Component Wizard is launched by select<strong>in</strong>g the Add/Remove W<strong>in</strong>dows Component<br />
button on Control Panel > Add/Remove Programs.<br />
Each Microsoft term<strong>in</strong>al server system will need a Microsoft Term<strong>in</strong>al Server Licens<strong>in</strong>g server <strong>in</strong>stall. This<br />
doesn’t have to be a separate computer but is a program <strong>in</strong>stalled on an exist<strong>in</strong>g computer. It is <strong>in</strong>stalled<br />
by select<strong>in</strong>g the Term<strong>in</strong>al Server Licens<strong>in</strong>g checkbox on the W<strong>in</strong>dows Component Wizard.<br />
See Microsoft Licenses for details.<br />
ACP Th<strong>in</strong>Manager <strong>6.0</strong> Non-Th<strong>in</strong>Manager Components 525
28.2 Creat<strong>in</strong>g Microsoft User Profiles<br />
A term<strong>in</strong>al needs a valid W<strong>in</strong>dows User Profiles to log onto a term<strong>in</strong>al server.<br />
Open the Computer Management Console by select<strong>in</strong>g Start > Adm<strong>in</strong>istrative Tools > Computer<br />
Management <strong>in</strong> W<strong>in</strong>dows 2003/2008 to create a user profile.<br />
Computer Management Console<br />
Highlight the User sub-folder of Local Users and Groups <strong>in</strong> the Computer Management tree pane.<br />
Select Action > New User. This will launch a New User dialog box.<br />
526 Non-Th<strong>in</strong>Manager Components ACP Th<strong>in</strong>Manager <strong>6.0</strong>
New User Dialog<br />
Enter the user name for the user <strong>in</strong> the User name field.<br />
Enter a password <strong>in</strong> the Password field.<br />
Re-enter the password <strong>in</strong> the Confirm password field.<br />
The User must change password at next logon check box forces the user to change the password.<br />
Select the Create button to f<strong>in</strong>ish the profile.<br />
Select the Close button to return to the Computer Management Console.<br />
Note: Users need to be added to the Remote Desktop Users group or the Adm<strong>in</strong>istrators group to be<br />
allowed to connect to a term<strong>in</strong>al server.<br />
ACP Th<strong>in</strong>Manager <strong>6.0</strong> Non-Th<strong>in</strong>Manager Components 527
28.3 Software Installation On W<strong>in</strong>dows 2003<br />
Microsoft W<strong>in</strong>dows 2003/Server requires that software be added <strong>in</strong> the “Install Mode” through the<br />
Control Panel > Add/Remove Programs.<br />
Select Start > Sett<strong>in</strong>gs > Control Panel > Add/Remove Programs to launch the Add/Remove<br />
Programs dialog box.<br />
Note: Some software, especially downloaded software, doesn’t allow the <strong>in</strong>staller to <strong>in</strong>stall it through the<br />
Add/Remove Programs tools. To manually put the mach<strong>in</strong>e <strong>in</strong>to the <strong>in</strong>stall mode open a command prompt<br />
and type:<br />
change user /<strong>in</strong>stall<br />
This command sets the mach<strong>in</strong>e to <strong>in</strong>stall mode. When f<strong>in</strong>ished, type:<br />
change user /execute<br />
This command returns the mach<strong>in</strong>e to the normal run mode.<br />
Add/Remove Programs<br />
Select the CD or Floppy button on the Add/Remove Programs dialog box to open the Installation<br />
wizard.<br />
528 Non-Th<strong>in</strong>Manager Components ACP Th<strong>in</strong>Manager <strong>6.0</strong>
Install Program W<strong>in</strong>dow<br />
The wizard will prompt for the <strong>in</strong>stallation of the software disk. Select Next to display the Run Installation<br />
Program dialog box.<br />
Note: If the new program starts <strong>in</strong> autorun and proceeds without go<strong>in</strong>g through the follow<strong>in</strong>g procedures,<br />
either stop the autorun and use the wizard to <strong>in</strong>itiate the <strong>in</strong>stallation, or use the change user<br />
/<strong>in</strong>stall command to place the mach<strong>in</strong>e <strong>in</strong> the <strong>in</strong>stall mode. Use the change user /execute<br />
command when f<strong>in</strong>ished to return the mach<strong>in</strong>e to the Run mode.<br />
Run Installation Program<br />
ACP Th<strong>in</strong>Manager <strong>6.0</strong> Non-Th<strong>in</strong>Manager Components 529
Enter the command l<strong>in</strong>e of the <strong>in</strong>stallation program and select F<strong>in</strong>ish, or select the Browse button to<br />
select the <strong>in</strong>stallation file.<br />
Browse File W<strong>in</strong>dow<br />
Select<strong>in</strong>g the Browse button on the Run Installation dialog box will launch a Browse File w<strong>in</strong>dow.<br />
Highlight the <strong>in</strong>stallation file and select Open. This will beg<strong>in</strong> the application setup.<br />
After Installation W<strong>in</strong>dow<br />
As the <strong>in</strong>stallation beg<strong>in</strong>s, an After Installation dialog box is displayed. It requests that the Next button<br />
be selected when the <strong>in</strong>stallation is f<strong>in</strong>ished. When this button is selected a second confirmation w<strong>in</strong>dow<br />
is displayed.<br />
530 Non-Th<strong>in</strong>Manager Components ACP Th<strong>in</strong>Manager <strong>6.0</strong>
F<strong>in</strong>ish Install W<strong>in</strong>dow<br />
Select the F<strong>in</strong>ish button when the <strong>in</strong>stallation is f<strong>in</strong>ished.<br />
Note: If a choice is given to Reboot Now or Reboot Later, choose to reboot later once the entire setup is<br />
completed and the dialog boxes are cleared.<br />
28.3.1 Term<strong>in</strong>al Services Configuration<br />
Microsoft provides the Term<strong>in</strong>al Services Configuration <strong>in</strong>terface to configure how term<strong>in</strong>al services is<br />
handled on each term<strong>in</strong>al server.<br />
Select Start > Programs > Adm<strong>in</strong>istrative Tools > Term<strong>in</strong>al Services Configuration to launch the<br />
Term<strong>in</strong>al Services Configuration Console. There are two folders, Connections and Server Sett<strong>in</strong>gs.<br />
28.3.2 Term<strong>in</strong>al Services Connections<br />
The Term<strong>in</strong>al Services Configuration tree has a Connections folder. Highlight<strong>in</strong>g this folder will display<br />
the <strong>in</strong>stalled client communication protocols.<br />
ACP Th<strong>in</strong>Manager <strong>6.0</strong> Non-Th<strong>in</strong>Manager Components 531
Term<strong>in</strong>al Services Configuration\\Connections Console - Connections<br />
Double click<strong>in</strong>g on the RDP-tcp icon on the right will launch the RDP-tcp Properties<br />
532 Non-Th<strong>in</strong>Manager Components ACP Th<strong>in</strong>Manager <strong>6.0</strong>
28.3.2.1 RDP-tcp Log<strong>in</strong> Sett<strong>in</strong>gs<br />
RDP-tcp Log<strong>in</strong> Sett<strong>in</strong>gs<br />
The Log<strong>in</strong> Sett<strong>in</strong>gs should use the Use client-provided logon <strong>in</strong><strong>format</strong>ion radio button so that each<br />
user will log<strong>in</strong> with a unique account.<br />
The Always prompt for password should be unselected to allow auto-log<strong>in</strong>s.<br />
ACP Th<strong>in</strong>Manager <strong>6.0</strong> Non-Th<strong>in</strong>Manager Components 533
28.3.2.2 RDP-tcp Sessions Sett<strong>in</strong>gs<br />
Individual User Account Sessions Configuration<br />
Each user account can be configured <strong>in</strong>dividually <strong>in</strong> the Computer Management <strong>in</strong>terface. These can be<br />
set to end a disconnected session or an idle session after a period of time. The Term<strong>in</strong>al Services<br />
Configuration Console allows these sett<strong>in</strong>gs to be made for every user of the term<strong>in</strong>al server, speed<strong>in</strong>g<br />
configuration time.<br />
534 Non-Th<strong>in</strong>Manager Components ACP Th<strong>in</strong>Manager <strong>6.0</strong>
RDP-tcp Sessions Sett<strong>in</strong>gs<br />
The Sessions tab of the RDP-tcp Properties allows all users to be configured with a consistent<br />
disconnect policy by select<strong>in</strong>g the Override user sett<strong>in</strong>gs checkbox.<br />
Select<strong>in</strong>g End Session sett<strong>in</strong>g for the When session limit is reached or connection is broken and<br />
select<strong>in</strong>g the Override user sett<strong>in</strong>gs will cause a new session to be created when a term<strong>in</strong>al disconnects<br />
and reconnects.<br />
ACP Th<strong>in</strong>Manager <strong>6.0</strong> Non-Th<strong>in</strong>Manager Components 535
28.3.2.3 RDP-tcp Client Sett<strong>in</strong>gs<br />
RDP-tcp Client Sett<strong>in</strong>gs<br />
The Client Sett<strong>in</strong>gs tab of the RDP-tcp Properties allows the color depth to be set <strong>in</strong> the Limit Maximum<br />
Color Depth drop-down.<br />
Drive mapp<strong>in</strong>g, LPT port mapp<strong>in</strong>g, COM port mapp<strong>in</strong>g, and audio mapp<strong>in</strong>g are allowed if the appropriate<br />
Disable the follow<strong>in</strong>g checkboxes are un-selected.<br />
Audio mapp<strong>in</strong>g is disabled by default. You need to uncheck the Audio mapp<strong>in</strong>g checkbox to allow a th<strong>in</strong><br />
client to play sound.<br />
536 Non-Th<strong>in</strong>Manager Components ACP Th<strong>in</strong>Manager <strong>6.0</strong>
28.3.2.4 RDP-tcp Network Adapter Sett<strong>in</strong>gs<br />
RDP-tcp Network Adapter Sett<strong>in</strong>gs<br />
The Network Adapter tab of the RDP-tcp Properties can be used to limit the number of active users to<br />
aid <strong>in</strong> application licens<strong>in</strong>g compliance.<br />
28.3.3 Term<strong>in</strong>al Services Connections<br />
The Term<strong>in</strong>al Services Configuration tree has a Connections folder. Highlight<strong>in</strong>g this folder will display<br />
the <strong>in</strong>stalled client communication protocols.<br />
ACP Th<strong>in</strong>Manager <strong>6.0</strong> Non-Th<strong>in</strong>Manager Components 537
Term<strong>in</strong>al Services Configuration\\Connections Console - Connections<br />
The Server Sett<strong>in</strong>gs have several sett<strong>in</strong>gs that can control the term<strong>in</strong>al services experience.<br />
28.3.4 Licens<strong>in</strong>g Mode<br />
Microsoft expanded the Term<strong>in</strong>al Services Client Access License (TS CAL) program <strong>in</strong> W<strong>in</strong>dows 2003.<br />
TS CALs are available <strong>in</strong> two types, TS Device CALs and TS User CALs.<br />
<br />
<br />
The TS Device CAL licenses one device to connect to any Microsoft Term<strong>in</strong>al Servers as any<br />
user. This functions like the previous W<strong>in</strong>dows 2000 TS CAL.<br />
The TS User CAL licenses one user for any device to connect to any Microsoft Term<strong>in</strong>al<br />
Servers.<br />
To change between the Per Device licens<strong>in</strong>g and Per User licens<strong>in</strong>g, double-click Licens<strong>in</strong>g to launch<br />
the Licens<strong>in</strong>g Mode w<strong>in</strong>dow.<br />
538 Non-Th<strong>in</strong>Manager Components ACP Th<strong>in</strong>Manager <strong>6.0</strong>
Term<strong>in</strong>al Services Configuration Console- Licens<strong>in</strong>g Mode<br />
Select the desired mode from the Licens<strong>in</strong>g Mode dropdown box and click OK.<br />
28.3.5 Permission Compatibility<br />
Microsoft has <strong>in</strong>creased the security <strong>in</strong> each successive release of its term<strong>in</strong>al server software. These<br />
new policies prevent users from access<strong>in</strong>g the system folder, *.<strong>in</strong>i files, the registry, and other resources.<br />
Some programs such as HMI, SCADA, database, and control software need access to these resources<br />
to function. Instead of mak<strong>in</strong>g all the users adm<strong>in</strong>istrators, the security can be set to the less strenuous<br />
W<strong>in</strong>dows NT 4.0-style security.<br />
Term<strong>in</strong>al Services Configuration Console- Permission Compatibility<br />
Launch the Permission Compatibility w<strong>in</strong>dow by double-click<strong>in</strong>g on the Permission Compatibility<br />
sett<strong>in</strong>g. Select the Relaxed Security radio button and select the OK button.<br />
ACP Th<strong>in</strong>Manager <strong>6.0</strong> Non-Th<strong>in</strong>Manager Components 539
28.3.6 Restrict Each User to a S<strong>in</strong>gle Session<br />
The Restrict Each User to a S<strong>in</strong>gle Session sett<strong>in</strong>g prevents duplicate and orphaned sessions by<br />
limit<strong>in</strong>g each user to a s<strong>in</strong>gle log<strong>in</strong>.<br />
Double-click<strong>in</strong>g the sett<strong>in</strong>g will launch a sett<strong>in</strong>gs w<strong>in</strong>dow.<br />
Term<strong>in</strong>al Services Configuration Console- S<strong>in</strong>gle Session Per User<br />
The Restrict each user to one session checkbox is selected by default <strong>in</strong> W<strong>in</strong>dows 2003.<br />
Note: Keep this sett<strong>in</strong>g selected. MultiSession will still work as long as each session is us<strong>in</strong>g a different<br />
AppL<strong>in</strong>k program.<br />
28.3.7 License Server Discovery Mode<br />
A new feature <strong>in</strong> W<strong>in</strong>dows 2003, Service Pack 1 and later, is a sett<strong>in</strong>g to po<strong>in</strong>t the term<strong>in</strong>al server to a<br />
specific Term<strong>in</strong>al Server Licens<strong>in</strong>g Server. This is the License server discovery mode sett<strong>in</strong>g <strong>in</strong><br />
Term<strong>in</strong>al Services Configuration. This is easier than hard cod<strong>in</strong>g the license server <strong>in</strong>to the registry.<br />
540 Non-Th<strong>in</strong>Manager Components ACP Th<strong>in</strong>Manager <strong>6.0</strong>
Term<strong>in</strong>al Server License Server Discovery W<strong>in</strong>dow<br />
Launch the Term<strong>in</strong>al Server License Server Discovery W<strong>in</strong>dow by double-click<strong>in</strong>g the License server<br />
discovery mode sett<strong>in</strong>g <strong>in</strong> Term<strong>in</strong>al Services Configuration w<strong>in</strong>dow.<br />
Enter<strong>in</strong>g a valid Microsoft Term<strong>in</strong>al Server Licens<strong>in</strong>g Server name <strong>in</strong> the Use these license servers field<br />
will force the term<strong>in</strong>al server to use the def<strong>in</strong>ed server as the license server. This keeps the term<strong>in</strong>al<br />
server from gett<strong>in</strong>g confused when there are multiple license servers.<br />
The Automatically discovered license servers field would be automatically populated with license<br />
servers found by the term<strong>in</strong>al server and can be used as a reference. The Check names button will<br />
check the validation of the name <strong>in</strong> the Use these license servers field.<br />
ACP Th<strong>in</strong>Manager <strong>6.0</strong> Non-Th<strong>in</strong>Manager Components 541
28.4 W<strong>in</strong>dows 2008 Server<br />
28.4.1 Add<strong>in</strong>g Term<strong>in</strong>al Server Role<br />
W<strong>in</strong>dows 2008 Server, like W<strong>in</strong>dows 2003 Server, allows two RDP connections for adm<strong>in</strong>istrative<br />
purposes. To make the W<strong>in</strong>dows 2008 Server a term<strong>in</strong>al server where many people can access<br />
applications requires add<strong>in</strong>g the Term<strong>in</strong>al Services Role.<br />
Open the Server Manager w<strong>in</strong>dow.<br />
Server Manager W<strong>in</strong>dow<br />
Highlight Roles <strong>in</strong> the tree and select Add Roles <strong>in</strong> the right pane. A wizard will launch allow<strong>in</strong>g you to<br />
add Term<strong>in</strong>al Services as a role.<br />
Highlights of the Role Wizard <strong>in</strong>clude:<br />
542 Non-Th<strong>in</strong>Manager Components ACP Th<strong>in</strong>Manager <strong>6.0</strong>
Role Wizard - Select Server Roles<br />
The Role Wizard lists a dozen roles that are available.<br />
Check the Remote Desktop Services (or Term<strong>in</strong>al Services) checkbox and any other roles desired.<br />
Select Next to cont<strong>in</strong>ue.<br />
ACP Th<strong>in</strong>Manager <strong>6.0</strong> Non-Th<strong>in</strong>Manager Components 543
Role Wizard –Select Role Services<br />
Term<strong>in</strong>al Services has several options:<br />
Term<strong>in</strong>al Server – the basic term<strong>in</strong>al services option. Check this option<br />
TS Licens<strong>in</strong>g – This makes the server a 2008 License Server.<br />
You need a 2008 License Server and 2008 Term<strong>in</strong>al Services Client Access Licenses (TS<br />
CALs) to operate.<br />
Select this if this server will be your Term<strong>in</strong>al Services License Server.<br />
Select Next to cont<strong>in</strong>ue.<br />
544 Non-Th<strong>in</strong>Manager Components ACP Th<strong>in</strong>Manager <strong>6.0</strong>
Role Wizard – Specify Licens<strong>in</strong>g Mode<br />
W<strong>in</strong>dows 2008 TS CALs, like W<strong>in</strong>dows 2003 TS CALs, are available as Per Device or Per User.<br />
The term<strong>in</strong>al server should match the mode that the license server is us<strong>in</strong>g.<br />
Select Next to cont<strong>in</strong>ue.<br />
ACP Th<strong>in</strong>Manager <strong>6.0</strong> Non-Th<strong>in</strong>Manager Components 545
Role Wizard – Confirm Installation Selections<br />
The Add Roles Wizard will end with a list of the configurations that will be <strong>in</strong>stalled.<br />
Select Install to add the role(s). Once the wizard is f<strong>in</strong>ished it will assume the role of a term<strong>in</strong>al server.<br />
546 Non-Th<strong>in</strong>Manager Components ACP Th<strong>in</strong>Manager <strong>6.0</strong>
28.4.2 Add<strong>in</strong>g Applications <strong>in</strong> W<strong>in</strong>dows 2008<br />
Applications on term<strong>in</strong>al servers need to be <strong>in</strong>stalled <strong>in</strong> the Install Mode. Open the Control Panel and<br />
click on the Install Application on Term<strong>in</strong>al Server icon to start the <strong>in</strong>stallation wizard.<br />
Install Application on Term<strong>in</strong>al Server Icon<br />
A wizard will run that allows the <strong>in</strong>stallation of the application.<br />
The Install Mode can also be entered by typ<strong>in</strong>g change user /<strong>in</strong>stall at a command prompt.<br />
You can then run the setup.exe to <strong>in</strong>stall your application.<br />
Type change user /execute when f<strong>in</strong>ished <strong>in</strong>stall<strong>in</strong>g to leave the Install Mode.<br />
ACP Th<strong>in</strong>Manager <strong>6.0</strong> Non-Th<strong>in</strong>Manager Components 547
28.4.3 Create Users<br />
Users management is located <strong>in</strong> the Server Manager console.<br />
Server Manager – Local Users and Groups<br />
Users need to be members of the Remote Desktop Users group to access the term<strong>in</strong>al server.<br />
28.4.4 Allow<strong>in</strong>g Application Access<br />
Applications <strong>in</strong>stalled on a term<strong>in</strong>al server are not available to remote users unless the Term<strong>in</strong>al Server<br />
Sett<strong>in</strong>gs are changed to allow access to the applications. You can either allow access to all applications<br />
or allow access to specific applications <strong>in</strong> the TS RemoteApp Manager.<br />
28.4.4.1 Allow<strong>in</strong>g Application Access – All Applications<br />
Applications <strong>in</strong>stalled on a term<strong>in</strong>al server are not available to remote users unless the Term<strong>in</strong>al Server<br />
Sett<strong>in</strong>gs are changed to allow access to the applications.<br />
You can change the sett<strong>in</strong>gs to allow access to all <strong>in</strong>stalled applications <strong>in</strong> the TS RemoteApp Manager.<br />
548 Non-Th<strong>in</strong>Manager Components ACP Th<strong>in</strong>Manager <strong>6.0</strong>
TS RemoteApp Manager<br />
Highlight TS RemoteApp Manager under the Term<strong>in</strong>al Services branch of the Server Manager tree.<br />
Select the Change l<strong>in</strong>k for the Term<strong>in</strong>al Server Sett<strong>in</strong>gs to launch the RemoteApp Deployment<br />
Sett<strong>in</strong>gs page.<br />
ACP Th<strong>in</strong>Manager <strong>6.0</strong> Non-Th<strong>in</strong>Manager Components 549
RemoteApp Deployment Sett<strong>in</strong>gs<br />
Select the Term<strong>in</strong>al Server tab of the RemoteApp Deployment Sett<strong>in</strong>gs page.<br />
Select the Allow users to start both listed and unlisted programs on <strong>in</strong>itial connection radio button<br />
<strong>in</strong> the Access to unlisted programs section.<br />
This will allow any program to be run by an authorized user.<br />
You can also select and def<strong>in</strong>e specific applications that can be run by configur<strong>in</strong>g them <strong>in</strong> the TS<br />
RemoteApp Manager.<br />
550 Non-Th<strong>in</strong>Manager Components ACP Th<strong>in</strong>Manager <strong>6.0</strong>
28.4.4.2 Allow<strong>in</strong>g Application Access – Specific Applications<br />
You can control application access on W<strong>in</strong>dows 2008 Server by only allow<strong>in</strong>g access to specific<br />
applications.<br />
TS RemoteApp Manager<br />
Highlight TS RemoteApp Manager under the Term<strong>in</strong>al Services branch of the Server Manager tree.<br />
Select the Add RemoteApp Programs l<strong>in</strong>k <strong>in</strong> the Actions column on the right of the screen to launch the<br />
RemoteApp Wizard.<br />
ACP Th<strong>in</strong>Manager <strong>6.0</strong> Non-Th<strong>in</strong>Manager Components 551
RemoteApp Wizard<br />
The RemoteApp Wizard shows a list of applications <strong>in</strong>stalled on the W<strong>in</strong>dows 2008 Server.<br />
Select the checkbox for each application that you want available for deployment as a Th<strong>in</strong>Manager<br />
Display Client.<br />
Select Next to complete the wizard. A remote user can run any checked application.<br />
28.4.5 Install<strong>in</strong>g Th<strong>in</strong>Manager<br />
It is a common practice to <strong>in</strong>stall Th<strong>in</strong>Manager on a term<strong>in</strong>al server but Th<strong>in</strong>Manager is <strong>in</strong>dependent of<br />
term<strong>in</strong>al services and doesn’t need to be <strong>in</strong>stalled on a term<strong>in</strong>al server.<br />
Applications on term<strong>in</strong>al servers need to be <strong>in</strong>stalled <strong>in</strong> the Install Mode. Open the Control Panel and<br />
click on the Install Application on Term<strong>in</strong>al Server icon to start the <strong>in</strong>stallation wizard.<br />
Install Application on Term<strong>in</strong>al Server Icon<br />
552 Non-Th<strong>in</strong>Manager Components ACP Th<strong>in</strong>Manager <strong>6.0</strong>
Once the wizard beg<strong>in</strong>s navigate to the Th<strong>in</strong>Manager setup.exe program and cont<strong>in</strong>ue with the wizard.<br />
See Installation of Th<strong>in</strong>Manager for details.<br />
The Install Mode can also be entered by typ<strong>in</strong>g change user /<strong>in</strong>stall at a command prompt.<br />
You can then run the setup.exe to <strong>in</strong>stall Th<strong>in</strong>Manager.<br />
Type change user /execute when f<strong>in</strong>ished <strong>in</strong>stall<strong>in</strong>g to leave the Install Mode.<br />
28.4.6 Allow Inbound Traffic to Firewall<br />
Th<strong>in</strong>Manager requires communications to the th<strong>in</strong> clients. This communication is blocked by default <strong>in</strong> the<br />
firewall and needs to be allowed.<br />
You can either open the firewall to all traffic or open the specific ports needed.<br />
28.4.6.1 Allow All Inbound Traffic<br />
You can configure the firewall by select<strong>in</strong>g W<strong>in</strong>dows Firewall with Advanced Security <strong>in</strong> the Server<br />
Manager tree.<br />
W<strong>in</strong>dows Firewall with Advanced Security<br />
Highlight W<strong>in</strong>dows Firewall with Advanced Security <strong>in</strong> the Server Manager tree. Right click and select<br />
Properties to launch the Properties w<strong>in</strong>dow.<br />
ACP Th<strong>in</strong>Manager <strong>6.0</strong> Non-Th<strong>in</strong>Manager Components 553
W<strong>in</strong>dows Firewall with Advanced Security Properties<br />
Select the profile tab that matches the type of network you are us<strong>in</strong>g, Doma<strong>in</strong>, Private, or Public profile.<br />
Change the Inbound connections to Allow and select OK to accept the change.<br />
This will allow the th<strong>in</strong> clients to connect to Th<strong>in</strong>Manager through the firewall.<br />
554 Non-Th<strong>in</strong>Manager Components ACP Th<strong>in</strong>Manager <strong>6.0</strong>
28.4.6.2 Open Ports <strong>in</strong> Firewall<br />
You can open specific ports <strong>in</strong> the W<strong>in</strong>dows 2008 Server firewall <strong>in</strong>stead of allow<strong>in</strong>g all <strong>in</strong>bound<br />
connections if you prefer.<br />
Open the Local Security Policy by select<strong>in</strong>g the Start > Adm<strong>in</strong>istrative Tools > Local Security Policy.<br />
Local Security Policy<br />
Expand the W<strong>in</strong>dows Firewall with Advanced Security to show the Inbound Rules.<br />
Right click on the Inbound Rules and select New Rule. A wizard will launch that allows configuration of a<br />
new port.<br />
You need to run the wizard twice, once to allow UDP 4900 and once to allow TCP 2031.<br />
ACP Th<strong>in</strong>Manager <strong>6.0</strong> Non-Th<strong>in</strong>Manager Components 555
Rule Wizard – Rule Type<br />
Select Port as the rule you are configur<strong>in</strong>g and select Next to cont<strong>in</strong>ue.<br />
556 Non-Th<strong>in</strong>Manager Components ACP Th<strong>in</strong>Manager <strong>6.0</strong>
Rule Wizard – Protocols and Ports<br />
You will need to select the protocol and port for each rule. You will need to run the wizard once for UDP<br />
4900 and once for TCP 2031.<br />
Select the protocol and enter the port as shown <strong>in</strong> Rule Wizard – Protocols and Ports.<br />
Select Next to cont<strong>in</strong>ue.<br />
ACP Th<strong>in</strong>Manager <strong>6.0</strong> Non-Th<strong>in</strong>Manager Components 557
Rule Wizard – Action<br />
Select Allow the Connection.<br />
Select Next to cont<strong>in</strong>ue.<br />
558 Non-Th<strong>in</strong>Manager Components ACP Th<strong>in</strong>Manager <strong>6.0</strong>
Rule Wizard – Profile<br />
Select the network(s) that the rule will apply to.<br />
Select Next to cont<strong>in</strong>ue.<br />
A Name page will allow you to name the rule and add a description for management and organizational<br />
purposes.<br />
Select F<strong>in</strong>ish to save and apply the rule.<br />
ACP Th<strong>in</strong>Manager <strong>6.0</strong> Non-Th<strong>in</strong>Manager Components 559
Repeat for UDP 4900 or TCP 2031.<br />
Applied Rules<br />
This will allow th<strong>in</strong> clients to use port 4900 to download the firmware and allow the th<strong>in</strong> client to use port<br />
2031 to download the configuration but will keep other ports closed on the firewall.<br />
560 Non-Th<strong>in</strong>Manager Components ACP Th<strong>in</strong>Manager <strong>6.0</strong>
28.4.7 Local Security Policy – User Access Controls<br />
You may need to go to the Local Security Policy and change the User Account Control: Behavior of<br />
the elevation prompt for adm<strong>in</strong>istrators <strong>in</strong> Adm<strong>in</strong> Approval Mode to Elevate without prompt<strong>in</strong>g for<br />
Th<strong>in</strong>Manager to run properly.<br />
Open the Local Security Policy by select<strong>in</strong>g the Start > Adm<strong>in</strong>istrative Tools > Local Security Policy.<br />
Local Security Policy – User Account Controls<br />
Highlight Local Policies > Security Options <strong>in</strong> the tree.<br />
Browse to User Account Control: Behavior of the elevation prompt for adm<strong>in</strong>istrators <strong>in</strong> Adm<strong>in</strong><br />
Approval Mode and change the sett<strong>in</strong>g to Elevate without prompt<strong>in</strong>g.<br />
This may be needed to run Th<strong>in</strong>Manager as a non-adm<strong>in</strong>istrator.<br />
ACP Th<strong>in</strong>Manager <strong>6.0</strong> Non-Th<strong>in</strong>Manager Components 561
28.5 Command Prompt<br />
Term<strong>in</strong>al Services has several commands that aid <strong>in</strong> manag<strong>in</strong>g the term<strong>in</strong>al server. Some useful ones<br />
are:<br />
Command<br />
change logon<br />
change port<br />
change user /<strong>in</strong>stall<br />
change user /execute<br />
Ipconfig<br />
Logoff<br />
net send username “message”<br />
query process<br />
query session<br />
query termserver<br />
query user<br />
reset session<br />
Shadow<br />
Tsdiscon<br />
Tsshutdn<br />
Action<br />
Temporarily disables logons to a Term<strong>in</strong>al Server<br />
Changes COM port mapp<strong>in</strong>gs for MS-DOS program compatibility<br />
Puts the server <strong>in</strong>to “Install Mode”<br />
Removes the server from “Install Mode”<br />
Displays the IP addresses of the network card<br />
Logs off a user from a session and deletes the session from the server<br />
Sends a message to a user. username is the NT/2000 user name that the<br />
person or term<strong>in</strong>al is logged <strong>in</strong> as. “message” is the text of the message.<br />
Quotation marks are needed for any messages conta<strong>in</strong><strong>in</strong>g a space.<br />
Displays <strong>in</strong><strong>format</strong>ion about processes runn<strong>in</strong>g on a Term<strong>in</strong>al server<br />
Displays <strong>in</strong><strong>format</strong>ion about sessions on a Term<strong>in</strong>al server<br />
Displays a list of all Term<strong>in</strong>al servers on the network<br />
Displays <strong>in</strong><strong>format</strong>ion about user sessions on a Term<strong>in</strong>al server<br />
Resets a session to known <strong>in</strong>itial values<br />
Monitors another user's session<br />
Disconnects a client from a term<strong>in</strong>al server session<br />
Shuts down the term<strong>in</strong>al server <strong>in</strong> an orderly manner<br />
See the W<strong>in</strong>dows onl<strong>in</strong>e help for additional commands and parameters.<br />
Other useful commands <strong>in</strong>clude:<br />
Command<br />
Action<br />
gpedit.msc<br />
Launches the Group Policy Editor<br />
tscc.msc<br />
Launches the Term<strong>in</strong>al Services Configuration Console<br />
tsadm<strong>in</strong><br />
Launches the Term<strong>in</strong>al Services Manager<br />
562 Non-Th<strong>in</strong>Manager Components ACP Th<strong>in</strong>Manager <strong>6.0</strong>
28.6 Alternative Term<strong>in</strong>al Keystrokes<br />
Certa<strong>in</strong> keystrokes are not available <strong>in</strong> a term<strong>in</strong>al session. Microsoft has provided these alternatives.<br />
Keystroke<br />
ALT+PAGE UP<br />
ALT+PAGE DOWN<br />
ALT+INSERT<br />
ALT+HOME<br />
CTRL+ALT+BREAK<br />
CTRL+ALT+END<br />
ALT+DELETE<br />
CTRL+ALT+M<strong>in</strong>us (-) symbol on the<br />
numeric keypad<br />
CTRL+ALT+Plus (+) symbol on the<br />
numeric keypad<br />
Function<br />
Switches between programs from left to right.<br />
Switches between programs from right to left.<br />
Cycles through the programs <strong>in</strong> the order they were started.<br />
Displays the Start menu.<br />
Switches the client between a w<strong>in</strong>dow and full screen.<br />
Br<strong>in</strong>gs up the W<strong>in</strong>dows 2000 Security dialog box.<br />
Displays the W<strong>in</strong>dows menu.<br />
Places a snapshot of the active w<strong>in</strong>dow, with<strong>in</strong> the client, on the Term<strong>in</strong>al server<br />
clipboard (provides the same functionality as press<strong>in</strong>g Pr<strong>in</strong>tScrn on a local<br />
computer.)<br />
Places a snapshot of the entire client w<strong>in</strong>dow area on the Term<strong>in</strong>al server<br />
clipboard (provides the same functionality as press<strong>in</strong>g ALT+Pr<strong>in</strong>tScrn on a local<br />
computer.)<br />
ACP Th<strong>in</strong>Manager <strong>6.0</strong> Non-Th<strong>in</strong>Manager Components 563
28.7 DHCP Server Setup<br />
Dynamic Host Configuration Protocol (DHCP) is a program that assigns IP addresses to devices on a<br />
network. DHCP server can be used to provide IP addresses to th<strong>in</strong> clients. It can also be configured to<br />
po<strong>in</strong>t the th<strong>in</strong> clients to the Th<strong>in</strong>Manager Servers with Option 66, Boot Server Host Name.<br />
28.7.1.1 Scope Options<br />
The DHCP Server needs Option 066 configured before it will provide the Th<strong>in</strong>Manager Server IP address<br />
that the term<strong>in</strong>al needs to boot.<br />
Boot Server Host Name<br />
The Boot Server Host Name, Option 066, assigns a Th<strong>in</strong>Manager server to the term<strong>in</strong>al.<br />
Open the Scope Options dialog box by highlight<strong>in</strong>g the Scope Option folder <strong>in</strong> the tree pane of the<br />
Computer Management Console under the Services and Application > DHCP folder and select<strong>in</strong>g<br />
Action > Configure Options.<br />
Scroll through the list w<strong>in</strong>dow and check the Option 066 check box.<br />
Enter the IP address of the desired Th<strong>in</strong>Manager server <strong>in</strong> the Str<strong>in</strong>g Value field.<br />
The DHCP Server can issue the IP address for a Primary Th<strong>in</strong>Manager Server and a Secondary<br />
Th<strong>in</strong>Manager Server by list<strong>in</strong>g the IP addresses of both, separated with a space.<br />
564 Non-Th<strong>in</strong>Manager Components ACP Th<strong>in</strong>Manager <strong>6.0</strong>
28.7.1.2 DHCP Properties<br />
The DHCP Server can be configured to check for duplicate IP addresses before issu<strong>in</strong>g a new address.<br />
This is a good feature to use.<br />
Highlight DHCP under Services and Applications <strong>in</strong> the Computer Management tree and select<br />
Action > Properties, or right-click on DHCP and select Properties. The DHCP Properties w<strong>in</strong>dow will<br />
launch.<br />
DHCP Properties – Advanced Tab<br />
Select the Advanced tab. Replace the zero <strong>in</strong> the Conflict detection attempts field with an <strong>in</strong>teger. This<br />
will prompt the DHCP Server to check for duplicate IP addresses before assign<strong>in</strong>g an IP address.<br />
Select OK when f<strong>in</strong>ished.<br />
ACP Th<strong>in</strong>Manager <strong>6.0</strong> Non-Th<strong>in</strong>Manager Components 565
28.8 Group Policy<br />
W<strong>in</strong>dows has a number of features that can be allowed or prevented with a Group Policy. Group Policy is<br />
configured <strong>in</strong> the Group Policy Object Editor snap-<strong>in</strong> to the Microsoft Management Console.<br />
Access the Group Policy Editor by typ<strong>in</strong>g gpedit.msc at a command prompt to launch the Microsoft<br />
Group Policy Editor.<br />
Group Policy Sett<strong>in</strong>gs<br />
Expand<strong>in</strong>g the tree will show Group Policy sett<strong>in</strong>gs that can affect the term<strong>in</strong>al server experience.<br />
Please refer to Microsoft documentation for <strong>in</strong><strong>format</strong>ion on us<strong>in</strong>g these features.<br />
566 Non-Th<strong>in</strong>Manager Components ACP Th<strong>in</strong>Manager <strong>6.0</strong>
28.9 Microsoft Licenses<br />
28.9.1 Microsoft Client Access Licenses (CALs)<br />
Th<strong>in</strong> Clients require a term<strong>in</strong>al server with W<strong>in</strong>dows 2003 or 2008 Server with Term<strong>in</strong>al Services<br />
enabled as an operat<strong>in</strong>g system.<br />
Each of these operat<strong>in</strong>g systems requires a standard Microsoft Client Access License (CAL) for each<br />
connection to the server. These are based on concurrent use; a 5-pack would allow more than five users<br />
to access server resources, but only five users at a time.<br />
28.9.2 Microsoft Term<strong>in</strong>al Server Licenses<br />
Term<strong>in</strong>als, such as th<strong>in</strong> clients and fat clients, require a license to access term<strong>in</strong>al services <strong>in</strong> addition to<br />
the standard Microsoft Client Access License (CAL). This is called the Microsoft Term<strong>in</strong>al Services<br />
Client Access License (TS CAL) <strong>in</strong> W<strong>in</strong>dows 2003 and is called the Remote Desktop Services Client<br />
Access License (RDS CAL) <strong>in</strong> W<strong>in</strong>dows 2008.<br />
W<strong>in</strong>dows 2003 term<strong>in</strong>al servers require W<strong>in</strong>dows 2003 TS CALs and W<strong>in</strong>dows 2008 term<strong>in</strong>al servers<br />
require W<strong>in</strong>dows 2008 RDS CALs.<br />
Note: This document will refer to all term<strong>in</strong>al services CALs as a TS/RDS CALs.<br />
. This licens<strong>in</strong>g is per seat; ten term<strong>in</strong>als would require ten TS/RDS CALs, even if only two were<br />
connected at a time.<br />
These can be <strong>in</strong>stalled as Per Device or Per User.<br />
<br />
The TS/RDS Device CAL licenses one device to connect to any Microsoft Term<strong>in</strong>al Servers<br />
as any user. This functions like the previous W<strong>in</strong>dows 2000 TS CAL.<br />
The TS/RDS User CAL licenses one user for any device to connect to any Microsoft Term<strong>in</strong>al<br />
Servers.<br />
All TS/RDS CALs are <strong>in</strong>stalled on a Term<strong>in</strong>al Services Licens<strong>in</strong>g Server. This acts as a repository for<br />
all TS/RDS CALs. The term<strong>in</strong>al servers request TS/RDS CAL authentication from the Term<strong>in</strong>al Services<br />
Licens<strong>in</strong>g Server as term<strong>in</strong>als attach to term<strong>in</strong>al servers.<br />
Note: The Term<strong>in</strong>al Server Licens<strong>in</strong>g Server does not need to be a separate computer. It is a program<br />
that can be <strong>in</strong>stalled on any exist<strong>in</strong>g server.<br />
The Term<strong>in</strong>al Services Licens<strong>in</strong>g server is activated through the Internet by connect<strong>in</strong>g to the Microsoft<br />
Certificate Authority and License Clear<strong>in</strong>ghouse.<br />
W<strong>in</strong>dows 2003 and 2008 Servers with Term<strong>in</strong>al Services enabled will issue 90-day or 120-day temporary<br />
licenses while the Term<strong>in</strong>al Services Licens<strong>in</strong>g server is be<strong>in</strong>g setup and activated. If this period has<br />
elapsed, the term<strong>in</strong>al will not connect to the term<strong>in</strong>al server and will display an “Error Number 50”<br />
message box.<br />
W<strong>in</strong>dows Server is not normally sold with TS CALs. These need to purchased separately and <strong>in</strong>stalled on<br />
the Term<strong>in</strong>al Services License server.<br />
ACP Th<strong>in</strong>Manager <strong>6.0</strong> Non-Th<strong>in</strong>Manager Components 567
28.9.3 Microsoft Term<strong>in</strong>al Server Licens<strong>in</strong>g Activation<br />
In W<strong>in</strong>dows 2003 and 2008, all the TS CALs are <strong>in</strong>stalled on a s<strong>in</strong>gle Term<strong>in</strong>al Server Licens<strong>in</strong>g Server.<br />
This allows a s<strong>in</strong>gle site for management and authentication of term<strong>in</strong>al server connections. A server<br />
becomes a Term<strong>in</strong>al Server Licens<strong>in</strong>g Server by selection of the option dur<strong>in</strong>g the <strong>in</strong>stallation phase or by<br />
select<strong>in</strong>g Add/Remove Programs > Add/Remove W<strong>in</strong>dows Components from the Control Panel and<br />
select<strong>in</strong>g the Term<strong>in</strong>al Services Licens<strong>in</strong>g.<br />
The licens<strong>in</strong>g of the Microsoft components of a W<strong>in</strong>dows 2003 or 2008 term<strong>in</strong>al server is a two-step<br />
process; one must first authorize the Term<strong>in</strong>al Server Licens<strong>in</strong>g Server, then one must activate the<br />
licenses. The license activation will be repeated for each license pack.<br />
568 Non-Th<strong>in</strong>Manager Components ACP Th<strong>in</strong>Manager <strong>6.0</strong>
29 Th<strong>in</strong>Manager Troubleshoot<strong>in</strong>g<br />
Guide<br />
This is a list of common configuration errors and a guide for fix<strong>in</strong>g them.<br />
Note: When any problem arises, check Downloads at www.th<strong>in</strong>manager.com for the latest firmware and<br />
any service packs. The problem you are experienc<strong>in</strong>g may have already been fixed and released <strong>in</strong> a<br />
later version of firmware and us<strong>in</strong>g the latest version will cure the current problem. Try apply<strong>in</strong>g the latest<br />
firmware, and then reboot the th<strong>in</strong> client to see if the problem still exists. The current version (v.2.06.X) is<br />
backwards compatible to earlier versions of Th<strong>in</strong>Manager (2.3.1, 2.4, 2.5, etc.)<br />
29.1 Section 1 - From Power on to Term<strong>in</strong>al Server<br />
Log<strong>in</strong><br />
1) Power<strong>in</strong>g on the Th<strong>in</strong> Client<br />
A) No Power<br />
Check power cable, power supply, and power outlets.<br />
B) No Video<br />
Check video cable and monitor.<br />
Warn<strong>in</strong>g: Never go <strong>in</strong>to the th<strong>in</strong> client BIOS and change the<br />
Integrated Peripherals>Display Status from CRT to LCD. This<br />
changes the video output of the motherboard from the VGA port to a<br />
socket on the motherboard used for <strong>in</strong>tegrated LCD panels. Chang<strong>in</strong>g<br />
this from CRT will prevent any video from be<strong>in</strong>g displayed on a<br />
monitor.<br />
2) Boot<strong>in</strong>g - ACP Network Boot Loader<br />
A) Cannot get IP address us<strong>in</strong>g DHCP<br />
Is the th<strong>in</strong> client set to DHCP They are set to DHCP by default, but can be changed.<br />
Is the Th<strong>in</strong> Client on the same side of the router as the DHCP server<br />
Does the DHCP server have addresses to give out<br />
B) Cannot get IP address us<strong>in</strong>g Static IP menu<br />
Certa<strong>in</strong> models (Th<strong>in</strong>Adapters and older DC-40-100s with black PS/2 ports) cannot use<br />
static IP.<br />
Static IP hasn't been set. Use the spacebar when the "Select any Key to Configure IP<br />
Sett<strong>in</strong>gs" is displayed and set the client IP address<br />
ACP Th<strong>in</strong>Manager <strong>6.0</strong><br />
569 Th<strong>in</strong>Manager Troubleshoot<strong>in</strong>g Guide
3) Cannot Load Firmware<br />
A) Is Th<strong>in</strong> Client connect<strong>in</strong>g to Th<strong>in</strong>Manager Server<br />
i) Us<strong>in</strong>g DHCP<br />
Has Option 066 been set to the Th<strong>in</strong>Manager Server IP<br />
Address<br />
Is there a l<strong>in</strong>k light on the network port<br />
Check router address, IP Addresses, and Subnet Mask<br />
ii) Us<strong>in</strong>g Static IP<br />
Has the Th<strong>in</strong>Manager Server IP Address been entered <strong>in</strong> the IP<br />
Configuration Menu<br />
B) Is the network blocked<br />
ACP Enabled th<strong>in</strong> clients that communicate through routers, gateways,<br />
or firewalls may need some ports opened to allow data flow through<br />
these devices. If the th<strong>in</strong> client communicates through one of these and it<br />
is hav<strong>in</strong>g trouble, check to see if these ports are allowed.<br />
The required ports are:<br />
UDP/4900 - TFTP - Used for the TFTP download of the firmware.<br />
TCP/2031 - Configuration - Used to pass the configuration from the Th<strong>in</strong>Manager<br />
Server to the th<strong>in</strong> client.<br />
TCP/1494 - Citrix - Used by the ICA protocol (if us<strong>in</strong>g ICA <strong>in</strong>stead of RDP).<br />
TCP/3389 - RDP - Used by the RDP protocol (if us<strong>in</strong>g RDP <strong>in</strong> v2.4.1 or later).<br />
TCP/5900 - Shadow<strong>in</strong>g - Used to shadow term<strong>in</strong>als.<br />
TCP/1758 – Multicast – Used for firmware download unless multicast is turned<br />
off on the Th<strong>in</strong>Manager Server Configuration Wizard.<br />
P<strong>in</strong>g and DHCP - These need configured as needed.<br />
C) Loads firmware <strong>in</strong>termittently/slowly<br />
Check for IP conflicts<br />
Check cable connections<br />
Make sure Th<strong>in</strong>Manager Server CPU usage is below 100%<br />
Check the IGMP sett<strong>in</strong>gs on the routers. If the IGMP is blocked, the Multicast of<br />
firmware will be <strong>in</strong>terrupted. Unselect<strong>in</strong>g Multicast <strong>in</strong> the Th<strong>in</strong>Manager Server<br />
Configuration wizard will allow firmware downloads if the IGMP is blocked.<br />
4) Th<strong>in</strong> Client Loads Firmware but shows blue message screen<br />
A) "Please Def<strong>in</strong>e on Server"<br />
Enter Th<strong>in</strong>Manager and def<strong>in</strong>e the term<strong>in</strong>al.<br />
B) "License Not Available"<br />
Check your license usage <strong>in</strong> Th<strong>in</strong>Manager. You are out of an ACP-supplied<br />
License<br />
C) "This Term<strong>in</strong>al Disabled"<br />
A Th<strong>in</strong>Manager adm<strong>in</strong>istrator has disabled this term<strong>in</strong>al. Re-enable it.<br />
D) "Network Error - Check Network Connections"<br />
Check the network cable. L<strong>in</strong>k light and network.<br />
E) Was Disabled, but did not go on when Re-enabled.<br />
Reboot.<br />
F) Term<strong>in</strong>al Selection menu is shown, but keyboard does not work<br />
570 Th<strong>in</strong>Manager Troubleshoot<strong>in</strong>g Guide ACP Th<strong>in</strong>Manager <strong>6.0</strong>
Check keyboard and reboot<br />
Use PS/2 splitter if the unit has only one PS/2 port<br />
Switch the mouse and the keyboard if plugged <strong>in</strong>to a PS/2 splitter.<br />
5) Graphical ACP Logo is shown, but boot process stops<br />
A) Does not attempt to connect to the term<strong>in</strong>al server<br />
Check Term<strong>in</strong>al Configuration Wizard to make sure a term<strong>in</strong>al server is specified<br />
B) Cannot Connect to Server xxx (0.0.0.0)<br />
The term<strong>in</strong>al server doesn't have an IP address configured <strong>in</strong> the Term<strong>in</strong>al<br />
Server Configuration Wizard.<br />
If us<strong>in</strong>g DNS, check the term<strong>in</strong>al server's registration.<br />
If you are us<strong>in</strong>g a Citrix Published Application, you may need to specify the ICA<br />
browser.<br />
C) Cannot Connect to Server xxx (w.x.y.z)<br />
Check the event viewer. If it says "Could not issue client license", you need a<br />
Microsoft Term<strong>in</strong>al Server Client Access License (MS TS CAL) and/or a<br />
Microsoft Term<strong>in</strong>al Server Licens<strong>in</strong>g server.<br />
Check the Subnet Mask <strong>in</strong> the ACP Boot Loader on the th<strong>in</strong> client. If it is set to<br />
255.255.255.255 <strong>in</strong>stead of 255.255.255.0, it will fail to connect to the term<strong>in</strong>al<br />
server.<br />
Reboot the th<strong>in</strong> client and use the spacebar when the "Select any Key to<br />
Configure IP Sett<strong>in</strong>gs" is displayed. Change the subnet mask <strong>in</strong> the ACP Boot<br />
Loader menu.<br />
D) Error 50 - Disconnected<br />
Check the event viewer. If it says "Could not issue client license", you need a MS<br />
TS Cal / MS TS Licens<strong>in</strong>g server.<br />
6) Attempts to connect to term<strong>in</strong>al server, but dies<br />
Some servers (Dell and its Dellwall.bmp, for example) load a complex bitmapped background that<br />
can <strong>in</strong>terfere with load<strong>in</strong>g. F<strong>in</strong>d the offend<strong>in</strong>g wallpaper file on the console session and renamed it<br />
so that it doesn't load at log<strong>in</strong><br />
7) Connects to connect to term<strong>in</strong>al server, but cannot log<strong>in</strong><br />
Is the user a valid user Is the password correct<br />
Does the user have permission to connect through Term<strong>in</strong>al Services (user properties <strong>in</strong> the User<br />
Manager)<br />
If logg<strong>in</strong>g <strong>in</strong> to a W<strong>in</strong>dows 2003/2008 term<strong>in</strong>al server, is the user a member of the Adm<strong>in</strong>istrators<br />
group or Remote Desktop Users group<br />
Check the event viewer. If it says "Could not issue client license", you need a Microsoft TS Cal<br />
and or a Microsoft TS Licens<strong>in</strong>g server.<br />
8) Log<strong>in</strong> to Term<strong>in</strong>al Server prompts for password even though the username and password are<br />
filled <strong>in</strong> Th<strong>in</strong>Manager<br />
The password may be entered wrong <strong>in</strong> Th<strong>in</strong>Manager.<br />
W<strong>in</strong>dows 2000 Server is set to always prompt for password at log<strong>in</strong> for RDP users. Select<br />
Programs>Adm<strong>in</strong>istrative Tools>Term<strong>in</strong>al Services Configuration and double click on RDPtcp<br />
Properties <strong>in</strong> the right-hand w<strong>in</strong>dow. Uncheck the Always Prompt for Password checkbox<br />
on the Log<strong>in</strong> Sett<strong>in</strong>gs tab.<br />
ACP Th<strong>in</strong>Manager <strong>6.0</strong> Th<strong>in</strong>Manager Troubleshoot<strong>in</strong>g Guide 571
29.2 Section 2 - Th<strong>in</strong> Client is Booted, Connected, and<br />
Runn<strong>in</strong>g a Session on the Term<strong>in</strong>al Server<br />
9) Disconnects randomly<br />
<br />
<br />
<br />
<br />
Make sure each user is logg<strong>in</strong>g on with a unique user name. W<strong>in</strong>dows 2003/2008 will only allow<br />
one session per name by default.<br />
Check the physical network connection.<br />
Check for a different computer (e.g. a laptop) with the same IP address.<br />
Slow down the Monitor<strong>in</strong>g Interval on the Monitor<strong>in</strong>g Connection page of the Term<strong>in</strong>al<br />
Configuration Wizard by <strong>in</strong>creas<strong>in</strong>g the timeout and retry values.<br />
10) The session <strong>in</strong> W<strong>in</strong>dows 2003requires frequent log<strong>in</strong>s<br />
Turn off the W<strong>in</strong>dows screen saver. User accounts <strong>in</strong> W<strong>in</strong>dows 2003 use a secure screen saver<br />
by default that requires this frequent log<strong>in</strong>.<br />
11) Mouse works but the application is unresponsive<br />
Application on term<strong>in</strong>al server is locked up - kill the application and let the th<strong>in</strong> client reconnect to<br />
term<strong>in</strong>al server and restart the application<br />
12) Sound doesn't work<br />
Make sure that you are us<strong>in</strong>g a W<strong>in</strong>dows 2003/2008 term<strong>in</strong>al server<br />
Make sure that Audio Mapp<strong>in</strong>g is allowed on the Client Sett<strong>in</strong>gs of the RDP-tcp Properties <strong>in</strong> the<br />
Term<strong>in</strong>al Server Configuration Console.<br />
Make sure that you are us<strong>in</strong>g a th<strong>in</strong> client that has sound capability<br />
Add the Universal Sound Module to that th<strong>in</strong> client<br />
Connect a powered speaker to the "L<strong>in</strong>e Out" plug. L<strong>in</strong>e Out isn't amplified so it requires a<br />
powered speaker.<br />
Properly work<strong>in</strong>g th<strong>in</strong> clients will play sounds at boot.<br />
13) The touch screen doesn't work<br />
Make sure you are us<strong>in</strong>g the right Touch Screen Module for the touch screen controller.<br />
Make sure that the serial cable is plugged <strong>in</strong>to the correct serial port<br />
Make sure that the Touch Screen Module is us<strong>in</strong>g the correct baud rate.<br />
14) The touch screen mouse doesn't match the touches.<br />
Calibrate the touch screen by highlight<strong>in</strong>g the unit <strong>in</strong> the Th<strong>in</strong>Manager tree and select Tools ><br />
Calibrate Touch Screen.<br />
15) Changes to the configuration <strong>in</strong> Th<strong>in</strong>Manager don't show up on the th<strong>in</strong> client.<br />
Reboot the th<strong>in</strong> client. Changes are only set to a th<strong>in</strong> client at bootup.<br />
16) The configuration of the primary Th<strong>in</strong>Manager Server and the secondary Th<strong>in</strong>Manager Server<br />
are different.<br />
Synchronize the configurations by select<strong>in</strong>g Manage>Th<strong>in</strong>Manager Server List and select<strong>in</strong>g<br />
Auto-synchronize <strong>in</strong> the Th<strong>in</strong>Manager Server List Wizard.<br />
17) The term<strong>in</strong>als <strong>in</strong> the tree on the primary Th<strong>in</strong>Manager Server show green while the term<strong>in</strong>als<br />
on the secondary are all red.<br />
Add both Th<strong>in</strong>Manager Servers to the Th<strong>in</strong>Manager Server Monitor List <strong>in</strong> the Term<strong>in</strong>al<br />
Configuration Wizard (then reboot the term<strong>in</strong>als and synchronize the Th<strong>in</strong>Managers as <strong>in</strong> Number<br />
15 and Number 16).<br />
18) The client is show<strong>in</strong>g the time of the term<strong>in</strong>al server <strong>in</strong> a different time zone and not the local<br />
time.<br />
Use the Time Zone Redirection Module on the client with the local time zone selected.<br />
572 Th<strong>in</strong>Manager Troubleshoot<strong>in</strong>g Guide ACP Th<strong>in</strong>Manager <strong>6.0</strong>
Make sure that the security policy of the term<strong>in</strong>al server or doma<strong>in</strong> allows it. Look at Computer<br />
Configuration > Adm<strong>in</strong>istrative Templates> W<strong>in</strong>dows Components > Term<strong>in</strong>al Services<br />
>Client/Server data redirection >Allow Time Zone Redirection and set it to Enabled<br />
19) When "Term<strong>in</strong>al Servers" is highlighted <strong>in</strong> the Th<strong>in</strong>Manager tree, the Details pane doesn't<br />
show OK for the connections.<br />
A) No log<strong>in</strong> <strong>in</strong><strong>format</strong>ion supplied<br />
Run the Term<strong>in</strong>al Server List Wizard and add an adm<strong>in</strong>istrative user name and<br />
password on the Term<strong>in</strong>al Server Name page of the Term<strong>in</strong>al Server List Wizard.<br />
B) User specified does not have permission to connect<br />
<br />
<br />
This <strong>in</strong>dicates that the Term<strong>in</strong>al Server had an <strong>in</strong>valid username and password<br />
added on the Term<strong>in</strong>al Server Name page of the Term<strong>in</strong>al Server List Wizard.<br />
Run the Term<strong>in</strong>al Server List Wizard and change to an adm<strong>in</strong>istrative user name<br />
and password on the Term<strong>in</strong>al Server Name page of the Term<strong>in</strong>al Server List<br />
Wizard.<br />
Use the doma<strong>in</strong> <strong>in</strong> the Doma<strong>in</strong> field on the Term<strong>in</strong>al Server Name page of the<br />
Term<strong>in</strong>al Server List Wizard.<br />
If not <strong>in</strong> a doma<strong>in</strong>, try us<strong>in</strong>g the term<strong>in</strong>al server name <strong>in</strong> the Doma<strong>in</strong> field on the<br />
Term<strong>in</strong>al Server Name page of the Term<strong>in</strong>al Server List Wizard.<br />
C) WTSAPI32.dll connection failed<br />
This occurs when the term<strong>in</strong>al server is off or unreachable. Try p<strong>in</strong>g<strong>in</strong>g the<br />
term<strong>in</strong>al server.<br />
20) The Users, Sessions, and Processes tabs don't show data for a term<strong>in</strong>al server<br />
A) No log<strong>in</strong> <strong>in</strong><strong>format</strong>ion supplied<br />
Run the Term<strong>in</strong>al Server List Wizard and add an adm<strong>in</strong>istrative user name and<br />
password on the Term<strong>in</strong>al Server Name page of the Term<strong>in</strong>al Server List Wizard.<br />
B) User specified does not have permission to connect<br />
<br />
<br />
This <strong>in</strong>dicates that the Term<strong>in</strong>al Server had an <strong>in</strong>valid username and password<br />
added on the Term<strong>in</strong>al Server Name page of the Term<strong>in</strong>al Server List Wizard.<br />
Run the Term<strong>in</strong>al Server List Wizard and change to an adm<strong>in</strong>istrative user name<br />
and password on the Term<strong>in</strong>al Server Name page of the Term<strong>in</strong>al Server List<br />
Wizard.<br />
Use the doma<strong>in</strong> <strong>in</strong> the Doma<strong>in</strong> field on the Term<strong>in</strong>al Server Name page of the<br />
Term<strong>in</strong>al Server List Wizard.<br />
If not <strong>in</strong> a doma<strong>in</strong>, try us<strong>in</strong>g the term<strong>in</strong>al server name <strong>in</strong> the Doma<strong>in</strong> field on the<br />
Term<strong>in</strong>al Server Name page of the Term<strong>in</strong>al Server List Wizard.<br />
21) The Users and Sessions tabs show data for a term<strong>in</strong>al server, but the Processes tabs shows<br />
no data.<br />
Shorten the name of the term<strong>in</strong>al.<br />
Microsoft truncates the term<strong>in</strong>al names to 15 characters. The Process <strong>in</strong><strong>format</strong>ion won't display<br />
for term<strong>in</strong>als with a name longer than 15 characters.<br />
22) When shadow<strong>in</strong>g a client the mouse doesn't work <strong>in</strong> the shadowed session.<br />
<br />
<br />
<br />
The user must be logged <strong>in</strong>to the shadow<strong>in</strong>g computer as an adm<strong>in</strong>istrator or as a Th<strong>in</strong>Manager<br />
Adm<strong>in</strong>istrator to use <strong>in</strong>teractive shadow<strong>in</strong>g.<br />
The <strong>in</strong>teractive shadow must be checked <strong>in</strong> RemoteView on the Th<strong>in</strong>Manager menu.<br />
A term<strong>in</strong>al us<strong>in</strong>g the Share Keyboard and Mouse module will only be <strong>in</strong>teractive if the mouse is<br />
active <strong>in</strong> that session.<br />
ACP Th<strong>in</strong>Manager <strong>6.0</strong> Th<strong>in</strong>Manager Troubleshoot<strong>in</strong>g Guide 573
Boot 128<br />
Boot Loader 105<br />
30 Index<br />
A<br />
Access Groups 93, 453, 455, 457, 459,<br />
466, 468<br />
acpboot.b<strong>in</strong> 215<br />
Activate Master License 54<br />
ActiveX Configuration 320, 336<br />
ActiveX Configuration Module 320, 336,<br />
512<br />
ActiveX Control 512<br />
ActiveX Demo 519<br />
Add Group 88, 250<br />
Add Programs 27<br />
Add Remove 27<br />
Add Remove Programs 526<br />
Add Server 148, 234<br />
Add Term<strong>in</strong>al 88, 175<br />
Add Th<strong>in</strong>Manager Server 88<br />
Add<strong>in</strong>g Modules 304<br />
Add<strong>in</strong>g Term<strong>in</strong>als 134<br />
Adm<strong>in</strong>istrators 433<br />
Allow term<strong>in</strong>al to be shadowed 434<br />
Application Group Configuration Wizard 91<br />
Application L<strong>in</strong>k 255<br />
AppL<strong>in</strong>k 255, 261<br />
Attach Module 305<br />
Auto Log<strong>in</strong> 255<br />
Auto-Create 135, 155<br />
Auto-Create Mask 135<br />
Auto-Create mode 135<br />
Auto-Creation 136<br />
Auto-Log<strong>in</strong> 255<br />
Available Term<strong>in</strong>al Servers 234<br />
B<br />
Background 326, 430<br />
Backup 99<br />
Backup Configuration 99<br />
Badge 501<br />
C<br />
CAL 565<br />
Calibrate 115<br />
Calibrate Touch Screen 115<br />
Camera 264, 274<br />
Camera Authentication Page 244<br />
Camera Configuration Wizard 242<br />
Camera Model Options 244<br />
Camera Name Page 242<br />
Camera Overlay Layout Page 264<br />
Cameras 267<br />
Card 501<br />
Cha<strong>in</strong> Loader 106<br />
Change User 526<br />
Chang<strong>in</strong>g a Term<strong>in</strong>al’s Group 225<br />
Citrix 21, 186, 344, 345, 346, 348, 349<br />
Citrix Device Services 239<br />
Citrix ICA UseAlternateAddress Module<br />
311<br />
Clear Event Log 117, 158<br />
Clear History 158<br />
Client Access License 565<br />
Client Communication Protocol 21<br />
Command L<strong>in</strong>e Options 199<br />
Command Prompt 560<br />
Communication Indicator 70<br />
Compact Flash 314<br />
Components 21<br />
Computer Management Console 524<br />
Configuration Wizards 140<br />
Configure Default 97<br />
Configure Default Term<strong>in</strong>al 97<br />
Confirm at Term<strong>in</strong>al 314<br />
Create a Master License 49<br />
Create New Term<strong>in</strong>al 134<br />
Create New Term<strong>in</strong>al Mode 134<br />
D<br />
Data Gather<strong>in</strong>g 240<br />
Data Gather<strong>in</strong>g Page 240<br />
Default 136<br />
Default Term<strong>in</strong>al 97<br />
Default Term<strong>in</strong>al 136<br />
Delete 91<br />
Delet<strong>in</strong>g 86<br />
Demo Code 62<br />
Detail pane 69<br />
Details Pane 80<br />
ACP Th<strong>in</strong>Manager <strong>6.0</strong><br />
574 Index
Device Services 239<br />
DHCP 23, 129, 130, 213, 215, 562<br />
DHCP Options 129<br />
Disable 76, 113, 114<br />
Disconnect 100<br />
Disk On Chip 314<br />
Disk-On-Chip 315<br />
Display Client 292, 370, 476<br />
Display Client List 249<br />
Display Client Members Page 258<br />
Display Client Name Page 250<br />
Display Client Options 252<br />
Display Client Options Page 254<br />
Display Client Selection Page 190<br />
Display Clients 287<br />
Display Clients 189<br />
DNS Configuration 97, 172<br />
Doma<strong>in</strong> 173, 229<br />
Doma<strong>in</strong> Name Server 172<br />
E<br />
Edit 88<br />
Edit Group 250<br />
Edit Server 234<br />
E-mail 165<br />
Enable 114, 115<br />
Encryption 348<br />
Enforce Primary 255<br />
Event Log 117, 508<br />
Exclusions 219<br />
Experience 204, 326<br />
F<br />
Failover 23, 285, 287<br />
F<strong>in</strong>d 92<br />
F<strong>in</strong>d Next 93<br />
F<strong>in</strong>d Server 234<br />
Firmware 103, 104<br />
Firmware Update 314<br />
Force Update 315<br />
Full Screen 120<br />
Full Security 538<br />
G<br />
Go FullScreen 120<br />
Graph 256<br />
Graphic User Interface 69<br />
Group Configuration 221<br />
Group Configuration Wizard 91<br />
Group Modules 207, 232, 306<br />
Group Options 351<br />
Group Policy 321, 327, 564<br />
Group Selector 496<br />
Group Sett<strong>in</strong>g 221<br />
Groups 221<br />
H<br />
Hardware 22<br />
Help 121, 132<br />
Help Topics 121<br />
HID Cards 461, 474<br />
HMI 537<br />
Hotkey 295, 351, 354, 355, 357, 358,<br />
374, 464, 480<br />
Hotkey Configuration Page 197<br />
Hotkeys 343<br />
Hybrid 133<br />
Hybrid IP 133<br />
I<br />
ICA 21, 186, 344, 345, 346, 348, 349<br />
ICA Browser 349<br />
ICA Modules 310, 311<br />
Icons 72, 296<br />
Initial Program 255, 256<br />
Install 20, 100<br />
Install Mode 526<br />
Install New Firmware 104<br />
Install New TermCap Database 101<br />
Installation 27, 36, 526<br />
Installation ID 55<br />
Install<strong>in</strong>g a Module 301<br />
Instant Failover 255, 257, 290, 292, 296,<br />
355<br />
Instant Failover Module 342<br />
Interactive Shadow 119<br />
IP Address 129, 132, 217<br />
IP Address Range 217<br />
IP Configuration 130, 132<br />
IP Range 217<br />
J<br />
Jo<strong>in</strong> a Group 177<br />
K<br />
Key Block 311, 448<br />
Key Block S<strong>in</strong>gle Key 312<br />
Keyboard 312<br />
Keyboard Configuration 312<br />
Keystrokes 435, 561<br />
ACP Th<strong>in</strong>Manager <strong>6.0</strong> Index 575
L<br />
License 44<br />
License Activation 45<br />
Licens<strong>in</strong>g 100, 565<br />
List Wizards 140<br />
Load<strong>in</strong>g Order 310<br />
Local Pr<strong>in</strong>ter 316<br />
Local Storage Modules 313<br />
Lock 92<br />
Log In In<strong>format</strong>ion Page 199<br />
Log<strong>in</strong> 477<br />
Log<strong>in</strong> 199<br />
M<br />
MAC Address 220<br />
Ma<strong>in</strong> Menu 497<br />
Manage 93<br />
Manage a Master License 50<br />
Master License 44, 59<br />
Menu Bar 69<br />
Menu Items 88<br />
Microsoft License Server 538<br />
Microsoft Licens<strong>in</strong>g 536, 565<br />
Mirrored 67<br />
Mirrored Redundancy 67<br />
Modify 91<br />
Modify<strong>in</strong>g 85<br />
Module 206, 231<br />
Module List 298<br />
Module Load<strong>in</strong>g Order 310<br />
Module Parameters 307<br />
Module Selection 205<br />
Modules 107, 205, 298, 304<br />
Modules Properties 209<br />
Monitor Retry 212<br />
Monitor Timeout 212<br />
Monitor<strong>in</strong>g Configuration Page 211<br />
Mouse Modules 322<br />
Multicast 169<br />
MultiMonitor 25, 26, 44, 364, 430<br />
MultiMonitor 360<br />
MultiMonitor Video 202<br />
MultiMonitor W<strong>in</strong><strong>TM</strong>C 430<br />
MultiSession 25<br />
N<br />
Network 23<br />
Network Access 90<br />
New Hardware 134<br />
New User 524<br />
O<br />
Operat<strong>in</strong>g System 21<br />
Option 066 23, 129<br />
Option 067 23, 129<br />
Options 119, 120<br />
Overlay 264, 267, 274<br />
Overlay Cameras 267<br />
Override 191<br />
P<br />
Package 103<br />
Packages 95<br />
Pane 69<br />
Password 132, 229, 446, 471<br />
Permission Compatibility 538<br />
Permissions 162, 251, 279, 442, 452,<br />
455, 457, 459<br />
Policy 327<br />
Primary Up Delay 212<br />
Primary Up Delay Multiplier 212<br />
Pr<strong>in</strong>t 118, 316<br />
Product Code 51<br />
Product Licenses 44<br />
ProxCard 508<br />
ProxCards 461, 474<br />
Published Application 349<br />
Published Applications 349<br />
PXE Boot 213, 215<br />
PXE Server 97, 213, 214<br />
Q<br />
Queu<strong>in</strong>g 260<br />
Quick Start 20<br />
R<br />
RDP 21, 239, 326<br />
RDP Experience 326<br />
RDP Modules 326<br />
RDP Serial Port 327<br />
RDP Sett<strong>in</strong>gs 531, 534<br />
Reboot 112<br />
Reboot Term<strong>in</strong>als 112<br />
Reboot<strong>in</strong>g 86<br />
Reconnect 99<br />
Redirect 429<br />
Redundancy 65<br />
Redundant Ethernet 319<br />
Relaxed Security 538<br />
Remote Desktop Protocol 21, 239<br />
Remote View 119<br />
576 Index ACP Th<strong>in</strong>Manager <strong>6.0</strong>
Remove Module from All Term<strong>in</strong>als 303<br />
Remove Programs 27<br />
Remove Server 148<br />
Remove Th<strong>in</strong>Manager Server 90<br />
Rename 91<br />
Renam<strong>in</strong>g 86<br />
Renam<strong>in</strong>g a Term<strong>in</strong>al 86<br />
Replace or Create New Term<strong>in</strong>al 134<br />
Replace or Create New Term<strong>in</strong>al Mode 134<br />
Replacements 155<br />
Reports 109, 117, 412, 414, 418<br />
Requirements 21<br />
Reservations 220<br />
Restart 112<br />
Restart Term<strong>in</strong>als 112<br />
Restart<strong>in</strong>g 86<br />
Restore 98<br />
Restore Configuration 98<br />
Restrict each user to one session 538<br />
RFID 461, 474, 501, 508, 509<br />
Right Click 122<br />
Right Click Menus 122<br />
Router 132, 218<br />
S<br />
SCADA 537<br />
Scaled to W<strong>in</strong>dow 120<br />
Schedule 398, 401, 404, 409, 418<br />
Schedule Reports 418<br />
Scope Options 562<br />
Screen Saver 331<br />
Screen Saver 331<br />
Screen Saver Modules 331<br />
Screened 360<br />
Search Doma<strong>in</strong> 173<br />
Second Network Module 319<br />
Security 90, 442, 446, 448, 537<br />
Select Individual Term<strong>in</strong>al Servers 185<br />
Select<strong>in</strong>g Reports 414<br />
Send Key 121<br />
Send Message 116<br />
Serial 327<br />
Server Rank<strong>in</strong>g 256<br />
Session Options 120<br />
SessionTil<strong>in</strong>g 352, 374<br />
Shadow 119, 280, 320<br />
Shadow<strong>in</strong>g 320, 432, 434, 435, 484<br />
Share Keyboard and Mouse 360<br />
Share Keyboard and Mouse 324<br />
Share Keyboard and Mouse 360<br />
Share Keyboard and Mouse Module 324,<br />
360<br />
Show Connected Only 117<br />
S<strong>in</strong>gle click<strong>in</strong>g 87<br />
S<strong>in</strong>gle Session Per User 538<br />
SmartSession 240, 241, 254, 255<br />
SmartSession Configuration 241<br />
SmartSession Sett<strong>in</strong>gs 260<br />
Software Installation 526<br />
Sound Modules 333<br />
Spanned 360<br />
Static IP 131<br />
Status Bar 69, 117<br />
Subnet Mask 132, 218<br />
Synchronization 216<br />
Synchronize 99, 150<br />
Synchronize Configuration 99<br />
T<br />
Tabs 80<br />
TermCap 102<br />
TermCap Database 101<br />
Term<strong>in</strong>al Capability 102<br />
Term<strong>in</strong>al Configuration Wizard 175<br />
Term<strong>in</strong>al Connection License 44<br />
Term<strong>in</strong>al Connection Type 186<br />
Term<strong>in</strong>al Group Configuration Wizard 221<br />
Term<strong>in</strong>al Groups 221<br />
Term<strong>in</strong>al Hardware Page 180<br />
Term<strong>in</strong>al Interface Options 463, 478<br />
Term<strong>in</strong>al Interface Options Page 196<br />
Term<strong>in</strong>al IP Address 132<br />
Term<strong>in</strong>al Mode Selection 184<br />
Term<strong>in</strong>al Name Page 176<br />
Term<strong>in</strong>al Options 182<br />
Term<strong>in</strong>al Server 21<br />
Term<strong>in</strong>al Server Capabilities Page 238<br />
Term<strong>in</strong>al Server Client Access License 565<br />
Term<strong>in</strong>al Server Display Client Type 253<br />
Term<strong>in</strong>al Server Group 249<br />
Term<strong>in</strong>al Server List 233<br />
Term<strong>in</strong>al Server List Wizard 233<br />
Term<strong>in</strong>al Server Name Page 237<br />
Term<strong>in</strong>al Server Selection Page 187<br />
Term<strong>in</strong>al Server Sett<strong>in</strong>gs 535<br />
Term<strong>in</strong>al Server Wizard 236<br />
Term<strong>in</strong>al Services Configuration Console<br />
529<br />
Term<strong>in</strong>al Services Display Servers 233<br />
Term<strong>in</strong>al Shadow 280, 320<br />
Term<strong>in</strong>al-to-Term<strong>in</strong>al 320<br />
Term<strong>in</strong>al-to-Term<strong>in</strong>al Shadow<strong>in</strong>g 435<br />
TermMon 336, 512<br />
ACP Th<strong>in</strong>Manager <strong>6.0</strong> Index 577
TermSecure 26, 44, 93, 357, 409, 449,<br />
451, 457, 459, 466<br />
TermSecure Access Groups 93<br />
TermSecure Log<strong>in</strong> 493<br />
TermSecure Menu 495<br />
TermSecure Modules 335<br />
TermSecure User 488<br />
TermSecure User Group 488<br />
TermSecure Users 459, 485<br />
Theme 326<br />
Themes 430<br />
Th<strong>in</strong>Manager 21, 68<br />
Th<strong>in</strong>Manager Adm<strong>in</strong>istrators 433<br />
Th<strong>in</strong>Manager Compatible 22<br />
Th<strong>in</strong>Manager Installation 27, 36<br />
Th<strong>in</strong>Manager Interactive Shadow Users<br />
433<br />
Th<strong>in</strong>Manager IP Address 132<br />
Th<strong>in</strong>Manager Power Users 433<br />
Th<strong>in</strong>Manager Ready 22<br />
Th<strong>in</strong>Manager Security 446<br />
Th<strong>in</strong>Manager Security Groups 162, 442<br />
Th<strong>in</strong>Manager Server 148<br />
Th<strong>in</strong>Manager Server Configuration Wizard<br />
91<br />
Th<strong>in</strong>Manager Server List 93, 142, 148<br />
Th<strong>in</strong>Manager Server Monitor List 210<br />
Th<strong>in</strong>Manager Shadow Users 433<br />
Th<strong>in</strong>Manager Users 433<br />
Th<strong>in</strong>Server 21<br />
Time Zone 321<br />
Title Bar 69<br />
Tools 112<br />
Touch Screen 115, 300, 338, 498<br />
Touch Screen Modules 338<br />
Touch Screens 33<br />
Tree 71<br />
Tree pane 69, 71<br />
TS CAL 21, 536, 538, 565<br />
TS CAL Activation 566<br />
Username 229<br />
Users 450<br />
V<br />
VCenter Server Property Wizard 91<br />
Video 201, 230, 341, 366<br />
Video Resolution 230<br />
Video Resolution Page 201<br />
View 117<br />
Virtualization 377<br />
W<br />
WaveTrend 461, 474, 509<br />
Web Management 96<br />
Weight 260<br />
What is New 13<br />
W<strong>in</strong>dows 2003 90, 327<br />
W<strong>in</strong>dows Groups 442<br />
W<strong>in</strong>dows Log<strong>in</strong> 477<br />
W<strong>in</strong>dows User Groups 161<br />
W<strong>in</strong>dows XP 89<br />
W<strong>in</strong><strong>TM</strong>C 36, 44, 203, 424<br />
W<strong>in</strong><strong>TM</strong>C Configuration 424, 427<br />
W<strong>in</strong><strong>TM</strong>C Installation 36<br />
W<strong>in</strong><strong>TM</strong>C License 63, 431<br />
W<strong>in</strong><strong>TM</strong>C Sett<strong>in</strong>gs 203, 429<br />
Wizards 139<br />
X<br />
XLi Licenses 45<br />
U<br />
Unknown Term<strong>in</strong>als 155<br />
Unlock 92<br />
Upgrades 64<br />
Upgrad<strong>in</strong>g 64<br />
USB 323, 337<br />
USB Flash Drive 508<br />
USB Flash Drive Module 313<br />
USB Flash Drives 461, 474, 501<br />
Use Display Clients 184<br />
User Profile 524<br />
578 Index ACP Th<strong>in</strong>Manager <strong>6.0</strong>