Chapter 13 - Display Clients - ThinManager 6.0 Help Manual
Chapter 13 - Display Clients - ThinManager 6.0 Help Manual
Chapter 13 - Display Clients - ThinManager 6.0 Help Manual

Create successful ePaper yourself
Turn your PDF publications into a flip-book with our unique Google optimized e-Paper software.
<strong>13</strong> <strong>Display</strong> <strong>Clients</strong><br />
<strong>Display</strong> Client is the term used to denote the graphic rendering of the output from a <strong>Display</strong> Server. This<br />
could be a traditional Terminal Server session, IP Camera display, a Terminal-to-Terminal Shadow<br />
session or a workstation session.<br />
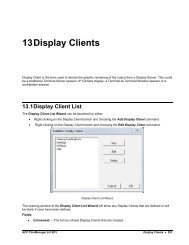
<strong>13</strong>.1 <strong>Display</strong> Client List<br />
The <strong>Display</strong> Client List Wizard can be launched by either:<br />
Right clicking on the <strong>Display</strong> Client branch and choosing the Add <strong>Display</strong> Client command<br />
Right clicking on the <strong>Display</strong> Client branch and choosing the Edit <strong>Display</strong> Client command.<br />
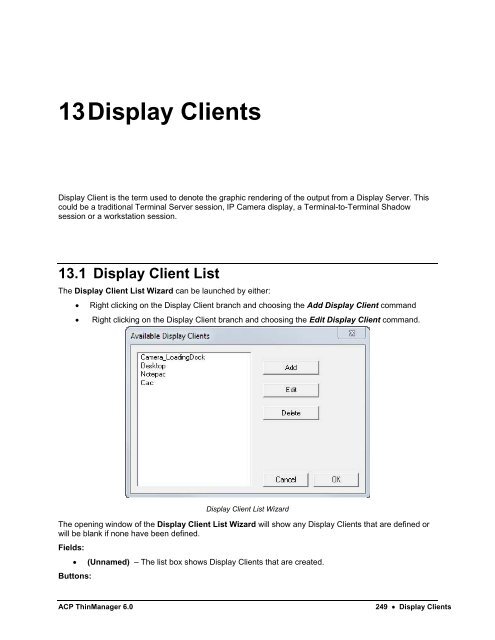
<strong>Display</strong> Client List Wizard<br />
The opening window of the <strong>Display</strong> Client List Wizard will show any <strong>Display</strong> <strong>Clients</strong> that are defined or<br />
will be blank if none have been defined.<br />
Fields:<br />
(Unnamed) – The list box shows <strong>Display</strong> <strong>Clients</strong> that are created.<br />
Buttons:<br />
ACP <strong>ThinManager</strong> <strong>6.0</strong><br />
249 <strong>Display</strong> <strong>Clients</strong>
Add Group – This will launch the <strong>Display</strong> Client Wizard to create a new <strong>Display</strong> Client.<br />
Edit Group – This will open the properties for a highlighted <strong>Display</strong> Client.<br />
Delete Group – This will remove a highlighted <strong>Display</strong> Client from the list.<br />
Cancel – This will close the wizard without action.<br />
OK - This will close the wizard after accepting changes.<br />
<strong>13</strong>.1.1.1 <strong>Display</strong> Client Name Page<br />
<strong>Display</strong> Client Name Page<br />
Importance of Page: This page starts the configuration wizard, sets the name, and the type of <strong>Display</strong><br />
Client.<br />
Fields:<br />
Group Name – This field is used to name the <strong>Display</strong> Client.<br />
Settings:<br />
Type of <strong>Display</strong> Client drop-down box selects the function of the <strong>Display</strong> Client.<br />
o<br />
Terminal Services – This creates a <strong>Display</strong> Client that allows a terminal to connect to a<br />
terminal server, login, and run a session.<br />
250 <strong>Display</strong> <strong>Clients</strong> ACP <strong>ThinManager</strong> <strong>6.0</strong>
o<br />
o<br />
o<br />
Terminal Shadow – creates a <strong>Display</strong> Client that allows a terminal to be shadowed by<br />
another terminal.<br />
Camera – creates a <strong>Display</strong> Client that allows the use of IP Cameras.<br />
Workstation – creates a template for workstation deployment. The Workstation <strong>Display</strong><br />
Client gets assigned to a specific workstation when it is applied to a terminal. See Virtual<br />
Workstations for details.<br />
Buttons:<br />
Permissions - The button will launch the Permissions window that allows Permissions to be set<br />
for TermSecure. This is discussed in Permissions.<br />
Why Change from Default Settings: The group needs a name and a type assigned to it.<br />
This section covers Terminal Services <strong>Display</strong> <strong>Clients</strong>. Once the Type of <strong>Display</strong> Client is set to<br />
Terminal Services select Next to configure the group options.<br />
ACP <strong>ThinManager</strong> <strong>6.0</strong> <strong>Display</strong> <strong>Clients</strong> 251
<strong>13</strong>.2 Terminal Services <strong>Display</strong> <strong>Clients</strong><br />
The Terminal Services <strong>Display</strong> <strong>Clients</strong> of <strong>ThinManager</strong> have the same function as the Terminal Server<br />
Groups from pre-3.2 versions of <strong>ThinManager</strong> and the Application Groups of <strong>ThinManager</strong> 3.2 and 3.3.<br />
They allow a terminal to connect to a terminal server, login, and run a session. The specific terminal<br />
server that the terminal connects to is based on the <strong>Display</strong> Client configuration and options.<br />
<strong>13</strong>.2.1.1 <strong>Display</strong> Client Options Page<br />
<strong>Display</strong> Client Options<br />
Importance of Page: This page allows the configuration of <strong>Display</strong> Client parameters<br />
Checkbox:<br />
Allow group to be tiled – If checked, this allows the <strong>Display</strong> Client to be tiled in SessionTiling.<br />
See SessionTiling Options for details.<br />
Allow Group to be moved (MultiMonitor) – If checked, this allows a <strong>Display</strong> Client to be moved<br />
from one MultiMonitor screen to another. See MultiMonitor for details.<br />
252 <strong>Display</strong> <strong>Clients</strong> ACP <strong>ThinManager</strong> <strong>6.0</strong>
Include IP Camera Overlays –This will allow IP Camera overlays to be added to this <strong>Display</strong><br />
Client.<br />
Always maintain a connection – This keeps a session active, reconnecting and restarting if it is<br />
closed. If unchecked, the user can close a session and another session won’t start automatically.<br />
Connect at boot-up – If checked, the terminal will start a session for this <strong>Display</strong> Client at boot<br />
up. If unchecked, a user action is required to start the session.<br />
Disconnect in background – If checked, a <strong>Display</strong> Client being used in a MultiSession<br />
configuration will disconnect once it is moved into the background. This could be done to require<br />
fewer resources.<br />
Why Change from Default Settings: The Always maintain a connection and Connect at boot up<br />
checkboxes, if unselected, will lower the demand on the terminal servers by allowing sessions to be<br />
closed until needed.<br />
Select Next to continue, Finish to save and close, or Cancel to close without saving.<br />
<strong>13</strong>.2.1.2 Terminal Services <strong>Display</strong> Client Type Page<br />
Terminal Services <strong>Display</strong> Client Type<br />
Importance of Page: Each Terminal Services <strong>Display</strong> Client can use a single protocol to connect to the<br />
terminal servers.<br />
ACP <strong>ThinManager</strong> <strong>6.0</strong> <strong>Display</strong> <strong>Clients</strong> 253
Settings:<br />
Citrix ICA – This allows the use of the Citrix© ICA protocol in client to server communications.<br />
Citrix Device Services – This is a legacy version of the ICA protocol used on Windows NT and<br />
Windows 2000 terminal servers.<br />
Remote Desktop Protocol (RDP) – This is the default protocol from Microsoft©. It is<br />
automatically installed on Microsoft© terminal servers.<br />
Why Change from Default Settings: Change to the Citrix© ICA protocol if the Citrix© ICA protocol is<br />
going to be used instead of the default RDP.<br />
Select Next to continue, Finish to save and close, or Cancel to close without saving.<br />
<strong>13</strong>.2.1.3 Terminal Services <strong>Display</strong> Client Options Page<br />
Terminal Services <strong>Display</strong> Client Options<br />
Importance of Page: This page sets the roles of the <strong>Display</strong> Client.<br />
Checkbox:<br />
SmartSession Group – - This adds SmartSession to the <strong>Display</strong> Client, which provides load<br />
balancing between member terminal servers.<br />
SmartSession uses CPU availability, memory, and the number of sessions on the member<br />
254 <strong>Display</strong> <strong>Clients</strong> ACP <strong>ThinManager</strong> <strong>6.0</strong>
terminal servers to determine the load on the servers. Thin clients connect to the terminal server<br />
in the <strong>Display</strong> Client with the most available resources. See SmartSession Option for details.<br />
Application Link Group (AppLink) – - AppLink, provides the Initial Program function to thin<br />
clients that connect to members of the <strong>Display</strong> Client. The Initial Program function launches a<br />
program instead of the desktop. Closing the program will end the connection and force a<br />
reconnection to a session running the application. See AppLink Option for details.<br />
Enforce Primary - This allows a thin client to connect to its original terminal server if that terminal<br />
server has failed and recovered. This is not available if SmartSession is selected.<br />
Instant Failover (requires license) - This provides Instant Failover where the terminal will<br />
connect to two terminal servers in the <strong>Display</strong> Client. The terminal will have an active session on<br />
two terminal servers but will only display one session. If the first terminal server fails, the session<br />
of the second terminal server session is immediately displayed, eliminating any downtime due to<br />
terminal server failure.<br />
Allow Auto-Login - If checked, the terminal will use the login information supplied in the terminal<br />
configuration to automatically logon to the terminal server. If unchecked, the user will be required<br />
to manually login to the terminal server.<br />
Why Change from Default Settings: <strong>Display</strong> Client features like SmartSession and Instant Failover are<br />
added on this page. You can force users to manually login to a session by deselecting the Allow Auto-<br />
Login checkbox.<br />
Note: Enforce Primary is not available with SmartSession.<br />
<strong>13</strong>.2.1.4 SmartSession Option<br />
SmartSession is a load balancing strategy that allows terminals to connect to the member of a Terminal<br />
Services <strong>Display</strong> Client that has the most available resources. <strong>ThinManager</strong> monitors the CPU load,<br />
memory availability, and number of sessions on the terminal servers and ranks them by availability.<br />
When a thin client connects to a member of a Terminal Services <strong>Display</strong> Client with SmartSession, the<br />
terminal connects to the terminal server with the lightest load.<br />
SmartSession<br />
Each member terminal server needs SmartSession configured in the Terminal Server <strong>Display</strong> Server<br />
Wizard. See Terminal Server Capabilities Page for details.<br />
ACP <strong>ThinManager</strong> <strong>6.0</strong> <strong>Display</strong> <strong>Clients</strong> 255
Once <strong>ThinManager</strong> has polled the terminal servers and established the availability of their resources,<br />
<strong>ThinManager</strong> passes the Server Ranking to the thin clients for its connection instructions.<br />
<strong>ThinManager</strong> Interface – Server Rank Tab<br />
The Server Rankings are displayed on the Server Rank tab when a Terminal Services <strong>Display</strong> Client is<br />
highlighted in the <strong>ThinManager</strong> tree. In the example above a thin client would connect to Green22<br />
because it has the lowest load.<br />
<strong>13</strong>.2.1.5 AppLink Option<br />
AppLink provides the Initial Program functionality to a Terminal Services <strong>Display</strong> Client. If AppLink is<br />
enabled, the path to an Initial Program is entered into the AppLink Page of Terminal Services <strong>Display</strong><br />
Client Wizard. This program will be the only program to run in that session.<br />
Note: If the AppLink option is not used then the terminal services session will display a desktop.<br />
Note: If a Terminal Services <strong>Display</strong> Client contains several terminal servers, the path must be valid on all<br />
terminal servers. If different terminal servers have different paths to the desired program, write a batch file<br />
to open the program.<br />
256 <strong>Display</strong> <strong>Clients</strong> ACP <strong>ThinManager</strong> <strong>6.0</strong>
<strong>13</strong>.2.1.6 Instant Failover Option<br />
Terminal Services <strong>Display</strong> <strong>Clients</strong> can provide Instant Failover without using the Instant Failover<br />
Module. With Instant Failover a terminal will connect to a session on two terminal servers. Both sessions<br />
are active but only one is displayed. If the first terminal server fails, the second session is immediately<br />
displayed, eliminating any downtime due to terminal server failure.<br />
Note: AppLink and Auto-Login is normally used with Instant Failover to provide instant access to an<br />
application.<br />
Instant Failover is configured by selecting the Instant Failover checkbox on the Terminal Services<br />
<strong>Display</strong> Client Options page of the Terminal Services <strong>Display</strong> Client Wizard,<br />
Instant Failover works with the terminal servers of a <strong>Display</strong> Client, not between different <strong>Display</strong> <strong>Clients</strong>.<br />
Note: Do not use the Instant Failover Module when using Instant Failover in <strong>Display</strong> Client.<br />
In a standard Terminal Services <strong>Display</strong> Client, the terminal will use the first listed terminal server as<br />
the primary server and will use the second listed terminal server as the secondary server.<br />
If using SmartSession, the primary session will be on the server with the lightest load and the backup<br />
session will be on the terminal server with the second lightest load.<br />
ACP <strong>ThinManager</strong> <strong>6.0</strong> <strong>Display</strong> <strong>Clients</strong> 257
<strong>13</strong>.2.1.7 <strong>Display</strong> Client Members Page<br />
<strong>Display</strong> Client Members<br />
Importance of Page: This allows the selection of the terminal servers that will be members of the <strong>Display</strong><br />
Client. Adding multiple terminal servers to the Selected Terminal Server list will establish failover.<br />
List Box:<br />
<br />
Available Terminal Servers – This is the list of the terminals configured in the Terminal Server<br />
Configuration Wizard and available to the terminal.<br />
If the Available Terminal Server list box is empty the Terminal Server Configuration Wizard can<br />
be launched with the Edit Server List button to define the terminal servers.<br />
Selected Terminal Servers – This is the list of terminal servers that the <strong>Display</strong> Client will use.<br />
Move the terminal servers to this list with the left and right arrow or by double clicking on the<br />
name.<br />
Listing two or more terminal servers configures Failover.<br />
The terminal will connect to the terminal servers in the order listed unless SmartSession is used.<br />
The terminal will connect to the terminal server with the lightest load if SmartSession is being<br />
used.<br />
Buttons:<br />
258 <strong>Display</strong> <strong>Clients</strong> ACP <strong>ThinManager</strong> <strong>6.0</strong>
Arrows – The left and right arrows move the terminal servers between list boxes. The up and<br />
down arrow change the order that the terminal servers are used. The top terminal server is<br />
considered the primary terminal server.<br />
Edit Server List – This launches the Terminal Server Configuration Wizard that allows<br />
terminal servers to be defined within <strong>ThinManager</strong>. Selecting Manage > Terminal Server List<br />
from the <strong>ThinManager</strong> menu will also launch the Terminal Server Configuration Wizard.<br />
Why Change from Default Settings: It is critical to list the terminal servers that the <strong>Display</strong> Client will<br />
use. The wizard will not advance without a terminal server selected.<br />
If the Available Terminal Servers column is empty, the Terminal Server List Wizard needs to be run to<br />
define the terminal servers. Select the Edit Server List to launch the Terminal Server Configuration<br />
Wizard and define the terminal servers.<br />
If the <strong>Display</strong> Client is using the SmartSession option, the Next button will launch the SmartSession<br />
Settings page.<br />
If the <strong>Display</strong> Client is not SmartSession Group the Finish button will complete the <strong>Display</strong> Client<br />
configuration.<br />
<strong>13</strong>.2.1.8 <strong>Display</strong> Client SmartSession Settings Page<br />
Smart Session Settings<br />
ACP <strong>ThinManager</strong> <strong>6.0</strong> <strong>Display</strong> <strong>Clients</strong> 259
Importance of Page: This allows tweaking of SmartSession values by adjusting the weights of the<br />
SmartSession settings.<br />
<strong>ThinManager</strong> multiplies the CPU utilization, Memory utilization, and number of sessions on the terminal<br />
server by the Weight shown to define the SmartSession terminal server’s available resources.<br />
The higher the Weight, relative to the others, the greater the importance that parameter has in<br />
determining the load for SmartSession.<br />
The SmartSession load = (CPU weight * CPU Utilization %) + (Memory weight * Memory Utilization %) +<br />
(Session weight * Session Utilization %)<br />
Settings:<br />
CPU Utilization Weight – This is the CPU multiplier.<br />
Memory Utilization Weight – This is the Memory multiplier.<br />
Session Weight – This is the Session multiplier.<br />
Queuing controls the rate that terminals connect to the terminal servers in the <strong>Display</strong> Client to allow<br />
processor intensive applications to load one at a time instead of many sessions forming at once, bringing<br />
the server to a halt. As terminals that use SmartSession Queuing boot, they request their terminal server<br />
from <strong>ThinManager</strong>. <strong>ThinManager</strong> will send the first terminal to the terminal server with the lightest load<br />
and will put the other terminals in a queue for the interval defined in the Min _ Sec field. This allows the<br />
terminal server load to stabilize and allows <strong>ThinManager</strong> to re-sample the loads and send the terminal to<br />
the terminal server with the lowest current load.<br />
Fields:<br />
<br />
Min _ Sec – This is the amount of seconds that a terminal will wait in the queue before being sent<br />
to a terminal server that has another terminal connecting. The terminal may wait longer than this<br />
value to connect if the CPU of the terminal server exceeds the Maximum CPU Utilization<br />
defined on the SmartSession Configuration page of the Terminal Server Configuration<br />
wizard. See SmartSession Configuration Page for details.<br />
Max _ Sec – This is the maximum amount of seconds that a terminal will wait in the queue before<br />
being sent to the terminal server to login, regardless of the load.<br />
Checkbox:<br />
Infinite - If the Infinite checkbox is selected, <strong>ThinManager</strong> will wait until the CPU utilization of the<br />
terminal server has regained an acceptable range before sending other terminals to it to login.<br />
Why Change from Default Settings: The values can be tweaked to alter performance, if needed.<br />
Note: The Weighs are relative. Increasing all three Weights from “1” to “10” doesn’t change the relative<br />
values.<br />
If the <strong>Display</strong> Client uses the AppLink option, an AppLink page will be displayed by selecting the Next<br />
button.<br />
260 <strong>Display</strong> <strong>Clients</strong> ACP <strong>ThinManager</strong> <strong>6.0</strong>
<strong>13</strong>.2.1.9 <strong>Display</strong> Client Linked Application Page<br />
AppLink Path<br />
Importance of Page: This page configures the <strong>Display</strong> Client as an AppLink group where it will launch a<br />
single application in the session. If this application is closed the terminal will reconnect and re-launch the<br />
application.<br />
Fields:<br />
Program Path and Filename - Enter the path to the desired application in the field.<br />
Note: Quotation marks may be needed when there is a space in the path.<br />
<br />
Command Line Options – This field provides a space for command line options and switches.<br />
This field may not be required.<br />
Start in the following folder - This field is provided in case you need to specify the working<br />
directory for the program when using a relative path for the initial program. This field may not be<br />
required.<br />
Buttons:<br />
<br />
Browse – The Browse button will allow you to select the executable file using a file browser.<br />
Make sure the path is correct on all terminal servers.<br />
ACP <strong>ThinManager</strong> <strong>6.0</strong> <strong>Display</strong> <strong>Clients</strong> 261
Note: If a Terminal Services <strong>Display</strong> Client contains several terminal servers, the path must be valid on all<br />
terminal servers. If different terminal servers have different paths to the desired program, write a batch file<br />
to open the program.<br />
Why Change from Default Settings: This allows you to control a user’s access. If the <strong>Display</strong> Client<br />
uses AppLink the user will not get a desktop or icons but will be limited to the application specified.<br />
Closing it will re-launch the program, assuring that it is always running.<br />
Selecting the Finish button will close the <strong>Display</strong> Client List wizard and display the created terminal<br />
server groups.<br />
<strong>13</strong>.3 Camera <strong>Display</strong> <strong>Clients</strong><br />
The Camera <strong>Display</strong> Client configuration wizard can be launched by right clicking on the Camera branch<br />
of the <strong>ThinManager</strong> tree and selecting the Add <strong>Display</strong> Client option.<br />
Camera <strong>Display</strong> Client Wizard – Name<br />
Importance of Page: Allows naming and selection of <strong>Display</strong> Client type.<br />
Fields:<br />
Client Name – Name for <strong>Display</strong> Client.<br />
262 <strong>Display</strong> <strong>Clients</strong> ACP <strong>ThinManager</strong> <strong>6.0</strong>
Type of <strong>Display</strong> Client – Drop-down to select type of <strong>Display</strong> Client.<br />
Button:<br />
Permissions – Sets TermSecure permissions. See Permissions for details.<br />
Why Change from Default Settings: The display client needs a name.<br />
Enter the name of the <strong>Display</strong> Client and any TermSecure permissions on this page.<br />
Camera <strong>Display</strong> Client Options<br />
Importance of Page: Sets <strong>Display</strong> Client options.<br />
Checkbox:<br />
Allow <strong>Display</strong> Client to be tiled – Allows tiling of the client.<br />
Allow <strong>Display</strong> Client to be moved (MultiMonitor) – Allows the <strong>Display</strong> Client to be opened in<br />
any MultiMonitor window.<br />
Why Change from Default Settings: Provides additional options.<br />
Select if this <strong>Display</strong> Client can be tiled and if when using MultiMonitor it can be moved to a different<br />
screen.<br />
ACP <strong>ThinManager</strong> <strong>6.0</strong> <strong>Display</strong> <strong>Clients</strong> 263
<strong>13</strong>.3.1.1 Overlay Layout Page<br />
Camera <strong>Display</strong> Client Overlay Layout<br />
Importance of Page: Sets camera layout<br />
Settings:<br />
Choose Camera Overlay – Allows you to set the layout of the displays. You may have a single<br />
overlay or multiple overlays on the <strong>Display</strong> Client.<br />
<strong>Display</strong> Size – Sets the size (resolution) of the display to be shown.<br />
Buttons:<br />
Add Overlay – Adds an overlay to the <strong>Display</strong> Client.<br />
Remove Overlay – Removes a highlighted overlay from the <strong>Display</strong> Client.<br />
Why Change from Default Settings: You need at least one overlay in the <strong>Display</strong> Client.<br />
This page determines the layout of the camera overlays. You can define your own custom layout or<br />
choose from predefined layouts. The <strong>Display</strong> Size selection should be set to the resolution of the<br />
terminal screen to which the <strong>Display</strong> Client will be added. The picture on this page represents the overlay<br />
layout.<br />
264 <strong>Display</strong> <strong>Clients</strong> ACP <strong>ThinManager</strong> <strong>6.0</strong>
Camera <strong>Display</strong> Client Layout Selection<br />
Use the layout drop down to select the desired layout.<br />
ACP <strong>ThinManager</strong> <strong>6.0</strong> <strong>Display</strong> <strong>Clients</strong> 265
Camera <strong>Display</strong> Client 2x2 Layout Selection<br />
Once a layout has been selected, it will be represented graphically. Select Next to configure the overlays.<br />
266 <strong>Display</strong> <strong>Clients</strong> ACP <strong>ThinManager</strong> <strong>6.0</strong>
<strong>13</strong>.3.1.2 Overlay Cameras Page<br />
Camera <strong>Display</strong> Client Overlay definition<br />
Importance of Page: Configures the overlays.<br />
Fields:<br />
Overlay Name – Name for the overlay (filled in by default).<br />
Settings:<br />
Left – Sets the left side of the overlay in pixels.<br />
Top – Sets the top of the overlay in pixels.<br />
Width – Sets the overlay width in pixels.<br />
Height – Sets the overlay height in pixels.<br />
Buttons:<br />
Add – Adds a camera to the overlay.<br />
Delete – Removes a highlighted camera from the overlay.<br />
Set Initial Camera – Sets the initial camera from a series of cameras.<br />
Overlay Options – Launches the Overlay Options page.<br />
ACP <strong>ThinManager</strong> <strong>6.0</strong> <strong>Display</strong> <strong>Clients</strong> 267
Checkbox:<br />
All Cameras Available – This makes all cameras available if checked. If unchecked the Add<br />
button allows specific cameras to be added.<br />
Why Change from Default Settings: Each Camera <strong>Display</strong> Client needs overlays.<br />
Each overlay will be given a default name. The grey region of the screen representation is the overlay<br />
which is currently being configured. If the All Cameras Available checkbox is checked, all of the<br />
cameras will be available to be selected by the user at the terminal.<br />
Set Initial Camera Dialog<br />
Selecting the Set Initial Camera button allows the camera the overlay will start on at boot up to be<br />
selected.<br />
268 <strong>Display</strong> <strong>Clients</strong> ACP <strong>ThinManager</strong> <strong>6.0</strong>
Overlay Camera Selection<br />
If the All Cameras Available checkbox is unchecked, cameras must be added manually. Use the Add<br />
button to add cameras to the list. Adding more than one camera allows the user to select from these<br />
cameras at the terminal and allows the cycling between the listed cameras.<br />
ACP <strong>ThinManager</strong> <strong>6.0</strong> <strong>Display</strong> <strong>Clients</strong> 269
Camera Selection<br />
Overlay Options<br />
Clicking the Overlay Options button will allow the setting of additional overlay options.<br />
General Options:<br />
270 <strong>Display</strong> <strong>Clients</strong> ACP <strong>ThinManager</strong> <strong>6.0</strong>
Enable Overlay – This option allows the overlay to be started in a disabled non-visible state. The<br />
TermMon ActiveX Control can be used by an application to enable the overlay.<br />
Interactive – This option allows the user on the terminal to interact with the overlay. If the user<br />
clicks in the overlay area, he can perform functions such as switching cameras and making the<br />
overlay full screen.<br />
Scale – This option will scale camera frames to be to the size of the overlay window. Aspect ratio<br />
will be maintained.<br />
Crop – This option will crop the camera frame if it is larger than the camera overlay. This option<br />
when combined with the Scale option will always fill the entire overlay area.<br />
Show Complete Camera Name – Using this option allows the entire path of the camera to be<br />
displayed. The path includes any groups of which the camera is a member.<br />
Border Size – This setting determines the size of the overlay outside border.<br />
Title Options:<br />
Title Position – This is the position of the camera name within the overlay.<br />
Title Size – This is the size of the camera name when displayed within the overlay. Set this to<br />
Don’t’ Show Title if you do not want the camera name displayed.<br />
Cycling Options:<br />
Enable Cycling – Check this setting to cycle between the cameras assigned to the overly.<br />
Cycle Time – This is the time in seconds that the overlay will display each camera before<br />
switching to the next camera.<br />
Camera <strong>Display</strong> Client Tree View<br />
ACP <strong>ThinManager</strong> <strong>6.0</strong> <strong>Display</strong> <strong>Clients</strong> 271
Once a Camera <strong>Display</strong> Client has been configured it will be reflected in the <strong>ThinManager</strong> tree under<br />
<strong>Display</strong> <strong>Clients</strong>->Camera.<br />
Terminal Configuration <strong>Display</strong> Client Selection<br />
During the terminal configuration, select the desired <strong>Display</strong> <strong>Clients</strong> for the terminal. Multiple <strong>Display</strong><br />
<strong>Clients</strong> can be added to the configuration for a MultiSession configuration.<br />
272 <strong>Display</strong> <strong>Clients</strong> ACP <strong>ThinManager</strong> <strong>6.0</strong>
Camera <strong>Display</strong> Client Terminal Tree View<br />
When the terminal is running, the Camera <strong>Display</strong> Client status will be reflected in the <strong>ThinManager</strong><br />
terminal tree view. The status of each Camera Overlay and Camera will be displayed. A green lightning<br />
bolt on the <strong>Display</strong> Client icon represents that <strong>Display</strong> Client is in the foreground. A yellow lightning bolt<br />
on the <strong>Display</strong> Client icon represents that the <strong>Display</strong> Client is in the background. A green lightning bolt<br />
on the overlay icon represents an active overlay. A green lightning bolt on the camera icon represents an<br />
active connection to the camera.<br />
ACP <strong>ThinManager</strong> <strong>6.0</strong> <strong>Display</strong> <strong>Clients</strong> 273
<strong>13</strong>.3.2 Adding a Camera Overlay to a <strong>Display</strong> Client<br />
Terminal Configuration <strong>Display</strong> Client Options<br />
During the terminal configuration check the Include IP Camera Overlays option to add camera overlays<br />
to a <strong>Display</strong> Client.<br />
274 <strong>Display</strong> <strong>Clients</strong> ACP <strong>ThinManager</strong> <strong>6.0</strong>
Terminal Configuration Overlay Layout<br />
Camera Overlays can be configured before completing the Terminal Configuration wizard,<br />
Terminal Configuration Add Camera Overlay<br />
Clicking the Add Overlay button will allow the creation of the overlay. Enter the name position and size of<br />
the desired overlay.<br />
ACP <strong>ThinManager</strong> <strong>6.0</strong> <strong>Display</strong> <strong>Clients</strong> 275
Camera Overlay Layout<br />
Once an overlay has been added, it will be represented as a white outlined square on the layout page.<br />
Selecting the Next button will allow the completion of the configuration camera overlays<br />
276 <strong>Display</strong> <strong>Clients</strong> ACP <strong>ThinManager</strong> <strong>6.0</strong>
Overlay Camera Selection<br />
The camera overlay configuration can be completed as described in the IP Camera <strong>Display</strong> Server<br />
Configuration Wizard section.<br />
<strong>13</strong>.3.3 Camera Overlays and TermMon ActiveX Control<br />
Camera Overlays can be controlled by an application by using the TermMon ActiveX Control. The Control<br />
can be used to perform operations such as switching cameras and changing the overlay size and<br />
position. See TermMon ActiveX for details.<br />
ACP <strong>ThinManager</strong> <strong>6.0</strong> <strong>Display</strong> <strong>Clients</strong> 277
<strong>13</strong>.4 Terminal Shadow <strong>Display</strong> <strong>Clients</strong><br />
Terminal Shadow <strong>Display</strong> <strong>Clients</strong> allow a terminal to shadow another terminal. The Shadow <strong>Display</strong> Client<br />
can contain a specific terminal or several terminals.<br />
<strong>13</strong>.4.1.1 Group Name Page<br />
Terminal Shadow <strong>Display</strong> Client - Group Name Page<br />
Importance of Page: This page starts the configuration wizard, sets the name, and the type of <strong>Display</strong><br />
Client.<br />
Fields:<br />
Group Name – This field is used to name the <strong>Display</strong> Client.<br />
Settings:<br />
Type of <strong>Display</strong> Client drop-down box selects the function of the <strong>Display</strong> Client.<br />
o<br />
Terminal Services – This creates a <strong>Display</strong> Client that allows a terminal to connect to a<br />
terminal server, login, and run a session.<br />
278 <strong>Display</strong> <strong>Clients</strong> ACP <strong>ThinManager</strong> <strong>6.0</strong>
o Terminal Shadow – creates a <strong>Display</strong> Client that allows a terminal to be shadowed by<br />
another terminal.<br />
Buttons:<br />
Permissions - The button will launch the Permissions window that allows Permissions to be set<br />
for TermSecure. This is discussed in Permissions.<br />
Why Change from Default Settings: The group needs a name and a type assigned to it.<br />
This section covers Terminal Shadow <strong>Display</strong> <strong>Clients</strong>. Configure the <strong>Display</strong> Client by selecting<br />
Terminal Shadow from the Type of <strong>Display</strong> Client drop-down after naming the group.<br />
Select the Next button to continue.<br />
Terminal Shadow <strong>Display</strong> Client –<strong>Display</strong> Client Options<br />
Importance of Page: This page allows the configuration of <strong>Display</strong> Client parameters<br />
Checkbox:<br />
Allow group to be tiled – If checked, this allows the <strong>Display</strong> Client to be tiled in SessionTiling.<br />
See SessionTiling Options for details.<br />
Allow Group to be moved (MultiMonitor) – If checked, this allows a <strong>Display</strong> Client to be moved<br />
from one MultiMonitor screen to another. See MultiMonitor for details.<br />
ACP <strong>ThinManager</strong> <strong>6.0</strong> <strong>Display</strong> <strong>Clients</strong> 279
Include IP Camera Overlays –This will allow IP Camera overlays to be added to this <strong>Display</strong><br />
Client.<br />
Always maintain a connection – This keeps a session active, reconnecting and restarting if it is<br />
closed. If unchecked, the user can close a session and another session won’t start automatically.<br />
Connect at boot-up – If checked, the terminal will start a session for this <strong>Display</strong> Client at boot<br />
up. If unchecked, a user action is required to start the session.<br />
Disconnect in background – If checked, a <strong>Display</strong> Client being used in a MultiSession<br />
configuration will disconnect once it is moved into the background. This could be done to require<br />
fewer resources.<br />
Why Change from Default Settings: The Always maintain a session for this group and Start a<br />
session at boot-up for this group checkboxes, if unselected, will lower the demand on the terminal<br />
servers by allowing sessions to be closed until needed.<br />
Select Next to continue, Finish to save and close, or Cancel to close without saving.<br />
<strong>13</strong>.4.1.2 Terminal Shadow <strong>Display</strong> Client Page<br />
The Terminal Shadow <strong>Display</strong> Client page allows the selection of the terminal or terminals to be<br />
shadowed.<br />
Terminal Shadow <strong>Display</strong> Client – All Terminals Available<br />
280 <strong>Display</strong> <strong>Clients</strong> ACP <strong>ThinManager</strong> <strong>6.0</strong>
Importance of Page: This page selects what terminals are available to be shadowed using Terminal-to-<br />
Terminal Shadowing.<br />
Checkbox:<br />
All Terminals Available – This checkbox allows all terminals to be shadowed. Unselect it to limit<br />
Terminal-to-Terminal Shadowing to specific terminals.<br />
Interactive Shadow – This checkbox allows interactive shadowing of the terminals.<br />
Fields:<br />
Terminal to Shadow – This list box shows the terminals available to shadow.<br />
Buttons:<br />
Add – This button adds terminals to the Terminal to Shadow list box when All Terminals<br />
Available is unselected.<br />
Delete – This button deletes a highlighted terminal from the Terminal to Shadow list box when<br />
All Terminals Available is unselected.<br />
Why Change from Default Settings: The default setting grants permission to shadow all of the<br />
terminals. Unselecting the All Terminals Available checkbox allows specific terminals to be added.<br />
Additionally, multiple shadow groups can be created, each with a specific terminal or group of terminals.<br />
By default the Shadow Group is configured to allow all terminals to be shadowed. Unselecting the All<br />
Terminals Available checkbox will allow the designation of specific terminals.<br />
ACP <strong>ThinManager</strong> <strong>6.0</strong> <strong>Display</strong> <strong>Clients</strong> 281
Terminal Shadow <strong>Display</strong> Client –Select Terminals<br />
Select the Add button to launch the terminal selection window.<br />
282 <strong>Display</strong> <strong>Clients</strong> ACP <strong>ThinManager</strong> <strong>6.0</strong>
Select Terminal or Group Window<br />
Select a terminal for shadowing by highlighting it in the Select Terminal or Group window and selecting<br />
the OK button. The window will close after each selection.<br />
To add multiple terminals repeat the process by selecting the Add button on the Terminal Shadow<br />
<strong>Display</strong> Client page.<br />
ACP <strong>ThinManager</strong> <strong>6.0</strong> <strong>Display</strong> <strong>Clients</strong> 283
Terminal Shadow <strong>Display</strong> Client – Selected Terminals<br />
The Terminals to Shadow textbox will display the terminals added to the list.<br />
Terminal Selector<br />
284 <strong>Display</strong> <strong>Clients</strong> ACP <strong>ThinManager</strong> <strong>6.0</strong>
When a terminal launches a Shadow <strong>Display</strong> Client that has multiple members a Select Terminal to<br />
Shadow window will be displayed to allow the selection of the terminal to shadow. Highlight the desired<br />
terminal and select the OK button.<br />
<strong>13</strong>.4.1.3 <strong>Display</strong> Client List Window<br />
Available <strong>Display</strong> <strong>Clients</strong><br />
After a <strong>Display</strong> Client is configured the <strong>Display</strong> Client List will show configured <strong>Display</strong> <strong>Clients</strong>.<br />
Additional groups can be configured by selecting the New Group button.<br />
The <strong>Display</strong> Client List wizard can be closed by selecting OK.<br />
ACP <strong>ThinManager</strong> <strong>6.0</strong> <strong>Display</strong> <strong>Clients</strong> 285