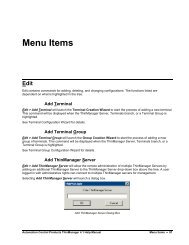
Non-ThinManager Components
Non-ThinManager Components
Non-ThinManager Components

You also want an ePaper? Increase the reach of your titles
YUMPU automatically turns print PDFs into web optimized ePapers that Google loves.
28 <strong>Non</strong>-<strong>ThinManager</strong> <strong>Components</strong><br />
Microsoft Terminal Servers play an important role in the <strong>ThinManager</strong> system. It is recommended that you<br />
become familiar with the documentation provided by Microsoft about their server. The following information is<br />
provided as an aid to understanding terminal services and is not a substitute for Microsoft documentation.<br />
Microsoft Terminal Services requires a license, either a TS CAL (Terminal Services Client Access License) on<br />
a 2003 Server or a RDS CAL (Remote Desktop Services Client Access License) on a 2008 Server.<br />
This section covers:<br />
Server 2003<br />
Server 2008<br />
DHCP (Dynamic Host Configuration Protocol) Servers<br />
Terminal Services Licensing<br />
28.1 Server 2003<br />
28.1.1 Installing Terminal Services<br />
A Windows 2003 Server can be made a terminal server by installing the Terminal Services role. This can be<br />
done with either the Manage Your Server or through the Add/Remove Programs > Add/Remove Windows<br />
<strong>Components</strong>.<br />
Automation Control Products <strong>ThinManager</strong> 5.0 Help Manual <strong>Non</strong>-<strong>ThinManager</strong> <strong>Components</strong> 535
Manager Your Server<br />
Select the Add or remove a role link on the Manager Your Server splash screen to install the Terminal<br />
Services role and/or the Terminal Services License Server role.<br />
Automation Control Products <strong>ThinManager</strong> 5.0 Help Manual <strong>Non</strong>-<strong>ThinManager</strong> <strong>Components</strong> 536
Windows Component Wizard<br />
Terminal Services can be installed by selecting the Terminal Server checkbox in the Windows Component<br />
Wizard.<br />
The Windows Component Wizard is launched by selecting the Add/Remove Windows Component button<br />
on Control Panel > Add/Remove Programs.<br />
Each Microsoft terminal server system will need a Microsoft Terminal Server Licensing server install. This<br />
doesn’t have to be a separate computer but is a program installed on an existing computer. It is installed by<br />
selecting the Terminal Server Licensing checkbox on the Windows Component Wizard.<br />
See Microsoft Licenses for details.<br />
28.2 Creating Microsoft User Profiles<br />
A terminal needs a valid Windows User Profiles to log onto a terminal server.<br />
Open the Computer Management Console by selecting Start > Administrative Tools > Computer<br />
Management in Windows 2003/2008 to create a user profile.<br />
Automation Control Products <strong>ThinManager</strong> 5.0 Help Manual <strong>Non</strong>-<strong>ThinManager</strong> <strong>Components</strong> 537
Computer Management Console<br />
Highlight the User sub-folder of Local Users and Groups in the Computer Management tree pane.<br />
Select Action > New User. This will launch a New User dialog box.<br />
Automation Control Products <strong>ThinManager</strong> 5.0 Help Manual <strong>Non</strong>-<strong>ThinManager</strong> <strong>Components</strong> 538
New User Dialog<br />
Enter the user name for the user in the User name field.<br />
Enter a password in the Password field.<br />
Re-enter the password in the Confirm password field.<br />
The User must change password at next logon check box forces the user to change the password.<br />
Select the Create button to finish the profile.<br />
Select the Close button to return to the Computer Management Console.<br />
Note: Users need to be added to the Remote Desktop Users group or the Administrators group to be<br />
allowed to connect to a terminal server.<br />
28.3 Software Installation On Windows 2003<br />
Microsoft Windows 2003/Server requires that software be added in the “Install Mode” through the Control<br />
Panel > Add/Remove Programs.<br />
Select Start > Settings > Control Panel > Add/Remove Programs to launch the Add/Remove Programs<br />
dialog box.<br />
Note: Some software, especially downloaded software, doesn’t allow the installer to install it through the<br />
Add/Remove Programs tools. To manually put the machine into the install mode open a command prompt<br />
and type:<br />
change user /install<br />
This command sets the machine to install mode. When finished, type:<br />
Automation Control Products <strong>ThinManager</strong> 5.0 Help Manual <strong>Non</strong>-<strong>ThinManager</strong> <strong>Components</strong> 539
change user /execute<br />
This command returns the machine to the normal run mode.<br />
Add/Remove Programs<br />
Select the CD or Floppy button on the Add/Remove Programs dialog box to open the Installation wizard.<br />
Automation Control Products <strong>ThinManager</strong> 5.0 Help Manual <strong>Non</strong>-<strong>ThinManager</strong> <strong>Components</strong> 540
Install Program Window<br />
The wizard will prompt for the installation of the software disk. Select Next to display the Run Installation<br />
Program dialog box.<br />
Note: If the new program starts in autorun and proceeds without going through the following procedures,<br />
either stop the autorun and use the wizard to initiate the installation, or use the change user /install<br />
command to place the machine in the install mode. Use the change user /execute command when<br />
finished to return the machine to the Run mode.<br />
Run Installation Program<br />
Automation Control Products <strong>ThinManager</strong> 5.0 Help Manual <strong>Non</strong>-<strong>ThinManager</strong> <strong>Components</strong> 541
Enter the command line of the installation program and select Finish, or select the Browse button to select<br />
the installation file.<br />
Browse File Window<br />
Selecting the Browse button on the Run Installation dialog box will launch a Browse File window. Highlight<br />
the installation file and select Open. This will begin the application setup.<br />
After Installation Window<br />
As the installation begins, an After Installation dialog box is displayed. It requests that the Next button be<br />
selected when the installation is finished. When this button is selected a second confirmation window is<br />
displayed.<br />
Automation Control Products <strong>ThinManager</strong> 5.0 Help Manual <strong>Non</strong>-<strong>ThinManager</strong> <strong>Components</strong> 542
Finish Install Window<br />
Select the Finish button when the installation is finished.<br />
Note: If a choice is given to Reboot Now or Reboot Later, choose to reboot later once the entire setup is<br />
completed and the dialog boxes are cleared.<br />
28.3.1 Terminal Services Configuration<br />
Microsoft provides the Terminal Services Configuration interface to configure how terminal services is<br />
handled on each terminal server.<br />
Select Start > Programs > Administrative Tools > Terminal Services Configuration to launch the<br />
Terminal Services Configuration Console. There are two folders, Connections and Server Settings.<br />
28.3.2 Terminal Services Connections<br />
The Terminal Services Configuration tree has a Connections folder. Highlighting this folder will display the<br />
installed client communication protocols.<br />
Automation Control Products <strong>ThinManager</strong> 5.0 Help Manual <strong>Non</strong>-<strong>ThinManager</strong> <strong>Components</strong> 543
Terminal Services Configuration\\Connections Console - Connections<br />
Double clicking on the RDP-tcp icon on the right will launch the RDP-tcp Properties<br />
Automation Control Products <strong>ThinManager</strong> 5.0 Help Manual <strong>Non</strong>-<strong>ThinManager</strong> <strong>Components</strong> 544
28.3.2.1 RDP-tcp Login Settings<br />
RDP-tcp Login Settings<br />
The Login Settings should use the Use client-provided logon information radio button so that each user<br />
will login with a unique account.<br />
The Always prompt for password should be unselected to allow auto-logins.<br />
Automation Control Products <strong>ThinManager</strong> 5.0 Help Manual <strong>Non</strong>-<strong>ThinManager</strong> <strong>Components</strong> 545
28.3.2.2 RDP-tcp Sessions Settings<br />
Individual User Account Sessions Configuration<br />
Each user account can be configured individually in the Computer Management interface. These can be set<br />
to end a disconnected session or an idle session after a period of time. The Terminal Services<br />
Configuration Console allows these settings to be made for every user of the terminal server, speeding<br />
configuration time.<br />
Automation Control Products <strong>ThinManager</strong> 5.0 Help Manual <strong>Non</strong>-<strong>ThinManager</strong> <strong>Components</strong> 546
RDP-tcp Sessions Settings<br />
The Sessions tab of the RDP-tcp Properties allows all users to be configured with a consistent disconnect<br />
policy by selecting the Override user settings checkbox.<br />
Selecting End Session setting for the When session limit is reached or connection is broken and<br />
selecting the Override user settings will cause a new session to be created when a terminal disconnects<br />
and reconnects.<br />
Automation Control Products <strong>ThinManager</strong> 5.0 Help Manual <strong>Non</strong>-<strong>ThinManager</strong> <strong>Components</strong> 547
28.3.2.3 RDP-tcp Client Settings<br />
RDP-tcp Client Settings<br />
The Client Settings tab of the RDP-tcp Properties allows the color depth to be set in the Limit Maximum<br />
Color Depth drop-down.<br />
Drive mapping, LPT port mapping, COM port mapping, and audio mapping are allowed if the appropriate<br />
Disable the following checkboxes are un-selected.<br />
Audio mapping is disabled by default. You need to uncheck the Audio mapping checkbox to allow a thin<br />
client to play sound.<br />
Automation Control Products <strong>ThinManager</strong> 5.0 Help Manual <strong>Non</strong>-<strong>ThinManager</strong> <strong>Components</strong> 548
28.3.2.4 RDP-tcp Network Adapter Settings<br />
RDP-tcp Network Adapter Settings<br />
The Network Adapter tab of the RDP-tcp Properties can be used to limit the number of active users to aid<br />
in application licensing compliance.<br />
Automation Control Products <strong>ThinManager</strong> 5.0 Help Manual <strong>Non</strong>-<strong>ThinManager</strong> <strong>Components</strong> 549
28.3.3 Terminal Services Connections<br />
The Terminal Services Configuration tree has a Connections folder. Highlighting this folder will display the<br />
installed client communication protocols.<br />
Terminal Services Configuration\\Connections Console - Connections<br />
The Server Settings have several settings that can control the terminal services experience.<br />
28.3.4 Licensing Mode<br />
Microsoft expanded the Terminal Services Client Access License (TS CAL) program in Windows 2003. TS<br />
CALs are available in two types, TS Device CALs and TS User CALs.<br />
<br />
<br />
The TS Device CAL licenses one device to connect to any Microsoft Terminal Servers as any<br />
user. This functions like the previous Windows 2000 TS CAL.<br />
The TS User CAL licenses one user for any device to connect to any Microsoft Terminal Servers.<br />
To change between the Per Device licensing and Per User licensing, double-click Licensing to launch the<br />
Licensing Mode window.<br />
Automation Control Products <strong>ThinManager</strong> 5.0 Help Manual <strong>Non</strong>-<strong>ThinManager</strong> <strong>Components</strong> 550
Terminal Services Configuration Console- Licensing Mode<br />
Select the desired mode from the Licensing Mode dropdown box and click OK.<br />
28.3.5 Permission Compatibility<br />
Microsoft has increased the security in each successive release of its terminal server software. These new<br />
policies prevent users from accessing the system folder, *.ini files, the registry, and other resources. Some<br />
programs such as HMI, SCADA, database, and control software need access to these resources to function.<br />
Instead of making all the users administrators, the security can be set to the less strenuous Windows NT 4.0-<br />
style security.<br />
Terminal Services Configuration Console- Permission Compatibility<br />
Automation Control Products <strong>ThinManager</strong> 5.0 Help Manual <strong>Non</strong>-<strong>ThinManager</strong> <strong>Components</strong> 551
Launch the Permission Compatibility window by double-clicking on the Permission Compatibility setting.<br />
Select the Relaxed Security radio button and select the OK button.<br />
28.3.6 Restrict Each User to a Single Session<br />
The Restrict Each User to a Single Session setting prevents duplicate and orphaned sessions by limiting<br />
each user to a single login.<br />
Double-clicking the setting will launch a settings window.<br />
Terminal Services Configuration Console- Single Session Per User<br />
The Restrict each user to one session checkbox is selected by default in Windows 2003.<br />
Note: Keep this setting selected. MultiSession will still work as long as each session is using a different<br />
AppLink program.<br />
28.3.7 License Server Discovery Mode<br />
A new feature in Windows 2003, Service Pack 1 and later, is a setting to point the terminal server to a specific<br />
Terminal Server Licensing Server. This is the License server discovery mode setting in Terminal Services<br />
Configuration. This is easier than hard coding the license server into the registry.<br />
Automation Control Products <strong>ThinManager</strong> 5.0 Help Manual <strong>Non</strong>-<strong>ThinManager</strong> <strong>Components</strong> 552
Terminal Server License Server Discovery Window<br />
Launch the Terminal Server License Server Discovery Window by double-clicking the License server<br />
discovery mode setting in Terminal Services Configuration window.<br />
Entering a valid Microsoft Terminal Server Licensing Server name in the Use these license servers field will<br />
force the terminal server to use the defined server as the license server. This keeps the terminal server from<br />
getting confused when there are multiple license servers.<br />
The Automatically discovered license servers field would be automatically populated with license servers<br />
found by the terminal server and can be used as a reference. The Check names button will check the<br />
validation of the name in the Use these license servers field.<br />
28.4 Windows 2008 Server<br />
28.4.1 Adding Terminal Server Role<br />
Windows 2008 Server, like Windows 2003 Server, allows two RDP connections for administrative purposes.<br />
To make the Windows 2008 Server a terminal server where many people can access applications requires<br />
adding the Terminal Services Role.<br />
Open the Server Manager window.<br />
Automation Control Products <strong>ThinManager</strong> 5.0 Help Manual <strong>Non</strong>-<strong>ThinManager</strong> <strong>Components</strong> 553
Server Manager Window<br />
Highlight Roles in the tree and select Add Roles in the right pane. A wizard will launch allowing you to add<br />
Terminal Services as a role.<br />
Highlights of the Role Wizard include:<br />
Automation Control Products <strong>ThinManager</strong> 5.0 Help Manual <strong>Non</strong>-<strong>ThinManager</strong> <strong>Components</strong> 554
Role Wizard - Select Server Roles<br />
The Role Wizard lists a dozen roles that are available.<br />
Check the Terminal Services checkbox and any other roles desired.<br />
Select Next to continue.<br />
Automation Control Products <strong>ThinManager</strong> 5.0 Help Manual <strong>Non</strong>-<strong>ThinManager</strong> <strong>Components</strong> 555
Role Wizard –Select Role Services<br />
Terminal Services has several options:<br />
Terminal Server – the basic terminal services option. Check this option<br />
TS Licensing – This makes the server a 2008 License Server.<br />
You need a 2008 License Server and 2008 Terminal Services Client Access Licenses<br />
(TS CALs) to operate.<br />
Select this if this server will be your Terminal Services License Server.<br />
Select Next to continue.<br />
Automation Control Products <strong>ThinManager</strong> 5.0 Help Manual <strong>Non</strong>-<strong>ThinManager</strong> <strong>Components</strong> 556
Role Wizard – Specify Licensing Mode<br />
Windows 2008 TS CALs, like Windows 2003 TS CALs, are available as Per Device or Per User.<br />
The terminal server should match the mode that the license server is using.<br />
Select Next to continue.<br />
Automation Control Products <strong>ThinManager</strong> 5.0 Help Manual <strong>Non</strong>-<strong>ThinManager</strong> <strong>Components</strong> 557
Role Wizard – Confirm Installation Selections<br />
The Add Roles Wizard will end with a list of the configurations that will be installed.<br />
Select Install to add the role(s). Once the wizard is finished it will assume the role of a terminal server.<br />
Automation Control Products <strong>ThinManager</strong> 5.0 Help Manual <strong>Non</strong>-<strong>ThinManager</strong> <strong>Components</strong> 558
28.4.2 Adding Applications in Windows 2008<br />
Applications on terminal servers need to be installed in the Install Mode. Open the Control Panel and click on<br />
the Install Application on Terminal Server icon to start the installation wizard.<br />
Install Application on Terminal Server Icon<br />
A wizard will run that allows the installation of the application.<br />
The Install Mode can also be entered by typing change user /install at a command prompt. You<br />
can then run the setup.exe to install your application.<br />
Type change user /execute when finished installing to leave the Install Mode.<br />
28.4.3 Create Users<br />
Users management is located in the Server Manager console.<br />
Server Manager – Local Users and Groups<br />
Automation Control Products <strong>ThinManager</strong> 5.0 Help Manual <strong>Non</strong>-<strong>ThinManager</strong> <strong>Components</strong> 559
Users need to be members of the Remote Desktop Users group to access the terminal server.<br />
28.4.4 Allowing Application Access<br />
Applications installed on a terminal server are not available to remote users unless the Terminal Server<br />
Settings are changed to allow access to the applications. You can either allow access to all applications or<br />
allow access to specific applications in the TS RemoteApp Manager.<br />
28.4.4.1 Allowing Application Access – All Applications<br />
Applications installed on a terminal server are not available to remote users unless the Terminal Server<br />
Settings are changed to allow access to the applications.<br />
You can change the settings to allow access to all installed applications in the TS RemoteApp Manager.<br />
TS RemoteApp Manager<br />
Highlight TS RemoteApp Manager under the Terminal Services branch of the Server Manager tree.<br />
Select the Change link for the Terminal Server Settings to launch the RemoteApp Deployment Settings<br />
page.<br />
Automation Control Products <strong>ThinManager</strong> 5.0 Help Manual <strong>Non</strong>-<strong>ThinManager</strong> <strong>Components</strong> 560
RemoteApp Deployment Settings<br />
Select the Terminal Server tab of the RemoteApp Deployment Settings page.<br />
Select the Allow users to start both listed and unlisted programs on initial connection radio button in<br />
the Access to unlisted programs section.<br />
This will allow any program to be run by an authorized user.<br />
You can also select and define specific applications that can be run by configuring them in the TS<br />
RemoteApp Manager.<br />
Automation Control Products <strong>ThinManager</strong> 5.0 Help Manual <strong>Non</strong>-<strong>ThinManager</strong> <strong>Components</strong> 561
28.4.4.2 Allowing Application Access – Specific Applications<br />
You can control application access on Windows 2008 Server by only allowing access to specific applications.<br />
TS RemoteApp Manager<br />
Highlight TS RemoteApp Manager under the Terminal Services branch of the Server Manager tree.<br />
Select the Add RemoteApp Programs link in the Actions column on the right of the screen to launch the<br />
RemoteApp Wizard.<br />
Automation Control Products <strong>ThinManager</strong> 5.0 Help Manual <strong>Non</strong>-<strong>ThinManager</strong> <strong>Components</strong> 562
RemoteApp Wizard<br />
The RemoteApp Wizard shows a list of applications installed on the Windows 2008 Server.<br />
Select the checkbox for each application that you want available for deployment as a <strong>ThinManager</strong> Display<br />
Client.<br />
Select Next to complete the wizard. A remote user can run any checked application.<br />
28.4.5 Installing <strong>ThinManager</strong><br />
It is a common practice to install <strong>ThinManager</strong> on a terminal server but <strong>ThinManager</strong> is independent of<br />
terminal services and doesn’t need to be installed on a terminal server.<br />
Applications on terminal servers need to be installed in the Install Mode. Open the Control Panel and click on<br />
the Install Application on Terminal Server icon to start the installation wizard.<br />
Install Application on Terminal Server Icon<br />
Automation Control Products <strong>ThinManager</strong> 5.0 Help Manual <strong>Non</strong>-<strong>ThinManager</strong> <strong>Components</strong> 563
Once the wizard begins navigate to the <strong>ThinManager</strong> setup.exe program and continue with the wizard. See<br />
Installation of <strong>ThinManager</strong> for details.<br />
The Install Mode can also be entered by typing change user /install at a command prompt. You<br />
can then run the setup.exe to install <strong>ThinManager</strong>.<br />
Type change user /execute when finished installing to leave the Install Mode.<br />
Automation Control Products <strong>ThinManager</strong> 5.0 Help Manual <strong>Non</strong>-<strong>ThinManager</strong> <strong>Components</strong> 564
28.4.6 Allow Inbound Traffic to Firewall<br />
<strong>ThinManager</strong> requires communications to the thin clients. This communication is blocked by default in the<br />
firewall and needs to be allowed.<br />
You can either open the firewall to all traffic or open the specific ports needed.<br />
28.4.6.1 Allow All Inbound Traffic<br />
You can configure the firewall by selecting Windows Firewall with Advanced Security in the Server<br />
Manager tree.<br />
Windows Firewall with Advanced Security<br />
Highlight Windows Firewall with Advanced Security in the Server Manager tree. Right click and select<br />
Properties to launch the Properties window.<br />
Automation Control Products <strong>ThinManager</strong> 5.0 Help Manual <strong>Non</strong>-<strong>ThinManager</strong> <strong>Components</strong> 565
Windows Firewall with Advanced Security Properties<br />
Select the profile tab that matches the type of network you are using, Domain, Private, or Public profile.<br />
Change the Inbound connections to Allow and select OK to accept the change.<br />
This will allow the thin clients to connect to <strong>ThinManager</strong> through the firewall.<br />
Automation Control Products <strong>ThinManager</strong> 5.0 Help Manual <strong>Non</strong>-<strong>ThinManager</strong> <strong>Components</strong> 566
28.4.6.2 Open Ports in Firewall<br />
You can open specific ports in the Windows 2008 Server firewall instead of allowing all inbound connections if<br />
you prefer.<br />
Open the Local Security Policy by selecting the Start > Administrative Tools > Local Security Policy.<br />
Local Security Policy<br />
Expand the Windows Firewall with Advanced Security to show the Inbound Rules.<br />
Right click on the Inbound Rules and select New Rule. A wizard will launch that allows configuration of a<br />
new port.<br />
You need to run the wizard twice, once to allow UDP 4900 and once to allow TCP 2031.<br />
Automation Control Products <strong>ThinManager</strong> 5.0 Help Manual <strong>Non</strong>-<strong>ThinManager</strong> <strong>Components</strong> 567
Rule Wizard – Rule Type<br />
Select Port as the rule you are configuring and select Next to continue.<br />
Automation Control Products <strong>ThinManager</strong> 5.0 Help Manual <strong>Non</strong>-<strong>ThinManager</strong> <strong>Components</strong> 568
Rule Wizard – Protocols and Ports<br />
You will need to select the protocol and port for each rule. You will need to run the wizard once for UDP 4900<br />
and once for TCP 2031.<br />
Select the protocol and enter the port as shown in Rule Wizard – Protocols and Ports.<br />
Select Next to continue.<br />
Automation Control Products <strong>ThinManager</strong> 5.0 Help Manual <strong>Non</strong>-<strong>ThinManager</strong> <strong>Components</strong> 569
Rule Wizard – Action<br />
Select Allow the Connection.<br />
Select Next to continue.<br />
Automation Control Products <strong>ThinManager</strong> 5.0 Help Manual <strong>Non</strong>-<strong>ThinManager</strong> <strong>Components</strong> 570
Rule Wizard – Profile<br />
Select the network(s) that the rule will apply to.<br />
Select Next to continue.<br />
A Name page will allow you to name the rule and add a description for management and organizational<br />
purposes.<br />
Select Finish to save and apply the rule.<br />
Automation Control Products <strong>ThinManager</strong> 5.0 Help Manual <strong>Non</strong>-<strong>ThinManager</strong> <strong>Components</strong> 571
Repeat for UDP 4900 or TCP 2031.<br />
Applied Rules<br />
This will allow thin clients to use port 4900 to download the firmware and allow the thin client to use port 2031<br />
to download the configuration but will keep other ports closed on the firewall.<br />
Automation Control Products <strong>ThinManager</strong> 5.0 Help Manual <strong>Non</strong>-<strong>ThinManager</strong> <strong>Components</strong> 572
28.4.7 Local Security Policy – User Access Controls<br />
You may need to go to the Local Security Policy and change the User Account Control: Behavior of the<br />
elevation prompt for administrators in Admin Approval Mode to Elevate without prompting for<br />
<strong>ThinManager</strong> to run properly.<br />
Open the Local Security Policy by selecting the Start > Administrative Tools > Local Security Policy.<br />
Local Security Policy – User Account Controls<br />
Highlight Local Policies > Security Options in the tree.<br />
Browse to User Account Control: Behavior of the elevation prompt for administrators in Admin<br />
Approval Mode and change the setting to Elevate without prompting.<br />
This may be needed to run <strong>ThinManager</strong> as a non-administrator.<br />
Automation Control Products <strong>ThinManager</strong> 5.0 Help Manual <strong>Non</strong>-<strong>ThinManager</strong> <strong>Components</strong> 573
28.5 Command Prompt<br />
Terminal Services has several commands that aid in managing the terminal server. Some useful ones are:<br />
Command<br />
change logon<br />
change port<br />
change user /install<br />
change user /execute<br />
Ipconfig<br />
Logoff<br />
net send username “message”<br />
query process<br />
query session<br />
query termserver<br />
query user<br />
reset session<br />
Shadow<br />
Tsdiscon<br />
Tsshutdn<br />
Action<br />
Temporarily disables logons to a Terminal Server<br />
Changes COM port mappings for MS-DOS program compatibility<br />
Puts the server into “Install Mode”<br />
Removes the server from “Install Mode”<br />
Displays the IP addresses of the network card<br />
Logs off a user from a session and deletes the session from the server<br />
Sends a message to a user. username is the NT/2000 user name that the<br />
person or terminal is logged in as. “message” is the text of the message.<br />
Quotation marks are needed for any messages containing a space.<br />
Displays information about processes running on a Terminal server<br />
Displays information about sessions on a Terminal server<br />
Displays a list of all Terminal servers on the network<br />
Displays information about user sessions on a Terminal server<br />
Resets a session to known initial values<br />
Monitors another user's session<br />
Disconnects a client from a terminal server session<br />
Shuts down the terminal server in an orderly manner<br />
See the Windows online help for additional commands and parameters.<br />
Other useful commands include:<br />
Command<br />
Action<br />
gpedit.msc<br />
Launches the Group Policy Editor<br />
tscc.msc<br />
Launches the Terminal Services Configuration Console<br />
tsadmin<br />
Launches the Terminal Services Manager<br />
Automation Control Products <strong>ThinManager</strong> 5.0 Help Manual <strong>Non</strong>-<strong>ThinManager</strong> <strong>Components</strong> 574
28.6 Alternative Terminal Keystrokes<br />
Certain keystrokes are not available in a terminal session. Microsoft has provided these alternatives.<br />
Keystroke<br />
ALT+PAGE UP<br />
ALT+PAGE DOWN<br />
ALT+INSERT<br />
ALT+HOME<br />
CTRL+ALT+BREAK<br />
CTRL+ALT+END<br />
ALT+DELETE<br />
CTRL+ALT+Minus (-) symbol on the<br />
numeric keypad<br />
CTRL+ALT+Plus (+) symbol on the<br />
numeric keypad<br />
Function<br />
Switches between programs from left to right.<br />
Switches between programs from right to left.<br />
Cycles through the programs in the order they were started.<br />
Displays the Start menu.<br />
Switches the client between a window and full screen.<br />
Brings up the Windows 2000 Security dialog box.<br />
Displays the Windows menu.<br />
Places a snapshot of the active window, within the client, on the Terminal server<br />
clipboard (provides the same functionality as pressing PrintScrn on a local<br />
computer.)<br />
Places a snapshot of the entire client window area on the Terminal server<br />
clipboard (provides the same functionality as pressing ALT+PrintScrn on a local<br />
computer.)<br />
Automation Control Products <strong>ThinManager</strong> 5.0 Help Manual <strong>Non</strong>-<strong>ThinManager</strong> <strong>Components</strong> 575
28.7 DHCP Server Setup<br />
Dynamic Host Configuration Protocol (DHCP) is a program that assigns IP addresses to devices on a<br />
network. DHCP server can be used to provide IP addresses to thin clients. It can also be configured to point<br />
the thin clients to the <strong>ThinManager</strong> Servers with Option 66, Boot Server Host Name.<br />
28.7.1.1 Scope Options<br />
The DHCP Server needs Option 066 configured before it will provide the <strong>ThinManager</strong> Server IP address<br />
that the terminal needs to boot.<br />
Boot Server Host Name<br />
The Boot Server Host Name, Option 066, assigns a <strong>ThinManager</strong> server to the terminal.<br />
Open the Scope Options dialog box by highlighting the Scope Option folder in the tree pane of the Computer<br />
Management Console under the Services and Application > DHCP folder and selecting Action ><br />
Configure Options.<br />
Scroll through the list window and check the Option 066 check box.<br />
Enter the IP address of the desired <strong>ThinManager</strong> server in the String Value field.<br />
The DHCP Server can issue the IP address for a Primary <strong>ThinManager</strong> Server and a Secondary<br />
<strong>ThinManager</strong> Server by listing the IP addresses of both, separated with a space.<br />
Automation Control Products <strong>ThinManager</strong> 5.0 Help Manual <strong>Non</strong>-<strong>ThinManager</strong> <strong>Components</strong> 576
28.7.1.2 DHCP Properties<br />
The DHCP Server can be configured to check for duplicate IP addresses before issuing a new address. This<br />
is a good feature to use.<br />
Highlight DHCP under Services and Applications in the Computer Management tree and select Action ><br />
Properties, or right-click on DHCP and select Properties. The DHCP Properties window will launch.<br />
DHCP Properties – Advanced Tab<br />
Select the Advanced tab. Replace the zero in the Conflict detection attempts field with an integer. This will<br />
prompt the DHCP Server to check for duplicate IP addresses before assigning an IP address.<br />
Select OK when finished.<br />
28.8 Group Policy<br />
Windows has a number of features that can be allowed or prevented with a Group Policy. Group Policy is<br />
configured in the Group Policy Object Editor snap-in to the Microsoft Management Console.<br />
Access the Group Policy Editor by typing gpedit.msc at a command prompt to launch the Microsoft<br />
Group Policy Editor.<br />
Automation Control Products <strong>ThinManager</strong> 5.0 Help Manual <strong>Non</strong>-<strong>ThinManager</strong> <strong>Components</strong> 577
Group Policy Settings<br />
Expanding the tree will show Group Policy settings that can affect the terminal server experience.<br />
Please refer to Microsoft documentation for information on using these features.<br />
28.9 Microsoft Licenses<br />
28.9.1 Microsoft Client Access Licenses (CALs)<br />
Thin Clients require a terminal server with Windows 2003 or 2008 Server with Terminal Services enabled<br />
as an operating system.<br />
Each of these operating systems requires a standard Microsoft Client Access License (CAL) for each<br />
connection to the server. These are based on concurrent use; a 5-pack would allow more than five users to<br />
access server resources, but only five users at a time.<br />
Automation Control Products <strong>ThinManager</strong> 5.0 Help Manual <strong>Non</strong>-<strong>ThinManager</strong> <strong>Components</strong> 578
28.9.2 Microsoft Terminal Server Licenses<br />
Terminals, such as thin clients and fat clients, require a license to access terminal services in addition to the<br />
standard Microsoft Client Access License (CAL). This is called the Microsoft Terminal Services Client<br />
Access License (TS CAL) in Windows 2003 and is called the Remote Desktop Services Client Access<br />
License (RDS CAL) in Windows 2008.<br />
Windows 2003 terminal servers require Windows 2003 TS CALs and Windows 2008 terminal servers require<br />
Windows 2008 RDS CALs.<br />
Note: This document will refer to all terminal services CALs as a TS/RDS CALs.<br />
. This licensing is per seat; ten terminals would require ten TS/RDS CALs, even if only two were connected at<br />
a time.<br />
These can be installed as Per Device or Per User.<br />
<br />
The TS/RDS Device CAL licenses one device to connect to any Microsoft Terminal Servers as<br />
any user. This functions like the previous Windows 2000 TS CAL.<br />
The TS/RDS User CAL licenses one user for any device to connect to any Microsoft Terminal<br />
Servers.<br />
All TS/RDS CALs are installed on a Terminal Services Licensing Server. This acts as a repository for all<br />
TS/RDS CALs. The terminal servers request TS/RDS CAL authentication from the Terminal Services<br />
Licensing Server as terminals attach to terminal servers.<br />
Note: The Terminal Server Licensing Server does not need to be a separate computer. It is a program that<br />
can be installed on any existing server.<br />
The Terminal Services Licensing server is activated through the Internet by connecting to the Microsoft<br />
Certificate Authority and License Clearinghouse.<br />
Windows 2003 and 2008 Servers with Terminal Services enabled will issue 90-day or 120-day temporary<br />
licenses while the Terminal Services Licensing server is being setup and activated. If this period has elapsed,<br />
the terminal will not connect to the terminal server and will display an “Error Number 50” message box.<br />
Windows Server is not normally sold with TS CALs. These need to purchased separately and installed on the<br />
Terminal Services License server.<br />
28.9.3 Microsoft Terminal Server Licensing Activation<br />
In Windows 2003 and 2008, all the TS CALs are installed on a single Terminal Server Licensing Server. This<br />
allows a single site for management and authentication of terminal server connections. A server becomes a<br />
Terminal Server Licensing Server by selection of the option during the installation phase or by selecting<br />
Add/Remove Programs > Add/Remove Windows <strong>Components</strong> from the Control Panel and selecting the<br />
Terminal Services Licensing.<br />
The licensing of the Microsoft components of a Windows 2003 or 2008 terminal server is a two-step process;<br />
one must first authorize the Terminal Server Licensing Server, then one must activate the licenses. The<br />
license activation will be repeated for each license pack.<br />
Automation Control Products <strong>ThinManager</strong> 5.0 Help Manual <strong>Non</strong>-<strong>ThinManager</strong> <strong>Components</strong> 579