DVG-N5402SP - StarHub
DVG-N5402SP - StarHub
DVG-N5402SP - StarHub

You also want an ePaper? Increase the reach of your titles
YUMPU automatically turns print PDFs into web optimized ePapers that Google loves.
<strong>DVG</strong>-<strong>N5402SP</strong> User’s Manual Hardware Description<br />
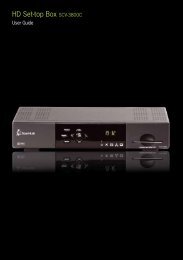
Rear Panel<br />
7. POWER: Power adapter, for connecting to the power adapter of 12V, 2A.<br />
1. Antenna: Connect to a<br />
wireless network.<br />
2. LINE: Connect to the<br />
telephone line on the wall jack<br />
through a telephone cable.<br />
3. PHONE2/PHONE1:<br />
Connect to your phones through<br />
a standard telephone cable.<br />
4. USB: USB host 2.0 port,<br />
for connecting to another USB<br />
device to supply some<br />
value-added application.<br />
5. LAN4/LAN3/LAN2/LAN1:<br />
RJ-45 port, for connecting to the<br />
Ethernet port of a PC or the<br />
Ethernet devices through an<br />
Ethernet cable.<br />
6. WAN: Connect to your<br />
ONT through an Ethernet cable.<br />
8. RESET: Restore to factory defaults. To restore factory defaults, keep the VoIP Router powered on, push a<br />
paper clip into the hole to press the button for over 5 seconds and then release.<br />
9. WPS: Button to enable or disable WPS.<br />
10. ON/OFF: Power switch, power on or power off the VoIP Router.<br />
WARNING: DO NOT (1) connect the phone ports to each other (FXS to FXS) or (2) connect any<br />
phone port directly to a PSTN line (FXS to PSTN) or to an internal PBX line (FXS to PBX extension).<br />
(3) Stacking is forbidden. Doing so may damage your VoIP Router.<br />
Use the Reset Button to restore factory default settings:<br />
1. Power on.<br />
2. Press and hold the Reset button for over 5 seconds.<br />
3. Release the Reset button. Factory settings are restored.<br />
D-Link Systems, Inc. 3