1975 Thunderjet - Vintage Snow
1975 Thunderjet - Vintage Snow
1975 Thunderjet - Vintage Snow

Create successful ePaper yourself
Turn your PDF publications into a flip-book with our unique Google optimized e-Paper software.
22<br />
The secret of proper studding is to consider what you will<br />
need from your sled to meet different weather conditions and<br />
type of track. Then app ly the basic stud principles to create a<br />
studding pattern to answer those traction needs. For example,<br />
on a course w ith very short corners you might try<br />
us ing Thunder Klaws placed backwards on the left si de of<br />
your track. The aggressive edge to the fr ont would give you<br />
extremely good braking so you could hit the corner flying;<br />
yet wi th th e edge to t he front would not significantly reduce<br />
your accelerat ion coming out of the corner.<br />
Studding is all a matter of applying the principles of experimenting<br />
. Do Not Forget : the right number of sharp studs of<br />
specific design plac ed where th e weight will be concentrated<br />
is the key to your best studding pattern .<br />
D. Carbide Wear Bars<br />
Once you can acc elerate to racing speeds your next need<br />
is to control that speed through a corner. Basically,<br />
cornering is the ability to enter corner one and exit<br />
co rner two w ith the least possible delay.<br />
There are three basic principles to follow in checking<br />
wear bars:<br />
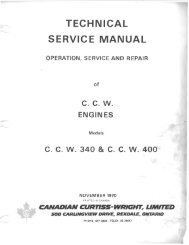
1. Sharp edges d ig . Dull edges do not.<br />
Carb ide must be sharp to cut through frozen earth ,<br />
yet this sam e frozen earth dulls the carbide very<br />
quickly. The more effic iently your wear bar handles<br />
and transmits turn pressures, the better you go<br />
around a corner, and the more your Carbide dulls.<br />
Keep your wear bars sharp.<br />
2. Turn forces try to rol l a wear bar off its edge . (Figure<br />
5£)<br />
edge . This will make your steering easier. Two - do not<br />
remove any more carbide than is necessary to get an<br />
edge as this will just shorten the life of your bar.<br />
Rep lac ing carb ide inserts - whether through chipping,<br />
breakage or just plain wearing out, eventually you wi ll<br />
need to replace your wear bars . You can buy a complete<br />
new set and bolt them on . Or you can use your existing<br />
host bar and just buy a Carbide Replacement Kit (fro m<br />
Kalamazoo Engineering). If you choose the kit, proceed<br />
as follows:<br />
Heat the wear bar with a torch. Avoid heating the bar<br />
too hot because it will remove the strength f rom the<br />
carbide inserts and the host bar. When the bar starts<br />
to turn red hot (about 1200 °), remove worn insert with<br />
a pair of pl iers . Let bar cool and clean the groove.<br />
Brush the groove with fl ux from the kit and insert the<br />
new carbide piece. Heat the bar again and touch the<br />
silver wire to the carbide so it just f lows along the<br />
edge of the carbide. Heat just enough to bond the<br />
insert to the bar .<br />
With the same engines, proper track and ski set-up can<br />
provide a considerable performance advantage. Sharp,<br />
flat-backed wear bars for maximum turn carve and a<br />
cu stom stud pattern of sharp, well-designed studs to<br />
give you acce leration down the straight aways and let<br />
you drive through the corners will make you competitive<br />
in any race you enter.<br />
Align Skis<br />
The skis should be equipped w ith carb ide skags that will<br />
greatly improve handling characteristics. So as not to damage<br />
the carbide, installation should be made just before<br />
actual field lesting.<br />
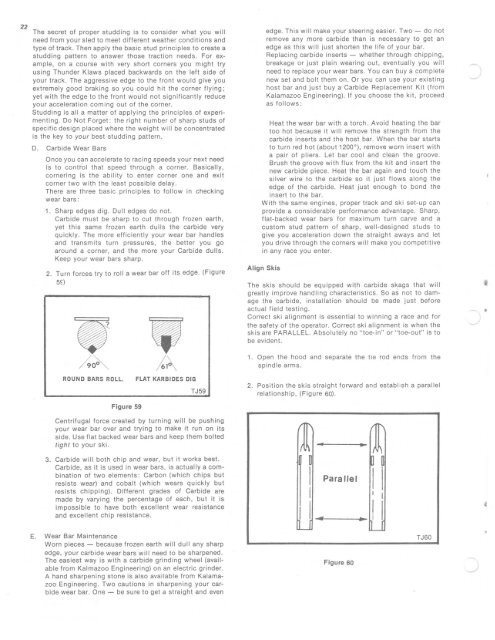
Correct sk i alignment is essential to winning a race and for<br />
the safety of the operator. Correct ski alignment is when the<br />
skis are PARALLEL. Absolutely no " toe-in" or " to e-out" is to<br />
be evident.<br />
ROUND BARS ROLL.<br />
FLAT KARBIDES DIG<br />
TJ59<br />
1. Open the hood and separate the tie rod ends fro m the<br />
spindle arms.<br />
2. Position the skis straight forward and establish a parallel<br />
relat ionship, (Figure 60).<br />
Figure 59<br />
Centrifugal force created by turning will be pushing<br />
your wear bar over and trying to make it run on its<br />
side. Use f lat backed wear bars and keep them bolted<br />
tight to your sk i.<br />
3. Carbide w ill both ch ip and wear , but it works best.<br />
Carbide, as it is used in wear bars , is actually a combination<br />
of two elements: Carbon (which chips but<br />
resists wear) and cobalt (which wears quickly but<br />
resists chipping). Different grades of Carbide are<br />
made by varying the percentage of each, but it is<br />
impossible to have both ' excellent wear resistance<br />
and excellent chip resistance.<br />
E. Wear Bar Maintenance<br />
Worn pieces - because frozen earth will du ll any sharp<br />
edge, your carbide wear bars will need to be sharpened.<br />
The easiest way is w ith a carbide grinding wheel (available<br />
from Kalmazoo Engineering) on an electric grinder.<br />
A hand sharpening stone is also available from Kalamazoo<br />
Eng ineering. Two cautions in sharpening your carbide<br />
wear bar. One - be sure to get a straight and even<br />
/<br />
'" " .......<br />
I( '\<br />
.. .-<br />
0<br />
n~<br />
I<br />
Para lief<br />
II<br />
I I I<br />
I I • ~u<br />
U<br />
Figure 60<br />
TJ60