1975 Thunderjet - Vintage Snow
1975 Thunderjet - Vintage Snow
1975 Thunderjet - Vintage Snow

Create successful ePaper yourself
Turn your PDF publications into a flip-book with our unique Google optimized e-Paper software.
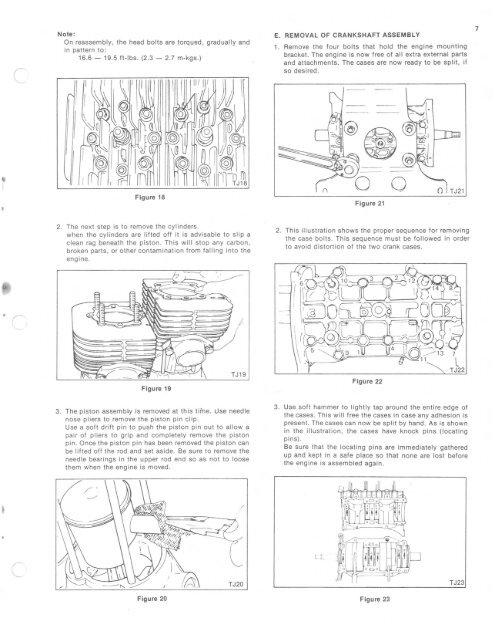
Note:<br />
On reassembly, the head bolts are torqued, gradually and<br />
in pattern to:<br />
16.6 - 19.5 ft-Ibs. (2.3 - 2.7 m-kgs.)<br />
E. REMOVA L OF CRANK SHAFT ASSEMBLY<br />
1. Remove the four bolts that hold the engine mounting<br />
bracket. The engine is now free of all extra ext ern al part s<br />
and attachments. The cas es are now ready to be spli t , if<br />
so des ired.<br />
7<br />
t<br />
Figure 18<br />
Figure 21<br />
2. The next step is to remove the cylinders.<br />
when the cylinders are lifted off it is advisable to sl ip a<br />
clean rag beneath the piston. This will stop any carbon,<br />
broken parts, or other contamination from falling into the<br />
engine.<br />
2. This illustration shows the proper sequence for removing<br />
the case bolts. This sequence must be followed in order<br />
to avoid distortion of the two crank cases.<br />
•<br />
Figure 19<br />
Fi gure 22<br />
3. The piston assembly is removed at this time. LJse needle<br />
nose pliers to remove the piston pin clip.<br />
Use a soft drift pin to push the piston pin out to allow a<br />
pai r of pliers to grip and completely remove the piston<br />
pin. Once the piston pin has been removed the piston can<br />
be lift ed off the rod and set aside. Be sure to remove the<br />
needle bearings in the upper rod end so as not to loose<br />
them when the engine is moved.<br />
3. Use soft hammer to lightly tap around the entire edge of<br />
the cases. This will free the cases in case any adhesion is<br />
present. The cases can now be split by hand. As is shown<br />
in the illustration, the cases have knock pins (locating<br />
pins).<br />
Be sure that the locating pins are immediately gathered<br />
up and kept in a safe place so th at none are lost before<br />
the eng ine is assembled again.<br />
CL<br />
TJ23<br />
Figu re 20 Figure 23