
You also want an ePaper? Increase the reach of your titles
YUMPU automatically turns print PDFs into web optimized ePapers that Google loves.
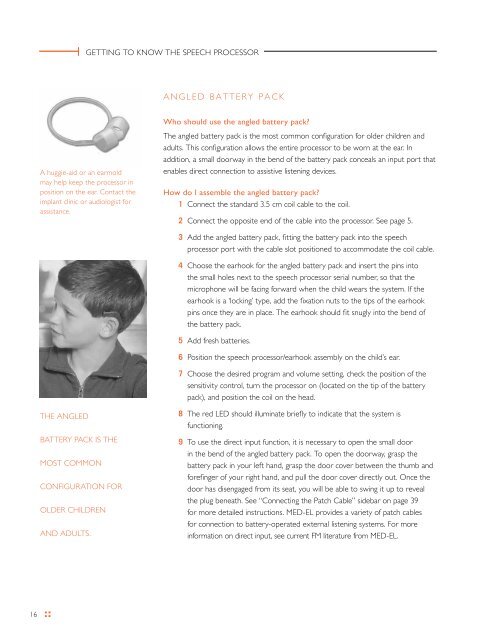
A huggie-aid or an earmold<br />
may help keep the processor in<br />
position on the ear. Contact the<br />
implant clinic or audiologist for<br />
assistance.<br />
THE ANGLEd<br />
BATTERY PACK IS THE<br />
MOST COMMON<br />
CONFIGURATION FOR<br />
OLdER CHILdREN<br />
ANd AdULTS.<br />
GETTING TO KNOW THE SPEECH PROCESSOR<br />
ANGLEd BATTERY PACK<br />
Who should use the angled battery pack?<br />
The angled battery pack is the most common configuration for older children and<br />
adults. This configuration allows the entire processor to be worn at the ear. In<br />
addition, a small doorway in the bend of the battery pack conceals an input port that<br />
enables direct connection to assistive listening devices.<br />
How do I assemble the angled battery pack?<br />
1 Connect the standard 3.5 cm coil cable to the coil.<br />
2 Connect the opposite end of the cable into the processor. See page 5.<br />
3 Add the angled battery pack, fitting the battery pack into the speech<br />
processor port with the cable slot positioned to accommodate the coil cable.<br />
4 Choose the earhook for the angled battery pack and insert the pins into<br />
the small holes next to the speech processor serial number, so that the<br />
microphone will be facing forward when the child wears the system. If the<br />
earhook is a ‘locking’ type, add the fixation nuts to the tips of the earhook<br />
pins once they are in place. The earhook should fit snugly into the bend of<br />
the battery pack.<br />
5 Add fresh batteries.<br />
6 Position the speech processor/earhook assembly on the child’s ear.<br />
7 Choose the desired program and volume setting, check the position of the<br />
sensitivity control, turn the processor on (located on the tip of the battery<br />
pack), and position the coil on the head.<br />
8 The red LEd should illuminate briefly to indicate that the system is<br />
functioning.<br />
9 To use the direct input function, it is necessary to open the small door<br />
in the bend of the angled battery pack. To open the doorway, grasp the<br />
battery pack in your left hand, grasp the door cover between the thumb and<br />
forefinger of your right hand, and pull the door cover directly out. Once the<br />
door has disengaged from its seat, you will be able to swing it up to reveal<br />
the plug beneath. See “Connecting the Patch Cable” sidebar on page 39<br />
for more detailed instructions. MEd-EL provides a variety of patch cables<br />
for connection to battery-operated external listening systems. For more<br />
information on direct input, see current FM literature from MEd-EL.<br />
STRAIGHT BATTERY PACK<br />
Who should use the straight configuration?<br />
The straight configuration combines the speech processor with the straight battery<br />
pack, all at the ear level. Some children and adults like the straight battery pack for<br />
its non-traditional look.<br />
How do I assemble the straight configuration?<br />
1 Connect the standard 3.5 cm coil cable to the coil.<br />
2 Connect the opposite end of the cable into the processor. See page 5.<br />
3 Add the straight battery pack, fitting the battery pack into the speech<br />
processor port with the cable slot positioned to accommodate the coil cable.<br />
4 Choose the desired earhook (for the straight battery pack) and insert the<br />
pins into the small holes next to the speech processor serial number, so that<br />
the microphone will be facing forward when the child wears the system.<br />
If the earhook is a ‘locking’ type, add the fixation nuts to the tips of the<br />
earhook pins once they are in place.<br />
5 Add fresh batteries.<br />
6 Position the speech processor/earhook assembly on the child’s ear.<br />
7 Choose the desired program and volume setting, check the position of the<br />
sensitivity control, turn the processor on (located on the tip of the battery<br />
pack), and position the coil on the head.<br />
8 The red LEd should illuminate briefly to indicate that the system is functioning.<br />
SOME CHILdREN ANd<br />
AdULTS LIKE THE<br />
STRAIGHT BATTERY<br />
PACK FOR ITS NON-<br />
TRAdITIONAL LOOK.<br />
SPECIAL CONSIdERATIONS FOR SMALL CHILdREN<br />
The speech processor has several features that are particularly designed for small children. Among them:<br />
Locking earhooks, which use screws or a safety lock<br />
to secure the earhook in place on the processor.<br />
See page 6.<br />
Tamper-resistant battery covers on all battery packs,<br />
with a locking lever on the children’s battery pack.<br />
See page 8.<br />
Flexible programming to prevent accidental program<br />
or volume change. It is possible to program each<br />
position and volume setting to the same map. In this<br />
configuration, changing the program or volume has no<br />
effect on the child’s listening experience. Contact the<br />
implant clinic for assistance.<br />
A plastic activity cover is available<br />
that covers the controls of the<br />
speech processor and provides<br />
some protection against moisture<br />
and impact. The activity cover<br />
can fit the straight and BabyBTE<br />
wearing options. Contact the<br />
implant clinic or MEd-EL to<br />
purchase an activity cover.<br />
Wearing options for small ears that remove<br />
the speech processor from the head and place it<br />
securely on the clothing. See page 14.<br />
16 EQUIPMENT GUIdE: TEMPO+ and OPUS 1 SPEECH PROCESSORS<br />
17