
Create successful ePaper yourself
Turn your PDF publications into a flip-book with our unique Google optimized e-Paper software.
GETTING TO KNOW THE SPEECH PROCESSOR<br />
Battery packs<br />
Each battery pack contains the batteries, has an ON/OFF switch, and (for three<br />
of the battery packs) an input for assistive listening devices. The battery packs are<br />
separate from the speech processor. The different wearing options are created by<br />
connecting a given battery pack with the speech processor. Five different battery<br />
packs support six different wearing options. Each wearing option and corresponding<br />
battery pack is described in detail in the next section. For information on changing the<br />
batteries, see the “Batteries” section on page 8.<br />
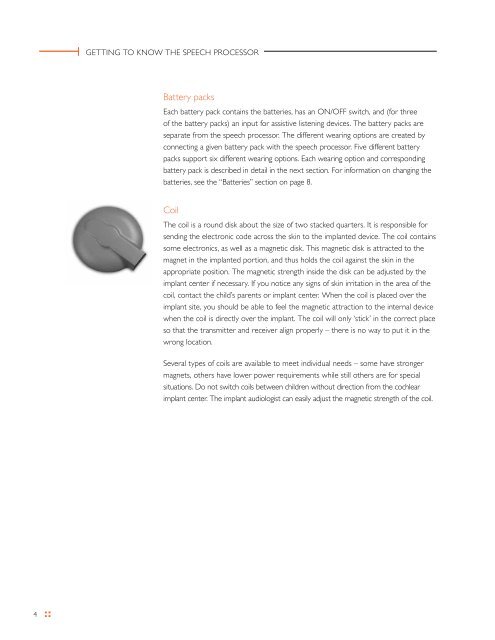
Coil<br />
The coil is a round disk about the size of two stacked quarters. It is responsible for<br />
sending the electronic code across the skin to the implanted device. The coil contains<br />
some electronics, as well as a magnetic disk. This magnetic disk is attracted to the<br />
magnet in the implanted portion, and thus holds the coil against the skin in the<br />
appropriate position. The magnetic strength inside the disk can be adjusted by the<br />
implant center if necessary. If you notice any signs of skin irritation in the area of the<br />
coil, contact the child’s parents or implant center. When the coil is placed over the<br />
implant site, you should be able to feel the magnetic attraction to the internal device<br />
when the coil is directly over the implant. The coil will only ‘stick’ in the correct place<br />
so that the transmitter and receiver align properly – there is no way to put it in the<br />
wrong location.<br />
Several types of coils are available to meet individual needs – some have stronger<br />
magnets, others have lower power requirements while still others are for special<br />
situations. do not switch coils between children without direction from the cochlear<br />
implant center. The implant audiologist can easily adjust the magnetic strength of the coil.<br />
The coil cable<br />
The coil and the speech processor are connected by the coil cable, which carries<br />
information between the two components. The coil cable is available in different<br />
lengths, from 9 cm up to 28 cm (used for the BabyBTE configuration, or to place<br />
the processor on the opposite ear from the implanted ear). There is only one<br />
correct way to insert the cable into the speech processor and the coil (see right).<br />
The coil end of the cable has a particular shape that only fits one way into the coil<br />
– note the shape of the plug and the shape of the plug receptacle on the coil. On<br />
the processor end, special care should be taken to be sure that the cable is inserted<br />
properly, so that the longer pin is inserted into the proper side of the plug.<br />
TIP: One of the coil pins is somewhat longer than the other two. When looking at<br />
the top of the processor (where the program and volume controls are located) with<br />
the microphone pointing away from you, the cable should plug<br />
in so that the largest prong is on the right-hand side.<br />
4 EQUIPMENT GUIdE: TEMPO+ and OPUS 1 SPEECH PROCESSORS<br />
control unit<br />
cable slot<br />
to control unit<br />
to coil<br />
coil<br />
coil cable<br />
5