Installation and Operation Manual For Hunter Ceiling ... - Hunter Fan
Installation and Operation Manual For Hunter Ceiling ... - Hunter Fan
Installation and Operation Manual For Hunter Ceiling ... - Hunter Fan

You also want an ePaper? Increase the reach of your titles
YUMPU automatically turns print PDFs into web optimized ePapers that Google loves.
®<br />
STEP 2 - INSTALLING THE CEILING PLATE<br />
1. Drill two pilot holes into the wood<br />
support structure through the<br />
outermost holes on the outlet<br />
box. The pilot holes should be<br />
9/64" in diameter by 2 3/4" in<br />
depth.<br />
2. Bring the lead wires around the<br />
sides of the ceiling plate. Threading<br />
the lead wires through the<br />
hole in the middle may cause<br />
problems when installing the remote<br />
<strong>and</strong> trying to close the<br />
canopy.<br />
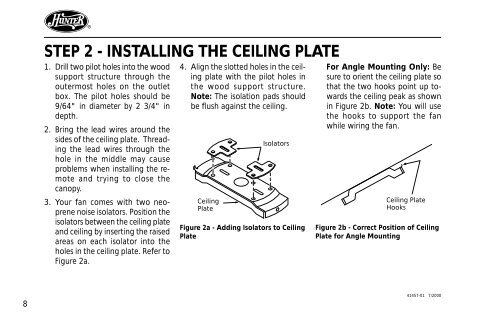
3. Your fan comes with two neoprene<br />
noise isolators. Position the<br />
isolators between the ceiling plate<br />
<strong>and</strong> ceiling by inserting the raised<br />
areas on each isolator into the<br />
holes in the ceiling plate. Refer to<br />
Figure 2a.<br />
4. Align the slotted holes in the ceiling<br />
plate with the pilot holes in<br />
the wood support structure.<br />
Note: The isolation pads should<br />
be flush against the ceiling.<br />
<strong>Ceiling</strong><br />
Plate<br />
Isolators<br />
Figure 2a - Adding Isolators to <strong>Ceiling</strong><br />
Plate<br />
<strong>For</strong> Angle Mounting Only: Be<br />
sure to orient the ceiling plate so<br />
that the two hooks point up towards<br />
the ceiling peak as shown<br />
in Figure 2b. Note: You will use<br />
the hooks to support the fan<br />
while wiring the fan.<br />
<strong>Ceiling</strong> Plate<br />
Hooks<br />
Figure 2b - Correct Position of <strong>Ceiling</strong><br />
Plate for Angle Mounting<br />
8<br />
41457-01 7/2000