BoosterpaQ® Grundfos CR-Booster Systems 60 Hz
BoosterpaQ® Grundfos CR-Booster Systems 60 Hz
BoosterpaQ® Grundfos CR-Booster Systems 60 Hz

Create successful ePaper yourself
Turn your PDF publications into a flip-book with our unique Google optimized e-Paper software.
111 - Presetting<br />
See Display 102.<br />
SETTING MENU (“SET BUTTON”)<br />
200 - Setting of Set-point Max.<br />
This is the place where you will select the set-point of<br />
your system. The set-point is the pressure at which you<br />
want your system to operate regardless of flow demand.<br />
If the factory set function parameters listed in this manual<br />
match your application needs, this will be the ONLY setting<br />
you will have to adjust when you install your <strong>Booster</strong>paQ.<br />
If the factory Display 200 setting (page 14) matches your<br />
required set-point and has not been changed, you may not<br />
need to make any PMU 2000 changes.<br />
The set-point max. can be reduced to “set-point act.”<br />
through settings in the clock program (Display 201), or setpoint<br />
influence (Display 202). For many <strong>Booster</strong>paQ applications,<br />
“set-point max.” will be the same as “set-point<br />
act.”. Only when a custom application setup is required will<br />
these two numbers be different (examples: more than one<br />
system pressure required throughout the day, friction loss<br />
compensation, etc.). These influences are set in other displays<br />
which are explained in this section. All “influences”<br />
reduce the “set-point max.” down to the “set-point act.”<br />
when they are activated. More than one “influence” can<br />
operate at the same time.<br />
201 - Clock Program for Change of Set-point (multiple setpoints).<br />
This is NOT where the clock is set. That is Display<br />
102.<br />
This is one of the “influences” mentioned in Display 200<br />
which reduces “set-point max.” If only one set-point is<br />
required, skip this display, or clear it if it has data in it.<br />
Multiple set-points are required when the pressure demand<br />
throughout the day changes. Lowering the “set-point max.”<br />
can provide better service and reduces energy usage when<br />
peak pressure is not required. For example, a multiple zone<br />
sprinkler application may be best served with multiple<br />
pressure settings. Setting the sprinklers and changing of<br />
the set-point to coincide accomplishes this. This feature<br />
can also be used to reduce the system pressure during off<br />
peak usage at factories and commercial buildings.<br />
In the “clock program,” each switching time is set separately.<br />
If three daily switching times are required, three<br />
displays must be set. It is possible to set a total of 10<br />
switching times.<br />
In the data field [program], one of four different functions<br />
can be selected for time.<br />
1 - [insert] A new switching time can be inserted.<br />
Switching times already set will remain unchanged.<br />
2 - [change] The displayed switching time can be<br />
changed.<br />
3 - [delete] The displayed switching time can be deleted<br />
4 - [copy] Switching times from another zone are copied<br />
into the current zone and the existing clock program<br />
is deleted. This feature normally does not apply as the<br />
standard setup for <strong>Booster</strong>paQs is only for Zone A.<br />
Possible settings for days:<br />
1 - [daily] The same switching times apply to each day<br />
of the week.<br />
2 - [Mon, Tue, Wed, Thu, Fri, Sat, Sun]<br />
Different switching times for each day.<br />
3 - [Mon, Fri] The same switching times from Monday<br />
to Friday.<br />
4 - [Sa-Su] The same switching times for Saturday and<br />
Sunday.<br />
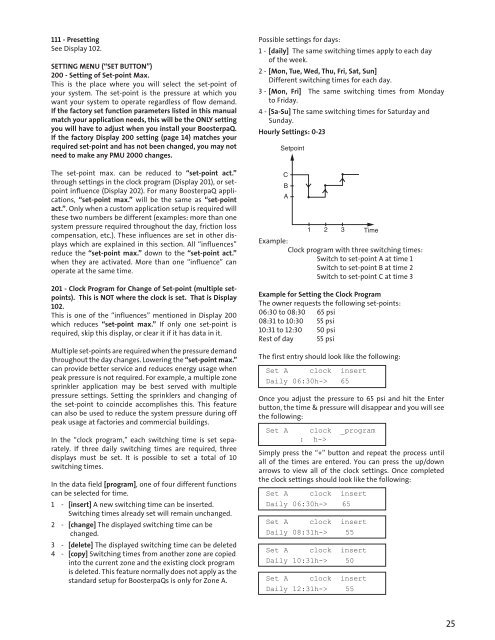
Hourly Settings: 0-23<br />
1 2 3 Time<br />
Example:<br />
Clock program with three switching times:<br />
Switch to set-point A at time 1<br />
Switch to set-point B at time 2<br />
Switch to set-point C at time 3<br />
Example for Setting the Clock Program<br />
The owner requests the following set-points:<br />
06:30 to 08:30 65 psi<br />
08:31 to 10:30 55 psi<br />
10:31 to 12:30 50 psi<br />
Rest of day 55 psi<br />
The first entry should look like the following:<br />
Set A clock insert<br />
Daily 06:30h-> 65<br />
Once you adjust the pressure to 65 psi and hit the Enter<br />
button, the time & pressure will disappear and you will see<br />
the following:<br />
Set A<br />
Setpoint<br />
C<br />
B<br />
A<br />
clock _program<br />
: h-><br />
Simply press the “+” button and repeat the process until<br />
all of the times are entered. You can press the up/down<br />
arrows to view all of the clock settings. Once completed<br />
the clock settings should look like the following:<br />
Set A clock insert<br />
Daily 06:30h-> 65<br />
Set A clock insert<br />
Daily 08:31h-> 55<br />
Set A clock insert<br />
Daily 10:31h-> 50<br />
Set A clock insert<br />
Daily 12:31h-> 55<br />
25