
You also want an ePaper? Increase the reach of your titles
YUMPU automatically turns print PDFs into web optimized ePapers that Google loves.
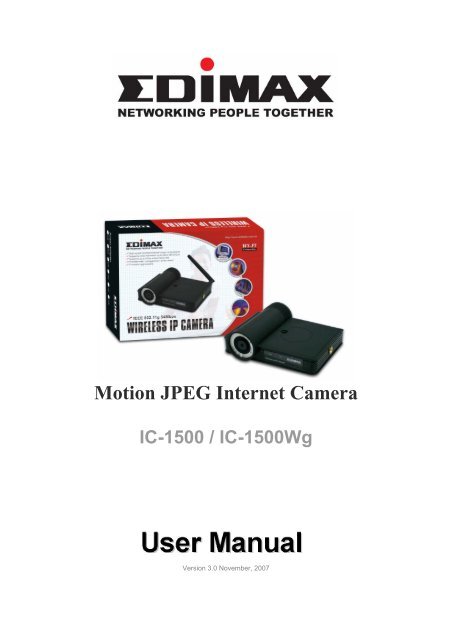
<strong>Motion</strong> <strong>JPEG</strong> <strong>Internet</strong> <strong>Camera</strong><br />
IC-1500 / IC-1500Wg<br />
Version 3.0 November, 2007
Copyright© by <strong>Edimax</strong> Technology Co, LTD. all rights reserved. No part of this publication<br />
may be reproduced, transmitted, transcribed, stored in a retrieval system, or translated into<br />
any language or computer language, in any form or by any means, electronic, mechanical,<br />
magnetic, optical, chemical, manual or otherwise, without the prior written permission of this<br />
company<br />
This company makes no representations or warranties, either expressed or implied, with<br />
respect to the contents hereof and specifically disclaims any warranties, merchantability or<br />
fitness for any particular purpose. Any software described in this manual is sold or licensed<br />
"as is". Should the programs prove defective following their purchase, the buyer (and not this<br />
company, its distributor, or its dealer) assumes the entire cost of all necessary servicing,<br />
repair, and any incidental or consequential damages resulting from any defect in the<br />
software. Further, this company reserves the right to revise this publication and to make<br />
changes from time to time in the contents hereof without obligation to notify any person of<br />
such revision or changes.<br />
※ Software and specifications are subjected to change without notice. Please visit<br />
<strong>Edimax</strong> web site for the updates.<br />
※ All rights reserved. Trademarks or registered trademarks are the property of their<br />
Respective holder.<br />
2
Contents<br />
1. INTRODUCTION .......................................................................................................................... 5<br />
2. PACKAGE CONTENT .................................................................................................................... 5<br />
3. SYSTEM REQUIREMENT .............................................................................................................. 5<br />
4. HARDWARE INSTALLATION ........................................................................................................ 5<br />
4.1 Connect The Cable .......................................................................................................... 5<br />
4.2 Check The LED And Focusing At The Front Panel ............................................................. 6<br />
4.3 Familiar With The <strong>Internet</strong> <strong>Camera</strong>’s Ports ...................................................................... 6<br />
5. INSTALLING SOFTWARE WITH THE INSTALLATION WIZARD ........................................................ 7<br />
6. USING THE CAMERA VIEWER ..................................................................................................... 10<br />
6.1 Run The <strong>Camera</strong> Viewer ...................................................................................................... 10<br />
6.2 How To Use The <strong>Camera</strong> Viewer To View Live Video? .......................................................... 11<br />
6.3 How To Check The <strong>Camera</strong> Viewer Status? .......................................................................... 12<br />
6.4 Familiar With The Control Buttons ....................................................................................... 12<br />
6.4 Familiar With The Control Buttons (Continued) ................................................................... 13<br />
6.5 What Are The Settings You Change In The <strong>Camera</strong> Viewer? ................................................. 13<br />
6.6 How To Record The Video Using The <strong>Camera</strong> Viewer? ......................................................... 14<br />
6.6.1 Manual Recording ......................................................................................................... 14<br />
6.6.2 How To Change The Snapshot And Recording Directory? .............................................. 15<br />
6.6.3 Schedule Recording....................................................................................................... 15<br />
6.7 How To Check If The <strong>Internet</strong> <strong>Camera</strong> Is Connected Successfully? ........................................ 17<br />
6.8 What Is The Current Version Of Your <strong>Camera</strong> Viewer? ......................................................... 19<br />
6.9 How To Playback The Recorded Video Stream File? ............................................................. 19<br />
6.10 How To Rotate The Video? ................................................................................................ 20<br />
7. USING THE ADMIN UTILITY ........................................................................................................ 20<br />
7.1 General Setting .................................................................................................................... 20<br />
7.2 How To Use The Detail Setting In The Admin Utility? ........................................................... 21<br />
3
7.2.1 Network Setting ............................................................................................................ 22<br />
7.2.2 E‐Mail Setting ............................................................................................................... 23<br />
7.2.3 FTP Settings .................................................................................................................. 24<br />
7.2.4 Date / Time Settings ..................................................................................................... 25<br />
7.2.5 Resolution .................................................................................................................... 25<br />
7.2.6 Advanced Settings ........................................................................................................ 26<br />
7.2.7 Admin And User Accounts ............................................................................................. 27<br />
7.2.8 How To Do Firmware Upgrade? & How To Reset To Factory Default? ........................... 28<br />
7.2.9 About The Admin Utility ............................................................................................... 29<br />
8. USING THE WEB BROWSER (You need an <strong>Internet</strong> Explorer v6.x or above) ................................ 29<br />
8.1 How To Use The <strong>Internet</strong> Explorer To View Live Video? ....................................................... 29<br />
8.2 How To Use The <strong>Internet</strong> Explorer To Configure The <strong>Internet</strong> <strong>Camera</strong>? ................................ 30<br />
8.2.1 <strong>Camera</strong> Setting ............................................................................................................. 31<br />
8.2.2 LAN Setting ................................................................................................................... 32<br />
8.2.3 WLAN (for IC‐1500Wg only) .......................................................................................... 34<br />
8.2.4 E‐Mail and FTP .............................................................................................................. 35<br />
8.2.5 <strong>Motion</strong> Detection ......................................................................................................... 36<br />
8.2.6 System .......................................................................................................................... 37<br />
8.2.7.Schedule........................................................................................................................38<br />
8.2.8 Status ........................................................................................................................... 39<br />
8.2.9 User Accounts ............................................................................................................... 39<br />
9. FREQUENTLY ASKED QUESTIONS ...............................................................................................40<br />
10. TECHNICAL SPECIFICATIONS ....................................................................................................40<br />
11. Appendix A: Router/Gateway Setup for <strong>Internet</strong> Viewing .......................................................41<br />
12. Appendix B: Configuring Your <strong>Internet</strong> <strong>Camera</strong> To A Wireless Network ................................... 42<br />
13. Appendix C: Viewing via UPnP in Windows XP ......................................................................... 44<br />
4
1. INTRODUCTION<br />
Congratulations on your purchase of the IC-1500/IC-1500Wg <strong>Internet</strong> <strong>Camera</strong>. This <strong>Internet</strong> <strong>Camera</strong> sends live<br />
video through 10/100Mbps wired network or 54Mbps on wireless network to the web browser or the <strong>Camera</strong><br />
Viewer across the <strong>Internet</strong>. This enables you to view the <strong>Internet</strong> <strong>Camera</strong> anywhere in the world! This compact,<br />
self-contained unit lets you keep an eye on your home, your kids, and your workplace—whatever’s important to<br />
you. How does the <strong>Internet</strong> <strong>Camera</strong> do all of this? Unlike standard “web cams” that require an attached PC, the<br />
<strong>Internet</strong> <strong>Camera</strong> can connect directly to a network. The <strong>Motion</strong> <strong>JPEG</strong> video compression produces a high quality,<br />
high-frame rate and 640 x 480 video streaming. The <strong>Camera</strong> Viewer allows you to record the video to your local<br />
hard drive, or on a predetermined schedule. Use this User Manual to help you to integrate the <strong>Internet</strong> <strong>Camera</strong><br />
into your network. These instructions should be all you need to get the most out of the <strong>Internet</strong> <strong>Camera</strong>.<br />
2. PACKAGE CONTENT<br />
�One <strong>Internet</strong> <strong>Camera</strong> �One Power Adapter �One <strong>Camera</strong> Stand �One 100M Category 5 Ethernet Cable<br />
�One Quick Installation Guide �One CD (Including User Manual/Utility) �One Antenna (Only for IC-1500Wg)<br />
If any of the above items are missing, please contact your supplier.<br />
3. SYSTEM REQUIREMENT<br />
System requirement for PC, MAC or Notebook PC to access the <strong>Internet</strong> <strong>Camera</strong> are: �OS System: Windows<br />
2000, XP, Server 2003, Vista �IE Version: 6.0.29 + SP2 or above �CPU: Intel Pentium III 750MHz above or<br />
Intel Celeron 1GHz above �Memory Size: 128MB (256MB recommended) �DirectX 7.0 or above �VGA card<br />
with fully DirectX 7.0 supported. �VGA Card Resolution: 800 x 600 or above.<br />
4. HARDWARE INSTALLATION<br />
4.1 Connect The Cable<br />
Connect to a power outlet.<br />
Connect to the<br />
router/network.<br />
�Connect an Ethernet cable to the LAN port located at the back panel of the <strong>Internet</strong> <strong>Camera</strong> and attach it<br />
to the router or your network.<br />
�Connect the power adapter to the <strong>Internet</strong> <strong>Camera</strong> located at the back panel and connect it to a power<br />
outlet.<br />
When power on the <strong>Internet</strong> <strong>Camera</strong>, the Ready LED will light in orange. It is highly recommended to use<br />
the power adapter shipped with the <strong>Internet</strong> <strong>Camera</strong>, do NOT use any other power adapter from any sources.<br />
5
4.2 Check The LED And Focusing At The Front Panel<br />
The <strong>Internet</strong> <strong>Camera</strong> has a focus ring that allows you to modify the focus of the <strong>Internet</strong> <strong>Camera</strong>. To adjust the<br />
focus, rotate the dark focus ring. There are three (IC-1500) or four (IC-1500wg) LEDs indicating the <strong>Internet</strong><br />
<strong>Camera</strong> status and networking status.<br />
�Monitoring<br />
When someone is viewing the <strong>Internet</strong> <strong>Camera</strong>, the LED will stay lit.<br />
�Ready<br />
When the <strong>Internet</strong> <strong>Camera</strong> is powered on and ready for access, the LED will stay lit.<br />
�LAN<br />
When the <strong>Internet</strong> <strong>Camera</strong> is linked to the wired network, the LED will stay lit. The LED will be flashing when a<br />
video is transmitting or receiving through the wired network.<br />
�WLAN (IC-1500Wg only)<br />
When the <strong>Internet</strong> <strong>Camera</strong> is linked to a Wireless LAN AP or a Wireless Station, the LED will stay lit. The LED<br />
will be flashing when a video is transmitting or receiving through wireless network.<br />
4.3 Familiar With The <strong>Internet</strong> <strong>Camera</strong>’s Ports<br />
The <strong>Internet</strong> <strong>Camera</strong> has three ports and a Reset button at the back panel.<br />
�Antenna Connector : (IC-1500Wg only) Standard reverse SMA connector where any antennas with reverse<br />
SMA connector can connect to this <strong>Internet</strong> <strong>Camera</strong>.<br />
�Power : Connect to the power adapter.<br />
�LAN : Connect to the Ethernet network cable.<br />
�Reset :<br />
To reset but keep your existing settings, power on the <strong>Internet</strong> <strong>Camera</strong> and press the reset button with a pencil<br />
tip for 2 seconds. The <strong>Internet</strong> <strong>Camera</strong> will reboot and keeping your existing settings.<br />
To reset the <strong>Internet</strong> <strong>Camera</strong> to factory default settings, power on the <strong>Internet</strong> <strong>Camera</strong> and press<br />
the reset button with a pencil tip for 20 seconds. The <strong>Internet</strong> <strong>Camera</strong> will reboot and restore to the<br />
factory default settings.<br />
6
5. INSTALLING SOFTWARE WITH THE INSTALLATION WIZARD<br />
You must disable all personal firewall (eg: Norton/McAfee) during this software installation.<br />
�Insert the CD shipped along with the <strong>Internet</strong> <strong>Camera</strong> into your CD-ROM drive. The “Autorun.exe” program<br />
should be executed automatically. If not, run “Autorun.exe” manually from “Autorun” folder in the CD-ROM<br />
drive.<br />
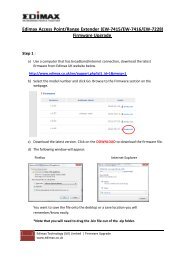
�The Installation Wizard will show four selections, select “IC-1500 / Wg” and click on “Setup Utility”.<br />
1) Click On Setup Utility.<br />
2) Click Next.<br />
3) Click Next.<br />
7
4) Click Install.<br />
5) Click Finish.<br />
�The software installation is completed. The system will auto run the software called “Admin Utility“ to allow<br />
you to configure the <strong>Internet</strong> <strong>Camera</strong>.<br />
You must disable all personal firewall (eg: Norton/McAfee) during this configuration. You can enable the<br />
firewall once the configuration is completed.<br />
8
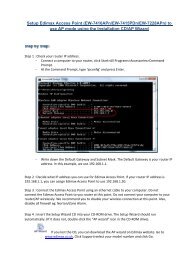
�The Admin Utility will search for the <strong>Internet</strong> <strong>Camera</strong>. The cameras found in the network will be listed at the left<br />
window. Select the IC-1500 icon and click on “Setting Wizard”.<br />
�By default the password is “1234” and click “OK” to login to the IP setup page.<br />
�The IP Address, Subnet and Gateway must correspond to your router/network IP range. By default, the IP<br />
address of the <strong>Internet</strong> <strong>Camera</strong> is 192.168.2.3.<br />
� IP Address => Set an IP address within your router’s IP range.<br />
� Subnet => Set the Subnet Mask that correspond to your router.<br />
� Gateway => Gateway is the IP address of your router.<br />
� By default Video port is 4321. Please use the default “4321”.<br />
.<br />
.<br />
1) Select IC-1500.<br />
2) Click on Setting<br />
Wizard.<br />
Enter password<br />
“1234” and then<br />
click OK button.<br />
Click “Finish” to<br />
save the settings.<br />
�A window will pop up to ask you if you want to run the “<strong>Camera</strong> Viewer” to view the video of the <strong>Internet</strong><br />
<strong>Camera</strong>. Click “OK”.<br />
9
�The <strong>Camera</strong> Viewer will display the video immediately. You can view 4 <strong>Internet</strong> <strong>Camera</strong>s at the same time<br />
using the <strong>Camera</strong> Viewer.<br />
The installation and configuration of the <strong>Internet</strong> <strong>Camera</strong> is now completed. You can now enable any<br />
firewall you have disabled during the above installation.<br />
This Installation Wizard installed 2 utilities, the “Admin Utility” (Refer Chapter 7) and the “<strong>Camera</strong> Viewer”<br />
(Refer Chapter 6) in your computer. You can find these under “Start>All Programs>IP <strong>Camera</strong>>”.<br />
�You also can view the <strong>Internet</strong> <strong>Camera</strong> using the web browser (<strong>Internet</strong> Explorer 6.x and above). (Refer<br />
Chapter 8).<br />
6. USING THE CAMERA VIEWER<br />
Click “OK”.<br />
After the hardware and software installation (as in Chapter 4 and 5), you can now use the <strong>Camera</strong> Viewer to<br />
view the video, to schedule video recording, playback video and configure your video viewing.<br />
6.1 Run The <strong>Camera</strong> Viewer<br />
�Click on Start>All Programs>IP <strong>Camera</strong>><strong>Camera</strong> Viewer. You will see a Control Panel window.<br />
10
6.2 How To Use The <strong>Camera</strong> Viewer To View Live Video?<br />
�To view the <strong>Internet</strong> <strong>Camera</strong>, Right-click on and select Configure <strong>Camera</strong> 1.<br />
�Enter your <strong>Internet</strong> <strong>Camera</strong>’s IP Address (By default is 192.168.2.3). Your <strong>Internet</strong> <strong>Camera</strong> may have<br />
different IP Address. Use default Video Port as “4321” and enter Username/Password (By default is<br />
admin/1234). Click OK and the live video will be displayed.<br />
11
�If you have 4 <strong>Internet</strong> <strong>Camera</strong>s, repeat the above by right-click on , or to view the <strong>Camera</strong> 2,<br />
<strong>Camera</strong> 3 and <strong>Camera</strong> 4 simultaneously. All 4 <strong>Internet</strong> <strong>Camera</strong>s must set to different IP address and Video port<br />
number. (Please use the below recommended video port numbers but the IP addresses must correspond<br />
to your router/network IP range).<br />
For example: If your router IP Address is 192.168.0.1, then you can set the <strong>Internet</strong> <strong>Camera</strong>s to:<br />
• <strong>Camera</strong> 1 is 192.168.0.100 Video Port is 4321<br />
• <strong>Camera</strong> 2 is 192.168.0.101 Video Port is 4322<br />
• <strong>Camera</strong> 3 is 192.168.0.102 Video Port is 4323<br />
• <strong>Camera</strong> 4 is 192.168.0.103 Video Port is 4324<br />
6.3 How To Check The <strong>Camera</strong> Viewer Status?<br />
�The status bar shows at different colour to indicate the status of each <strong>Internet</strong> <strong>Camera</strong>.<br />
<strong>Camera</strong> Status<br />
Yellow No camera has been configured to .<br />
Blue The camera is connected and playing the live video.<br />
Pink The camera has been configured but it is not connected at this point.<br />
Red The camera is recording.<br />
6.4 Familiar With The Control Buttons<br />
12
Control Buttons<br />
Play Click on “Play” button to play the video (in normal and playback mode).<br />
Stop<br />
Pause<br />
Click on “Stop” button to stop the current video. In playback mode, click on<br />
“Stop” to stop playing the video.<br />
Click on “Pause” button to pause the current video. To resume the video, click<br />
on “Play” button to resume.<br />
Forward “Forward” button applied only to play back the recording file (in playback<br />
mode). Click on “Forward” will move the video faster.<br />
Snapshot<br />
Record<br />
Click on “Snapshot” to take a snapshot of the video and save the picture as a<br />
bitmap file in the hard disk.<br />
Click on “Record” to record the video.<br />
6.4 Familiar With The Control Buttons (Continued)<br />
Setting 2x2 Views Open File<br />
Small Size Large Size Rotate<br />
6.5 What Are The Settings You Change In The <strong>Camera</strong> Viewer?<br />
�Click on “Setting” button in the <strong>Camera</strong> Viewer’s Control Panel, the Setting window will pop up.<br />
Note: Before you change the setting such as IP Address, Video Port, etc. in the “Setting” option, you must<br />
disconnect the <strong>Internet</strong> <strong>Camera</strong> first by clicking on the “Stop” button.<br />
13
Setting<br />
Name Enter Your <strong>Internet</strong> <strong>Camera</strong>’s Name.<br />
IP Address IP address of the <strong>Internet</strong> <strong>Camera</strong>. (This must correspond to your router IP range).<br />
Video Port The Video port used by the <strong>Internet</strong> <strong>Camera</strong>. (By default is 4321).<br />
Model Select Your “<strong>Internet</strong> <strong>Camera</strong>” (This camera only supports M<strong>JPEG</strong>).<br />
Username The username to login into the <strong>Internet</strong> <strong>Camera</strong>. By default, the username is “admin”.<br />
Password The password to login into the <strong>Internet</strong> <strong>Camera</strong>. By default, the password is “1234”.<br />
Discover<br />
Click “Discover”, then the camera’s auto-discover windows will pop up. The window<br />
will show all the cameras available on your LAN environment.<br />
6.6 How To Record The Video Using The <strong>Camera</strong> Viewer?<br />
�This <strong>Camera</strong> Viewer allows you to record the video in AVI file format.<br />
There are two types of video recording – Manual Recording and Schedule Recording.<br />
6.6.1 Manual Recording<br />
Manual Recording<br />
You can manually record the video stream. Click “Record” button, the <strong>Camera</strong> Viewer will start to record<br />
immediately. You can assign the path in the “Setting” dialog. If you want to stop recording, click “Stop”<br />
button.<br />
Note: Before manual recording, select the <strong>Internet</strong> <strong>Camera</strong> 1,2,3 or 4. Then, ensure that the <strong>Camera</strong><br />
Viewer is successfully connected to the <strong>Internet</strong> <strong>Camera</strong>.<br />
14
6.6.2 How To Change The Snapshot And Recording Directory?<br />
�You can change the snapshot and video directory. Click on “Setting” button in the <strong>Camera</strong> Viewer’s<br />
Control Panel and then click on “General” tab.<br />
Snap Shot Directory<br />
Record Directory<br />
Free Disk Space<br />
Max Recording Space<br />
General<br />
Click on Change button to change the directory. This snapshot directory will<br />
store the bitmap files. The default folder is where the software program is<br />
installed, “C:\Program Files\<strong>Internet</strong> <strong>Camera</strong>”.<br />
Click on Change button to change the directory. This record directory will store<br />
the recorded video file (AVI). The default folder is where the software program<br />
is installed, “C:\Program Files\<strong>Internet</strong> <strong>Camera</strong>”.<br />
The current free disk space of the hard drive where is assigned to save<br />
recording files.<br />
You can reserve a disk space to store the recorded video and snapshot files. If<br />
the space is full, a message will pop up to remind you.<br />
Used Disk Space The current used disk space for saving the recording file.<br />
Max Video File Size<br />
This let you to assign a maximum size of each video file. The upper bound of<br />
this value is 2 GB per file.<br />
6.6.3 Schedule Recording<br />
Schedule Recording<br />
You can assign a schedule and let this <strong>Camera</strong> Viewer automatically record the video stream. The file<br />
name of the recorded video file is followed the date and time of the recording. For example, the file name<br />
is “IP<strong>Camera</strong>_2007-10-01-23-00-00.avi”. This means that the video was recorded on 2007/10/01 at<br />
23:00:00.<br />
Note:<br />
A. Before you set up the Schedule Recording, the <strong>Camera</strong> Viewer must be up and running and ensure it is<br />
successfully connected to the <strong>Internet</strong> <strong>Camera</strong>, otherwise the Schedule Recording will fail.<br />
B. The One-Time or Weekly Schedule should not overlap; otherwise the Schedule Recording will fail.<br />
�Click on “Setting” button in the <strong>Camera</strong> Viewer’s Control Panel and then click on “Recording” tab.<br />
15
One-Time Schedule<br />
16
Cycle Recording<br />
One-Time Schedule<br />
Weekly Schedule<br />
Schedule<br />
Weekly Schedule<br />
Select this item to enable Cycle Recording. When the Cycle Recording is enabled<br />
and the storage usage has already reached the maximum reserved storage space,<br />
the <strong>Camera</strong> Viewer will automatically delete the oldest recorded video file and use<br />
the space to store the new video file.<br />
You can assign a period of time and the <strong>Camera</strong> Viewer will automatically record the<br />
video stream only during that period of time. (By default, the starting time is set to be<br />
2 minutes later from the current time.)<br />
You can assign the days in a week and the period of time in a day to record the video<br />
stream. The <strong>Camera</strong> Viewer will automatically record the video stream during the<br />
periods of time and days.<br />
Schedule<br />
New Click “New” to add a new recording schedule.<br />
Edit Select an existing schedule in the schedule list and click “Edit” to edit the schedule.<br />
Delete<br />
Select an existing schedule in the schedule list and click “Delete” to delete the<br />
schedule.<br />
6.7 How To Check If The <strong>Internet</strong> <strong>Camera</strong> Is Connected Successfully?<br />
�You can see the current status information of the connection session between the <strong>Camera</strong> Viewer and the<br />
<strong>Internet</strong> <strong>Camera</strong>. Click on “Setting” button in the <strong>Camera</strong> Viewer’s Control Panel and then click on “Status”<br />
tab.<br />
17
Connected<br />
Stream Started At<br />
Time Elapsed<br />
Video Received<br />
Audio Received<br />
Frame Rate<br />
Data Rate<br />
Number of Frames<br />
Status<br />
It displays “Yes” when the <strong>Camera</strong> Viewer is connected to the <strong>Internet</strong> <strong>Camera</strong><br />
and displays “No” when the <strong>Camera</strong> Viewer is not connected to the <strong>Internet</strong><br />
<strong>Camera</strong>.<br />
The beginning time of the current connection session between the <strong>Camera</strong><br />
Viewer and the <strong>Internet</strong> <strong>Camera</strong>.<br />
The elapsed time of the current connection session between the <strong>Camera</strong><br />
Viewer and the <strong>Internet</strong> <strong>Camera</strong>.<br />
The total size (Unit in KByte) of video stream received during the current<br />
connection session between the <strong>Camera</strong> Viewer and the <strong>Internet</strong> <strong>Camera</strong>.<br />
The total size (Unit in KByte) of audio stream received during the current<br />
connection session between the <strong>Camera</strong> Viewer and the <strong>Internet</strong> <strong>Camera</strong>.<br />
The frame rate (frame per second) of the current video downloading speed<br />
from the <strong>Internet</strong> <strong>Camera</strong> to the <strong>Camera</strong> Viewer.<br />
The data rate (KByte per second) of the current video downloading speed from<br />
the <strong>Internet</strong> <strong>Camera</strong> to the <strong>Camera</strong> Viewer.<br />
The total number of video frames received during the current connection<br />
session between the <strong>Camera</strong> Viewer and the <strong>Internet</strong> <strong>Camera</strong>.<br />
Number of Users The total number of users that is currently viewing the <strong>Internet</strong> <strong>Camera</strong>.<br />
18
6.8 What Is The Current Version Of Your <strong>Camera</strong> Viewer?<br />
�Click on “Setting” button in the <strong>Camera</strong> Viewer’s Control Panel and then click on “About” tab.<br />
6.9 How To Playback The Recorded Video Stream File?<br />
�Click on “Open File” button in the <strong>Camera</strong> Viewer’s Control Panel and the “Open File” window will pop<br />
up. Select the AVI file that you want to playback. The <strong>Camera</strong> Viewer will start playing the selected video file.<br />
19
6.10 How To Rotate The Video?<br />
�Click on “Rotate” button in the <strong>Camera</strong> Viewer’s Control Panel, it lets you to rotate the video frame 180<br />
degree angles each time you click the “Rotate” button. With this function, you can view the live video with normal,<br />
and 180 degree angles counter clockwise.<br />
7. USING THE ADMIN UTILITY<br />
The Admin Utility allows you to search and setup the cameras located within the Intranet or on the <strong>Internet</strong>. Using<br />
the Admin Utility, you can view all the information of the selected internet camera; furthermore, it provides a<br />
setting wizard, which can guide you to add the camera to the network easily and promptly.<br />
Run the Admin Utility:<br />
- Click “Start”, select “All Programs>IP <strong>Camera</strong>>Admin Utility”.<br />
7.1 General Setting<br />
20
LAN<br />
Auto Discover Click Auto Discover to search the <strong>Internet</strong> <strong>Camera</strong> within the network.<br />
<strong>Camera</strong> List<br />
Add<br />
The list shows the <strong>Internet</strong> <strong>Camera</strong>’s name and the setup status of the <strong>Internet</strong> <strong>Camera</strong>.<br />
<strong>Internet</strong><br />
Click “Add” will appear a window for you to enter the IP Address of the <strong>Internet</strong> <strong>Camera</strong> on the<br />
<strong>Internet</strong>. (You need to use Public IP Address to connect via the <strong>Internet</strong>).<br />
Delete Click “Delete” to delete the <strong>Internet</strong> <strong>Camera</strong> from the list.<br />
<strong>Camera</strong> List<br />
Information Of<br />
<strong>Camera</strong><br />
The list shows the <strong>Internet</strong> <strong>Camera</strong>’s name and the connect status.<br />
Information of <strong>Camera</strong><br />
It displays all information of the selected <strong>Internet</strong> <strong>Camera</strong>. These information are Firmware<br />
Version, Network Information, IP Address, UPnP Setting, DDNS Setting, Resolution and E-mail<br />
setting, etc.<br />
<strong>Camera</strong> Setting<br />
Detail Setting Click “Detail Setting” to configure more settings of the <strong>Internet</strong> <strong>Camera</strong> such as IP address,<br />
Resolution, password and firmware upgrade, etc.<br />
Setting Wizard Click “Setting Wizard” to setup the <strong>Internet</strong> <strong>Camera</strong>.<br />
7.2 How To Use The Detail Setting In The Admin Utility?<br />
�Click on “Detail Setting”, a screen will pop up for you to enter the “Administrator Name” and “Password”. The<br />
default Name is “admin” and Password is “1234”. Click “OK” button.<br />
21
7.2.1 Network Setting<br />
Network Setting<br />
DHCP It’s recommended to Disable the DHCP. Set a fix IP Address to the <strong>Internet</strong> <strong>Camera</strong>.<br />
<strong>Internet</strong><br />
<strong>Camera</strong> Name<br />
IP Address<br />
Subnet Mask<br />
The default camera name is “IC1500/Wg”. You can change the name to a name that<br />
meaningful to you.<br />
Enter an unused IP Address within the IP address range used in your router/network. If the IP<br />
Address of your router is from 192.168.2.1 to 192.168.2.254, you can set an unused IP<br />
Address from this range, for example: 192.168.2.250.<br />
The Subnet Mask field must match the Subnet Mask in your router. For example:<br />
255.255.255.0.<br />
Gateway The Gateway is the IP Address of your router.<br />
DNS Server<br />
Video Port<br />
Web Port<br />
DNS Server (Domain Name Server) that translates names to IP addresses. Set the same DNS<br />
Server as the PCs on your LAN. (You can set it to be the same as the Gateway).<br />
Network Setting<br />
The Video Port is used to transmit or receive the video streaming in the network. The default<br />
port “4321”.<br />
This camera supports web connection, the default web port is 80. You can change it to port<br />
8080. If you change the web port from 80 to 8080, you must type http://192.168.2.3:8080 to<br />
connect the camera using the web browser.<br />
22
7.2.2 E-Mail Setting<br />
E-Mail Setting<br />
This camera supports “Snap Shot” and “<strong>Motion</strong> Detection” functions. When the <strong>Motion</strong><br />
Detection is enabled, the <strong>Internet</strong> <strong>Camera</strong> will take a picture when a motion has been<br />
Recipient E-<br />
detected. You can set it to send the picture to your email address. (You need to enable the<br />
Mail Address<br />
<strong>Motion</strong> Detection function, please refer to page 35).<br />
Enter the E-Mail Account to receive the picture.<br />
SMTP Server Enter the SMTP Server for the E-Mail sending.<br />
Sender E-Mail<br />
Address<br />
Specified the e-mail address of the sender.<br />
Authentication<br />
Enable or Disable the SMTP Authentication. (This must correspond to your email server’s<br />
configuration).<br />
Username When Authentication is enabled, input the SMTP Username.<br />
Password When Authentication is enabled, input the password.<br />
Send a Test<br />
Email<br />
Press this button to send a test e-mail to your mailbox. You can use this function to test if<br />
your setting is correct.<br />
23
7.2.3 FTP Settings<br />
FTP Settings<br />
This camera supports “Snap Shot” and “<strong>Motion</strong> Detection” functions. When <strong>Motion</strong><br />
Detection is enabled, the <strong>Internet</strong> <strong>Camera</strong> will take a picture when a motion has been<br />
FTP Server detected. You can send the picture to your FTP server. (You need to enable the <strong>Motion</strong><br />
Detection function, please refer to page 35).<br />
Enter the FTP address.<br />
FTP Port Enter the port of the FTP server.<br />
User Name Specify the user account of ftp server.<br />
Password Specify the Password of your ftp account.<br />
Remote<br />
Folder<br />
Specify the folder of the ftp site where the picture will be saved.<br />
Password When Authentication is enabled, input the password.<br />
Passive Mode<br />
If your <strong>Internet</strong> <strong>Camera</strong> is connected to a router/ NAT, you normally need to enable<br />
Passive Mode.<br />
24
7.2.4 Date / Time Settings<br />
7.2.5 Resolution<br />
25
7.2.6 Advanced Settings<br />
UPnP<br />
Advanced Setting<br />
When the UPnP function is enabled, the camera can be detected by UPnP<br />
compliant system such as Windows XP. The camera will be displayed in the<br />
Neighbourhood of Windows XP, so you can directly click the camera to view<br />
the video through web browser.<br />
Many internet connections use a "Dynamic IP address", where the <strong>Internet</strong> IP<br />
address is allocated dynamically whenever the <strong>Internet</strong> connection is<br />
established. <strong>Internet</strong> users should know the IP Address of the camera when<br />
they want to connect to the camera every time. DDNS is designed to solve this<br />
DDNS<br />
problem, by allowing users to connect to your <strong>Internet</strong> <strong>Camera</strong> using a domain<br />
name, without worrying if you have the right Public IP address.<br />
(You need to register your DDNS with a DDNS Service Provider before you<br />
can use this function, eg: DynDNS).<br />
Enable/Disable Enable or disable DDNS function of the camera.<br />
Several companies provide DDNS service. This camera supports the service<br />
Provider<br />
from DynDNS, whom is one of the DDNS providers.<br />
The domain name given by DynDNS is eg:“registername.dyndns.com”. Enter<br />
Domain Name the domain name that you have registered for the camera from DynDNS web<br />
site.<br />
Account Enter the login name for the DDNS service.<br />
Password Enter the password for the DDNS service.<br />
26
7.2.7 Admin And User Accounts<br />
Users<br />
Administrator Set the password of the Administrator account<br />
Current Password Enter the current password of the camera.<br />
New Password Enter your new password.<br />
Confirm New Password Retype the new password to confirm.<br />
User<br />
Set up the user account and password. Your camera can support 4 user<br />
accounts.<br />
27
7.2.8 How To Do Firmware Upgrade? & How To Reset To Factory Default?<br />
Tools<br />
Firmware Version Display current firmware version.<br />
You can upgrade the camera’s firmware. Press this button and select the<br />
correct firmware file to upgrade. (You can get the latest firmware file from<br />
Firmware Update <strong>Edimax</strong> website, download and save the firmware file to your computer in<br />
order to perform the firmware upgrade).<br />
Reset to Default<br />
Click on this button will reset the <strong>Internet</strong> <strong>Camera</strong> to factory default settings. All<br />
settings you have configured will be lost. The default settings of the camera<br />
are: <strong>Camera</strong> Name: “IP <strong>Camera</strong>” IP Address: “192.168.2.3” Subnet Mask:<br />
255.255.255.0 Administrator Name: “admin” Password: “1234” Video Port:<br />
“4321” Web Port: “80”<br />
28
7.2.9 About The Admin Utility<br />
8. USING THE WEB BROWSER (You need an <strong>Internet</strong> Explorer v6.x or above)<br />
8.1 How To Use The <strong>Internet</strong> Explorer To View Live Video?<br />
�Open the <strong>Internet</strong> Explorer. Click on Start>All Program><strong>Internet</strong> Explorer.<br />
At the Address bar, type the IP address of your<br />
<strong>Internet</strong> <strong>Camera</strong> (in this example, we use<br />
192.168.2.3). Press Enter.<br />
29
�Install the ActiveX Plug-in.<br />
Enter User name as<br />
“admin” (lower case).<br />
Password is “1234”.<br />
Then, Click “OK”.<br />
Click “Install”.<br />
You are only required to install this ActiveX Plug-in once. At the very first time when you are viewing the<br />
<strong>Internet</strong> <strong>Camera</strong> with the <strong>Internet</strong> Explorer.<br />
�After the installation of the ActiveX Plug-in, the video image will be displayed in the <strong>Internet</strong> Explorer.<br />
In this example, the IP<br />
Address of <strong>Internet</strong><br />
<strong>Camera</strong> is<br />
192.168.2.3. Your<br />
IC-1500/IC-1500Wg<br />
may have different<br />
IP Address.<br />
8.2 How To Use The <strong>Internet</strong> Explorer To Configure The <strong>Internet</strong> <strong>Camera</strong>?<br />
�You can configure the <strong>Internet</strong> <strong>Camera</strong> using the menu options on the web control screen. They are:<br />
�<strong>Camera</strong> – View live video and adjust the video.<br />
�LAN – Configure the camera LAN settings.<br />
�WLAN (for IC-1500Wg only) – Configure the Wireless Connection.<br />
�E-Mail & FTP – Configure E-Mail address and FTP server for <strong>Motion</strong> Detection.<br />
�<strong>Motion</strong> Detection – Configure the <strong>Motion</strong> Detection.<br />
�System – Configure the System settings.<br />
�Status – Shows the camera information and current status.<br />
�Users – Setup up to 4 user accounts.<br />
30
8.2.1 <strong>Camera</strong> Setting<br />
Resolution<br />
<strong>Camera</strong> Setting<br />
Select the desired video resolution format. Larger resolution requires more<br />
bandwidth. 640 x 480 is “VGA” format. 320 x 240 is “CIF” format. The default<br />
resolution is CIF format.<br />
Image Quality Adjust this property to control the video quality<br />
Max Frame Rate<br />
Set the video max frame rate. This camera can support at the most 30 frames per<br />
second. Set the frame rate higher can get video smoother. But will use more<br />
bandwidth.<br />
Frequency Adjust this property to fit light frequency.<br />
You can adjust the brightness of the video. If the video is too dark, you can input<br />
Brightness the larger number in this text box. The video will be brighter. This value can be<br />
from 1 to 100.<br />
Contrast<br />
You can adjust the contrast by changing the value. This value can be from 1 to<br />
100.<br />
Saturation<br />
You can adjust the saturation by changing the value. This value can be from 1 to<br />
100.<br />
Hue You can adjust the hue by changing the value. This value can be from 1 to 100.<br />
Whiteness<br />
You can adjust the white balance by changing this value. This value can be from<br />
10 to 30.<br />
Enable Auto Exposure You can enable Auto Exposure by check this box.<br />
Apply When you finish “AV Server” setting, click this button to validate the setting values.<br />
31
8.2.2 LAN Setting<br />
Network Type<br />
IP Address<br />
Subnet Mask<br />
LAN<br />
This camera can obtain IP via DHCP protocol or specified static IP Address to it. It’s<br />
recommended to use Static IP Address.<br />
Enter an unused IP Address within the IP address range used in your router/network. If<br />
the IP Address of your router is from 192.168.2.1 to 192.168.2.254, you can set an<br />
unused IP Address from this range, for example: 192.168.2.250.<br />
The Subnet Mask field must match the Subnet Mask in your router. For example:<br />
255.255.255.0.<br />
Gateway The Gateway is the IP Address of your router.<br />
DNS Server<br />
AV Control Port<br />
Web Port<br />
DNS Server (Domain Name Server) that translates names to IP addresses. Set the same<br />
DNS Server as the PCs on your LAN. (You can set it to be the same as the Gateway).<br />
The AV Control Port is used to transmit or receive the video streaming in the network.<br />
The default port “4321”.<br />
This camera supports web connection, the default web port is 80. You also can change it<br />
to port 8080. If you change the web port from 80 to 8080, you must type<br />
http://192.168.2.3:8080 to connect the camera using the web browser.<br />
Apply When you finish the “LAN” settings, click “Apply” to save the settings.<br />
Dynamic DNS<br />
Enable DDNS Enable or disable DDNS function of the camera.<br />
Provider<br />
Domain Name<br />
Several companies provide DDNS service. This camera supports the service from<br />
DynDNS company.<br />
The domain name given by DynDNS is “registername.dyndns.com”. Enter the domain<br />
name that you register for the camera from DynDNS web site.<br />
User Name Enter the login name for the DDNS service.<br />
Password Enter the password for the DDNS service.<br />
Apply When you finish the “Dynamic DNS” setting, click “Apply”.<br />
UPnP<br />
Enable UPNP Enable or disable UPnP function of the camera.<br />
Apply When you finish the “UPnP” setting, click “Apply”.<br />
32
LoginFree<br />
Filename That’s mean user can get a snapshot image from browser (IE and firefox ). The<br />
format is like:<br />
You can from internet or intranet to get a picture .Where you can get different<br />
pictures every few minutes because all pictures stock in the IC CAM temporary .<br />
You should input a file name (Ex: “pppp”), for URL . Then you can get the<br />
snapshot image from IE http://192.168.2.3/pppp.jpg” without authentication . If<br />
you will get the picture from internet . You should enable the relative<br />
port(EX:8080) for IP CAM . (EX: http://192.168.2.3:8080/pppp.jpg )<br />
PS:If you want to disable loginfree function, please keep filename field empty.<br />
Apply When you finish the “LoginFree” setting, click “Apply”.<br />
33
8.2.3 WLAN (for IC-1500Wg only)<br />
Wireless connection<br />
Network Type<br />
Wireless Setting<br />
Enable or disable the wireless function of the <strong>Internet</strong> <strong>Camera</strong>. By default, the<br />
function is disabled.<br />
Infrastructure – This operation mode requires the presence of a Wireless LAN<br />
Access Point or Router. All communication is done via the Access Point or Router.<br />
Ad-Hoc – Select this mode if you want to connect to other wireless stations in the<br />
Wireless LAN network without an Access Point or Router.<br />
Available Networks Select the networks listed below and click apply to connect to the specified network.<br />
The SSID (up to 32 printable ASCII characters) is the unique name identified in a<br />
WLAN (for IC-1500Wg only). The ID prevents the unintentional merging of two colocated<br />
WLANs. You may specify a SSID for the card and then only the device with<br />
SSID the same SSID can interconnect to the card. If you want to add one of the networks<br />
nearby to the profile list, pull down the menu, all the networks nearby will be listed<br />
and you can add one of them to the profile list.<br />
Channel<br />
This setting is only available for Ad Hoc mode. Select the number of the radio<br />
channel used for the network. The channel setting should be the same with the<br />
network you are connecting to.<br />
Basic Rate The camera will use the data rate you have selected to transmit the data.<br />
Authentication and<br />
Encryption Type<br />
WPA Pre-Shared<br />
Key<br />
WEP Key Length<br />
WEP Key Format<br />
Choose the authentication type you want to use. “None” means that you don’t want<br />
any encryption for wireless. “Open System” means that you can use WEP for<br />
encryption or no encryption. When you select “Shared Key”, you must use WEP for<br />
encryption. The last option is “WPA-PSK”. When you select this authentication type,<br />
you can use WPA-TKIP or WPA-AES. (You must use the same Authentication<br />
and Encryption that you used in your wireless router/wireless network).<br />
The WPA-PSK key can be from 8 to 64 characters and can be letters or numbers.<br />
(You must use the same key that you used in your wireless router/wireless<br />
network).<br />
You may select 64-bit or 128-bit to encrypt transmitted data. Larger key length will<br />
provide higher level of security, but the throughput will be lower.<br />
Hexadecimal – Only “A-F“, “a-f“ and “0-9“ are allowed to be set as WEP key. ASCII –<br />
Numerical values, characters or signs are allowed to be WEP key.<br />
Default Key Select one of the keys (1~4) as the encryption key.<br />
34
Key1 ~ Key4 The WEP keys are used to encrypt data transmitted in the wireless network. Fill the text box<br />
by following rules below. 64-bit – Input 10-digit Hex values (in the “A-F”, “a-f” and “0-9” range)<br />
or 5-digit ASCII characters (including “a-z” and “0-9”) as the encryption keys. For example:<br />
“0123456aef“ or “test1”.<br />
128-bit – Input 26-digit Hex values (in the “A-F”, “a-f” and “0-9” range) or 13-digit ASCII<br />
characters (including “a-z” and “0-9”) as the encryption keys. For example:<br />
“01234567890123456789abcdef“ or “administrator”.<br />
Apply When you finish “WLAN” settings, click this button to save the settings.<br />
8.2.4 E-Mail and FTP<br />
The “E-Mail & FTP” configuration allows you to setup E-Mail and FTP when the <strong>Motion</strong> Detection is enabled. The<br />
<strong>Internet</strong> <strong>Camera</strong> can send images to your e-mail account or FTP server when <strong>Motion</strong> has been detected.<br />
Recipient E-Mail Address<br />
AV Server<br />
This camera supports “Snap Shot” and “<strong>Motion</strong> Detection” functions. You can<br />
the picture to your E-Mail account.<br />
Enter the E-Mail Account to receive the picture.<br />
SMTP Server Enter the SMTP Server for the E-Mail sending.<br />
Sender E-Mail Address Specified the e-mail address of the sender.<br />
SMTP Authentication Enable or Disable the SMTP Authentication.<br />
Username When Authentication is enabled, input the SMTP Username.<br />
Password When Authentication is enabled, input the password.<br />
Press this button to send a test e-mail to your mailbox. You can use this<br />
Send a Test Email<br />
function to test if your setting is correct.<br />
This camera supports “Snap Shot” and “<strong>Motion</strong> Detection” functions. When<br />
<strong>Motion</strong> Detection is enabled, the <strong>Internet</strong> <strong>Camera</strong> will take a picture when a<br />
FTP Server<br />
motion has been detected. You can send the picture to your FTP server.<br />
Enter the FTP address.<br />
FTP Port Enter the port of the FTP server.<br />
User Name Specify the user account of ftp server.<br />
35
Password Specify the Password of your ftp account.<br />
Remote Folder Specify the folder of the ftp site that you want to store the picture.<br />
Password When Authentication is enabled, input the password.<br />
Passive Mode<br />
If your <strong>Internet</strong> <strong>Camera</strong> is connected to a router/ NAT, you normally need to<br />
enable Passive Mode.<br />
8.2.5 <strong>Motion</strong> Detection<br />
When <strong>Motion</strong> Detection is enabled, the <strong>Internet</strong> <strong>Camera</strong> will take a picture when a motion has been detected.<br />
You can configure it to send the picture to your E-mail address or to your ftp server (Refer to previous page).<br />
<strong>Motion</strong> Detection Enable<br />
<strong>Motion</strong> Detection<br />
Enable or Disable the <strong>Motion</strong> Detection Function.<br />
Next Event Detected Setup the interval between two events. For example, if you setup the interval to 5<br />
Interval<br />
seconds, the next event will start after this event finished + 5 seconds.<br />
Threshold Setup the sensitivity of motion detection.<br />
Send Recording File to E-<br />
Mail<br />
Select Yes to send the pictures to your e-mail account that you had specified at<br />
“E-Mail & FTP” menu.<br />
E-Mail Subject Specify the subject of motion detection notify e-mail.<br />
Send Recording File to<br />
FTP<br />
Select Yes to send the pictures to your FTP server that you had specified at “E-<br />
Mail & FTP” menu.<br />
36
8.2.6 System<br />
The “System” allows users to setup the camera’s parameters, like camera name, data/time setting, firmware<br />
upgrade and reset.<br />
<strong>Camera</strong> Name<br />
System<br />
The default camera name is “IC1500 or IC1500Wg”. You can change the<br />
name to a name that meaningful to you.<br />
Login Name Setup your administrator account’s login name. Default name is “admin”<br />
Password Enter up to 4 digits password for the new user account.<br />
Confirm Password Enter the password again to confirm the setting.<br />
Set Date/Time manually Set the current Date and Time.<br />
NTP Server Synchronize the Date and Time with NTP server.<br />
Time Zone Select the time zone of your <strong>Internet</strong> <strong>Camera</strong>.<br />
NTP Server Specify the IP Address of the NTP Server.<br />
You can upgrade the camera’s firmware. Press this button and select the<br />
correct firmware file to upgrade. (You can get the latest firmware file from<br />
Upgrade Firmware<br />
<strong>Edimax</strong> website, download and save the firmware file to your computer in<br />
order to perform the firmware upgrade).<br />
Click on the Reset button will reset the <strong>Internet</strong> <strong>Camera</strong> to factory default<br />
settings. All settings you have configured will be lost. The default settings of<br />
Reset to Factory Defaults the camera are: <strong>Camera</strong> Name: “IP <strong>Camera</strong>” IP Address: “192.168.2.3” Subnet<br />
Mask: 255.255.255.0 Administrator Name: “admin” Password: “1234” Video<br />
Port: “4321” Web Port: “80”<br />
Reboot Device To reboot the <strong>Internet</strong> <strong>Camera</strong>, click “Reboot”.<br />
There are four LEDs to indicate the status of <strong>Internet</strong> <strong>Camera</strong>. If you wish to<br />
LED Setting turn off the LED light, click on “LED Light OFF”. To turn on the LED light, click<br />
on “LED Light ON”.<br />
37
8.2.7 Schedule<br />
The "Schedule" function allows users to transfer one image to FTP or E-mail every seconds, minutes, hours or<br />
days.<br />
Schedule<br />
Enable FTP Schedule The "Schedule" function allows users to transfer one image to FTP or E-mail<br />
every seconds, minutes, hours or days.<br />
Time Interval To setup the interval for capture 1 picture by ‘’seconds’’, ‘’minutes’’, ‘’hours’’ or<br />
‘’days’’<br />
File control To choose the file name of picture by ‘’date/time’’ composition or overwrite the<br />
picture with only 1 file name you named.<br />
Enable E-Mail Schedule To enable picture capturing schedule function and send pictures to Email.<br />
Time interval To setup the interval to send the image .<br />
38
8.2.8 Status<br />
The “Status” shows the current firmware version, uptime, system time and IP information of the camera.<br />
8.2.9 User Accounts<br />
This “Users” web menu allows you to add four user accounts which will lets them to only view the video using the<br />
<strong>Camera</strong> Viewer and the <strong>Internet</strong> Explorer. They cannot configure the camera.<br />
User 1 / 2 / 3 / 4<br />
User # Enable or Disable the user number #.<br />
Login Enter the login name.<br />
Password Enter up to 4 digits password for the new user account.<br />
Confirm Password Enter the password again to confirm the setting.<br />
Apply Click “Apply” to save the user account setting.<br />
39
9. FREQUENTLY ASKED QUESTIONS<br />
Q1: What is an <strong>Internet</strong> <strong>Camera</strong>?<br />
A: The <strong>Internet</strong> <strong>Camera</strong> is a standalone system connecting directly to an Ethernet or Fast Ethernet network. It is<br />
different from the conventional PC <strong>Camera</strong>. The <strong>Internet</strong> <strong>Camera</strong> is an all-in-one system with built-in CPU and<br />
web-based solutions providing a low cost solution that can transmit high quality video images for monitoring. The<br />
<strong>Internet</strong> <strong>Camera</strong> can be managed remotely, accessed and controlled from any PC/Notebook over the Intranet<br />
and <strong>Internet</strong> via a web browser or camera viewer.<br />
Q2: What algorithm is used to compress the digital image?<br />
A: The <strong>Internet</strong> <strong>Camera</strong> utilizes M<strong>JPEG</strong> video compression technology to provide high quality images.<br />
M<strong>JPEG</strong> is a standard for video compression and can be applied to various application software.<br />
Q3: What network cable is required for the <strong>Internet</strong> <strong>Camera</strong>?<br />
A: The <strong>Internet</strong> <strong>Camera</strong> uses Category 5 UTP Twisted-pair cable allowing 10 Base-T and 100 Base-T<br />
networking.<br />
Q4: Can the <strong>Internet</strong> <strong>Camera</strong> be setup as a PC-cam on the computer?<br />
A: No, the <strong>Internet</strong> <strong>Camera</strong> is used only on Ethernet and Fast Ethernet network.<br />
Q5: Can the <strong>Internet</strong> <strong>Camera</strong> be connected on the network if it consists of only private IP Addresses?<br />
A: Yes, the <strong>Internet</strong> <strong>Camera</strong> can be connected to a LAN with private IP Addresses.<br />
Q6: The focus on the <strong>Internet</strong> <strong>Camera</strong> is bad, how can I correct it?<br />
A: Adjust the <strong>Internet</strong> <strong>Camera</strong>’s focus ring manually.<br />
10. TECHNICAL SPECIFICATIONS<br />
Video specification<br />
• Max Resolution: 640 x 480 pixels<br />
• Sensor: 300K pixels 1/4" colour CMOS sensor<br />
• Gain control: Automatic<br />
• Exposure: Automatic<br />
• White Balance: Automatic<br />
• Focal Length: 6.0 mm<br />
• Aperture: F=1.8<br />
Image (Video Setting)<br />
• Image compression: M<strong>JPEG</strong> Image<br />
• Video Digital 24-bit Colour<br />
• Frame rate: 30fps@CIF, 20fps@VGA<br />
• Video resolution: 320x240, 640x480<br />
System Hardware<br />
• LAN Connector: One RJ-45 port to connect to 10/100Mbps Ethernet<br />
• LED Indicator: Monitoring LED (Green), Ready LED (Orange), LAN LED (Green), Power Supply:<br />
12VDC, 0.5A<br />
HTTP/Utility<br />
• Includes easy-to-use Viewer & Recorder utility<br />
• Provides Admin utility & WEB browser Management<br />
• View multiple cameras simultaneously - Up to 4 cameras at a time<br />
• Manual/Schedule Record, Video Playback/Stop/Forward/Pause<br />
• Supports four additional user accounts for viewing camera<br />
• Auto sending Snap Shot by E-mail or FTP<br />
• Support DDNS and UPnP functions<br />
• Supports Windows 2000/XP/2003<br />
• Firmware Upgradeable<br />
EMI & Safety<br />
• FCC, CE<br />
40
11. Appendix A: Router/Gateway Setup for <strong>Internet</strong> Viewing<br />
How to view the <strong>Internet</strong> <strong>Camera</strong> over the <strong>Internet</strong>?<br />
To view the <strong>Internet</strong> <strong>Camera</strong> across the <strong>Internet</strong>, you need to open some ports in your Router/Gateway, so that<br />
the router can pass through the incoming TCP/UDP connections from the remote PC to the <strong>Internet</strong> <strong>Camera</strong>. You<br />
will need to setup port forwarding or virtual server in your router (Please refer to your router’s manual on how<br />
to open the ports). Please see the illustration as below.<br />
These are the port protocol and number you required.<br />
Name Protocol Port LAN IP<br />
Setup 1 TCP 80 192.168.2.3<br />
Setup 2 TCP 4321 192.168.2.3<br />
Setup 3 UDP 13364 192.168.2.3<br />
Setup 4 UDP 4322 192.168.2.3<br />
Port Definition<br />
Setup 1 This is the Web port. You have to configure the protocol to “TCP”.<br />
Setup 2 This is the Video port. You have to configure the protocol to “TCP”.<br />
Setup 3<br />
Setup 4<br />
Setup 1/Setup 2<br />
Setup 2/Setup 4<br />
Setup 3<br />
This is the port for <strong>Internet</strong> <strong>Camera</strong> and Admin Utility communication. The<br />
protocol setting should be “UDP”.<br />
This is the port for <strong>Internet</strong> <strong>Camera</strong> and <strong>Camera</strong> Viewer communication. The<br />
protocol setting should be “UDP”.<br />
Viewing <strong>Internet</strong> <strong>Camera</strong> via Web Browser Over the <strong>Internet</strong> (<strong>Internet</strong> Explorer<br />
v6.x or above)<br />
If you want to view the video via Web Browser, you have to ensure the<br />
Router/Gateway has configured setup1 and setup 2. You need to know the<br />
Public IP address of your network in order to view the <strong>Internet</strong> <strong>Camera</strong>. You<br />
can find the Public IP Address in your router’s WAN Status page.<br />
For example, if your Public IP Address is 203.30.212.82. The remote user will<br />
type http://203.30.212.82 at the address bar in the <strong>Internet</strong> Explorer to view<br />
the live video over the internet.<br />
If the web port is not using default port “80”, but changed to 8080. You will<br />
need to open the port TCP 8080. Then, remote user will need to type<br />
http://203.30.212.82:8080 at the address bar in the <strong>Internet</strong> Explorer to view<br />
the live video over the internet.<br />
Viewing <strong>Internet</strong> <strong>Camera</strong> via <strong>Camera</strong> Viewer Over the <strong>Internet</strong><br />
If you want to use <strong>Camera</strong> Viewer to view the camera, please make sure the<br />
Router/Gateway has configured setup2 and setup 4. Then, access with the<br />
Public IP Address.<br />
Setup <strong>Internet</strong> <strong>Camera</strong> via Admin Utility Over the <strong>Internet</strong><br />
If you want to use Admin Utility to configure the <strong>Internet</strong> <strong>Camera</strong> via <strong>Internet</strong>,<br />
the Router/Gateway should configure setup 3. Then, access with the Public<br />
IP Address.<br />
41
12. Appendix B: Configuring Your <strong>Internet</strong> <strong>Camera</strong> To A Wireless Network<br />
(Only for IC-1500Wg)<br />
1) You can configure your IC-1500Wg to connect to a wireless router/network using the web browser<br />
(<strong>Internet</strong> Explorer 6.x or above).<br />
Click on “WLAN”.<br />
Select Enable Wireless Connection and click Apply to save the setting.<br />
Click on “Enable”<br />
and then click<br />
Apply button.<br />
42
2) IC-1500Wg will automatically detect any wireless router/network and it will be listed in a table. In this<br />
example, connect your IC-1500Wg to your router BTBusinessHub-330.<br />
3) After the wireless settings have been saved successfully, unplug the LAN Ethernet cable from the IC-<br />
1500Wg. (You must unplug the LAN cable to allow wireless connection to take effect).<br />
You can now view the IC-1500Wg without a LAN Ethernet cable connected to the wireless router.<br />
If you connected the LAN Ethernet cable to the IC-1500Wg, the wireless connection won’t work. The IC-<br />
1500Wg only allows one connection at a time, either LAN Ethernet connection or wireless connection.<br />
Wireless Router<br />
Step 3: Click Apply to save.<br />
Step 1: Select<br />
BTBusinessHub-<br />
330.<br />
Step 2: Configure<br />
the Encryption<br />
that correspond<br />
to your router.<br />
Wireless<br />
43<br />
IC‐1500Wg
13. Appendix C: Viewing via UPnP in Windows XP<br />
When the UPnP function is enabled, the camera can be detected by UPnP compliant system such as Windows<br />
XP. The camera will be displayed in the Network Neighbourhood of Windows XP. You can directly double click<br />
the camera or right click the camera and select “Invoke” to view the video through web browser.<br />
44
Enable UPnP in Windows XP SP2<br />
If you can’t find the camera in the Network Neighbourhood of Windows XP SP2 or you have seen the following<br />
message when you double click the camera. Please check if UPnP function is blocked by the firewall. Please<br />
follow the steps below to enable it.<br />
1. Go to “Start\Settings\Network Connections”.<br />
2. Right click the “Local Area Connection” and select “Properties”.<br />
3. In the “Local Area Connection Properties”, select “Advanced” option menu and click “Settings”.<br />
4. The “Windows Firewall” screen will be popped up, select “Exceptions” option menu.<br />
45
5. Enable “UPnP Framework” from the “Programs and Services list” and click “Ok”.<br />
46