unvented gas log heater or vented decorative ... - Spotlight Retail
unvented gas log heater or vented decorative ... - Spotlight Retail
unvented gas log heater or vented decorative ... - Spotlight Retail
Create successful ePaper yourself
Turn your PDF publications into a flip-book with our unique Google optimized e-Paper software.
LOG PLACEMENT<br />
Bef<strong>or</strong>e you begin — This unit is supplied with four <strong>or</strong> five ceramic fiber <strong>log</strong>s. Do not handle these <strong>log</strong>s with your bare<br />
hands. Always wear gloves to prevent skin irritation from ceramic fibers. After handling the <strong>log</strong>s, wash your hands<br />
gently with soap and water to remove any traces of fibers.<br />
WARNING<br />
The positioning of the <strong>log</strong>s are critical to the safe and clean operation of this <strong>heater</strong>.<br />
Sooting and other problems may result if the <strong>log</strong>s are not properly and firmly positioned<br />
in the appliance. Never add additional <strong>log</strong>s <strong>or</strong> embellishments such as pine cones,<br />
vermiculite <strong>or</strong> rock wool to the <strong>heater</strong>. Only use the <strong>log</strong>s supplied with the unit.<br />
Failure to position the parts in acc<strong>or</strong>dance with diagrams below <strong>or</strong> to use only<br />
parts specifically approved f<strong>or</strong> this <strong>heater</strong> may result in property damage <strong>or</strong><br />
personal injury.<br />
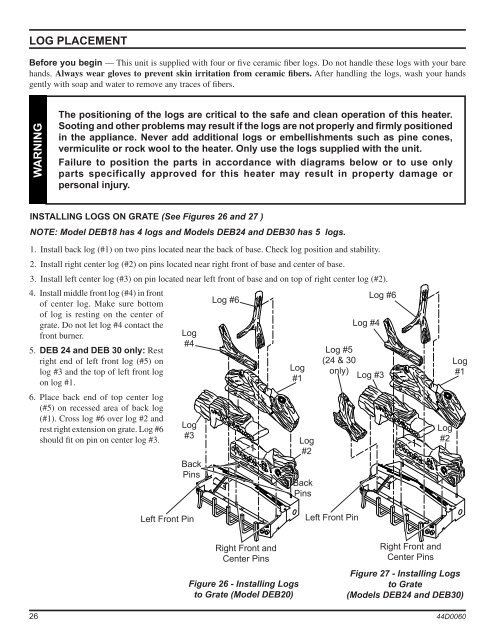
INSTALLING LOGS ON GRATE (See Figures 26 and 27 )<br />
NOTE: Model DEB18 has 4 <strong>log</strong>s and Models DEB24 and DEB30 has 5 <strong>log</strong>s.<br />
1. Install back <strong>log</strong> (#1) on two pins located near the back of base. Check <strong>log</strong> position and stability.<br />
2. Install right center <strong>log</strong> (#2) on pins located near right front of base and center of base.<br />
3. Install left center <strong>log</strong> (#3) on pin located near left front of base and on top of right center <strong>log</strong> (#2).<br />
4. Install middle front <strong>log</strong> (#4) in front<br />
of center <strong>log</strong>. Make sure bottom<br />
of <strong>log</strong> is resting on the center of<br />
grate. Do not let <strong>log</strong> #4 contact the<br />
front burner.<br />
5. DEB 24 and DEB 30 only: Rest<br />
right end of left front <strong>log</strong> (#5) on<br />
<strong>log</strong> #3 and the top of left front <strong>log</strong><br />
on <strong>log</strong> #1.<br />
6. Place back end of top center <strong>log</strong><br />
(#5) on recessed area of back <strong>log</strong><br />
(#1). Cross <strong>log</strong> #6 over <strong>log</strong> #2 and<br />
rest right extension on grate. Log #6<br />
should fit on pin on center <strong>log</strong> #3.<br />
Log<br />
#4<br />
Log<br />
#3<br />
Back<br />
Pins<br />
Log #6<br />
Log<br />
#1<br />
Log<br />
#2<br />
Back<br />
Pins<br />
Log #4<br />
Log #6<br />
Log #5<br />
(24 & 30<br />
only)<br />
Log #3<br />
Log<br />
#2<br />
Log<br />
#1<br />
Left Front Pin<br />
Left Front Pin<br />
Right Front and<br />
Center Pins<br />
Figure 26 - Installing Logs<br />
to Grate (Model DEB20)<br />
Right Front and<br />
Center Pins<br />
Figure 27 - Installing Logs<br />
to Grate<br />
(Models DEB24 and DEB30)<br />
26 44D0060


