
You also want an ePaper? Increase the reach of your titles
YUMPU automatically turns print PDFs into web optimized ePapers that Google loves.
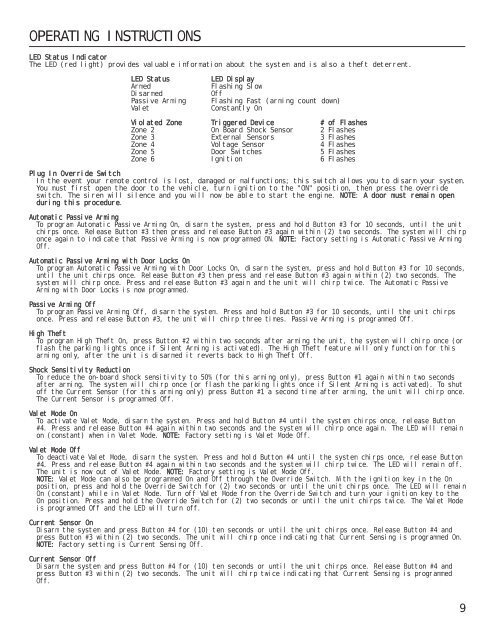
OPERATING INSTRUCTIONS<br />
LED Status Indicator<br />
The LED (red light) provides valuable information about the system and is also a theft deterrent.<br />
LED Status<br />
Armed<br />
Disarmed<br />
Passive Arming<br />
Valet<br />
LED Display<br />
Flashing Slow<br />
Off<br />
Flashing Fast (arming count down)<br />
Constantly On<br />
Violated Zone Triggered Device # of Flashes<br />
Zone 2 On Board Shock Sensor 2 Flashes<br />
Zone 3 External Sensors 3 Flashes<br />
Zone 4 Voltage Sensor 4 Flashes<br />
Zone 5 Door Switches 5 Flashes<br />
Zone 6 Ignition 6 Flashes<br />
Plug In Override Switch<br />
In the event your remote control is lost, damaged or malfunctions; this switch allows you to disarm your system.<br />
You must first open the door to the vehicle, turn ignition to the "ON" position, then press the override<br />
switch. The siren will silence and you will now be able to start the engine. NOTE: A door must remain open<br />
during this procedure.<br />
Automatic Passive Arming<br />
To program Automatic Passive Arming On, disarm the system, press and hold Button #3 for 10 seconds, until the unit<br />
chirps once. Release Button #3 then press and release Button #3 again within (2) two seconds. The system will chirp<br />
once again to indicate that Passive Arming is now programmed ON. NOTE: Factory setting is Automatic Passive Arming<br />
Off.<br />
Automatic Passive Arming with Door Locks On<br />
To program Automatic Passive Arming with Door Locks On, disarm the system, press and hold Button #3 for 10 seconds,<br />
until the unit chirps once. Release Button #3 then press and release Button #3 again within (2) two seconds. The<br />
system will chirp once. Press and release Button #3 again and the unit will chirp twice. The Automatic Passive<br />
Arming with Door Locks is now programmed.<br />
Passive Arming Off<br />
To program Passive Arming Off, disarm the system. Press and hold Button #3 for 10 seconds, until the unit chirps<br />
once. Press and release Button #3, the unit will chirp three times. Passive Arming is programmed Off.<br />
High Theft<br />
To program High Theft On, press Button #2 within two seconds after arming the unit, the system will chirp once (or<br />
flash the parking lights once if Silent Arming is activated). The High Theft feature will only function for this<br />
arming only, after the unit is disarmed it reverts back to High Theft Off.<br />
Shock Sensitivity Reduction<br />
To reduce the on-board shock sensitivity to 50% (for this arming only), press Button #1 again within two seconds<br />
after arming. The system will chirp once (or flash the parking lights once if Silent Arming is activated). To shut<br />
off the Current Sensor (for this arming only) press Button #1 a second time after arming, the unit will chirp once.<br />
The Current Sensor is programmed Off.<br />
Valet Mode On<br />
To activate Valet Mode, disarm the system. Press and hold Button #4 until the system chirps once, release Button<br />
#4. Press and release Button #4 again within two seconds and the system will chirp once again. The LED will remain<br />
on (constant) when in Valet Mode. NOTE: Factory setting is Valet Mode Off.<br />
Valet Mode Off<br />
To deactivate Valet Mode, disarm the system. Press and hold Button #4 until the system chirps once, release Button<br />
#4. Press and release Button #4 again within two seconds and the system will chirp twice. The LED will remain off.<br />
The unit is now out of Valet Mode. NOTE: Factory setting is Valet Mode Off.<br />
NOTE: Valet Mode can also be programmed On and Off through the Override Switch. With the ignition key in the On<br />
position, press and hold the Override Switch for (2) two seconds or until the unit chirps once. The LED will remain<br />
On (constant) while in Valet Mode. Turn off Valet Mode from the Override Switch and turn your ignition key to the<br />
On position. Press and hold the Override Switch for (2) two seconds or until the unit chirps twice. The Valet Mode<br />
is programmed Off and the LED will turn off.<br />
Current Sensor On<br />
Disarm the system and press Button #4 for (10) ten seconds or until the unit chirps once. Release Button #4 and<br />
press Button #3 within (2) two seconds. The unit will chirp once indicating that Current Sensing is programmed On.<br />
NOTE: Factory setting is Current Sensing Off.<br />
Current Sensor Off<br />
Disarm the system and press Button #4 for (10) ten seconds or until the unit chirps once. Release Button #4 and<br />
press Button #3 within (2) two seconds. The unit will chirp twice indicating that Current Sensing is programmed<br />
Off.<br />
9