
Create successful ePaper yourself
Turn your PDF publications into a flip-book with our unique Google optimized e-Paper software.
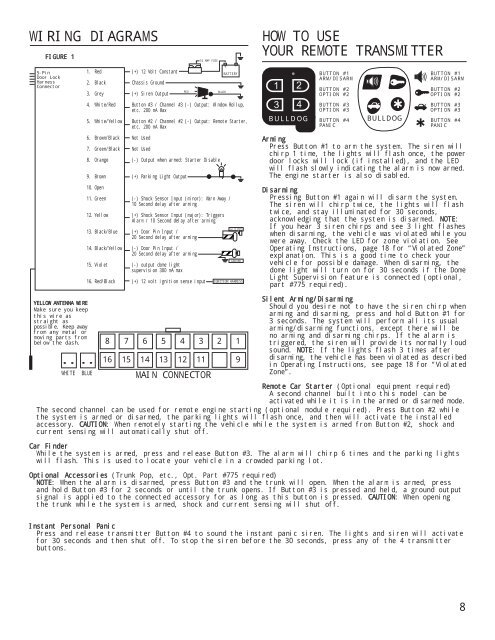
WIRING DIAGRAMS<br />
FIGURE 1<br />
HOW TO USE<br />
YOUR REMOTE TRANSMITTER<br />
5-Pin<br />
Door Lock<br />
Harness<br />
Connector<br />
1. Red (+) 12 Volt Constant<br />
2. Black Chassis Ground<br />
3. Grey (+) Siren Output<br />
4. White/Red Button #3 / Channel #3 (-) Output: Window Rollup,<br />
etc. 200 mA Max<br />
5. White/Yellow Button #2 / Channel #2 (-) Output: Remote Starter,<br />
etc. 200 mA Max<br />
RED<br />
BLACK<br />
1 2<br />
3 4<br />
BULLDOG<br />
BUTTON #1<br />
ARM/DISARM<br />
BUTTON #2<br />
OPTION #2<br />
BUTTON #3<br />
OPTION #3<br />
BUTTON #4<br />
PANIC<br />
BULLDOG<br />
BUTTON #1<br />
ARM/DISARM<br />
BUTTON #2<br />
OPTION #2<br />
BUTTON #3<br />
OPTION #3<br />
BUTTON #4<br />
PANIC<br />
6. Brown/Black Not Used<br />
7. Green/Black Not Used<br />
8. Orange (-) Output when armed: Starter Disable<br />
9. Brown (+) Parking Light Output<br />
10. Open<br />
11. Green (-) Shock Sensor Input (minor): Warn Away /<br />
10 Second delay after arming<br />
12. Yellow (+) Shock Sensor Input (major): Triggers<br />
Alarm / 10 Second delay after arming<br />
13. Black/Blue (+) Door Pin Input /<br />
20 Second delay after arming<br />
14. Black/Yellow (-) Door Pin Input /<br />
20 Second delay after arming<br />
15. Violet (-) output dome light<br />
supervision 300 mA max<br />
16. Red/Black (+) 12 volt ignition sense input<br />
Arming<br />
Press Button #1 to arm the system. The siren will<br />
chirp 1 time, the lights will flash once, the power<br />
door locks will lock (if installed), and the LED<br />
will flash slowly indicating the alarm is now armed.<br />
The engine starter is also disabled.<br />
Disarming<br />
Pressing Button #1 again will disarm the system.<br />
The siren will chirp twice, the lights will flash<br />
twice, and stay illuminated for 30 seconds,<br />
acknowledging that the system is disarmed. NOTE:<br />
If you hear 3 siren chirps and see 3 light flashes<br />
when disarming, the vehicle was violated while you<br />
were away. Check the LED for zone violation. See<br />
Operating Instructions, page 18 for “Violated Zone”<br />
explanation. This is a good time to check your<br />
vehicle for possible damage. When disarming, the<br />
dome light will turn on for 30 seconds if the Dome<br />
Light Supervision feature is connected (optional,<br />
part #775 required).<br />
YELLOW ANTENNA WIRE<br />
Make sure you keep<br />
this wire as<br />
straight as<br />
possible. Keep away<br />
from any metal or<br />
moving parts from<br />
below the dash.<br />
:<br />
:<br />
WHITE<br />
BLUE<br />
8 7 6 5 4 3 2 1<br />
16 15 14 13 12 11 9<br />
MAIN CONNECTOR<br />
Silent Arming/Disarming<br />
Should you desire not to have the siren chirp when<br />
arming and disarming, press and hold Button #1 for<br />
3 seconds. The system will perform all its usual<br />
arming/disarming functions, except there will be<br />
no arming and disarming chirps. If the alarm is<br />
triggered, the siren will provide its normally loud<br />
sound. NOTE: If the lights flash 3 times after<br />
disarming, the vehicle has been violated as described<br />
in Operating Instructions, see page 18 for “Violated<br />
Zone”.<br />
Remote Car Starter (Optional equipment required)<br />
A second channel built into this model can be<br />
activated while it is in the armed or disarmed mode.<br />
The second channel can be used for remote engine starting (optional module required). Press Button #2 while<br />
the system is armed or disarmed, the parking lights will flash once, and then will activate the installed<br />
accessory. CAUTION: When remotely starting the vehicle while the system is armed from Button #2, shock and<br />
current sensing will automatically shut off.<br />
Car Finder<br />
While the system is armed, press and release Button #3. The alarm will chirp 6 times and the parking lights<br />
will flash. This is used to locate your vehicle in a crowded parking lot.<br />
Optional Accessories (Trunk Pop, etc., Opt. Part #775 required)<br />
NOTE: When the alarm is disarmed, press Button #3 and the trunk will open. When the alarm is armed, press<br />
and hold Button #3 for 2 seconds or until the trunk opens. If Button #3 is pressed and held, a ground output<br />
signal is applied to the connected accessory for as long as this button is pressed. CAUTION: When opening<br />
the trunk while the system is armed, shock and current sensing will shut off.<br />
Instant Personal Panic<br />
Press and release transmitter Button #4 to sound the instant panic siren. The lights and siren will activate<br />
for 30 seconds and then shut off. To stop the siren before the 30 seconds, press any of the 4 transmitter<br />
buttons.<br />
8