Download 2100-A16 Installation Guide - Intech Instruments Ltd
Download 2100-A16 Installation Guide - Intech Instruments Ltd
Download 2100-A16 Installation Guide - Intech Instruments Ltd

You also want an ePaper? Increase the reach of your titles
YUMPU automatically turns print PDFs into web optimized ePapers that Google loves.
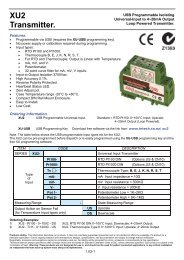
Section D. Connecting to a Microscan Scada System.<br />
<strong>2100</strong>-<strong>A16</strong> Analogue Input Expansion - Using <strong>2100</strong>-M Analogue Input Multiplexer.<br />
Analogue input expansion can be achieved using up to four <strong>2100</strong>-M, 16 Channel, Analogue Input Multiplexers. This<br />
gives a total of 76 analogue inputs. Control for the <strong>2100</strong>-M is through the AO1 and AO2 on the <strong>2100</strong>-<strong>A16</strong>. (Refer Note<br />
4 below.) One analogue input is required per <strong>2100</strong>-M, and each <strong>2100</strong>-M input must be of the same type and range. The<br />
remaining <strong>2100</strong>-<strong>A16</strong> analogue inputs can be used for any other type of input.<br />
Option 1. 5 Wire Connection Diagram.<br />
This uses 5 wires for the first <strong>2100</strong>-M, with 2 additional wires for each additional <strong>2100</strong>-M. In this configuration the<br />
analogue inputs are differential. The maximum peak input voltage is 18V.<br />
-<br />
Analogue Input No.1<br />
+<br />
<strong>2100</strong>-<strong>A16</strong><br />
-<br />
Analogue Input No.2<br />
+<br />
-<br />
Analogue Input No.3<br />
+<br />
-<br />
Analogue Input No.4<br />
+<br />
2<br />
1<br />
5<br />
4<br />
8<br />
7<br />
11<br />
10<br />
AO COM 60<br />
AO 1 61<br />
AO 2 62<br />
51 COM First<br />
53 Iout <strong>2100</strong>-M<br />
60 CS COM<br />
61 RESET<br />
62 CLOCK<br />
51 COM Second<br />
53 Iout <strong>2100</strong>-M<br />
60 CS COM<br />
61 RESET<br />
62 CLOCK<br />
51 COM Third<br />
53 Iout <strong>2100</strong>-M<br />
60 CS COM<br />
61 RESET<br />
62 CLOCK<br />
51 COM Fourth<br />
53 Iout <strong>2100</strong>-M<br />
60 CS COM<br />
61 RESET<br />
62 CLOCK<br />
Note 1. The <strong>2100</strong>-<strong>A16</strong> resolution on <strong>2100</strong>-M<br />
multiplexer inputs is 12 bits (4096 steps)<br />
Note 2. All cables must be screened, and the screens<br />
earthed at one end only.<br />
Note 3. Analogue Input expansion is also possible<br />
using the EXPO-3. Refer to the connection<br />
diagram below.<br />
Note 4.<br />
OR<br />
When <strong>2100</strong>-M multiplexers are used:<br />
AO COM connects to CS COM;<br />
AO 1 is used for the RESET pulse;<br />
AO 2 is used for the CLOCK pulse.<br />
AO 1 & AO 2 are not available for any other use.<br />
26 COM EXPO-3<br />
28 Iout<br />
29 CS COM<br />
30 RESET<br />
31 CLOCK<br />
The analogue output mode is set in the Station Advanced Dialog Box ‘AO 1 & AO 2 button’.<br />
For <strong>2100</strong>-M Driver select Mode 1.<br />
For detailed programming info, refer to ‘Programming <strong>2100</strong>-Series Remote Station’ in the Microscan Manual.<br />
Option 2. 4 Wire Connection Diagram.<br />
This uses 4 wires (2 pair) for the first <strong>2100</strong>-M, with 1 additional wire for each additional <strong>2100</strong>-M. In this configuration the<br />
analogue inputs single ended. i.e. All the -ve inputs are all commoned.<br />
-<br />
Analogue Input No.1<br />
+<br />
<strong>2100</strong>-<strong>A16</strong><br />
-<br />
Analogue Input No.2<br />
+<br />
-<br />
Analogue Input No.3<br />
+<br />
-<br />
Analogue Input No.4<br />
+<br />
2<br />
1<br />
5<br />
4<br />
8<br />
7<br />
11<br />
10<br />
AO COM 60<br />
AO 1 61<br />
AO 2 62<br />
51 COM First<br />
53 Iout <strong>2100</strong>-M<br />
60 CS COM<br />
61 RESET<br />
62 CLOCK<br />
51 COM Second<br />
53 Iout <strong>2100</strong>-M<br />
60 CS COM<br />
61 RESET<br />
62 CLOCK<br />
51 COM Third<br />
53 Iout <strong>2100</strong>-M<br />
60 CS COM<br />
61 RESET<br />
62 CLOCK<br />
51 COM Fourth<br />
53 Iout <strong>2100</strong>-M<br />
60 CS COM<br />
61 RESET<br />
62 CLOCK<br />
Note 1. The <strong>2100</strong>-<strong>A16</strong> resolution on <strong>2100</strong>-M<br />
multiplexer inputs is 12 bits (4096 steps)<br />
Note 2. All cables must be screened, and the screens<br />
earthed at one end only.<br />
Note 3. Analogue Input expansion is also possible<br />
using the EXPO-3. Refer to the connection<br />
diagram below.<br />
Note 4.<br />
OR<br />
When <strong>2100</strong>-M multiplexers are used:<br />
AO COM connects to CS COM;<br />
AO 1 is used for the RESET pulse;<br />
AO 2 is used for the CLOCK pulse.<br />
AO 1 & AO 2 are not available for any other use.<br />
26 COM EXPO-3<br />
28 Iout<br />
29 CS COM<br />
30 RESET<br />
31 CLOCK<br />
The analogue output mode is set in the Station Advanced Dialog Box ‘AO 1 & AO 2 button’.<br />
For <strong>2100</strong>-M Driver select Mode 1.<br />
For detailed programming info, refer to ‘Programming <strong>2100</strong>-Series Remote Station’ in the Microscan Manual.<br />
14.02-11


![NZ Catalogue Pages [PDF] - Intech Instruments Ltd](https://img.yumpu.com/36229536/1/184x260/nz-catalogue-pages-pdf-intech-instruments-ltd.jpg?quality=85)