A-dec 500 12 O'Clock System
A-dec 500 12 O'Clock System
A-dec 500 12 O'Clock System
- No tags were found...

You also want an ePaper? Increase the reach of your titles
YUMPU automatically turns print PDFs into web optimized ePapers that Google loves.
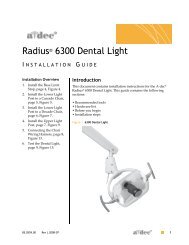
A-<strong>dec</strong> <strong>500</strong> <strong>12</strong> O’Clock <strong>System</strong> Installation Guide<br />
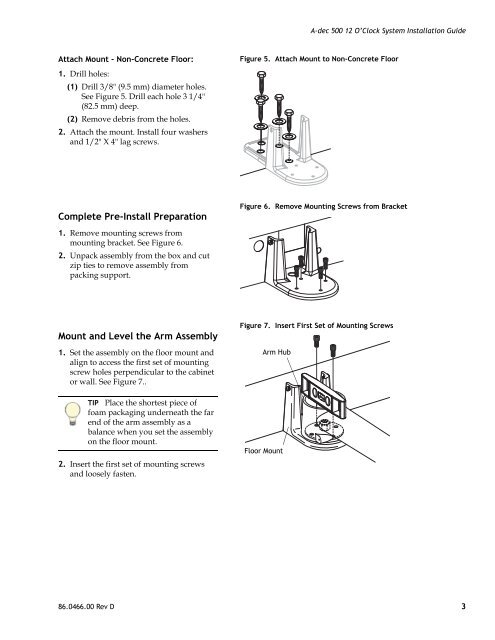
Attach Mount - Non-Concrete Floor:<br />
1. Drill holes:<br />
(1) Drill 3/8" (9.5 mm) diameter holes.<br />
See Figure 5. Drill each hole 3 1/4"<br />
(82.5 mm) deep.<br />
(2) Remove debris from the holes.<br />
2. Attach the mount. Install four washers<br />
and 1/2" X 4" lag screws.<br />
Figure 5. Attach Mount to Non-Concrete Floor<br />
Complete Pre-Install Preparation<br />
1. Remove mounting screws from<br />
mounting bracket. See Figure 6.<br />
2. Unpack assembly from the box and cut<br />
zip ties to remove assembly from<br />
packing support.<br />
Figure 6. Remove Mounting Screws from Bracket<br />
Mount and Level the Arm Assembly<br />
1. Set the assembly on the floor mount and<br />
align to access the first set of mounting<br />
screw holes perpendicular to the cabinet<br />
or wall. See Figure 7..<br />
TIP Place the shortest piece of<br />
foam packaging underneath the far<br />
end of the arm assembly as a<br />
balance when you set the assembly<br />
on the floor mount.<br />
2. Insert the first set of mounting screws<br />
and loosely fasten.<br />
Figure 7. Insert First Set of Mounting Screws<br />
Arm Hub<br />
Floor Mount<br />
86.0466.00 Rev D 3