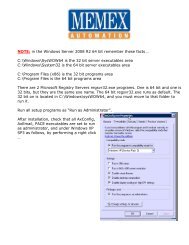
Yasnac i80 Memory Upgrade Manual - Memex Automation
Yasnac i80 Memory Upgrade Manual - Memex Automation
Yasnac i80 Memory Upgrade Manual - Memex Automation
- No tags were found...

You also want an ePaper? Increase the reach of your titles
YUMPU automatically turns print PDFs into web optimized ePapers that Google loves.
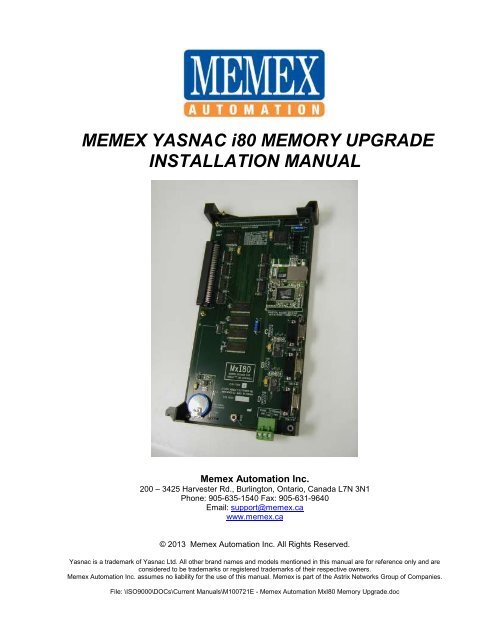
MEMEX YASNAC <strong>i80</strong> MEMORY UPGRADE<br />
INSTALLATION MANUAL<br />
<strong>Memex</strong> <strong>Automation</strong> Inc.<br />
200 – 3425 Harvester Rd., Burlington, Ontario, Canada L7N 3N1<br />
Phone: 905-635-1540 Fax: 905-631-9640<br />
Email: support@memex.ca<br />
www.memex.ca<br />
© 2013 <strong>Memex</strong> <strong>Automation</strong> Inc. All Rights Reserved.<br />
<strong>Yasnac</strong> is a trademark of <strong>Yasnac</strong> Ltd. All other brand names and models mentioned in this manual are for reference only and are<br />
considered to be trademarks or registered trademarks of their respective owners.<br />
<strong>Memex</strong> <strong>Automation</strong> Inc. assumes no liability for the use of this manual. <strong>Memex</strong> is part of the Astrix Networks Group of Companies.<br />
File: \ISO9000\DOCs\Current <strong>Manual</strong>s\M100721E - <strong>Memex</strong> <strong>Automation</strong> MxI80 <strong>Memory</strong> <strong>Upgrade</strong>.doc
INTRODUCTION<br />
CHAPTER 1: INTRODUCTION<br />
The <strong>Yasnac</strong> <strong>i80</strong> CNC has two distinct part program memory areas – a base<br />
memory or about 64k on the FC200 “SMON” board and an extended one on<br />
the FC120 “FILE” board (up to 1984k) for a total of 2 Megabytes.<br />
All system data including Tool Offsets and Parameters are stored in the FC200<br />
board and up to 160 meters (64k) of part program storage is also there.<br />
Additional memory sizes from 320 meters (128k) to 5120 meters (2 Megs) are<br />
enabled in the <strong>Memex</strong> FC120 board. The <strong>Memex</strong> FC120 File storage board is<br />
plugged into the control’s Masterboard at the position labeled “FC120”.<br />
The available <strong>Yasnac</strong> <strong>i80</strong> memory options are as follows:<br />
BOARD MEMORY OPTION<br />
FC200<br />
FC200<br />
80M or 32k<br />
160M or 64k<br />
FC120-1 320M or 128k OPM06 = xxxx 0011= 3<br />
FC120-2 640M or 256k OPM06 = xxxx 0100= 4<br />
FC120-3 1280M or 512k OPM06 = xxxx 0101= 5<br />
FC120-4 2560M or 1 Megabyte OPM06 = xxxx 0110= 6<br />
FC120-5 5120M or 2 Megabytes OPM06 = xxxx 0111= 7<br />
A <strong>Yasnac</strong> <strong>i80</strong> Version A Controller<br />
©Copyright 2012 <strong>Memex</strong> <strong>Automation</strong> Inc. All rights reserved.<br />
No part may be used or copied without the express written consent of <strong>Memex</strong> <strong>Automation</strong> Inc.<br />
<strong>Memex</strong> <strong>Automation</strong> Inc. assumes no liability for the use of this information.
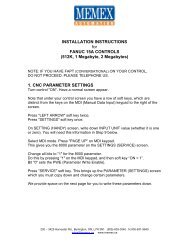
I80 MEMORY INSTALLATION<br />
CHAPTER 2: INSTALLATION OVERVIEW<br />
Before starting the installation, power on the control and verify that the<br />
machine tool is in good working order. If the control has a system error<br />
during or after your installation, you will appreciate a backup.<br />
The <strong>Memex</strong> <strong>i80</strong> FC120 board contains only part programs, but they can<br />
also contain macro programs for tool changers that are protected from<br />
download. An install will erase all part programs during the REGEN<br />
(regenerate) process, so a complete backup of macro files is necessary.<br />
That said, a full backup is recommended on a regular basis anyway.<br />
Please note that the <strong>Memex</strong> FC120 is not dependent upon the control’s<br />
battery system as it comes equipped with the Perma-Charge Battery<br />
Backup feature.<br />
Important!<br />
If you are upgrading an existing <strong>Yasnac</strong> FC120 memory board with a<br />
larger <strong>Memex</strong> version, please note that the original board once removed<br />
from the control, will only retain its Part Program data for 20 minutes or<br />
so. For this reason, it is essential that the Part Programs be backed up<br />
properly on the computer via the RS-232 serial port. If in doubt, consult<br />
your <strong>Yasnac</strong> manuals, as they are your ultimate authority on your<br />
particular version of control.<br />
©Copyright 2012 <strong>Memex</strong> <strong>Automation</strong> Inc. All rights reserved.<br />
No part may be used or copied without the express written consent of <strong>Memex</strong> <strong>Automation</strong> Inc.<br />
<strong>Memex</strong> <strong>Automation</strong> Inc. assumes no liability for the use of this information.
I80 MEMORY INSTALLATION<br />
YASNAC <strong>i80</strong> MEMORY INSTALLATION<br />
Time Needed:<br />
Tools Needed:<br />
Components:<br />
Controls:<br />
Important!<br />
COM Setup<br />
Set Ball to 2<br />
Macro File<br />
Unprotect<br />
About 1 hour<br />
1 Long Philips #2 Screwdriver<br />
1 Small Slot Screwdriver<br />
1 <strong>Memex</strong> MxI80 FC120 memory board<br />
1 Set of Instructions<br />
<strong>Yasnac</strong> <strong>i80</strong> CNC<br />
Before starting the installation, power on the control and verify that the<br />
machine tool is in good working order. Although not absolutely necessary<br />
for this installation, it is advisable that you have a current backup of your<br />
NC parameters, Tool Offsets and other Fixed Files (PC Parameters). That<br />
said, it is necessary to download all part programs, which will be<br />
explained further on.<br />
1. Set up your computer to receive data through its COM port and connect<br />
it to your <strong>Yasnac</strong> control (with a standard null modem cable). Set the<br />
communication parameters on your PC for the data bits, stop bits and<br />
baud rate as determined by the applicable parameters for your control.<br />
Please refer to the “<strong>Yasnac</strong> <strong>i80</strong> Technical Summary” section in the back<br />
of this manual for the appropriate parameters.<br />
2. With the Power Off, locate the Rotary Switch (the “Ball”) on the<br />
FC200 “SMON” board. Turn the switch to position 2 with the small<br />
Setting Screwdriver provided, then Power On. By the way, setting the<br />
Ball to “2” will automatically set the Parameter Write Enable bit.<br />
3. Check whether any 8000 or 9000 programs are protected and reset it in<br />
order to punch all the part programs (use MAIN, PARM, SETING):<br />
SETING PARAMETERS<br />
#20 = xxxx xxx0 – to enable Display & Output of 8000-8999 programs<br />
#21 = xxxx xxx0 – to enable Editing of programs of 8000-8999 programs<br />
#22 = xxxx xxx0 – to enable editing of 9000-9999 programs<br />
#3004 = xxxx xxx0 – to enable Display & Output of 9000-9999 programs<br />
4. Now with a computer connected properly to the <strong>Yasnac</strong> serial port,<br />
proceed to the [P1 PROG] screen and punch out all the part programs<br />
as you would normally. Check that all programs including the 8000-<br />
©Copyright 2012 <strong>Memex</strong> <strong>Automation</strong> Inc. All rights reserved.<br />
No part may be used or copied without the express written consent of <strong>Memex</strong> <strong>Automation</strong> Inc.<br />
<strong>Memex</strong> <strong>Automation</strong> Inc. assumes no liability for the use of this information.
I80 MEMORY INSTALLATION<br />
9999 series are punched as this memory will be erased upon in<br />
following steps.<br />
Find Options<br />
5. On Power On, depress the [MAINT] or [P4 MAT] key to get to the<br />
Maintenance screen. Using the Up/Down Arrows on the right, highlight<br />
[OPTION] tab on the lower right (under [LADDER]) of the menu<br />
(note this only shows when the Ball is set to “2”). When in the Option<br />
Parameters screen, cursor down to OPM06. Follow step 6 below to<br />
enable you to cursor right (Option 6) – then cursor right to set the bits.<br />
See picture below for the Option screen you are looking for…<br />
[ OPTION<br />
Set Option OP6<br />
6. Now type in the Password of “0000 0000” (8 zeros) and press “WR”<br />
(or Write). Note that you will see nothing on the screen. However you<br />
will now be able to cursor across Option 6 and set the bits according to<br />
the table below (where x = leave alone)…<br />
Note that some versions have a passcode of or “YASNAC80” not 8<br />
zeros.<br />
©Copyright 2012 <strong>Memex</strong> <strong>Automation</strong> Inc. All rights reserved.<br />
No part may be used or copied without the express written consent of <strong>Memex</strong> <strong>Automation</strong> Inc.<br />
<strong>Memex</strong> <strong>Automation</strong> Inc. assumes no liability for the use of this information.
I80 MEMORY INSTALLATION<br />
BOARD MEMORY<br />
OPTION<br />
FC120-1 = 320M or 128k opm06 = xxxx 0011= 3<br />
FC120-2 = 640M or 256k opm06 = xxxx 0100= 4<br />
FC120-3 = 1280M or 512k opm06 = xxxx 0101= 5<br />
FC120-4 = 2560M or 1 Megabyte opm06 = xxxx 0110= 6<br />
FC120-5 = 5120M or 2 Megabytes opm06 = xxxx 0111= 7 (Default)<br />
7. Power off the control, and reset the Ball (FC200 rotary switch) to “E”<br />
(4 clicks back from 2 or counter-clockwise where you should be right<br />
now). Install the <strong>Memex</strong> MxI80 FC120 board at this point in the slot<br />
labeled FC120 on your main <strong>Yasnac</strong> masterboard. The unit installs<br />
from the bottom first and then rocks upwards until the connector is<br />
seated. When the MxI80 is firmly mounted, screw in the Philips screw<br />
at the top to secure it.<br />
©Copyright 2012 <strong>Memex</strong> <strong>Automation</strong> Inc. All rights reserved.<br />
No part may be used or copied without the express written consent of <strong>Memex</strong> <strong>Automation</strong> Inc.<br />
<strong>Memex</strong> <strong>Automation</strong> Inc. assumes no liability for the use of this information.
I80 MEMORY INSTALLATION<br />
8. Power on the control and with the Ball on the FC200 board set to “E”<br />
you will get the INITIAL MENU - REGEN (regenerate) screen as<br />
shown below. Cursor down to the PROGRAM menu item and hit the<br />
WR (write key to mark it with an “*”). Then select the “INITI” soft key<br />
and you should get the picture below.<br />
Be very careful that you do NOT activate “SL ALL” (select all) or<br />
any other file other than PROGRAM as it will erase whatever is<br />
selected.<br />
When you have exactly what we have in the picture below, press the<br />
“Y” key to REGEN the new memory. You will get a screen confirming<br />
the new memory size and that all is well and the new memory is<br />
present.<br />
9. Power off and reset the FC200 Ball back to “2”.<br />
10.Power on and proceed to reload the part programs that you<br />
downloaded earlier.<br />
11.After all the part programs are loaded, including the 8000-9999 macro<br />
files, you should go back and reset the SETING parameters #20, 21, 22<br />
& 3004 to their normal state.<br />
©Copyright 2012 <strong>Memex</strong> <strong>Automation</strong> Inc. All rights reserved.<br />
No part may be used or copied without the express written consent of <strong>Memex</strong> <strong>Automation</strong> Inc.<br />
<strong>Memex</strong> <strong>Automation</strong> Inc. assumes no liability for the use of this information.
I80 MEMORY INSTALLATION<br />
12.When all is done, power off and reset the FC200 Ball to “0” or normal<br />
mode and power back on.<br />
13. Finally, please re-check all <strong>i80</strong> control functionality.<br />
Congratulations, you are done!<br />
Please note that the Ethernet with 3 serial port Universal Machine Interface(UMI)<br />
Option on the MxI80 board is covered in a separate manual.<br />
©Copyright 2012 <strong>Memex</strong> <strong>Automation</strong> Inc. All rights reserved.<br />
No part may be used or copied without the express written consent of <strong>Memex</strong> <strong>Automation</strong> Inc.<br />
<strong>Memex</strong> <strong>Automation</strong> Inc. assumes no liability for the use of this information.
CHECKLIST<br />
MxI80 INSTALLATION CHECKLIST (for <strong>Yasnac</strong> <strong>i80</strong> Controls)<br />
1. Check Machine - Power On - Check for Machine Problems Before You Start.<br />
2. Power Off, then Set the BALL on FC200 to “2”.<br />
3. Check that SETING Parameters pm20,21,22 & #3004 Bit 0 = 0 to enable 8000-9999 punch out<br />
4. With the computer ready, punch OUT all the part programs – check 8000-9999 are outputted<br />
5. Power On – Go to MAINT or P4 MAT Maintenance screen and find the Option Parameters<br />
6. Set Option 6 Bits 0,1 &2 to a 3 for 320M, 4 for 640M, 5 for 1280M, 6 for 1 Meg and 7 for 2 Megs<br />
7. Power off and set FC200 Ball to “E” – 4 clicks counterclockwise. Mount new MxI80 FC120 Board.<br />
8. Power On to get REGEN screen. Select PROGRAM only (get “*” when selected). Press “INITI” and hit<br />
“Y” to REGENerate memory. Screen appears confirming new memory.<br />
9. Power Off and reset FC200 Ball to “2”.<br />
10. Reload part programs from (P1) PROG screen.<br />
11. Restore SETING Parameters # 20,21,22 & 3004 to initial values to re-protect 8000-9999 macro programs<br />
12. Turn rotary switch back to 0.<br />
13. Check machine functionality.<br />
14. You are done…<br />
©Copyright 2012 <strong>Memex</strong> <strong>Automation</strong> Inc. All rights reserved.<br />
No part may be used or copied without the express written consent of <strong>Memex</strong> <strong>Automation</strong> Inc.<br />
<strong>Memex</strong> <strong>Automation</strong> Inc. assumes no liability for the use of this information.
TECHNICAL SUMMARY<br />
CHAPTER 3: <strong>Yasnac</strong> <strong>i80</strong> Technical Summary<br />
Communication Parameter Settings (MAIN, PARM, SETING):<br />
Bits:<br />
(7654 3210) = Order of Bits with “x” = don’t care<br />
# 0009 xxx0 xxxx – Specifies 1 st COM Port on FC200 Board for Outputting (1 = FC903)<br />
# 0009 xxxx xxx0 – Specifies 1 st COM Port on FC200 Board for Inputting (1=FC903)<br />
# 0010 0010 0010 – Specifies RS-232C as Equipment Allocation for Port 1 on FC200<br />
# 0015 0010 0010 – Specifies RS-232C as Equipment Allocation for Port 2 on FC903<br />
Port 1 Input Settings:<br />
# 0004 xxx0 0x00 – Bit 4 = No Feed, Bit 3 = TH (Parity) for ISO Input, Bit 1 = no TV Check, Bit 0 = ISO Output<br />
# 0011 x010 1111 – Bits 6&5 = Even Parity, Bit 4 = 7 data bits, Bit 3=2 stop (0=1 stop), Bits2,1,0 = BAUD<br />
(111= 9600 Baud, 110=4800, 101=2400, 100=1200, 011=600, 001=110 & 000=100 Baud)<br />
# 0012 xxxx x011 – Bit 2 = no check of DTR line, Bit 1 = RTS flow control, Bit 0 = RS232 Control Codes<br />
Port 1 Output Settings:<br />
# 0006 xxx0 0x00 – Bit 4 = No Feed, Bit 3 = TH (Parity) for ISO Input, Bit 1 = no TV Check, Bit 0 = ISO Output<br />
# 0013 x010 1111 – Bits 6&5 = Even Parity, Bit 4 = 7 data bits, Bit 3=2 stop (0=1 stop), Bits2,1,0 = BAUD<br />
(111= 9600 Baud, 110=4800, 101=2400, 100=1200, 011=600, 001=110 & 000=100 Baud)<br />
# 0014 xxxx x011 – Bit 2 = no check of DTR line, Bit 1 = RTS flow control, Bit 0 = RS232 Control Codes<br />
Port 2 Input Settings:<br />
# 0016 x010 1111 – Bits 6&5 = Even Parity, Bit 4 = 7 data bits, Bit 3=2 stop (0=1 stop), Bits2,1,0 = BAUD<br />
(111= 9600 Baud, 110=4800, 101=2400, 100=1200, 011=600, 001=110 & 000=100 Baud)<br />
# 0017 xxxx x011 – Bit 2 = no check of DTR line, Bit 1 = RTS flow control, Bit 0 = RS232 Control Codes<br />
Port 2 Output Settings:<br />
# 0018 x010 1111 – Bits 6&5 = Even Parity, Bit 4 = 7 data bits, Bit 3=2 stop (0=1 stop), Bits2,1,0 = BAUD<br />
(111= 9600 Baud, 110=4800, 101=2400, 100=1200, 011=600, 001=110 & 000=100 Baud)<br />
# 0019 xxxx x011 – Bit 2 = no check of DTR line, Bit 1 = RTS flow control, Bit 0 = RS232 Control Codes<br />
Macro Part Program Protection:<br />
# 0020 xxxx xxx0 – Specifies Edit, display & Output of O8000-O8999<br />
# 0021 xxxx xxx0 – Specifies Edit Operation of O8000-O8999<br />
# 0022 xxxx xxx0 – Specifies Edit Operation of O9000-O9999<br />
# 3004 xxxx xxx0 – Specifies Edit, Display & Output of O9000-O9999<br />
FC200 Port 1 RS-232 Specification:<br />
CN20 Connector - DB9 Female – Pin 1 = Frame Ground, Pin 2 = Send Data (TX), Pin 3 = Receive Data (RX),<br />
Pin 4 = Ready To Send (RTS), Pin 5 = Clear to Send (CTS), Pin 6 = Data Set Ready (DSR), Pin 7 = Signal Ground,<br />
Pin 8 = no connect, & Pin 9 = Data Terminal Ready (DSR)<br />
©Copyright 2012 <strong>Memex</strong> <strong>Automation</strong> Inc. All rights reserved.<br />
No part may be used or copied without the express written consent of <strong>Memex</strong> <strong>Automation</strong> Inc.<br />
<strong>Memex</strong> <strong>Automation</strong> Inc. assumes no liability for the use of this information.
TECHNICAL SUMMARY<br />
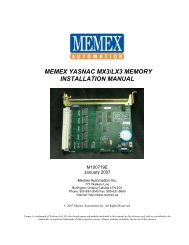
A <strong>Yasnac</strong> <strong>i80</strong> Model A with our MxI80 <strong>Memory</strong> Card<br />
installed in the center slot labeled FC120<br />
(with the 3 DB9 Ports and the Ethernet Port and no label at the top).<br />
Note: To enable the Ethernet connection on our MxI80 board (and to set up the serial port COM1<br />
for connection to the <strong>Yasnac</strong> Port A) please consult the UMI installation manual. Use the utility<br />
“LocateIP” found on our web site or on the NetDNC CD in the 100 Utilities folder.<br />
©Copyright 2012 <strong>Memex</strong> <strong>Automation</strong> Inc. All rights reserved.<br />
No part may be used or copied without the express written consent of <strong>Memex</strong> <strong>Automation</strong> Inc.<br />
<strong>Memex</strong> <strong>Automation</strong> Inc. assumes no liability for the use of this information.
TECHNICAL SUMMARY<br />
<strong>Memex</strong> <strong>Automation</strong> Inc.<br />
200 – 3425 Harvester Rd.<br />
Burlington, Ontario Canada<br />
L7N 3N1<br />
Ph: 905-635-1540 Fax: 905-631-9640<br />
www.memex.ca<br />
Sales: (905) 635-3041<br />
Support: (905) 635-3042<br />
Thank you for Choosing <strong>Memex</strong> <strong>Memory</strong><br />
File: /ISO9000/DOCS/M100721E - <strong>Memex</strong> <strong>Automation</strong> MxI80 <strong>Memory</strong> <strong>Upgrade</strong>.doc<br />
©Copyright 2012 <strong>Memex</strong> <strong>Automation</strong> Inc. All rights reserved.<br />
No part may be used or copied without the express written consent of <strong>Memex</strong> <strong>Automation</strong> Inc.<br />
<strong>Memex</strong> <strong>Automation</strong> Inc. assumes no liability for the use of this information.