Conductivity Meter
Conductivity Meter
Conductivity Meter

You also want an ePaper? Increase the reach of your titles
YUMPU automatically turns print PDFs into web optimized ePapers that Google loves.
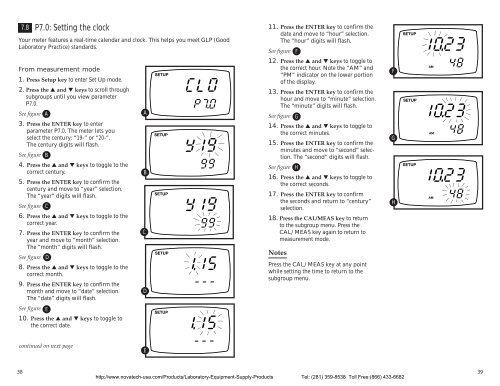
7.8<br />
P7.0: Setting the clock<br />
Your meter features a real-time calendar and clock. This helps you meet GLP (Good<br />
Laboratory Practice) standards.<br />
11. Press the ENTER key to confirm the<br />
date and move to “hour” selection.<br />
The “hour” digits will flash.<br />
See figure F<br />
SETUP<br />
From measurement mode<br />
1. Press Setup key to enter Set Up mode.<br />
SETUP<br />
12. Press the ▲ and ▼ keys to toggle to<br />
the correct hour. Note the “AM” and<br />
“PM” indicator on the lower portion<br />
of the display.<br />
F<br />
AM<br />
2. Press the ▲ and ▼ keys to scroll through<br />
subgroups until you view parameter<br />
P7.0.<br />
See figure A<br />
3. Press the ENTER key to enter<br />
parameter P7.0. The meter lets you<br />
select the century: “19-” or “20-”.<br />
The century digits will flash.<br />
See figure B<br />
4. Press the ▲ and ▼ keys to toggle to the<br />
correct century.<br />
5. Press the ENTER key to confirm the<br />
century and move to “year” selection.<br />
The “year” digits will flash.<br />
See figure C<br />
6. Press the ▲ and ▼ keys to toggle to the<br />
correct year.<br />
7. Press the ENTER key to confirm the<br />
year and move to “month” selection.<br />
The “month” digits will flash.<br />
See figure D<br />
8. Press the ▲ and ▼ keys to toggle to the<br />
correct month.<br />
9. Press the ENTER key to confirm the<br />
month and move to “date” selection.<br />
The “date” digits will flash.<br />
A<br />
B<br />
C<br />
D<br />
SETUP<br />
SETUP<br />
SETUP<br />
13. Press the ENTER key to confirm the<br />
hour and move to “minute” selection.<br />
The “minute” digits will flash.<br />
See figure G<br />
14. Press the ▲ and ▼ keys to toggle to<br />
the correct minutes.<br />
15. Press the ENTER key to confirm the<br />
minutes and move to “second” selection.<br />
The “second” digits will flash.<br />
See figure H<br />
16. Press the ▲ and ▼ keys to toggle to<br />
the correct seconds.<br />
17. Press the ENTER key to confirm<br />
the seconds and return to “century”<br />
selection.<br />
18. Press the CAL/MEAS key to return<br />
to the subgroup menu. Press the<br />
CAL/MEAS key again to return to<br />
measurement mode.<br />
Notes<br />
Press the CAL/MEAS key at any point<br />
while setting the time to return to the<br />
subgroup menu.<br />
G<br />
H<br />
SETUP<br />
SETUP<br />
AM<br />
AM<br />
See figure E<br />
10. Press the ▲ and ▼ keys to toggle to<br />
the correct date.<br />
SETUP<br />
continued on next page<br />
E<br />
38<br />
http://www.novatech-usa.com/Products/Laboratory-Equipment-Supply-Products Tel: (281) 359-8538 Toll Free:(866) 433-6682<br />
39