Here's the details - TOPS - Packaging Software
Here's the details - TOPS - Packaging Software
Here's the details - TOPS - Packaging Software

You also want an ePaper? Increase the reach of your titles
YUMPU automatically turns print PDFs into web optimized ePapers that Google loves.
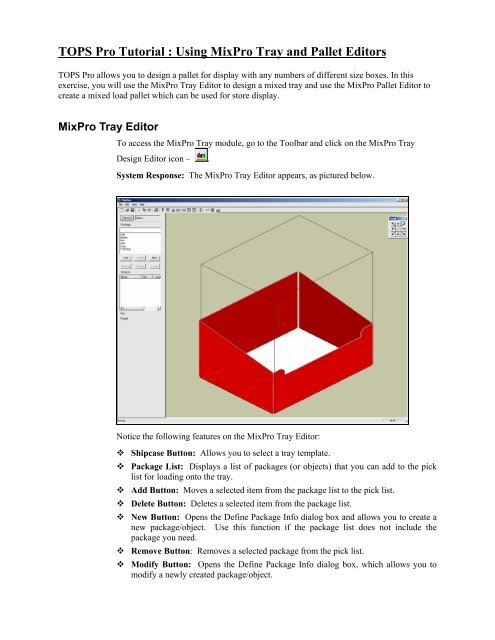
<strong>TOPS</strong> Pro Tutorial : Using MixPro Tray and Pallet Editors<br />
<strong>TOPS</strong> Pro allows you to design a pallet for display with any numbers of different size boxes. In this<br />
exercise, you will use <strong>the</strong> MixPro Tray Editor to design a mixed tray and use <strong>the</strong> MixPro Pallet Editor to<br />
create a mixed load pallet which can be used for store display.<br />
MixPro Tray Editor<br />
To access <strong>the</strong> MixPro Tray module, go to <strong>the</strong> Toolbar and click on <strong>the</strong> MixPro Tray<br />
Design Editor icon – .<br />
System Response: The MixPro Tray Editor appears, as pictured below.<br />
Notice <strong>the</strong> following features on <strong>the</strong> MixPro Tray Editor:<br />
Shipcase Button: Allows you to select a tray template.<br />
Package List: Displays a list of packages (or objects) that you can add to <strong>the</strong> pick<br />
list for loading onto <strong>the</strong> tray.<br />
Add Button: Moves a selected item from <strong>the</strong> package list to <strong>the</strong> pick list.<br />
Delete Button: Deletes a selected item from <strong>the</strong> package list.<br />
New Button: Opens <strong>the</strong> Define Package Info dialog box and allows you to create a<br />
new package/object. Use this function if <strong>the</strong> package list does not include <strong>the</strong><br />
package you need.<br />
Remove Button: Removes a selected package from <strong>the</strong> pick list.<br />
Modify Button: Opens <strong>the</strong> Define Package Info dialog box, which allows you to<br />
modify a newly created package/object.
Note: The Modify function applies only to packages created in MixPro Tray. You<br />
cannot modify packages created in <strong>TOPS</strong> Pro. Also, you cannot modify a package<br />
that’s already placed onto <strong>the</strong> tray.<br />
Pick List: Displays a list of packages you’ve selected from <strong>the</strong> package list. These<br />
packages can be loaded onto <strong>the</strong> tray. The pick list also tracks <strong>the</strong> following<br />
information for each type of package: number of packages, length, width and height.<br />
Tray Display Window: Displays an image of <strong>the</strong> tray and allows you to drag<br />
packages onto <strong>the</strong> tray.<br />
Snap Toolbar: Allows you to move <strong>the</strong> assortment of packages flush to any corner<br />
or side of <strong>the</strong> tray.<br />
In this exercise, we’ll create a mixed tray that consists of <strong>the</strong> following ArmorAll<br />
products:<br />
ArmorAll spray bottles<br />
ArmorAll cloth packets<br />
The first step in this process is to create a new tray designed to hold <strong>the</strong>se products.<br />
We’ll design <strong>the</strong> tray based on a template designed in CASY. From <strong>the</strong> MixPro Tray<br />
Editor, follow <strong>the</strong>se instructions:<br />
1. Click on <strong>the</strong> Shipcase button.<br />
System Response: The Select ShipCase dialog box appears.<br />
2. From <strong>the</strong> Select Shipcase dialog box, click on <strong>the</strong> New button.<br />
System Response: The Define Shipcase dialog box appears, as followed.
3. Use <strong>the</strong> following fields to define <strong>the</strong> tray parameters:<br />
Style: Use <strong>the</strong> drop-down list to select a tray template (tray.tsc).<br />
Name: Enter ArmorAll.<br />
Length: Enter 16.<br />
Width: Enter 12.<br />
Height: Enter 15.<br />
4. If all your tray parameters are correct, click on OK.<br />
System Response: The Define Shipcase dialog box closes. The Select Shipcase<br />
dialog box re-appears with <strong>the</strong> parameters for <strong>the</strong> new tray.<br />
5. From <strong>the</strong> Select Shipcase dialog box, click on OK.<br />
System Response: MixPro saves <strong>the</strong> new tray to <strong>the</strong> database. (MixPro saves <strong>the</strong><br />
tray as a shipcase.) The MixPro Tray Editor re-appears, as pictured below, with <strong>the</strong><br />
new tray name (ArmorAll) displayed next to <strong>the</strong> Shipcase button.<br />
6. Look at <strong>the</strong> package list and decide which items you want to place onto <strong>the</strong> tray. In<br />
this exercise, we want <strong>the</strong> mixed tray to include ArmorAll spray bottles and cloth<br />
packets.
Notice that <strong>the</strong> initial package list does not include any of <strong>the</strong>se items. In this case,<br />
MixPro allows you to create new packages for <strong>the</strong>se items. From <strong>the</strong> MixPro Tray<br />
Editor, click on <strong>the</strong> New button.<br />
System Response: The Define Package Info dialog box appears.<br />
7. Use <strong>the</strong> following fields to define <strong>the</strong> ArmorAll spray bottle:<br />
Style: Use <strong>the</strong> drop-down box to select a tray template (in this exercise,<br />
hairsp.tpr).<br />
Name: Enter ArmorAll Spray.<br />
Length: Enter 4.<br />
Width: Enter 4.<br />
Height: Enter 10.<br />
If you want, you can also define a label for each package and assign <strong>the</strong> case a<br />
specific color.<br />
8. If all your package dimensions are correct, click on OK.<br />
System Response: MixPro saves <strong>the</strong> new package to <strong>the</strong> database. The MixPro<br />
Tray Editor re-appears with <strong>the</strong> name of <strong>the</strong> new package included in <strong>the</strong> package<br />
list.<br />
9. Repeat steps 7 and 8 to create <strong>the</strong> ArmorAll Cloth Packets. Use <strong>the</strong>se dimensions:<br />
<br />
Style: Use <strong>the</strong> drop-down box to select a tray template (in this exercise,<br />
2alarm1.tpr).<br />
Name: Enter ArmorAll Cloth.<br />
Length: Enter 8.<br />
Width: Enter 1.<br />
Height: Enter 10.<br />
10. In order to place a package onto <strong>the</strong> tray, you have to move it from <strong>the</strong> package list to<br />
<strong>the</strong> pick list. To move an item to <strong>the</strong> pick list, select an item from <strong>the</strong> package list<br />
and click on <strong>the</strong> Add button.
11. To load <strong>the</strong> item onto <strong>the</strong> tray, click on <strong>the</strong> image of <strong>the</strong> item and drag it onto <strong>the</strong><br />
tray.<br />
System Response: The system copies an image of <strong>the</strong> item to <strong>the</strong> tray area.<br />
Repeat this step until <strong>the</strong> tray contains six ArmorAll spray bottles. When you’ve<br />
done this, <strong>the</strong> screen will look similar to <strong>the</strong> one pictured below.
12. Repeat steps 10 and 11 to place 12 ArmorAll Cloth Packets onto <strong>the</strong> tray. When<br />
you’ve loaded <strong>the</strong> tray with spray bottles and cloth packets, your tray will look<br />
similar to <strong>the</strong> tray pictured on <strong>the</strong> next page.<br />
13. If <strong>the</strong> ArmorAll tray is <strong>the</strong> way you want it, open <strong>the</strong> File menu and select <strong>the</strong> Save<br />
As option.<br />
System Response: The Save As dialog box appears, as pictured below.<br />
14. Select a location where <strong>the</strong> file will be saved. In <strong>the</strong> File name field, enter <strong>the</strong> name<br />
of <strong>the</strong> mixed tray (ArmorAll).<br />
15. Click on <strong>the</strong> Save button.<br />
System Response: MixPro saves <strong>the</strong> tray to <strong>the</strong> database.
16. Exit MixPro Tray.<br />
System Response: The Control Panel appears.<br />
17. From <strong>the</strong> Toolbar at <strong>the</strong> top of <strong>the</strong> Control Panel, click on <strong>the</strong> MixPro Mixed Pallet<br />
Editor icon – .<br />
System Response: The MixPro Pallet Editor appears, as pictured below.
17. To add <strong>the</strong> mixed tray (shipcase) to <strong>the</strong> pallet, select <strong>the</strong> ArmorAll shipcase and click<br />
on <strong>the</strong> Add button.<br />
System Response: MixPro adds <strong>the</strong> tray (shipcase) to <strong>the</strong> pick list and displays a<br />
graphic of <strong>the</strong> tray (shipcase), as pictured below.<br />
18. Drag and drop <strong>the</strong> shipcases onto <strong>the</strong> pallet until <strong>the</strong> unitload is complete.<br />
Note: For instructions on how to load shipcases onto a pallet, please refer to <strong>the</strong> next<br />
section, MixPro Pallet Editor.<br />
19. To display <strong>the</strong> contents of <strong>the</strong> shipcases, go to <strong>the</strong> Toolbar at <strong>the</strong> top of <strong>the</strong> MixPro<br />
Pallet Editor and click on <strong>the</strong> MixPro Tray Design Editor icon – .<br />
System Response: The MixPro Pallet Editor re-appears to show <strong>the</strong> contents of <strong>the</strong><br />
package, as pictured on <strong>the</strong> next page.
MixPro Pallet Editor<br />
To access <strong>the</strong> MixPro Pallet module, go to <strong>the</strong> Toolbar and click on <strong>the</strong> MixPro Mixed<br />
Pallet Editor icon – .<br />
System Response: The MixPro Pallet Editor appears, as pictured below.<br />
Notice <strong>the</strong> following features on <strong>the</strong> MixPro Pallet Editor:<br />
Pallet Button: Allows you to select a pallet for loading shipcases.<br />
Shipcase List: Displays a list of shipcases that you can add to <strong>the</strong> pick list for<br />
loading onto <strong>the</strong> pallet.<br />
Add Button: Moves a selected item from <strong>the</strong> shipcase list to <strong>the</strong> pick list.<br />
Delete Button: Deletes a selected item from <strong>the</strong> shipcase list.<br />
New Button: Opens <strong>the</strong> Define Shipcase dialog box and allows you to create a new<br />
shipcase. Use this function if <strong>the</strong> shipcase list does not include <strong>the</strong> shipcase you<br />
need.<br />
Remove Button: Removes a selected shipcase from <strong>the</strong> pick list.<br />
Modify Button: Opens <strong>the</strong> Define Shipcase dialog box, which allows you to modify<br />
a newly created shipcase.<br />
Note: The Modify function applies only to shipcases created in MixPro. You cannot<br />
modify shipcases created in <strong>TOPS</strong> Pro. Also, you cannot modify a shipcase that’s<br />
already loaded onto <strong>the</strong> pallet.<br />
Layer Button: Opens <strong>the</strong> Layer Generation Screen, which allows you to create and<br />
select a layer configuration and specify a number of layers.<br />
Pick List: Displays a list of shipcases you’ve selected from <strong>the</strong> shipcase list. These<br />
shipcases can be loaded onto <strong>the</strong> pallet. The pick list also tracks <strong>the</strong> following<br />
information for each type of shipcase: number of cases, length, width and height.
Pallet Display Window: Displays an image of <strong>the</strong> pallet and allows you to drag<br />
shipcases onto <strong>the</strong> pallet.<br />
Snap Toolbar: Allows you to move <strong>the</strong> unitload flush to any corner or side of <strong>the</strong><br />
pallet.<br />
In this exercise, we’ll create a mixed pallet load that consists of <strong>the</strong> following:<br />
15 cases of chocolate bars<br />
32 cases of peanut bars<br />
30 cases of corn chips<br />
To load this mixed pallet, follow <strong>the</strong>se instructions:<br />
1. Click on <strong>the</strong> Pallet button.<br />
System Response: The Pallet Parameters dialog box appears, as pictured on <strong>the</strong> next<br />
page.<br />
2. Use <strong>the</strong> following fields to define <strong>the</strong> pallet parameters:<br />
Pallet: Use <strong>the</strong> default (GMA [Notched]).<br />
Length Overhang: Use <strong>the</strong> default (0).<br />
Width Overhang: Use <strong>the</strong> default (0).<br />
Maximum Height (Including Pallet): Enter 56.<br />
Maximum Weight: Use <strong>the</strong> default (0).<br />
3. Look at <strong>the</strong> shipcase list and decide which items you want to load onto <strong>the</strong> pallet. In<br />
this exercise, we want <strong>the</strong> mixed pallet load to include chocolate bars, peanut bars<br />
and corn chips.<br />
Notice that <strong>the</strong> initial shipcase list does not include any of <strong>the</strong>se items. In this case,<br />
MixPro allows you to create new shipcases for <strong>the</strong>se items. To create a new<br />
shipcase, click on <strong>the</strong> New button.<br />
System Response: The Define Shipcase dialog box appears, as pictured here.
4. Use <strong>the</strong> following fields to define <strong>the</strong> three shipcases:<br />
Chocolate Bars Shipcase<br />
Style: Use <strong>the</strong> drop-down list to select a shipcase template.<br />
Name: Enter Chocolate Bars.<br />
Length: Enter 16.<br />
Width: Enter 12.<br />
Height: Enter 10.<br />
Peanut Bars Shipcase<br />
Style: Use <strong>the</strong> drop-down list to select a shipcase template.<br />
Name: Enter Peanut Bars.<br />
Length: Enter 12.<br />
Width: Enter 6.<br />
Height: Enter 12.<br />
Corn Chips Shipcase<br />
Style: Use <strong>the</strong> drop-down list to select a shipcase template.<br />
Name: Enter Corn Chips.<br />
Length: Enter 10.<br />
Width: Enter 9.<br />
Height: Enter 10.<br />
When your shipcase dimensions are correct, click on OK..<br />
System Response: The MixPro Pallet Editor redisplays with <strong>the</strong> name of <strong>the</strong> new<br />
shipcase included in <strong>the</strong> shipcase list. When you’ve created <strong>the</strong>se three new<br />
shipcases, <strong>the</strong> shipcase list will include chocolate bars, peanut bars and corn chips.<br />
6. In order to load an item onto <strong>the</strong> pallet, you have to move it from <strong>the</strong> shipcase list to<br />
<strong>the</strong> pick list. To move an item to <strong>the</strong> pick list, select an item from <strong>the</strong> shipcase list<br />
and click on <strong>the</strong> Add button.<br />
Repeat this step for each item you want to select to <strong>the</strong> pick list. In this exercise,<br />
we’re loading three items – chocolate bars, peanut bars and corn chips.<br />
7. From <strong>the</strong> pick list, select an item to be loaded onto <strong>the</strong> pallet. In this exercise, we’ll<br />
select <strong>the</strong> chocolate bars first.<br />
Note: To change <strong>the</strong> orientation of <strong>the</strong> case – for example, position it on its side or<br />
on its end – click on <strong>the</strong> face of <strong>the</strong> shipcase you want to face <strong>the</strong> floor. Click on <strong>the</strong><br />
top of <strong>the</strong> case to rotate 90 degrees.
8. To load <strong>the</strong> item onto <strong>the</strong> pallet, click on <strong>the</strong> image of <strong>the</strong> shipcase and drag it onto<br />
<strong>the</strong> pallet.<br />
In <strong>the</strong> figure above, <strong>the</strong> shipcase is sitting a few inches from <strong>the</strong> closest edge of <strong>the</strong> pallet.<br />
We want <strong>the</strong> case to sit flush in <strong>the</strong> top left corner of <strong>the</strong> pallet. The Snap feature allows<br />
you to position <strong>the</strong> shipcase flush against any part of <strong>the</strong> pallet you choose.<br />
9. Click on <strong>the</strong> red X to activate <strong>the</strong> Snap feature, <strong>the</strong>n click on <strong>the</strong> button. Click on<br />
<strong>the</strong> shipcase and drag it to <strong>the</strong> top left corner of <strong>the</strong> pallet.<br />
10. We've loaded <strong>the</strong> first of 15 cases of chocolate bars onto <strong>the</strong> pallet. To complete <strong>the</strong><br />
unitload, follow <strong>the</strong> guidelines outlined at <strong>the</strong> end of this chapter.<br />
Continue to load cases until you’ve loaded 15 cases of chocolate bars to <strong>the</strong> pallet,<br />
forming a wall along <strong>the</strong> backside of <strong>the</strong> pallet. Your unitload will look similar to <strong>the</strong><br />
one pictured below.
11.To begin adding <strong>the</strong> next item onto <strong>the</strong> pallet (<strong>the</strong> peanut bars), select it from<br />
<strong>the</strong> pick list. The case pictured in <strong>the</strong> g.o.d. window changes to <strong>the</strong> newly<br />
selected case.<br />
Complete <strong>the</strong> mixed pallet load until <strong>the</strong> unitload contains <strong>the</strong> following items:<br />
15 cases of chocolate bars<br />
32 cases of peanut bars<br />
30 cases of corn chips
Layer Configurations<br />
MixPro allows you to configure layers of shipcases on a pallet.<br />
1. Click on <strong>the</strong> Layers button.<br />
Notice <strong>the</strong> following about <strong>the</strong> Layer Generation Screen:<br />
A list of layer configurations is displayed in <strong>the</strong> lower portion of <strong>the</strong> screen. For<br />
each configuration, <strong>the</strong> screen displays pattern type, count (number of cases in a<br />
layer), area percentage, length, width and height.<br />
The layer configuration display shows an illustration of <strong>the</strong> selected configuration<br />
in <strong>the</strong> upper portion of <strong>the</strong> screen. This display also provides dimensions for length,<br />
width and height.<br />
The Layer Number box allows you to specify <strong>the</strong> number of layers in <strong>the</strong> configuration.<br />
To use <strong>the</strong> Layer Generation feature, follow <strong>the</strong>se instructions:<br />
1. Select <strong>the</strong> layer configuration you want for <strong>the</strong> mixed pallet load.<br />
2. Select <strong>the</strong> number of layers you want in <strong>the</strong> configuration.<br />
3. Click on OK.<br />
System Response: MixPro applies <strong>the</strong> selected layer parameters to <strong>the</strong> mixed<br />
pallet load and redisplays <strong>the</strong> MixPro Pallet Editor.