ELECTRONIC THREE-SPEED AUTOMATIC WASHERS with ...
ELECTRONIC THREE-SPEED AUTOMATIC WASHERS with ...
ELECTRONIC THREE-SPEED AUTOMATIC WASHERS with ...

You also want an ePaper? Increase the reach of your titles
YUMPU automatically turns print PDFs into web optimized ePapers that Google loves.
ACCESSING COMPONENTS IN THE CONSOLE<br />
1. Disconnect the power supply to the washer.<br />
2. Remove the two (2) Phillips Head screws<br />
securing the lower left and right rear corners<br />
of the console to the washer top. (Fig. 2)<br />
Fig. 2<br />
3. Tilt the console back on the hinges that<br />
secure the top of the console to the washer<br />
back.<br />
All components in the console are now accessible for service.<br />
IMPORTANT SERVICING POINTS<br />
Electrostatic Discharge (ESD) Sensitive Electronics<br />
Do not open the package containing the Electronic Printed Circuit Board until it is time to install it.<br />
ESD may damage or weaken the electronic board.<br />
•Use an anti-static wrist strap. Connect wrist strap to a green ground connection point or unpainted metal on the<br />
appliance.<br />
OR<br />
Touch your finger repeatedly to a green ground connection point or unpainted metal on the appliance.<br />
•Avoid touching electronic parts or terminal contacts; handle the electronic board by the edges only.<br />
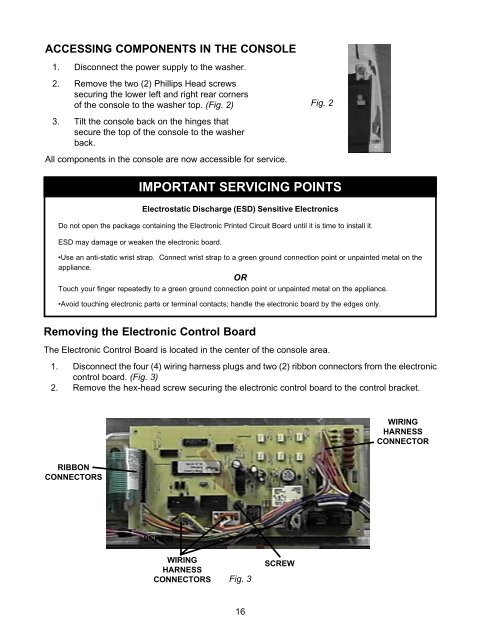
Removing the Electronic Control Board<br />
The Electronic Control Board is located in the center of the console area.<br />
1. Disconnect the four (4) wiring harness plugs and two (2) ribbon connectors from the electronic<br />
control board. (Fig. 3)<br />
2. Remove the hex-head screw securing the electronic control board to the control bracket.<br />
WIRING<br />
HARNESS<br />
CONNECTOR<br />
RIBBON<br />
CONNECTORS<br />
SCREW<br />
WIRING<br />
HARNESS<br />
CONNECTORS<br />
Fig. 3<br />
SCREW<br />
16