Owner's Manual - Universal Remote Control
Owner's Manual - Universal Remote Control
Owner's Manual - Universal Remote Control

You also want an ePaper? Increase the reach of your titles
YUMPU automatically turns print PDFs into web optimized ePapers that Google loves.
Congratulations!<br />
Congratulations on purchasing <strong>Universal</strong> <strong>Remote</strong><br />
<strong>Control</strong>’s WR7 7-Component Pre--Programmed<br />
and Learning remote control. You now have the<br />
power to control your entire home entertainment<br />
system with one easy--to--use remote. The WR7can<br />
be used with thousands of audio/video components<br />
because of the extensive library of codes that<br />
have already been programmed into the remote.<br />
So... get ready to sit back, relax, and simplify your<br />
home entertainment experience.<br />
This Owner’s <strong>Manual</strong> is designed to assist you in<br />
programming your WR7 remote to work with your<br />
components by guiding you through an easy stepby-step<br />
process. Everything you need to know<br />
about programming the WR7 is contained in this<br />
<strong>Manual</strong>.<br />
WR7 Owner’s <strong>Manual</strong> © 2008 <strong>Universal</strong> <strong>Remote</strong><br />
<strong>Control</strong>, Inc.<br />
This document is protected by the copyright laws<br />
of the United States and internationally by the<br />
Berne Convention. No part of this manual may be<br />
reproduced in any form without the express written<br />
consent of <strong>Universal</strong> <strong>Remote</strong> <strong>Control</strong>, Inc. Although<br />
reasonable care has been taken to assure the<br />
accuracy of the information herein contained,<br />
<strong>Universal</strong> <strong>Remote</strong> <strong>Control</strong>, Inc. is not responsible<br />
for operational, technical or editorial errors or<br />
omissions. The specifications and information in<br />
this manual may be subject to change without<br />
notice. MacroPower and SimpleSound are<br />
trademarks of <strong>Universal</strong> <strong>Remote</strong> <strong>Control</strong>, Inc.<br />
Entertainment Made Simple ® is a registered trademark<br />
of <strong>Universal</strong> <strong>Remote</strong> <strong>Control</strong>, Inc. All other<br />
brand or product names are trademarks or registered<br />
trademarks of their respective owners.<br />
The Pioneer in <strong>Control</strong> Technology<br />
500 Mamaroneck Avenue, Harrison, NY 10528<br />
Phone: (914) 835-4484 Fax: (914) 835-4532<br />
Page 2
Table of Contents<br />
Getting Started - Overview<br />
• <strong>Control</strong> up to 7 Components ......5<br />
• Activating Component Buttons ....5<br />
• Learning Capability...................5<br />
• AUX Function............................6<br />
• Light Button...............................6<br />
• Battery Installation.....................6<br />
• Low Battery Warning.................6<br />
• Couch Mode ............................6<br />
Special Advanced Features<br />
• MacroPower & Other<br />
Macros ....................................7<br />
• “My Favorites” - Favorite<br />
Channels..................................7<br />
• SimpleSound & Other<br />
“Punch Throughs” ......................7<br />
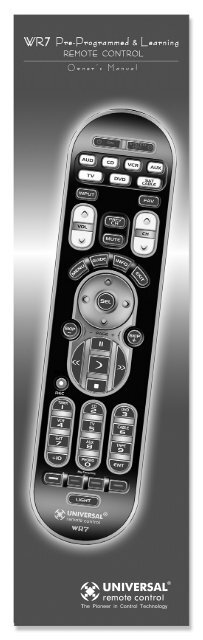
Keypad Layout & Button<br />
Functions ........................8<br />
Programming WR7 Using<br />
Pre-Programmed Codes.....9<br />
• Quick Set-Up Method............9-10<br />
• Three-Digit Code Entry<br />
Method .............................11-13<br />
• Auto-Search Method ...........14-15<br />
Programming WR7 Using<br />
the Learning Method ..16-18<br />
AUX Function: Programming<br />
a 7th Component............19<br />
Finding a Component’s<br />
Set-Up Code Number ..19-20<br />
Page 3
Programming Special<br />
Advanced Features<br />
• MacroPower Total System<br />
On/Off ..............................21-22<br />
• “My Favorites” – Favorite<br />
Channels............................23-24<br />
• SimpleSound Total System<br />
Volume <strong>Control</strong>....................25-26<br />
• Channel <strong>Control</strong><br />
“Punch Through”.......................27<br />
• Transport <strong>Control</strong><br />
“Punch Through”.......................28<br />
• OSD (On-Screen Display)<br />
<strong>Control</strong> “Punch Through”............29<br />
Erasing Commands -<br />
Overview......................30<br />
• Erasing a Single Learned<br />
Command ...............................30<br />
• Erasing All Learned Commands<br />
from One Component...............31<br />
• Erasing MacroPower & Other<br />
Macro Commands ...................32<br />
• Erasing SimpleSound & Other<br />
“Punch Through” Commands......33<br />
• Factory Reset ...........................34<br />
Pre-Programmed Code<br />
Tables ..........................35<br />
• AUDIO ..................................36<br />
• CD ........................................37<br />
• VCR/DVR...............................38<br />
• AUX ......................................39<br />
• TV ....................................40-41<br />
• DVD ......................................42<br />
• CABLE/SAT ............................43<br />
FAQs ............................44<br />
Warranty ......................45<br />
Specifications ................45<br />
Page 4
Getting Started -<br />
Overview<br />
<strong>Control</strong> up to 7 Components<br />
The WR7 remote control is designed to<br />
control up to seven different Audio/Video<br />
components and operate virtually all<br />
brands of AUDIO, TV, DVD, VCR/DVR,<br />
CD, SAT/CABLE and AUX (Light, Music<br />
Server, etc.) components.<br />
Activating Component Buttons<br />
Once you have programmed the WR7<br />
for all of your components, all you need<br />
to do is press a component button and<br />
all the buttons on the WR7 will work with<br />
that component. For example, when you<br />
press the TV component button, all the<br />
buttons on your WR7 will operate your<br />
TV. If you press the DVD component button,<br />
all the buttons on the WR7 will operate<br />
your DVD.<br />
Each time you press any of the buttons<br />
on the remote, the LED light in the component<br />
button will light up to indicate<br />
which component you are controlling.<br />
TV BUTTON<br />
Learning Capability<br />
The WR7 has the ability to “learn” functions<br />
from the original remote controls of other<br />
manufacturers, even if they are not in the<br />
Pre-programmed database.<br />
Page 5
AUX Function<br />
The AUX (Auxillary) button is designed to<br />
operate a 7th audio/video component that<br />
you may have in your system… such as a<br />
TIVO, a second VCR or DVD, or an additional<br />
audio component.<br />
Light Button<br />
The WR7 features a fully backlit keypad for<br />
ease of use in low light or darkened viewing<br />
conditions. Press the LIGHT button to backlight<br />
all the keypad buttons. Press again to<br />
turn off (or simply wait 10 seconds for automatic<br />
shut-off).<br />
Battery Installation<br />
Press the tab and remove the cover of the<br />
battery compartment located in the back of<br />
your remote. Insert the two AA Alkaline batteries<br />
(included in the package) making sure<br />
to match the positive (+) and negative (- )<br />
symbols as shown in the diagram. Place the<br />
cover back over the battery compartment.<br />
INSERT BATTERIES<br />
CORRECTLY<br />
Low Battery Warning<br />
When the batteries are low and need to be<br />
replaced the component LED will quickly<br />
blink three times when you press the<br />
POWER [ON] button.<br />
Couch Mode<br />
The WR7 is designed to automatically turn<br />
itself off if a button is pressed for more than<br />
30 seconds. This prevents battery power<br />
from being depleted should the remote accidentally<br />
slip between the couch cushions.<br />
Page 6
Special Advanced<br />
Features<br />
The WR7 also offers the following special<br />
advanced features that can offer you many<br />
time-saving conveniences:<br />
MacroPower & Other Macro<br />
Buttons<br />
MacroPower is a unique feature that enables<br />
you to turn all your components ON or OFF, all<br />
at the same time, simply with the press of one<br />
button. The WR7 has 13 Macro buttons that<br />
are designed to store up to 20 commands in<br />
each button. Pressing any one of the Macro<br />
buttons will send out the series of commands<br />
that are stored in that button.<br />
“My Favorites”<br />
(Favorite Channels)<br />
This is one of the most desirable features of the<br />
WR7 remote control. Once it’s set up, you can<br />
select one of four favorite channels with the<br />
press of one button – without the need to type<br />
in a channel number. So, whether it’s CNN or<br />
the Food Network, your favorite viewing spot is<br />
just one click away.<br />
SimpleSound & Other “Punch<br />
Throughs”<br />
SimpleSound Volume <strong>Control</strong> is a dynamic feature<br />
that gives you total volume control over all<br />
the components in your system, even those that<br />
do not have their own built--in volume control,<br />
such as TIVO, DVD and VCR... saving you the<br />
hassle and inconvenience of constantly needing<br />
to switch between component modes on the<br />
remote. As an example, in order to increase the<br />
volume while watching a DVD, you would typically<br />
have to pick up the TV remote control to<br />
increase the volume. With the WR7, you do<br />
not even have to press the TV component button.<br />
Once you program SimpleSound in your<br />
DVD mode, you will automatically have TV volume<br />
control in DVD mode.<br />
SimpleSound is what is called a “Punch<br />
Through” feature and is not limited to volume<br />
control. It can also be applied to Channel<br />
<strong>Control</strong>, Transport <strong>Control</strong>, and OSD <strong>Control</strong>.<br />
Page 7
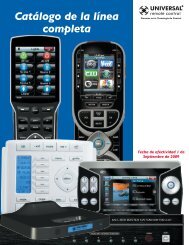
ON<br />
Allows you to turn the selected<br />
component on and off.<br />
AUD, CD, VCR, AUX,<br />
TV, DVD,SAT/CABLE<br />
Used to select the component<br />
you want to<br />
operate and signals<br />
remote control activity.<br />
INPUT<br />
Selects the video<br />
source from available<br />
components.<br />
PREVIOUS<br />
CHANNEL<br />
Returns to the previously<br />
tuned channel<br />
through the SAT/Cable<br />
Set Top Box.<br />
VOLUME<br />
Raises or lowers the<br />
sound volume.<br />
GUIDE<br />
Displays the Program<br />
Guide Listings provided<br />
by the Cable or Satellite<br />
Service Provider.<br />
MENU<br />
Displays the<br />
Applications Menu<br />
through the Cable<br />
Set Top Box.<br />
CURSOR NAVI-<br />
GATION PAD<br />
Used for programming<br />
steps and onscreen<br />
navigation<br />
and highlighting.<br />
TRANSPORT<br />
CONTROLS<br />
Perform standard<br />
VCR and DVD functions<br />
when in VCR<br />
and DVD mode, or<br />
VOD (Video-On-<br />
Demand) and DVR<br />
(Digital Video<br />
Recorder) functions<br />
when in Cable mode.<br />
MY<br />
FAVORITES<br />
Custom-programmable<br />
Favorite Channel Buttons<br />
Keypad Layout &<br />
Button Functions<br />
Page 8<br />
SYSTEM OFF<br />
Designed to send Power On/Off<br />
commands for up to seven components<br />
with one button press.<br />
FAVORITE<br />
Designed to send<br />
Power On/Off<br />
commands for<br />
up to seven components<br />
with one<br />
button press.<br />
LIGHT BUTTON<br />
Press to back-light all keypad buttons.<br />
Press again to shut off (or simply wait 10<br />
seconds for automatic shut-off).<br />
CHANNEL<br />
Selects the next<br />
higher or lower<br />
channel.<br />
MUTE<br />
Silences the Audio.<br />
Press to activate. Press<br />
again to restore sound<br />
to the previous level.<br />
INFO<br />
Displays information<br />
about the program<br />
currently playing or<br />
highlighted in the<br />
Program Guide (see<br />
GUIDE).<br />
EXIT<br />
Exits from current<br />
screen.<br />
SELECT<br />
Selects highlighted<br />
screen options.<br />
SKIP-/+<br />
Skip forward or<br />
backward a<br />
whole day in the<br />
Program Guide.<br />
NUMBER<br />
PAD<br />
Use to enter code numbers<br />
for programming<br />
components and to enter<br />
channel numbers to tune<br />
in channels. Also used to<br />
make numeric entries<br />
on on-screen menus. The<br />
alpha labels on the keys refer<br />
to Audio component functions<br />
that can be accessed with the<br />
respective keys.
Programming WR7 using<br />
Pre-Programmed Codes<br />
There are three ways you can program your<br />
WR7 using the component brand codes that<br />
are pre-programmed into the remote.<br />
• Quick Set-Up Method<br />
• Three-Digit Code Entry Method<br />
• Auto--Search Method<br />
The Quick Set-Up Method is a unique new feature<br />
that enables the fastest and easiest set-up<br />
by using one-digit codes for up to 10 major<br />
brands for each component. The Three-digit<br />
Code Entry Method allows you to set-up the<br />
WR7 using 3-digit codes for component brand<br />
names. It is also a fast and easy way to program<br />
the remote. The Auto-Search Method<br />
scans through all the brands in the remote control,<br />
one at a time. It should be used when<br />
either the Quick Set-Up or Three-Digit Code<br />
Entry Methods do not work.<br />
* * *<br />
Quick Set-Up Method<br />
STEP 1: <strong>Manual</strong>ly or using your old<br />
remote, turn on the component you want to<br />
program—for example, to program your TV,<br />
turn on your TV set.<br />
STEP 2: Point the WR7 toward the component<br />
that you want to program (in this case<br />
the TV set) and press and hold the component<br />
button (in this case the TV button).<br />
While holding down the component<br />
button, begin to press numeric<br />
keys, one number at a time, starting from 1,<br />
continuing to 2, 3…0 until the component<br />
(in this case the TV) turns off.<br />
Page 9
STEP 3: Release the component button to<br />
save the code. The component LED light will<br />
blink three times to confirm that the code has<br />
been stored.<br />
Repeat the above steps for other components.<br />
COMPONENT<br />
BUTTONS<br />
NUMBER<br />
PAD<br />
Page 10
Three-Digit Code Entry Method<br />
STEP 1: Find the 3-digit code numbers<br />
assigned to your brand from the lists in the<br />
back of this manual. The codes are listed by<br />
component category (i.e., TV, VCR, DVD,<br />
etc.), then by brand name. For instance, if<br />
you would like to locate a code for a Sony<br />
television, first locate the TV category and<br />
then look for the Sony brand.<br />
STEP 2: Once you have located the 3digit<br />
codes for each of the components that<br />
you wish to operate with your WR7, write<br />
them ALL down on a piece of paper. It’s<br />
important that you write down all the codes<br />
listed for your brand because only one code<br />
is going to work with your component.<br />
STEP 3: <strong>Manual</strong>ly or using your old<br />
remote, turn on the component you want to<br />
program—for example, to program your TV<br />
turn on your TV set.<br />
STEP 4: On the WR7, press the<br />
Component button that you want to program<br />
(in this case the button that says TV) and the<br />
SELECT [SEL] button at the same time. Hold<br />
down both buttons for two seconds until the<br />
TV Component LED light turns on. This signals<br />
that you are in programming mode.<br />
COMPONENT<br />
BUTTONS<br />
SELECT<br />
BUTTON<br />
Page 11
IMPORTANT: You have 30 seconds to<br />
perform the next step while you are in programming<br />
mode. If you do not press a button<br />
within 30 seconds, the component LED<br />
light will turn off. The remote will exit the<br />
programming mode and you will have to<br />
start over.<br />
STEP 5: Point the WR7 toward the component<br />
(in this example the TV) and punch in<br />
the first 3-digit code that you wrote down for<br />
that specific component. Use the Number<br />
buttons 0~9 on the remote to punch in the<br />
code. The TV LED light will blink each time a<br />
number is pressed.<br />
NUMBER<br />
BUTTONS<br />
If the 3-digit code number you just punched<br />
in is the correct number, the component you<br />
are trying to program will turn off. If it did<br />
not turn off, enter the next code number<br />
from your list until it does turn off.<br />
STEP 6: Once you’ve entered the code<br />
number and the component has turned off,<br />
press the POWER [ON] button on the WR7<br />
remote to turn the component back on.<br />
Next test the VOLUME and CHANNEL buttons<br />
(or PLAY and STOP buttons for VCR and<br />
DVD) to make sure they all work. For example,<br />
perhaps your Sony TV turned off with<br />
code number 147, but the volume controls<br />
did not work properly. In this case, try the<br />
next code number listed for that component.<br />
Repeat Step 5 using the next code number<br />
until you find a perfect match.<br />
Page 12
STEP 7: Once you’ve entered a correct<br />
code, you must save it. Press the component<br />
button you just programmed (in this<br />
case TV) one more time to save the code<br />
number.<br />
The component LED light will blink three<br />
times to confirm that the code was successfully<br />
stored. Now when you press the TV<br />
component button, all of the buttons will<br />
work with your TV.<br />
Program the remaining components by<br />
repeating steps 3 through 7.<br />
IMPORTANT: If you have tried all the setup<br />
codes in the list and the component still<br />
did not turn off after Step 5, either the Auto-<br />
Search Method (page 14) or the Learning<br />
Method (page 16) will help you program.<br />
Page 13
Auto-Search Method<br />
The Auto-Search Method is a way you can<br />
scan through all of the codes in the table to<br />
find the right code for your component.<br />
STEP 1: <strong>Manual</strong>ly or using your old remote,<br />
turn on the component you want to program—for<br />
example, to program your TV,<br />
turn on your TV set.<br />
STEP 2: On the WR7, press the Component<br />
button that you want to program (in this<br />
case the button that says TV) and the<br />
SELECT [SEL] button at the same time. Hold<br />
down both buttons for two seconds until the<br />
TV Component button light turns on. This signals<br />
that you are in programming mode.<br />
IMPORTANT: You have 30 seconds to perform<br />
the next step while you are in programming<br />
mode. If you do not press a button<br />
within 30 seconds, the component LED light<br />
will turn off. The remote will exit the programming<br />
mode and you will have to start<br />
over.<br />
UP�<br />
ARROW<br />
DOWN�<br />
ARROW<br />
Page 14
STEP 3: Point the WR7 remote control<br />
toward the component and press the UP [� ]<br />
arrow (or DOWN [� ] arrow) button once.<br />
Each time the UP or DOWN arrow button is<br />
pressed, the code will count up (or down) one<br />
code number and send a Power OFF signal.<br />
When the correct code is sent out, the component<br />
will turn off.<br />
STEP 4: Once you have found the right code<br />
number and the component has turned off,<br />
press the POWER [ON] button on the WR7<br />
remote to turn the component back on.<br />
Next test the VOLUME and CHANNEL buttons<br />
(or PLAY and STOP buttons for VCR and DVD)<br />
to make sure they all work. If any of the buttons<br />
do not work properly, you need to find a new<br />
code. Continue pressing the UP (or DOWN)<br />
arrow button until you find a new code that<br />
turns off the component and makes the VOL-<br />
UME or PLAY buttons respond correctly.<br />
STEP 5: Once you have found the right<br />
code, you must save it. Press the component<br />
button you just programmed (in this case<br />
TV) one more time to save the code number.<br />
The component LED light will blink three times<br />
to confirm that the code was successfully stored.<br />
Now when you press the TV component button,<br />
all of the buttons will work with your TV.<br />
NOTE: Use this method for those components<br />
you cannot program with either the Quick Set-<br />
Up or 3-digit Code Entry Methods.<br />
IMPORTANT: If you cannot find the right<br />
code after 5 minutes of trying the Auto-Search<br />
Method, try the Learning Method (page 16).<br />
PLEASE DO NOT RETURN<br />
THIS PRODUCT TO THE STORE<br />
PLEASE CONTACT OUR TECHNICAL<br />
SUPPORT CENTER.<br />
IF YOU NEED ASSISTANCE E-MAIL<br />
techsupport@<strong>Universal</strong><strong>Remote</strong>.com<br />
or dial 1-800-901-0800<br />
(9:00AM - 6:00PM EST)<br />
Page 15
Programming WR7 using<br />
the Learning Method<br />
STEP 1: Line up the WR7 to the remote control<br />
you want to “learn” from, head--to--head as shown<br />
below. Start with both remotes’ IR windows touching<br />
(or nearly touching).<br />
STEP 2: On the WR7, press the Component<br />
button that you want to program (in this case<br />
the button that says TV) and the ENTER [ENT]<br />
button at the same time. Hold down both buttons<br />
for two seconds until the TV Component<br />
button light turns on. This signals that you are<br />
in programming mode.<br />
IMPORTANT: You have 30 seconds to perform<br />
the next step while you are in programming<br />
mode. If you do not press a button within<br />
30 seconds, the component LED light will<br />
turn off. The remote will exit the programming<br />
mode and you will have to start over.<br />
STEP 3: Press any button on the WR7 that<br />
you want to teach a command to. For example,<br />
if you want to teach the [MUTE] button on the<br />
WR7 the TV Mute command from the other<br />
remote, first press the [MUTE] button on the<br />
WR7 and the TV component button LED light<br />
will blink once indicating that the WR7 is ready<br />
to learn the command.<br />
Page 16
STEP 4: Press and hold the [MUTE] button<br />
on the other remote until the component button<br />
LED on the WR7 blinks twice. Now you<br />
can continue learning all other buttons from<br />
your old remote by pressing the next button<br />
on the WR7 and repeating this step.<br />
Note: The component LED will blink five times<br />
if there was an error in the learning process. In<br />
this case, please repeat Steps 3 and 4.<br />
STEP 5: Once the WR7 has learned all<br />
the buttons in the selected component mode,<br />
press and hold the Component button and<br />
ENTER [ENT] buttons at the same time to<br />
save the learned functions. The component<br />
LED light will blink three times to confirm the<br />
programming. Now test all the buttons to<br />
make sure they learned correctly.<br />
Repeat Steps 1-5 to program any other component<br />
modes.<br />
If the Learning Method does not<br />
work, here are a few suggestions:<br />
• If you have a Plasma TV, move to another<br />
room<br />
• Avoid programming under fluorescent light<br />
or direct sunlight<br />
• Put new batteries in the old remote<br />
• Gradually vary the distance between the two<br />
remote controls<br />
• Adjust the angles of the remotes (i.e., keep<br />
the WR7 on a flat surface while holding the<br />
other remote in hand and angling it down<br />
toward the WR7)<br />
• Tap the button on your old remote instead of<br />
pressing and holding it during the learning<br />
process<br />
Page 17
Here are some additional facts<br />
regarding the Learning process:<br />
• Learned functions override any existing preprogrammed<br />
functions on the remote control<br />
• Learned functions are automatically erased<br />
when a new function is learned on the same<br />
button<br />
• Learned functions are retained even after a<br />
different set-up code number is programmed<br />
into the remote control<br />
• To return to an original pre-programmed<br />
function, a learned function must be erased<br />
• Rapidly tapping the Volume Up button on the<br />
old remote will teach the WR7 to ramp the volume<br />
instead of raising it in increments of one<br />
Page 18
AUX Function: Programming<br />
a 7th Component<br />
After you’ve finished programming the WR7 for six<br />
primary components and you did not use AUX, you<br />
can take advantage of the AUX function to program<br />
a 7th component, such as a second TV, DVD, or<br />
any other audio/video component that you may<br />
have in your system. Simply program the [AUX] button<br />
in the same manner as any other component<br />
using either the Quick Set-Up Method, the 3-Digit<br />
Code Entry Method, the Auto-Search Method or the<br />
Learning Method.<br />
Finding a Component’s<br />
Set-up Code Number<br />
If you used the Auto--Search or Learning Methods<br />
to program a component, you may not know the<br />
code number you programmed. Here is a way for<br />
you to identify what that code number is, so you<br />
can make a note in the back of this <strong>Manual</strong> for<br />
future reference.<br />
STEP 1: Press the component button you<br />
would like to verify and the SELECT [SEL]<br />
button at the same time for two seconds until<br />
the selected component LED light turns on.<br />
IMPORTANT: You have 30 seconds to<br />
perform the next step while you are in programming<br />
mode. If you do not press a button<br />
within 30 seconds, the component LED<br />
light will turn off.<br />
The remote will exit the programming mode<br />
and you will have to start over.<br />
COMPONENT<br />
BUTTONS<br />
SELECT<br />
Page 19<br />
INFO
STEP 2: Press the [INFO] button and count<br />
the number of times the Component LED light<br />
blinks. This number indicates the first digit of<br />
the code. Next it will pause for about one second<br />
and begin blinking again to indicate the<br />
number of the second digit. Then once again<br />
it will pause, then blink, to indicate the number<br />
of the third digit.<br />
Example: One blink, pause, eight blinks,<br />
pause, three blinks indicates code number 183.<br />
Note that ten (10) blinks represent the number 0.<br />
Page 20
Programming Special<br />
Advanced Features<br />
Programming Multi-Commands to<br />
Macro Buttons<br />
The WR7 has 13 Macro buttons (ON, SYS-<br />
TEM OFF, 7 Component buttons, and 4 “My<br />
Favorites” buttons) that are designed to store<br />
up to 20 commands in each button. Pressing<br />
any one of the Macro buttons will send out<br />
the series of commands that are stored in<br />
that particular button.<br />
MacroPower Total System On/Off<br />
MacroPower makes several devices work together<br />
by pressing one button. Imagine the convenience<br />
of turning on your TV, your DVD player<br />
and your Surround Sound receiver by pressing<br />
a single button on your WR7. What could normally<br />
take three remotes and three button pushes,<br />
the WR7 can accomplish with the press of<br />
one button. We call that MacroPower. Any of<br />
the Power On or the System Off buttons can be<br />
programmed for MacroPower control. To set it<br />
up, follow these easy steps:<br />
STEP 1: To program MacroPower commands<br />
for the POWER [ON] button, press the POWER<br />
[ON] button and the [MUTE] button at the same<br />
time for two seconds until one of the component<br />
button LED lights turns on.<br />
POWER<br />
MUTE<br />
Page 21
IMPORTANT: You have 30 seconds to perform<br />
the next step while you are in programming<br />
mode. If you do not press a button within 30 seconds,<br />
the component LED light will turn off. The<br />
remote will exit the programming mode and you<br />
will have to start over.<br />
STEP 2: Press the component button you<br />
want to turn on and then the POWER [ON]<br />
button; repeat for all other components in the<br />
order you want them to turn on. The component<br />
LED lights will blink once each time you<br />
press the POWER [ON] button.<br />
POWER<br />
COMPONENT<br />
BUTTONS<br />
STEP 3: Once you’ve entered all the<br />
Power On commands, press the CHANNEL<br />
Up [CH� ] button to save your MacroPower<br />
commands. The component LED lights will<br />
blink three times to confirm that the programming<br />
has been successfully saved.<br />
SUGGESTION: Most of the components<br />
have the same signal to turn the power On and<br />
Off. You may want to program MacroPower<br />
only in the POWER [ON] button and save the<br />
[SYSTEM OFF] button to turn components On<br />
or Off individually.<br />
Note: If you want to program MacroPower<br />
for the [SYSTEM OFF] button, repeat the same<br />
steps used for POWER [ON] programming.<br />
Page 22<br />
CHANNEL<br />
UP�
Programming “My Favorites” -<br />
Favorite Channel Buttons<br />
In Cable mode, the four [MY FAVORITES]<br />
buttons are also designed to serve as dedicated<br />
Favorite Channel buttons.<br />
Each button will access one of your favorite<br />
channels with just one button press. Here’s<br />
how to program Favorite Channels:<br />
STEP 1: Press the [CABLE/SAT] button to<br />
select the Cable/SAT mode.<br />
STEP 2: Press one of the [MY FAVORITES]<br />
buttons and the [MUTE] button at the same<br />
time for two seconds until the [CABLE/SAT]<br />
component LED turns on.<br />
IMPORTANT: You have 30 seconds to perform<br />
the next step while you are in programming<br />
mode. If you do not press a button within<br />
30 seconds, the component LED light will<br />
turn off. The remote will exit the programming<br />
mode and you will have to start over.<br />
MY<br />
FAVORITES<br />
MUTE<br />
Page 23
STEP 3: Using the Number Pad, punch in<br />
the Channel number of the Favorite Channel<br />
that you want to store in the Macro button.<br />
The CABLE/SAT component LED light will<br />
blink once for each button pressed.<br />
STEP 4: Press the CHANNEL UP [CH� ]<br />
button to store the commands entered. The<br />
[CABLE/SAT] component LED will blink three<br />
times to confirm the programming.<br />
Notes regarding programming<br />
multi-commands to Macro buttons:<br />
• You can program up to 20 commands on<br />
each Macro button.<br />
• You can program delays in between commands<br />
by pressing the [PAUSE] button.<br />
Each press adds a one-half second delay.<br />
• Also, if you add the delay time as the first<br />
step of Macro commands, the remote will<br />
not send the Macro unless the button is<br />
held for two seconds. (This is the Press &<br />
Hold Function).<br />
• You can also program macro commands in<br />
“layers” by pressing the [STOP] button in<br />
between commands. (For example, if you<br />
press [009], [STOP], [035], [STOP], [365],<br />
[STOP] in Step 3 of the Favorite Channel<br />
programming process) the remote will send<br />
out 009 at the first press of the selected<br />
[My Favorites] button, and then send out<br />
035 at the second press, etc.<br />
• You cannot program the [CH� ] or<br />
[PAUSE] buttons as macro commands.<br />
Page 24<br />
CHANNEL<br />
UP�
SimpleSound Total System<br />
Volume <strong>Control</strong><br />
SimpleSound is one of the most exciting features<br />
of the WR7. It gives you total volume<br />
control over ALL the components in your system,<br />
even those that do not have built--in volume<br />
control, such as TIVO, DVD and VCR.<br />
SimpleSound saves you the hassle and inconvenience<br />
of constantly switching between<br />
component modes just to control volume.<br />
First you should identify which device in your<br />
system will be used to deliver sound. In a<br />
basic system, the sound may come from your<br />
TV speaker. In a more advanced system, the<br />
sound may come from your audio components<br />
(such as a Surround Sound Receiver or<br />
Home Theatre system).<br />
Now, let’s set--up SimpleSound. Here’s how:<br />
STEP 1: Press and hold the button that corresponds<br />
to the Component you want to add volume<br />
control to (such as a DVD or VCR) and the<br />
SELECT (SEL) button at the same time for about<br />
three seconds until the component LED light<br />
turns on.<br />
IMPORTANT: You have 30 seconds to perform<br />
the next step while you are in programming<br />
mode. If you do not press a button within<br />
30 seconds, the component LED light will turn<br />
off. The remote will exit the programming mode<br />
and you will have to start over.<br />
COMPONENT<br />
BUTTONS<br />
SELECT<br />
Page 25
STEP 2: Press the VOLUME UP [VOL�] button<br />
and then press either the TV or AUDIO component<br />
button that you want to use for volume.<br />
The Component LED light will blink three times<br />
to confirm that it is saved. This sets up three buttons<br />
(Volume Up, Volume Down and MUTE) as<br />
a group for that component.<br />
VOLUME<br />
UP�<br />
Repeat Steps 1-2 for all other components.<br />
Note: SimpleSound is what’s technically<br />
referred to as a “Punch Through” feature and is<br />
not limited to volume control. It can also be<br />
applied to other groups of buttons. If you find<br />
yourself switching to a particular component<br />
mode frequently to access a particular control,<br />
consider using Punch Through.<br />
Page 26
Channel <strong>Control</strong> “Punch Through”<br />
This “punch through” enables you to program<br />
the WR7 so that either the Cable or TV<br />
Channel <strong>Control</strong>s (CHANNEL UP, DOWN,<br />
LAST, CHANNEL NUMBERS 0-9, +10 and<br />
ENTER) will also operate in other component<br />
modes on the remote control.<br />
STEP 1: Press and hold the component button<br />
you want to add channel control to, such as<br />
[DVD] or [VCR], and the SELECT [SEL] button at<br />
the same time for two seconds until the<br />
Component LED light turns on.<br />
IMPORTANT: You have 30 seconds to perform<br />
the next step while you are in programming<br />
mode. If you do not press a button within<br />
30 seconds, the component LED light will turn<br />
off. The remote will exit the programming mode<br />
and you will have to start over.<br />
STEP 2: Press the CHANNEL UP [CH� ]<br />
button. The component LED light will blink once.<br />
SELECT<br />
STEP 3: Press either the [TV] or [CABLE/SAT]<br />
button that you want to use as the source of<br />
channel control. The component LED will blink<br />
three times to confirm it is saved.<br />
Page 27<br />
COMPONENT<br />
BUTTONS<br />
CHANNEL<br />
UP�
Transport <strong>Control</strong> “Punch Through”<br />
This “punch through” enables you to program<br />
the WR7 so that VCR or DVD Transport <strong>Control</strong>s<br />
(PLAY, STOP, FF, REW, PAUSE, SKIP and RECORD)<br />
will also operate in other component modes on the<br />
remote control.<br />
STEP 1: Press and hold the component button<br />
you want to add Transport <strong>Control</strong> to, such<br />
as [CABLE/SAT] or [TV], and the SELECT [SEL]<br />
button at the same time for two seconds until<br />
the Component LED light turns on.<br />
IMPORTANT: You have 30 seconds to perform<br />
the next step while you are in programming<br />
mode. If you do not press a button within<br />
30 seconds, the component LED light will turn<br />
off. The remote will exit the programming mode<br />
and you will have to start over.<br />
STEP 2: Press the [PLAY] button. The component<br />
LED light will blink once.<br />
STEP 3: Press either the [DVD] or [VCR]<br />
button that you want to use as the source of<br />
Transport <strong>Control</strong>. The component LED will<br />
blink three times to confirm it is saved.<br />
Page 28<br />
COMPONENT<br />
BUTTONS<br />
SELECT<br />
PLAY
OSD (On-Screen Display) <strong>Control</strong><br />
“Punch Through”<br />
This “punch through” enables you to program<br />
the WR7 so that CBL or DVD OSD <strong>Control</strong>s<br />
(MENU, GUIDE, INFO, EXIT, SEL and 4<br />
Cursor <strong>Control</strong>s) will also operate in other<br />
component modes on the remote control.<br />
STEP 1: Press and hold the component button<br />
you want to add OSD <strong>Control</strong> to, such as<br />
[TV] or [VCR], and the SELECT [SEL] button at<br />
the same time for two seconds until the<br />
Component LED light turns on.<br />
IMPORTANT: You have 30 seconds to perform<br />
the next step while you are in programming<br />
mode. If you do not press a button within<br />
30 seconds, the component LED light will<br />
turn off. The remote will exit the programming<br />
mode and you will have to start over.<br />
STEP 2: Press the [MENU] button. The<br />
component LED will blink once.<br />
MENU<br />
STEP 3: Press either the [CABLE/SAT] or<br />
[DVD] button that you want to use as the<br />
source of OSD <strong>Control</strong>. The component LED<br />
will blink three times to confirm it is saved.<br />
Page 29<br />
COMPONENT<br />
BUTTONS<br />
SELECT
Erasing Commands -<br />
Overview<br />
You can erase a single learned command, all<br />
learned commands in each component mode,<br />
SimpleSound programming, MacroPower commands,<br />
or re--set the remote to original factory<br />
default settings.<br />
Erasing a Single Learned Command from<br />
One Component<br />
STEP 1: Press the component button where<br />
the learned command is stored and the [ENTER]<br />
button at the same time for two seconds until the<br />
component LED light turns on.<br />
IMPORTANT: You have 30 seconds to perform<br />
the next step while you are in programming<br />
mode. If you do not press a button within 30 seconds,<br />
the component LED light will turn off. The<br />
remote will exit the programming mode and you<br />
will have to start over.<br />
STEP 2: Press and hold the button you<br />
want to erase for two seconds. The component<br />
LED light will blink twice to confirm the<br />
erasure.<br />
STEP 3: Repeat Step 2 to erase any other<br />
buttons in the selected component mode.<br />
STEP 4: To exit Erase mode, press and<br />
hold both the component button and the<br />
[ENTER] button at the same time until the<br />
component LED light blinks three times.<br />
Page 30<br />
COMPONENT<br />
BUTTONS<br />
ENTER
Erasing All Learned Commands from<br />
One Component<br />
This function allows you to erase all the<br />
learned commands from one component.<br />
For example, if you want to erase all<br />
learned commands on the TV component<br />
button because you bought a new TV, the<br />
process is very simple.<br />
STEP 1: Press the component button where<br />
all the learned commands are stored and the<br />
[ENTER] button at the same time for two seconds<br />
until the component LED turns on.<br />
IMPORTANT: You have 30 seconds to<br />
perform the next step while you are in programming<br />
mode. If you do not press a button<br />
within 30 seconds, the component LED<br />
light will turn off. The remote will exit the<br />
programming mode and you will have to<br />
start over.<br />
STEP 2: Press and hold both the component<br />
button you want to erase and the [PAUSE] button<br />
at the same time for two seconds, until the<br />
component LED light blinks twice to confirm<br />
the erasure.<br />
STEP 3: To exit Erase mode, press and<br />
hold both the component button and the<br />
[ENTER] button at the same time until the<br />
component LED light blinks three times.<br />
Page 31<br />
COMPONENT<br />
BUTTONS<br />
PAUSE<br />
ENTER
Erasing MacroPower & Other<br />
Macro Commands<br />
STEP 1: To erase MacroPower commands<br />
on the POWER [ON] or [SYSTEM OFF] button,<br />
press and hold either the POWER [ON]<br />
or [SYSTEM OFF] button and the [MUTE]<br />
button simultaneously for two seconds until<br />
the current status component LED turns on.<br />
IMPORTANT: If you don’t proceed to the<br />
next step within 30 seconds, the LED will<br />
turn off and exit set-up mode and you will<br />
need to start over.<br />
STEP 2: Press the CHANNEL UP [CH� ]<br />
button to erase and exit Erase mode. The<br />
component LED light will blink three times to<br />
confirm the erasure.<br />
POWER<br />
ON<br />
MUTE<br />
NOTE: To erase other Macros, simply press<br />
the appropriate button in Step 1 in combination<br />
with the [MUTE] button.<br />
Page 32<br />
SYSTEM<br />
OFF<br />
CHANNEL<br />
UP�
Erasing SimpleSound & Other<br />
“Punch Through” Commands<br />
STEP 1: Press and hold the Component<br />
button you want to erase volume control<br />
from, such as DVD or VCR and the SELECT<br />
[SEL] button at the same time for two seconds<br />
until the Component LED light turns on.<br />
STEP 2: Press the VOLUME UP [VOL � ]<br />
button and the same component button from<br />
Step 1. The component LED light will blink<br />
three times to confirm the erasure.<br />
VOLUME<br />
UP�<br />
Repeat Steps 1--2 to erase SimpleSound<br />
commands from other components.<br />
NOTE: To erase other “punch through” commands,<br />
simply press the following buttons in<br />
place of VOLUME UP in Step 2:<br />
• For Channel <strong>Control</strong>, press: CHANNEL<br />
UP [CH� ]<br />
• For Transport <strong>Control</strong>, press: PLAY [�]<br />
• For OSD <strong>Control</strong>, press: [MENU]<br />
Page 33<br />
SELECT<br />
COMPONENT<br />
BUTTONS
Factory Reset<br />
You can reset your WR7 remote to the original<br />
factory default settings.<br />
Press and hold both the [TV] and RECORD<br />
[REC] buttons for about five seconds until the<br />
[CABLE/SAT] component LED light blinks five<br />
times. All programming and set-up codes that<br />
you have entered into the remote will be erased<br />
and the WR7 will return to the original factory<br />
default settings.<br />
Warning<br />
This procedure will erase all programming<br />
and set-up codes that you have entered<br />
into the remote.<br />
TV COMPONENT<br />
BUTTON<br />
RECORD<br />
Page 34<br />
SAT/CABLE
Pre-Programmed<br />
Code Tables<br />
The WR7 Pre-Programmed code library is classified<br />
by category (Audio, CD, VCR/DVR, etc.).<br />
Within each category, the code numbers are listed<br />
in rows by brand (Sony, Panasonic, B & K,<br />
etc.). Some brands have more than one threedigit<br />
code.<br />
Circle the correct row and refer to it while you<br />
perform setup operations.<br />
AUDIO<br />
CD<br />
VCR/DVR<br />
AUX<br />
TV<br />
DVD<br />
CABLE/SAT<br />
Amps, Preamps & A/V<br />
Receivers<br />
CD Players & Changers<br />
VCRs, DVRs & Combo Units<br />
iPod, Media PC, Gaming<br />
System, Lighting <strong>Control</strong>s<br />
TVs, Plasmas, Projectors &<br />
Monitors<br />
DVD Players & Recorders<br />
Cable Set Top Boxes & Satellite<br />
Receivers<br />
Page 35<br />
36<br />
37<br />
38<br />
39<br />
40-41<br />
42<br />
43
AUDIO<br />
Brand Code Numbers Brand Code Numbers<br />
ADC 007<br />
ADCOM 082 092 225 161 269 355<br />
356<br />
AIWA 170 018 104 202 203 213<br />
211 188<br />
AKAI 189<br />
AMC 125 126 127 281 282<br />
ANGSTROM 142<br />
ANTHEM 335 337<br />
ARCAM 141 418<br />
ATLANTIC TECHNOLOGY 342<br />
AUDIO FILE 071<br />
AUDIO MATRIX 167<br />
AUDIO TECHNICA 134<br />
B & K 096 097<br />
BOSE 070 170 224 347 409 460<br />
BOSTON ACOUSTICS 447<br />
BRIX 555<br />
CARVER 006 028 061 071 201 214<br />
226 185 022 077 284<br />
CINEMA SOUND 134<br />
CITATION 148 272<br />
CLARION 026<br />
DELPHI 515<br />
DENON 109 215 230 234 330<br />
001(Default) 801<br />
DVICO 802<br />
ELAN 057 290<br />
ENLIGHTENED AUDIO 099 098<br />
ESCIENT 368 451<br />
FISHER 047 214 182 297<br />
FLEXTRONICS 378<br />
FOSGATE AUDIONICS 231 342<br />
GE 056<br />
GOLDSTAR 008<br />
HARMAN KARDON 231 233 153 154 118 318<br />
HITACHI 020<br />
INTEGRA 275 781<br />
INSIGNIA 589<br />
JAMO 398 799<br />
JCPENNEY 216<br />
JENSEN 058<br />
JVC 163 191 114 279 291<br />
KENWOOD 026 066 145 192 182 005<br />
280 374<br />
KLH 331<br />
KOSS 216<br />
KRELL 072 376 384<br />
KYOCERA 007<br />
LEXICON 120 235 236 237 357 360<br />
LINN 124 377<br />
LUXMAN 139 052 165 115 004 009<br />
LXI 056<br />
MAGNAVOX 086 164 152 208<br />
MARANTZ 006 028 031 040 063 185<br />
479 251 265 119 289<br />
MCINTOSH 238 286<br />
MERIDIAN 100 012 013<br />
MITSUBISHI 242 243 204<br />
MONDIAL 157 158 042 043 081 112<br />
MYRYAD 276 293<br />
NAD 113 283 478 479<br />
NAKAMICHI 040 244 245 172 183 287<br />
NEC 176<br />
NIRO 343<br />
NILES 403<br />
ONKYO 017 046 108 080 209 275<br />
OPTIMUS 026 041<br />
Page 36<br />
OUTLAW 342<br />
PANASONIC 032 195 219 177 292 383<br />
PARASOUND 129 130 132 261 294 295<br />
333 334<br />
PHILIPS 249 250 251 063 119 805<br />
PIONEER 014 039 044 069 168 116<br />
035 078 198 480<br />
POLKAUDIO 515<br />
PROCEED 144 268<br />
RCA 010 048 117 156 067 288<br />
REALISTIC 019 056 073 075 095<br />
ROTEL 074 083 085<br />
RUSSOUND 379 391 392<br />
SAMSUNG 016 804<br />
SANSUI 040 048 110 119 065 228<br />
SANYO 047<br />
SCOTT 019 091<br />
SHARP 026 094 026 175<br />
SHERWOOD 024 102 106 447<br />
SIRIUS 555<br />
SONY 018 247 248 166 101 184<br />
218 271 369 372 380 800<br />
SOUNDESIGN 036<br />
SSI 068<br />
SUNFIRE 344 345 346<br />
TEAC 005 019 049 040 212 217<br />
TECHNICS 122 176 193 219 178 177<br />
200 257 262<br />
THETA DIGITAL 136<br />
TOSHIBA 060 087 198 278<br />
XM SATELLITE RADIO 515<br />
YAMAHA 026 253 169 067 173 264<br />
232 089 264 274 285 373<br />
803<br />
ZENITH 143 210<br />
SATELLITE Radios<br />
BRIX 555<br />
DELPHI 515<br />
POLKAUDIO 515<br />
SIRIUS 555<br />
SONY 380<br />
XM SATELLITE RADIO 515
Brand Code Numbers<br />
CD<br />
Brand Code Numbers<br />
ADCOM 062 042<br />
AIWA 089 170 187<br />
AKAI 202<br />
AMC 231 232<br />
ARCAM 238<br />
AUDIO ACCESS 119 147<br />
AUDIO EASE 165<br />
AUDIO TECHNICA 046<br />
CALIFORNIA AUDIO 147 008<br />
CARVER 185 041 050 107 130 134<br />
135 138 139 203 204 167<br />
CREEK 159<br />
DENON 002 123<br />
EMERSON 042<br />
FISHER 050 185 134 008<br />
GENEXXA 010<br />
HARMAN KARDON 033 047 208<br />
HITACHI 042 175<br />
INKEL 130<br />
JCPENNEY 141<br />
JENSEN 158<br />
JVC 004 022 136 163 213 214<br />
242 243<br />
KENWOOD 185 007 023 055 071 072<br />
142 137 254<br />
KRELL 241 255<br />
KYOCERA 005<br />
LUXMAN 011 028 070 249 252<br />
MAGNAVOX 107<br />
MARANTZ 041 051 077 107 209 246<br />
MCINTOSH 212 247<br />
MEMOREX 010<br />
MISSION 107<br />
MITSUBISHI 179<br />
MONDIAL 147<br />
MYRYAD 244 155<br />
NAD 005 178<br />
NAKAMICHI 217 218<br />
NEC 062<br />
NIKKO 046<br />
NSM 107<br />
ONKYO 030 038 039 168 169<br />
OPTIMUS 010 050 081<br />
PANASONIC 147 172 008 068 248<br />
PARASOUND 233 240<br />
PHILIPS 041 107 246<br />
PIONEER 010 020 174 175 176<br />
PROCEED 239<br />
PROTON 107<br />
QUASAR 147 008<br />
RCA 017 042 150<br />
REALISTIC 042 050 051 187<br />
ROTEL 107 161 178 250<br />
SAE 107<br />
SANSUI 107 128 171 190 125<br />
SANYO 050<br />
SHARP 026 031 051<br />
SHERWOOD 051 096 112 115 119 166<br />
SIGNATURE 033<br />
SONY 048 081 097 126 133 177<br />
001(Default) 226 164<br />
SOUNDESIGN 251<br />
SUMO 155<br />
SYLVANIA 107<br />
SYMPHONIC 052<br />
TANDY 010<br />
TEAC 051 052 233 079<br />
TECHNICS 147 172 184 008 068<br />
Page 37<br />
THETA DIGITAL 234 235<br />
VICTOR 004 022<br />
WARDS 185 033<br />
YAMAHA 024 046 054 186 183 245
VCR/DVR<br />
Brand Code Numbers Brand Code Numbers<br />
VCRs<br />
AIWA 034<br />
AKAI 043<br />
AMPRO 072<br />
ANAM 145<br />
AUDIO DYNAMICS 012 043<br />
BROKSONIC 129<br />
CANON 145<br />
CRAIG 003 135<br />
CURTIS MATHES 145<br />
DAEWOO 010 112<br />
DBX 012 043<br />
DYNATECH 034 053<br />
ELECTROHOME 059<br />
EMERSON 006 145 034 101 129 131<br />
153<br />
FISHER 003 010 008<br />
FUNAI 034<br />
GE 145 072 147 144<br />
GOLDSTAR 101 013 012 123<br />
HARMAN KARDON 012<br />
HITACHI 004 034 043 013<br />
INSTANTREPLAY 145<br />
JCL 145<br />
JCPENNEY 012 013 101<br />
JENSEN 043<br />
JVC 048 043 012 145<br />
KENWOOD 048 034<br />
LG 101 013 012 123<br />
LLOYD 034<br />
LXI 034 003<br />
MAGNAVOX 067 145 034<br />
MARANTZ 067 012 145<br />
MARTA 101<br />
MEI 145<br />
MEMOREX 101 003 010 145 034 053<br />
072 102<br />
MGA 059<br />
MINOLTA 013<br />
MITSUBISHI 059 013<br />
MTC 034<br />
MULTITECH 034<br />
NEC 012 043 048<br />
NORDMENDE 043<br />
OPTONICA 053<br />
PANASONIC 070 145 167<br />
PENTAX 013 145<br />
PHILCO 145 034 067<br />
PHILIPS 145 067 034 101<br />
PILOT 101<br />
PIONEER 013 048<br />
PULSAR 072<br />
QUASAR 145<br />
RADIO SHACK 123<br />
RCA 144 147 145 013 034<br />
REALISTIC 003 008 010 145 034 053<br />
101<br />
RICO 058<br />
SAMSUNG 102 112<br />
SANSUI 043 048 135<br />
SANYO 003 010 102<br />
SCOTT 112 129 131<br />
SEARS 003 008 010 013 101 112<br />
SHARP 149 145<br />
SIGNATURE 034<br />
SONY 057 058 003 145 149 154<br />
SOUNDESIGN 034<br />
STS 013<br />
SYLVANIA 145 034 059 067<br />
Page 38<br />
SYMPHONIC 034<br />
TANDY 010 034<br />
TATUNG 043<br />
TEAC 034 043<br />
TECHNICS 145 070<br />
TEKNIKA 145 034 101<br />
THOMAS 034<br />
TMK 006<br />
TOSHIBA 112 131 008 059 013<br />
TOTEVISION 101<br />
VECTOR RESEARCH 012<br />
VICTOR 048<br />
VIDEO CONCEPTS 012 034<br />
WARDS 003 013 145 034 053 131<br />
YAMAHA 012 034 043<br />
ZENITH 072 048 101 034 058<br />
TV/VCR Combos<br />
EMERSON 153<br />
FUNAI 034<br />
GOLDSTAR 101 123<br />
HITACHI 034<br />
JCPENNEY 101<br />
LG 101 123<br />
LLOYD 034<br />
MAGNAVOX 034 067<br />
MEMOREX 101<br />
PANASONIC 070 167<br />
PHILIPS 034 067<br />
RADIO SHACK 123<br />
RCA 034<br />
SEARS 101<br />
SONY 057 154<br />
SYLVANIA 067<br />
SYMPHONIC 034<br />
THOMAS 034<br />
ZENITH 034<br />
PVR, TIVO<br />
HUGHES 001(Default)<br />
HUMAX 001<br />
PHILIPS 001<br />
REPLAY NETWORKS 775<br />
SONY 804 805<br />
TIVO 001<br />
TOSHIBA 001
AUX<br />
Brand Code Numbers<br />
PC & iPod <strong>Control</strong>s<br />
APPLE 401 412 476<br />
BOSE 409<br />
DLO 418<br />
GRIFFIN 471<br />
IPORT 419<br />
KENSINGTON 406<br />
SONACE 419<br />
TEN TECHNOLOGY 401<br />
MEDIA PC <strong>Control</strong>s<br />
DELL 001 262<br />
GATEWAY 001 262<br />
HAUPPAUGE 294 295<br />
HP 001(Default) 262<br />
KEYSPAN 297<br />
SONY 001 262<br />
TOSHIBA 001 262<br />
WINBOOK 001 262<br />
GAMING SYSTEM <strong>Control</strong>s<br />
MICROSOFT / XBOX 408 107<br />
SONY / PS2 414<br />
SONY / PS3 598<br />
AUDIO AUTHORITY / PS3 622<br />
LIGHTING <strong>Control</strong>s<br />
LITE-TOUCH 208 257<br />
LUTRON 158 159 077<br />
X-10 183 093<br />
D2A<br />
ARTEC 586<br />
CASTI 587<br />
CRAIG 588<br />
DIGITAL STREAM 609<br />
GRIDLINK 592<br />
INET ACCESS 589<br />
INSIGNIA 567<br />
LASONIC 592<br />
MAGNAVOX 584<br />
RCA 585<br />
SANSONIC 592<br />
TIVAX 589 590<br />
ZENITH 567<br />
ZENTECH 610<br />
ZINWELL 591 593<br />
Page 39
Brand Code Numbers<br />
TV<br />
Brand Code Numbers<br />
ABEX 025<br />
ADMIRAL 072 251 333 160<br />
ADVENT 247<br />
ADVENTURA 002<br />
AKAI 197 146 248 473 474 475<br />
405<br />
A MARK 112 143<br />
AMPRO 167 073<br />
AMSTRAD 052<br />
ANAM 043 054 056 080 112<br />
AOC 197 363 112 058<br />
APEX DIGITAL 006 591<br />
AQUAVISION 573 574<br />
ASTAR 477<br />
AUDIOVOX 076<br />
BELCOR 116<br />
BELL&HOWELL 333 072<br />
BROKSONIC 238<br />
BROCKWOOD 116<br />
CAIRN 201<br />
CANDLE 197 002 003 363<br />
CAPEHART 058<br />
CELEBRITY 001<br />
CENTURION 197<br />
CETRONIC 043<br />
CITIZEN 197 002 003 363 043 258<br />
103 143<br />
CLASSIC 043<br />
CLP CLASSIC 333<br />
COLORTYME 116 197<br />
CONCIERGE 073<br />
CONCERTO 363<br />
CONTEC 043 050 051<br />
CORNEA 116<br />
CORONADO 143<br />
CRAIG 043 054<br />
CROWN 043 143<br />
CURTIS MATHES 197 258 363 143<br />
CXC 043<br />
DAEWOO 363 043 076 103 127 143<br />
DAYTRON 363 143<br />
DELL 319 320<br />
DIGITAL PROJECTION 570<br />
DIMENSIA 333<br />
DREAMVISION 235<br />
DUKANE 011 025<br />
DUMONT 116 073<br />
DURABRAND 096<br />
DWIN 177 257<br />
DYNASTY 043<br />
DYNATECH 062<br />
DYNEX 399<br />
EIKI 187<br />
ELECTROBAND 001<br />
ELECTROGRAPH 470<br />
ELECTROHOME 143 024 076 196<br />
ELEKTRA 072<br />
ELEMENT 363 494<br />
EMERSON 028 048 043 155 005 197<br />
363 047 050 051 076 096<br />
143 151 153 154<br />
ENVISION 116 197<br />
ESA 323<br />
FISHER 007 057<br />
FUJITSU 198 246 346<br />
FUNAI 028 043 052<br />
FUTURETECH 043<br />
GATEWAY 242 268<br />
Page 40<br />
GE 160 144 165 073 197 008<br />
009 034 056 074 130 155<br />
333 363<br />
GEM 391<br />
GIBRALTAR 116 073<br />
GOLDSTAR 113 116 102 363 106 112<br />
127 143<br />
HALL MARK 363<br />
HAIER 164 363<br />
HANNSPREE 381<br />
HISENSE 419 442<br />
HITACHI 011 166 363 009 010 012<br />
023 075 143 158 072 250<br />
587<br />
HP 316 327 378<br />
HUMAX 518<br />
ILO 472 399<br />
INFINITY 164<br />
INFOCUS 330 333 547 548 532<br />
INTEQ 073<br />
INSIGNIA 350 354 457 399 164 454<br />
JANEIL 002<br />
JBL 164<br />
JCB 001<br />
JCPENNEY 363 024 197 008 009 030<br />
065 258 143 160<br />
JENSEN 013<br />
JVC 038 034 001 083 199 210<br />
240 406 581<br />
KAWASHO 116 001 197<br />
KEC 043<br />
KENWOOD 197 001<br />
KLEGG 470<br />
KLOSS 002 059<br />
KMC 143<br />
KONKA 457<br />
KREISEN 530<br />
KTV 043 197 143 154<br />
KURAZAI 072<br />
LG 113 116 102 106 112 127<br />
143 284 363 569 576<br />
LODGENET 072<br />
LOEWE 164<br />
LOGIK 072<br />
LUXMAN 363<br />
LXI 166 007 138 052 251 160<br />
164<br />
MAGNAVOX 164 059 197 003 060 061<br />
363 063 064 127 022 160<br />
094 226 467<br />
MAJESTIC 333 072<br />
MARANTZ 197 164<br />
MATSUI 164<br />
MAXENT 242<br />
MEGATRON 116 197 011<br />
MEMOREX 007 072 363<br />
MGA 197 363 024 028 042<br />
MIDLAND 333 073<br />
MINUTZ 008<br />
MITSUBISHI 109 124 024 363 028 040<br />
042 146 348 450<br />
MONTGOMERY WARD 333 072<br />
MTC 197 363 062 258<br />
NAD 138 025<br />
NEC 130 134 197 040 024 056<br />
019 237 262 272 575 577<br />
NET TV 202<br />
NIKEI 043
Brand Code Numbers<br />
TV<br />
Brand Code Numbers<br />
NIKKO 116 197<br />
NIKO 527<br />
NORCENT 390<br />
NUVISION 351 567<br />
OLEVIA 432 363<br />
ONKING 043<br />
ONWA 043<br />
OPTIMUS 025<br />
OPTONICA 019 251<br />
OPTOMA 265 270 249<br />
ORION 096<br />
PANASONIC 034 056 080 164 208 524<br />
583<br />
PHILCO 197 003 059 060 064 164<br />
363 024 056 063<br />
PHILIPS 164 005 093 038 197 003<br />
363 059 127 206 333 431<br />
594<br />
PILOT 116<br />
PIONEER 135 025 197 018 023 116<br />
234 272 374 393<br />
POLAROID 323 328 353 354 356 457<br />
494 505<br />
PORTLAND 363 143<br />
PROSCAN 144 160 333 165 167<br />
PROTON 363 112 058 143 171 172<br />
193<br />
PROTRON 498 499 392 398<br />
PROVIEW 494<br />
PROX 572<br />
PULSAR 116 073<br />
QUASAR 034 056<br />
RADIO SHACK 019 363 143 043 127<br />
RCA 160 165 065 144 197 363<br />
024 056 152 023 074 333<br />
588<br />
REALISTIC 007 019 043 047<br />
REVOLUTION HD 470<br />
RUNCO 072 169 178 179 180 181<br />
182 073 342 416 395<br />
SAMPO 197 058 363 202<br />
SAMSUNG 050 089 105 363 127 143<br />
160 228 229 258 578<br />
SAMSUX 197<br />
SANSUI 096 399<br />
SANYO 166 007 020 053 057 082<br />
187<br />
SCEPTRE 276<br />
SCOTCH 116 197<br />
SCOTT 028 043 363 048 143 497<br />
SEARS 138 030 363 007 028 057<br />
143 094 160 082 165 166<br />
SELECO 189 200 205 011<br />
SHARP 019 014 028 029 363 022<br />
143 175 251 308 496<br />
SHOGUN 116<br />
SIGNATURE 072<br />
SIMPSON 003<br />
SONY 001(Default) 147 185 085<br />
213 277 279<br />
SOUNDESIGN 028 363 003 043<br />
SOYO 528<br />
SPECTRICON 112<br />
SPECTRONIQ 499<br />
SSS 363 043<br />
SUPRA 116<br />
SUPRE MACY 002<br />
SUPREME 001<br />
Page 41<br />
SVA 328<br />
SYLVANIA 197 003 052 059 060 063<br />
064 164 160 127 593<br />
SYNTAX OLEVIA 333 144 160 376 432 363<br />
TANDY 251<br />
TATUNG 056 062<br />
TECHNICS 034 080<br />
TECHWOOD 363<br />
TEKNIKA 002 003 363 024 028 043<br />
072 258 143<br />
TELEFUNKEN 037 046<br />
TELERENT 072<br />
TERA 172<br />
TMK 363<br />
TOSHIBA 138 030 007 040 062 258<br />
325<br />
TOTEVISION 143<br />
TRUTECH 529<br />
UNIVERSAL 008 009<br />
VICTOR 038<br />
VIDEO CONCEPTS 146<br />
VIDIKRON 174 164 188 192 342<br />
VIDTECH 363<br />
VIEWSONIC 242 433<br />
VIKING 002<br />
VIORE 472 592<br />
VISCO 494<br />
VITO 363<br />
VIZIO 391 603<br />
WARDS 363 008 009 019 028 060<br />
061 063 064 072 074 143<br />
164 034<br />
WESTINGHOUSE 076 276 001<br />
YAMAHA 197 363 370 372 408<br />
YORK 363<br />
YUPITERU 043<br />
ZENITH 073 072 095 103 284<br />
ZONDA 112
Brand Code Numbers Brand Code Numbers<br />
AIWA 146<br />
AKAI 281<br />
ALPINE 098<br />
APEX DIGITAL 087 282 115<br />
BROKSONIC 130<br />
CINEVISION 091<br />
COBY 260<br />
CYBERHOME 271<br />
DENON 138 080 173<br />
DURABRAND 091<br />
DVD 2000 017<br />
EMERSON 091 143<br />
ESA 143<br />
FISHER 147<br />
FUNAI 143<br />
GE 027<br />
GO VIDEO 137 091 220 221 265<br />
GOLDSTAR 091<br />
HARMAN KARDON 084 140<br />
HITACHI 101<br />
ILO 268<br />
INITIAL 282<br />
INSIGNIA 143<br />
INTEGRA 142 338<br />
JBL 084<br />
JVC 012<br />
KENWOOD 151<br />
KISS 279<br />
KLH 135<br />
KRELL 104<br />
LEXICON 148<br />
LG 091 057<br />
LITEON 264 265<br />
MAGNAVOX 001 096 143 282<br />
MALATA 267<br />
MARANTZ 083 095<br />
MERIDIAN 153<br />
MICROSOFT 027<br />
MINTEK 282<br />
MITSUBISHI 017<br />
MYRYAD 102 134<br />
NAD 088<br />
NAKAMICHI 103<br />
ONKYO 076 141 142 338<br />
OPPO 266 341<br />
OPTIMUS 107<br />
ORION 130<br />
PANASONIC 042 138 144 150 285<br />
PHILIPS 001(Default) 083 095 166<br />
344<br />
PHILIPS-MAGNOVOX 141 001<br />
PIONEER 023 092 099 107 108 131<br />
304<br />
POLAROID 233<br />
POLK AUDIO 141 001<br />
PROSCAN 027<br />
RCA 027<br />
RJTECH 269<br />
SAMSUNG 056 165 170 137 159 275<br />
SANSUI 130<br />
SANYO 147<br />
SEARS 130<br />
Sensory Science 265<br />
SHARP 094<br />
SONY 033 118 145 126 191 286<br />
242 243 343<br />
SUPERSCAN 143<br />
SV2000 143<br />
DVD<br />
Page 42<br />
SYLVANIA 143<br />
SYMPHONIC 143<br />
TATUNG 102<br />
TEAC 107<br />
TECHNICS 042<br />
TECHWOOD 088<br />
THOMPSON 027<br />
TOSHIBA 130 141 164 188 273<br />
VENTURER 149<br />
X-BOX 027<br />
YAMAHA 042 089 166 138 197 334<br />
ZENITH 057 091<br />
BLU-RAY & HD DVDs<br />
LG 091<br />
PANASONIC 285<br />
PIONEER 304<br />
SAMSUNG 275<br />
SONY 286<br />
TOSHIBA 273<br />
DVD Recorders<br />
CYBERHOME 271<br />
GO VIDEO 220 221 265<br />
ILO 268<br />
KISS 279<br />
LITEON 265<br />
PANASONIC 138<br />
SENSORY SCIENCE 265<br />
SONY 191<br />
TOSHIBA 188<br />
TV/DVD Combos<br />
AIWA 146<br />
AKAI 281<br />
DURABRAND 143<br />
ESA 143<br />
FUNAI 143<br />
INSIGNIA 143<br />
MAGNAVOX 282<br />
MINTEK 282<br />
SAMSUNG 165<br />
SV2000 143<br />
SYLVANIA 143<br />
SYMPHONIC 143<br />
TOSHIBA 130<br />
TV/DVD/VCR Combos<br />
EMERSON 143<br />
INSIGNIA 143<br />
MAGNAVOX 143<br />
PANASONIC 144<br />
SUPERSCAN 143<br />
SYLVANIA 143<br />
TOSHIBA 164<br />
DVD/VCR Combos<br />
GO VIDEO 137<br />
PANASONIC 150<br />
PHILIPS 001<br />
(VCR Functions for VCR 067)<br />
SAMSUNG 137 159<br />
SANSUI 130<br />
SONY 145 191<br />
TOSHIBA 141<br />
ZENITH 091<br />
(VCR Functions for VCR101)
Brand Code Numbers Brand Code Numbers<br />
CABLE BOXES<br />
ABC 004 042 053<br />
ADB 315 254 255 259<br />
ADELPHIA 001 074<br />
ADVANCED NEWHOUSE 001<br />
ALTRIO 001<br />
AMERICAST 099<br />
AMINO 256 257 260 261<br />
ARMSTONG 074<br />
AT&T BROADBAND 074 035<br />
ATLANTIC BROADBAND 001 074<br />
BELL SOUTH 099<br />
BLUE RIDGE 001 074<br />
BRESNAN 074<br />
BRIGHT HOUSE 001 110<br />
BUCKEYE COMM 074<br />
CABLEVISION 001 074 108<br />
CHARTER 001 074<br />
CISCO 001 041 042 045 313 035<br />
356<br />
COGECO 074<br />
COMCAST 001 074 110 313<br />
COMSAT 074<br />
COX DIGITAL 001 074<br />
DIGEO 111<br />
EAGLE 020 030<br />
EASTERN 057<br />
ENTONE 316 258<br />
GEMINI 008<br />
GENERAL INSTRUMENT 074 104<br />
GNC 099<br />
GOLDEN CHANNEL 030<br />
HAMLIN 049 055<br />
HITACHI 055<br />
INSIGHT 074<br />
JERROLD 074 004 002 008 009 010<br />
069<br />
MAGNAVOX 010 012<br />
MASSILLON 074<br />
MEDIACOM 074<br />
MOTOROLA 074 110 148 111 112 036<br />
MOXI 111 252 086<br />
MYRIO 254 255<br />
NCTC 074<br />
NOW TV 314<br />
NSC 015 038<br />
OAK 031 053<br />
PACE 001 074 110 313<br />
PANASONIC 044 047<br />
PHILIPS 006 012 013 020 085<br />
PIONEER 001(Default) 034 051 063<br />
105<br />
QUEST 112<br />
RCA 047<br />
RCN 074<br />
REGAL 049<br />
REGENCY 057<br />
RODGERS 001<br />
SAMSUNG 030<br />
SCIENTIFIC ATLANTA 001 041 042 045 035<br />
SEREN 001<br />
SERVICE ELECTRIC 074<br />
SHAW 074<br />
SIGECOM 001<br />
SONY 108<br />
SPRUCER 047<br />
STARCOM 002 004 008 009<br />
STARGATE 008 030 104<br />
CABLE/SAT<br />
Page 43<br />
SUSQUEHANNA 001 074<br />
TELNET 154<br />
TIME WARNER 001 074<br />
TOCOM 056<br />
UNITED CABLE 004 053<br />
VERIZON 110<br />
VIDEOTRON 001<br />
VIEWSTAR 012 015<br />
WEGENER 250<br />
WIDE OPEN WEST 001 099<br />
ZENITH 093 100<br />
SATELLITE RECEIVERS<br />
CABLEVISION 148<br />
DIRECTV 173<br />
DISH NETWORK 122<br />
ECHOSTAR 122<br />
EXPRESSVU 122<br />
GENERAL ELECTRIC 116 150<br />
GENERAL INSTRUMENT 148<br />
GOI 122<br />
HITACHI 139 140<br />
HTS 122<br />
HUGHES 114<br />
JVC 122<br />
LG 170<br />
MITSUBISHI 114<br />
MOTOROLA 148<br />
NEXT LEVEL 148<br />
NFUSION 192<br />
PANASONIC 142 160<br />
PHILIPS 152 153 156 114<br />
PROSCAN 116 150<br />
RADIOSHACK 148<br />
RCA 116 150<br />
SAMSUNG 155 163 169 175<br />
SKY 164<br />
SONY 115<br />
STAR CHOICE 148<br />
TOSHIBA 127 114 158<br />
VOOM 148
Frequently Asked<br />
Questions<br />
If the batteries run out, will I<br />
lose my settings?<br />
No. The WR7 stores all of your settings in nonvolatile<br />
FLASH memory. You could remove the<br />
batteries for months, replace them at your convenience,<br />
and the WR7 would still remember<br />
your settings.<br />
What is MacroPower?<br />
MacroPower is a very useful way to make a lot<br />
of things happen with one button push. For<br />
example, in most home theaters, to watch television,<br />
the user must turn on the TV, then turn on<br />
the Cable Box or the Satellite Receiver, then turn<br />
on the Surround Sound system for sound.<br />
Instead of pressing all of those buttons one at a<br />
time, MacroPower enables you to turn on all of<br />
these components, in the sequence you want,<br />
with one button push. For more information on<br />
why and how you should program MacroPower<br />
commands, refer to page 21 in this <strong>Manual</strong>.<br />
What if my remote control no<br />
longer works from a distance?<br />
Replace the batteries with new Alkaline batteries.<br />
Who can I contact for more<br />
answers?<br />
The <strong>Universal</strong> <strong>Remote</strong> <strong>Control</strong> technical support<br />
and customer service staff are ready to answer<br />
any questions you might have.<br />
E-Mail us at techsupport@universalremote.com<br />
Visit our website www.universalremote.com<br />
Call us at (914) 835-4484<br />
Monday - Friday, 9AM to 6PM (EST)<br />
Page 44
USA Limited<br />
Warranty<br />
UNIVERSAL REMOTE CONTROL, INC. warrants<br />
this product against defects in material or<br />
workmanship for a period of one (1) year and<br />
as set forth below. <strong>Universal</strong> <strong>Remote</strong> <strong>Control</strong><br />
will, at its sole option, repair the product using<br />
new or comparable rebuilt parts, or exchange<br />
the product for a comparable new or rebuilt<br />
product.<br />
This warranty not does apply to<br />
the following:<br />
• Units purchased from unauthorized resellers.<br />
• Units purchased second-hand (used).<br />
• Units installed or deployed for rental or commercial<br />
use.<br />
• Damage caused by misuse, neglect, or acts of<br />
nature.<br />
• Products that have been modified or incorporated<br />
into other products.<br />
• Products purchased more than 12 months ago.<br />
Specifications<br />
Learning Capability<br />
................................80 buttons for any component<br />
Macro Capability<br />
..........................13 Macros of up to 20 steps each<br />
Non-Volatile Flash Memory<br />
...............................................................64 KByte<br />
IR Range (Line of Sight via Infrared)<br />
....................30--50 feet, depending on operational<br />
environmental conditions<br />
Weight .............................6.9 oz. (with batteries)<br />
Size ...................2 1/8”W x 8 3/4”H x 1 1/8”D<br />
Batteries......Two AA Alkaline batteries (included)<br />
Page 45
MEMO<br />
Page 46
MEMO<br />
Page 47
MEMO<br />
Page 48
MEMO<br />
Page 49
MEMO<br />
Page 50
MEMO<br />
Page 51
500 Mamaroneck Avenue, Harrison, NY 10528<br />
Phone: (914) 835-4484 Fax: (914) 835-4532<br />
www.universalremote.com<br />
OCE-0085A Rev 02<br />
The Pioneer in <strong>Control</strong> Technology