NB-FT5 Nashbar Fluid Trainer
NB-FT5 Nashbar Fluid Trainer
NB-FT5 Nashbar Fluid Trainer

You also want an ePaper? Increase the reach of your titles
YUMPU automatically turns print PDFs into web optimized ePapers that Google loves.
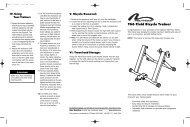
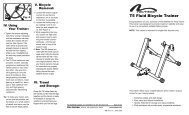
IV. Using<br />
Your <strong>Trainer</strong>:<br />
V. Bicycle<br />
Removal:<br />
1. Tighten the tension adjusting<br />
bolt (H) by turning it clockwise<br />
until the resistance unit roller<br />
makes firm contact with the<br />
rear tire. The roller needs to<br />
provide only enough pressure<br />
to prevent the rear tire from<br />
slipping while in use.<br />
Overtightening the bolt may<br />
cause premature tire wear. If<br />
the rear tire slips during use,<br />
tighten the adjusting bolt by<br />
additional 1/4 turns as necessary<br />
to reduce slippage.<br />
2. The fluid resistance unit provides<br />
smooth, naturally progressive<br />
resistance that<br />
varies based on wheel<br />
speed. Use your bicycle’s<br />
gearing to vary the level of<br />
resistance. Mid-range gearing<br />
simulates level road conditions,<br />
lower gearing is useful<br />
for warm-ups or high<br />
cadence training, and high<br />
gearing approximates hillclimbing<br />
conditions.<br />
1. Loosen the tension adjusting<br />
bolt (H) so that the<br />
resistance unit is as close<br />
to the floor as possible.<br />
2. Loosen the locking ring (J)<br />
by sliding it all the way to<br />
the right until it contacts<br />
the handle. See Figure 2.<br />
3. While supporting the bicycle,<br />
loosen the right side<br />
axle support cup by spinning<br />
the handle counterclockwise,<br />
until the rear<br />
wheel axle is free of the<br />
support cups.<br />
4. Note: The QR skewer provided<br />
with the trainer can be<br />
used when riding the bicycle<br />
off the trainer as well. If you<br />
choose to reinstall your bicycle’s<br />
original skewer, refer to<br />
your bicycle owner’s manual<br />
for instructions on properly<br />
adjusting the skewer. Before<br />
riding, ensure the quick<br />
release skewer is tight.<br />
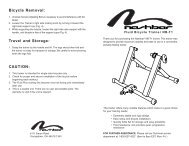
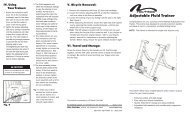
<strong>Fluid</strong> <strong>Trainer</strong><br />
Congratulations on your purchase of the <strong>Nashbar</strong> <strong>Fluid</strong> <strong>Trainer</strong>.<br />
This trainer was designed to provide maximum stability and ease<br />
of use in a convenient, portable folding trainer.<br />
NOTE: This trainer is intended for single-rider bicycles only.<br />
Tip: To make your indoor workout<br />
as quiet as possible, set<br />
the trainer on a small section<br />
of carpet, and use a rear tire<br />
with a smooth tread pattern.<br />
VI. Travel<br />
and Storage:<br />
Grasp the trainer frame by the<br />
handle and lift. Fold the legs<br />
together and the trainer is ready<br />
for transport or storage. Be<br />
careful to avoid pinching your<br />
fingers when you fold the legs.<br />
This product is protected by US Patent 5,792,030<br />
For technical support, call 1-800-888-2710, M-F 9am-6pm EST Made in China<br />
Bike <strong>Nashbar</strong>, 6103 Rt. 446, Canfield,OH. 44406<br />
www.nashbar.com<br />
This trainer offers many notable features which make it a good<br />
choice for your training needs:<br />
• Extremely stable and rigid design.<br />
• Easy setup and bicycle installation.<br />
• Quickly folds flat for storage and easy portability.<br />
• <strong>Fluid</strong> resistance unit provides quiet, progressive resistance.<br />
<strong>NB</strong>-<strong>FT5</strong> / <strong>NB</strong>-<strong>FT5</strong>H, V.1 – April 2005
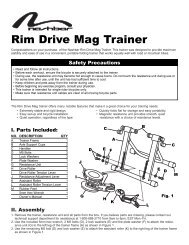
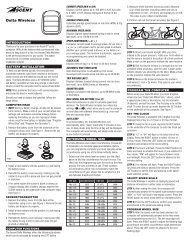
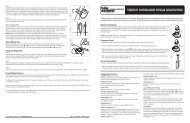
I. Parts Included:<br />
II. Assembly:<br />
Safety Precautions<br />
• Read and follow all instructions.<br />
• Before each workout, ensure bicycle is securely<br />
attached to trainer.<br />
• During use, resistance unit may become hot enough to<br />
cause burns. Do not touch resistance unit during use or<br />
for some time after use, until the unit has had sufficient<br />
time to cool.<br />
• Keep children and pets away from trainer during use.<br />
• Before beginning any exercise program, consult your physician.<br />
• This trainer is intended for single rider bicycles only.<br />
NO. DESCRIPTION QTY<br />
A <strong>Trainer</strong> Frame 1<br />
B Handle 1<br />
C M5 Bolts and Washers 2 each<br />
D Plastic Feet 4<br />
E <strong>Fluid</strong> Resistance Unit 1<br />
F Mounting Plate 1<br />
E<br />
H<br />
▲! CAUTION<br />
NO. DESCRIPTION QTY<br />
G Pivot Bolt, Washer, Nut 1 each<br />
H Tension Adjusting Bolt 1<br />
I Axle Support Cups 2<br />
J Locking Ring 1<br />
K Quick Release Skewer<br />
(not shown) 1<br />
1. Remove the trainer from the box and identify all parts. If you<br />
believe parts are missing, please contact our technical service<br />
department for assistance at 1-800-888-2710.<br />
I<br />
A<br />
D<br />
B<br />
G<br />
C<br />
H<br />
G<br />
I<br />
Fig. 3<br />
I<br />
F<br />
I<br />
E<br />
Fig. 1<br />
J<br />
B<br />
Fig. 2<br />
B<br />
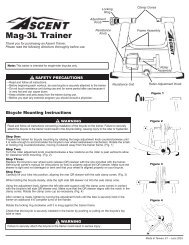
III. Bicycle Installation:<br />
▲! WARNING<br />
Read and follow all instructions concerning installation of<br />
bicycle on trainer. Failure to securely attach bicycle to trainer<br />
may allow bicycle to fall, resulting in injury to the rider or<br />
bystanders.<br />
1. Set the trainer on a flat, stable<br />
surface.<br />
2. NOTE: Replace the bicycle’s<br />
rear wheel quick<br />
release (QR) skewer with<br />
the one provided with the<br />
trainer. See bicycle<br />
owner’s manual for<br />
instructions on how to<br />
properly adjust the QR<br />
skewer. Make sure the<br />
QR skewer is tight and not<br />
damaged or bent.<br />
3. Loosen the locking ring (J)<br />
by sliding it all the way to<br />
the right until it contacts the<br />
handle. See Figure 2.<br />
4. Spin the handle (B) counterclockwise<br />
to fully loosen the<br />
right side axle support cup.<br />
5. Loosen the tension adjusting<br />
bolt (H) by turning it counterclockwise<br />
so that the resistance<br />
unit is as close to the<br />
floor as possible (to allow<br />
clearance for the rear wheel).<br />
6. Lift the bicycle into position,<br />
so that the rear QR skewer<br />
is aligned with the right and<br />
left axle support cups (I).<br />
See Figure 3.<br />
7. Fit the QR skewer lever on<br />
the left side of the wheel into<br />
the left axle support cup.<br />
Rotate the support cup as<br />
necessary, until the notch in<br />
the cup is aligned with the<br />
QR skewer lever.<br />
8. Tighten the right side axle support<br />
cup against the QR<br />
skewer nut on the right side of<br />
the wheel by spinning the<br />
handle clockwise until it contacts<br />
the QR skewer nut.<br />
Once contact is made, tighten<br />
the handle an additional 1/4<br />
to 3/4 rotation or so.<br />
9. Tighten the locking ring by sliding<br />
it all the way to the left<br />
(toward the bike). See Figure 2.<br />
10. Check that the bicycle is<br />
securely installed in the trainer<br />
by pushing or pulling on<br />
the bicycle’s top tube or seat.<br />
11. If the bicycle is not secure,<br />
check to see that the quick<br />
release skewer lever and nut<br />
are properly positioned in the<br />
axle support cups, and that<br />
the right side axle support<br />
cup is securley tightened.<br />
▲! WARNING<br />
Failure to securely attach bicycle to trainer could result in<br />
serious injury.