NS-CTF Nashbar Steel 700c Trekking/Cyclocross Fork
NS-CTF Nashbar Steel 700c Trekking/Cyclocross Fork
NS-CTF Nashbar Steel 700c Trekking/Cyclocross Fork

Create successful ePaper yourself
Turn your PDF publications into a flip-book with our unique Google optimized e-Paper software.
For technical support, call 1-800-888-2710 Made in Taiwan<br />
Bike <strong>Nashbar</strong>, 6103 Rt. 446, Canfield,OH. 44406 www.nashbar.com<br />
<strong>NS</strong>-<strong>CTF</strong>, 0506-2<br />
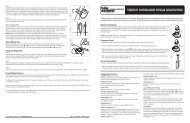
700C<br />
Cro-mo <strong>Fork</strong><br />
DIMPLED FOR<br />
DISC ROTOR<br />
CLEARANCE<br />
Thank you for purchasing the<br />
<strong>Nashbar</strong> 700C Cro-mo <strong>Fork</strong><br />
NOTE:<br />
1. This fork has a 1 1 /8" steerer tube diameter. Ensure that you have<br />
the correct size fork for your bicycle. If you are unsure, contact<br />
<strong>Nashbar</strong> technical support at 1-800-888-2710.<br />
2. If you are replacing the headset and/or stem at the same time, the<br />
steerer tube length requirement may be different from that of your current<br />
fork.<br />
3. The installation of a headset requires the use of special tools. You<br />
may need to have the fork installed by a qualified mechanic.<br />
! WARNING<br />
Proper fork installation is critical to your safety. A fork that is improperly<br />
installed or adjusted could lead to an accident resulting in serious injury or<br />
death. To ensure you have selected a compatible fork, headset and stem<br />
and that you have installed these components correctly, consult a qualified<br />
bicycle mechanic.
I<strong>NS</strong>TALLATION:<br />
1. Measure and record the height of your handlebars relative to the<br />
ground. You will need this measurement later, to achieve the same<br />
handlebar height with the new fork installed. Remove current stem, fork<br />
and headset (if replacing headset).<br />
2. Install the new headset according to the manufacturer's instructions.<br />
However, do not install the top cap or star nut yet.<br />
3. Insert the steerer tube fully through the head tube and slide the stem<br />
(and spacers, if required) onto the steerer tube. Seat the stem firmly<br />
against the top of the headset (the compression ring of the headset).<br />
Compare resulting height of the handlebar to the measurement noted<br />
in step 1. Add or subtract spacers accordingly, to obtain the same<br />
height as the original handlebar.<br />
4. Tighten the stem clamp bolts enough to hold everything in place.<br />
Make a mark on the steerer tube at the top of the stem.<br />
Make sure you have everything correctly assembled before you<br />
mark or cut your steerer tube. Do not use your old fork as a guide.<br />
5. Remove the stem from the steerer tube, and the fork from the head<br />
tube. Carefully cut the fork with a tubing cutter or hacksaw 3mm below<br />
the mark you just made. It is critical to get a square cut. The cut must<br />
be perpendicular to the steerer tube. Clean the top of the steerer tube<br />
with a file or wire brush to remove any rough edges.<br />
6. Wipe the outside of the steerer tube clean with a cloth, slide the fork<br />
into place through the headset and slide spacers (if any) and the stem<br />
onto the steerer tube.<br />
7. Check to make sure that the top of the steerer tube is approximately<br />
3mm below the top edge of the stem.<br />
a) If the steerer tube is too long, proper headset adjustment will not<br />
be possible. The steerer tube will need to be cut (shortened), or a<br />
spacer added.<br />
b) If the steerer tube is too short, the stem may not have sufficient<br />
clamping surface against the steerer tube. Remove spacers as neccessary<br />
to achieve the 3mm gap needed.<br />
! WARNING<br />
A steerer tube which is too long to allow proper headset adjustment, or too<br />
short to provide sufficient clamping surface for the stem can cause loss of<br />
steering control and lead to an accident.<br />
8. Install the star nut (in the steerer tube) and the top cap and tighten<br />
according to the headset manufacturer’s recommendation.<br />
9. Tighten the stem clamp bolts (the bolts securing the stem to the<br />
steerer tube) according to the stem manufacturer’s recommendation.<br />
10. While holding the front wheel between your legs, vigorously try to<br />
twist the handlebar. It should not easily rotate. Double-check the adjustment<br />
and tightness of the headset and stem before riding the bicycle.<br />
BRAKE I<strong>NS</strong>TALLATION:<br />
1. Install cantilever, direct pull or disc brakes according to brake manufacturer’s<br />
instructions.<br />
!<br />
WARNING<br />
Ensure all fittings are tightened securely to avoid possible loss of<br />
steering control.<br />
If you have any questions about the proper installation of this fork, please call our<br />
Technical Services Department at 1-800-888-2710