Shaping with a Router - MetosExpo - Free
Shaping with a Router - MetosExpo - Free
Shaping with a Router - MetosExpo - Free

Create successful ePaper yourself
Turn your PDF publications into a flip-book with our unique Google optimized e-Paper software.
Osage orange and its aliases<br />
In this geographical area we have a wood the "old timers"<br />
refe r to as bodock (pronounced <strong>with</strong> a long 0 and accented<br />
on both syllables). These old timers value the wood for use as<br />
fence posts because it won't succumb to termites and other<br />
insects. Can you tell me anything about this wood and lend<br />
advice about its use? -Donald E. Rutledge, Pulaski, Tenn.<br />
Jon Arno replies: I'm almost certain the wood you are describing<br />
is Osage orange, Maclura pomijera, a member of the<br />
mulberry family, Moraceae. The name bodock sounds like a corruption<br />
of bodarc (or bodark), which is, in turn, an Anglicized<br />
form of the French term bois d'arc, meaning "wood of the bow."<br />
When the early French settlers spread north from ew Orleans<br />
they encountered the Osage Indians who used this species for<br />
making their bows. This species was originally found only in the<br />
south central United States, native to eastern Texas and parts of<br />
Oklahoma, Arkansas and Louisiana. It is a small- to medium-size<br />
tree, seldom growing more than 50 ft. tall, <strong>with</strong> gnarly, thornprotected<br />
branches and large, round clusters of fruit about 4 in.<br />
to 5 in. dia., which look like rough-skinned green oranges. Prior<br />
to the introduction of barbed wire in 1874, Osage orange was<br />
planted by farmers throughout the Midwest to create what were<br />
descriptively referred to as "pig-tight" hedges, and now the tree<br />
may be seen growing along fence rows as far north as Chicago<br />
and east to the Atlantic seaboard.<br />
With an average specific gravity of 0.76 (ovendry weight/green<br />
volume), Osage orange is heavier and harder than any of our<br />
native hickories, but like the hickories, it is extremely elastic and<br />
resilient. The sapwood is white in color, while the heartwood is<br />
a vivid yellow when freshly cut, aging over time to a warm, amber<br />
gold. The pigment that gives Osage orange such a bright<br />
color is water soluble, and by boiling the wood chips, the early<br />
settlers were able to extract a dye for use <strong>with</strong> home-spun fabrics.<br />
Since the wood of Osage orange can be confused <strong>with</strong> that<br />
of black locust, Robinia pseudoacacia, the boiling of wood chips<br />
serves a modern purpose in helping to separate these two species<br />
because the yellow pigment in the latter is not easily dissolved<br />
in water. Because Osage orange is a ring-porous wood, it<br />
has a very attractive figure to complement its stuningly brilliant<br />
color. It's definitely a real challenge to work, especially <strong>with</strong><br />
hand tools, but the results can be rewarding.<br />
Uon Arno is a wood technologist and consultant in Schaumburg, Ill.]<br />
Bandsaw-blade tracking problems<br />
My 14-in. Delta bandsaw refuses to cut true when I run narrow<br />
blades. To remedy this, I'd like to fi t the saw <strong>with</strong> Thompson<br />
Model 236.2 conical blade guides. Do you know if this<br />
mOdification will improve performance or correct blade drift?<br />
-Roderick K Shaw, Jr., Tampa, Fla.<br />
Mark Duginske replies: It can be velY disturbing when a<br />
bandsaw will not cut in a straight line parallel <strong>with</strong> the saw table.<br />
This phenomenon is called either lead or drift. There are a number<br />
of possible causes for blade drift, but fortunately, the problem<br />
is often remedied or is greatly decreased by tuning up the saw.<br />
The best place to start is to properly align the bandsaw<br />
wheels. The wheels should be in line <strong>with</strong> each other when the<br />
blade is tensioned. This is particularly true of wider blades that<br />
are normally used for making straight cuts. This is described in<br />
detail in an article on bandsaw wheel alignment in Fine Woodworking<br />
#75. Next, the guides and thrust bearings must be adjusted<br />
accurately; this is a must for straight cutting. Both thrust<br />
bearings have to support the back of the blade evenly. The distance<br />
between the blade and the thrust bearing should be about<br />
.015 in. or 1/64 in., except for the Vs-in. and 1/16-in. blade, which<br />
should be against the bearing. Because the guide post rarely<br />
goes straight up and down, the top guides and thrust bearing<br />
should be readjusted every time the post is moved.<br />
The blade guides are adjusted after the thrust bearings are set.<br />
Metal guides should be adjusted until they're .004 in. (the thickness<br />
of a dollar bill) away from the blade. If you've fitted your<br />
bandsaw <strong>with</strong> non-metal guides that contain a dry lubricant,<br />
such as Cool Blocks, the guides can be set in contact <strong>with</strong> the<br />
blade. This decreases the tendency of the blade-especially<br />
narrow blades-to deflect sideways, which can lead to blade<br />
drift. Also, for straight cuts, make sure that the blade you are<br />
using is sharp; use your dull blades for curved cuts.<br />
Even <strong>with</strong> good guides and a carefully adjusted saw, you might<br />
still experience some blade lead. First, it's best to work <strong>with</strong> the<br />
lead rather than fight it. First, test the saw to see which way the<br />
blade has a tendency to lead. Do this by putting a mark about Y2<br />
in. from the edge on a 2-ft.-long board. Then, cut along this line<br />
and feed the board about 12 in. into the blade. You may have to<br />
angle the board slightly for the board to follow the line. After<br />
cutting 12 in. along tl1e line, stop the saw, and keep the board at<br />
the same angle that you fed the board to get a su-aight cut. Measure<br />
this angle and set your bandsaw's rip fence to it.<br />
[Mark Duginske is is a woodworker, teacher and author who<br />
lives in Wausau, Wisc.]<br />
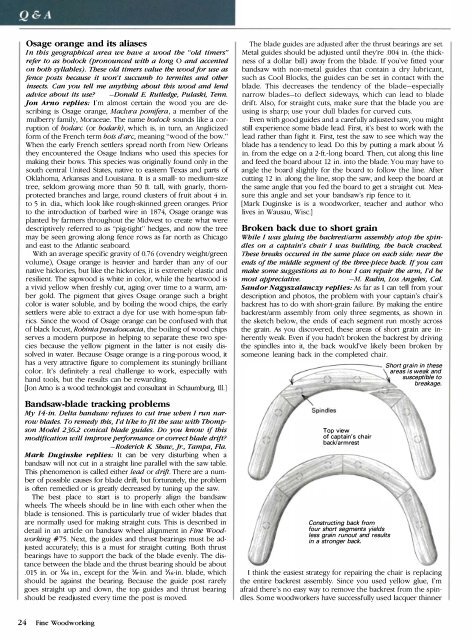
Broken back due to short grain<br />
While I was gluing the backrest/aim assembly atop the spindles<br />
on a captain's chair I was building, the back cracked.<br />
These breaks occured in the same place on each side: near the<br />
ends of the middle segment of the three-piece back. If you can<br />
make some suggestions as to how I can repair the arm, I'd be<br />
most appreciative.<br />
-M. Radin, Los Angeles, Cal.<br />
Sandor Nagyszalanczy replies: As far as I can tell from your<br />
description and photos, the problem <strong>with</strong> your captain's chair's<br />
backrest has to do wim short-grain failure. By making the entire<br />
backrest/arm assembly from only tl1fee segments, as shown in<br />
the sketch below, the ends of each segment run mostly across<br />
the grain. As you discovered, mese areas of short grain are inherently<br />
weak. Even if you hadn't broken the backrest by driving<br />
the spindles into it, the back would've likely been broken by<br />
someone leaning back in the completed chair.<br />
Top view<br />
of captain's chair<br />
backla rm rest<br />
Constructing back from<br />
four short segments yields<br />
less grain runout and results<br />
in a stronger back.<br />
Short grain in these<br />
areas is weak and<br />
susceptible to<br />
breakage.<br />
I think me easiest strategy for repairing me chair is replacing<br />
the entire backrest assembly. Since you used yellow glue, I'm<br />
afraid there's no easy way to remove the backrest from tl1e spindles.<br />
Some woodworkers have successfully used lacquer minner<br />
24 Fine Woodworking