Fleck 2510 & 2510 Econominder - Pentair Residential Filtration
Fleck 2510 & 2510 Econominder - Pentair Residential Filtration
Fleck 2510 & 2510 Econominder - Pentair Residential Filtration
Create successful ePaper yourself
Turn your PDF publications into a flip-book with our unique Google optimized e-Paper software.
SEAL & SPACER TOOLS &<br />
REPLACEMENT<br />
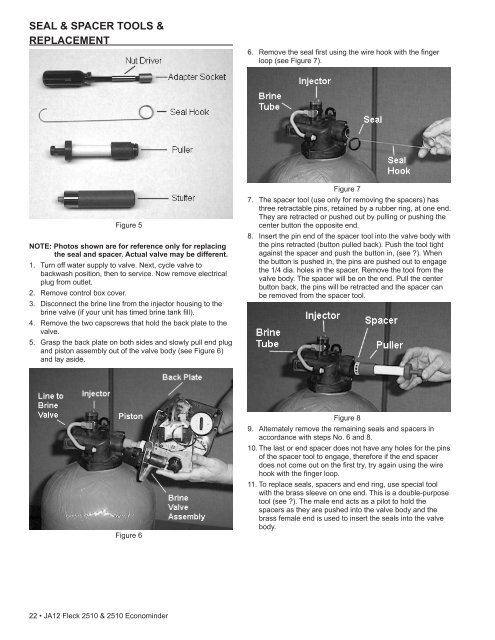
6. Remove the seal first using the wire hook with the finger<br />
loop (see Figure 7).<br />
Figure 5<br />
NOTE: Photos shown are for reference only for replacing<br />
the seal and spacer. Actual valve may be different.<br />
1. Turn off water supply to valve. Next, cycle valve to<br />
backwash position, then to service. Now remove electrical<br />
plug from outlet.<br />
2. Remove control box cover.<br />
3. Disconnect the brine line from the injector housing to the<br />
brine valve (if your unit has timed brine tank fill).<br />
4. Remove the two capscrews that hold the back plate to the<br />
valve.<br />
5. Grasp the back plate on both sides and slowly pull end plug<br />
and piston assembly out of the valve body (see Figure 6)<br />
and lay aside.<br />
Figure 7<br />
7. The spacer tool (use only for removing the spacers) has<br />
three retractable pins, retained by a rubber ring, at one end.<br />
They are retracted or pushed out by pulling or pushing the<br />
center button the opposite end.<br />
8. Insert the pin end of the spacer tool into the valve body with<br />
the pins retracted (button pulled back). Push the tool tight<br />
against the spacer and push the button in, (see ?). When<br />
the button is pushed in, the pins are pushed out to engage<br />
the 1/4 dia. holes in the spacer. Remove the tool from the<br />
valve body. The spacer will be on the end. Pull the center<br />
button back, the pins will be retracted and the spacer can<br />
be removed from the spacer tool.<br />
Figure 6<br />
Figure 8<br />
9. Alternately remove the remaining seals and spacers in<br />
accordance with steps No. 6 and 8.<br />
10. The last or end spacer does not have any holes for the pins<br />
of the spacer tool to engage, therefore if the end spacer<br />
does not come out on the first try, try again using the wire<br />
hook with the finger loop.<br />
11. To replace seals, spacers and end ring, use special tool<br />
with the brass sleeve on one end. This is a double-purpose<br />
tool (see ?). The male end acts as a pilot to hold the<br />
spacers as they are pushed into the valve body and the<br />
brass female end is used to insert the seals into the valve<br />
body.<br />
22 • JA12 <strong>Fleck</strong> <strong>2510</strong> & <strong>2510</strong> <strong>Econominder</strong>


