CM100 Advanced Manual (GB).pdf (1.347,89kb) - Viscount ...
CM100 Advanced Manual (GB).pdf (1.347,89kb) - Viscount ...
CM100 Advanced Manual (GB).pdf (1.347,89kb) - Viscount ...

You also want an ePaper? Increase the reach of your titles
YUMPU automatically turns print PDFs into web optimized ePapers that Google loves.
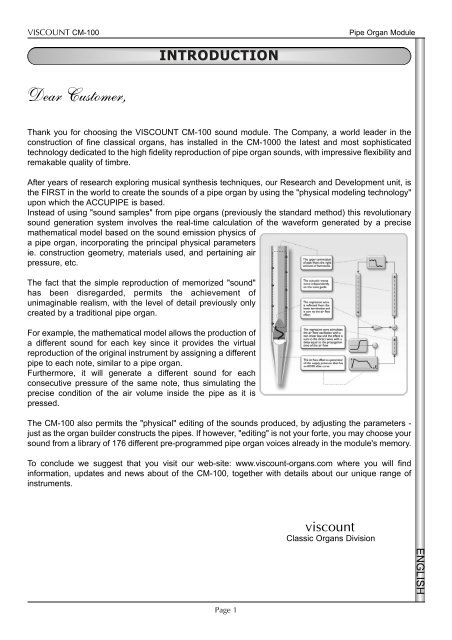
VISCOUNT CM-100<br />
Pipe Organ Module<br />
INTRODUCTION<br />
Dear Customer,<br />
Thank you for choosing the VISCOUNT CM-100 sound module. The Company, a world leader in the<br />
construction of fine classical organs, has installed in the CM-1000 the latest and most sophisticated<br />
technology dedicated to the high fidelity reproduction of pipe organ sounds, with impressive flexibility and<br />
remakable quality of timbre.<br />
After years of research exploring musical synthesis techniques, our Research and Development unit, is<br />
the FIRST in the world to create the sounds of a pipe organ by using the "physical modeling technology"<br />
upon which the ACCUPIPE is based.<br />
Instead of using "sound samples" from pipe organs (previously the standard method) this revolutionary<br />
sound generation system involves the real-time calculation of the waveform generated by a precise<br />
mathematical model based on the sound emission physics of<br />
a pipe organ, incorporating the principal physical parameters<br />
ie. construction geometry, materials used, and pertaining air<br />
pressure, etc.<br />
The fact that the simple reproduction of memorized "sound"<br />
has been disregarded, permits the achievement of<br />
unimaginable realism, with the level of detail previously only<br />
created by a traditional pipe organ.<br />
For example, the mathematical model allows the production of<br />
a different sound for each key since it provides the virtual<br />
reproduction of the original instrument by assigning a different<br />
pipe to each note, similar to a pipe organ.<br />
Furthermore, it will generate a different sound for each<br />
consecutive pressure of the same note, thus simulating the<br />
precise condition of the air volume inside the pipe as it is<br />
pressed.<br />
The CM-100 also permits the "physical" editing of the sounds produced, by adjusting the parameters -<br />
just as the organ builder constructs the pipes. If however, "editing" is not your forte, you may choose your<br />
sound from a library of 176 different pre-programmed pipe organ voices already in the module's memory.<br />
To conclude we suggest that you visit our web-site: www.viscount-organs.com where you will find<br />
information, updates and news about of the CM-100, together with details about our unique range of<br />
instruments.<br />
viscount<br />
Classic Organs Division<br />
ENGLISH<br />
Page 1
VISCOUNT CM-100<br />
Pipe Organ Module<br />
WARNINGS<br />
Switching on and off<br />
When switching the module on and off, make sure that the audio amplification system is switched off first:<br />
this will prevent signal peaks which may damage speaker components and people's hearing.<br />
Connecting and preventing interference<br />
For the connections to your sound system, see sections 1.3 and 1.4<br />
Use quality cables and remember to check their condition regularly. Do not install too close to radio<br />
equipment, cell-phones, or devices which may generate interference. Also check that the installation site<br />
is not subject to industrial interference, strong RFI or power blackouts.<br />
Protection and maintenance<br />
When transporting the instrument, protect it by using the original packaging or a suitably padded bag.<br />
Avoid prolonged exposure to direct sunlight, intense heat sources, strong vibrations and especially damp<br />
or dusty environments or rain, since they may cause malfunctions, deterioration and even electric<br />
shocks.<br />
If the instrument is to be unused for some time, protect it from dust and disconnect the power supply<br />
cable. Any dust which does collect on the module can be removed "dry" by using a soft cloth or a brush.<br />
Never use methylated spirits, acetone or solvents of any kind.<br />
In case of malfunction<br />
All the settings which can be made by the user are easily accessible on the outside of the instrument.<br />
The instrument has no internal parts which may be replaced or adjusted in any way by customers. In<br />
case of malfunction, contact only an authorised service centre.<br />
Notes about the instruction manual<br />
Read all the information provided in this manual carefully. You will avoid wasting time and will obtain the<br />
best performance from your instrument. Some illustrations and display pages are purely guideline and<br />
may differ from the model you have purchased.<br />
While the instrument's essential characteristics remain the same, the manufacturer reserves the right to<br />
make any modifications to parts, details or accessories considered appropriate to improve the product or<br />
for requirements of a construction or commercial nature, at any time and without undertaking to update<br />
this publication immediately.<br />
ENGLISH<br />
Disclaimer<br />
The manufacturer and its authorised dealers do not accept any liability with regard to the use or application of the products<br />
described in this documentation, and cannot be held responsible for any damage incurred by the client further to improper use<br />
of, or modifications to, the instrument.<br />
Any references to names, products and companies are for the sole purpose of illustrating the use of the products described<br />
herein. Any names, logos and brands referred to belong to their respective owners.<br />
© 2005. All rights reserved; the reproduction of any part of this manual, in any form, without the manufacturer's specific written<br />
permission is forbidden.<br />
Page 2
VISCOUNT CM-100<br />
Pipe Organ Module<br />
1. CONTROLS AND CONNECTIONS<br />
1.1 Description of the front panelp<br />
o VOICE key: Selection key used to access the menus for modifying everything relating to the voice, such<br />
as the timbre parameters, replacement of voices in the stops, the levels of each voice, and so on.<br />
o SETUP key: Press this key to access the menu for modifying the CM-100's general parameters, such<br />
as the MIDI channel, tremulant, reverb, etc. settings.<br />
o DEMO mode: In DEMO mode you can play back eight short pieces of music (which the instrument<br />
plays without any assistance from you) to demonstrate the instrument's timbre qualities: to access this<br />
mode, press the VOICE and SETUP keys simultaneously.<br />
o DATA rotary encoder: The data input device. Once you have selected the parameter for modification<br />
using the cursor keys, you can adjust its value by turning this knob. Turn the encoder clockwise to<br />
increase the value, or anticlockwise to decrease.<br />
o CURSOR ,, , keys: these buttons allow you to move the cursor around the video page on the<br />
display and select the various parameters for modification. What's more, the and buttons have<br />
LEDs which come on to indicate the availability of a video page before and/or after the one displayed.<br />
Press the relative button to display the video page you require.<br />
o ENTER key: button which confirms the selection of a function, a value or a procedure.<br />
o EXIT key: button for exiting the current video page or function. Pressing this key also aborts any<br />
procedures in progress (where permitted).<br />
o VOLUME trimmer: regulates the instrument's general volume.<br />
o REVERB trimmer: regulates the level of the Reverb effect. When the trimmer is turned to the minimum<br />
(lowest) setting, the effect is disabled.<br />
o SET key: Press this key to enable the saving of VOICE MEMORIES (see next point).<br />
ENGLISH<br />
Page 3
VISCOUNT CM-100<br />
Pipe Organ Module<br />
o<br />
VOICES MEMORY keys (from 1 to 8). Press these keys for easy recall of 8 stop (voice) setups saved<br />
earlier by the user. The CM-100 offers a total of 64 memories divided into 8 banks of 8 memories<br />
each. For more information about use of the voice memories, see chapter 4.<br />
o CANCEL key. "Clear" button: press this key to switch off all the voices which may be on.<br />
o<br />
WHOLE / SPLIT key. Sets the sound module's operating mode. When the key LED is off, the CM-100<br />
is set in WHOLE mode, in which all the voices respond to the same MIDI channel (single manual<br />
mode). Press the key to switch on the LED and activate SPLIT (multi-manual) mode, in which the<br />
instrument is able to respond to more than one MIDI channel, each channel associated to one or more<br />
voices. Press the key again to switch off the LED and revert to whole mode. See chapter 3 for more<br />
informations.<br />
o TREMULANT key: activates (LED on) and deactivates the tremulant effect.<br />
o VOICE REGISTERS (1 to 12) . Press these keys to switch the single voice on (press the lower part)<br />
or off (by pressing the upper part). Note that, as CM-100 is a fully programmable device, the voices<br />
installed (and therefore the labels of the keys) may change.<br />
ENGLISH<br />
Page 4
VISCOUNT CM-100<br />
Pipe Organ Module<br />
1.2 Description of the rear panelp<br />
o<br />
o<br />
o<br />
o<br />
o<br />
o<br />
POWER ON: On/off switch<br />
AC INPUT connector: connect the power supply lead supplied with the instrument to this connector.<br />
The CM-100 is able to operate on power supply voltages from 90 to 250 Volts AC.<br />
OUTPUTS connectors (from 1 to 6). Line outputs from which the audio signal can be collected to be<br />
sent to amplified sound diffusion systems, or any amplification system of any kind. For the best instru<br />
ment audio performance and for high-fidelity reproduction of the acoustic panorama generated by the<br />
windchests, it is absolutely essential to connect the outputs consecutively, always starting from output<br />
number 1. For the same reason, it is very important to take care when positioning the Loudspeaker,<br />
as described in point 1.4 of this manual.<br />
PHONES connector: jack 5” 1/4 socket to which a headphone set (not supplied) can be connected. It<br />
is important to use good quality headphones, with impedance of at least 16 Ohm<br />
EXP. PED connector: use this jack socket to connect an expression pedal (not supplied) to the CM-<br />
100. To assure good results, use linear response expression pedals having impedance of 22 Kohm,<br />
and fitted with stereo jack connector. For calibration operations, use the "EXP.PEDAL" settings (system<br />
environment)<br />
MIDI (IN, OUT and THRU) connectors: five-pin DIN connectors for connection of instruments with MIDI<br />
interface. The IN connector allows reception of MIDI data generated by remote MIDI sources, the OUT<br />
connector transmits the MIDI messages generated by the CM-100, and the THRU connector transmits<br />
exactly the MIDI data received by the IN connector.<br />
RS-232 connector. Serial connector for connecting the CM-100 to a computer running the “<strong>Viscount</strong><br />
Organ Editor” Software<br />
ENGLISH<br />
Page 5
VISCOUNT CM-100<br />
Pipe Organ Module<br />
1.3 Connections<br />
Connect the power supply lead supplied with the instrument to the CM-100's A.C. input connector (rear<br />
panel). Then connect the other end of the lead to the mains plug.<br />
Now connect the Loudspeaker boxes (or the amplification system) to the OUTPUTS connectors on the<br />
CM-100's rear panel.<br />
If you have two diffusers (system recommended minimum) connect them to outputs 1 (left diffuser) and<br />
2 (right diffuser). If you have more than two loudspeaker boxes, read the next point carefully.<br />
If you wish to listen to the instrument using headphones, connect them to the Phones output provided.<br />
Remember that connecting the headphones does not cut out any diffusers connected.<br />
Now use a MIDI cable to connect the MIDI OUT connector of your organ (or keyboard) to the CM-100's<br />
MIDI IN connector.<br />
ENGLISH<br />
Page 6
VISCOUNT CM-100<br />
Pipe Organ Module<br />
The fundamental connections have been made and the CM-100 is ready to be switched on.<br />
However, the interfacing options available do not end here: the instrument can be included in complex<br />
MIDI networks or connected to sequencers, computers or other devices.<br />
1.4 Positioning the loudspeaker boxes<br />
As mentioned in point 1.2, one of the key features of the CM-100 is the implementation of special<br />
algorithms that reproduce the acoustic panorama generated by the windchests of a pipe organ.<br />
To ensure that this reproduction is of the highest possible fidelity, it is of fundamental importance for the<br />
loudspeaker boxes to be connected and placed correctly, as shown below<br />
2 boxes configuration or connection to the organ’s amplification (ouputs 1 and 2)<br />
- 3 boxes configuration (outputs 1,2 and 3)<br />
ENGLISH<br />
Page 7
VISCOUNT CM-100<br />
Pipe Organ Module<br />
- 4 boxes configuration (outputs 1, 2, 3 and 4)<br />
- 5 boxes configuration (outputs 1, 2, 3, 4 and 5)<br />
- 6 boxes configuration (outputs 1, 2, 3, 4, 5 and 6)<br />
ENGLISH<br />
Page 8
VISCOUNT CM-100<br />
Pipe Organ Module<br />
The CM-100 offers a number of setup parameters for each output, as well as a range of windchest<br />
customisation possibilities: refer to the next chapters for more informations<br />
2. MAIN PAGE and DEMO MODE<br />
2.1 Main Page<br />
After making all the necessary connections, switch on the instrument by pressing the POWER ON button<br />
on the rear panel.<br />
The instrument will display the initial page, which carries the name of the instrument and the release of<br />
the operating system (Op.System) currently installed in the form of two numbers separated by a dot.<br />
PIPE ORGAN VOICES MODULE Op.System<br />
Accupipe Technology 1.10<br />
After a few moments, the display will automatically switch to the main page.<br />
M.BANK:1 ENSEMBLE:2 TRANSP.:+1 TUNE: 0<br />
TEMPERAMENT:Equal<br />
STATUS:Finish1<br />
containing the following parameters:<br />
o<br />
o<br />
o<br />
o<br />
M. BANK (Memory Bank) : this parameter can be used to select one of the eight memory banks, each<br />
of which contains 8 different voice memories (buttons underneath the stops).<br />
As well as providing a total of 64 memories, this function is especially important if the instrument is<br />
used by more than one organist, since each of them will be able to save his or her own settings in a<br />
different Memory Bank.<br />
ENSEMBLE: this parameter can be used to set eight levels of natural differences in pitch which occur<br />
in reality between one organ pipe and another: in other words, it is possible to accentuate the "tuning<br />
error" that occurs in the organ's pipes due to wear over time and variations in temperature. The values<br />
range from - (pipes perfectly tuned) to 8 (maximum pitch instability).<br />
TRANSP. (Transposer): sets the transposition of the instrument's key within a range of +5/-6 semitones.<br />
Set on 0 for no transposition.<br />
TUNE: allows adjustment of the fine tuning of the instrument within a range of +/- 50 cents (hundredths<br />
of a semitone).<br />
o TEMPERAMENT: this parameter allows the selection of a series of historic temperaments of different<br />
eras and national origins. You can choose from EQUAL, a temperament with perfect tuning, then<br />
WERCKMEISTER, KIRNBERGER, KELLNER, VALLOTTI, CHAUMONT, MEANTONE and<br />
PYTHAGOREAN<br />
o STATUS: the status parameter allows you to select 4 memories containing all the instrument's settings,<br />
known as "Finishes". These 4 finishes, known as "Finish1", "Finish2", "Finish3" and “Finish4” allow you<br />
to save all the instrument's main performance and timbre parameters, such as the pitch, temperament,<br />
voice parameters, and so on. When a parameter is modified, it will automatically be saved in the current<br />
finish: to confirm that it has been saved, two asterisks (*) will appear on either side of the name of the<br />
finish. For more information about the use and saving of the finishes and restoration of the original<br />
finishes, see chaper 4.5<br />
ENGLISH<br />
Page 9
VISCOUNT CM-100<br />
Pipe Organ Module<br />
The procedure for modifying these parameters is easy and intuitive:<br />
Use the cursor ,, , keys to locate on the value of the parameter you wish to modify (the field will<br />
start to flash), then turn the encoder to enter the value you require.<br />
Remember that turning the encoder clockwise increases the value, while turning it anticlockwise<br />
decreases the value.<br />
The instrument will adopt the value entered and automatically save it in the current finish.<br />
<br />
A BRIEF NOTE ON TEMPERAMENTS <br />
In the "natural" tuning system, based on the acoustic phenomenon of harmonic sounds, two important musical<br />
intervals, the major third and the perfect fifth, cannot be made to coexist in the "pure" state (i.e. beat-free).<br />
Therefore, over the centuries a variety of compromise solutions known as TEMPERAMENTS have been<br />
invented and realised. These give priority to one or the other interval by modifying them in various ways.<br />
In the ancient world and the Middle Ages, until the last few decades of the 17th Century, the "Pythagorean"<br />
tuning system, in which the fifths were retained perfectly pure, was in use. The resulting major third was<br />
particularly unattractive in sound, and was therefore treated as a dissonance. However, the music of the time<br />
was mainly monodic, and the early forms of vocal and instrumental polyphony made a great deal of use of the<br />
interval of a fifth. With the early Renaissance, and the start of the great flowering of vocal polyphony, the<br />
interval of a major third gradually came to be heard as consonant and not dissonant. The instruments with fixed<br />
tuning, such as the organ and harpsichord, gradually adapted to this situation by adopting a system of<br />
temperament known as "Meantone", which gave the major third priority over the fifth. This temperament is<br />
particularly important because it was the temperament in normal use in Europe in the 16th and 17th Centuries,<br />
until the early 18th Century. Here are the six temperaments available on the CM-100<br />
WERCKMEISTER: This temperament, invented by the organist and musical theorist Andreas Werckmeister, is<br />
recommended for performing the German musical repertoire of the late 1600s<br />
KIRNBERGER:This temperament, developed by Johann Philipp Kirnberger, pupil of J.S. Bach, is suitable for<br />
playing the German Baroque composers and the works of Bach.<br />
KELLNER:Herbert Anton Kellner, born in Prague in 1938, studied physics, mathematics and astronomy at the<br />
University of Vienna. In 1975, his research enabled him to identify the unequal temperament of the same name,<br />
used by Bach for his "Well-Tempered Clavier". Suitable for 18th Century German music and the music of Bach<br />
in particular.<br />
VALLOTTI: This Italian temperament invented by Francescantonio Vallotti was later taken up in England by<br />
Thomas Young. It can be used effectively for the Italian 18th Century repertoire, and also for the English<br />
repertoire of the same period.<br />
CHAUMONT (1696) :It is based on six pure major thirds: D-F# / E-G# / F-A / G-B / A-C# / C-E (the last one<br />
slightly diminished). It can be used mainly for French music composed between the end of the 17th and the<br />
beginning of the 18th Century.<br />
MEANTONE:<br />
- 8 pure major thirds: E flat - G / B flat - D / F - A / C - E / G - B / D - F # / A - C# / E - G.<br />
- 4 unusable major thirds (diminished fourths): B - D# / F# - A# / C# - E# / A flat - C.<br />
- 1 fifth known as the "wolf" (very dissonant extended fifth): A flat - E flat.<br />
- Highly irregular chromatic scale (meaning that chromatic compositions are given a very distinctive voice)<br />
- Keys usable with this temperament: C maj. / D maj. / G maj. / A maj. / B flat maj. and the relative minors.<br />
ENGLISH<br />
PYTHAGOREAN: In this temperament, all the fifths are natural except for the "wolf" fifth, in the interval A flat<br />
- E flat, which is greatly diminished.<br />
It dates from the Middle Ages up to the 15th century, and can therefore be used for compositions of that<br />
period.<br />
Page 10
VISCOUNT CM-100<br />
2.2 Display Messages<br />
Pipe Organ Module<br />
INFO MESSAGE: LINE OUTs NOT CONNECTED<br />
press EXIT<br />
The CM-100 has detected that there are no loudspeaker boxes connected to the outputs: you can only<br />
listen to the instrument using the headphones. Press EXIT to return to the main page<br />
WARNING: LINE OUTs HAVE TO BE CONNECTED<br />
CONTIGUOSLY (1 to 6) press EXIT<br />
The system has detected that the loudspeakers have not been connected correctly, so some outputs<br />
might not work or might malfunction.Check the connections and make sure that they have been made<br />
as described in point 1.4. Press EXIT to exit<br />
2.3 Listening to the Demo songs<br />
In the CM-100 DEMO mode you can play back a number of short pieces of music, which the instrument<br />
plays itself to demonstrate its timbre qualities (demo songs).<br />
To access the DEMO mode, locate on the main page and press the VOICE and SETUP keys<br />
simultaneously. The following video page will appear on the instrument's display:<br />
Select DEMO song with VOICE MEMORY Keys:<br />
There is one demo track associated to each of the VOICE MEMORY keys: simply press the key of the<br />
demo you wish to hear and it will start to play.<br />
The display will indicate that the selection has been made by showing the word PLAYING followed by<br />
the name of the song and the progress bar.<br />
Select DEMO song with VOICE MEMORY Keys:<br />
PLAYING: Pescetti_Presto [²²²²²/ ]<br />
At the end of the piece, the instrument returns to the demo song selection video page.<br />
You can stop the demo at any moment by pressing the EXIT key or pressing the demo song selection<br />
key again.<br />
<br />
N.B. The instrument automatically sets the timbre suitable for performance of the demo<br />
song selected: however, this setup can be changed while the song is playing using the<br />
stops on the front panel.<br />
To exit the DEMO mode, press the VOICE and SETUP keys simultaneously, or the EXIT button: in both<br />
cases the instrument will return to the main video page<br />
ENGLISH<br />
Page 11
VISCOUNT CM-100<br />
Pipe Organ Module<br />
The association between the VOICE MEMORY keys and the demo songs is as follows<br />
key 1: Johann Gottfried Walther - Allegro (from Concerto in F maj.)<br />
key 2: Johann Pachelbel - Von der Geburt Christi<br />
key 3: Domenico Zipoli - Allegretto in G min<br />
key 4: Johann Gottfried Walther - Schmücke dich, o liebe Seele<br />
key 5: Gio Batta Pescetti - Presto (from Sonata in C min.)<br />
key 6: Johann Pachelbel Alle Menschen müssen sterben (Choral und Variation)<br />
key 7: Robert Führer - Andantino in G maj<br />
key 8: Johann Gottfried Walther - Erschienen ist der Herrliche Tag.<br />
3. VOICE SECTION<br />
The Voice menu contains all the functions which modify the voices of the CM-100. When the VOICE<br />
button on the left of the instrument's display is pressed, its LED lights up and the following video page<br />
appears on the display:<br />
[EDIT] [CHANGE] [VOLUME] [OUT ROUTER]<br />
[V.F.S.] [LABEL CHECK] [SORT VOICES]<br />
giving access to the various voice modification sections which, in detail, are:<br />
o EDIT : regulates the sound generation parameters for each individual voice.<br />
o CHANGE: replaces the voices currently active on the expander's 12 stops<br />
o VOLUME: regulates the volume of the voices<br />
o OUT ROUTER: selects the type of windchest to be applied to the individual voice and its<br />
characteristics.<br />
o V.F.S.: voices factory settings. Used to restore the voice's parameters to their original values (set in the<br />
factory)<br />
o LABEL CHECK: allows you to check which voice has been assigned to each of the 12 stops on the<br />
front panel<br />
o VOICE SORT: starts the procedure for automatic sorting of the voices in the stops.<br />
Use the cursor keys to select the section required and press ENTER. You can exit this menu and return<br />
to the main menu page at any time by pressing the VOICE key (the LED of which is on) or the ESC key<br />
3.1 VOICE edit<br />
As already mentioned, the EDIT section of the voice menu gives the user access to the main timbre<br />
parameters of the current voice to allow him to adjust it to his needs.<br />
Press the ENTER key with the EDIT option selected to display a list of the voices currently installed in<br />
the 12 stops. The stop currently selected flashes<br />
Ctrbomb32 Bombard16 Bombarde8<br />
Schawm4 Waldhrn16 Cornopea8<br />
ENGLISH<br />
Then use the CURSOR keys again to select the voice you wish to modify; you can also do this by<br />
pressing the stop of your choice on the front panel.<br />
Page 12
VISCOUNT CM-100<br />
Pipe Organ Module<br />
Once the selection has been confirmed with ENTER, the display will show the relative parameter<br />
modification page, which will differ depending on the type of voice selected. The stop which contains the<br />
voice being modified will flash.<br />
3.1.1 Editing the Bourdons, Principals, Strings S<br />
and Flutes<br />
If the voice selected for modification belongs to the Principals, Bourdons or flutes family, the following<br />
page will appear on the display:<br />
Gedackt16 Character: 0 Noise: 0<br />
Volume: 0 Attack:0 ReleaseDet:0<br />
Making available the following fields:<br />
o<br />
o<br />
o<br />
o VOLUME general level of the voice<br />
Gedackt16 Character: 0 Noise: 0<br />
o ATTACK: adjusts Volume: the voice's 0 attack time, Attack:0 i.e. the time it takes ReleaseDet:0<br />
to reach the maximum volume value, on<br />
a scale of 8 values. Set 0 for the minimum attack time and 8 for the maximum time.<br />
Note that the scale of 8 values cannot be associated to fixed time values, since this parameter depends<br />
on the type of voice being modified and the Time Tracking of the keyboard, which means that attack<br />
times are shorter in the upper than in the lower part.<br />
o<br />
Voice being edited: The first field in the top corner of the display shows the name of the voice being<br />
edited: it can be changed by simply selecting the field (cursor keys) and turning the encoder.<br />
The voice can be also be selected by pressing the rocker switch of the stop containing the voice<br />
required<br />
CHARACTER: this parameter modifies the level of the harmonics of the selected voice, but without<br />
changing the level of the first harmonic. Changing this value makes the sound more "open" and<br />
immediate (positive values) or more "closed" and dark (negative values)<br />
NOISE: This parameter regulates the amount of air noise in the chosen voice. Note that thanks to the<br />
special physical model algorithm, the value will not be evenly distributed but will have a more or less<br />
noticeable effect on the voice depending on the pipe's footage, its characteristics and the note played<br />
RELEASE DETUNE: adjusts the variation in tuning when the note is released compared to the value<br />
with the note pressed, on a scale of 8 values. Here again, fixed values of hundredths of a semitone<br />
cannot be associated to the values shown on the screen, since the modification depends on the voice<br />
and the part of the keyboard being played.<br />
Set 0 for the minimum change in tuning and 8 for the maximum change.<br />
To select the field required use the CURSOR keys, remembering that a field is selected when its value<br />
flashes; once the field has been selected its value can be adjusted by turning the encoder.<br />
When the modification is complete you can return to the VOICE mode main menu page by pressing the<br />
EXIT key.<br />
3.1.2 Editing Reeds<br />
If the voice being edited belongs to the REEDS family, the display will show this page<br />
ENGLISH<br />
Page 13
VISCOUNT CM-100<br />
Pipe Organ Module<br />
Oboe8A Character: 0 Noise:-3<br />
Volume: 0 Attack:4 FreqSkew:4<br />
The parameters are basically the same as described above, except for the FREQUENCY SKEW field,<br />
which regulates the amount of the typical detuning skew the reeds cause when the note is released.<br />
Although their names are the same, the effects and properties of the other fields vary because the<br />
physical model applied to the sound generation changes: for example, you will notice that in reed<br />
instruments the character will also affect the first harmonic and its effects will differ in the case of bass or<br />
treble footage. The same applies to the noise, which has effects and timbre of a completely different kind<br />
when applied to the reeds.<br />
The procedure for using the section is the same: use the cursor keys to select the field for modification<br />
and the encoder to enter the appropriate value.<br />
Press EXIT to return to the VOICE mode main page, then the EXIT key again or the VOICE key to exit<br />
this page.<br />
3.1.3 Editing Mixtures<br />
The page for editing a voice in the mixtures family is as follows:<br />
Mixture Harm.base:1 1/3 Character: 0<br />
Volume: 0 Ranks:4 Attack:0 ReleaseDet:0<br />
The new fields which appear in this page, typical of the "physical" conformation of a mixture voice, relate<br />
to the HARM.BASE (Harmonic Base), which sets the basic harmonic on which the mixture voice is<br />
created, in a range of values from 2 1/3’, 2, 1 1/3’ 1'.<br />
As you will know, this organ voice is created by the action of several pipes arranged in ranks: the RANKS<br />
field in this page allows you to set the number of virtual ranks on the basis of which the CM-100 will<br />
calculate the mixture voice. The noise (air noise) parameter does not appear because the specific<br />
"physical conformation" of the pipes which generate these voices mean that it is negligible.<br />
As usual, use the cursor keys to select the field for modification and turn the encoder to enter the value<br />
you consider appropriate. When the modification is complete you can return to the VOICE mode main<br />
menu page by pressing the EXIT key.<br />
3.1.4 Editing Detuned voices<br />
When a detuned voice is selected for modification, the parameter editing video page will be as follows<br />
Schwebng8 Character: 0 Noise: 0<br />
Detune:+3 Volume: 0 Attack:0 ReleaseD:0<br />
ENGLISH<br />
Containing the following user fields:<br />
Page 14
VISCOUNT CM-100<br />
Pipe Organ Module<br />
o<br />
o<br />
Voice being edited. This is the voice being modified: it can be changed by simply selecting the field<br />
(cursor keys) and turning the encoder, or by pressing the stop rocker key.<br />
CHARACTER: changing this value makes the sound more "open" and immediate (positive values) or<br />
more "closed" and dark (negative values)<br />
o<br />
NOISE: This parameter regulates the amount of air noise in a range of 8 possible settings.<br />
o<br />
DETUNE: The field used to set the amount of "detuning" to be applied to the voice: the higher the<br />
value, the greater the "beating" effect the voice will acquire when used with other voices.<br />
With a setting of 0 the voice is perfectly tuned with the other voices and the beating typical of "detuned"<br />
voices will therefore not be audible<br />
o<br />
VOLUME: General level of the voice<br />
o<br />
o<br />
ATTACK: adjusts the voice's attack time, that means the time it takes to reach the maximum volume<br />
value. Set 0 for the minimum attack time and 8 for the maximum time.<br />
RELEASE DETUNE: adjusts the variation in tuning when the note is released compared to the value<br />
with the note pressed, on a scale of 8 values. Set 0 for the minimum change in tuning and 8 for the<br />
maximum change.<br />
3.1.5 Editing Cornets<br />
The last variant added to the voice editing page concerns the cornet voices<br />
Kornett Ranks:3<br />
Character: 0<br />
Volume: 0 Attack:4 ReleaseDet:0<br />
As the above video page shows, the function for editing the physical parameters of the cornet voices (like<br />
the mistures) does not include the noise parameter because of the unique construction and physical<br />
features of this family of stops.<br />
The noise parameter is replaced by the RANKS field (already discussed with regard to the mixture<br />
editing function) which sets the number of virtual pipes the instrument will use to construct the cornet<br />
sound.<br />
As usual, use the CURSOR keys to select the field you wish to modify; after this, you will be able to adjust<br />
its value by turning the encoder.<br />
When the modification is complete you can return to the VOICE mode main menu page by pressing the<br />
EXIT key.<br />
3.1.5 Keyboard TrackingT<br />
From each of the voice editing pages examined so far, pressing the illuminated CURSOR button gives<br />
access to the second page for editing and displaying the KEYBOARD TRACKING parameter:<br />
Gedackt16 Low: 0<br />
Keyb.Scaling High: 0<br />
ENGLISH<br />
Page 15
VISCOUNT CM-100<br />
Pipe Organ Module<br />
This parameter allows you to set the scaling of the voice's volume for the upper and lower parts of the<br />
manual.<br />
These two zones are fundamental in providing the right timbre and often their volume has to be slightly<br />
reduced or increased compared to the central part of the manual.<br />
The setting parameters are therefore the following:<br />
o LOW: regulates the attenuation (negative values) or increase (positive values) of the volume in the low<br />
part of the manual.<br />
o HIGH: regulates the attenuation (negative values) or increase (positive values) of the volume in the<br />
high part of the manual.<br />
As usual, use the cursor keys to select the field you wish to modify and turn the encoder to enter the<br />
correct value for it.<br />
At the end of the operation press EXIT to exit the function or the cursor key to return to the previous<br />
editing page.<br />
3.2 VOICE CHANGE<br />
As already mentioned at the beginning of this manual, the CM-100 has a library of 176 organ voices<br />
which the user can freely assign to each of the 12 stops on the instrument's front panel.<br />
Once the voice has been assigned to a stop, it will remain in the memory until the next time it is changed.<br />
Now let us take a detailed look at how to carry out the procedure for changing a stop's voice:<br />
Starting from the main page, press the VOICE key. The video page with the function's menu will appear<br />
on the display<br />
[EDIT] [CHANGE] [VOLUME] [OUT ROUTER]<br />
[V.F.S.] [LABEL CHECK] [SORT VOICES]<br />
Use the cursor keys to select the CHANGE menu option, which will start to flash. Press ENTER and the<br />
display will show the list of voices currently installed on the 12 stops: the stop currently selected will flash<br />
Ctrbomb32 Bombard16 Bombarde8<br />
Schawm4 Waldhrn16 Cornopea8<br />
Then use the cursor keys to select the voice you wish to replace; you can also do this by pressing the<br />
stop of your choice on the front panel.<br />
If the selection is confirmed by pressing ENTER, the display will show<br />
Replace:CtBourd32<br />
With:Principals press ENTER to continue<br />
ENGLISH<br />
For greater convenience, the CM-100's voice library has been subdivided into families, each containing<br />
the voices belonging to a specific type of organ pipe: these include the Principals, Bourdons, Reeds, etc.<br />
So on the current page, turn the encoder to select the family you require and press ENTER to confirm.<br />
(or exit to go back)<br />
Page 16
VISCOUNT CM-100<br />
Pipe Organ Module<br />
Replace:CtBourd32<br />
With:CtPrinc32<br />
Press ENTER to replace<br />
You can now turn the encoder to select the voice of your choice, contained in the family you choose in<br />
the step before. Note that the name of the voices is shown in abbreviated form: the appendix to this<br />
manual contains the name of the voice in full, its acronym, the family to which it belongs and the<br />
consecutive number consigned to it.<br />
Remember that when you are selecting a voice, the instrument allows you to listen to it in advance: if you<br />
play the master instrument, you will hear the timbre of the voice currently on the display, before it is<br />
definitively memorised.<br />
In the usual way, when you press ENTER the new voice selected will replace the one present in the<br />
selected stop. To confirm this has taken place, the display will show the following video page<br />
WARNING! Tab 1 now is CtPrinc32<br />
- Please change the label -<br />
reminding you that you have to physically change the label on the stop, because its contents have been<br />
changed.<br />
Then press EXIT to scroll back to the previous pages and make a new selection or return to the main<br />
operating page.<br />
3.3 Regulating the voice VOLUME<br />
The VOICES VOLUME function allows you to adjust the volume of each individual voice in a range from<br />
-9 dB to +6 dB. Each modification is saved immediately and is audible in real time, making it easier for<br />
the user to obtain the setting required.<br />
To recall this function, select the VOLUME option from the VOICES menu; the display will show:<br />
Gedackt16: : 0 Prinzip8A: 0 Schwebng8: 0<br />
HohlFlot8:+3 Oktave4A :-1 SptzFlot4: 0<br />
To set the new value (expressed in dB on the display), locate the cursor on the voice required using the<br />
CURSOR buttons or its register on the panel, and use the VALUE encoder to make the setting.<br />
Once you have made all the changes you require, press EXIT to return to display of the VOICES menu.<br />
The volume level here set is the same you’ll find in the EDIT section, describe at the point 3.1 of this<br />
manual<br />
3.4 OUT ROUTER function<br />
One of the Acupipe technology major innovations is the capability for simulating the position of the windchests<br />
and the arrangement of the pipes inside them, for every voice.<br />
All this is achieved by setting the channelling of the audio signals, i.e. the way in which they are<br />
distributed, on the rear outputs<br />
ENGLISH<br />
Page 17
VISCOUNT CM-100<br />
Pipe Organ Module<br />
For each voice, the system is able to set an output configuration which reflects the layout of the pipes in<br />
real wind-chests, as follows:<br />
Wedge<br />
Chromatic<br />
Left Wing<br />
Right Wing<br />
Mono<br />
Alternate Keys<br />
Moreover, each of these layouts can be further specified with regard to the width of the wind-chest and<br />
its central location in relation to the number of outputs connected.<br />
It is important to underline that the system automatically adapts the channelling to the number of<br />
speakers connected.<br />
3.4.1 Short introduction to the Windchest W<br />
of pipe organs<br />
The wind-chest is a box in which the air from a bellows is distributed. The bellows may be operated by<br />
hand or an electric motor, and keeps the air pressurised and ensures it is uniformly distributed through<br />
the pipes.<br />
Normally, each manual has its own wind-chest which contains the pipes.<br />
However, there are various types of wind-chest, which may contain a single register or have a cascade<br />
arrangement with an organ valve (a box full of air filled by the bellows) with the branches leading off to<br />
all the registers for each note.<br />
The following is a short description of the wind-chests which the CM-100 simulates:<br />
<br />
Wedge<br />
In this configuration, the tallest, broadest pipes are located in the centre, so the voice's<br />
lowest notes are played by the most central speakers. As the pitch rises the signal is<br />
gradually distributed further and further to the outside, in alternation; in other words,<br />
C will sound on the right and C# on the left.<br />
<br />
Chromatic<br />
This configuration is the opposite of the previous one; in this mode, the tallest,<br />
broadest pipes are on the outside, so the lowest notes are played on the outermost<br />
speakers, again in alternation. As the pitch rises the notes are played closer and<br />
closer to the centre.<br />
<br />
Left Wing<br />
As the the drawing shows, the tallest, broadest pipes are installed on the left, so the<br />
lowest notes are played by the speakers furthest to the left. As the pitch rises the notes<br />
are played more and more to the right.<br />
ENGLISH<br />
Page 18
VISCOUNT CM-100<br />
Pipe Organ Module<br />
<br />
Right Wing<br />
This layout is the reverse of the previous one, so the lowest notes sound on the right<br />
and the highest on the left.<br />
<br />
Mono<br />
This setting allows the sound of a voice to be sent to a single output, or a position midway<br />
between two outputs. This means that regardless of the point on the keyboard, the voice<br />
always sounds from the same position..<br />
<br />
Alternate Keys<br />
In this mode, the notes are sent in alternate semitones to two outputs (or a position<br />
midway between two outputs). This means, for example, that C can always be made<br />
to sound on output 1 and C# on output 4.<br />
3.4.2 Windchest W<br />
Settings<br />
The editing section which contains the virtual windchest settings is called OUT ROUTER.<br />
From the voice menu (accessed using the panel key provided) use the cursor keys to select the above<br />
field and press Enter. The following page will be made available on the display:<br />
Gedackt16 1 2 3 Width:15<br />
Windchest:0 Center: 8<br />
The first field in the top right-hand corner identifies the voice being edited, meaning the voice to which<br />
the windchest is to be assigned: it can be changed by selecting the field with the cursor keys (when the<br />
voice is selected, it flashes) and turning the encoder.<br />
The second field, called Windchest, in the bottom left-hand corner allows you to select the windchest on<br />
the following basis:<br />
<br />
<br />
<br />
<br />
<br />
<br />
Windchest = 0: Wedge<br />
Windchest = 1: Chromatic<br />
Windchest = 2: Left wing<br />
Windchest = 3: Right wing<br />
Windchest = 4: Mono output<br />
Windchest = 5: Alternate notes<br />
The central part of the display shows a diagram of the selected windchest (bottom line) and its distribution<br />
across the speakers currently connected (top line)<br />
ENGLISH<br />
Page 19
VISCOUNT CM-100<br />
Pipe Organ Module<br />
For example, if only two speakers are connected, they will be shown as follows:<br />
Gedackt16 1 2 Width:15<br />
Windchest:0 Center: 8<br />
If there are 3 speakers, the instrument automatically redistributes the windchest effect in the new<br />
configuration, so speaker 2 will carry the central part of the panorama and the third the left part. On the<br />
display the new situation will be shown as follows:<br />
Gedackt16 1 2 3 Width:15<br />
Windchest:0 Center: 8<br />
and the message "no line outs”<br />
Gedackt16 no line out Width:15<br />
Windchest:0 Center: 8<br />
indicates that, at present, there are no speakers connected and therefore the windchest will not be<br />
activated. Similarly, the message " wrong line out":<br />
Gedackt16 wrong line out Width:15<br />
Windchest:0 Center: 8<br />
informs the user that the speakers have not been connected in accordance with the rule that the first<br />
speaker must always be connected to output 1 proceeding in consecutive sequence, leaving no gaps<br />
between two connected speakers.<br />
The parameters on the right-hand side of the display are the parameters for adjustment of the active<br />
windchest, and their function changes depending on its physical characteristics.<br />
For central peak and wing windchests (all versions), the parameters available relate to the Width of the<br />
windchest and the position of its Centre within the acoustic panorama created by the speakers<br />
connected.<br />
As an example, let us take a left-hand wing windchest<br />
Gedackt16 1 2 3 Width:15<br />
Windchest:2 Center: 8<br />
If we reduce the value of the Width field (selected using the cursor keys) we will see that the windchest<br />
becomes narrower, and therefore the sound of the stop will be re-allocated within the acoustic panorama:<br />
in this case, it will no longer be present on outputs 1 and 3.<br />
ENGLISH<br />
Gedackt16 1 2 3 Width: 9<br />
Windchest:2 Center: 8<br />
Page 20
VISCOUNT CM-100<br />
Pipe Organ Module<br />
The Center parameter allows a narrow windchest (i.e. one which does not cover the whole acoustic<br />
panorama) to be placed more to the left or right, with the centre of the windchest itself as reference. In<br />
this case, the display shows the new position of the windchest and its distribution across the outputs<br />
currently in use after each adjustment<br />
Gedackt16 1 2 3 Width: 9<br />
Windchest:2<br />
Center:11<br />
If a mono setting has been selected, the only parameter available is Position, allowing the user to<br />
choose the single speaker to which the sound of the chosen voice is to be directed:<br />
Gedackt16 1 2 3 Position<br />
Windchest:4 8<br />
while,if the active windchest setup is "Alternate Notes", the parameters available will be the ones relating<br />
to the position within the acoustic panorama of the reference notes C and C#<br />
Gedackt16 1 2 3 Alt.C-C#<br />
Windchest:5 1 - 15<br />
IMPORTANT NOTE:<br />
Windchest effects cannot be reproduced unless at least two speakers are connected.<br />
If the instrument detects that only one speaker is connected, it will automatically switch all the<br />
active windchest settings to the mono setup, and the user will be unable to change this<br />
Gedackt16 1 Position<br />
Windchest:4 1<br />
3.5 V.FV<br />
.F.S..S.<br />
Sometimes, after several voice timbre or arrangement modification sessions, it may be necessary to<br />
reset all the changes made and return one or more voices to their original state, as set by the constructor<br />
when the instrument was delivered.<br />
To allow, this, the CM-100 provides the user with a specific voice menu function called V.F.S. (which<br />
stands for Voice Factory Settings)<br />
From the voice menu, accessed by pressing the relative key on the right of the display, use the cursor<br />
keys to select the V.F.S. function and press ENTER.<br />
The display will show the following video page:<br />
VOICE FACTORY SETTINGS<br />
[RESTORE PARAMETERS] [RESTORE LIST]<br />
Prompting you to choose from the following options:<br />
ENGLISH<br />
Page 21
VISCOUNT CM-100<br />
Pipe Organ Module<br />
o RESTORE PARAMETERS: this option allows the parameters of a single voice, chosen from the 12<br />
currently active on the instrument, to the factory values<br />
o RESTORE LIST. Restores the list and order of the voices active on the CM-100's 12 stops to their<br />
factory settings. Any changes made to the voices by means of the "voice change" function (point 3.2)<br />
will be cancelled<br />
Locate on the option required using the cursor keys and press ENTER to proceed; press ESC to return<br />
the system to the voice menu page and abort the current operation<br />
3.5.1 RESTORE PARAMETERSP<br />
When the function is accessed, the instrument prompts you to select which of the 12 voices currently<br />
present on the panel stops is to have its parameters restored. The display then shows the first selection<br />
page, comprising the first six voices<br />
Gedackt16 Prinzip8A Schwebng8<br />
HohlFlot8 Oktave4A SptzFlot4<br />
The voice required can be selected using the cursor keys. If the voice is not on the first video page, press<br />
the cursor key to select the next page.<br />
You can exit the procedure at any moment by pressing the EXIT key.<br />
Once the selection has been made, confirm the procedure by pressing the ENTER key: the instrument<br />
will request additional confirmation before proceeding<br />
Restore original voice parameters in:<br />
Prinzip8A - press ENTER to confirm -<br />
Press ENTER to complete the procedure or EXIT to abort the current operation and return to the VOICE<br />
menu<br />
3.5.2 RESTORE LIST<br />
As already mentioned, the RESTORE LIST function restores the list of the 12 voices associated to the<br />
panel stops to the factory settings. In practice, this cancels all the VOICE CHANGE operations (point 3.2)<br />
carried out by the user.<br />
Select the option of the same name from the V.F.S. menu and the instrument will request additional<br />
authorisation since once this operation has been concluded it will not be possible to return to the previous<br />
status<br />
Restore original VOICE LIST<br />
- press ENTER to confirm -<br />
Press ESC to abort the operation (no change to the voice list) or ENTER to perform the restore procedure<br />
ENGLISH<br />
When the procedure is complete a warning message<br />
Page 22
VISCOUNT CM-100<br />
Pipe Organ Module<br />
WARNING: Factory voices list has been<br />
restored - Please check labels<br />
will remind you that some voices have changed their positions, so presumably the labels on the stops<br />
will not correspond to the voices they refer to. The label check function, described in the previous<br />
section, will help you to solve this problem.<br />
Press EXIT to return to the voice menu<br />
3.6 LABEL CHECK<br />
After having changed or sorted the voices, it could happen that the name plates of the tabs do not<br />
correspond to the voices recalled.<br />
Therefore please verify this and in case it does not correspond, please change the name plates. The<br />
LABEL CHECK function is available for this purpose. To recall this function, select the LABEL CHECK<br />
option in the VOICES menu and press ENTER.<br />
The display then shows the progression of the voices currently assigned to the 12 tabs, three on each<br />
video page<br />
1>Gedackt16 2>Prinzip8A 3>Schwebng8<br />
Use the cursor keys and to scroll pages.<br />
In case the display shows the message:<br />
1>Gedackt16 2>Prinzip8A 3>Flote8<br />
Change labels and press ENTER when done<br />
it will mean that the voice has been changed and that it is necessary to replace the name plate. The Led<br />
of the rocker tab also will blink to let you recognize wich plate needs to be changed.<br />
Once the name plate has been changed (by following the procedures described on the next chapeter),<br />
press the ENTER key to confirm that plates have been changed.<br />
Press EXIT to leave the functions ad return to the VOICE menu<br />
3.6.2 Changing name plates<br />
To change the lables of the stops, ensuring that the name of the stop is the same as that of the voice<br />
loaded in the memory, just remove them with your fingers or using a small screwdriver (as shown below)<br />
and fit the correct one.<br />
The procedure is very easy as the plastic plates are just pressed into the stop.<br />
ENGLISH<br />
Page 23
VISCOUNT CM-100<br />
Pipe Organ Module<br />
3.7 SORT VOICES<br />
Once individual voices have been replaced by new ones it may be necessary to rearrange their<br />
progression across the 12 tabs on the front panel.<br />
Normally, the voices in an organ’s various sections are arranged with a stop progression that starts from<br />
the lower to the higher footages (32’, 16’, 8’, 4’, 2’, 1’).<br />
Within each group of the same footage, the families are then arranged as follows:<br />
Principals<br />
Open Flutes<br />
Bourdons (or Closed Flutes)<br />
Strings (or Mordents)<br />
Detuned: these voices are placed in the group of 8' voices in last position in the relative family<br />
Trumpet<br />
Mixtures<br />
The Reeds are placed after the last footage of the families listed above.<br />
The SORT VOICES function located on the VOICES menu allows all the CM-100’s voices to be sorted<br />
automatically on the basis of the criteria set out above.<br />
To recall this function, select the SORT VOICES option with cursor keys and press the ENTER button.<br />
The system will proceed displaying the following video page:<br />
VOICES AUTO-SORT PROCEDURE<br />
Press ENTER to start<br />
If you press ENTER again the procedure will start, while if you press ESC the display will return to the<br />
VOICE menu without making any changes.<br />
For as long as the operation takes the display will show the following video page<br />
SORTING VOICES * Please wait *<br />
- check out labels afer sort -<br />
Reminding you to use the label check function to check that the labels and stops correspond, since some<br />
voices may have changed their positions<br />
If the display shows the message "Voices already sorted"<br />
VOICES AUTO-SORT PROCEDURE<br />
- Voices already sorted -<br />
it means that the voices are already correctly arranged and therefore the sorting procedure will not be<br />
carried out<br />
ENGLISH<br />
Page 24
VISCOUNT CM-100<br />
Pipe Organ Module<br />
4. SETUP SECTION<br />
The setup section, accessed by pressing the button with the same name on the left of the CM-100<br />
display, contains all the instrument's general functions, such as management of the outputs, the MIDI<br />
interface, the reverb and tremulant effects and the display contrast.<br />
When the SETUP key is pressed, its LED lights up and the following video page appears on the display:<br />
[TREMULANT] [REVERB] [MIDI] [OUTS CTRL]<br />
[FINISH] [EXP. PEDAL] LCD contrast: 6<br />
giving access to the following options<br />
o TREMULANT: Tremulant effect modulation depth and speed settings<br />
o REVERB: Contains the reverb effect settings<br />
o MIDI: Setting of the operating mode, channels, filters and everything relating to the MIDI interface,<br />
including a handy data Bulk Dump function<br />
o OUT CTLS: Section which controls the CM-100's 6 outputs with volume and 5-band equalizer<br />
o FINISH: Section for saving and recalling the 4 instrument's 4 tonal finishing setups<br />
o EXP.PEDAL: Setting of the Range of the expression pedal (if any) connected to the rear panel<br />
EXP.PED connector<br />
o Lcd Contrast: Regulates the display contrast.<br />
Use the cursor key to select the section required and press the ENTER key to confirm the selection. You<br />
can exit this menu and return to the main menu page at any time by pressing the SETUP key or the EXIT<br />
key<br />
4.1 The TREMULANT effect<br />
In pipe organs, it is of fundamental importance for the air pressure to be constant in order to obtain an<br />
even, "sustained" sound. However, a number of mechanical devices were introduced to generate a<br />
number of periodic variations of varying intensity in the air flow.<br />
These variations produced a "tremulous" effect on the sound, which made a number of solo stops (such<br />
as the VOX HUMANA) more pleasant on the ear, and gave added expression to the wind stops.<br />
You can press the TREMULANT button (on the instrument's front panel) to enable or disable this effect.<br />
The effect is activated when the LED is on.<br />
ENGLISH<br />
Page 25
VISCOUNT CM-100<br />
Pipe Organ Module<br />
4.1.1 TEMULANT effect settings<br />
The CM-100 allows you to adjust the two fundamental parameters that set the character of the tremulant<br />
effect: the SPEED (modulation speed) and the DEPTH (modulation depth). You can also decide on which<br />
of the module's voices the tremulant effect is to act.<br />
To set the modulation speed and depth, proceed as described below:<br />
<br />
<br />
<br />
<br />
Locate on the instrument's Main page<br />
Press the SETUP button<br />
Use the cursor keys to select the "TREMULANT" option<br />
Press the ENTER key and the following video page will appear on the disp<br />
TREMULANT<br />
TREMULANT<br />
DEPTH:13<br />
SPEED:14<br />
Use the cursor and keys to select the field you require and turn the encoder to enter the values of<br />
your choice: when the operation is complete, the display wll return to the main page<br />
4.1.2 Differentiated activation<br />
As we will see when we discuss the instrument's MIDI characteristics (point 4.3), the CM-100 can be split<br />
into several sections, each of which will correspond to a separate MIDI channel, and thus to a specific<br />
manual.<br />
In this specific setup mode it may be necessary to disable the tremulant effect on some stops<br />
(corresponding to a specific midi channel / manual) for musical reasons. To do this, from the tremulant<br />
effect settings main page<br />
TREMULANT<br />
TREMULANT<br />
DEPTH:13<br />
SPEED:14<br />
Press the cursor key <br />
until the page below appears on the display<br />
TREMULANT TO MIDI CHANNELS IN SPLIT MODE<br />
1>YES 2>YES 3>NO 4> - 5> - 6> -<br />
The page shows the instrument's first 6 Midi channels.<br />
For the channels the system recognises as associated to one or more voices, a modifiable field with the<br />
options YES (tremulant in operation) or NO (tremulant off) will be made available.<br />
When the NO option is selected, the tremulant will not work for the voices associated to the<br />
corresponding midi channel (manual) even if it is turned on using the relative button on the front panel<br />
If the instrument shows the field "-" there are no voices associated to the channel, or the instrument is<br />
not currently in Split mode (see point 4.3).<br />
Now the cursor key can be used to select page<br />
ENGLISH<br />
TREMULANT TO MIDI CHANNELS IN SPLIT MODE<br />
7> - 8> - 9> - 10> - 11> - 12> -<br />
Page 26
VISCOUNT CM-100<br />
Pipe Organ Module<br />
and<br />
TREMULANT TO MIDI CHANNELS IN SPLIT MODE<br />
13> - 14> - 15> -<br />
which cover all the 16 midi channels which can be assigned to panel voices.<br />
To exit the video page use the cursor key <br />
SETUP area main menu page<br />
(back to previous page) or the EXIT key to return to the<br />
4.2 The REVERB effect<br />
Reverb, or reverberation, is the result of a series of sound reflections propagated inside a room.<br />
The order and value of each reflection depend on the room in which it occurs and a large number of<br />
factors come into play within any one room (e.g. the size of the room in which the phenomenon takes<br />
place, the nature of the materials of which it is made and the objects it contains, the listener's position,<br />
etc.).<br />
The powerful digital signal processors that form the "heart" of the CM-100 are able to perform the<br />
complicated task of artificially re-creating the complex reverberations that naturally occur in the types of<br />
building where pipe organs are normally installed, and thus generating the right reverb effect to complete<br />
the instrument's excellent timbre qualities.<br />
The reverb effect is provided in the headphones and on all six line outputs.<br />
4.2.1 REVERB effect settings<br />
There is a REVERB LEVEL trimmer on the CM-100 front panel<br />
When the trimmer is turned to the minimum setting, the reverb effect is deactivated; as the trimmer is<br />
turned up, the amount of effect will rise in proportion. This means you can make the setting you require<br />
depending on your own taste and the needs of the context in which the CM-100 is installed.<br />
The purpose of the REVERBERATION TYPE function in the SETUP menu is to allow you to select the<br />
type of reverb effect, ranging from a large church with strong reverb and many reflections to a small room<br />
with very short, muffled reverb.<br />
To do this, press the SETUP button and use the cursor keys to start the word REVERB flashing.<br />
Then press ENTER and the video page shown below will appear on the display.<br />
REVERBERATION<br />
type:Cathedral<br />
ENGLISH<br />
Page 27
VISCOUNT CM-100<br />
Pipe Organ Module<br />
The possible selections are:<br />
CATHEDRAL<br />
BASILICA<br />
GOTHIC CHURCH<br />
BAROQUE CHURCH<br />
ROMANIC CHURCH<br />
MODERN CHURCH<br />
PARISH<br />
CAPPELLA<br />
Use the encoder to select the type of reverb and press EXIT to save the selection and return to display<br />
of the SET-UP menu.<br />
4.3 MIDI<br />
The MIDI (Musical Instrument Digital Interface) interface allows instruments of different makes and kinds<br />
to communicate with each other, using this very specific protocol of codes. This allows the creation of<br />
systems of MIDI instruments, offering much greater versatility and control than is possible with single<br />
instruments. To make this communication possible, all MIDI instruments have two or three 5-pin DIN<br />
connectors called:<br />
o MIDI IN: The connector through which the instrument receives the MIDI data transmitted by other units.<br />
o MIDI OUT: The connector through which the instrument sends the MIDI data it has generated to other<br />
units.<br />
o MIDI THRU: This connector, not always provided on all instruments, is used for connecting several<br />
units in series, since it transmits the MIDI data exactly as they are received by the respective MIDI IN<br />
port.<br />
Most instruments equipped with MIDI interface transmit MIDI messages which specify, for example,<br />
which note has been played and with what dynamic, by means of the MIDI OUT connector. If this<br />
connector is connected to the MIDI IN connector of another MIDI instrument, such as an expander, the<br />
second instrument will respond exactly to the notes played on the transmitter instrument.<br />
The same type of information transfer is used for recording MIDI sequences. A computer or a sequencer<br />
can be used to record the MIDI data generated by the transmitter instrument. If these recorded data are<br />
sent back to the instrument, it automatically repeats the recorded performance.<br />
MIDI is able to transmit a multitude of digital data by means of just one cable, and thus just one<br />
connector. this is thanks to the MIDI channels. There are 16 MIDI channels, and in a similar way as for<br />
radio communications in which two stations can only communicate if they are tuned to the same<br />
frequency (or channel), two MIDI instruments connected together are only able to communicate if the<br />
transmitter instrument channel is the same as the receiver instrument channel.<br />
MIDI messages subdivide into channel messages and system messages. The following is a short<br />
description of these messages:<br />
ENGLISH<br />
NOTE ON<br />
This message is transmitted when a note is pressed on the keyboard. Each Note On message contains<br />
the following information:<br />
Note On: when a key has been struck;<br />
Note Number: the key which has been pressed, and therefore the relative note played;<br />
Velocity: note dynamic (i.e. the force applied when the key was struck).<br />
Note messages are expressed as a number from 0 to 127, with middle C represented by number<br />
60.<br />
Page 28
VISCOUNT CM-100<br />
Pipe Organ Module<br />
NOTE OFF<br />
This message is transmitted when a key struck previously is released.<br />
When it is received, the sound of the note relating to the key is switched off.<br />
PROGRAM CHANGE<br />
This message is used to select the programs or sounds of the receiver instrument.<br />
CONTROL CHANGE<br />
These are control messages (often associated to trimmers or pedals) used to add expression to the<br />
performance, allowing you to set (and control in real time if necessary) voice parameters such as<br />
volume (CC n.7) or the position of the expression pedals (CC n.11), etc.<br />
SYSTEM EXCLUSIVE<br />
These messages can only be interpreted by an instrument made by the same producer as the<br />
transmitter device (in some cases only by the same model). They mainly relate to the instrument's<br />
sound generation and programming parameters.<br />
The CM-100 uses these messages to control all the internal parameters and for switching the<br />
voices on and off.<br />
REAL TIME<br />
These messages are used for the real-time control of specific modules or functions of a connected<br />
instrument. These messages include the Start, Stop, Pause/Continue and Clock commands<br />
Since it is a sound module, the CM-100 needs to be connected to a "controlling" or "master" instrument,<br />
which will send it the data necessary for your performance, such as the notes to be played, the volume,<br />
the expression and other data.<br />
If the "master" instrument is a <strong>Viscount</strong> church organ, remote control of the switch-on and switch-off of<br />
the individual voice stops will also be possible.<br />
First connect the MIDI OUT connector of your master instrument (organ, keyboard or computer) to the<br />
CM-100's MIDI IN data input port. Use good quality MIDI cables no more than 15 metres long.<br />
Once the connection has been made, the two instruments have to be "tuned" to the same MIDI channel<br />
so that the data exchange can take place correctly.<br />
ENGLISH<br />
Page 29
VISCOUNT CM-100<br />
Pipe Organ Module<br />
4.3.1 The WHOLE and SPLIT modes<br />
The CM-100 sound module has two different modes for the reception of MIDI messages, called WHOLE<br />
and SPLIT. They are selected using a special button on the instrument's front panel.<br />
In the WHOLE (or "single manual") mode, the whole of the instrument responds to the MIDI commands<br />
resident on a single channel. This is the standard mode of most sound modules, and is particularly useful<br />
when the CM-100 is controlled using a keyboard, or using organs with more than one manual when only<br />
one manual is assigned to control the module.<br />
With the SPLIT mode selected, on the other hand, the CM-100 will be able to give different responses<br />
to several midi channels at a time, each of them with its own stop setup (settable by the user) .<br />
For example, with SPLIT mode the user can have stops 1, 2 and 3 responding to the MIDI 1 channel,<br />
while stop 4 responds to the MIDI 3 channel and the other stops to the MIDI 5 channel. In the final<br />
analysis, in SPLIT mode each stop can be assigned its own channel.<br />
Obviously, this mode is particularly useful when the CM-100 is to be controlled using organs which have<br />
several manuals, each of them with its own stop setup.<br />
4.3.2 Setting the MIDI Reception Channel in WHOLE Mode<br />
First, make sure that the LED of the WHOLE/SPLIT button on the CM front panel is off; otherwise, press<br />
the button of the same name to switch it off.<br />
Then press the SETUP button: the key LED comes on and the video page shown below will appear on<br />
the display.<br />
[TREMULANT] [REVERB] [MIDI] [OUTS CTRL]<br />
[FINISH] [EXP. PEDAL] LCD contrast: 6<br />
Use the CURSOR keys to select the MIDI field (the field is selected when the word MIDI is flashing), then<br />
press the ENTER key to confirm the selection.<br />
The display will show the options of the menu selected<br />
[WHOLE MODE] [SPLIT MODE] [FILTERS]<br />
[BULK DUMP] [CAPTURE VOICE ID]<br />
Press ENTER to select the WHOLE MODE option.<br />
The display will show the page for setting of the transmission (TX) and reception (RX) channels.<br />
CHANNEL SELECT Rx:1 TX: 1<br />
Use the cursor keys to select the RX option. Turn the encoder to select the channel required in a range<br />
from 1 to 15, taking care that the value set is the same as the master instrument transmission channel.<br />
ENGLISH<br />
If the ALL option is selected, the instrument will respond to any MIDI channel.<br />
Page 30
VISCOUNT CM-100<br />
Pipe Organ Module<br />
Once the settings have been made, press EXIT to return to the MIDI menu: the settings will automatically<br />
be saved, and will be retained even if the instrument is switched off. From the MIDI menu, you may return<br />
to the main page by pressing EXIT twice.<br />
4.3.3 Setting the MIDI Reception Channel in SPLIT Mode<br />
Press the WHOLE/SPLIT key to enable the multi-channel mode: when it is enabled, the LED of the key<br />
is constantly on.<br />
The procedure for setting the reception channels is similar to that described in point 3.3: from the main<br />
page, press the SETUP key<br />
[TREMULANT] [REVERB] [MIDI] [OUTS CTRL]<br />
[FINISH] [EXP. PEDAL] LCD contrast: 6<br />
then use the cursor keys to select the MIDI menu (the menu option is selected when it is flashing) and<br />
press ENTER<br />
[WHOLE MODE] [SPLIT MODE] [FILTERS]<br />
[BULK DUMP] [CAPTURE VOICE ID]<br />
Using the cursor keys, select the SPLIT MODE option and press ENTER<br />
CtBourd32> 1 Gedackt16> 1 Schwebng8> 1<br />
HohlFlot8> 1 Octave4A > 1 SptzFlot4> 2<br />
The video page contains the names of all the stops, in accordance with the instrument's current setup,<br />
followed by the value of the midi channel associated to each of them.<br />
With the usual procedure, use the CURSOR keys to select the value to be changed, and then modify it<br />
using the encoder.<br />
Note that:<br />
• When a stop is selected for modification, both its value on the display and the light in the rocker<br />
Tab switch on the panel flash<br />
• A stop can be selected for modification by pressing its key directly on the panel.<br />
• Illumination of the LEDs of the and buttons indicates the availability of a video page before<br />
or after the one currently displayed, respectively. Press the relative button to select it.<br />
Once the settings have been made, simply press EXIT to return to the MIDI menu: the settings made will<br />
automatically be enabled and saved. Then press EXIT to return to the SETUP video page, which can be<br />
exited by pressing the same key.<br />
<br />
Operation with Couplers<br />
The manual couplers are a particularly interesting feature. We have seen that in split mode it is possible<br />
to set a specific midi channel for each voice, meaning that the voices will respond to manuals different<br />
from those of the master organ. When two manuals are coupled together on the master organ, the CM-<br />
100 expects to receive the information on both the coupled channels simultaneously, to allow it to<br />
combine the stops. Some models of classical organ do not double-up the channels with the coupler<br />
active, and in this case the CM-100 does not implement the function.<br />
To deal with this problem, we have created a page allowing you to link the midi channel and the master<br />
organ manual.<br />
ENGLISH<br />
Page 31
VISCOUNT CM-100<br />
Pipe Organ Module<br />
Press the cursor key from the second split mode modification page and the display will show<br />
PEDAL CHOIR GREAT SWELL<br />
MIDI CHANNEL 4 3 2 1<br />
Where you can tell the CM-100 which midi channel corresponds to each manual, allowing it to obtain the<br />
couplings from other messages instead of from the channel.<br />
So after you have set the split mode channels you should enter this additional information to ensure<br />
perfect symbiosis between the expander and its master instrument.<br />
4.3.4 Setting the MIDI FILTERS<br />
A MIDI FILTER is a special function which allows a specific message to be cut out on all the MIDI<br />
channels (if it is a channelled message) in transmission and/or reception.<br />
For example, the note receive filter allows you not to accept MIDI notes on the MIDI IN port on all the<br />
MIDI channels received by the instrument.<br />
To set up the MIDI filters select the FILTERS field in the MIDI submenu. The following video page<br />
appears:<br />
MIDI FILTER Note CC PC SysEx Real<br />
RECEIVER NO NO NO NO NO<br />
This setting page is dedicate to the incoming MIDI messages (receiver) and the filters available for this<br />
section, shown on the top line of the display are,<br />
o Note: Note Messages<br />
o CC: Control Change (control messages)<br />
o PG: Program Change (messages for selecting voices memories)<br />
o SysEx: System Exclusive (system exclusive messages)<br />
o Real: Real Time messages ( Active Sensing).<br />
The bottom line contains the filter setting fields. Once they have been selected with the aid of the and<br />
cursor keys, you can set them with the values YES or NO as you prefer, by turning the encoder.<br />
Remember that YES means FILTER ON, so the message will NOT be accepted.<br />
Press the cursor for access to other types of incoming MIDI message which can be filtered<br />
MIDI FILTER Voices TremPar Coupler<br />
RECEIVER NO NO YES<br />
These are, in detail<br />
ENGLISH<br />
o VOICES: Incoming filter on the System Exclusive messages used to activate the voices<br />
o TREMPAR : Filter on the System Exclusive messages used to control the Tremulant parameters<br />
(speed and depth)<br />
o COUPLER: Activation of the MIDI filter on the Coupler control and activation messages<br />
As usual, the and cursor keys can be used to select the field required and adjust its status with the<br />
encoder<br />
Page 32
VISCOUNT CM-100<br />
Pipe Organ Module<br />
The last page of the filter menu allows you to enable the filters for the Control Change (CC) and System<br />
Exclusive (Sys) messages the instrument transmits on the MIDI OUT port, that means for the<br />
messages generated (and note received) by the CM-100<br />
MIDI FILTER CC Sysex<br />
TRANSMITTER NO NO<br />
To exit press the EXIT key or press the cursor key to select the previous pages.<br />
4.3.5 MIDI BULK DUMP<br />
The BULK DUMP function allows the contents of the instrument’s internal memory to be sent on the MIDI<br />
OUT port in the form of system exclusive messages (Sys. Ex.).<br />
These data can be recorded in a computer or sequencer, thus allowing the user to create himself one or<br />
more programming files and then reload them into the instrument when necessary. All this enables both<br />
the creation of backup copies of data and the formation of real programming files containing the user<br />
“finishing” (see chapter 4.5) resident in the instrument’s internal memory.<br />
To select the Bulk Dump function press the SETUP button (if not already selected ) and choose the MIDI<br />
option. The CM-100’s display will show:<br />
[WHOLE MODE] [SPLIT MODE] [FILTERS]<br />
[BULK DUMP] [CAPTURE VOICE ID]<br />
Now, using the cursor buttons, choose the BULK DUMP option and press the ENTER key.<br />
The video page that will appear will allow you to choose which finishing, of the four available, have to be<br />
sent to the MIDI OUT port in the form of sys-ex messages, to let you record them and create a back-up<br />
copy of your settings.<br />
:<br />
Bulk Dump:Finish1<br />
Press ENTER to start or EXIT to abort<br />
After making the appropriate selections, connect the CM-100 MIDI OUT connector to the MIDI IN<br />
connector of the unit which is to receive the data and switch the latter to record mode.<br />
Then press ENTER key and the CM-100 will start to send the data; the display will inform you about the<br />
dump progress until the message "Bulk Dump completed" appears on the display, at which point the<br />
procedure can be considered complete.<br />
:<br />
Bulk Dump:<br />
Bull Dump Progress[²²²²²² ]<br />
To reload the data, connect the MIDI OUT port of the device containing the bulk dump data to the<br />
intrument’s MIDI IN and start playback. The CM-100display will show, while receiving data, a message<br />
confirming the operation in progress.<br />
Warning: The user must absolutely never attempt to modify the contents of the<br />
exclusive code file using file editors; even an apparently tiny variation of just one<br />
letter or number will mean that the CM-100 wil be unable to recognize the file, and<br />
all the data it contains will be irreparably lost.<br />
ENGLISH<br />
Page 33
VISCOUNT CM-100<br />
Pipe Organ Module<br />
4.3.6 CAPTURE VOICE ID<br />
The 12 voice stops can be switched on and off in remote mode using special System Exclusive MIDI<br />
codes which contain the voice's identification and can control its status.<br />
The classical organs in the large <strong>Viscount</strong> range have their own Exclusive coding with which the CM-100<br />
is totally compatible; this means that you can use a <strong>Viscount</strong> console as master instrument and control<br />
the sound setups in remote mode without taking your hands off the organ.<br />
However, it may occur that the voice currently active on the CM-100 stops is not present on the master<br />
instrument, or special circumstances may mean that a specific expander voice has to be activated in<br />
correspondence with a different organ stop.<br />
The CAPTURE ID function allows the user to capture the voice switch-on code emitted by the master<br />
instrument and assign it to any stop on the panel. To do this, from the MIDI menu<br />
[WHOLE MODE] [SPLIT MODE] [FILTERS]<br />
[BULK DUMP] [CAPTURE VOICE ID]<br />
then select the CAPTURE VOICE ID option and press ENTER.<br />
The instrument will first ask you to select which of the twelve voices associated to stops is to house the<br />
new on/off command<br />
Gedackt16 Prinzip8A Schwebng8<br />
HohlFlot8 Oktave4A SptzFlot4<br />
Using the cursor keys select the voice you wish and press ENTER.<br />
If, as example, the chosen voice is Gedackt 16, as soon as the selection has been made the instrument<br />
will prompt you to send the code to be captured to its MIDI IN input<br />
CAPTURE ID FOR LOCAL REGISTER Gedackt16<br />
Please, push REMOTE REGISTER<br />
If the instruments are connected correctly, you have only to press the remote organ stop, as if you were<br />
activating the voice: the code generated by this action will be transmitted to the CM-100, which in this<br />
special operating mode will associate it to the chosen register.<br />
To confirm this the display will show<br />
CAPTURE ID FOR LOCAL REGISTER Gedackt16<br />
ID CAPTURED! please, press EXIT<br />
Now press EXIT to exit.<br />
ENGLISH<br />
From now on the new Midi code - Stop association is ready for use in all instrument operating<br />
environments<br />
If the code captured is already associated to another active voice, a special error message will appear<br />
on the display<br />
Page 34
VISCOUNT CM-100<br />
Pipe Organ Module<br />
CAPTURE ID FOR LOCAL REGISTER Gedackt16<br />
ID ALREADY USED by Tab 9, press EXIT<br />
4.4 OUTS CTRL<br />
N.B. The CAPTURE ID function can only be used with VISCOUNT classical organs.<br />
The function will not be completed if the organ is by a different constructor.<br />
Another important feature of the acupipe technology is the presence of audio parameters allowing<br />
control of the signal present on each output connector on the rear panel.<br />
The adjustment of each output's audio parameters allows even more realistic, accurate simulation of the<br />
original wind-chests. Moreover, the possibility of real-time control of the acoustic response of each<br />
speaker connected, at any moment, guarantees an extremely quick, effective sound setup.<br />
Each output has its own volume and equalization controls; these parameters are all found in the OUTS<br />
CTRL (that stands for CONTROLS) function, that you can select in the SETUP menu with the aid of the<br />
usual cursor buttons. By pressing ENTER the display will show the following page<br />
VOLUME Output: 1 2 3 4 5 6<br />
[dB] +3 0 -6 + +8 +8<br />
The fisrt video page contains the individual levels of the 6 outputs located in the real panel, identified<br />
by the numbers on the top line of the video page.<br />
The bottom line contains the Volume value (reported in dB) actually set for each of them: use the cursor<br />
and buttons to move select the desired output and the encoder to make the appropriate setting.<br />
To have access to the EQUALIZER settings page, simply press the cursor buttom from the volume<br />
settings page: tha display will show:<br />
Out1 100 315 1K 3.1K 10K<br />
Equalizer 0 0 0 0 0<br />
This video page allows you to set up the 5-band graphic equalizers available for each individual output.<br />
The first field in the top right-hand corner indicates the output for which the equalisation values are<br />
being displayed: use the encoder to choose select the desired one among the 6 available.<br />
Out2 100 315 1K 3.1K 10K<br />
Equalizer +4 +1 -2 +4 -4<br />
Now use the and buttons to locate the cursor in the adjustment fields (bottom line) of the five<br />
operating bands for which the signal gain / attenuation can be set in a range of values from +8 dB to -8<br />
dB.<br />
A graphic indication of the equalizer being adjusted is also displayed on the right of the screen, in real<br />
time.<br />
ENGLISH<br />
Page 35
VISCOUNT CM-100<br />
Pipe Organ Module<br />
4.5 FINISHING<br />
A tonal finishing memory is a special memory area which stores all the settings made on the instrument,<br />
from tuning through to the parameters of the individual voices and the midi reception channel.<br />
Each finishing setup is actually a very detailed snapshot of your instrument. The only exception is for the<br />
voices assigned to the 12 stops, which are not memorised and are a global parameter, common to all the<br />
instrument's sections.<br />
There are four finishing memories available, and they can be recalled directly from the instrument's main<br />
page through the value of te STATUS field<br />
M.BANK:1 ENSEMBLE:2 TRANSP.: 0 TUNE: 0<br />
TEMPERAMENT:Equal STATUS: FINISH1<br />
All the settings made on the instrument are automatically saved in the current tonal finishing shown in<br />
the Status field. When the settings of a finishing setup have been changed from the factory settings, two<br />
asterisks appear beside the Finish name<br />
M.BANK:1 ENSEMBLE:2 TRANSP.:+1 TUNE: 0<br />
TEMPERAMENT:Equal<br />
STATUS:*FINISH1*<br />
To recall the contents of a finishing setup saved previously, select the STATUS field using the cursor keys<br />
and turn the encoder.<br />
4.5.1 STORE Finshing<br />
As already stated in the previous point, the instrument's tonal finishing setups are saved in real time and<br />
all changes made are automatically stored in the instrument. However, it may be necessary to store the<br />
finishing setup in a "permanent" memory in the instrument.<br />
This is done on the user's request, and creates a copy of the setup which is protected against accidental<br />
modification.<br />
From the setup section main menu page<br />
[TREMULANT] [REVERB] [MIDI] [OUTS CTRL]<br />
[FINISH] [EXP. PEDAL] LCD contrast: 6<br />
Use the cursor keys to locate on the FINISH field and press ENTER<br />
ORGAN FINISHING Store to location:1<br />
press ENTER to continue<br />
ENGLISH<br />
The Store function allows you to save the current finishing setup (the one currently selected on the main<br />
page) on one of the instrument's "mass" memory locations, to create a copy which can be recalled as<br />
necessary.<br />
Use the cursor key to select the Location field (its number flashes) and turn the encoder to select the<br />
location required and press ENTER. A confirmation prompt page will appear on the display<br />
Page 36
VISCOUNT CM-100<br />
Pipe Organ Module<br />
ORGAN FINISHING Store to location:1<br />
Press ENTER to Store<br />
If the selection is correct, press ENTER to proceed.<br />
You can press EXIT to abort the operation and return to the previous menu.<br />
4.5.2 RECALL FINISHING<br />
The Finishing recall function allows you to download the data stored previously in a backup location into<br />
the active finishing setup.<br />
If you need to restore your finishing setup to a known condition, select the finish function and use the<br />
cursor keys to make the Store to field flash.<br />
Turn the encoder and the field will change to Recall from.<br />
ORGAN FINISHING Recall from location:2<br />
press ENTER to continue<br />
Move the cursor to the right and select the memory location containing the data saved previously, then<br />
press ENTER.<br />
Once again, a confirmation prompt will ask you to press the ENTER key to proceed (EXIT if you wish to<br />
abort the operation)<br />
ORGAN FINISHING Recall from location:2<br />
Press ENTER to recall<br />
When the operation is complete, the instrument will automatically return to the finishing setting video<br />
page with the current finishing setup loaded with the data saved earlier.<br />
Press EXIT to exit and return to the setup menu, then the EXIT key again to return to the main menu<br />
page.<br />
4.7 DISPLAY CONTRAST<br />
The cm-100's display has a contrast adjustment function allowing the maximum visibility to be obtained<br />
for the organist's performing angle.<br />
The setting can be made directly from the SETUP menu by locating the cursor on the Lcd contrast field<br />
and setting the value using the Whis encoder.<br />
[TREMULANT] [REVERB] [MIDI] [OUTS CTRL]<br />
[FINISH] [EXP. PEDAL] LCD contrast: 4<br />
The contrast value will be automatically saved. Press EXIT or SETUP buttons to retrun to the<br />
instrument’s main menu<br />
ENGLISH<br />
Page 37
VISCOUNT CM-100<br />
Pipe Organ Module<br />
5. FACTORY SETTINGS<br />
The Factory Settings procedure allows you to restore the factory settings of all the instrument's internal<br />
parameters (voices inclueded), deleting all the changes made by the user.<br />
To perform the Factory Settings procedure, switch the instrument on while keeping the Voice memory<br />
1, 2 and 3 keys pressed, until the display shows the following video page<br />
RESTORING FACTORY SETTINGS<br />
PLEASE WAIT<br />
Release the keys. After a few moments, the message confirming that the factory settings have been<br />
loaded will be displayed.<br />
FACTORY SETTINGS RESTORED<br />
The instrument will automatically be rebooted.<br />
ENGLISH<br />
Page 38
VISCOUNT CM-100<br />
Pipe Organ Module<br />
APPENDIX<br />
- <strong>CM100</strong> VOICES LIBRARY<br />
Family: PRINCIPALS<br />
Long name Display Abbreviation Voice #<br />
Contra Principal 32' . . . . . . . . . . . . . .CtPrinc32 . . . . . . . . . . . . . . . . . . . . . . . . . . .0<br />
Double Open Wood 32' . . . . . . . . . . .DbOpnWd32 . . . . . . . . . . . . . . . . . . . . . . . . .1<br />
Prestant 32' . . . . . . . . . . . . . . . . . . . .Prestnt32 . . . . . . . . . . . . . . . . . . . . . . . . . . . .2<br />
Double Diapason 16' . . . . . . . . . . . . .DbDiaps16 . . . . . . . . . . . . . . . . . . . . . . . . . .3<br />
Open Wood 16' . . . . . . . . . . . . . . . . .OpenWod16 . . . . . . . . . . . . . . . . . . . . . . . . .4<br />
Prestant 16' . . . . . . . . . . . . . . . . . . . .Prestnt16 . . . . . . . . . . . . . . . . . . . . . . . . . . . .5<br />
Principale 16' A . . . . . . . . . . . . . . . . .Princp16A . . . . . . . . . . . . . . . . . . . . . . . . . . .6<br />
Principale 16' B . . . . . . . . . . . . . . . . .Princp16B . . . . . . . . . . . . . . . . . . . . . . . . . . .7<br />
Principale 16' C . . . . . . . . . . . . . . . . .Prinzip16 . . . . . . . . . . . . . . . . . . . . . . . . . . . .8<br />
Conical Diapason 8' . . . . . . . . . . . . . .ConicDps8 . . . . . . . . . . . . . . . . . . . . . . . . . . .9<br />
Diapason 8' A . . . . . . . . . . . . . . . . . . .Diapasn8A . . . . . . . . . . . . . . . . . . . . . . . . . . .10<br />
Diapason 8' B . . . . . . . . . . . . . . . . . . .Diapasn8B . . . . . . . . . . . . . . . . . . . . . . . . . . .11<br />
First Open Diapason 8' . . . . . . . . . . .FstOpDps8 . . . . . . . . . . . . . . . . . . . . . . . . . .12<br />
Geigen Diapason 8' . . . . . . . . . . . . . .GeignDps8 . . . . . . . . . . . . . . . . . . . . . . . . . .13<br />
Gemshorn 8' A . . . . . . . . . . . . . . . . . .Gemshrn8A . . . . . . . . . . . . . . . . . . . . . . . . . .14<br />
Gemshorn 8' B . . . . . . . . . . . . . . . . . .Gemshrn8B . . . . . . . . . . . . . . . . . . . . . . . . . .15<br />
Gemshorn 8' C . . . . . . . . . . . . . . . . . .Gemshrn8C . . . . . . . . . . . . . . . . . . . . . . . . . .16<br />
Horn Diapason 8' . . . . . . . . . . . . . . . .HornDpsn8 . . . . . . . . . . . . . . . . . . . . . . . . . .17<br />
Octave Wood 8' . . . . . . . . . . . . . . . . .OctaveWd8 . . . . . . . . . . . . . . . . . . . . . . . . . .18<br />
Ottava 8' . . . . . . . . . . . . . . . . . . . . . . .Ottava8 . . . . . . . . . . . . . . . . . . . . . . . . . . . . .19<br />
Pedal Principal 8' . . . . . . . . . . . . . . . .PedPrinc8 . . . . . . . . . . . . . . . . . . . . . . . . . . .20<br />
Prestant 8' . . . . . . . . . . . . . . . . . . . . .Prestant8 . . . . . . . . . . . . . . . . . . . . . . . . . . . .21<br />
Principal 8' . . . . . . . . . . . . . . . . . . . . .Principl8 . . . . . . . . . . . . . . . . . . . . . . . . . . . .22<br />
Prinzipal 8' A . . . . . . . . . . . . . . . . . . .Prinzip8A . . . . . . . . . . . . . . . . . . . . . . . . . . . .23<br />
Prinzipal 8' B . . . . . . . . . . . . . . . . . . .Prinzip8B . . . . . . . . . . . . . . . . . . . . . . . . . . . .24<br />
Prinzipal 8' C . . . . . . . . . . . . . . . . . . .Prinzip8C . . . . . . . . . . . . . . . . . . . . . . . . . . . .25<br />
Second Open Diapason 8' . . . . . . . . .SndOpDpn8 . . . . . . . . . . . . . . . . . . . . . . . . .26<br />
First Octave 4' . . . . . . . . . . . . . . . . . .FrstOctv4 . . . . . . . . . . . . . . . . . . . . . . . . . . . .27<br />
Octave Geigen 4' . . . . . . . . . . . . . . . .OctGeign4 . . . . . . . . . . . . . . . . . . . . . . . . . . .28<br />
Oktave 4' A . . . . . . . . . . . . . . . . . . . . .Oktave4A . . . . . . . . . . . . . . . . . . . . . . . . . . .29<br />
Oktave 4' B . . . . . . . . . . . . . . . . . . . .Oktave4B . . . . . . . . . . . . . . . . . . . . . . . . . . .30<br />
Oktave 4' C . . . . . . . . . . . . . . . . . . . .Oktave4C . . . . . . . . . . . . . . . . . . . . . . . . . . .31<br />
Ottava 4' . . . . . . . . . . . . . . . . . . . . . . .Ottava4 . . . . . . . . . . . . . . . . . . . . . . . . . . . . .32<br />
Praestant 4' . . . . . . . . . . . . . . . . . . . .Praestnt4 . . . . . . . . . . . . . . . . . . . . . . . . . . . .33<br />
Principal Octave 4' . . . . . . . . . . . . . . .PrcplOct4 . . . . . . . . . . . . . . . . . . . . . . . . . . .34<br />
Prinzipal Oktav 4' . . . . . . . . . . . . . . . .PrzplOkt4 . . . . . . . . . . . . . . . . . . . . . . . . . . .35<br />
Second Octave 4' . . . . . . . . . . . . . . . .SndOctav4 . . . . . . . . . . . . . . . . . . . . . . . . . .36<br />
Violin Diapason 4' . . . . . . . . . . . . . . .VlnDpnOc4 . . . . . . . . . . . . . . . . . . . . . . . . . .37<br />
Prinzipal 2 2/3' . . . . . . . . . . . . . . . . . .Quint223A . . . . . . . . . . . . . . . . . . . . . . . . . . .38<br />
Quint 2 2/3' . . . . . . . . . . . . . . . . . . . .Quint223B . . . . . . . . . . . . . . . . . . . . . . . . . . .39<br />
Twelfth 2 2/3' . . . . . . . . . . . . . . . . . . .Twlfth223 . . . . . . . . . . . . . . . . . . . . . . . . . . . .40<br />
Fifteenth 2' . . . . . . . . . . . . . . . . . . . . .Fiftenth2 . . . . . . . . . . . . . . . . . . . . . . . . . . . .41<br />
Oktave 2' A . . . . . . . . . . . . . . . . . . . . .Oktave2A . . . . . . . . . . . . . . . . . . . . . . . . . . .42<br />
Oktave 2' B . . . . . . . . . . . . . . . . . . . .Oktave2B . . . . . . . . . . . . . . . . . . . . . . . . . . .43<br />
Superoktave 2' . . . . . . . . . . . . . . . . . .Superokt2 . . . . . . . . . . . . . . . . . . . . . . . . . . .44<br />
Superottava 2' . . . . . . . . . . . . . . . . . .Superott2 . . . . . . . . . . . . . . . . . . . . . . . . . . . .45<br />
Super Octave 2' . . . . . . . . . . . . . . . . .SuprOctv2 . . . . . . . . . . . . . . . . . . . . . . . . . . .46<br />
Terz 1 3/5' . . . . . . . . . . . . . . . . . . . . .Terz13/5 . . . . . . . . . . . . . . . . . . . . . . . . . . . .47<br />
Larigot 1 1/3' . . . . . . . . . . . . . . . . . . .Larigt113 . . . . . . . . . . . . . . . . . . . . . . . . . . . .48<br />
Nineteenth 1 1/3' . . . . . . . . . . . . . . . .Nintth113 . . . . . . . . . . . . . . . . . . . . . . . . . . . .49<br />
APPENDIX<br />
Appendix 1
VISCOUNT CM-100<br />
Pipe Organ Module<br />
Family: STRINGS<br />
Long name Display Abbreviation Voice #<br />
Contra Violone 32' . . . . . . . . . . . . . . .CtVioln32 . . . . . . . . . . . . . . . . . . . . . . . . . . . .50<br />
Gross Gambe 16' . . . . . . . . . . . . . . . .GrsGamb16 . . . . . . . . . . . . . . . . . . . . . . . . . .51<br />
Violone 16' A . . . . . . . . . . . . . . . . . . .Violon16A . . . . . . . . . . . . . . . . . . . . . . . . . . .52<br />
Violone 16' B . . . . . . . . . . . . . . . . . . .Violon16B . . . . . . . . . . . . . . . . . . . . . . . . . . .53<br />
Aeoline 8' . . . . . . . . . . . . . . . . . . . . . .Aeoline8 . . . . . . . . . . . . . . . . . . . . . . . . . . . .54<br />
Gamba 8' C . . . . . . . . . . . . . . . . . . . .Gamba8C . . . . . . . . . . . . . . . . . . . . . . . . . . .55<br />
Viola 8' . . . . . . . . . . . . . . . . . . . . . . . .Viola8 . . . . . . . . . . . . . . . . . . . . . . . . . . . . . .56<br />
Family: FLUTES<br />
Long name Display Abbreviation Voice #<br />
Doppel Flute 8' . . . . . . . . . . . . . . . . . .DoplFlut8 . . . . . . . . . . . . . . . . . . . . . . . . . . . .57<br />
Flöte 8' . . . . . . . . . . . . . . . . . . . . . . . .Flote8 . . . . . . . . . . . . . . . . . . . . . . . . . . . . . .58<br />
Flute Harmonique 8' . . . . . . . . . . . . .FltHrmnq8 . . . . . . . . . . . . . . . . . . . . . . . . . . .59<br />
Flute Traverse 8' . . . . . . . . . . . . . . . .FltTravr8 . . . . . . . . . . . . . . . . . . . . . . . . . . . .60<br />
Holh Flöte 8' . . . . . . . . . . . . . . . . . . . .HohlFlot8 . . . . . . . . . . . . . . . . . . . . . . . . . . . .61<br />
HolFluit 8' . . . . . . . . . . . . . . . . . . . . . .HolFluit8 . . . . . . . . . . . . . . . . . . . . . . . . . . . .62<br />
Traverse Flöte 8' . . . . . . . . . . . . . . . .TravFlot8 . . . . . . . . . . . . . . . . . . . . . . . . . . . .63<br />
Block Flöte 4' A . . . . . . . . . . . . . . . . .BlckFlt4A . . . . . . . . . . . . . . . . . . . . . . . . . . . .64<br />
Block Flöte 4' B . . . . . . . . . . . . . . . . .BlckFlt4B . . . . . . . . . . . . . . . . . . . . . . . . . . . .65<br />
Flute d'Amore 4' . . . . . . . . . . . . . . . . .FltdAmor4 . . . . . . . . . . . . . . . . . . . . . . . . . . .66<br />
Harmonic Flöte 4' . . . . . . . . . . . . . . . .HarmFlot4 . . . . . . . . . . . . . . . . . . . . . . . . . . .67<br />
Major Flute 4' . . . . . . . . . . . . . . . . . . .MajFlute4 . . . . . . . . . . . . . . . . . . . . . . . . . . .68<br />
Night Horn 4' . . . . . . . . . . . . . . . . . . .NightHrn4 . . . . . . . . . . . . . . . . . . . . . . . . . . .69<br />
Offen Flöte 4 ' . . . . . . . . . . . . . . . . . .OffnFlot4 . . . . . . . . . . . . . . . . . . . . . . . . . . . .70<br />
Spitz Flöte 4 ' . . . . . . . . . . . . . . . . . . .SptzFlot4 . . . . . . . . . . . . . . . . . . . . . . . . . . . .71<br />
Wald Flöte 4 ' . . . . . . . . . . . . . . . . . . .WaldFlot4 . . . . . . . . . . . . . . . . . . . . . . . . . . .72<br />
Flute Twelfth 2 2/3' . . . . . . . . . . . . . . .FlutTw223 . . . . . . . . . . . . . . . . . . . . . . . . . . .73<br />
Block Flöte 2 ' . . . . . . . . . . . . . . . . . .BlckFlot2 . . . . . . . . . . . . . . . . . . . . . . . . . . . .74<br />
Piccolo 2' A . . . . . . . . . . . . . . . . . . . .Piccolo2A . . . . . . . . . . . . . . . . . . . . . . . . . . .75<br />
Piccolo 2' B . . . . . . . . . . . . . . . . . . . .Piccolo2B . . . . . . . . . . . . . . . . . . . . . . . . . . .76<br />
Recorder 2' . . . . . . . . . . . . . . . . . . . .Recorder2 . . . . . . . . . . . . . . . . . . . . . . . . . . .77<br />
Spits Fluit 2' . . . . . . . . . . . . . . . . . . . .SpitFlut2 . . . . . . . . . . . . . . . . . . . . . . . . . . . .78<br />
Terts 1 3/5' . . . . . . . . . . . . . . . . . . . . .Terts135 . . . . . . . . . . . . . . . . . . . . . . . . . . . .79<br />
Tierce 1 3/5' . . . . . . . . . . . . . . . . . . . .Tierce135 . . . . . . . . . . . . . . . . . . . . . . . . . . .80<br />
Flageolet 1 1/3' . . . . . . . . . . . . . . . . .Flaglt113 . . . . . . . . . . . . . . . . . . . . . . . . . . . .81<br />
Sifflöte 1' . . . . . . . . . . . . . . . . . . . . . .Sifflote1 . . . . . . . . . . . . . . . . . . . . . . . . . . . . .82<br />
Siflet 1' . . . . . . . . . . . . . . . . . . . . . . . .Siflet1 . . . . . . . . . . . . . . . . . . . . . . . . . . . . . .83<br />
Family: BOURDONS<br />
APPENDIX<br />
Long name Display Abbreviation Voice #<br />
Contra Bourdon 32' . . . . . . . . . . . . . .CtBourd32 . . . . . . . . . . . . . . . . . . . . . . . . . . .84<br />
Double Lieblich 32' . . . . . . . . . . . . . .DbLiebl32 . . . . . . . . . . . . . . . . . . . . . . . . . . .85<br />
Major Bass 32' . . . . . . . . . . . . . . . . . .MajBass32 . . . . . . . . . . . . . . . . . . . . . . . . . .86<br />
Bourdon 16' . . . . . . . . . . . . . . . . . . . .Bourdon16 . . . . . . . . . . . . . . . . . . . . . . . . . . .87<br />
Gedackt 16' . . . . . . . . . . . . . . . . . . . .Gedackt16 . . . . . . . . . . . . . . . . . . . . . . . . . . .88<br />
Holzgedackt 16' . . . . . . . . . . . . . . . . .Hlzgdkt16 . . . . . . . . . . . . . . . . . . . . . . . . . . .89<br />
Major Bass 16' . . . . . . . . . . . . . . . . . .MajBass16 . . . . . . . . . . . . . . . . . . . . . . . . . .90<br />
Minor Bourdon 16' . . . . . . . . . . . . . . .MnBourd16 . . . . . . . . . . . . . . . . . . . . . . . . . .91<br />
Pedal Bourdon 16' . . . . . . . . . . . . . . .PedBrdn16 . . . . . . . . . . . . . . . . . . . . . . . . . .92<br />
Quintadena 16' . . . . . . . . . . . . . . . . . .Quintdn16 . . . . . . . . . . . . . . . . . . . . . . . . . . .93<br />
Stopped Diapason 16' . . . . . . . . . . . .StpDpsn16 . . . . . . . . . . . . . . . . . . . . . . . . . . .94<br />
Bordone 8' . . . . . . . . . . . . . . . . . . . . .Bordone8 . . . . . . . . . . . . . . . . . . . . . . . . . . . .95<br />
Appendix 2
VISCOUNT CM-100<br />
Pipe Organ Module<br />
Family: BOURDONS<br />
Long name Display Abbreviation Voice #<br />
Bourdon 8' . . . . . . . . . . . . . . . . . . . . .Bourdon8 . . . . . . . . . . . . . . . . . . . . . . . . . . . .96<br />
Chimney Flute 8' . . . . . . . . . . . . . . . .ChimnyFl8 . . . . . . . . . . . . . . . . . . . . . . . . . . .97<br />
Quintadena 8' . . . . . . . . . . . . . . . . . . .Quintadn8 . . . . . . . . . . . . . . . . . . . . . . . . . . .98<br />
Rohr Flöte 8' . . . . . . . . . . . . . . . . . . .RohrFlot8 . . . . . . . . . . . . . . . . . . . . . . . . . . .99<br />
Rohr Gedackt 8' . . . . . . . . . . . . . . . . .RohrGdkt8 . . . . . . . . . . . . . . . . . . . . . . . . . . .100<br />
Stopped Flute 8' . . . . . . . . . . . . . . . . .StopdFlt8 . . . . . . . . . . . . . . . . . . . . . . . . . . . .101<br />
Stopped Diapason 8' A . . . . . . . . . . .StpDpsn8A . . . . . . . . . . . . . . . . . . . . . . . . . .102<br />
Stopped Diapason 8' B . . . . . . . . . . .StpDpsn8B . . . . . . . . . . . . . . . . . . . . . . . . . .103<br />
Quintadena 5 1/3' . . . . . . . . . . . . . . . .Quintd513 . . . . . . . . . . . . . . . . . . . . . . . . . . .104<br />
Bourdon 4' . . . . . . . . . . . . . . . . . . . . .Bourdon4 . . . . . . . . . . . . . . . . . . . . . . . . . . . .105<br />
Spindle Flute 4' . . . . . . . . . . . . . . . . .SpndlFlt4 . . . . . . . . . . . . . . . . . . . . . . . . . . . .106<br />
Nazard 2 2/3' A . . . . . . . . . . . . . . . . .Nazrd223A . . . . . . . . . . . . . . . . . . . . . . . . . .107<br />
Nazard 2 2/3' B . . . . . . . . . . . . . . . . .Nazrd223B . . . . . . . . . . . . . . . . . . . . . . . . . .108<br />
Tapered Twelfth 2 2/3' . . . . . . . . . . . .TpdTwl223 . . . . . . . . . . . . . . . . . . . . . . . . . . .109<br />
Woud Fluit 2' . . . . . . . . . . . . . . . . . . .WoudFlut2 . . . . . . . . . . . . . . . . . . . . . . . . . . .110<br />
Family: REEDS<br />
Long name Display Abbreviation Voice #<br />
Contra Bombarde 32' A . . . . . . . . . . .CtBomb32A . . . . . . . . . . . . . . . . . . . . . . . . . .111<br />
Contra Bombarde 32' B . . . . . . . . . . .CtBomb32B . . . . . . . . . . . . . . . . . . . . . . . . . .112<br />
Contra Fagotto 32' . . . . . . . . . . . . . . .CtFagot32 . . . . . . . . . . . . . . . . . . . . . . . . . . .113<br />
Ophecleide 32' . . . . . . . . . . . . . . . . . .Ophecld32 . . . . . . . . . . . . . . . . . . . . . . . . . . .114<br />
Pedal Bombarde 32' . . . . . . . . . . . . .PdlBmbd32 . . . . . . . . . . . . . . . . . . . . . . . . . .115<br />
Bombarde 16' . . . . . . . . . . . . . . . . . . .Bombard16 . . . . . . . . . . . . . . . . . . . . . . . . . .116<br />
Double Tromba 16' . . . . . . . . . . . . . .DbTromb16 . . . . . . . . . . . . . . . . . . . . . . . . . .117<br />
Dulciana 16' A . . . . . . . . . . . . . . . . . .Dlcian16A . . . . . . . . . . . . . . . . . . . . . . . . . . .118<br />
Dulciana 16' B . . . . . . . . . . . . . . . . . .Dlcian16B . . . . . . . . . . . . . . . . . . . . . . . . . . .119<br />
Fagot 16' . . . . . . . . . . . . . . . . . . . . . .Fagot16 . . . . . . . . . . . . . . . . . . . . . . . . . . . . .120<br />
Fagott 16' A . . . . . . . . . . . . . . . . . . . .Fagott16A . . . . . . . . . . . . . . . . . . . . . . . . . . .121<br />
Fagott 16' B . . . . . . . . . . . . . . . . . . . .Fagott16B . . . . . . . . . . . . . . . . . . . . . . . . . . .122<br />
Pedal Bazuin 16' . . . . . . . . . . . . . . . .PedBazn16 . . . . . . . . . . . . . . . . . . . . . . . . . .123<br />
Pedal Trumpet 16' . . . . . . . . . . . . . . .PedTrpt16 . . . . . . . . . . . . . . . . . . . . . . . . . . .124<br />
Posaune 16' . . . . . . . . . . . . . . . . . . . .Posaune16 . . . . . . . . . . . . . . . . . . . . . . . . . .125<br />
Regaal 16' . . . . . . . . . . . . . . . . . . . . .Regaal16 . . . . . . . . . . . . . . . . . . . . . . . . . . . .126<br />
Trombone 16' A . . . . . . . . . . . . . . . . .Trombn16A . . . . . . . . . . . . . . . . . . . . . . . . . .127<br />
Trombone 16' B . . . . . . . . . . . . . . . . .Trombn16B . . . . . . . . . . . . . . . . . . . . . . . . . .128<br />
Waldhorn 16' . . . . . . . . . . . . . . . . . . .Waldhrn16 . . . . . . . . . . . . . . . . . . . . . . . . . . .129<br />
Bombarde 8' . . . . . . . . . . . . . . . . . . . .Bombarde8 . . . . . . . . . . . . . . . . . . . . . . . . . .130<br />
Clarinet 8' A . . . . . . . . . . . . . . . . . . . .Clarnet8A . . . . . . . . . . . . . . . . . . . . . . . . . . .131<br />
Clarinet 8' B . . . . . . . . . . . . . . . . . . . .Clarnet8B . . . . . . . . . . . . . . . . . . . . . . . . . . .132<br />
Corno d'Amore 8' . . . . . . . . . . . . . . . .CornoAmr8 . . . . . . . . . . . . . . . . . . . . . . . . . .133<br />
Cornopean 8' . . . . . . . . . . . . . . . . . . .Cornopea8 . . . . . . . . . . . . . . . . . . . . . . . . . .134<br />
Echo Trompet 8' . . . . . . . . . . . . . . . . .EchoTrpt8 . . . . . . . . . . . . . . . . . . . . . . . . . . .135<br />
Fagotto 8' . . . . . . . . . . . . . . . . . . . . . .Fagotto8 . . . . . . . . . . . . . . . . . . . . . . . . . . . .136<br />
French Vox Humana 8' . . . . . . . . . . .FrenchVH8 . . . . . . . . . . . . . . . . . . . . . . . . . .137<br />
Hobo 8' . . . . . . . . . . . . . . . . . . . . . . . .Hobo8 . . . . . . . . . . . . . . . . . . . . . . . . . . . . . .138<br />
Hobo d'Amour 8' . . . . . . . . . . . . . . . .HobodAmr8 . . . . . . . . . . . . . . . . . . . . . . . . . .139<br />
Klarinet 8' . . . . . . . . . . . . . . . . . . . . . .Klarinet8 . . . . . . . . . . . . . . . . . . . . . . . . . . . .140<br />
Kromhoorn 8' . . . . . . . . . . . . . . . . . . .Kromhorn8 . . . . . . . . . . . . . . . . . . . . . . . . . .141<br />
Musette 8' . . . . . . . . . . . . . . . . . . . . .Musette8 . . . . . . . . . . . . . . . . . . . . . . . . . . . .142<br />
Oboe 8' A . . . . . . . . . . . . . . . . . . . . . .Oboe8A . . . . . . . . . . . . . . . . . . . . . . . . . . . . .143<br />
Oboe 8' B . . . . . . . . . . . . . . . . . . . . . .Oboe8B . . . . . . . . . . . . . . . . . . . . . . . . . . . . .144<br />
Oboe 8' C . . . . . . . . . . . . . . . . . . . . . .Oboe8C . . . . . . . . . . . . . . . . . . . . . . . . . . . . .145<br />
Orchestral Oboe 8' . . . . . . . . . . . . . . .OrchOboe8 . . . . . . . . . . . . . . . . . . . . . . . . . .146<br />
Regaal 8' . . . . . . . . . . . . . . . . . . . . . .Regaal8 . . . . . . . . . . . . . . . . . . . . . . . . . . . . .147<br />
APPENDIX<br />
Appendix 3
VISCOUNT CM-100<br />
Pipe Organ Module<br />
Family: REEDS<br />
Long name Display Abbreviation Voice #<br />
CTromba 8' . . . . . . . . . . . . . . . . . . . .Tromba8 . . . . . . . . . . . . . . . . . . . . . . . . . . . .148<br />
Trompette 8' A . . . . . . . . . . . . . . . . . .Trompet8A . . . . . . . . . . . . . . . . . . . . . . . . . .149<br />
Trompette 8' B . . . . . . . . . . . . . . . . . .Trompet8B . . . . . . . . . . . . . . . . . . . . . . . . . .150<br />
Trompette 8' C . . . . . . . . . . . . . . . . . .Trompet8C . . . . . . . . . . . . . . . . . . . . . . . . . .151<br />
Tuba Mirabilis 8' . . . . . . . . . . . . . . . . .TubaMirb8 . . . . . . . . . . . . . . . . . . . . . . . . . . .152<br />
Vox Humana 8' A . . . . . . . . . . . . . . . .VoxHumn8A . . . . . . . . . . . . . . . . . . . . . . . . .153<br />
Vox Humana 8' B . . . . . . . . . . . . . . . .VoxHumn8B . . . . . . . . . . . . . . . . . . . . . . . . .154<br />
Vox Humana 8' C . . . . . . . . . . . . . . . .VoxHumn8C . . . . . . . . . . . . . . . . . . . . . . . . .155<br />
Bombarde Clarion 4' . . . . . . . . . . . . .BmbdClrn4 . . . . . . . . . . . . . . . . . . . . . . . . . .156<br />
Clarion 4' A . . . . . . . . . . . . . . . . . . . .Clarion4A . . . . . . . . . . . . . . . . . . . . . . . . . . .157<br />
Clarion 4' B . . . . . . . . . . . . . . . . . . . .Clarion4B . . . . . . . . . . . . . . . . . . . . . . . . . . .158<br />
Pedal Klaroen 4' . . . . . . . . . . . . . . . .PedKlarn4 . . . . . . . . . . . . . . . . . . . . . . . . . . .159<br />
Schalmei 4' A . . . . . . . . . . . . . . . . . . .Schalmei4 . . . . . . . . . . . . . . . . . . . . . . . . . . .160<br />
Schalmei 4' B . . . . . . . . . . . . . . . . . . .Schawm4 . . . . . . . . . . . . . . . . . . . . . . . . . . .161<br />
Family: MIXTURES<br />
Long name Display Abbreviation Voice #<br />
Mixture . . . . . . . . . . . . . . . . . . . . . . . .Mixture . . . . . . . . . . . . . . . . . . . . . . . . . . . . .162<br />
Family: CORNETS<br />
Long name Display Abbreviation Voice #<br />
Kornett . . . . . . . . . . . . . . . . . . . . . . . .Kornett . . . . . . . . . . . . . . . . . . . . . . . . . . . . . .163<br />
Sesquialtera . . . . . . . . . . . . . . . . . . . .Sesquialt . . . . . . . . . . . . . . . . . . . . . . . . . . . .164<br />
Family: DETUNEDS<br />
Long name Display Abbreviation Voice #<br />
Echo Aeoline 8' . . . . . . . . . . . . . . . . .EchoAeol8 . . . . . . . . . . . . . . . . . . . . . . . . . . .165<br />
Flauto Dolce 8' . . . . . . . . . . . . . . . . . .FlautoDl8 . . . . . . . . . . . . . . . . . . . . . . . . . . . .166<br />
Flöte Celeste 8' . . . . . . . . . . . . . . . . .Flotcel8 . . . . . . . . . . . . . . . . . . . . . . . . . . . . .167<br />
Gamba 8' A . . . . . . . . . . . . . . . . . . . .Gamba8A . . . . . . . . . . . . . . . . . . . . . . . . . . .168<br />
Gamba 8' B . . . . . . . . . . . . . . . . . . . .Gamba8B . . . . . . . . . . . . . . . . . . . . . . . . . . .169<br />
Melodia 8' . . . . . . . . . . . . . . . . . . . . . .Melodia8 . . . . . . . . . . . . . . . . . . . . . . . . . . . .170<br />
Muted Viole 8' . . . . . . . . . . . . . . . . . .MutViole8 . . . . . . . . . . . . . . . . . . . . . . . . . . .171<br />
Schwebung 8' . . . . . . . . . . . . . . . . . .Schwebng8 . . . . . . . . . . . . . . . . . . . . . . . . . .172<br />
Viola d'Amour 8' . . . . . . . . . . . . . . . . .VioladAm8 . . . . . . . . . . . . . . . . . . . . . . . . . . .173<br />
Violin Diapason 8' . . . . . . . . . . . . . . .ViolinDp8 . . . . . . . . . . . . . . . . . . . . . . . . . . . .174<br />
Viole de Gamba 8' . . . . . . . . . . . . . . .VldeGamb8 . . . . . . . . . . . . . . . . . . . . . . . . . .175<br />
APPENDIX<br />
Appendix 4