Create successful ePaper yourself
Turn your PDF publications into a flip-book with our unique Google optimized e-Paper software.
16. With the side plywood panels glued in place, install the panel assembly in the fuselage by<br />
gluing the portion of the side panels below the 3/4" square cross piece to the forward side of<br />
the 1" x 3/4" beveled cross piece "A" installed in Step 12 and Figure 1-19. <strong>The</strong> ends of the bow<br />
should be beveled to accommodate the forward slope of the panel.<br />
17. Make quarter-round gussets of 3/4" plywood for the intersections of the bottoms of Stations 2<br />
and 4 with the fuselage sides. With half-round 1/8" plywood gussets (Type "B", Figure 1-4)<br />
already in place, the curves on the 3/4" gussets can be made by tracing around square blocks<br />
held in place in the corners. Glue the 3/4" gussets in place by clamping against the 1/8" Type<br />
"B" gussets (see Figure 1-17). <strong>The</strong>se 3/4" gussets serve as supports for the inside landing gear<br />
anchor fittings.<br />
FUSELAGE BELLY STRINGERS<br />
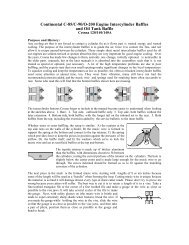
<strong>The</strong> two full-length belly stringers are fuselage structure, but for convenience of doing other work,<br />
should not be added until the inside is varnished, all equipment is installed, and the fuselage is<br />
ready to cover. Because the stringers are deep and narrow and take a significant curve at the<br />
forward end, each stringer is laminated in place from five thicknesses of 3/8" square wood. This<br />
can be spruce, redwood, fir, or pine.<br />
1. Glue two 3/4" square anchor blocks to the back side of the firewall as shown in Detail "B" of<br />
Figure 1-22.<br />
2. Start building up stringers with 3/8" square strips. <strong>The</strong> bottom two will be full-length from<br />
the firewall to Station 9. <strong>The</strong> second one will be tapered after others have been added per<br />
Detail "D", Figure 1-22. See Figure 1-17 for spacing in the cockpit area and Detail "C" of<br />
Figure 1-22 for method of attachment. First strip can be laid down by nailing and gluing<br />
directly to the fuselage cross pieces.<br />
3. When stringers are built up to full depth, use a plane or drawknife to taper them from Station<br />
5 to Station 9, ending up with one full thickness per Detail "D", Figure 1-22.<br />
4. Use scrap wood to fill in triangles between the stringers and the longerons at Station 9 per<br />
Detail "D" of Figure 1-22 and do the same at Station 2 using wood at least 1/2" thick between<br />
the stringers and from the stringers to the longerons. <strong>The</strong>se will became the forward anchors<br />
for the belly fabric during covering.<br />
<strong>Page</strong> 1-28